Multi-Vendor Marketplace for Shopify is here with another marketplace shipping feature add-on, i.e., Delhivery.
Delhivery: Delhivery Private Limited is India’s largest B2B & C2C Logistic Courier Service Provider in India.
They provide the fastest Parcel Transportation, Warehousing & more. Using this featured app, merchants can allow vendors to ship their goods via Delhivery and then print the shipping label.
Charges: This feature will have an additional charge of USD 10 per month over & above your current multivendor marketplace plan.
Before You Install: It is mandatory to have real-time carrier calculated shipping within your Shopify store.
This is a requirement defined by Shopify for your store to retrieve shipping rates from third-party sources, such as this shipping app.
This feature app is available only with the Multivendor Pro Plan ($60/month). Moreover, you need to enable the Shipping add-on (free) from the ‘featured apps’ section of the app.
DELHIVERY SHIPPING FEATURE APP IS AVAILABLE BOTH FOR RATE CALCULATION & FULFILLMENT.
Installation
Enable the following app by visiting:
- Multi-Vendor Admin Panel
- From the Dashboard, hover over the three dots on the top-right of the page
- Click on Feature Apps
- Search for ‘Delhivery‘ & click on ‘Enable‘
- After accepting the charges, you’ll be good to configure the app!

Configuration: Admin End
Firstly, the admin needs to enable this shipping method from the shipping configuration.
So, for this, visit Multivendor Marketplace Admin Panel > Configuration > Shipping Methods.
Click on the three dots under the Action menu & further, click on enable.

Delhivery Configuration
Moving on, the admin needs to configure the shipping. So, for this, visit Multivendor Marketplace Admin Panel > Configuration > Delhivery Configuration.
On the following page, configure the following details:
- Delhivery API Key
- Choose the shipping service that you want to allow:
- Standard
- Express

- Enable international shipping if you want to ship parcels internationally.
- Enable the sandbox mode if you want to test the Delhivery shipping on your store. Remember, shipping labels won’t be generated in testing mode.
- Shipping label extra charge: Choose who will bear the shipping label extra charges, the admin, or the seller. (This is an extra cost apart from what the customer has paid.)
- Select country.
Set Shipping Method For Sellers
The admin can further set the shipping methods for his sellers. Go to Multi vendor marketplace admin panel > Sellers > Seller Listing > Edit (under Action).
On the edit seller page, the admin will have the following block from where he can enable/disable/set as default:

Further, the admin can view all the sellers which are using this shipping method by going to Multi vendor marketplace admin panel > Configuration > Shipping Configuration:

The redirected page:

Here, clicking on the ‘Edit’ button for a particular seller will redirect you to the ‘Edit Seller’ page
from where you can disable the following shipping method for that seller (as shown previously in this blog).
Make Shipping Address Phone Number Mandatory
To use this feature add-on, the admin needs to make the shipping address phone number mandatory at the time of checkout.
So, to do this, go to Shopify Backend > Settings > Checkout > Under Form Options, make Shipping address phone number as Required:

Configuration: Seller End
Further, the seller can configuration shipping from his panel.
Go to Multi-Vendor Marketplace Seller Panel > Configuration > Shipping Method > Enable/Disable the shipping:

Furthermore, the seller can set the shipping method as by default so that every single product created by him will have Delhivery as the by default shipping method.
Clicking on ‘Set As Default‘ will give you the following dialogue box:

Set Default Shipping Method For Products:
- For all products (old and new)
- Only for new products
- For products that don’t have any shipping method on
If not this, the seller can set the shipping method on individual products while adding/editing them.
So, go to Multi-vendor marketplace seller panel > Products >Product Listing > Add/Edit the Product:

Global Configuration
Further, click on the Global Configuration menu on the Shipping method page. From here, the seller can do the SHIPPING PACKET CONFIGURATION:
Note: It is mandatory to save the global configuration atleast once.

GENERATE PICKUP REQUEST
Now, the seller can generate pick up requests for the delhivery of all fulfilled orders at once.
Just redirect to same page i.e.
Multi-Vendor Marketplace Seller Panel > Configuration > Shipping Method
Now, click on the three dots in front of Delhivery >> pickup request

When you will click on “Pickup request” then a pop up will appear on screen. Now, enter the pick up date, pickup time and click “SAVE” button.
And Your pick request will be sent to delhivery.

Note:-
1. This will generate the pickup request for all orders fulfilled via delhivery .
2. You can only generate a pickup requests once in 24 hrs.
Shopify Store Frontend
The customer will have an option to select the shipping method as per configured from the backend after entering the information:

Shipping Label Generation
If the order fulfillment is set to automatic, the seller will receive an email. The email will have a link to download the label.
If the orders are not set to auto-fulfillment, sellers can fulfill them manually. Seller will have an option to generate the shipping label from their seller panel.
Also, shipping labels can only be generated for fulfilled orders.
Fulfilling order via Delhivery:
Go to Multi-vendor marketplace seller panel > Orders > Order Listing > View (under Action).
Select the method of order fulfillment as Delhivery and fulfill the order. Further print the shipping label.

After fulfillment, you can generate the label from here:
Furthermore, this is how the shipping label will be downloaded in pdf form:

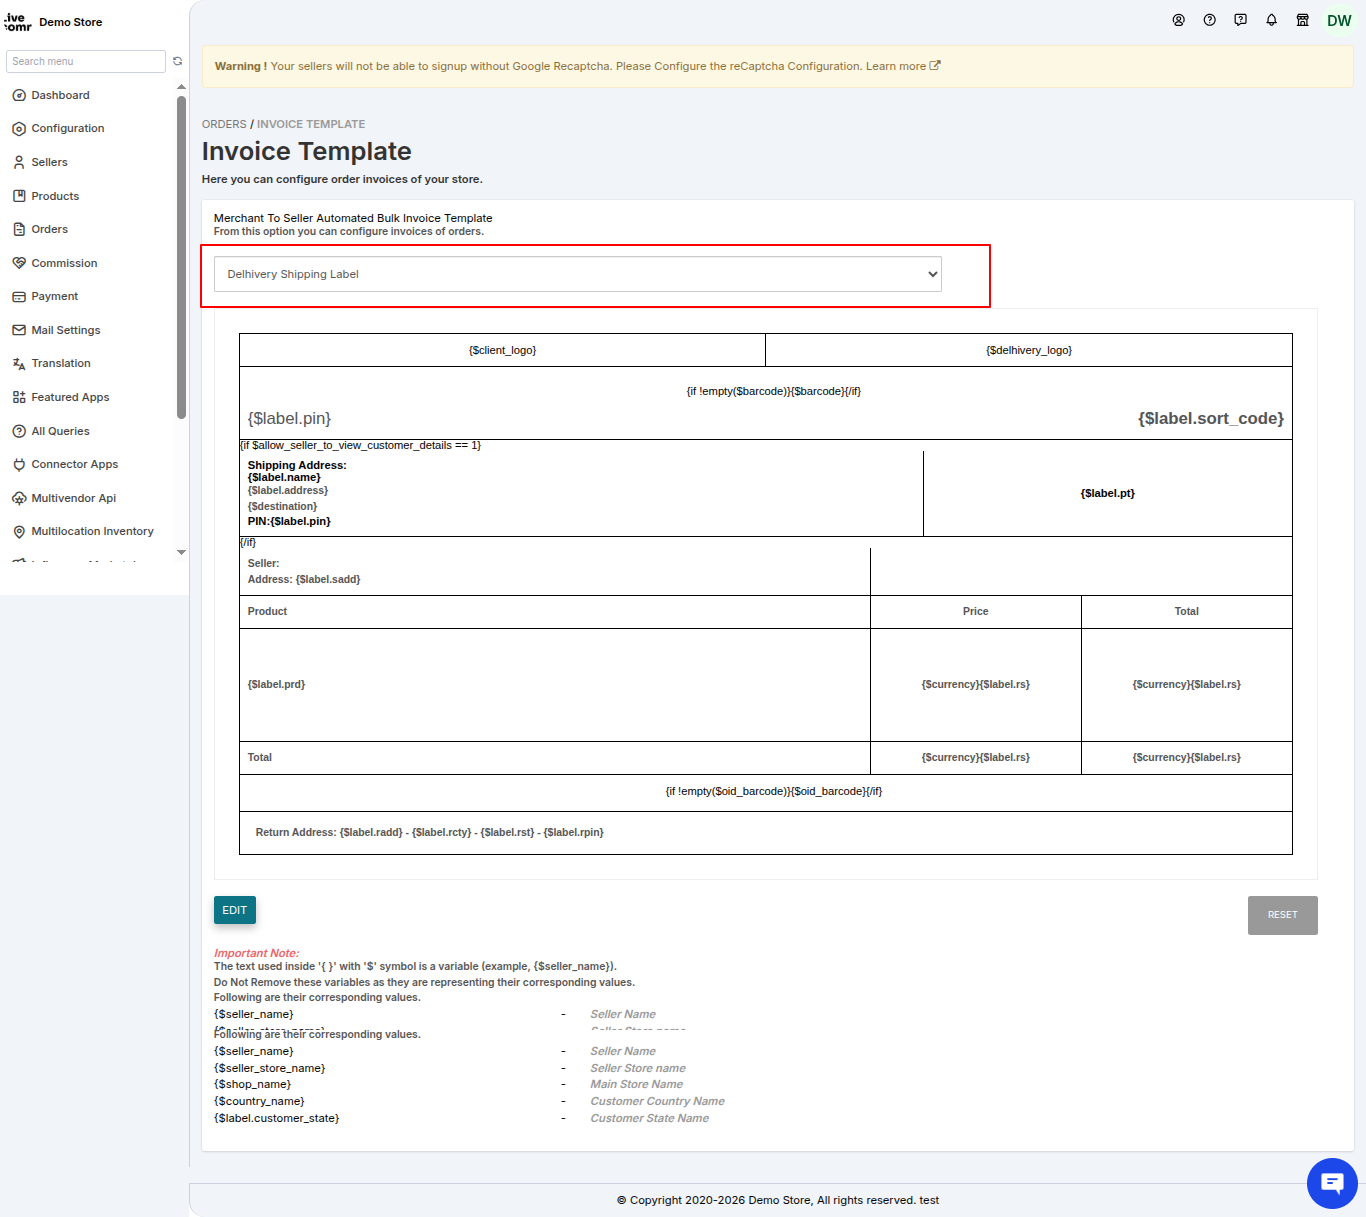
EDIT DELHIVERY SHIPPING LABEL
And now, this delhivery shipping label is editable from the admin panel >> order >> invoice configuration.
You can drop your query/suggestion at [email protected] or create your ticket at Webkul UV Desk.

Be the first to comment.