CS-Cart ShipStation Integration streamlines shipping by connecting your store with ShipStation for real-time rate fetching and order synchronization.
It enables carrier-based shipping methods and simplifies order fulfillment.
By integrating with ShipStation, it reduces manual work in managing shipping and ensures accurate rates at checkout for a smoother customer experience.
Ideal for any CS-Cart or Multi-Vendor store looking to simplify shipping operations and improve order processing efficiency.
Features
- Fetches real-time shipping rates from ShipStation-supported carriers.
- Automatically syncs orders from CS-Cart to ShipStation.
- Allows creation of shipping methods using ShipStation services.
- Displays accurate shipping rates on the checkout page.
- Supports multiple carriers and shipping services.
- Enables easy configuration of ShipStation API credentials.
- Provides centralized shipping management from admin panel.
- Reduces manual effort in shipping and order processing.
- Supports vendor-level shipping management in Multi-Vendor setup.
- Allows selection of preferred shipping services for each method.
- Improves checkout experience with transparent shipping charges.
- Ensures faster order processing with automated workflows.
- Fully compatible with CS-Cart Multi-Vendor platform.
- Simplifies overall shipping and order fulfillment process.
Installation
After downloading the CS-Cart Shipstation add-on, you’ll get one zip file, one install.txt file, and a relevant User Guide manual doc.
Read it carefully for proper configuration.
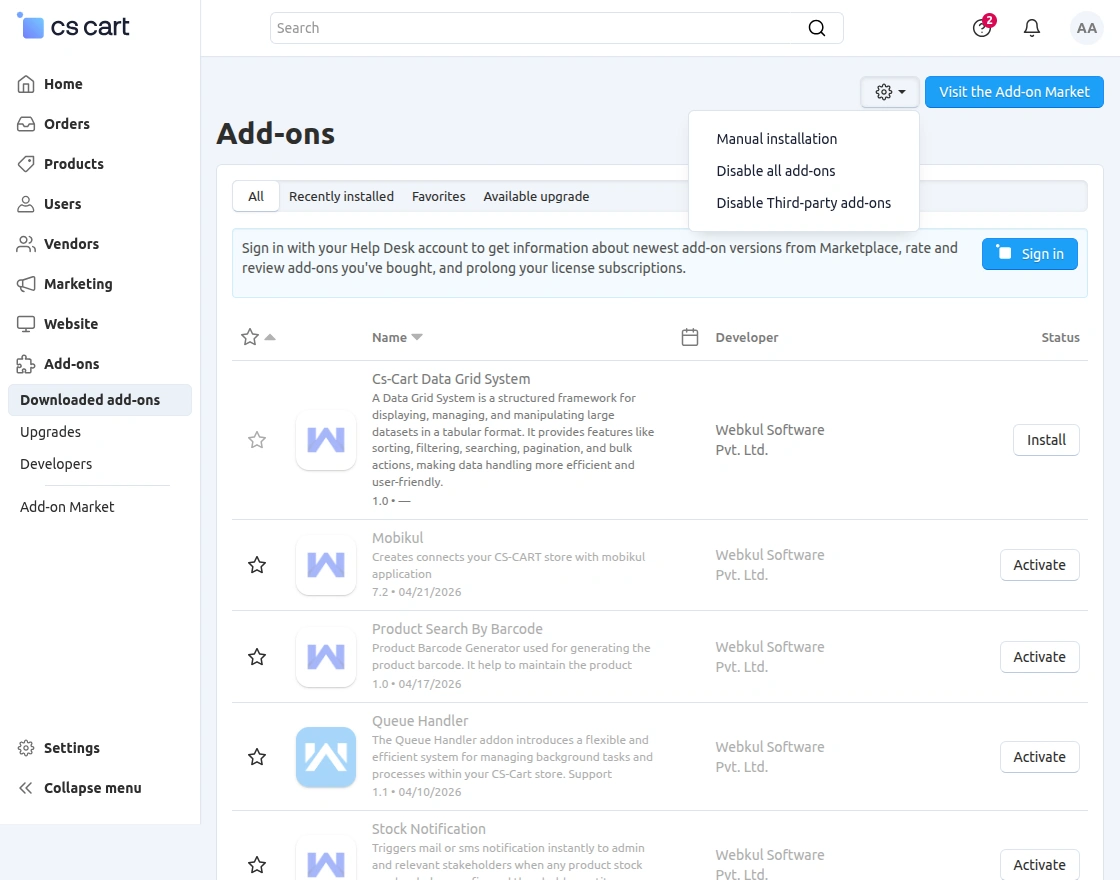
Go to Manage Add-ons, and click on “Manual Installation” as shown below in the snapshot.
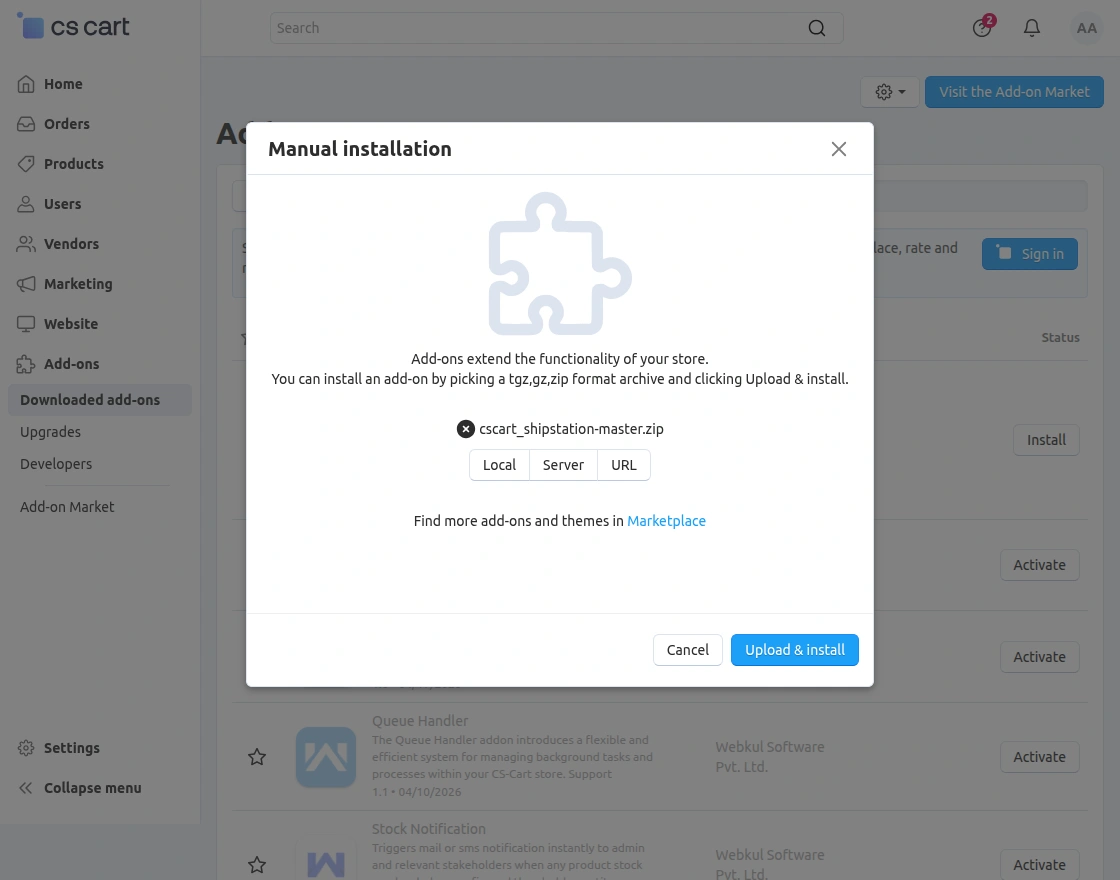
Click on “Local” to browse the zip file, and then click on “Upload & Install” as shown below in the snapshot.
Add-On Configuration
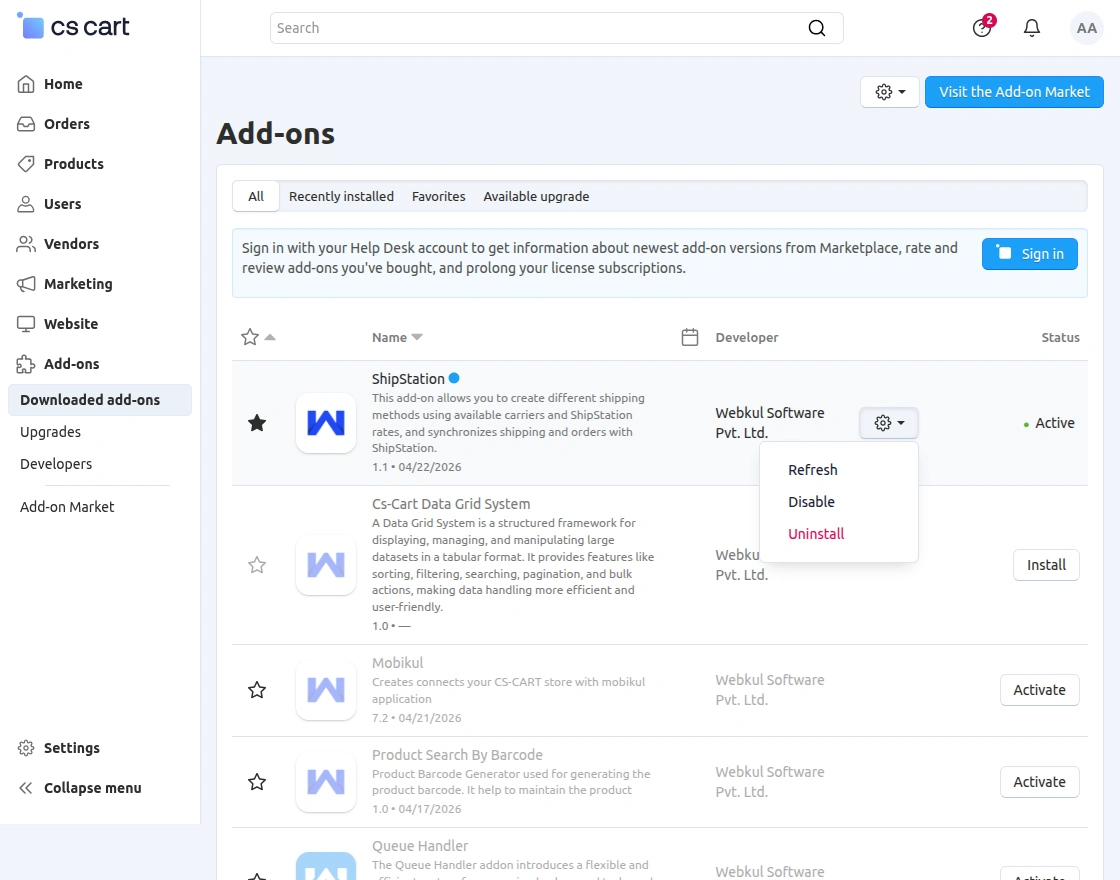
After installing the add-on, you will find CS-Cart Shipstation in the list of available add-ons.
Click on “Settings” to enable, disable, install, or refresh. Ensure you activate the add-on, as shown in the snapshot below.
Module Configuration | Admin End
To configure the module, go to the Add-Ons >> Developers >> Webkul Software Pvt Ltd. >> Shipstation >> Settings, as shown in the snapshot below.
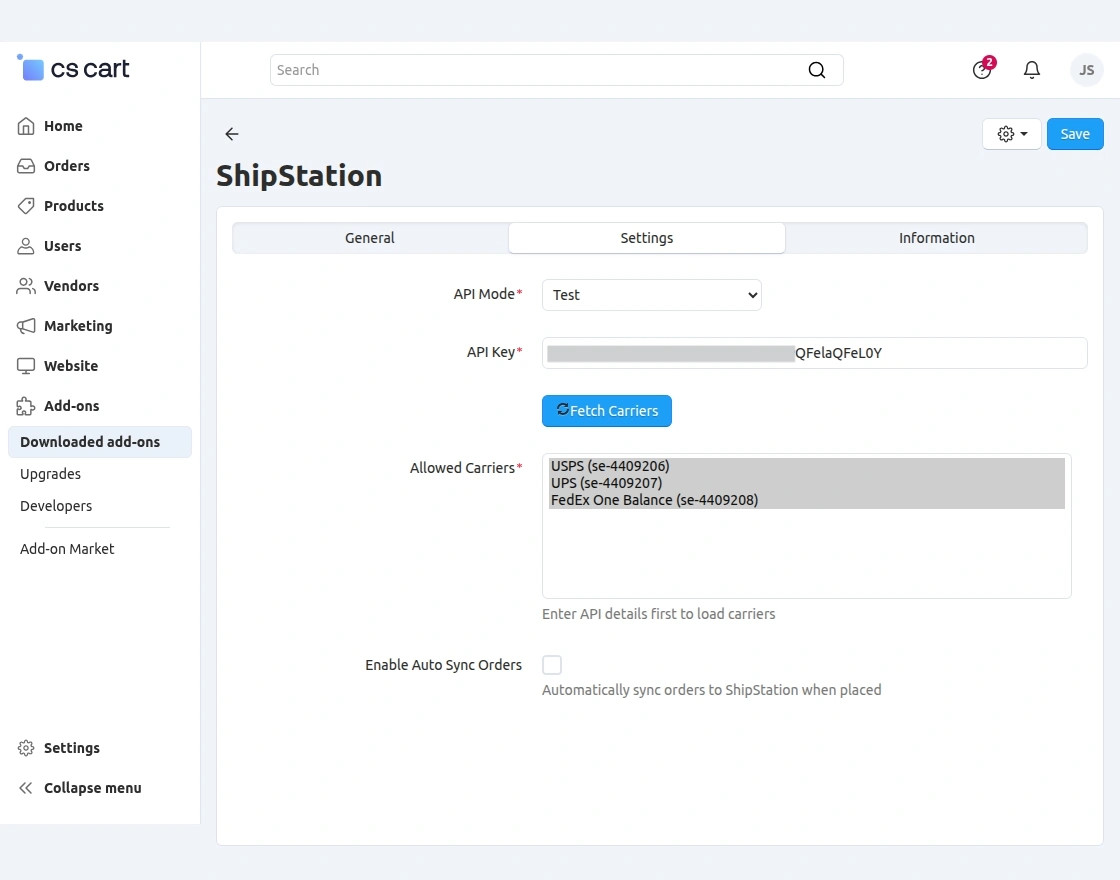
In the add-on configuration section, the admin needs to enter the required details to connect and activate the ShipStation integration. The available fields include:
API Mode – Select Test or Live mode based on your ShipStation environment.
API Key – Enter the ShipStation API key to establish the connection.
Fetch Carriers – Click to retrieve available carriers from ShipStation.
Allowed Carriers – Select the carriers that the system will use for shipping methods.
Enable Auto Sync Orders – Enable to automatically sync orders to ShipStation when placed.
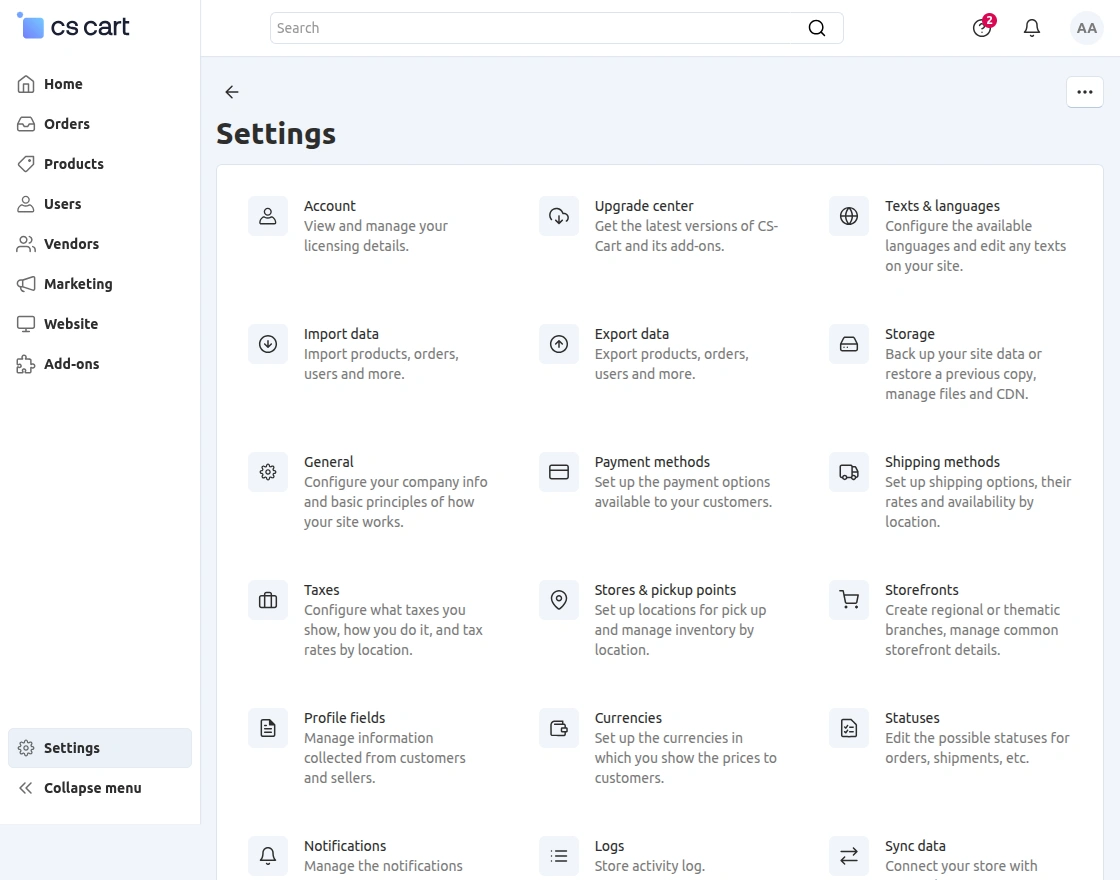
To create a ShipStation shipping method, the admin needs to navigate to Settings > Shipping methods from the CS-Cart admin panel.
This section allows the admin to manage all shipping-related configurations in the store.
From here, the admin can create new shipping methods and edit or manage existing ones based on business requirements.
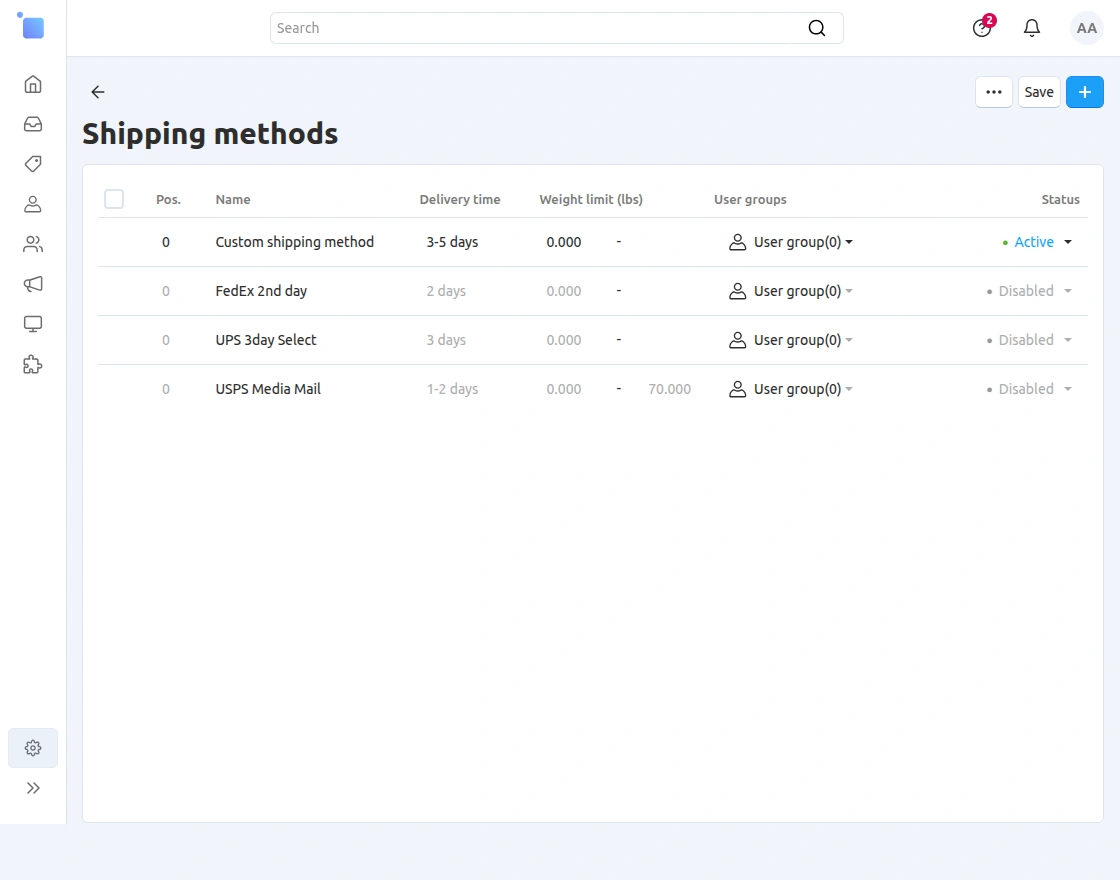
On the Shipping methods page, the admin can view all available shipping methods along with delivery time, weight limits, user groups, and status.
To add a new shipping method, the admin needs to click on the “+” (Add) icon available at the top right corner of the page.
This action initiates the process of creating a new shipping method.
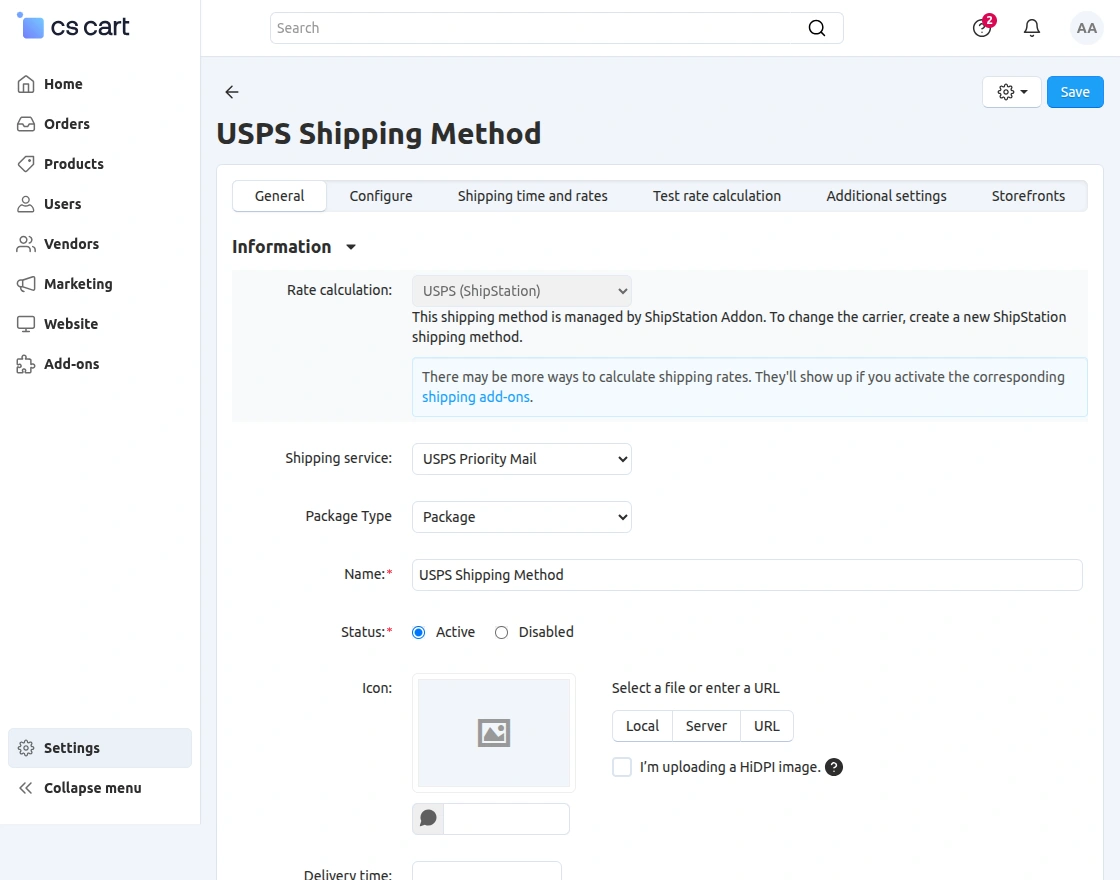
Create Shipping Method
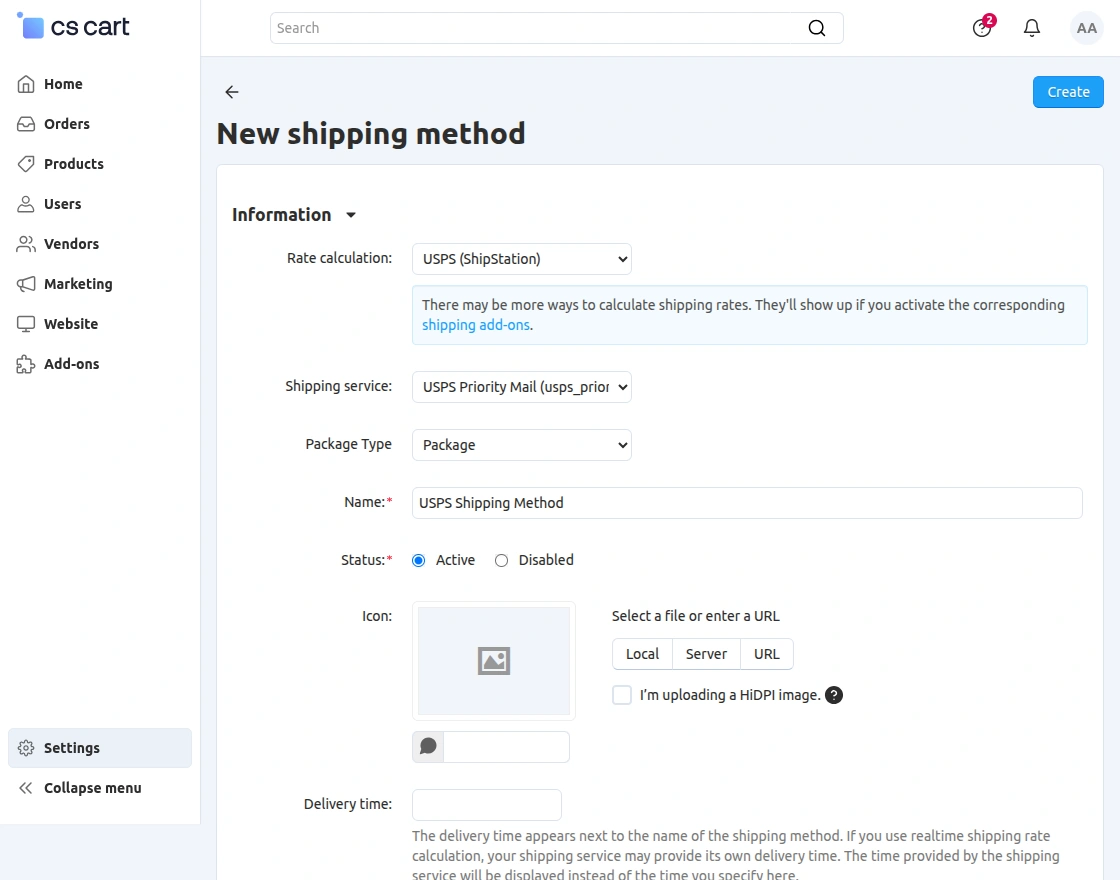
In the New shipping method section, the admin needs to fill the required details to create a ShipStation-based shipping method. The available fields include:
Rate Calculation – Select ShipStation to enable carrier-based real-time shipping rates.
Shipping Service – Choose the shipping service (e.g., USPS Priority Mail) fetched from ShipStation carriers.
Package Type – Select the type of package (e.g., Package, Envelope) based on the shipping requirement.
Name – Enter the shipping method name that the system will display to customers on the storefront.
Status – Set the shipping method as Active or Disabled. Only active methods will be available at checkout.
Icon – Upload or select an icon for the shipping method to display on the storefront (optional).
Delivery Time – Set the estimated delivery time that the system will show to customers during checkout.
Manage Shipping Methods
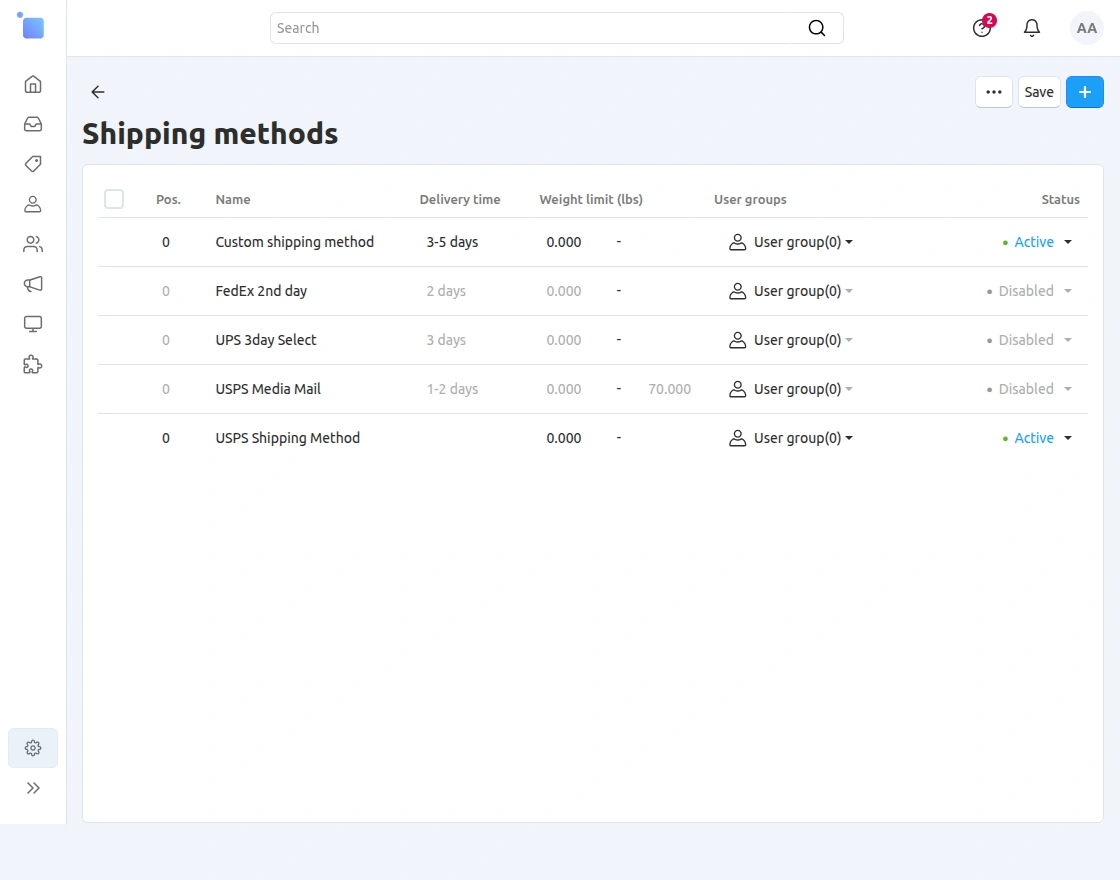
Once you fill in all the details, click the Save button to create the shipping method.
After saving, the newly created ShipStation shipping method will appear in the shipping methods list.
The admin can enable/disable it, edit it, or manage it further as needed.
This confirms that the system has successfully created the ShipStation shipping method and makes it ready for use on the storefront checkout page.
Configure Shipping Method
After creating the shipping method, the admin can open it from the shipping methods list to configure it further.
In this section, multiple tabs such as General, Configure, Shipping Time and Rates, Test Rate Calculation, Additional Settings, and Storefronts are available.
These sections allow the admin to manage and customize different aspects of the shipping method.
The admin can navigate through these sections to adjust settings as per requirements.
Shipping Time and Rates
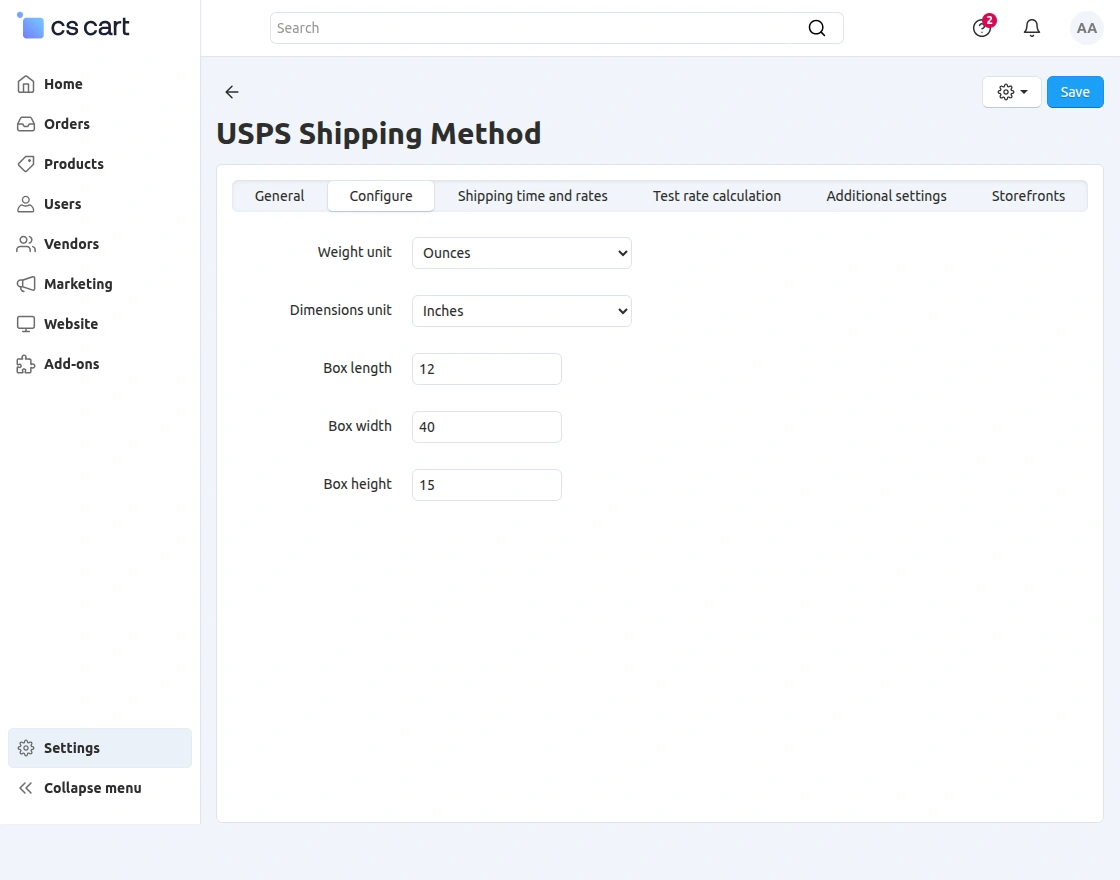
In this section, the admin moves to the Shipping Time and Rates tab to define how shipping charges apply.
This area lets the admin manage rate settings and control how the system calculates and displays shipping costs.
Test Rate Calculation
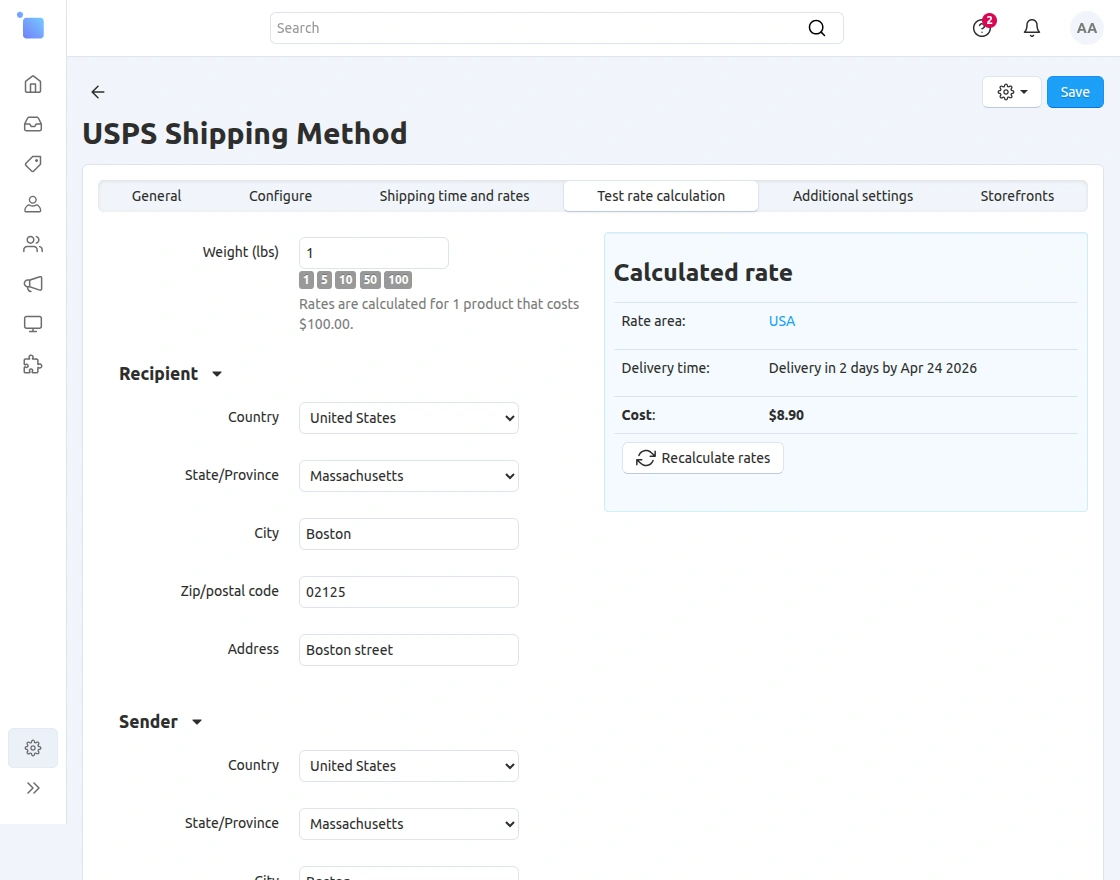
In this section, the admin can open the Test Rate Calculation tab to verify the shipping rates.
Here, the admin can enter recipient and sender details along with package weight to simulate the shipping process.
Based on the provided inputs, the system calculates and displays the shipping cost, delivery time, and applicable rate area.
This helps the admin ensure that the ShipStation shipping method is working correctly and returning accurate shipping rates before using it on the storefront.
Allow Shipping for Vendors
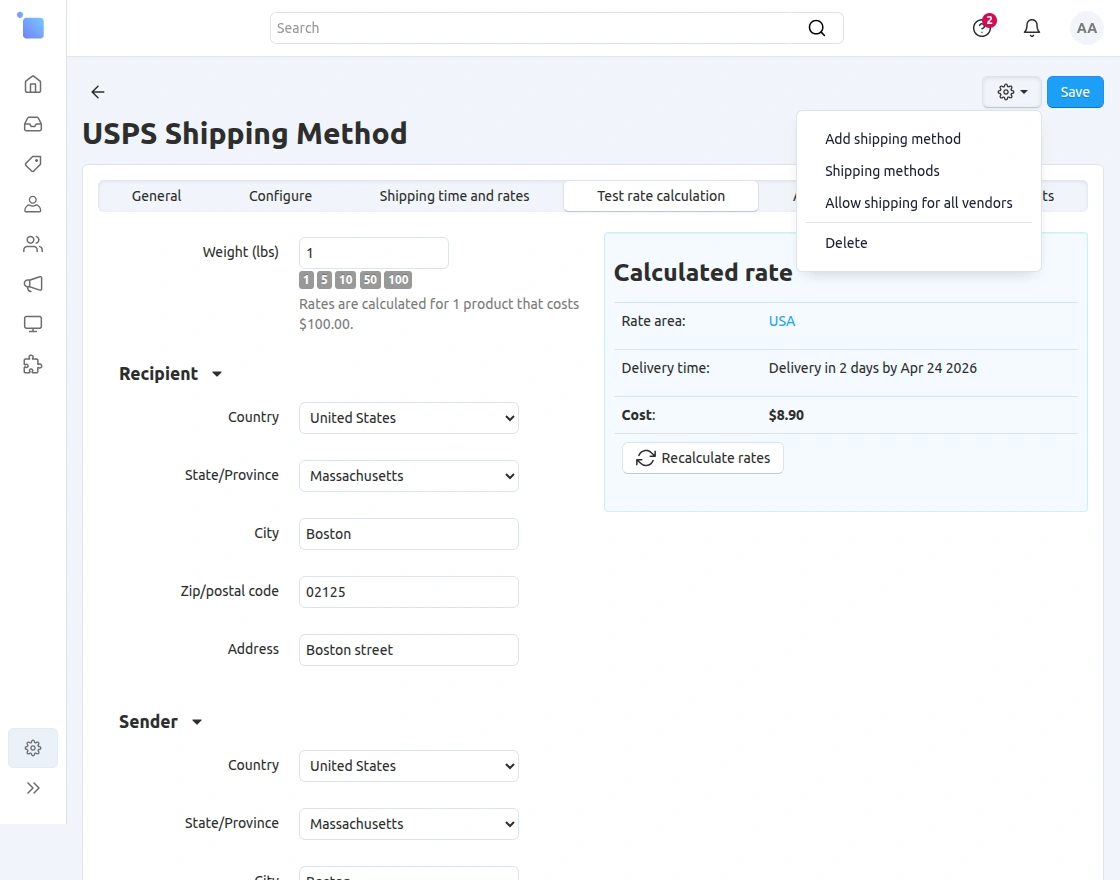
In this section, the admin can click on the gear icon and select the “Allow shipping for all vendors” option.
By enabling this option, the shipping method becomes available for all vendors in the multi-vendor setup.
This allows vendors to use this shipping method for their products and displays it on the checkout page for customers.
CS-Cart Shipstation Integration | Frontend
This is the storefront view where customers can browse products and proceed with the purchase process.
The system will apply the configured ShipStation shipping method during checkout.

Checkout Shipping Method
On the storefront, the customer can browse products and select any item to proceed with the purchase.
The customer needs to add the desired product to the cart and move forward to the checkout page.
This is the initial step where the system will later apply the ShipStation-configured shipping method during checkout.
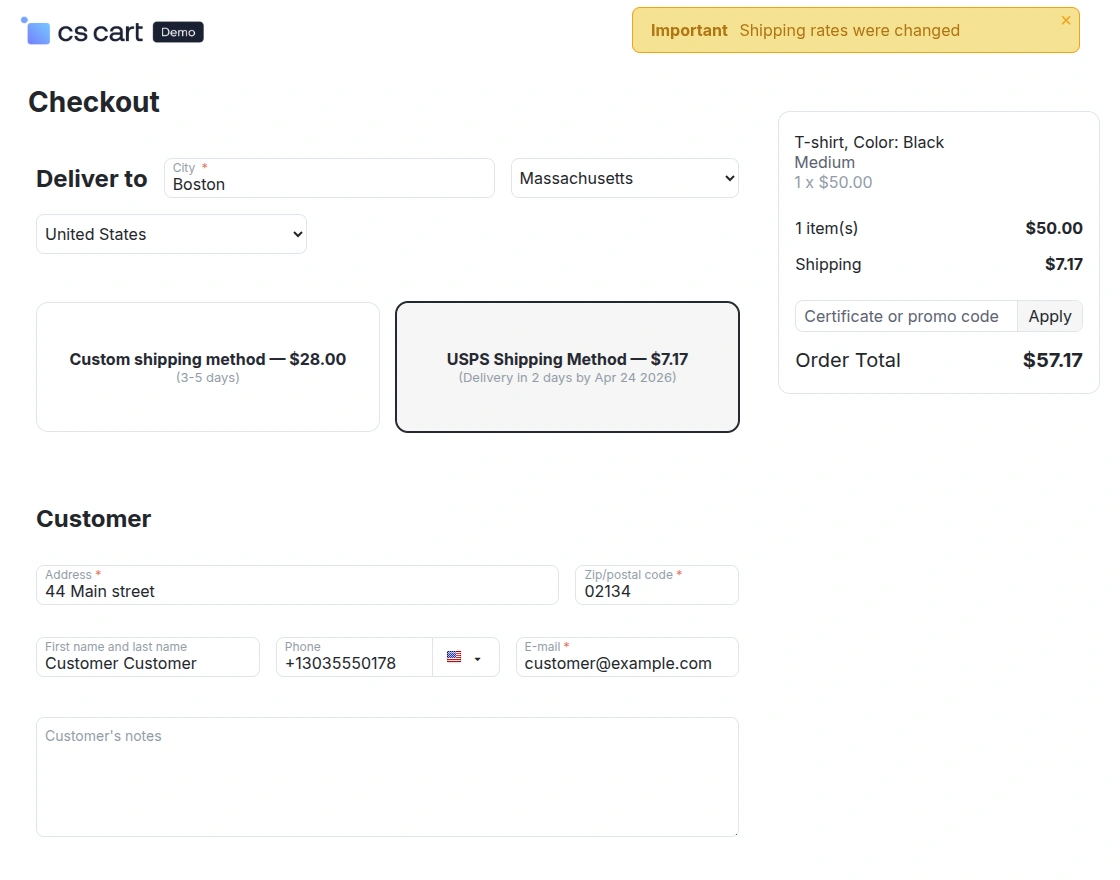
Order Details
On the checkout page, the customer can view the available shipping methods.
Furthermore, the system displays the ShipStation shipping method (e.g., USPS) along with the calculated shipping cost and delivery time.
The customer can select the preferred shipping method and proceed to place the order.
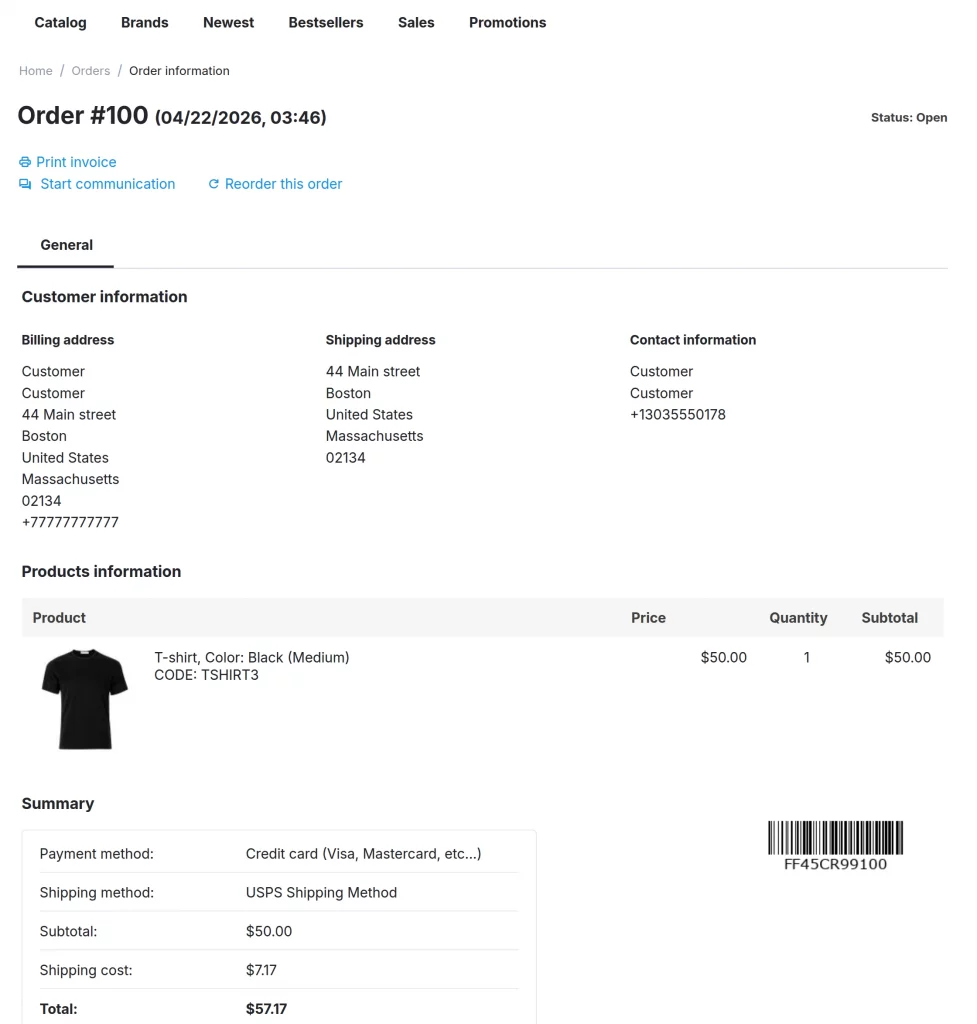
After placing the order, the customer can view the order details on the order information page.
Here, the system displays the selected ShipStation shipping method along with the shipping cost in the order summary.
This confirms that the system has successfully applied the ShipStation shipping method to the order.
Support
If you have any questions, suggestions, or customization requests, feel free to contact us at [email protected] or submit a ticket at webkul.uvdesk.com.
Explore our premium-quality CS Cart Extensions to enhance your store functionality.
You can also explore our CS-Cart Development Services and Quality CS-Cart add-ons.
Current Product Version - 1.1
Supported Framework Version - 4.16.x, 4.17.x, 4.18.x,4.19.x,4.20.x

Be the first to comment.