INTRODUCTION
Akeneo Odoo Connector works in conjunction with Odoo Akeneo Connector to integrate your Odoo with the Akeneo module allowing you to integrate your Akeneo PIM with Odoo.
Once configured successfully, the user can export product data from Odoo to Akeneo with a click.
A job is created when you send the product to Akeneo. You can fetch the status of the job from the Akeneo end to know whether the check product export status is at Akeneo’s end.
Please Note: Akeneo Odoo module is dependent on Odoo Akeneo Connector. You need to install Odoo PIM Integration Connector for Akeneo Odoo Connector to work properly.
FEATURES
- The module facilitates the Integration of Akeneo with Odoo.
- The user can export products from Odoo to Akeneo.
- The Odoo user can export products to Akeneo in bulk or selectively.
- The user can track product export job status at Odoo end as Starting completed or failed.
INSTALLATION
1.) Once you purchase the App from Webkul store, you will receive the link to download the zip file of the module.
2.) Extract the file on your system after the download finishes. You will be able to see a folder named- ‘odoo_akeneo’.
3.) Copy and paste this folder inside your Odoo Add-Ons path.
4.) Now, open the Odoo App and click on the Settings menu. Here, click on Activate the Developer Mode.
5.) Then, open on Apps menu and click on ‘Update Modules List’.
6.) In the search bar, remove all the filters and search ‘odoo_akeneo’.
7.) You will be able to see the module in the search result. Click on ‘Install’ to install it.
WORKFLOW
1.) log in to the Odoo database. Go to Sales and click on Configuration under Akeneo.
2.) Click on Akeneo to open configuration settings.

3.) Under credentials fill in the Akeneo Details such as Base URL, Client ID, Secret key, etc. Click Save. Check the configuration status by clicking on Test Connection.


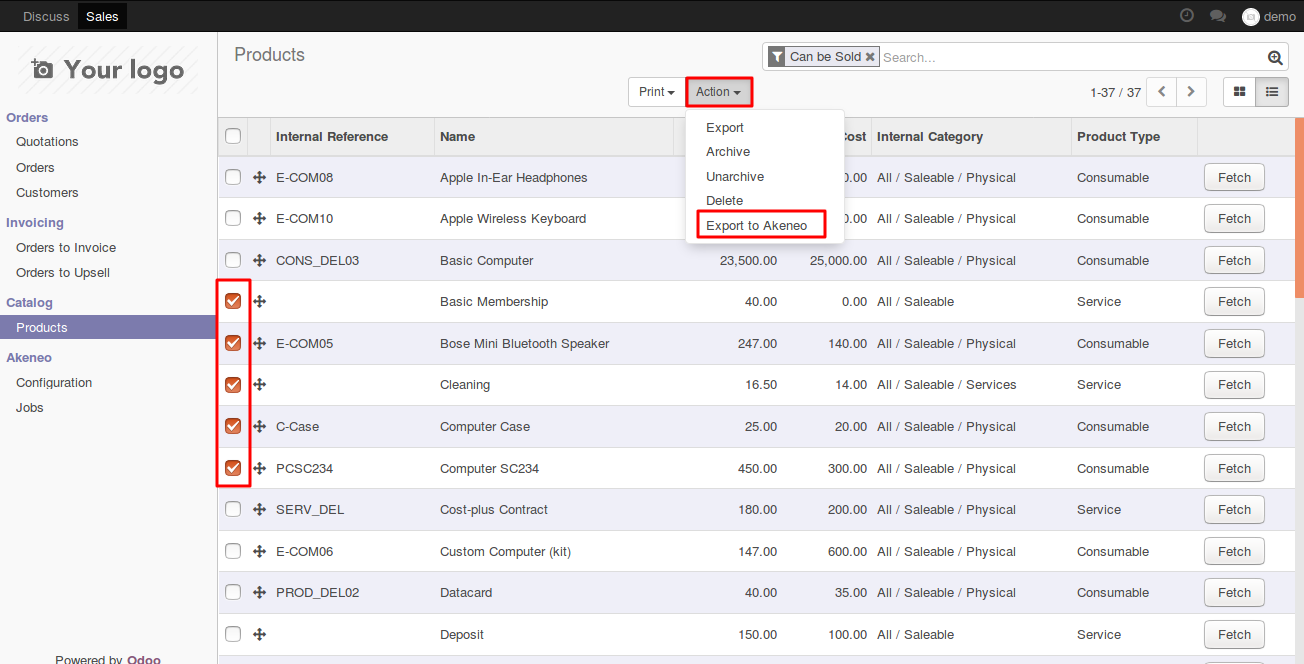
4.) Now go to products. Select the products you wish to export to Akeneo and click on the action tab at the top of the page. Click on Export to Akeneo.
5.) A pop to show that the products were successfully exported too Akeneo.

6.) A job is created for every export action. Go to Jobs under Akeneo.
7.) Click on fetch next to a job to get the latest status of that job from Akeneo end.


8.) The status would change to ‘Completed’ to show a successful export operation to Akeneo.

OTHER ODOO MODULES
- Odoo Neo4j Connector
- Opencart Odoo Connector
- Odoo MailJet Connector
- Odoo QuickBooks Online Connector
- Virtuemart Odoo Connector
- Shopify Odoo Connector
NEED HELP?
Hope you find the guide helpful! Please feel free to share your feedback in the comments below.
If you still have any issues/queries regarding the module, please raise a ticket at https://webkul.uvdesk.com/en/customer/create-ticket/.
Also, please explore our Odoo development services & an extensive range of quality Odoo Apps.
For any doubt, contact us at [email protected].
Thanks for paying attention!!
Current Product Version - 1.0.1
Supported Framework Version - ODOO V11, V12

Be the first to comment.