Magento 2 Semantic Search using Open Source LLM enables AI-powered product discovery using semantic search and Natural Language Processing (NLP).
Instead of exact keyword matching, the extension understands customer intent and contextual meaning more accurately.
Customers can search products using natural language phrases, prompts, descriptions, and conversational queries.
Moreover, the AI search engine analyzes search intent and returns the most relevant products from the storefront.
Users can enter short phrases, fragmented text, or detailed sentences to find products more naturally.
Additionally, the extension identifies related terms, attributes, and contextual relationships to improve search accuracy.
Customers can also refine results using filters such as price, brand, size, color, and category.
Furthermore, the module supports vector search using Elasticsearch 8, OpenSearch, and ChromaDB storage systems.
It also integrates with Google Gemini, OpenAI, Voyage AI, OpenRouter, Anthropic, Cerebras, and Mistral AI.
As a result, the extension improves product discovery, search relevance, and the overall shopping experience on Adobe Commerce stores.
If you want to enhance your Magento 2 e-commerce store by searching products using images, you can check our Magento 2 Product Search via Image extension.
Video Tutorial of Magento 2 Semantic Search
Features
- Customers can search products using natural language phrases and conversational queries.
- The extension returns semantically relevant products instead of exact keyword matches.
- Users can refine search results using filters like price, brand, size, and color.
- Admins can configure search result limits and similarity score settings.
- Moreover, the module supports Elasticsearch 8, OpenSearch, and ChromaDB vector storage.
- It supports both text and image embeddings for accurate product matching.
- The extension integrates with Google Gemini, OpenAI, Voyage AI, and other LLM providers.
- Furthermore, it supports asynchronous embedding generation using Magento queue consumers.
- Customers receive accurate and context-aware search results using AI-powered semantic search.
- Supports local text embeddings using ONNX Runtime, eliminating the need for cloud APIs and API keys.
Minimum System Requirement (API Setup)
The following system requirements are needed for this extension.
- PHP Version – 8.4
- Magento Version – 2.4.8 or higher
- SSH access for installation
- Docker support (Optional)
- Server key and cert files for the self-hosted embedding server
The module supports Elasticsearch 8, OpenSearch, and ChromaDB vector storage systems.
Moreover, API keys for Gemini, Voyage AI, and other providers are needed for cloud embedding generation.
Hosted API Requirements
The following requirements apply when using hosted embedding providers like Gemini or Voyage AI.
- RAM – 4 GB
- Storage Space – 4 GB
- API key for embedding generation
Self-hosted Embedding Server Requirements
The following requirements apply for the self-hosted Preconfigured embedding server.
- RAM – 4 GB
- Storage Space – 16 GB
Local LLM Deployment (Optional)
Local deployment requirements depend on the embedding model size.
Small to Medium Models (≤8B Parameters)
- CPU – 8 cores
- RAM – 16 GB minimum
- GPU – 8–12 GB VRAM
- Storage – 30–50 GB SSD
- OS – Linux
Large Models (13B–30B Parameters)
- CPU – 16+ cores
- RAM – 64 GB minimum
- GPU – RTX 3090/4090 or A100
- Storage – 100–200 GB SSD
- OS – Linux
Note: System requirements may vary depending on the catalog size, model size, and data volume.nts may vary depending on the catalog size, model size, and data volume..
You can also check the AI Models Server Installation Guide for reference.
Installation
The installation is quite simple just like the standard Magento 2 extensions.
#Download Module
Firstly, you need to log in to the Webkul Store, go to My Account>My Purchased Products section, verify, and then download and extract the contents of this zip folder on the system.
#Upload Folder
Once the module zip extracts, follow path src>app and then copy the app folder into the Magento 2 root directory on the server as shown below:

# Run Commands
You need to run the following commands:
php bin/magento setup:upgrade
php bin/magento setup:di:compile
php bin/magento setup:static-content:deploy
php bin/magento indexer:reindex
php bin/magento cache:flush
# Additional Commands
You need to run the following commands to create the embeddings:
Create/update existing product embeddings via the terminal
php bin/magento generate:embeddings
Create/update selected product embeddings via the terminal
php bin/magento generate:embeddings -p 1,2,3
Legacy in-process loop (no queue)
php bin/magento generate:embeddings --sync
Run the embedding batch consumer via the terminal.
php bin/magento queue:consumers:start webkul.aisearch.embedding.batch.consumer &
Language Translation
For translating the module language, navigate through the app/code/Webkul/AISearch/i18n and edit the en_US.csv file.
Thereafter, rename the CSV as “en_SA.csv” and translate all right side content after the comma in the Arabic language. After editing the CSV, save it.

Now, upload it to the path app/code/Webkul/AISearch/i18n where the installation of Magento 2 is on the server.
The Magento 2 Semantic Search will be translated into the Arabic Language. It supports both RTL and LTR languages.
The user can edit the CSV like the image below.

Initial Configuration Settings
After the successful installation of the module, for configuration admin will navigate Stores->Configuration->AI Configuration.
Admin can also access the configuration by navigating AI Configuration->General Configuration.
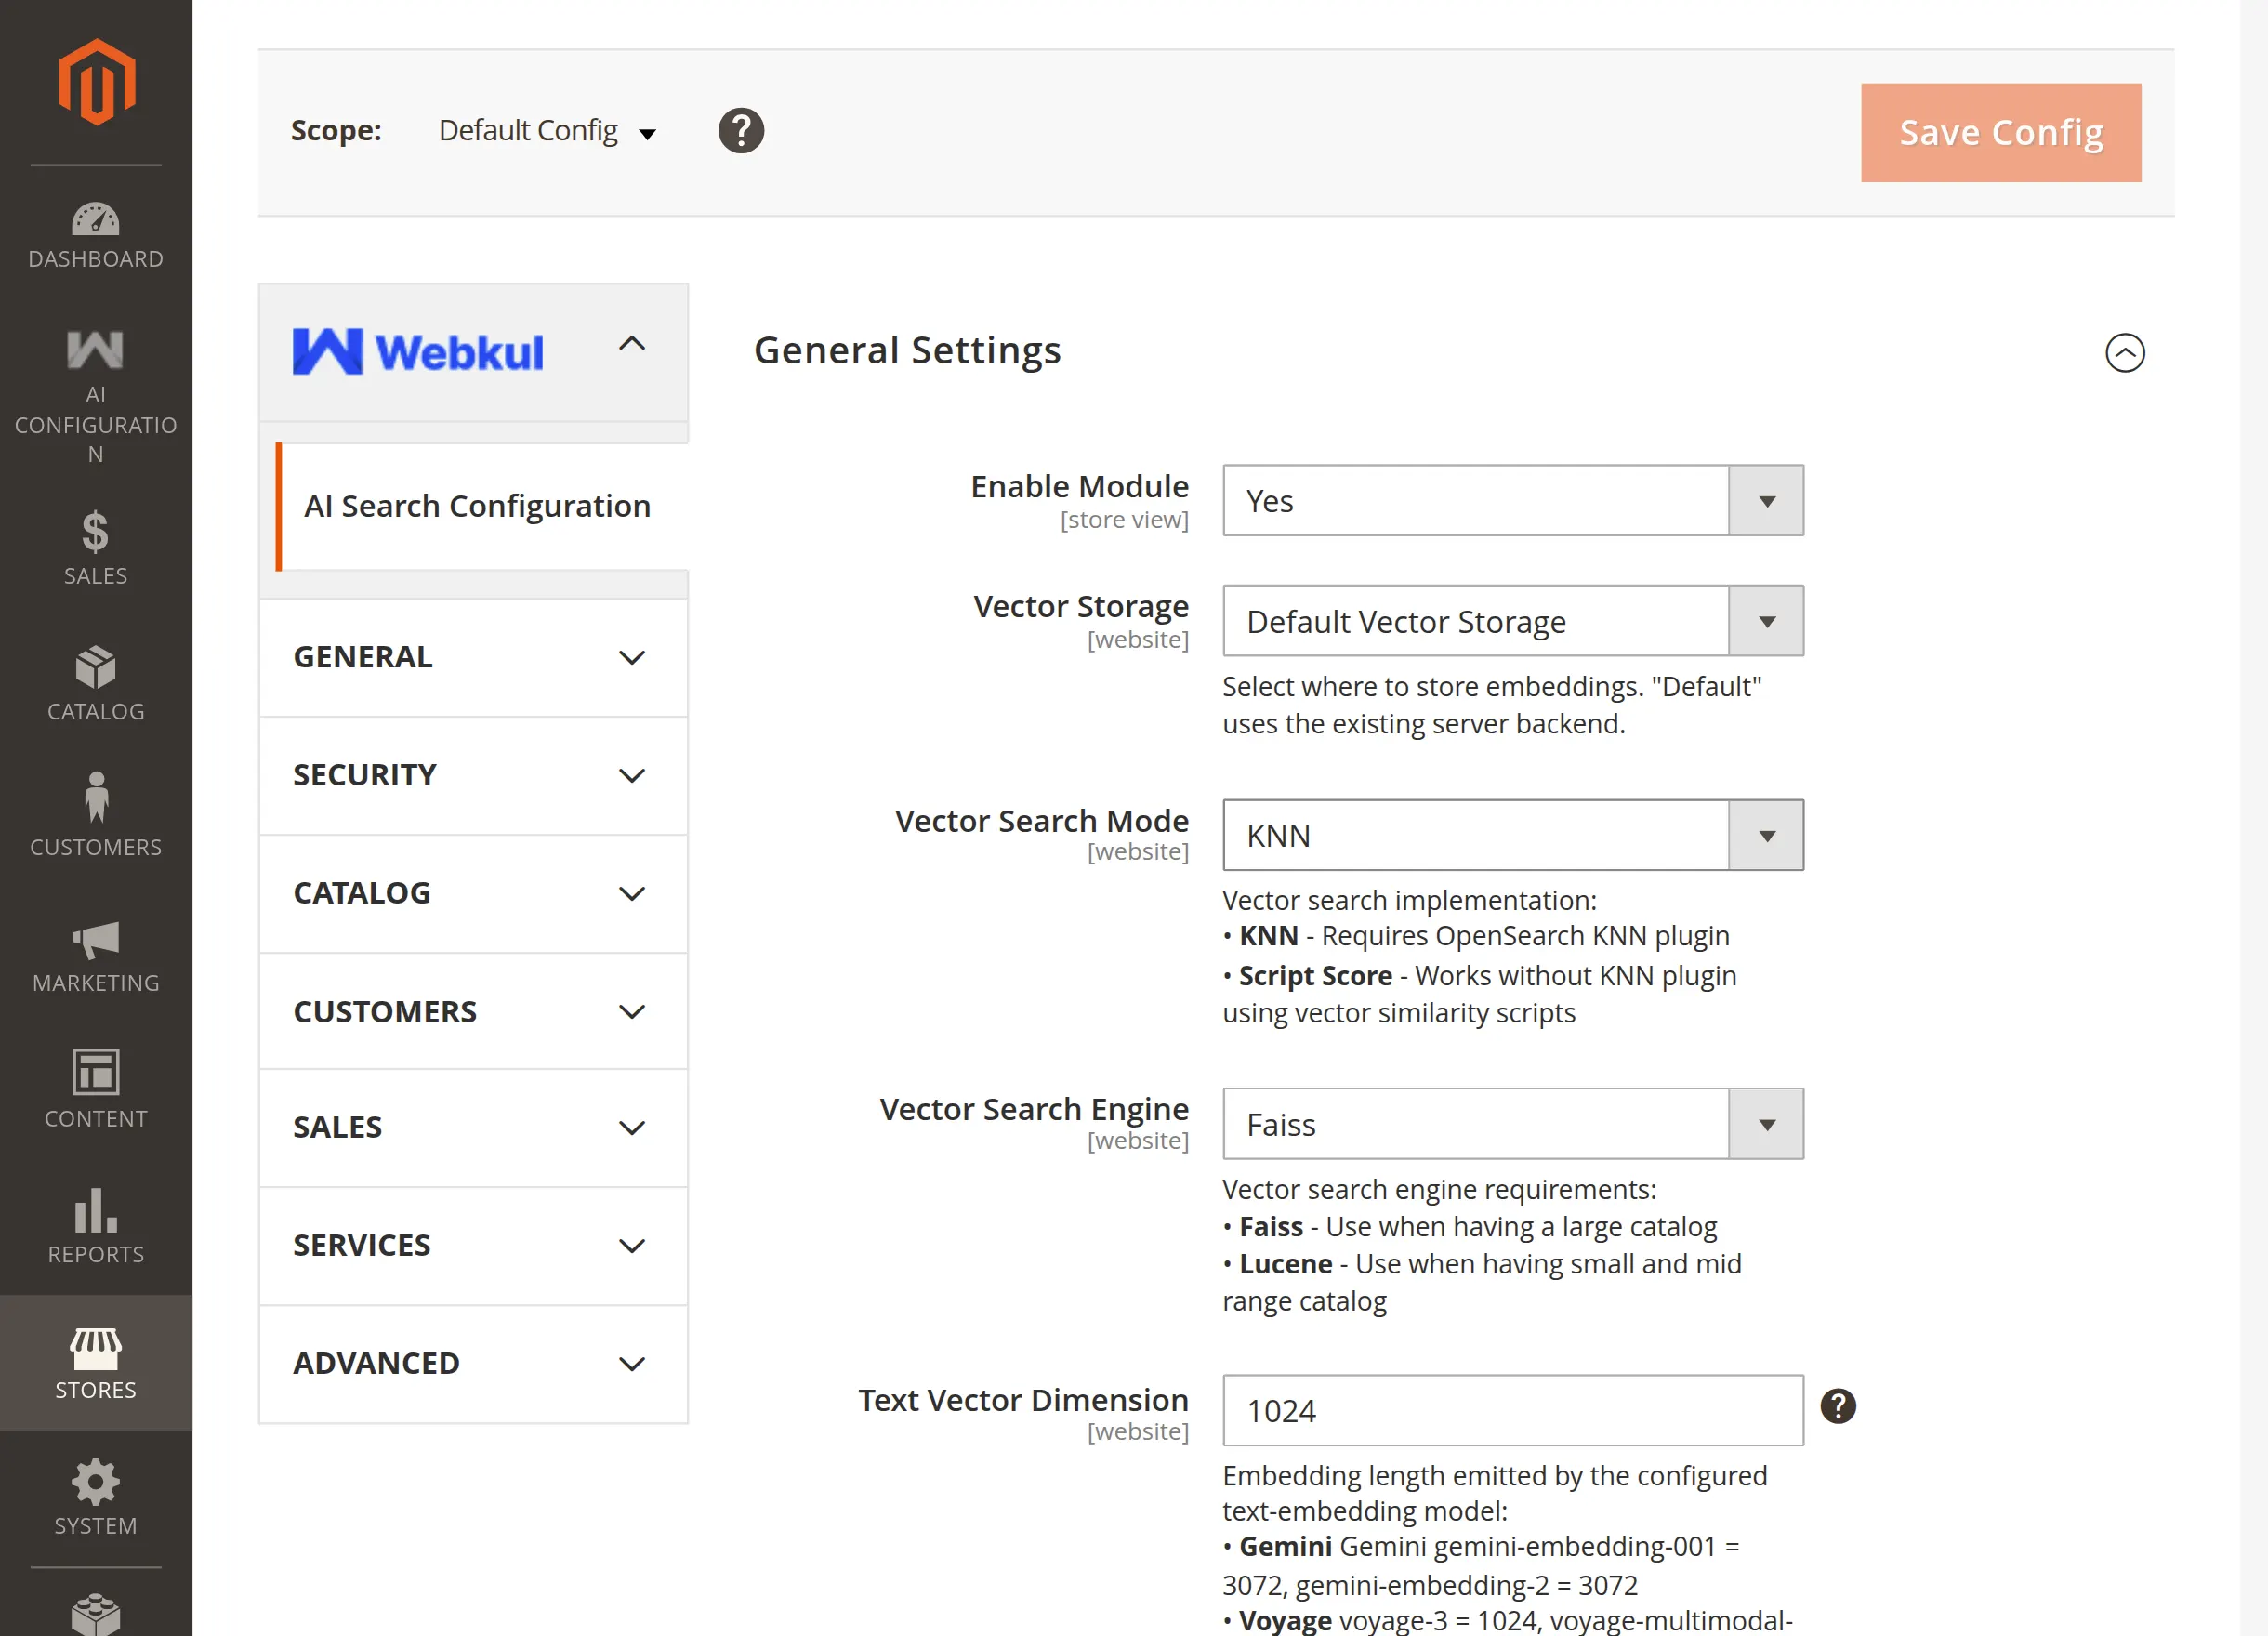
General Settings
This section manages the core AI Search configuration and semantic search settings for the store.
Enable Module: Select Yes or No from the dropdown to enable or disable the AI Search extension for the store.
Vector Storage: Select the required vector storage backend from the dropdown.
Default Endpoint: This field appears when Default Vector Storage is selected. Enter the Elasticsearch 8 or OpenSearch server endpoint.
Vector Search Mode: This field appears when Default Vector Storage is selected as the Vector Storage. Select the vector search implementation from the dropdown.
KNN: Uses the OpenSearch KNN plugin for vector search.
Script Score: Uses cosine similarity scripting for vector search.
Vector Search Engine: This field appears when KNN is selected as the Vector Search Mode. Select the KNN backend engine from the dropdown.
Faiss: Recommended for large catalogs.
Lucene: Recommended for small and medium-sized catalogs.
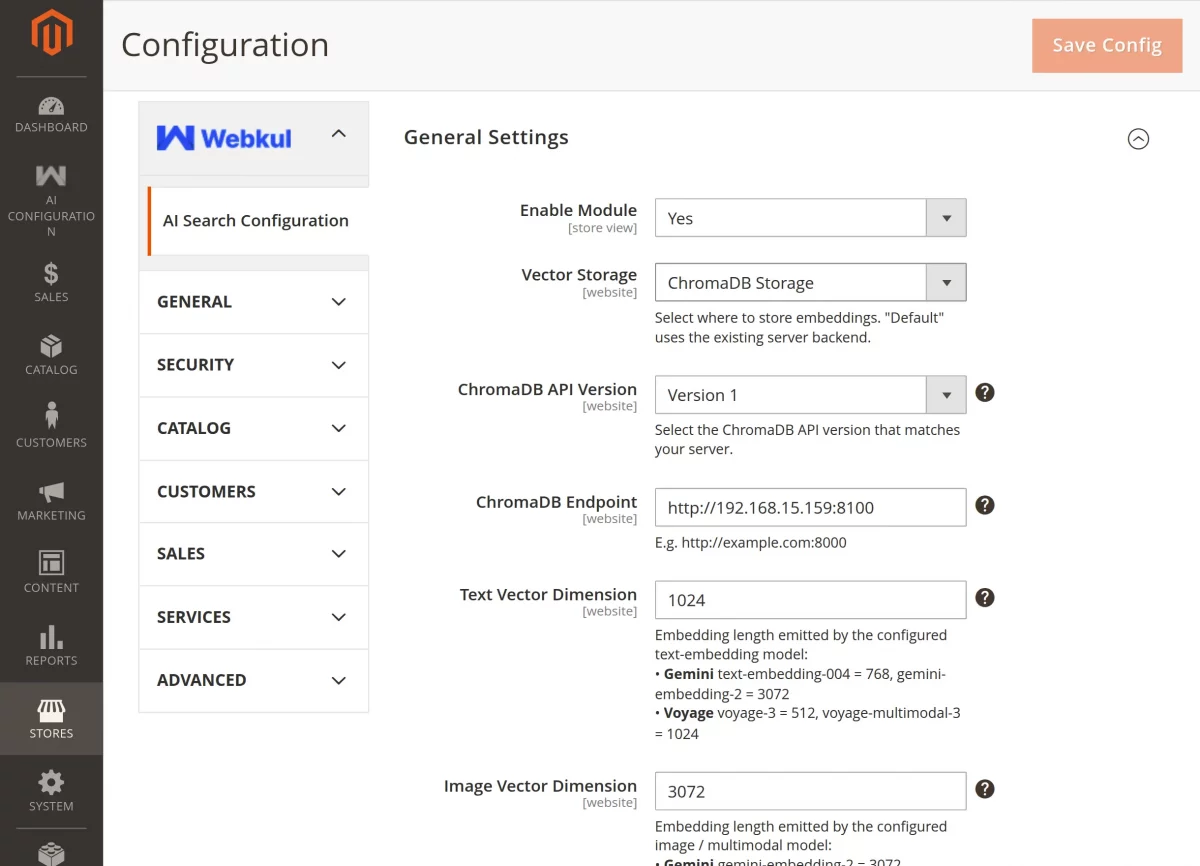
ChromaDB Endpoint: This field appears when ChromaDB Storage is selected. Enter the ChromaDB server endpoint.
ChromaDB API Version: This field appears when ChromaDB Storage is selected. Select the required ChromaDB API version from the dropdown.
Vector Dimension (Preconfigured): Enter the embedding vector dimension generated by the Preconfigured server.
Text Vector Dimension: Enter the text embedding vector dimension for semantic product search.
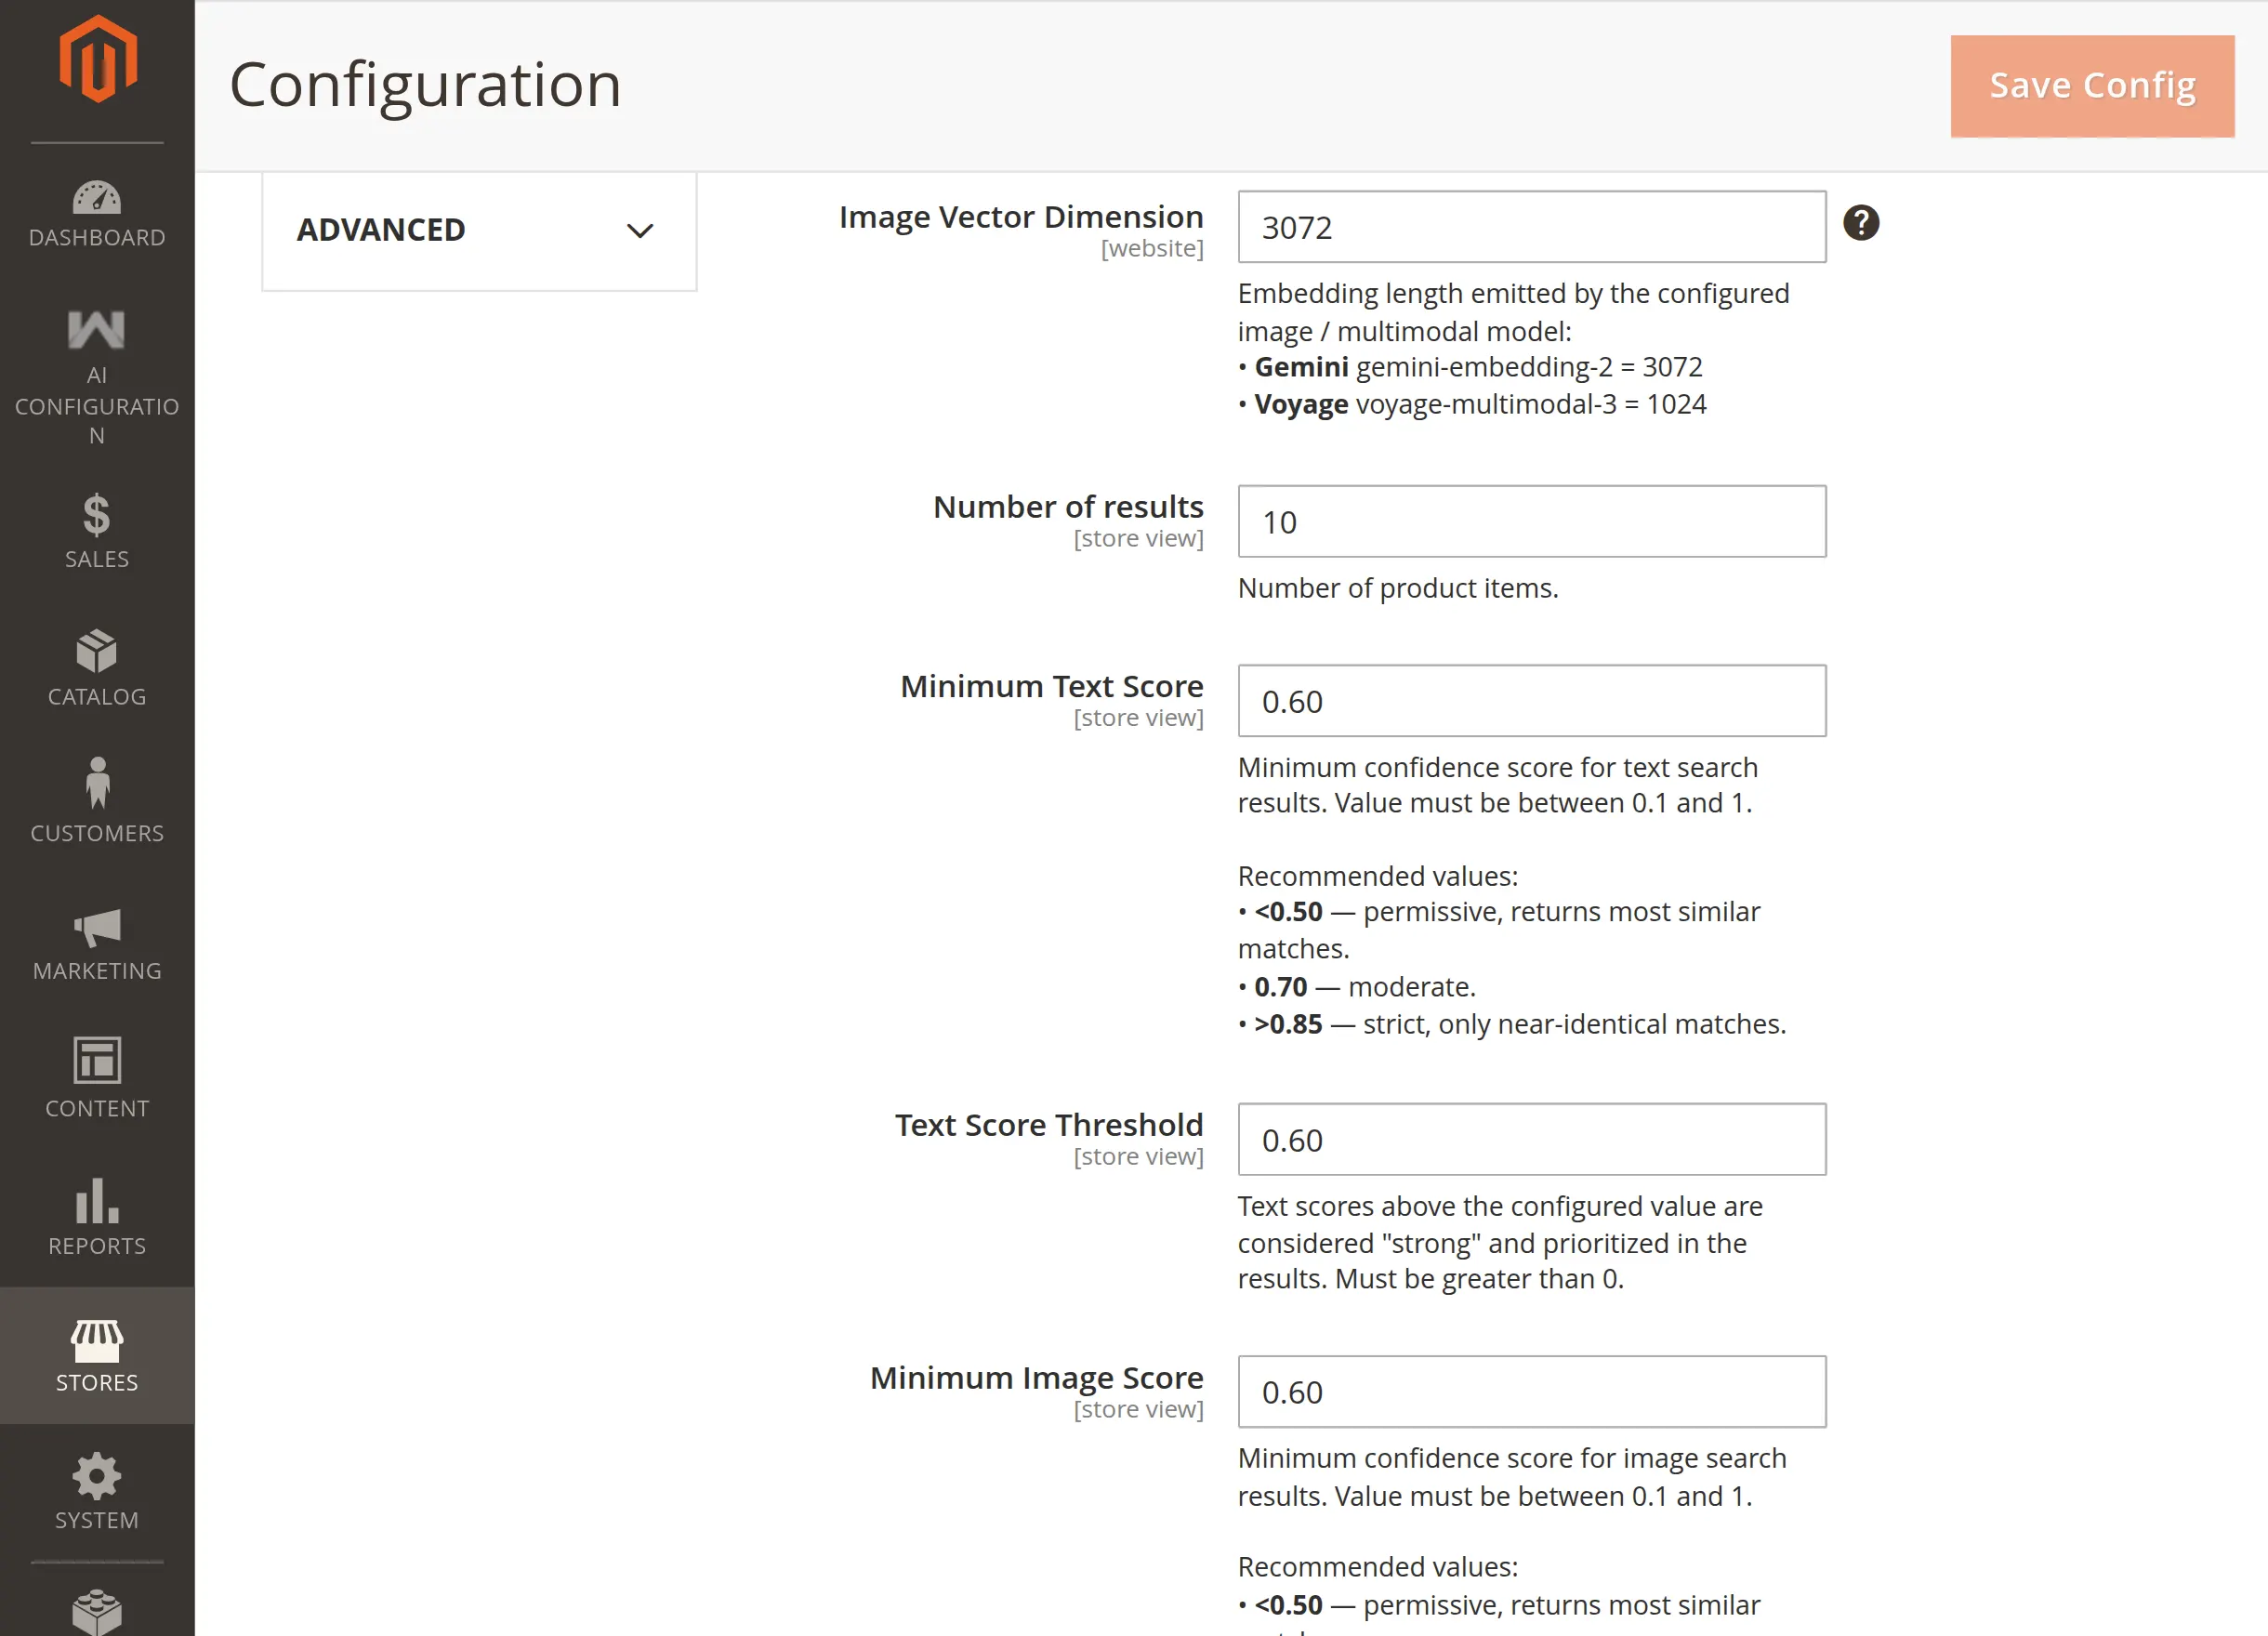
Number of Results: Configure the maximum number of products displayed for each search query.
Minimum Text Score: Define the minimum text similarity score required for relevant product results.
Text Score Threshold: Configure the maximum text distance limit for semantic product matching.
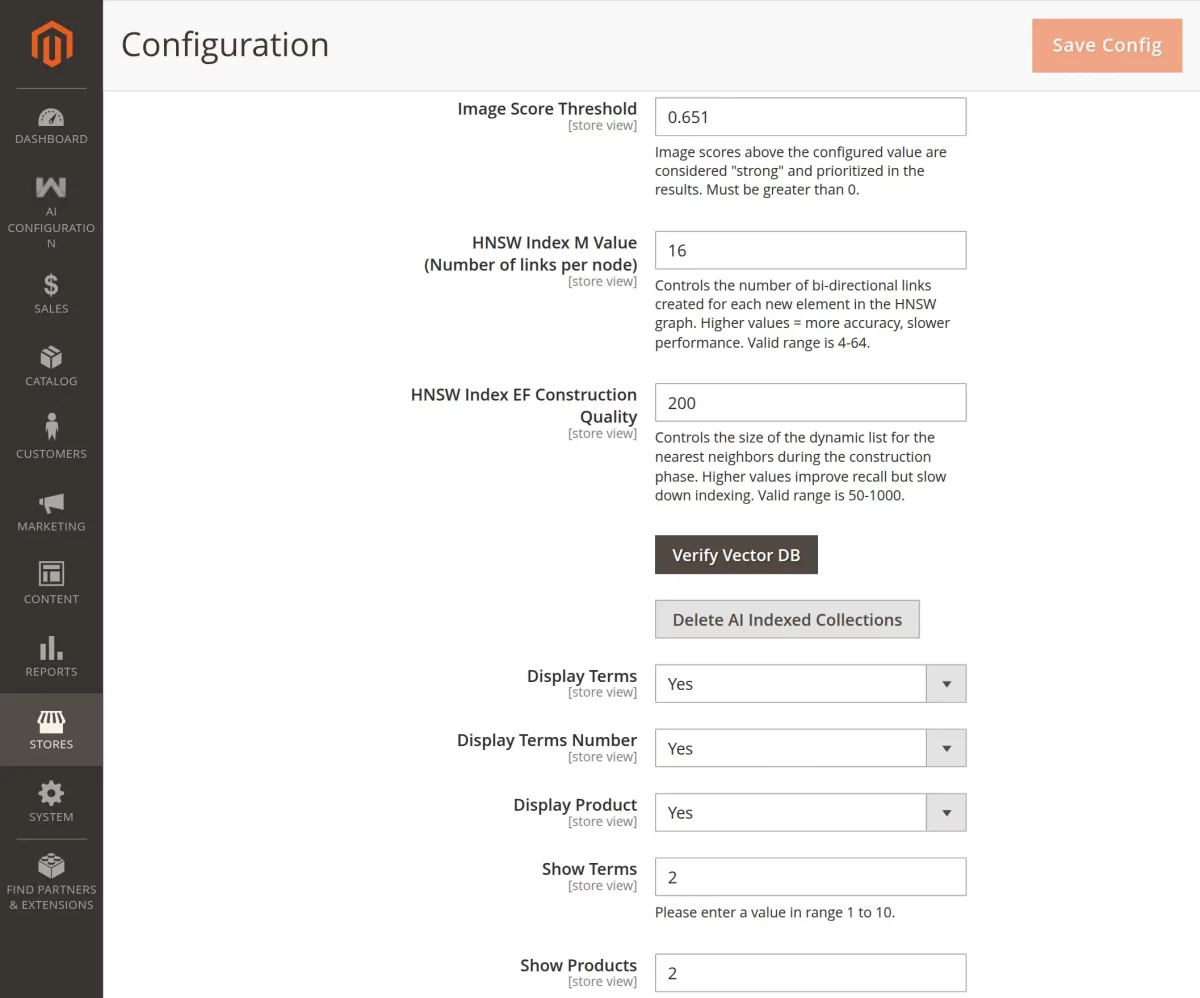
Minimum Image Score: Set the minimum image similarity score for product matching. Available when Enable Multi Model is enabled under Cloud LLMs → Image Embedding Configuration.
Image Score Threshold: Set the maximum image distance threshold for matching. Available when Enable Multi Model is enabled under Cloud LLMs → Image Embedding Configuration.
HNSW Index Configuration
HNSW Index M Value: Available when Default Vector Storage is selected. It controls node connections to improve vector indexing performance.
HNSW Index EF Construction Quality: Additionally, this setting enhances index construction quality for more accurate semantic search results.
Verify Vector DB: Use this button to verify connectivity with the configured vector storage backend.
Delete Vector Storage Collections: Admins can also remove stored product embeddings from vector storage using this option.
Display Settings
This section manages the search suggestion display settings for the storefront search box.
Display Terms: Select Yes or No from the dropdown to enable or disable suggested search terms.
Show Terms: Configure the number of suggested terms displayed in search suggestions.
Display Terms Number: After enabling Display Terms, configure the number of suggested term groups shown in search suggestions.
Display Product: Additionally, this option allows admins to enable or disable product suggestions in the search dropdown.
Show Products: Finally, this option controls the number of suggested products shown in the search dropdown.
Note: If you update the HNSW M Value or EF Construction Quality, make sure to delete the existing Elasticsearch index and re-save the embeddings.
AI Search Configuration – AI Model Type
This section allows admins to configure the AI model and embedding providers for semantic product search.
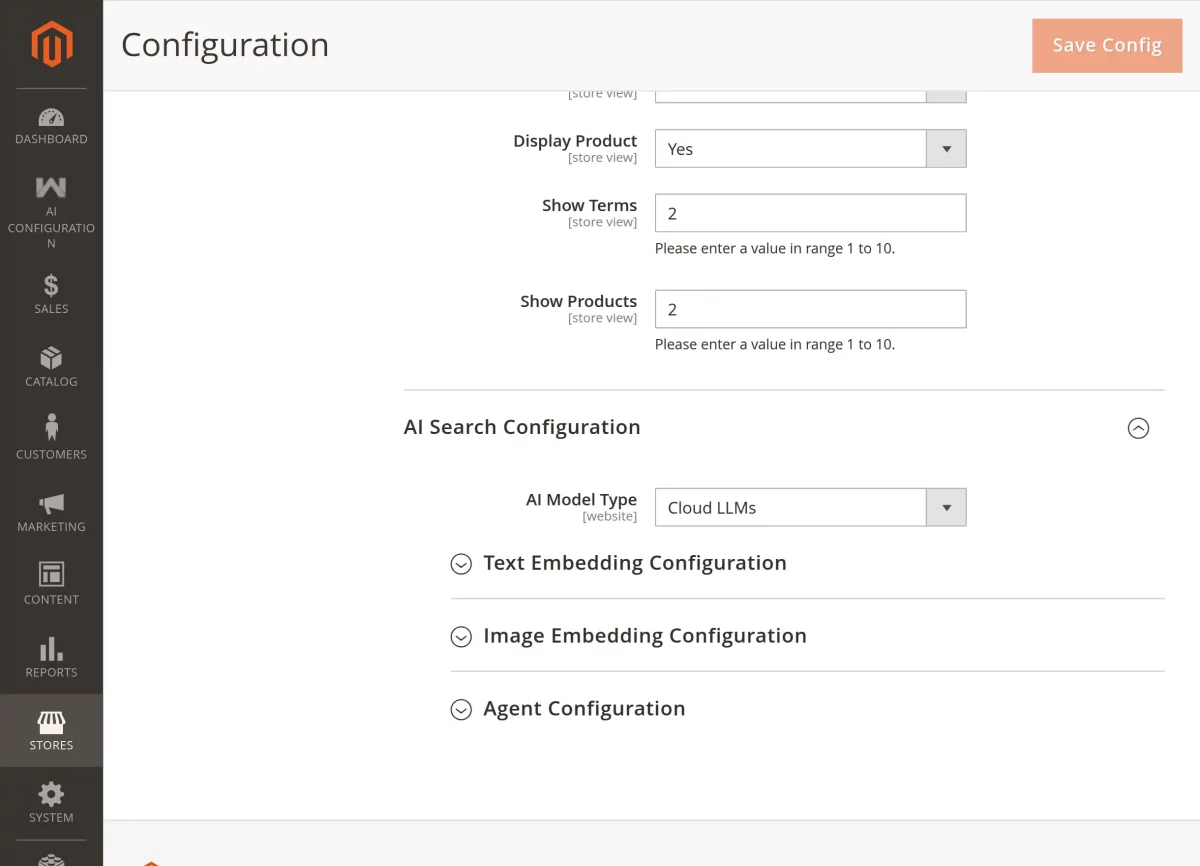
AI Model Type: Select the required AI model type from the dropdown. Available options include Pre Configured Model and Cloud LLMs.
Configuration for Pre Configured Model
The following settings appear when Pre Configured Model is selected as the AI Model Type.
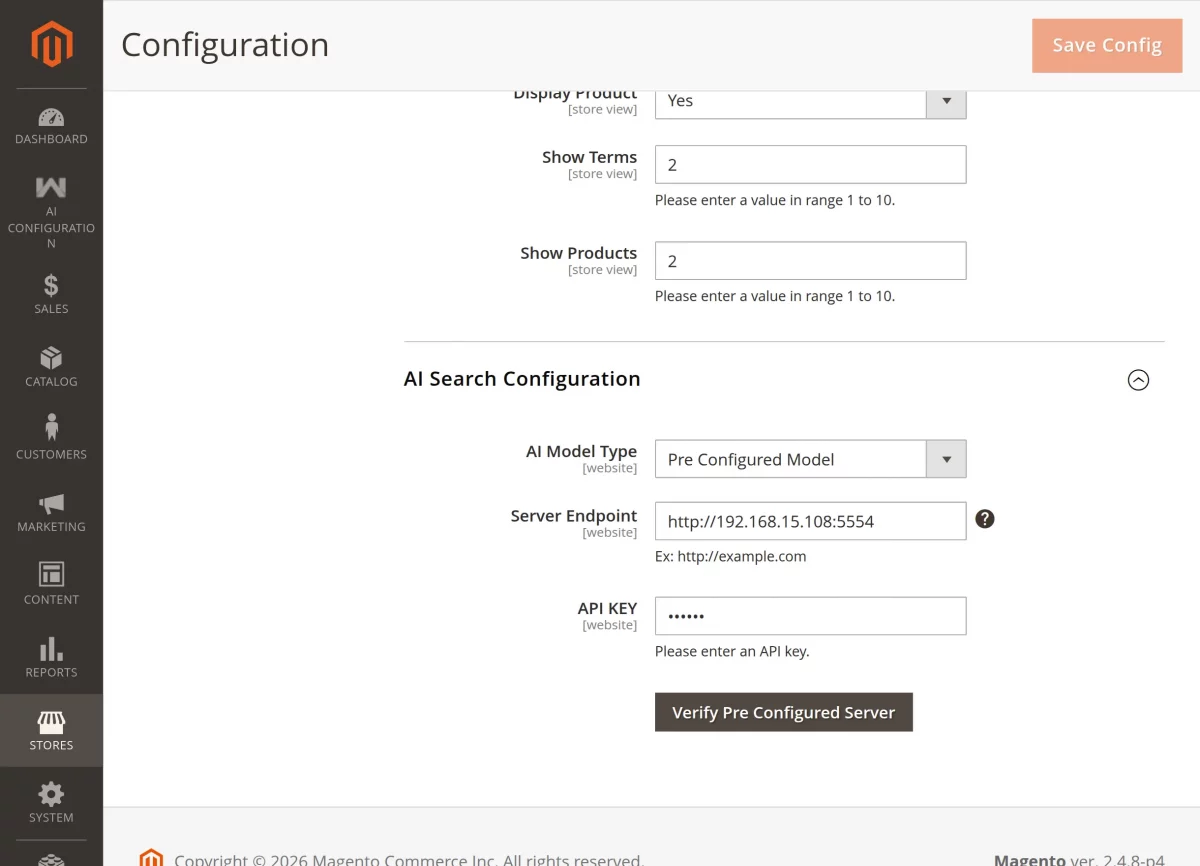
Server Endpoint: Enter the URL of the self-hosted Preconfigured embedding server.
API KEY: Enter the API key used to authenticate with the Preconfigured server.
Verify Preconfigured Server: Click the button to validate the configured server endpoint and API key.
After configuring all the settings, click on Save Config to apply and save the configuration successfully.
Configuration for Cloud LLMs
When Cloud LLMs is selected, the admin can configure Text Embedding, Image Embedding, and Agent settings separately.
Additionally, each section supports independent provider and model configuration for semantic search operations.
Furthermore, admins can manage embedding generation and query intent settings from the same configuration panel.
Note: First click the Verify button for each provider to load available models. After that, click Save Config to apply the settings.
Cloud LLMs – Text Embedding Configuration
This section configures the provider used for text embedding generation.
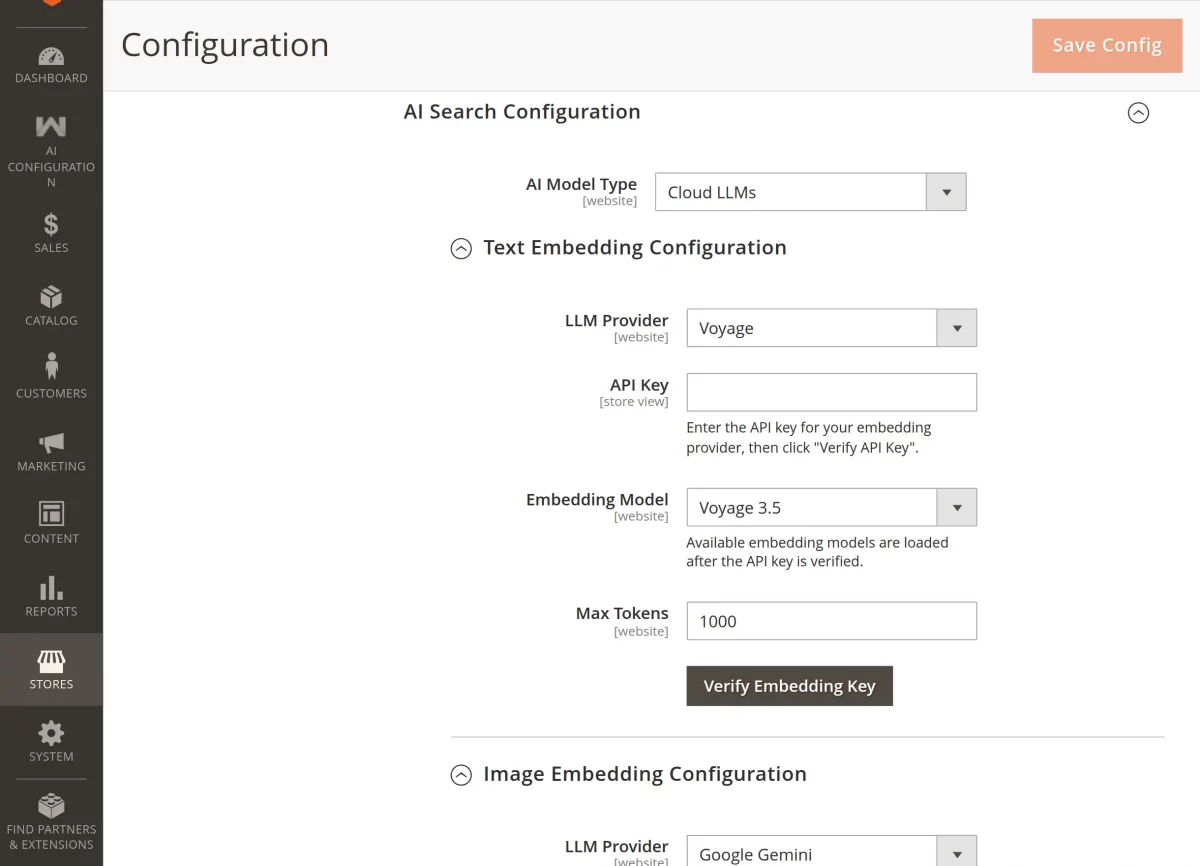
LLM Provider: Select the required text embedding provider from the dropdown.
Available providers include:
- Google Gemini
- Voyage AI
- OpenAI
- OpenRouter
- ONNX
API Key: Enter the API key for the selected embedding provider.
Embedding Model: Select the required text embedding model after successful verification.
Max Tokens: Enter the maximum number of tokens allowed per embedding request.
Verify Embedding Key: Click the button to validate the API key and load available embedding models.
Configuration with ONNX (Local) as Text Embedding Provider
LLM Provider: Select ONNX (Local) to generate embeddings directly on your server.
API Key: Not required for ONNX. Therefore, the API Key and Verify options remain hidden.
Embedding Model: Select the required Xenova embedding model from the dropdown.
Max Tokens: Enter the maximum number of tokens for embedding generation.
Text Vector Dimension: Ensure the configured dimension matches the selected model output.
Note: ONNX runs the embedding model locally without requiring a cloud account, API key, or external API requests.
Cloud LLMs – Image Embedding Configuration
This section manages image embedding and multimodal embedding configuration.
Enable Multi Model: Select Yes or No from the dropdown to enable or disable image embedding support.
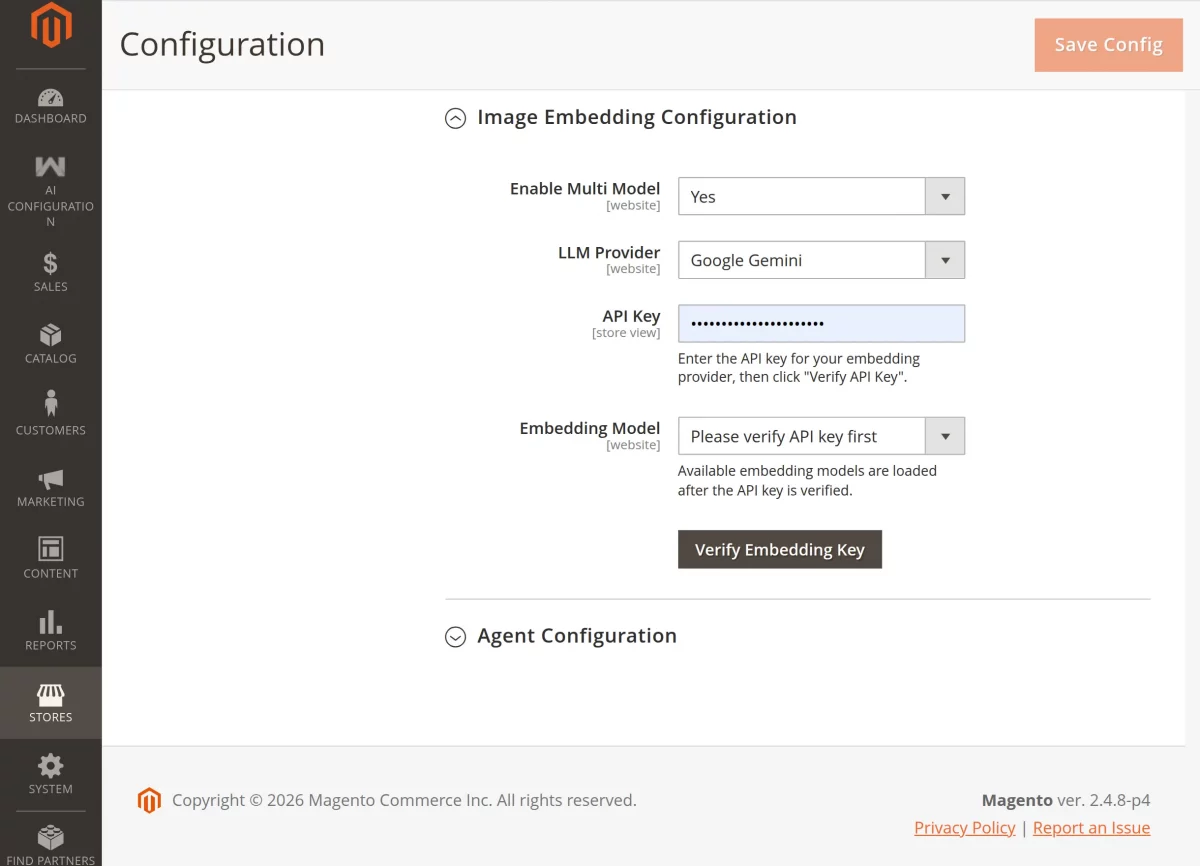
LLM Provider: Select the required image embedding provider from the dropdown.
Available providers include:
- Google Gemini
- Voyage AI
API Key: Enter the API key for the selected provider.
Embedding Model: Select the required image or multimodal embedding model.
Max Tokens: Configure the maximum token limit for embedding generation.
Verify Embedding Key: Click the button to validate the API key and load available models.
Cloud LLMs – Agent Configuration
The Agent model is used to understand customer intent and extract filters from natural language queries.
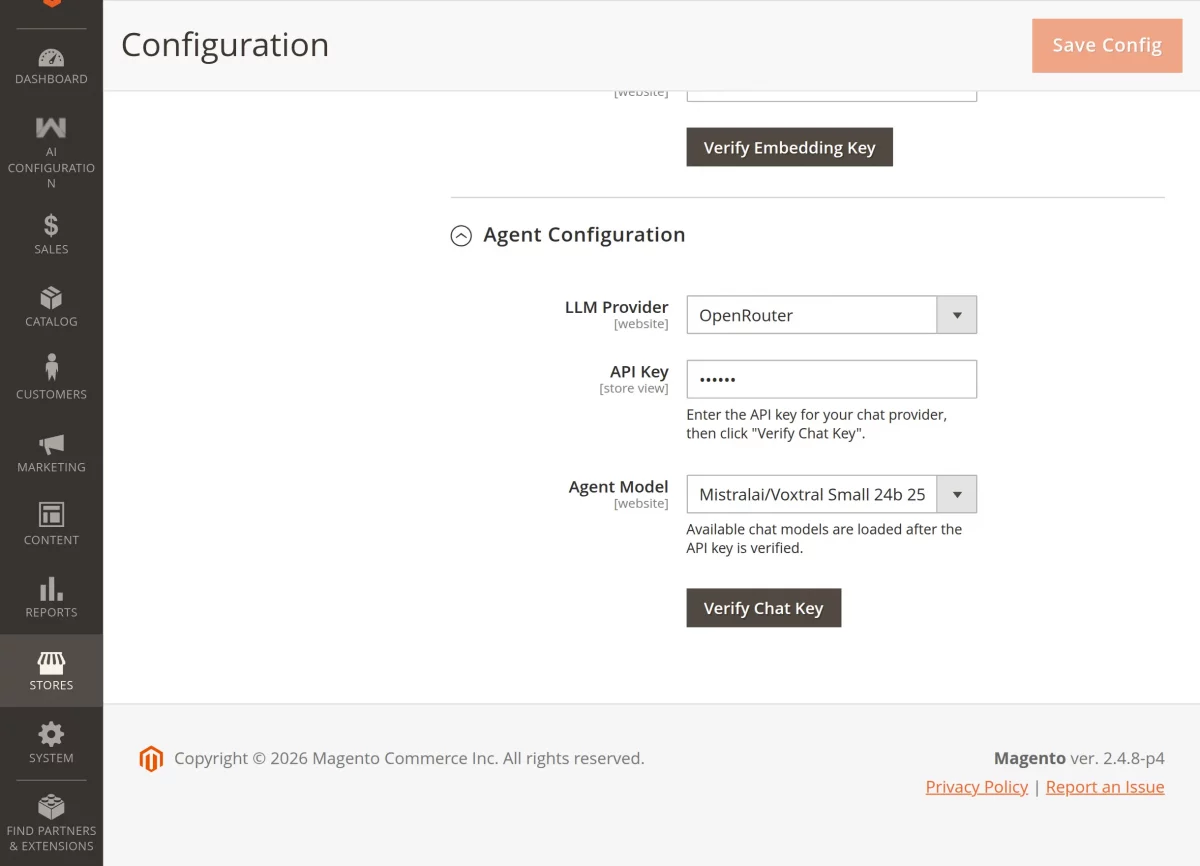
LLM Provider: Select the required chat model provider from the dropdown.
Available providers include:
- Google Gemini
- OpenAI
- Anthropic
- Cerebras
- OpenRouter
- Mistral AI
API Key: Enter the API key for the selected provider.
Agent Model: Select the required chat model after successful verification.
Verify: Click the button to validate the API key and load available chat models.
After verifying the provider settings successfully, click on the Save Config button to apply the configuration.
This is how admins can configure the AI Search module with the required LLM, embedding, and agent settings for semantic product search.
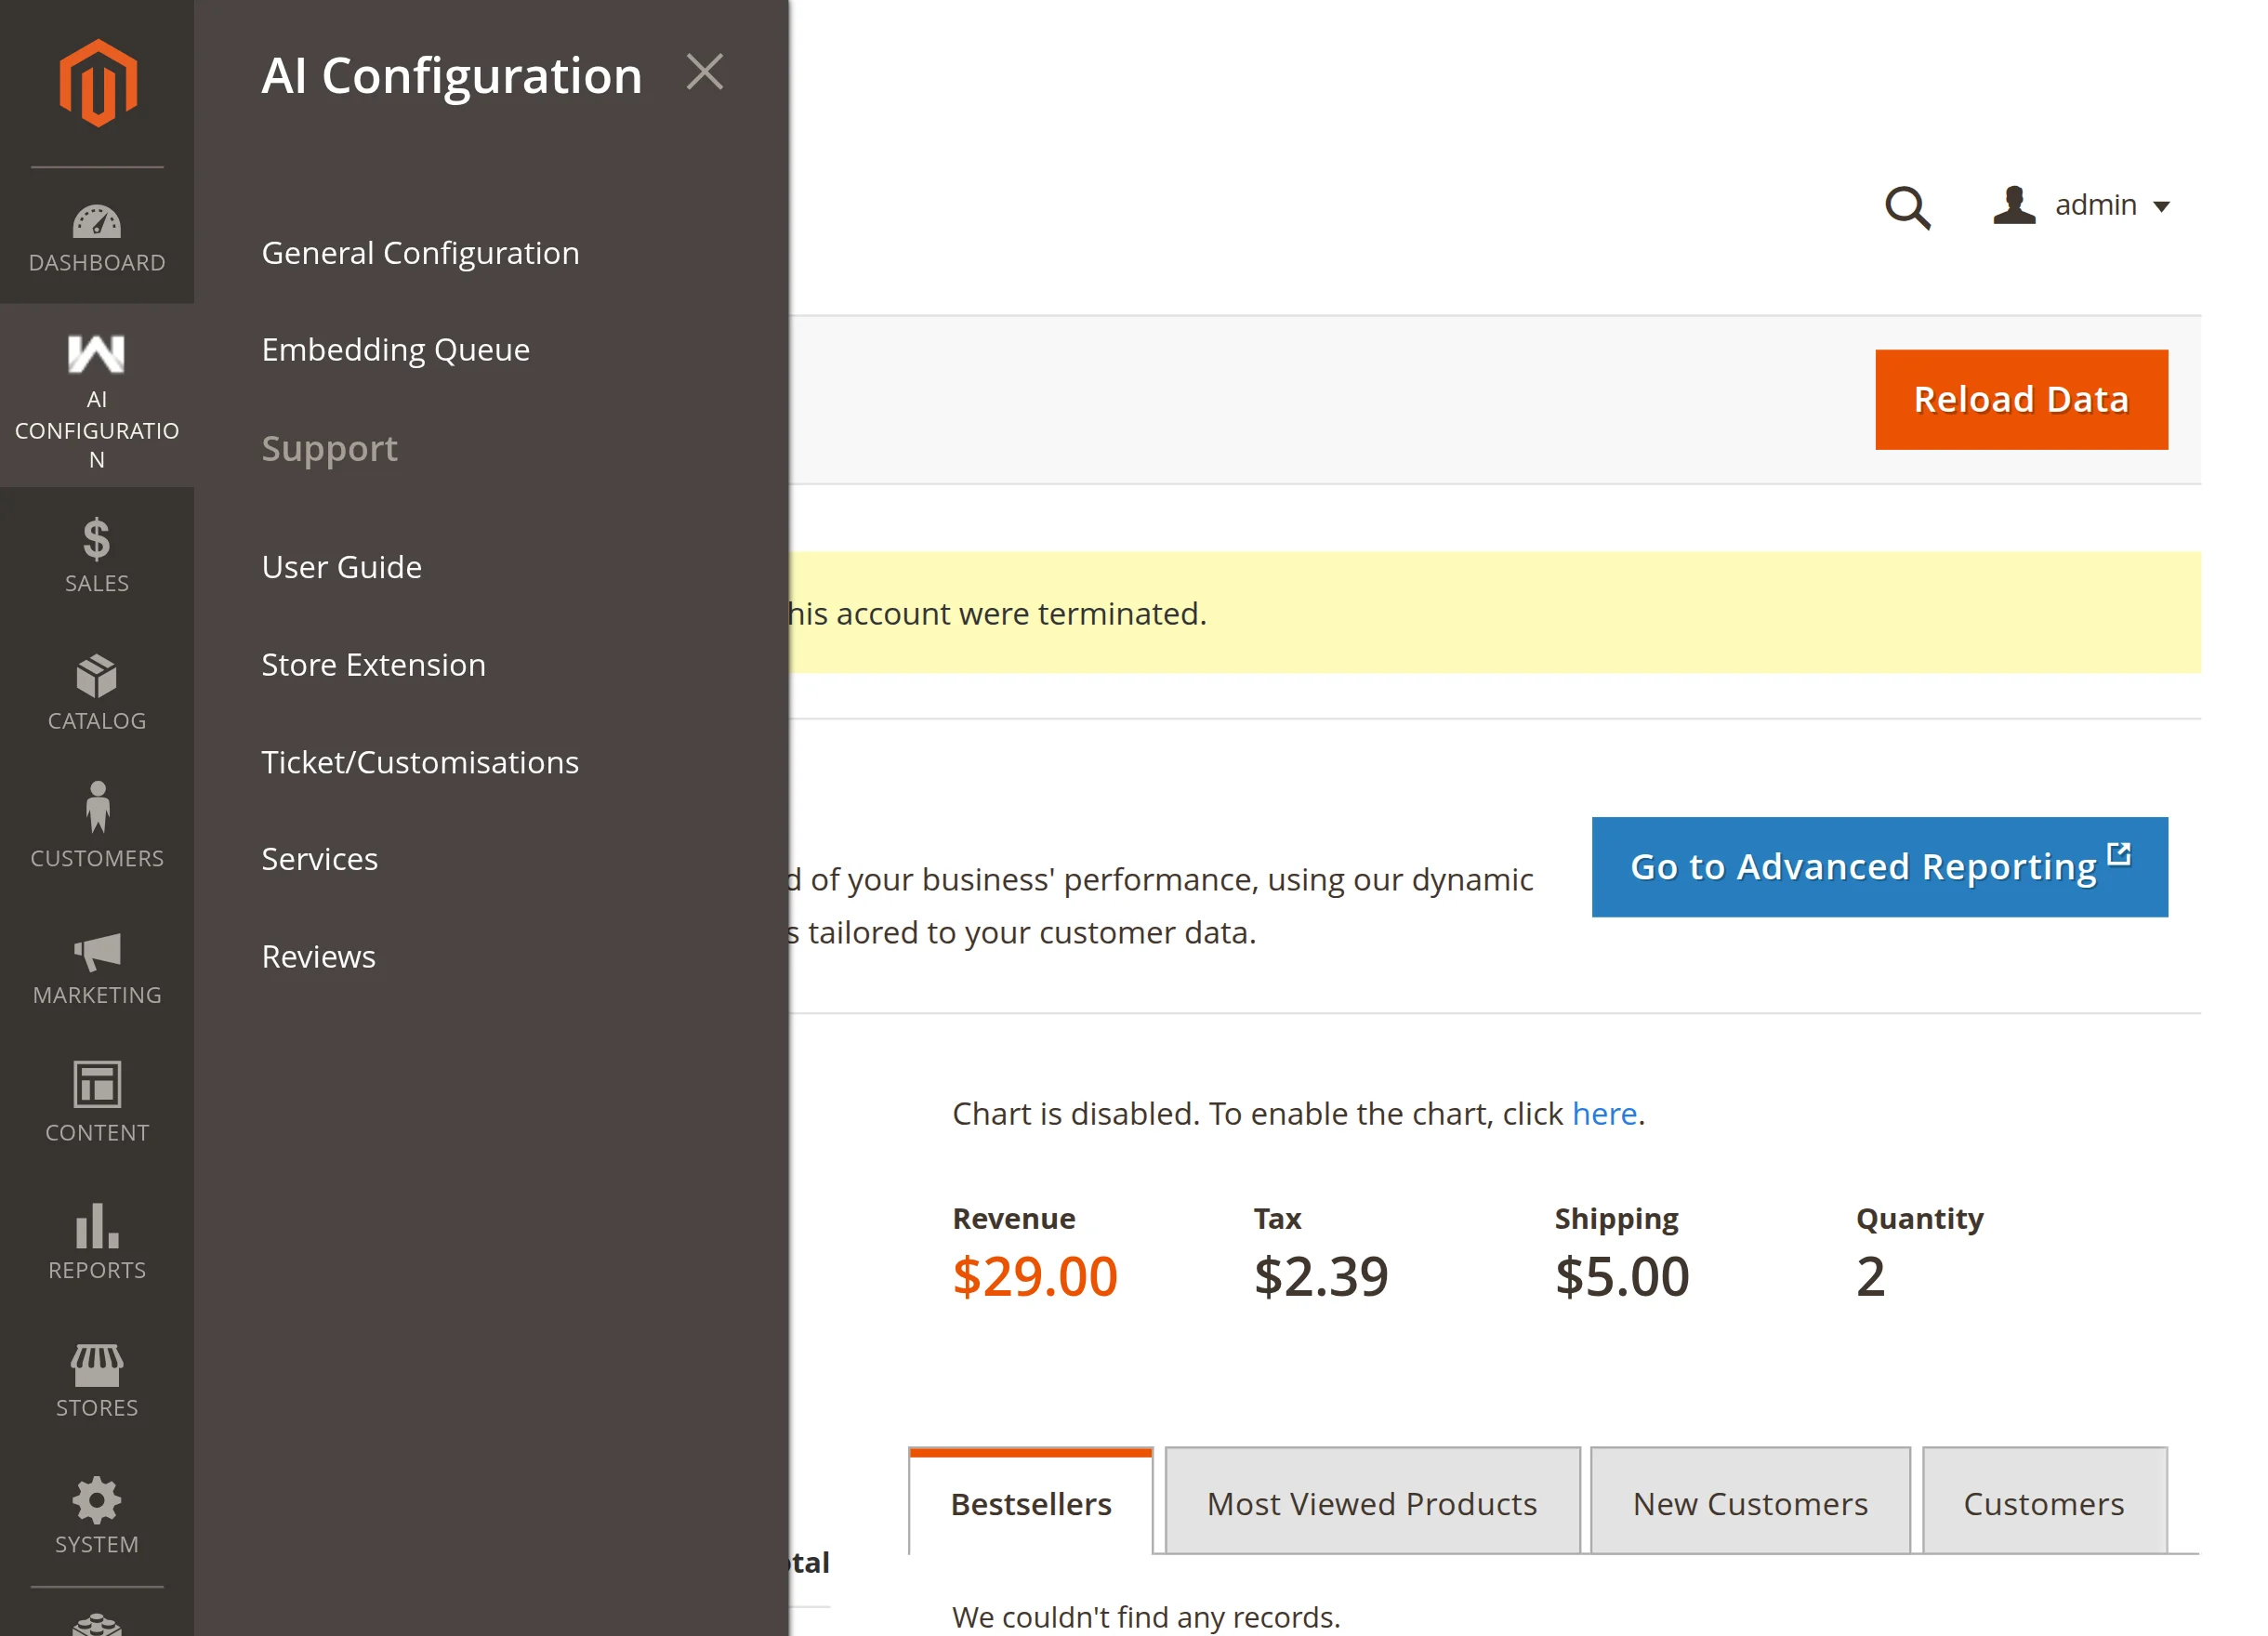
AI Configuration
After the successful installation and configuration, the AI Configuration menu option becomes visible to the admin in the Adobe Commerce backend.
Here, the admin has the following options to configure and manage AI Search operations across the store –
- Configuration
- Embedding Queue
Embedding Queue
Under this section, the admin can view and manage all product embedding batch processes used for AI-powered search.
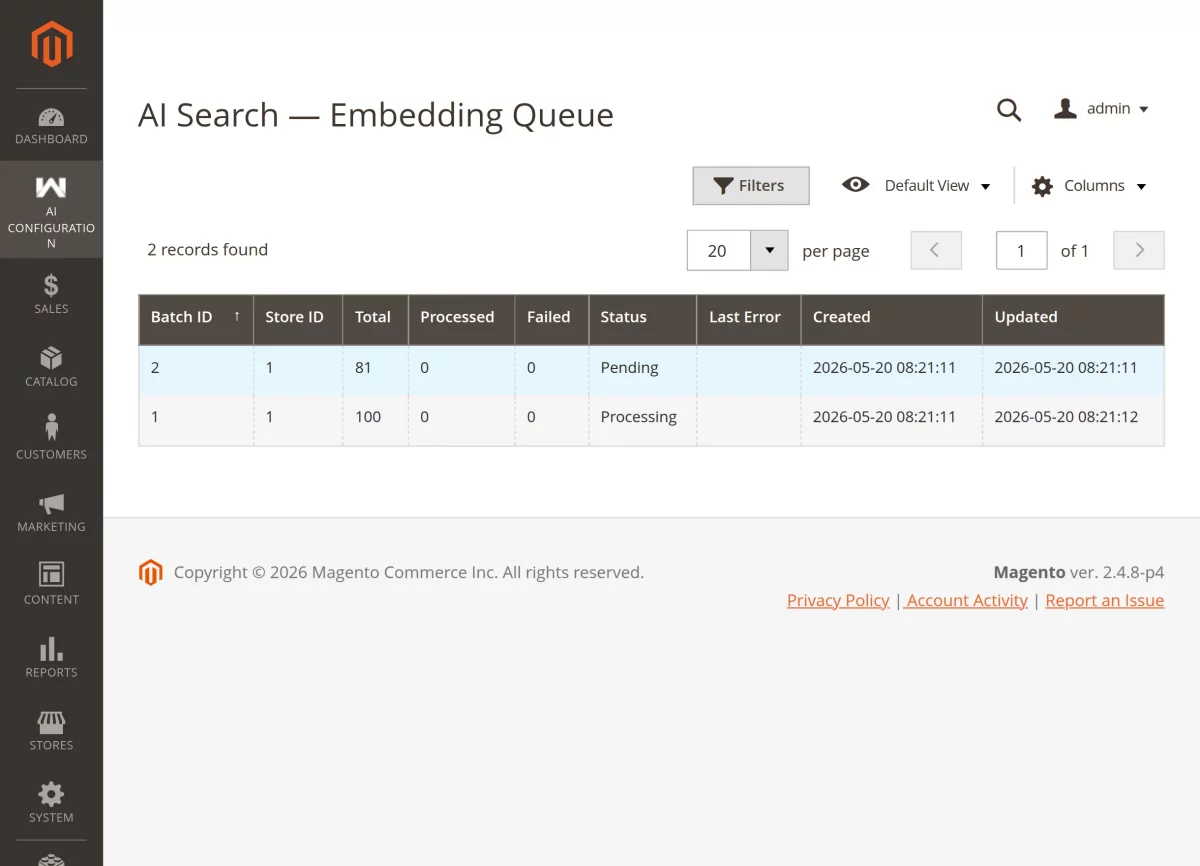
Here, the admin can monitor embedding batches, check their processing status, and review any errors if they occur.
Moreover, the admin can track details such as Batch ID, store view, total products, processed items, and failed items.
Additionally, each batch shows its current status such as New, In Progress, Completed, Retry Required, or Failed.
Here, the admin can also review timestamps and error logs for better debugging and monitoring.
Thus, this section helps ensure smooth processing and management of product embeddings for semantic search.
Storefront Workflow – Magento 2 Semantic Search
After the successful configuration of the module, the frontend view will appear as shown in the below image.

The Search Suggestion feature displays matching products and suggested terms while customers type in the search box.

To start with the query search for the product, customers will enter the search query in the above-displayed search bar.

Magneto 2 Semantic Search finds the customer’s search queries and figures out the meaning of the query as it uses Artificial intelligence and Natural Language Processing (NLP).
After that, it shows the relevant or accurate results on the store. As you can see in the below snapshot, it throws an accurate result.

Let’s say you’re looking for a men’s digital watch, You might use the following search query on the store “men’s watch with digital display and LED backlight”.
This search query includes ” which is a product type” and digital” which is an attribute.
The customer will receive a list of products as search results as shown in the below image.

The website user can also find accurate results by using search queries if products are available in the store.

Attribute-Based Search – Magento 2 Semantic Search
Customers can find the products by using search queries with the help of attribute value as well.
For example, the customer uses the “cotton” attribute along with the product information, and they get a list of all cotton t-shirts.

Customers can also search for products using other attribute values like price range. Let’s see an example.
Here the customer enters the search query as “men shorts below 50”.
By using the NLP technique, it will figure out the meaning of the query and find that the customer asking about the price of products.
And will show the results of all the products whose price is less than 50.

Support
That’s all about the Magento 2 Semantic Search Extension.
If you have any questions, suggestions, or customization requests, feel free to contact us at [email protected] or submit a ticket at webkul.uvdesk.com.
Please explore our Magento Development Services and Quality Magento 2 Extensions.
Current Product Version - 4.0.3
Supported Framework Version - Magento 2.0.x, 2.1.x, 2.2.x,2.3.x, 2.4.x

Be the first to comment.