Odoo Shopware Connector depends on the Odoo Multi-Channel Sale Module. That framework module provides the structure to integrate Shopware with Odoo.
Install the base module first for Odoo Shopware Connector to work properly. The module is also compatible with Shopware Version 6 and 5.
Introduction
Shopware is popular as it is simple yet effective e-commerce; on the other hand, Odoo is widely known for inventory management, accounting, etc.
Now, you can unite the two powerful platforms for the best possible results.
Odoo Shopware Connector allows you to connect multiple Shopware instances with your single Odoo instance.
Apart from other channels, if you are also managing one or more Shopware Stores, then Odoo Shopware Connector can help you in the best way.
Do you want to centralize the inventory of all your Shopware instances in one place?
If yes then you are landed at the right place, as Odoo Shopware Connector helps to manage all in one place.
FEATURES
Here is the concise list of the features. Visit the Store Page to know the detailed features of Odoo Shopware Connector
- Import Shopware Products, Orders, Categories, Partners and Delivery Methods in Odoo
- Import data manually or via cron scheduler
- Product details (like category, attributes, attribute values) are imported along with the products
- Order details (like customers and their addresses, taxes, payment methods, currency) and order statuses (like cancel, shipment and invoice) are imported along with the orders
- Customer details (like addresses) are imported along with the Customers
- Manually export selected or bulk products and categories From Odoo
- Fill the corresponding Order status of Shopware and Odoo in the Order Status table to manually map them
- You can sync order statuses, shipment, invoice, cancel status and Inventory from Odoo to Shopware in real-time.
- Auto sync new orders in real time from Shopware to Odoo via webhooks
- Enhanced Dynamic Dashboard to track the data from one place
Installation
1) After purchasing Odoo Shopware Connector, you will get a link at your registered email Id to download the module.
2) Extract the file on your system after the download finishes. You will be able to see a folder named- ‘shopware_odoo_connector’.
3) Copy and paste this folder inside your Odoo Add-Ons path.
4) Now, open the Odoo App and click on the Settings menu. Here, click on Activate the Developer Mode.
5) Then, open on Apps menu and click on ‘Update Modules List’.
6) In the search bar, remove all the filters and search ‘shopware_odoo_connector’.
7) You will be able to see the module in the search result. Click on ‘Install’ to install it.
Workflow
1) Login to your Odoo database and go to the multichannel module
2) Now, click on the connect button to connect Shopware with the Odoo instance

3) Firstly, Fill the details like Channel name and select Channel type.
Then add the credentials of the Shopware which includes URL, E-mail and Password.
To get the Shopware credentials, you need to go to Shopware.
Configuration at Shopware end
a) Go to the Shopware Settings >> System >> Users & Permissions
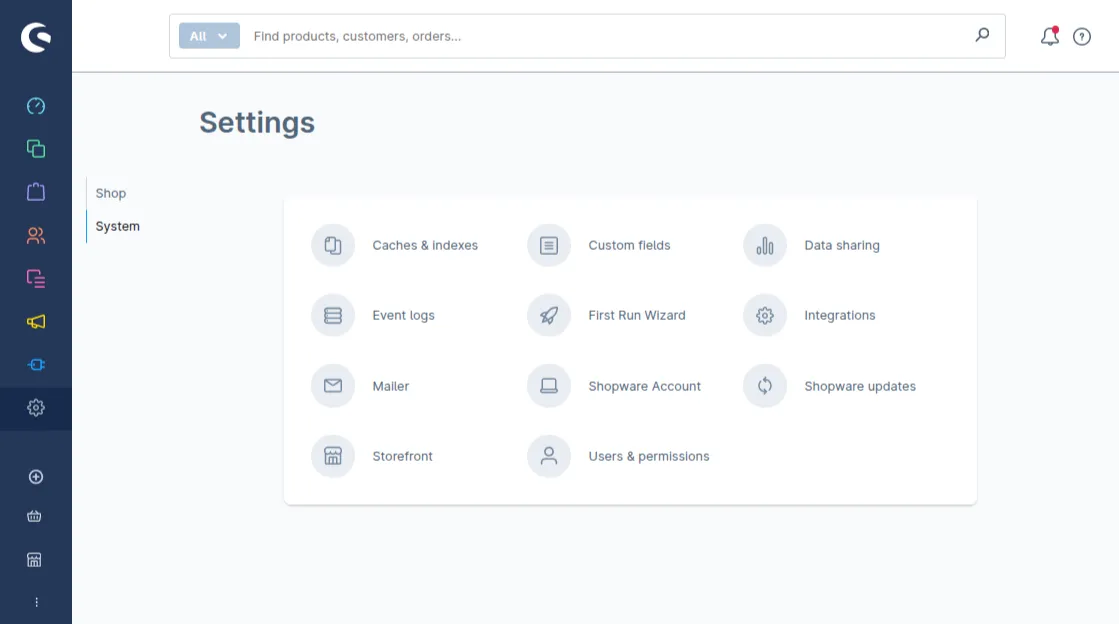
b) Click to create a new role for the user, which will be used for connection with Odoo
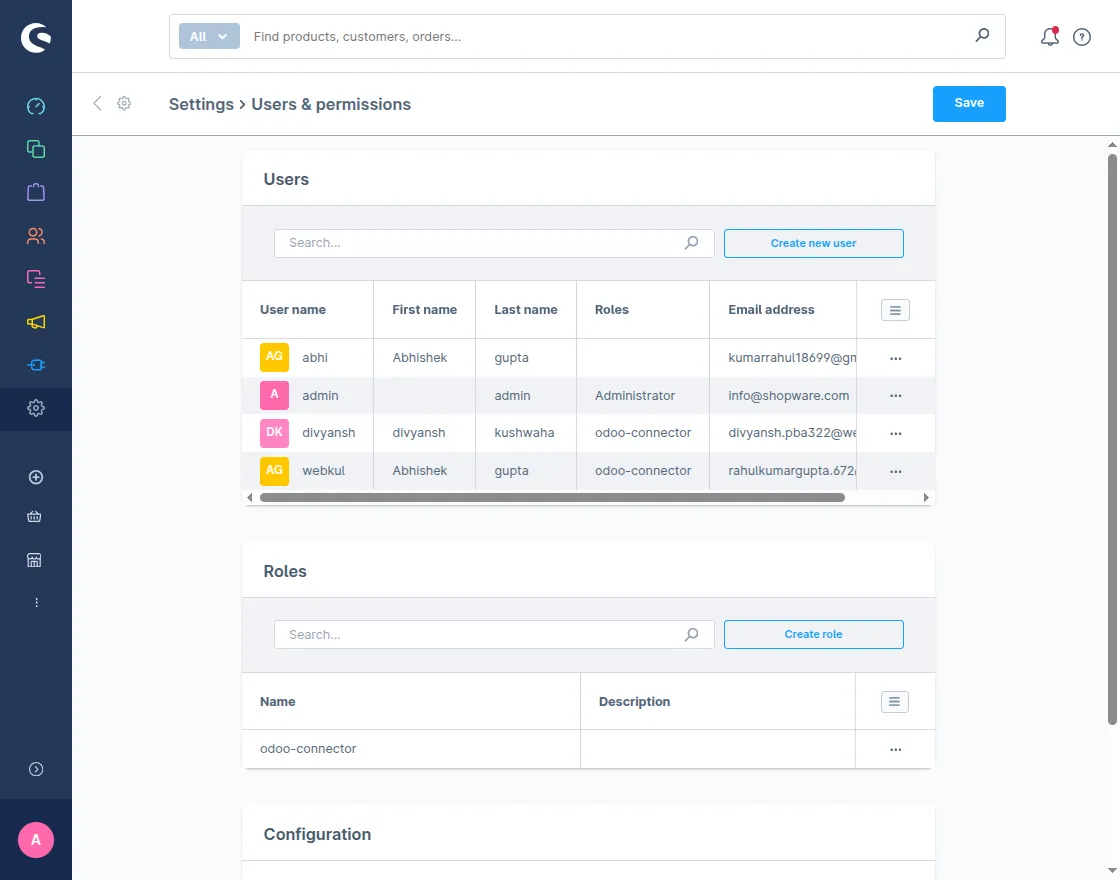
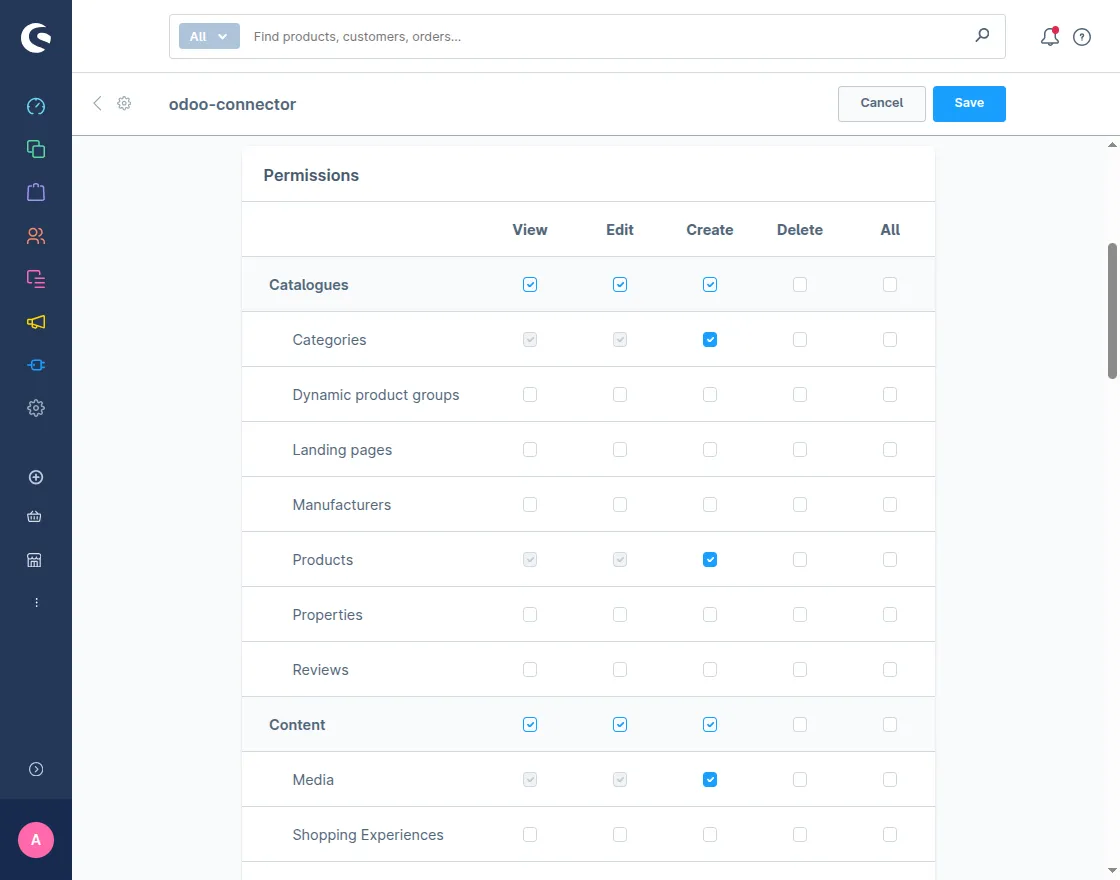
c) Enter the name for the user role and provide the following General permissions
| Main Permission | Minimum Required permissions | |
| Catalogues | Categories | Create |
| Products | Create | |
| Content | Media | Create |
| Customers | Customers | View |
| Orders | Orders | Edit |
| Refunds | Edit | |
| Other | Sales Channels | View |
| Settings | Currencies | View |
| Custom fields | Edit | |
| Customer groups | Edit | |
| Shipping | Edit | |
| Tax | View |
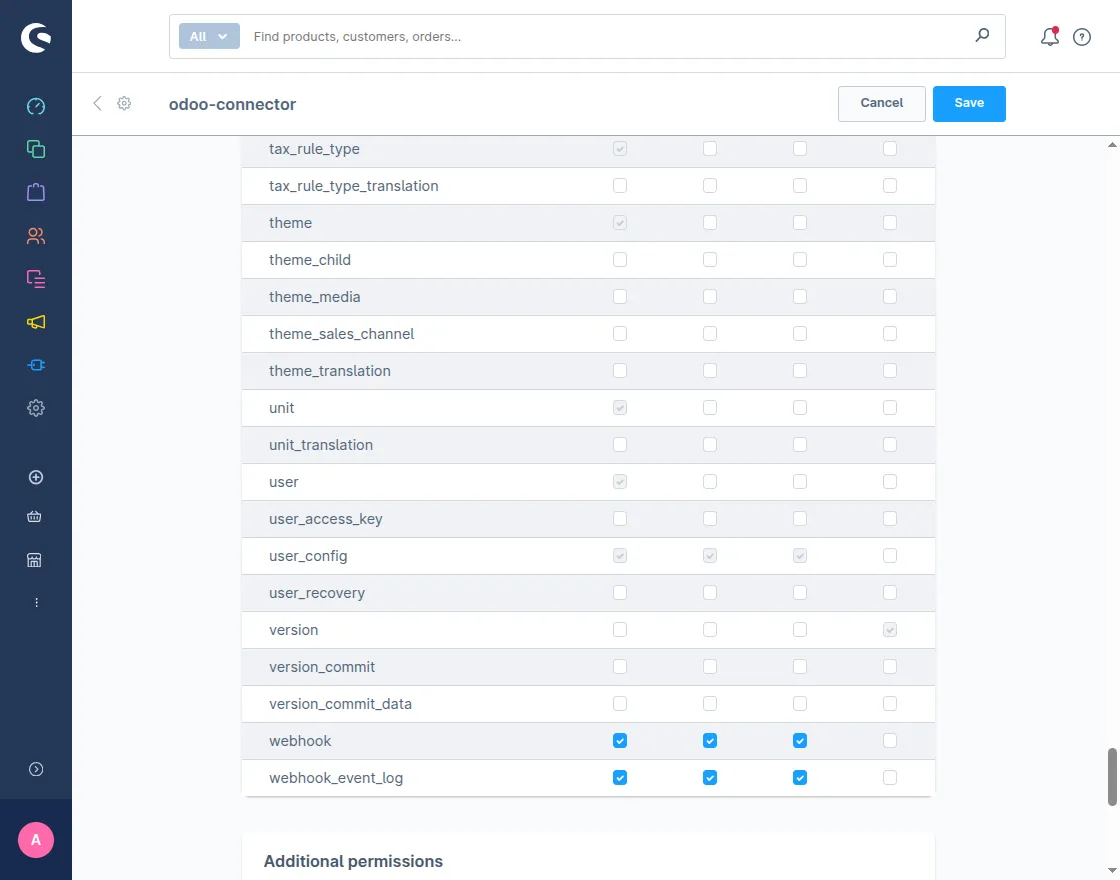
d) Now navigate to Detailed privileges and add the edit permission for order_transaction and create permissions for webhook and webhook_event_log
e) Once the permissions are configured for the new role, create a new user and add the role along with the username and password.
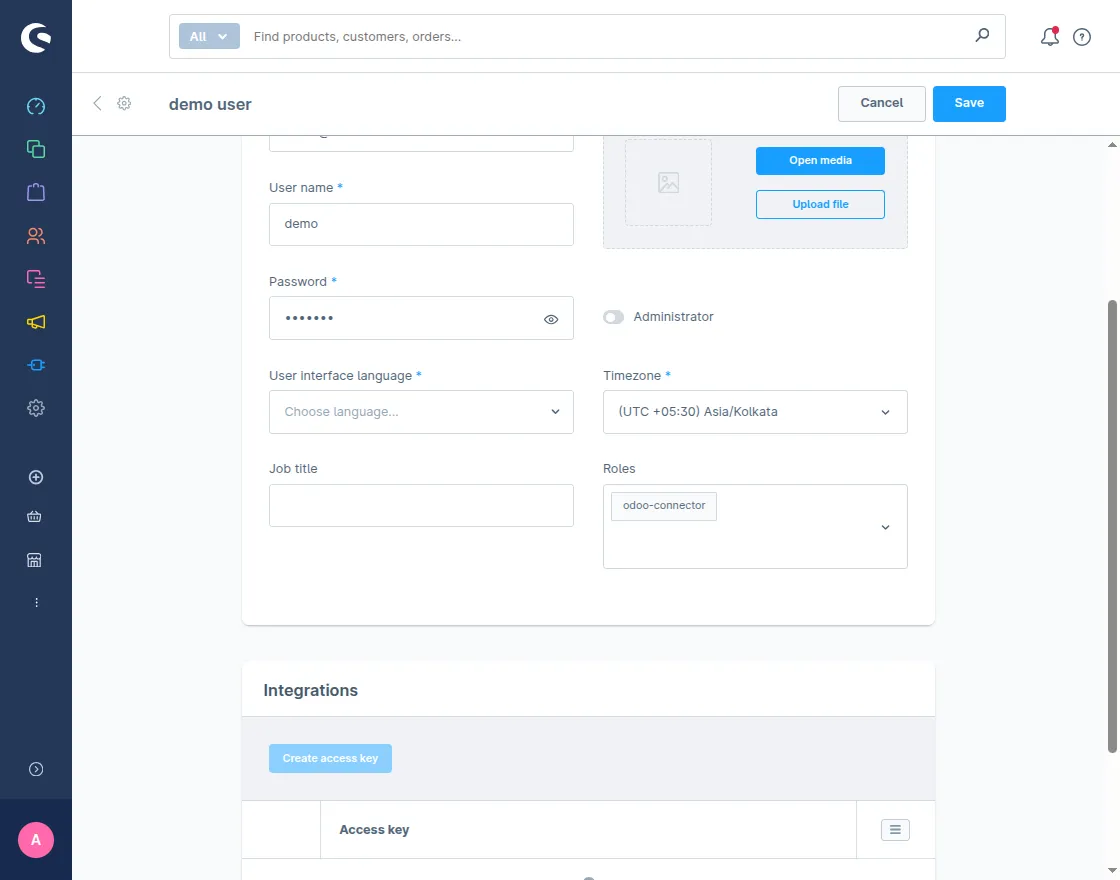
Configuration at Odoo end
4) Navigate to the Shopware Configuration tab and enter the default Tax ID and Currency ID from Shopware
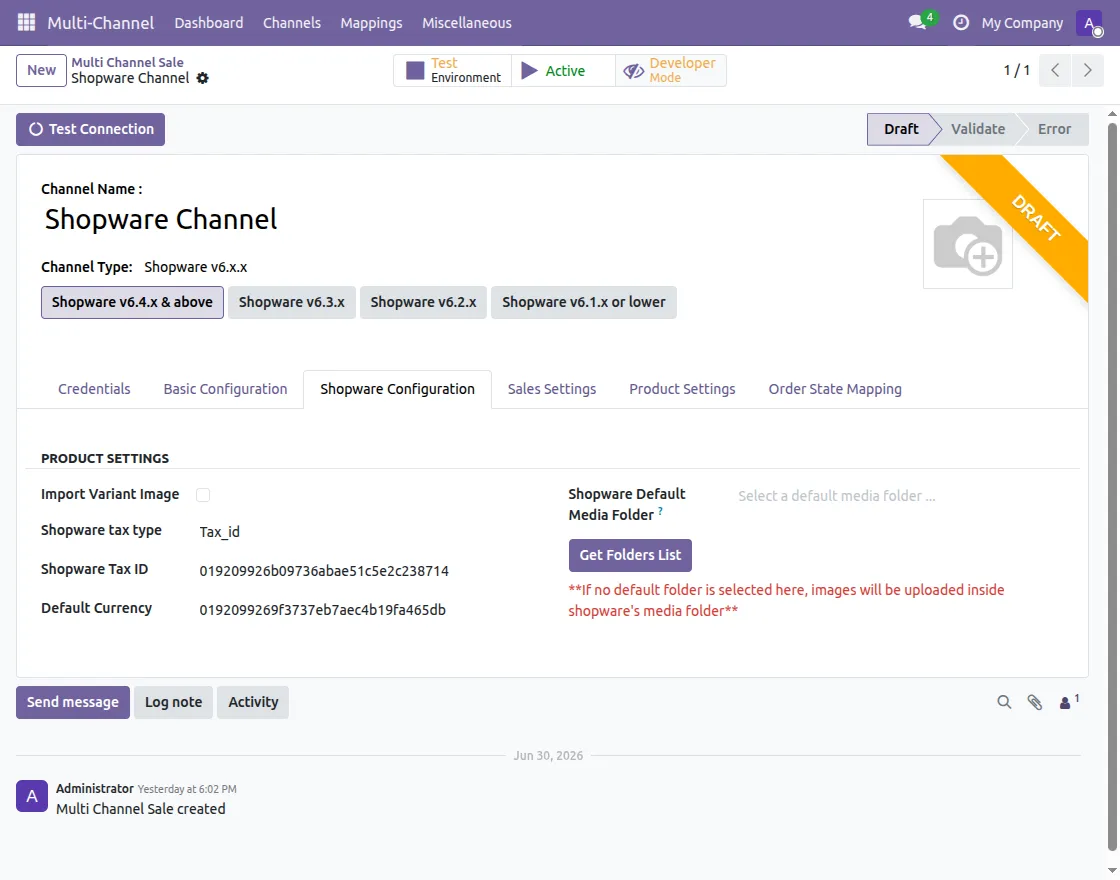
5) Now, save the changes and then click on the ‘Test Connection‘ button
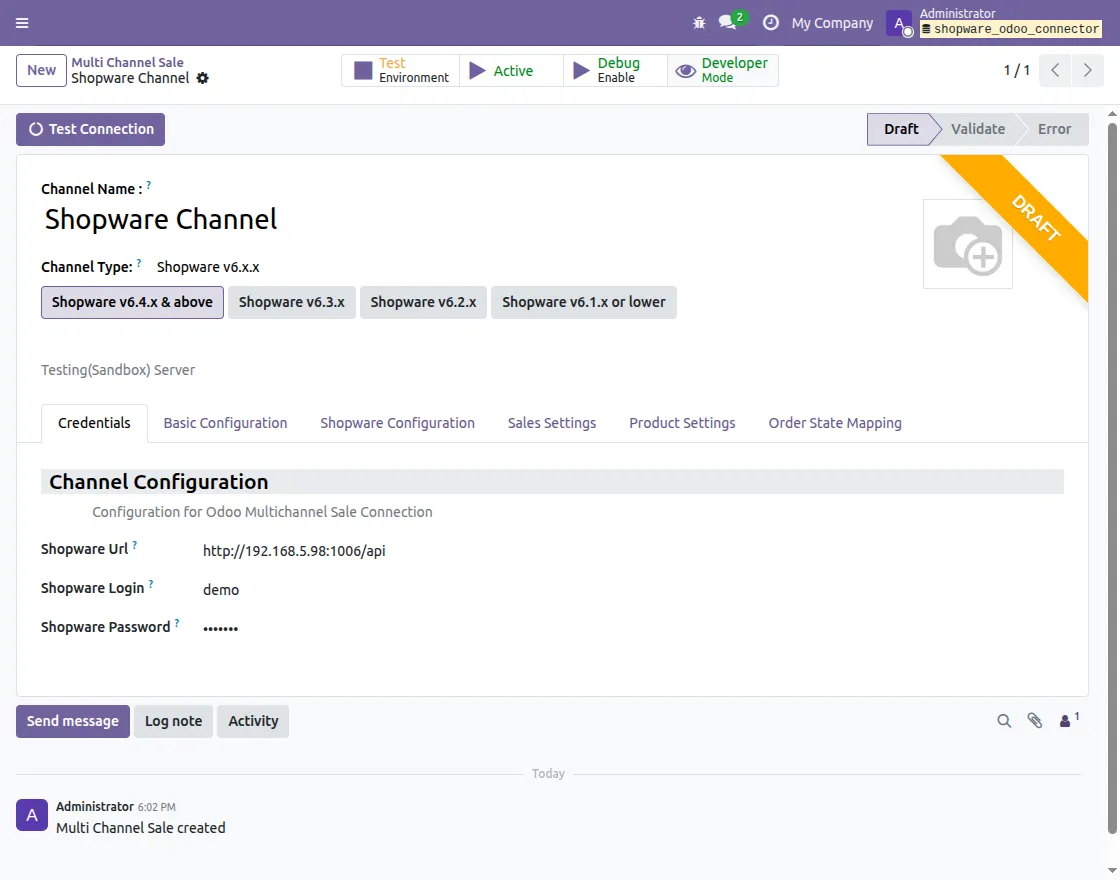
6) Go to the “Configuration” tab and configure the Shopware connection as per your requirements.
Order Status Configuration
You can also map order states from the Odoo configuration; Fill the corresponding Order state of Shopware and Odoo in the Order State table.
You can define states like default state, create an invoice, Set invoice state, and create a shipment.
- You can only set one order state as default at a time (if enabled then the order state will be as mentioned by default).
- If ‘Create Invoice’ is enabled then it generates order invoice at the same time.
- You can set invoice state to open or paid as per your requirement
- If ‘Create Shipment’ is enabled then it creates shipment at the mentioned state.
Base Configuration
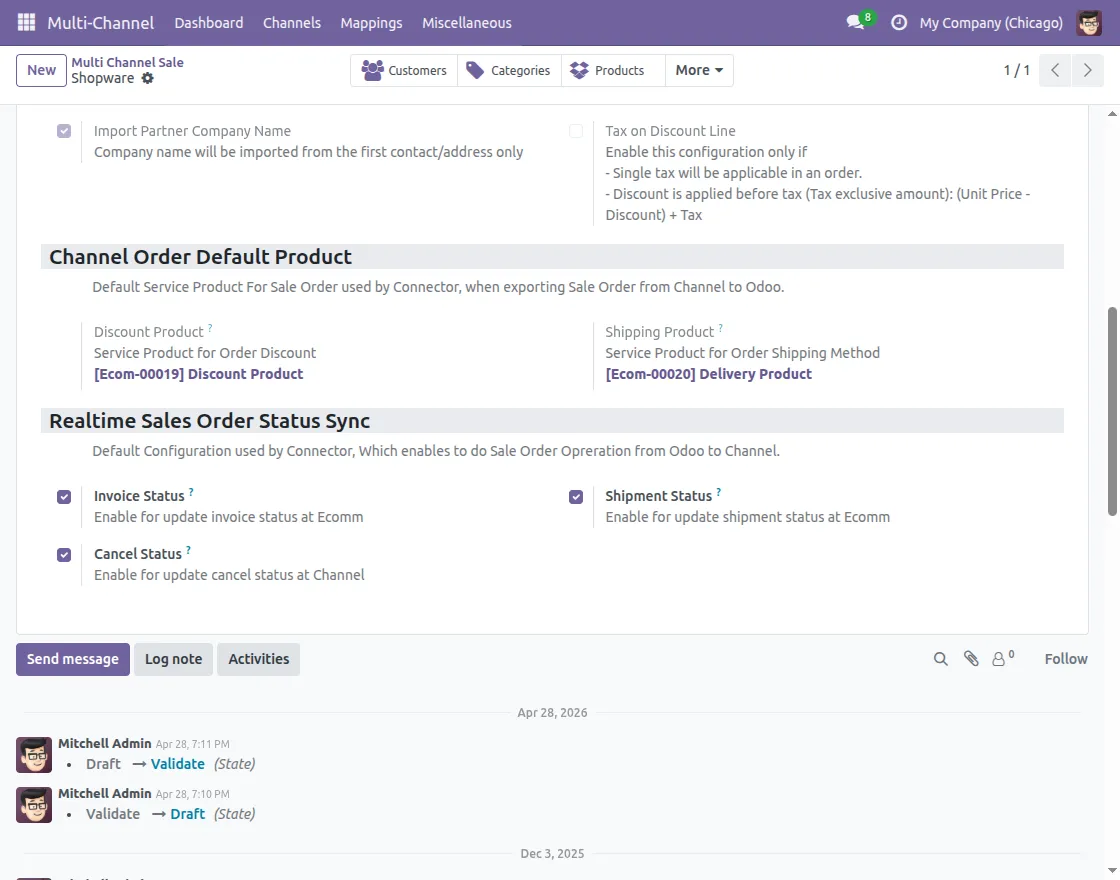
Also, set the default sales team, discount and delivery products for the Shopware orders to manage discount and delivery charges.
Moreover, set the default pricelist for the price of the Shopware products; set the sequence SKU for the Shopware products which do not have SKU.
If you want to set the Shopware products in a default category then you can do so from the same page.
Also, set the default warehouse/location to manage Shopware stock
If you will enable ‘Auto Evaluate Feed’ then all the feeds will be evaluated automatically while importing data.
If you will enable ‘Auto Sync Stock’ then there will be real-time synchronization of stocks from Odoo to Shopware.
You can enable/disable checkbox fields like Cancel, Invoice and Shipment Status to update these order statuses from Odoo to Shopware in real-time.
You can also check or set the last import and update date for orders, products and customers.
Set the total number of records per API hit and set the default color for the theme of Shopware.

Import functions
7) Go to the Shopware Connector Dashboard in Odoo.
From the dashboard, you can also analyze the data via line graph, donut chart, and clickable data cards.
Also, check sync history and feeds from the dashboard.
8) Then, click on the “Import” button to import the data from Shopware;

9) Select the object which you want to import and Filter Type to import the data.
From here, you can import category, customers, products and orders in bulk.

10) Moreover, you can also import products, category, customer and order along with order status to Odoo via Cron scheduler in Odoo.

Export functions
11) Click on the “Export” button to export the data; then, select the object which you want to export.
You can export product templates and categories from Odoo.

12) To export selected products from Odoo to Shopware then navigate to the Products and select the product which you want to export.
Moreover, you can update product data manually from the same form.

13) To export selected Category from Odoo to Shopware then navigate to the Inventory and select the Category which you want to export.
Moreover, you can update Category data manually from the same form.

14) Order status like shipping, invoice and cancel is exported from Odoo to Shopware in real-time.
Need Help?
Hope you find the guide helpful! Please feel free to share your feedback in the comments below.
However, if you still have any issues/queries regarding the module then please raise a ticket at https://webkul.uvdesk.com/en/customer/create-ticket/
For any doubt contact us at [email protected].
Thanks for paying attention!!
Current Product Version - 1.0.2
Supported Framework Version - Odoo V13


I have a possible client that needs to integrate Shopware 5 with Odoo 14.
Is there a possibility to have a demo or discussion of how this product actually works and see if it fits the needs of the client?
Thank you