Using this Opencart Version2 Marketplace Membership module admin can restrict the seller to add the product. The Seller needs to buy any membership plan to become a seller and manage their store.
Admin can set the payment method for membership and also apply membership plan based on “No. Of Products” and “Product Quantity”.
The Seller can buy membership plan by following the basic procedure of buying products. Admin can maintain membership record of each seller.
Since it’s an add-on for the Marketplace Module, so marketplace module must be installed before installing the Opencart Marketplace Membership.
Note:
1. This module supports all templates and themes including the Journal theme.
2. Opencart Marketplace Membership module supports the Multi-Store feature of default Opencart.
Check the backend configuration:
Check the storefront working in the video mentioned-below:
Features of Opencart Version2 Marketplace Membership
- The seller needs to buy any membership plan to become a seller and manage their store.
- Admin can set the amount to pay for any membership plan.
- The admin can set the number of products to be added to the membership plan.
- Admin can set the payment method for membership.
- The admin can select Membership based on No. of product and Product Quantity.
- Admin can select an option to reflect changes in account menu options, seller profile options, products tab options for the old membership as well as the new seller account.
- The admin can maintain the membership record for each seller.
- Admin can add new members, groups, members payment and also edit or delete them.
- Allow using both One-time Membership and Subscription Type membership.
- Marketplace membership overrides the access to marketplace Account menu, Product Tabs, Seller Profile Options and Seller Profile Fields.
- Allows to create mail template using relevant mail keywords.
- Seller commission will be according to the membership plan.
- The admin can set the number of days for membership plan.
- Admin can add remaining membership with the new membership or clear remaining membership.
- The admin can set a cronjob for the expiration of membership plan to their website.
- Add membership group tags to the membership plans.
- The membership partner can request for the quotation of any number of products.
- Using the membership group the admin can give access permissions to the partners and can set commission.
Opencart Marketplace Mobile App
This is a technology based era where everything is simplified even the online shopping. We all know about shopping apps and its advantages-how it reduces and makes our shopping experience hassle proof. So it is very important for all the Store owner to have a shopping app for providing a more convenient way to shop from their online store and now Webkul has launched its new app Opencart Marketplace Mobile App.
Opencart Marketplace Mobile App converts your marketplace store for Opencart into a mobile app. Your customers can easily purchase products on the go. They don’t need to have a laptop or desktop, they can easily explore your store through their smartphones. It will not only benefit the store owner and customer it will benefit the sellers too. Sellers can see their dashboard, order history through the mobile app. So what are you waiting for, you must now have an Opencart Marketplace Mobile App to be a step ahead.
- Seller list.
- The Seller Collection.
- Seller Profile.
- The Seller Dashboard.
- Seller Order History.
- Customers can contact the seller.
- Market Place Sell Page
- Users can review seller.
- Seller Location is mentioned on the map.
Installation Of Opencart Version2 Marketplace Membership
Installation of the Opencart Marketplace Membership module is very simple.After you unzip the main module directory, you will find admin, catalog, system, theme_patch, mp_automation.php and ocmod folders. You just need to move admin, catalog, system, and mp_automation.php folder into the root directory of your Opencart website.
If you are using a custom theme like Journal then we provide Journal theme patch (directory) in the module zip. While installing the module, navigate through Theme Patch->Journal2 folder and you will get “Catalog” folder. Just upload the “Catalog” folder into your Opencart root directory for the proper functioning of the module with the Journal Theme.

Once you upload the file then login to admin and from catalog section go to Extensions> Extension installer and upload the xml file. The xml file can be found on ocmod folder under module directory. Under the ocmod folder you will find wkmembership.ocmod.xml file.
After uploading the XML file, please navigate through Extensions > Modifications. Forthwith, click the Refresh button as visible in the below snapshot.

After that in Admin panel go to System -> Users -> Usergroup and edit ‘Administrator’ and choose select all for both Access and Modify Permission and save it.


After clicking on edit option below page will open. Here Admin can set the Marketplace Membership configuration as per their need.
Setting Cron Job
After the module installation, the store owner or the admin will set up the Cron Job. Just log in to the c panel Account then click on Cron Job.

To find PHP directory path go the terminal and login with your ssh account using command ‘ ssh user@ip/host‘. After that find the PHP path by running this command ‘whereis php‘.

Now copy the usr/bin/php and write it in the command section followed by the Marketplace Membership file path like this.

Module Configuration

Note – Once the module is enabled after that, you can also configure the module by navigating through Marketplace> Membership> Configuration.

Status
Using this field Admin can enable or disable the Marketplace Membership module.
Disable Payment Methods
Using this field admin can disable the payment method which they don’t want the seller to use while purchasing any Membership Plan.
Publish/Unpublish product for Seller
If enabled, the seller will be allowed to publish or un-publish their own products. When the product is published then the customer can buy that product.
Membership Order Complete Status:
Select order status when the order will treate as complete.
After Membership Expiry
What will be done when membership expires of any seller, either disable all product or delete all product is selected by this field.
Membership Expiry
Provide membership expiry feature in membership group or not.
Notify Seller of Expiry
This field is responsible for “Before how many days of membership expiry, the seller will be notified”.
Note: If the admin will not run cronjob on their website then no notification will be sent to the seller befor expiry time.
Allowed Failed Transaction
Enter limit of allowed failed transaction. Like “allowed failed transaction” is set to 2 then after attempting two failed transaction, the customer will unable to do the transaction for membership.
Date Format
Select date format that admin wants to show for the Membership part on the front-end and back-end.
Seller Membership Detail Format
From here, admin can set Membership Group detail format for the seller to display the membership details on the Seller-end. There are five keywords for membership group detail format.
Clear Previous Membership
If enabled then the remaining product, quantity, and listings of previous membership will add to the new or renewed membership else all remaining membership product, quantity, and listings will remove.
Membership Plans on Seller Registration
If this enables, the membership plans will display at seller registration page. After clicking on yes radio button to become a seller.

Store Time Zone
Select time zone of store. Membership module will work according to this time zone.
Cron For Expired Membership:
The admin can run a cronjob to their website for expired products. There is a file named as mp_automation.php in the module System directory. The admin can run this file manually or can set up a cron from cpanel or ssh. After running the cron file, previous expired membership will expire and all products of that membership will disable.
Admin can set mail for various different condition which will occur in Marketplace Membership.
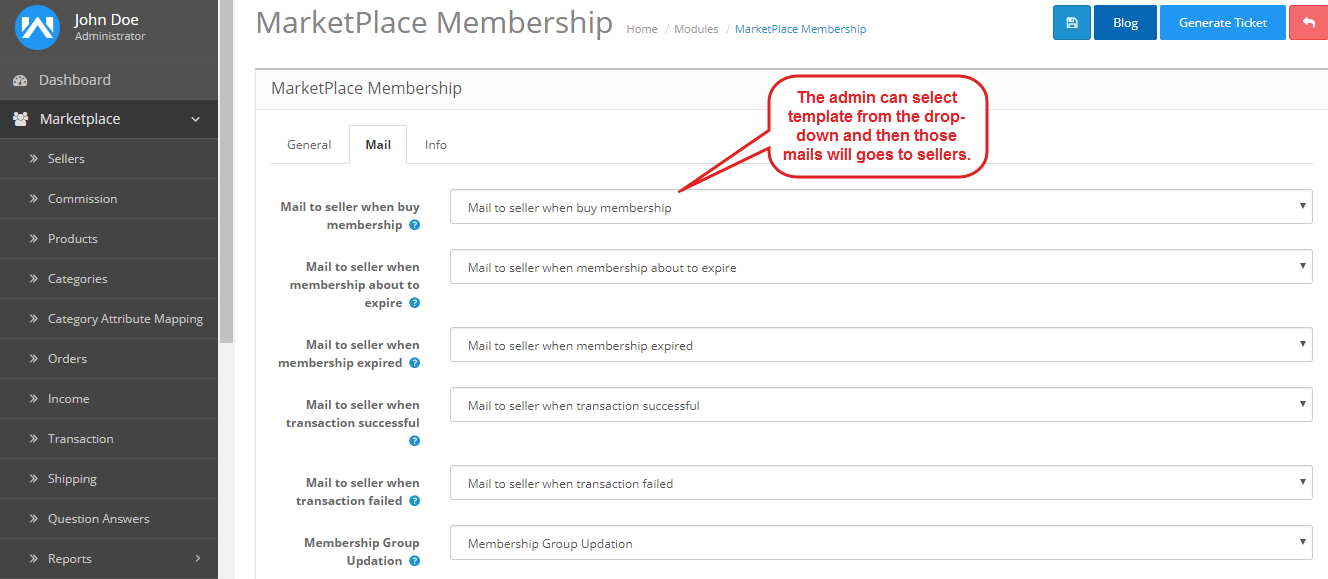
Info
In Info tab, admin can see the list of mail keywords. The Admin can add these mail keywords using marketplace module under mail > mail keywords.

Module Translation
As this Marketplace module supports multiple languages so this section will describe how to make the module work in different languages. Please check this link for language translation
Admin Management
After the successful installation of Opencart Marketplace Membership module you can find four tabs under Marketplace > Membership. Let’s explain each tab one by one.
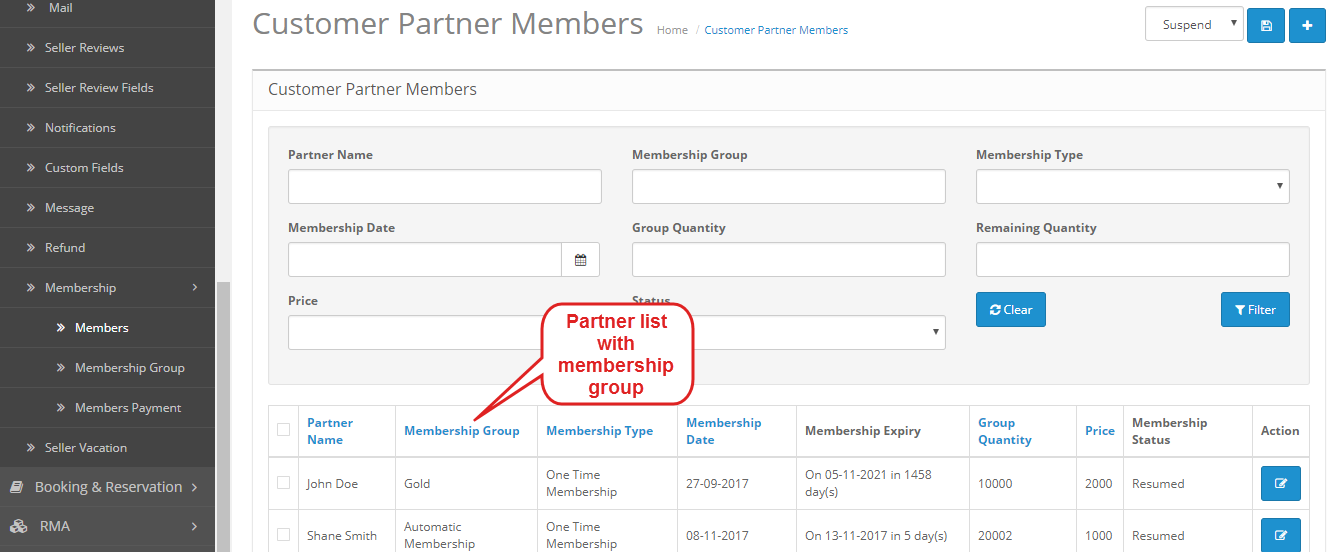
Members
In this field, you can see all membership list and also add new member. The type of membership admin can add from their end as well.

After clicking on the add(+) button below page will open. Here you can enter seller name, membership group and status of membership.

Membership Group
Here you can add new groups and also edit and delete the previously inserted groups.

After the click on Insert button below page will open. Here you can add new group.

General
Under general settings the admin needs to enter the following details –
- Membership Group – Enter the membership name here.
- Membership Type – Select the type, on which the membership will be applied. There are two types as – Product Quantity and Number of Products.
Product Quantity – The membership will be applied on the quantity of every individual product.
Number of Products – The membership will be applied on the total number of product.
- Membership Tag – Select the tag that will be displayed on the membership package.
- Group Image – Upload the group image.
- Expire In – Enter the duration for the expiry of membership group.
- Membership Options – Add the membership purchase option with price.
- Total Price – Enter the price including listing fees.
- Price – Enter the price here.
- Automatic Approve – By selecting the check box the membership group will approve automatically.
- Membership Group Type – Select the membership group type as One Time Membership or Subscripton Type Membership.
Subscription Type Membership
If the admin selects the subscription type membership then the following options will appear as shown in the screenshot.

Trial Period
If “Trial Period” is enabled then seller will get to try the membership before they purchase the Membership.
No. of trial
Here, the admin will enter number of trial available for the seller to try the membership and its feature before they purchase it.
Customer Group
From the drop-down, the admin can select for which Customer Group can avail this Membership.
Duration, Cycle & Frequency
Recurring amounts are calculated by the frequency and cycles. For example if you use a frequency of “week” and a cycle of “2”, then the user will be billed every 2 weeks. The duration is the number of times the user will make a payment, set this to 0 if you want payments until they are canceled.
If the Membership Type is Subscription Type, then the payment method which you will use should allow recurring payment. You have to call this code at the time of recurring payment call back function. Please check this link which will give you idea of setting Subscription Type Membership Group Through any recurring payment supporting payment method. If you want, we can do the setting of Subscription Type Membership Group Through your payment method and for that you just have to raise a ticket at HelpDesk Support.
Access Permission
- Reflects in Seller Account – By enabling this, the changes will get reflected to seller made by admin.
The selected option for the following tabs (account menu, product tabs, select profile options, select order options, and seller profile) will be visible to the sellers that belongs to this membership group.

Commission
Group Commission – Enter the category wise commission for the membership group.
Default Group Commission – This commission will work for the rest of the categories.

Allowed Quantities/Products
Under this tab the admin can define the following for the Membership partners –
- Quantity/Price – Enter the category, quantity and price for the entered category quantity.
- Default No. of Products/Price – Enter the default quantity and price here that will be applied to the remaining quantity.
- No. of Listing – Define the number listing for the categories and its quantity.
- Default No. of Listing – The default number listing will work for the remaining categories.
- Listing Duration – Enter the listing duration for the categories in days.
- Default Listing Duration – The default listing duration in days wil work for the remaining categories.
- Listing Fee – Enter the listing fees for the categories.
- Default Listing Fee – Default listing fees will work for the remaining categories.

Members Payment
With the help of members payment button the admin can view the payment made by the customers who have taken any kind of membership. Also, the admin can even delete the payment records of any partner.

Membership Group Tag
Using the Membership Group Tag button the admin will be able to view the list of all the created tags and can add tags to the partner membership.

By clicking on the add button the admin will get the options for adding a new tag.

Now the admin needs to enter the following details:
- Tag Name – Enter the tag name.
- Tag Position – Select the position of the tag on the membership product image.
- Height – Enter the height of the tage here.
- Width – Enter the width here.
- Image – Here the admin needs to upload the tag image.
Membership Group Quotation
Using the Membership Group Quotation button the admin can view the list of all the quotations.

The admin can view the detail of any quotaions and can approve/disapprove its request.

In the front-end the seller can click on Quote for Membership to view all the requested quotations.

Even the seller can click on the add button to request for a new quotation.

Front-End
Seller can see Add Membership field under marketplace section. Here seller can see the seller membership.

When seller will click on “View Membership Details” then a pop-up will appear using that the seller can view the entire details of that membership.

If Membership Type is selected as “No. of Products” from backend. Then after exceeding the product limit, warning message will display. Warning message will appear if you don’t have any membership or your membership has been expired.

If Membership Type is selected as “Product Quantity” from backend. Then you can not add the product until, you have sufficient quantity. Otherwise, message will display.

If you don’t have sufficient quantity then you can buy membership plan by following basic procedure of buying products. After adding the membership plan into the cart, you can proceed to checkout.


Note: After placing the order when the admin will set the status of the order as they have configured in the configuration then the seller can see the updated membership plan and details in their account.

The seller can access only that options which is assigned in membership group. Like there are two partners with Gold and Platinum membership group respectively.
Gold Membership group sellers can access only add products and Profile option in Account Menu whereas Platinum membership group can access Add Product, Product List, Order History, and Ask To Admin options. Refer to the screenshot for the same.


Sellers will able to do work with membership plan according to their accessible options.


Gold membership group has 2 selected option (store and collection) in seller profile option field. So only store and collection option are visible in the front end.


Gold membership group has only “option, discount, special” options so only these options will visible in frontend.

Platinum membership group has “Attribute and discount” option in product tab.

That’s all for the Opencart Marketplace Membership module, still have any issue feel free to add a ticket and let us know your views at HelpDesk Support to make the module better.
Current Product Version - 3.4.1.0
Supported Framework Version - 2.x.x.x, 3.x.x.x

2 comments
Kindly mail us at [email protected] with a snapshot of the issue that you are facing. So that our team can resolve the same asap.
Thanks and Regards,
Webkul Team.