OpenCart Product Return RMA module enables the customer with product return. This module allows you to organize a system for customers to request a return without any effort.
Even, with the help of this module, the customer can return the products within the admin-specified time limit.
Moreover, wanna know more about how Product Return Merchandise Authorization works? Check out the case study – RMA Case Study
Opencart Product Return RMA is also available as Marketplace RMA.
Check the overview of the plugin in the video mentioned-below –
Opencart Product Return RMA Features
- Fully Admin handled module.
- Guest Customers can generate Return too.
- Buyer and Admin can communicate at Store end.
- Store credit and store voucher for returns.
- Return History with Filters and Pagination.
- Admin can generate returns on behalf of customers.
- Return Policy Page.
- Dynamic order selection with various option.
- The customer can upload Return images.
- Print Return details and shipping label easily.
- Admin can set Order status for Return.
- Admin can manage Return status as well as Reasons.
- Using Return Quantity, Admin will return Return quantity to their store.
- Admin can add product with return option or not.
- Admin can define which type of return apply (Refund, Replace, Repair).
- Store owner can define which reason can be accepted on particular product.
- Returns details are displayed on the product page as per configuration.
- Product Pick-up address (Customer can select the address for product pickup while creating return).
- Select return type (Refund, Replace, Repair) while creating return.
Installation
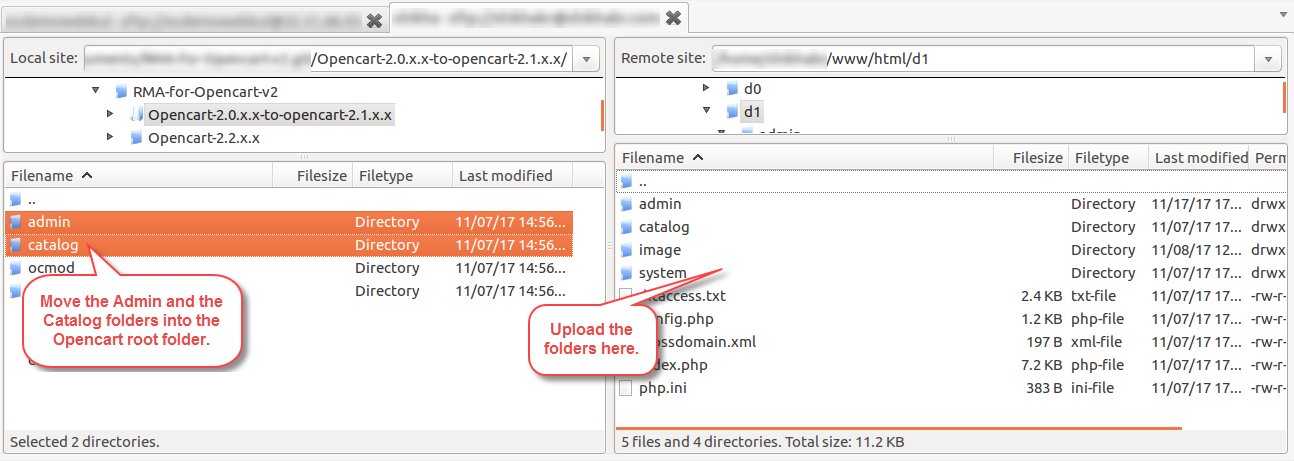
Now, the installation of the Opencart module is very simple. You just need to move the admin and catalog folders into the Opencart root folder.
Forthwith, navigate to Extensions>Extension Installer. Click the Upload button and browse the XML file, this file is in the ocmod folder. Please select the correct ocmod folder according to the Opencart version installed on your system.

Afterward uploading the file navigate to Extensions>Modification and click on Refresh button.

Thereafter that, in the Admin panel go to System->Users->User Groups and edit ‘Administrator’, and choose to select all for both Access and Modify Permission and save it.

After that under Extension > Module install the Return System module as shown below in the snapshot.

Admin Configuration
Subsequently installing the extension the admin will have the Mange Returns menu option along with the Module Configuration option and 3 sub-menu options –
- Module Configuration
- Manage Return Status
- Manage Return Reason
- Mapped Product
- Manage Returns

Now, to configure the module the admin will navigate to Returns>Module Configuration. Here, the admin will configure the module.

Now, here the admin will set the configuration for the module –
- Return Status
Now, set the module status as Enabled or Disabled as required. - Stores – Select the store where the configuration should be applicable to.
- Add Return Time
Then admin can enter the return time limit for the customers. The customer will be able to generate the return for any order within the set time limit added by the admin. Use the number 0 or leave the field blank for an unlimited time limit for the return. - Order Status for Return
The customers can place the return for only those status of orders that are selected here. - Return Order Upload Image Limit – Set the limit for the return order upload image.
- Allowed Image Extension
Enter the Image extensions separated by a comma that can be used by the customers for uploading an image. - Allowed File/Image Size
The size entered here will be allowed for the customers while uploading a File/Image. - Return Policy
Here the admin can select the policies from the information that will be displayed to the customer at the time of Add Return. - Voucher Theme – Select the voucher theme to add the content as required.
- Return Address
The address entered here is visible on the Return Shipping label. This will be your return address for the product.
Lastly, click to Save button in the top right-hand corner to save the configuration.
Manage Return(s)
Under this section, the admin can manage, filter, delete and view the returns very easily. The admin can also add new return on behalf of the customer. To manage a return the admin will tap the Edit button.

After clicking on the Edit button, the Return Details will be visible as shown below in the snapshot.

Tapping the Print Invoice button will display as shown below.

**Note:
- Using Return Quantity, the admin will return the quantity(return product) to their store.
The admin can see all details related to return which includes –
Products:
Under this section, the admin will find the product name with the return quantity and reason.

Pick Up Address:
The admin can view the pick-up address added by the customer to pick the product from the mentioned address.

Conversation:
Now in this section, the admin can find all the message conversations related to this return. The admin can make a reply to the selected return order, upload images along with the message, and can also change the return status.
Here, the admin can also select the return status for the requested return by the customer. The admin can also send the customers messages along with images of the product.

Return Images:
Here, the admin will find all the images uploaded by the customer related to the return.

Shipping Label:
The admin can upload the Shipping Label. Using this label, there is no need to give shipping charge during product return or order return.

Store Payment:
Moreover in this section, the admin can provide the customer with the store credit(can be used up at the time of making a purchase) or can provide him with the voucher(can be used up at the time of making a purchase).

For example, if the customer has opted for the return then in this case the admin for the respective return request can see – Add Store credit and Add Voucher option under the Store Payment tab.

After tapping the add voucher option, the return amount gift voucher will be emailed to the customer and a success message for the same is displayed to the admin.

The customer received the voucher gift card for the respective amount on their registered email address.

In case the admin provides store credits then after providing the credits the admin can see a success message for the same. 
Apart from that, the customer can see the details of the same in their account panel transaction section.

Admin Can generate RMA For The Customers
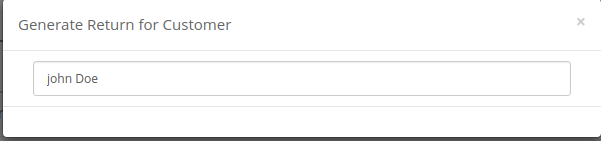
Admin can generate Returns on behalf of customers, by clicking on Add Return For Customer.

Furthermore, a pop-up will appear in which the admin needs to enter the name of the Customer for whom return needs to be generated.
Afterward entering the name of the customer admin would be redirected towards New Return Information Page.

- Order- The ID of the product order for which return is generated.
- Pick-up Address- Afterward, the address from where the product is going to be picked up.
- Item Ordered- Then the name of the product for which the return is generated. Here, the admin gets the Product Name, Model number, and Quantity ordered.Admin needs to choose the reason for return and the quantity to return.
- Image(s) of product- Now, the admin can even attach the images of the product for which a return is generated.
- Additional Information- Then, the admin can enter any note with regard to the return.
- Please add consignment no. if you are returning product(s)- The number of the consignment for which the return is being generated.
Manage Return Status
The admin can manage the return status by clicking the Add button as shown below in the snapshot. The admin can also alter/edit any of the previously created return statuses.

After clicking on Edit option below page will be open wherein the admin can change the name of the return status, color, and enable or disable the return status as shown below in the snapshot.

Additionally, after clicking the option to “Set Default Status of New Return“, you can assign any of the three statuses – Default, Solve and Cancel for the respective return statuses as per the requirement.

Furthermore, there are three statuses for the return – Default, Solve, and Cancel. Now, the admin can assign accordingly these three statuses to the respective return statuses that have been created by the admin.
Moreover, in the above example, the admin has set the Default status for the Pending Return Status, Cancel status for the Return Cancelled and likewise.
Now, whenever a return request is generated by the customer, the default status for the return will be set as Pending, and similarly when the Return is canceled the default status for the return will be set as Return Canceled.
Manage Return Reason
Moreover, there are several reasons which will be used by the customer at the time of the Return generation. The admin can Add, Update and Delete the Return Reasons as required.

Afterward clicking on Add option, below page will open where the admin can add a new reason.

Subsequently clicking on Edit option below page will open. Where the admin can edit the reason and can save it or can enable/disable the reason.

Mapped Product
Even the admin can map the products for which he has enabled the return option. There are two ways to enable the return option for a product.
- Mapped Product Return
- Return System under the Product
Return Mapped Product
Moreover, the admin can directly add the products to whom he wants to enable the return feature along with the return type and return reason information.

Furthermore, when the admin clicks on the Add option he can view the option to enable the return option for the selected products.

Product Name– The admin can select the products to which he wants to enable the return option.
Status– Enable/Disable the return option for the selected products
Return Type– Then, select the return type for the products
Reason of Return – Select the reason for the return of the product
Return System Under the Product
Forthwith, the admin will navigate to Catalog>Products and then can edit any product. Moreover, under the product the admin can view the return system from where he can enable the return option for the product.

Front End
Additionally, this module provides the option for the customers to view the return reasons for the product if the admin has enabled the return option for the product.

Moreover, this module provides two option for Return at the front end, first with account module and another with customer service.
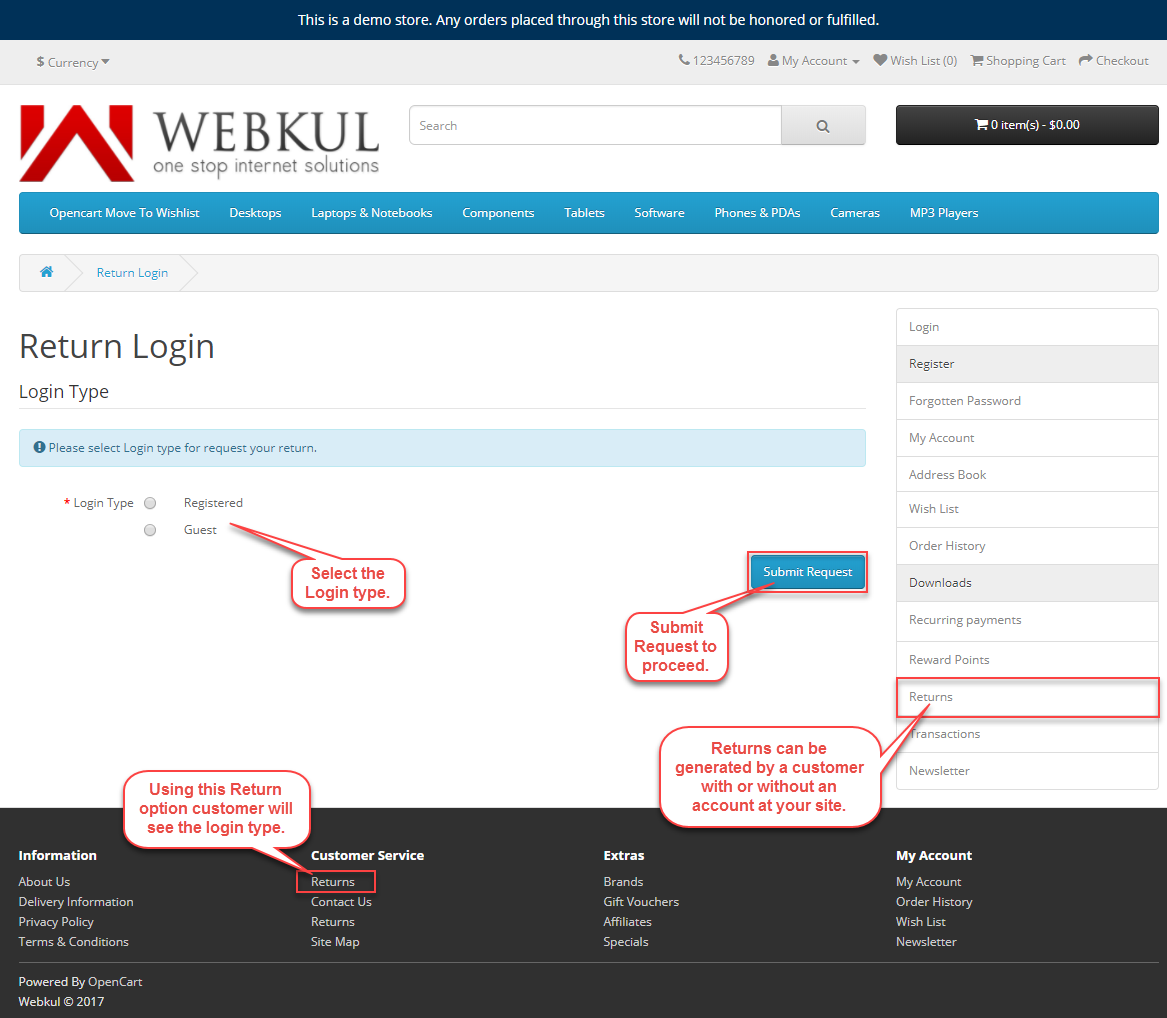
Afterward selecting a login type, the customer will redirect to the next page depends on their selection. For a Registered customer, the redirect is to the login page and in the case of a Guest, they will redirect to the below page.
Guest Customer Login:

Registered customer login:
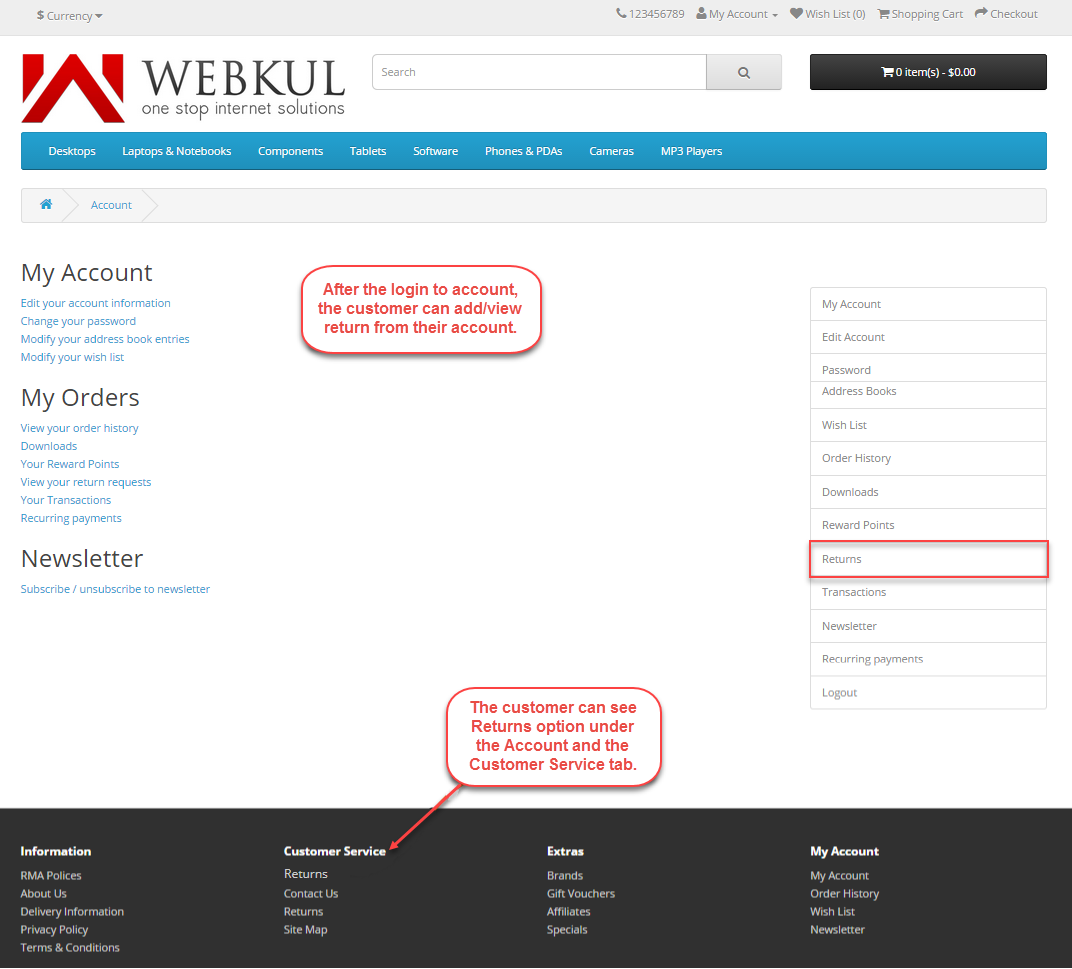
Thereafter customer can see their return requests and can add new ones by tapping the “Request for Returns” option.
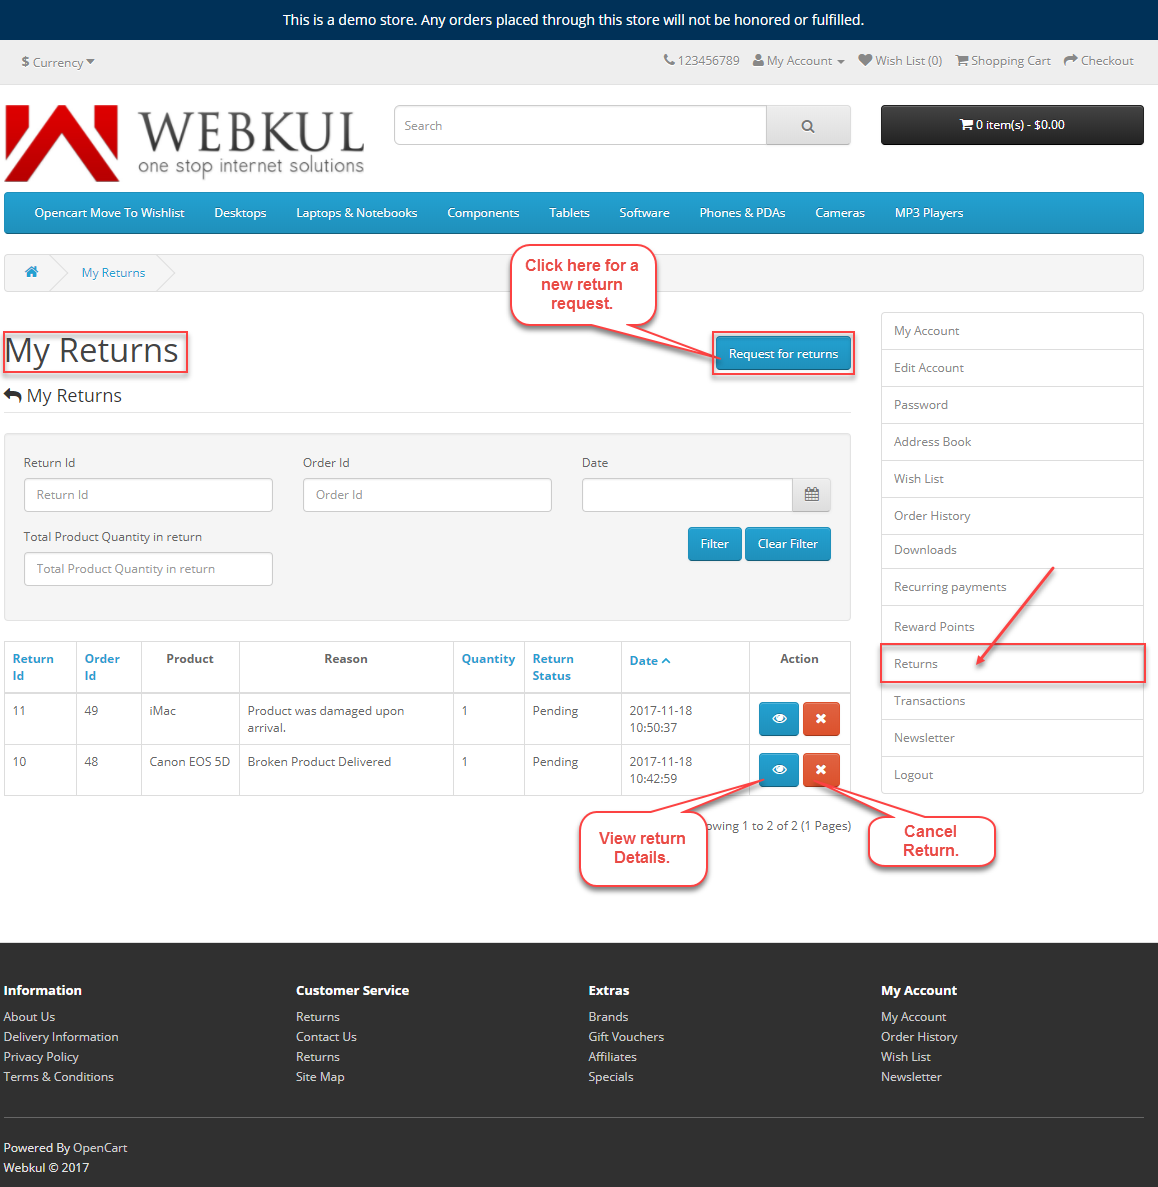
Furthermore, click on “Request for Returns“, the customer can add a new return.

Also, the customer will also get notified if the selected order doesn’t have any product which has the return options enabled on them. Furthermore, the customer can also select the pickup address from where the delivery guy can pick up the return order.

Afterward, with correct details, a return request will be generated and an e-mail will be sent to the customer for the same.

Even, the customer can see the complete detail of the return by clicking the View Detail option under the Returns section.

Furthermore, it enables printing a shipping label using the print shipping label option.

Moreover, the customer can print Return details.

Therefore, the customer can send messages to the admin by mail.

Hence that’s all about the Opencart Product Return RMA module.
Furthermore, if you still have any issues feel free to add a ticket. Also, let us know your views to make the module better https://webkul.uvdesk.com/.
Current Product Version - 4.0.0.1
Supported Framework Version - 3.x.x.x

Be the first to comment.