Magento 2 Seller Membership Marketplace Add-on will allow the admin to restrict the seller in two ways-
a) Admin can restrict sellers to pay a fee as fixed or percent for enabling each product that will be added from their account.
b) Admin can restrict sellers to pay for becoming a seller and can also restrict them to add a limited number of products. However, the admin can also set sellers’ membership expiration time.
Note: Marketplace Membership For the Magento 2 module is an add-on of Marketplace Module. To use this module you must have installed Magento 2 Marketplace Extension.
Check the plugin working at the storefront and on the admin’s end in the video mentioned below –
Features
- A seller needs to pay the admin a set fee to enable each of the products under his account.
- The fee amount could be set as fixed or precent by admin.
- Admin can apply the check for the vendor on -Time and Number Of Products, Only Number Of Product & Only Time.
- Admin can set the number of months for the expire time.
- PayPal API supported for membership and product upfront payment.
- Sellers can view their payment details in their account.
- Now Seller receives transaction emails.
- Admin has the option to disable the module from module settings.
- A seller can see his pending transactions.
- Admin can see seller’s transactions in the backend.
- A column ‘payment status’ is added in marketplace product grid at the backend.
- The Multi Vendor Marketplace module supports – Multi-Site, Multi-currency, and Multi Store functionality.
Installation of Seller Membership Marketplace
Customers will get a zip folder and they have to extract the contents of this zip folder on their system. The extracted folder has an src folder, inside the src folder you have the app folder.
You need to transfer this app folder into the Adobe Commerce root directory on the server as shown below.

After the successful installation, you have to run these commands in the Adobe Commerce Cloud root directory.
First command – php bin/magento setup:upgrade
Second Command – php bin/magento setup:di:compile

Third Command – php bin/magento setup:static-content:deploy

After running the commands, you have to flush the cache from Adobe Commerce admin panel by navigating through->System->Cache management as shown below.

Multi-Lingual Configuration
For Multilingual support, please navigate to Store>Configuration>General >Locale Options. And select your desired language from the Locale option.
Language Translation
If you need to do the module translation, please navigate to the following path in your system app/code/Webkul/Mpmembership/i18n.
Open the file named en_US.CSV for editing as shown in the below screenshot.

Once you have opened the file for editing. Replace the words after the†comma(,)†on the right with your translated words.

After editing and translating the CSV file, you need to save the translated file name according to your region language and country code such as – de_DE.CSV. Then upload the translated file to the same folder from where you have obtained it. Now your module translation is complete.

How to create a business PayPal account?
In order to use this module, the admin must have a business PayPal account ID.
Here are some steps on how to create the business PayPal account.
So, for this firstly open the paypal.com, and there click on “SignUp” option.

After this on the next screen, the admin will choose the desired account type and proceed to the next step, by clicking on the “next” option.
 Now here you need to enter the email id you’ll use to sign up or log in with & click on “Continue“.

Then on the next screen, to complete the SignUp process enter the password and click on “Continue” to proceed further.

Here brief your profile and business details, then after reading the policy of PayPal select the checkbox and click on “Agree and continue” button. 
After this step, on next you need to describe your business type, services offered, estimated monthly sales & website if any. As shown in the snapshot.

At last SSN details and home address details of the account holder. As shown in the below screenshot.

By clicking on submit button after mentioning brief details about the account holder (Admin).
The account will get successfully generated. Now in order to configure this account with the module, the admin firstly needs to verify the account Id and then enter it into a field ( Admin PayPal Account Id ) during the module configuration.

Configuration & Workflow
After the successful installation of Marketplace Membership, you will see the configuration panel under Stores-> Configuration->Marketplace->Marketplace Seller Membership.
Here the admin can set the Applied fee for the Product as well as the Seller/Vendor.
1. Fee Applied For – Product
If Admin selects “Product” in “Fee Applied For” field then configuration settings will be visible as shown below in the snapshot. The vendors can add products to their account, but to enable products seller needs to pay a fee for each product that has been set by the admin. The admin can set the type of fee as fixed or percent.

If “Product” is selected in “Fee Applied For“, then the seller has to pay the fee as Fixed or Percentage for enabling each product added from their account.
After adding a product, the seller will find the added product listed under – Pay Seller Fee (Seller Fee Payment Panel).
Here all the products that the seller has added to his account will be displayed.
Hence, to enable the products, the seller can check the products and then click on the Pay button to pay the fee for adding each product as shown below.

After clicking on Pay button (as shown in above snapshot), the user will be redirected to the PayPal payment page for making Feepay payment.
Here, enter your Username and the Password for PayPal and tap the LogIn button after that to proceed after that.
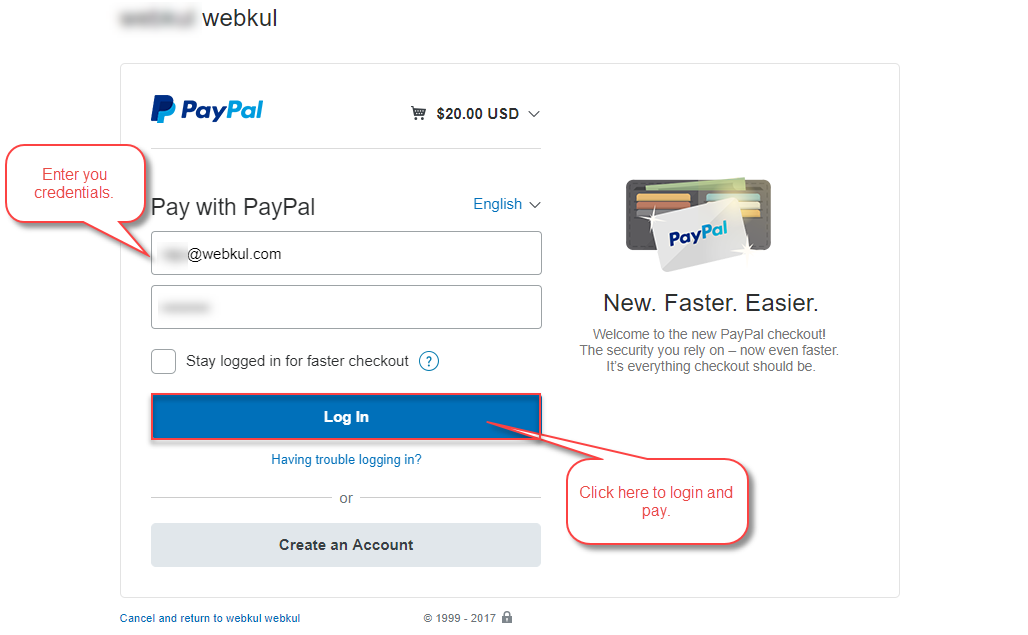
After login, the vendor will now tap the “Pay Now” to proceed and make the payment as shown below in the snapshot.

After successful payment at the PayPal, you can see the details of the payment made as shown below.

Now, after successful payment at PayPal you can find the details of the transaction under -> Pay Seller Fee menu item under the vendor account as shown below.

2. Fee Applied For – Vendors
For the Vendors, admin can apply the check on – Time and Number Of Products, Only Number Of Product & Only Time.
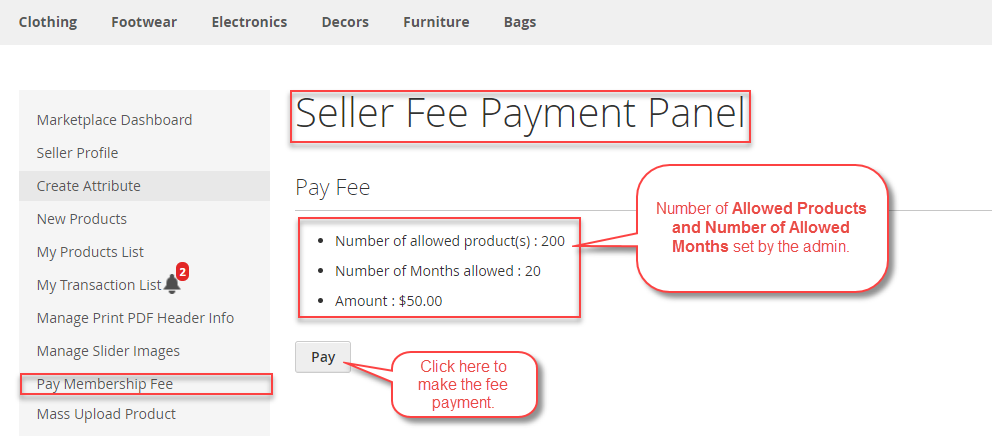
a).Time and Number of Products
When admin selects “Vendor” in “Fee Applied For” section and applies the check on “Time and Number of Products“.
Henceforth, it will allow the seller to only upload the set number of products for the set number of months that have been set by the admin.
So, as per the screenshot below, it will allow the vendor to upload 200 products. That are valid up to 20 months(Expiry Time) with a fee of 50.

Thus, the seller will go to the Pay Seller Fee menu item to pay the amount The payment will be done for the allowed number of products and months that are set by the admin.
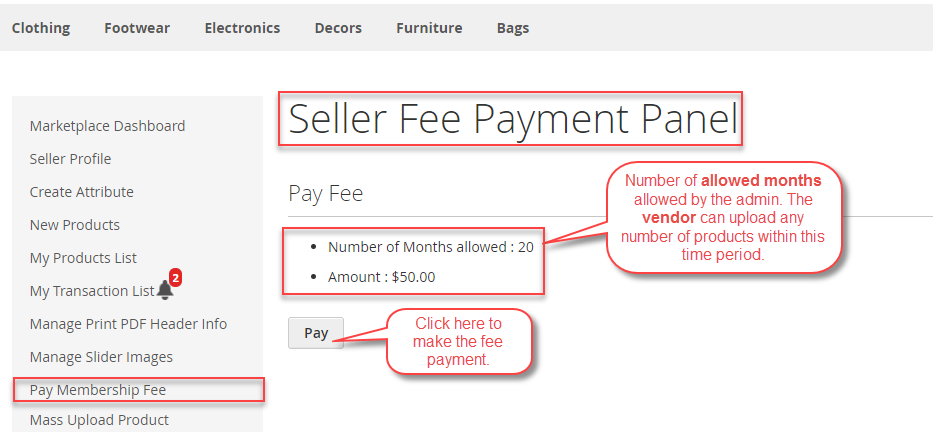
b). Only Time
When the admin selects “Vendor” in “Fee Applied For” section and applies the check on “Only Time“.
Thus, allowing the sellers to upload any number of products for the set number of months that are set by the admin.
So, the seller can upload an unlimited number of products within the set months in this condition.

The Vendor will navigate to the Pay Seller Fee menu item.
Wherein, one can click the Pay button to pay the Fee for the Allowed Number of Months.
c). Only Number Of Products
When admin selects “Vendor” in “Fee Applied For” section and applies the check on “Only Number Of Products“.
Then it will allow the seller to upload only the set number of products, that are set by the admin.
However, the product upload duration(months) will be unlimited in this condition.

The vendor will navigate to the Pay Seller Fee menu item and click the Pay button to pay the Fee for the Allowed Number of Products as shown below.

After clicking on Pay button, the user will be redirected to the PayPal payment page for doing Feepay payment as shown below.

So, after login, the vendor will now tap the “Pay Now” to proceed and make the payment as shown below in the snapshot. Hence, after successful payment at the PayPal, you can see the details of the payment made as shown below.

After making the payment, the seller will be able to see the transaction under menu item Pay Seller Fee -> Seller Fee Transaction List as shown below.

The seller can add the products up to the set number of months.
So, a message will be displayed with the left amount of products that can be added with the set expiry date and time.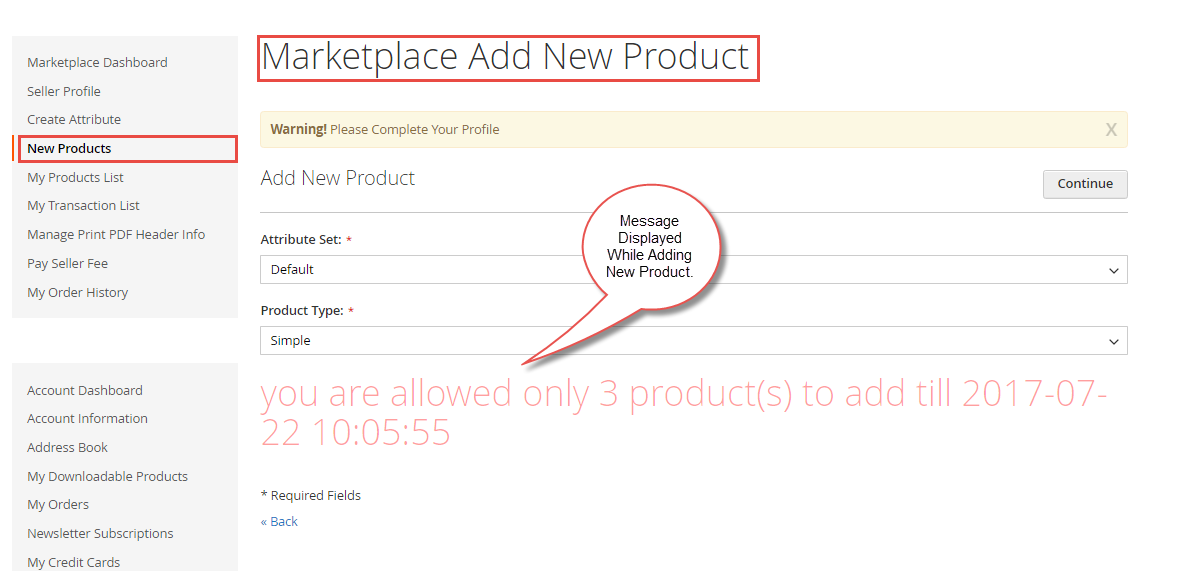
View Membership Seller Transactions
The admin can view all the transactions made by the seller under this section. The admin could navigate to this section by-
Magento Marketplace>View Membership Seller Transactions.

View Membership Product Transactions
Here, in this section, the admin could see the transaction details for the addition of new products. The admin could navigate through
Adobe Commerce Cloud Marketplace>View Membership Product Transactions.

That was all about the Magento 2 Seller Membership Marketplace. Moreover, if you have any doubts or queries regarding the extension get back to us at [email protected] or create a ticket at our HelpDesk system.
Current Product Version - 5.0.2
Supported Framework Version - Magento 2.0.x, 2.1.x, 2.2.x,2.3.x, 2.4.x

2 comments
Thanks for reaching back!
For becoming a seller there is no need to pay any amount. After registering(choosing as a seller) at the web store frontend, the user will have his seller account created.
The admin can restrict sellers to pay a fee as fixed or percent for enabling each product that will be added from their account.
Also, if the admin has set the option to approve a seller first, then the admin needs to approve the seller so that he can access his marketplace account menu options.
Hope this helps!
If you still have any doubts please send us a mail at [email protected] so that we can assist you in a better way.