Magento 2 Marketplace UPS Shipping add-on will provide UPS(United Parcel Service) shipping method for shipping the seller products.
Moreover, UPS is the largest shipment/logistics company in the world and now it is with the Marketplace.
Sellers can also set their UPS details to manage the shipment of their orders. It calculates the cost for UPS Shipping Methods on the basis of UPS configuration details entered by the admin.
The seller needs to put all the shipping details and the cost will be calculated accordingly for the seller products.
Note:
- Magento 2 Marketplace UPS Shipping module is an add-on to Magento 2 Marketplace Module.
- To use this module you must have installed the first Magento 2 Marketplace Extension.
Features Of Magento 2 Marketplace UPS Shipping
- The admin can set enable or disable the Marketplace UPS Shipping method.
- Set the Marketplace UPS shipping method name that will be shown on the front end.
- The admin can define the allowed methods and pickup methods.
- Set the UPS type and destination type.
- Admin can allow sellers to save his/her UPS Credentials.
- UPS shipping rate will be calculated from the seller’s address.
- The seller can download UPS Shipment Label in PDF format.
- Provides a dynamic shipping method for freight calculation.
- The seller needs to save his origin address to use this shipping method.
Installation
The installation is quite simple just like the standard Magento 2 extensions.
#Download Module
Firstly, you need to log in to the Webkul Store, go to My Account>My Purchased Products section, verify, and then download and extract the contents of this zip folder on the system.
#Upload Folder
Once the module zip extracts, follow path src>app and then copy the app folder into the Magento 2 root directory on the server as shown below:

# Run Commands
You need to run the following commands:
php bin/magento setup:upgrade
php bin/magento setup:di:compile
php bin/magento setup:static-content:deploy
php bin/magento indexer:reindex
php bin/magento cache:flush
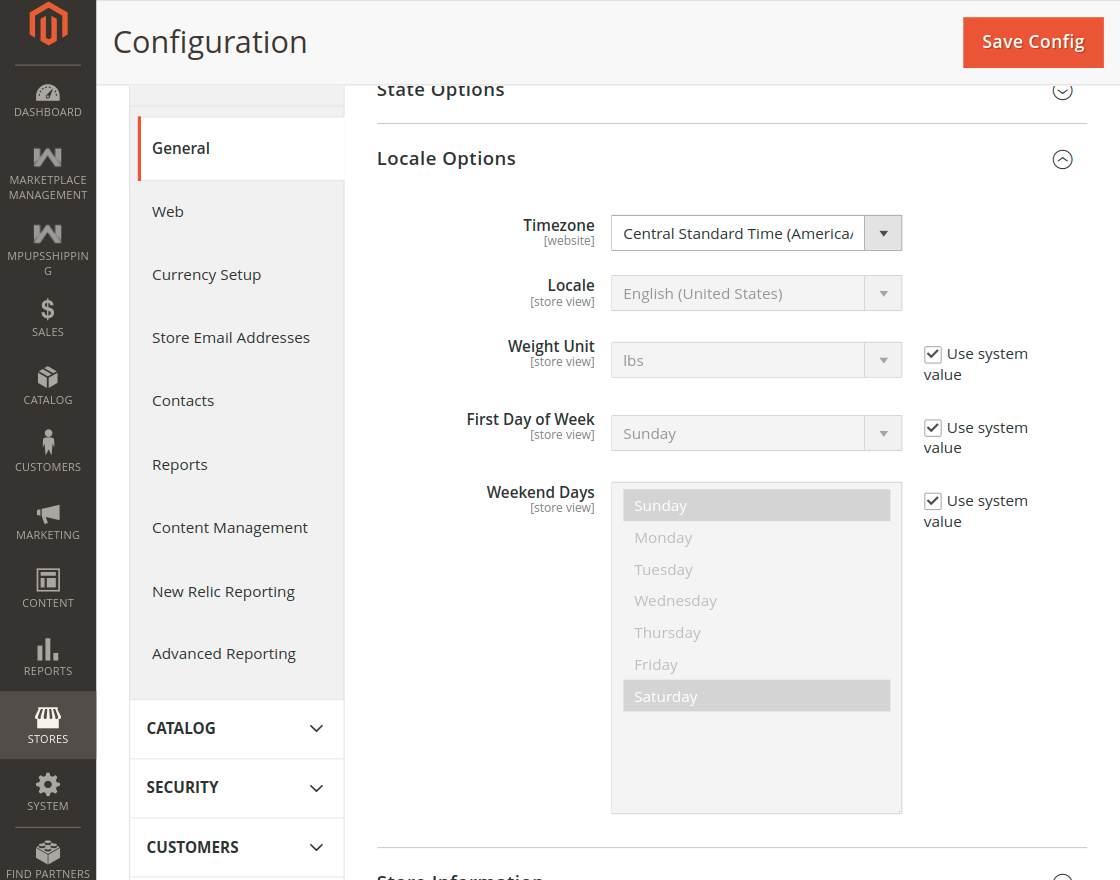
For the multilingual support. Firstly the admin will navigate through Store->Configuration->General ->Locale Options and select the locale as German
(the language into which the admin wants to translate his store content).
Magento 2 Marketplace UPS Shipping Translation
If a user wants to translate their module from English to German then they need to follow the path app/code/Webkul/MpUPSShipping/i18n in their unzipped folder
And will get a CSV file with the name “en_US.csv”.
Now they will rename that CSV as “de_DE.csv” and translate all right side content after the comma in the German language.
After editing the CSV, save it and then upload it to the path app/code/Webkul/MpUPSShipping/i18n where they have installed Magento 2 on the server.
As a result, the module will get translated into the German Language. It supports both RTL and LTR languages.
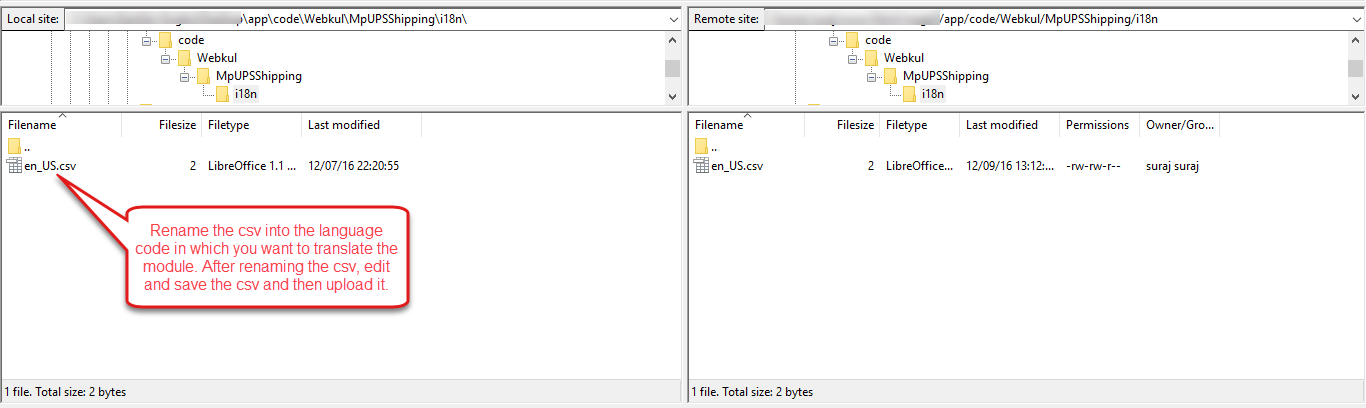
The user can edit the CSV like the image below.

How to get UPS shipping credentials
Before doing the module configuration, the admin needs to have the UPS Shipping credentials for OAuth 2.0. The admin needs, Client ID, Client secret, and Shipper Number.
Create Account :
First, click here to visit the UPS login page. The following page will appear, click Sign Up if you want to create a new account by entering your details.

If you have already a UPS account then simply click and log-in button. All you need to have your username and the password for login.

After login, a homepage will appear.

Now, go to the profile section, and you will see a field with the name accounts and payment. Click on this field and select the payment method from the list.

After clicking on the accounts and the payment, a page will open where you can select the payment method from the list.

Once the addition of the payment method is done, and after proceeding you will get the shipper number.

Now, You need to create an app, go to my apps, and click on Add app.

After completion of the creation of the app, your App becomes visible in the My Apps section, click on your App name, and there you will get the credentials, Client ID, and Secret.

Configuration Of Magento 2 Marketplace UPS Shipping
After the successful installation of the Magento 2 Marketplace UPS Shipping module.
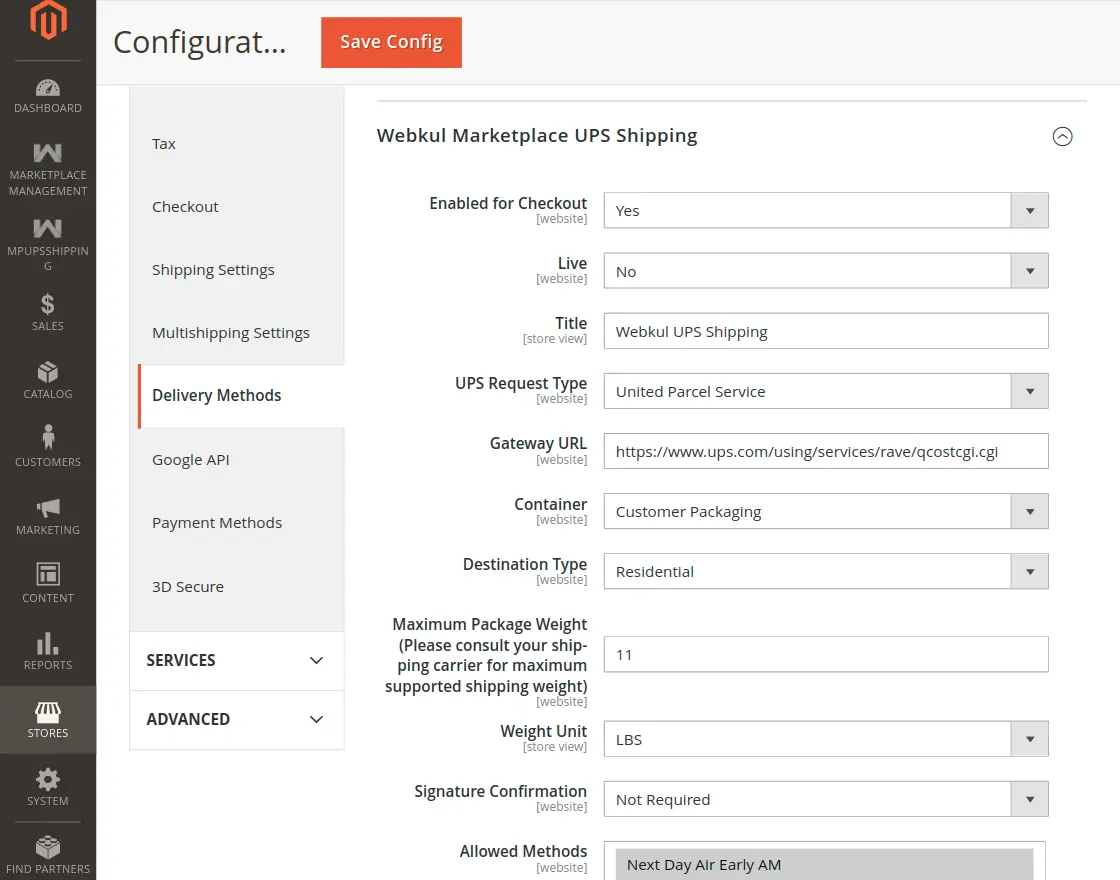
you will be able to see the configuration panel under Store > Configuration > Sales > Delivery Methods >Webkul Marketplace UPS Shipping as shown below.
Configuration – United Parcel Service
Here, we can manage all Webkul Marketplace UPS Shipping settings when UPS Request Type -> United Parcel Service.
Thus, the admin can manage all the settings for the UPS Shipping method.
Let’s go through each of the configuration settings –
Webkul Marketplace UPS Shipping –
- Enabled for Checkout – Select “Yes” to enable the method for checkout else select “No“.
- Live – Select “Yes” to enable for Live mode else select “No“.
- Title – Enter the title for the shipping method that will be displayed on the checkout page.
- UPS Request type – Select the OAuth 2.0 Based Parcel Service for shipping.
- Gateway URL – The URL is used to access an API through API Gateway. API Gateway provides a default gateway endpoint for all active APIs.
- Destination type – Select the destination type commercial or residential.
- Maximum package weight- Enter the maximum weight of package for shipping.
- Weight unit- Select the weight unit as LBS or KGS as required.
- Signature confirmation – Select the option for delivery confirmation with or without signature as required.
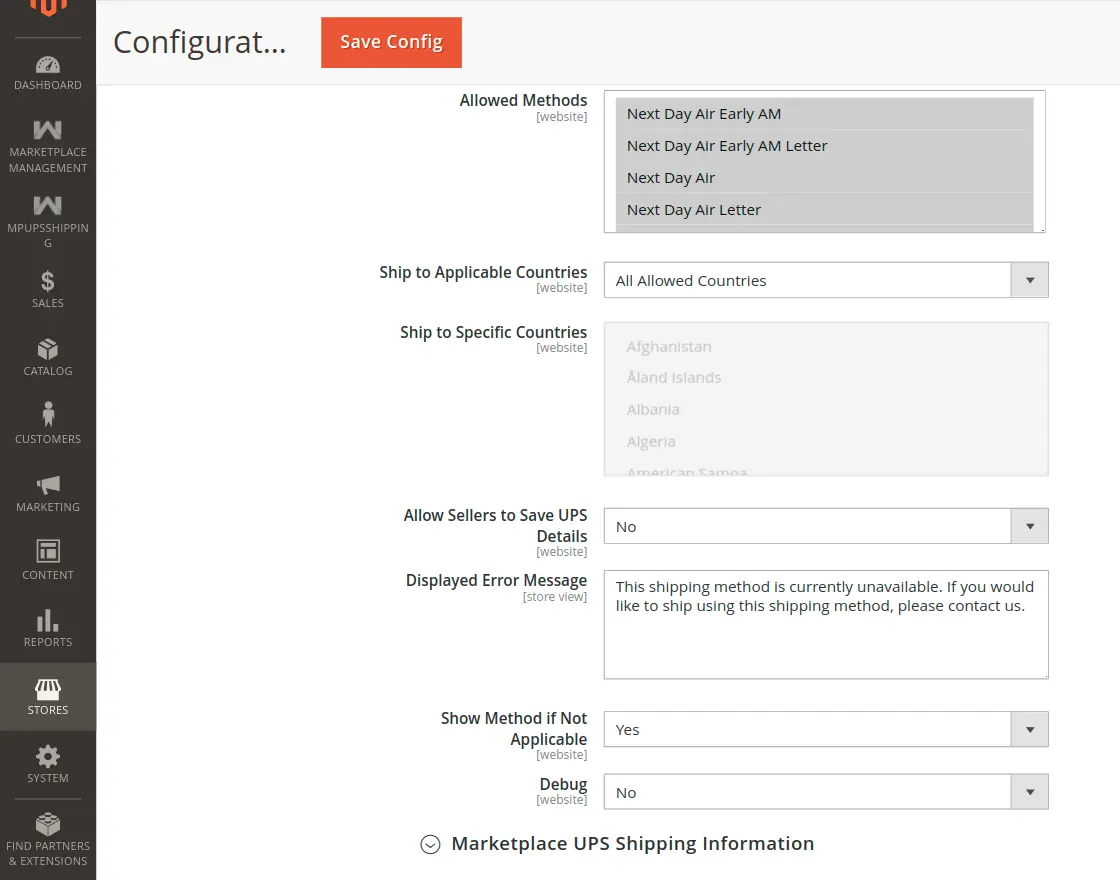
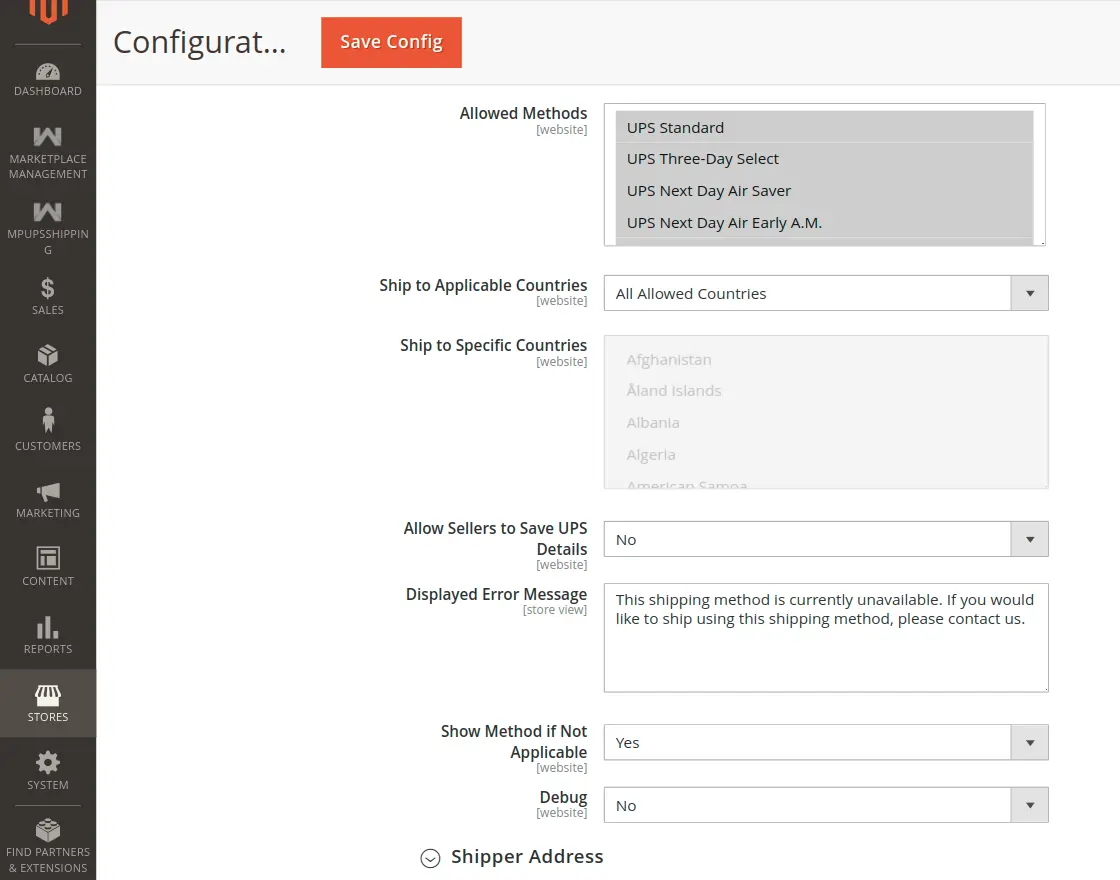
- Allowed methods – Select the methods of UPS.
- Ship to Applicable Countries – Select the countries where this shipping method will be applicable to.
- Ship To Specific Countries – Select the specific countries where you want to ship to.
- Allow sellers to save UPS details – Select “Yes” to enable the method to allow the seller to save details else select “No.
- Displayed Error Message – Enter the displayed error message if the “Show Method If Not Applicable” is set as “Yes“.
- Show Method if Not Applicable – Select “Yes” to show the method if not applicable.
- Debug – Select “No” to not store the debug log information else select “Yes” to store the debug log.
Configuration – OAuth 2.0 Based Parcel Service
Here, we can manage all the settings for Webkul Marketplace UPS Shipping when UPS Request Type -> OAuth 2.0 Based Parcel Service.
Enter the Client ID, Client secret, and Shipper Number from your UPS account.
(OAuth 2.0 is a protocol used for authentication and authorization between two or more web applications.
The OAuth 2.0 security model involves the use of access tokens, which are issues to a client application by an authorization server).

 Thus, the admin can manage all the setting for UPS Shipping method.
Let’s go through each of the configuration settings –
Webkul Marketplace UPS Shipping –
- Enabled for Checkout – Select “Yes” to enable the method for checkout else select “No“.
- Live – Select “Yes” to enable for Live mode else select “No“.
- Title – Enter the title for the shipping method that will be displaying on the checkout page.
- UPS Request type – Select the OAuth 2.0 Based Parcel Service for shipping.
- Client ID – Enter the client ID from your UPS account.
- Client Secret- Enter the client secret from your UPS account.
- Container – Select the packaging container in which product will be packed.
- Destination type – Select the destination type commercial or residential.
- Maximum package weight- Enter the maximum weight of package for shipping.
- Weight unit- Select the weight unit as LBS or KGS as required.
- Signature confirmation – Select the option for delivery confirmation with or without signature as required.
- Allowed methods – Select the methods of UPS.
- Ship to Applicable Countries – Select the countries where this shipping method will be applicable to.
- Ship To Specific Countries – Select the specific countries where you want to ship to.
- Allow sellers to save UPS details – Select “Yes” to enable the method to allow the seller to save details else select “No.
- Displayed Error Message – Enter the displayed error message if the “Show Method If Not Applicable” is set as “Yes“.
- Show Method if Not Applicable – Select “Yes” to show the method if not applicable.
- Debug – Select “No” to not store the debug log information else select “Yes” to store the debug log.
Configuration – United Parcel Service XML
Here, we can manage the all the settings for Webkul Marketplace UPS Shipping when UPS Request Type -> United Parcel Service XML.


Thus, the admin can manage all the setting for UPS Shipping method.
Let’s go through each of the configuration settings –
Webkul Marketplace UPS Shipping –
- Enabled for Checkout – Select “Yes” to enable the method for checkout else select “No“.
- Live – Select “Yes” to enable for Live mode else select “No“.
- Title – Enter the title for the shipping method that will be displaying on the checkout page.
- UPS Request type – Select the OAuth 2.0 Based Parcel Service for shipping.
- Gateway XML URL – The URL is used to access an API through API Gateway. API Gateway provides a default gateway endpoint for all active APIs.
- Origin of the shipment – Select the origin of the shipment.
- Access License Number – Enter the UPS account information to access the license number.
- Shipper Number – Enter the UPS account information to access the shipper number.
- User ID – Enter the UPS account information to access the User ID.
- Password – Enter the UPS account information to access the Password.
- Container – Select the packaging container in which product will be packed.
- Enable Negotiated rates – Select “YES” to enable the negotiated rates else select “NO“.
Note – Only shippers approved to ship can use negotiated rates.
- Destination type – Select the destination type commercial or residential.
- Maximum package weight- Enter the maximum weight of package for shipping.
- Weight unit- Select the weight unit as LBS or KGS as required.
- Signature confirmation – Select the option for delivery confirmation with or without signature as required.
- Allowed methods – Select the methods of UPS.
- Ship to Applicable Countries – Select the countries where this shipping method will be applicable to.
- Ship To Specific Countries – Select the specific countries where you want to ship to.
- Allow sellers to save UPS details – Select “Yes” to enable the method to allow the seller to save details else select “No.
- Displayed Error Message – Enter the displayed error message if the “Show Method If Not Applicable” is set as “Yes“.
- Show Method if Not Applicable – Select “Yes” to show the method if not applicable.
- Debug – Select “No” to not store the debug log information else select “Yes” to store the debug log.
Frontend Management – Magento 2 Marketplace UPS Shipping
To use this shipping method seller, the seller enters his origin address under the Marketplace Dashboard > Shipping Setting where he enters the details and then saves them.

If the Magento 2 Marketplace UPS Shipping module is enable then the seller can set the Invoice & Shipping address, VAT, and TAX information under Marketplace > Manage Print PDF Header Info.
Sellers can also save their UPS configuration details if the admin has set the option “Allow Sellers To Save UPS Details” to Yes from the backend.

Note: To use UPS request type as OAuth 2.0 Based Parcel Service. The user must need to set the configuration.
For that, Go to Manage UPS on the dashboard, and click on Manage UPS Shipping, a page will open Manage UPS Configuration,
Where the user needs to fill in the details, Client ID, Client Secret, and shipper number.

Now, the user has to set up the UPS Shipper Address, The UPS Shipper Address will be visible in the same Manage UPS section.

If the Marketplace UPS Shipping module is enabled by admin then the buyer can select the Marketplace UPS shipping method in the cart as shown below.

Buyers can see the selected shipping method on the checkout page as shown.
Buyers will see the shipping method selected on the order review page as well.
UPS Shipping Management – Magento 2 Marketplace UPS Shipping
When the order is placed, the seller can see the order under “My Order History” as per the image below.
If the admin sets the “Allow Seller to Manage Order” option “yes” then the seller can manage the orders from the front-end.
The seller can generate invoices for their ordered products, generate the tracking number and shipment for the orders of their products.
Even the seller can notify the customers by sending them emails, cancel the order and even print the order.

Once the seller generates the shipment and invoice, the seller will able to see complete order details.

Shipping Information:
The seller can see the complete shipping details as shown below.

Now after the seller creates the shipment, he creates a shipping label by adding dimension to the shipment package as per the order dimension then add the product to the selected package and saves it.
For this seller have to go Create a shipment label find the details in the below screenshot.

The seller can click on UPS Shipment Slip and then the label will get downloaded.

Invoice Information:
The seller can see the complete Invoice details as shown below.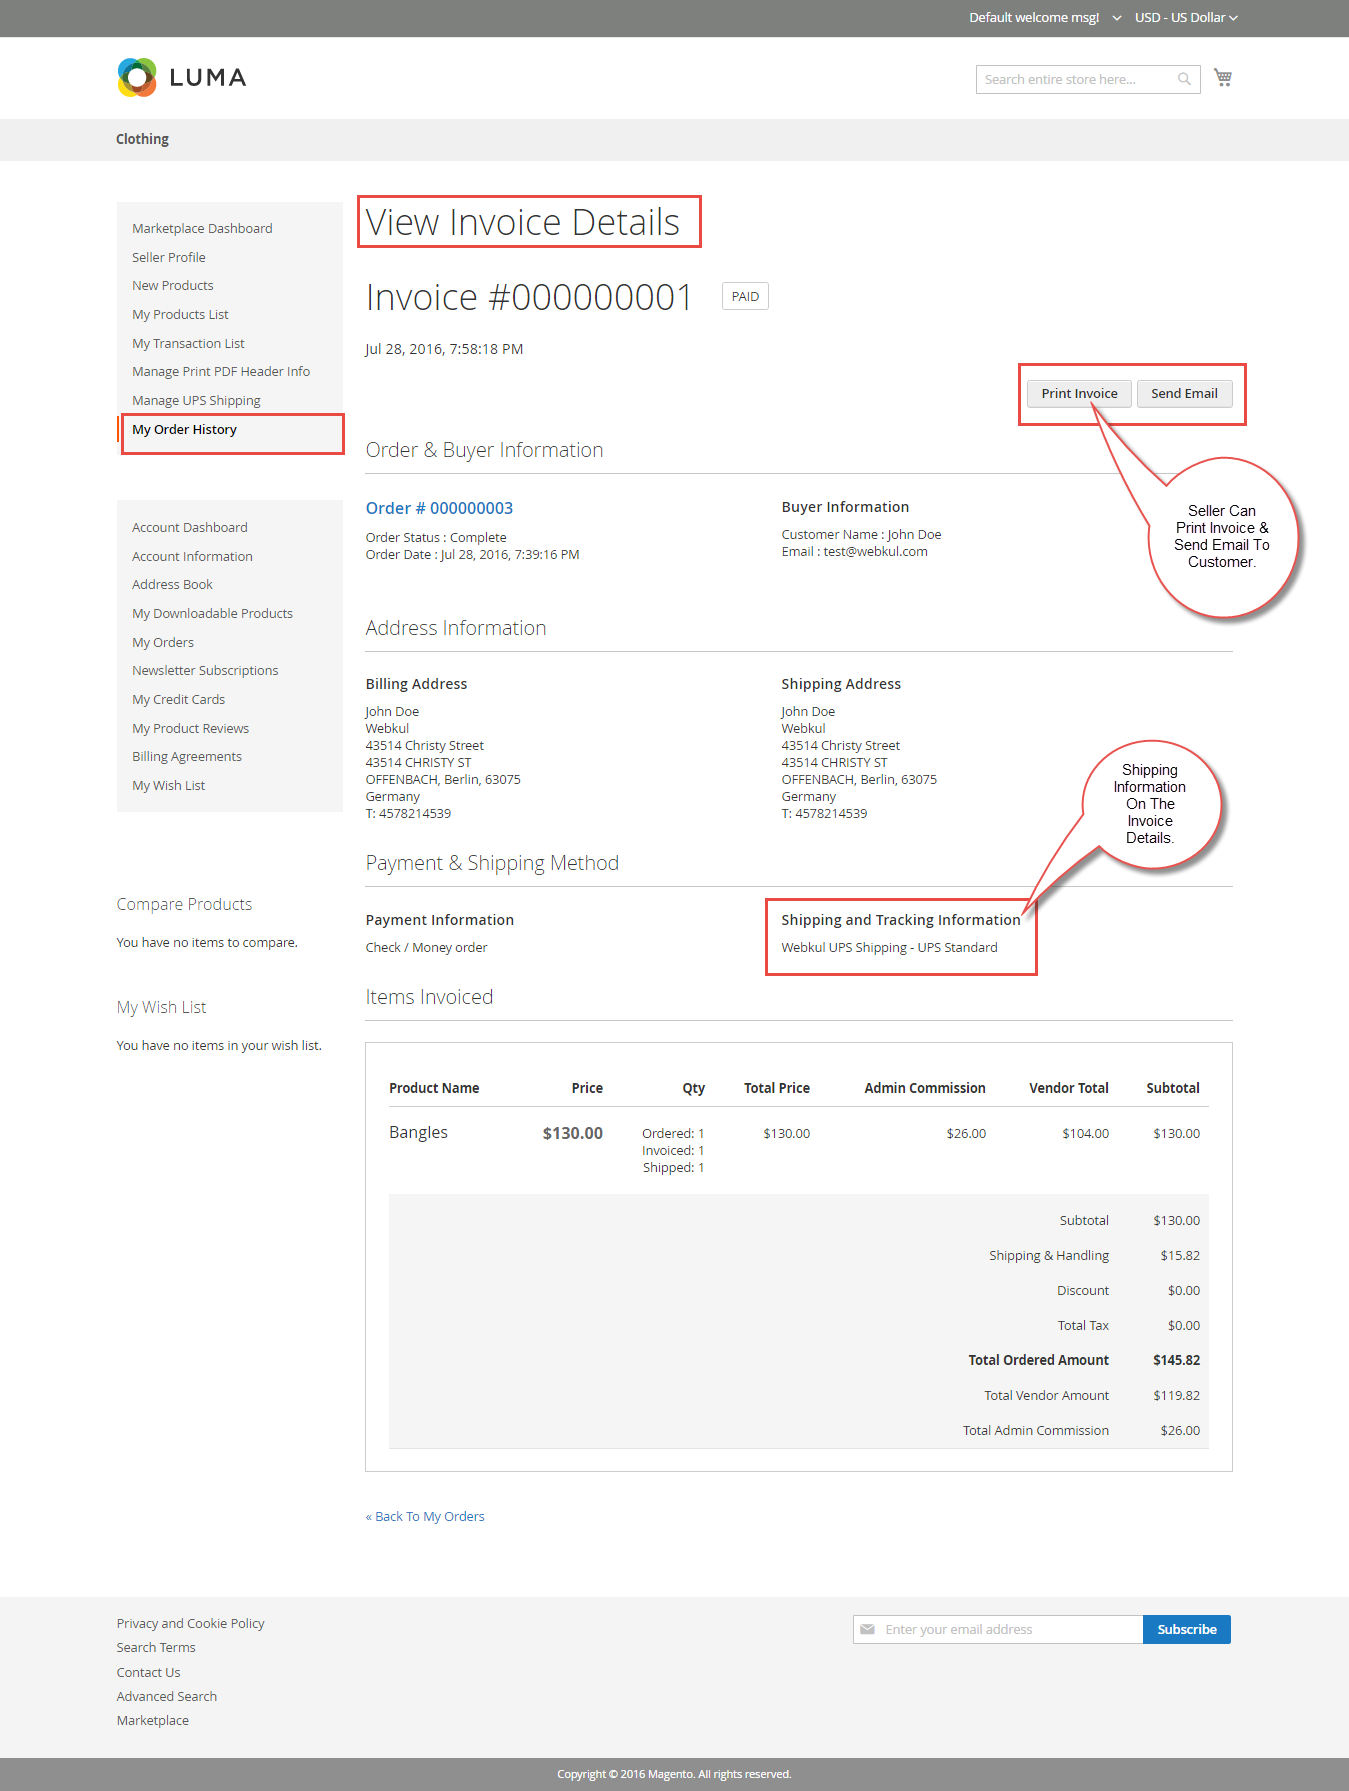
The seller can download the Shipping and Invoice slip very easily.
In these slip, you can also see the company logo and address, vat, tax information which is entered by the seller under Manage Print PDF Header Info as shown below.
1. Shipping Slip:
2. Invoice Slip:

My Order History
The seller can also download the PDF of shipping and invoice slip under Marketplace > My Order History.
After clicking on the download all option a pop-up window will pop up.
Here you will enter the date up to which you want to download invoice or shipping slips as shown below in the screenshot.

That’s all for the Magento 2 Marketplace UPS Shipping still have any issue feel free to add a ticket and let us know your views to make the module better webkul.uvdesk.com
Current Product Version - 5.0.4
Supported Framework Version - Magento 2.0.x, 2.1.x, 2.2.x,2.3.x, 2.4.x

Be the first to comment.