OpenCart Zoho Connector is an efficient tool that sets up a connection between your OpenCart Store and Zoho.
This module facilitates the store admin to synchronize their store’s data such as customer, product, or orders with the Zoho CRM for organized and effective data management.
You can also sync the OpenCart store’s data with the Zoho Inventory using the OpenCart Zoho Inventory Connector.
The store owner can manually sync the data to Zoho CRM wherever there is an update.
Also, the store owners can delete or edit the products, customers, manually on Zoho as needed.
Further, the store owners can also import or export products, customers, or orders from Zoho to the OpenCart Store.
What is Zoho CRM?
Zoho CRM is a customer relationship management software and a Cloud App that fetches data stored in the cloud.
It’s known for its effective customer data management and synchronization.
The store owners can manually sync data to Zoho CRM and thus it helps maintain a smooth business workflow and customer relationships.
Note: As Zoho provides a trial for a limited period few functionalities might not work on the demo, kindly use your own credentials to check the demo of this add-on.
Check the setup and flow of the plugin below –
Features
- The admin can manually sync customers with Zoho CRM.
- The products can also be manually synced with the Zoho CRM.
- Also, the admin can sync the orders to Zoho CRM.
- Synchronized products, customers, and orders can be deleted manually by the admin from Zoho CRM.
- Moreover, the admin can also edit the products, customers.
Installation
Upload Files
First, extract the downloaded zip file. After that, open the correct Opencart Version Folder. According to Opencart Version installed in your system.
Then, upload admin, catalog, and system to the Opencart root directory.

Edit User Groups
After that, go to System > Users > Usergroups. And then edit ‘Administrator’. Click Select All for both Access Permission and Modify Permission and Save it.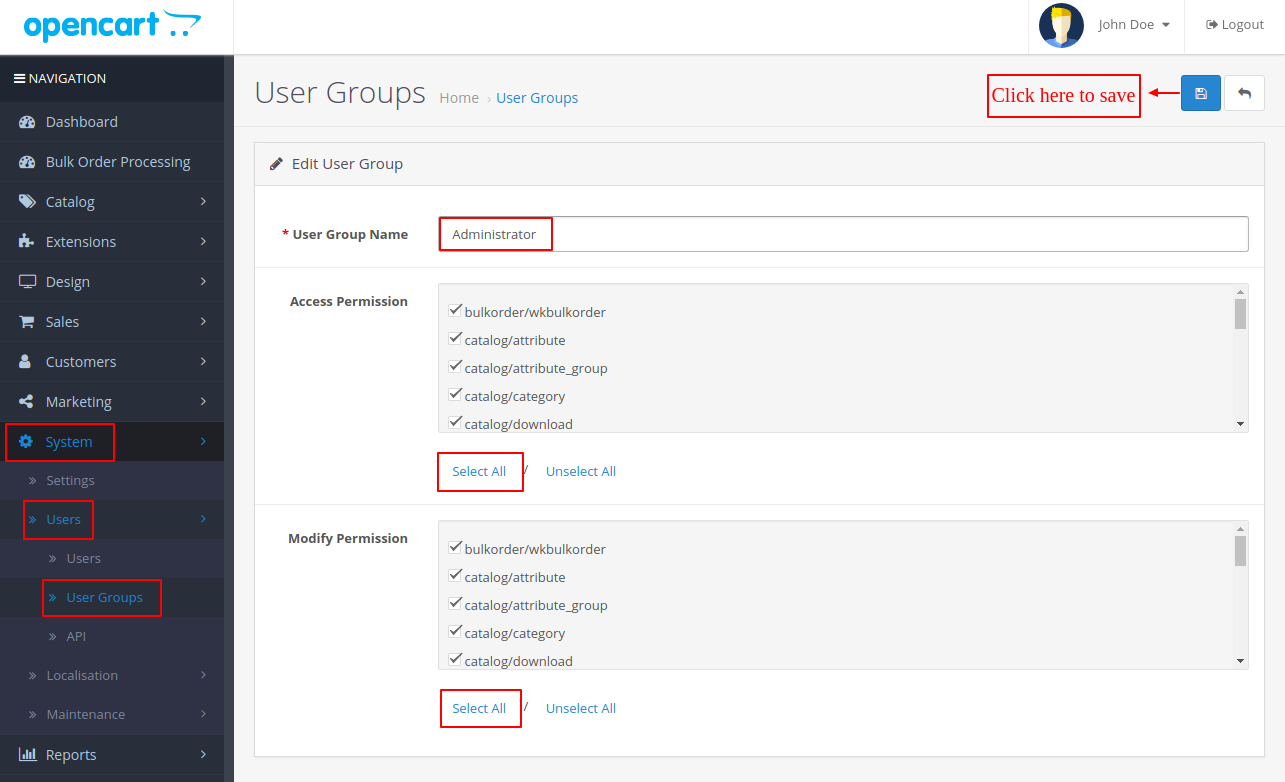
Install
Now navigate to Extensions > Extensions > Modules. Find Webkul Zoho Connector from the list. Click the Install button as visible in the screenshot below.

Admin Configuration
On installing the module successfully, the admin should navigate to Extensions > Extensions > Modules and select Webkul Zoho Connector.

Further, as the admin clicks the Edit button, it redirects to the Webkul Zoho Connector page as shown in the image below.
Admin can also open directly click on configuration through webkul zoho connector Webkul Zoho Connector>Configuration as show in below image.

The admin will have to set the following configuration initially-
Status- Set the status as Enabled or Disabled.
Auto Sync Zoho Account- Select zoho account for which newly added customers, products and orders are auto synchronize at zoho end.
The admin can sign up with Zoho by clicking on the highlighted option that is provided in the image.

Thereafter, the admin must click on the save button. This will lead to displaying a success message as shown in the image below.

Retrieving Client Id and Secret Key | Zoho OpenCart Integration
Step 1:
Initially, the user needs to navigate to the link
Create Your Zoho Account opens up where the user needs to add details such as Name, Email Address, Password, Country, etc.
Then agree to the Terms of Service and Privacy Policy and proceed to Sign Up.

Step 2:
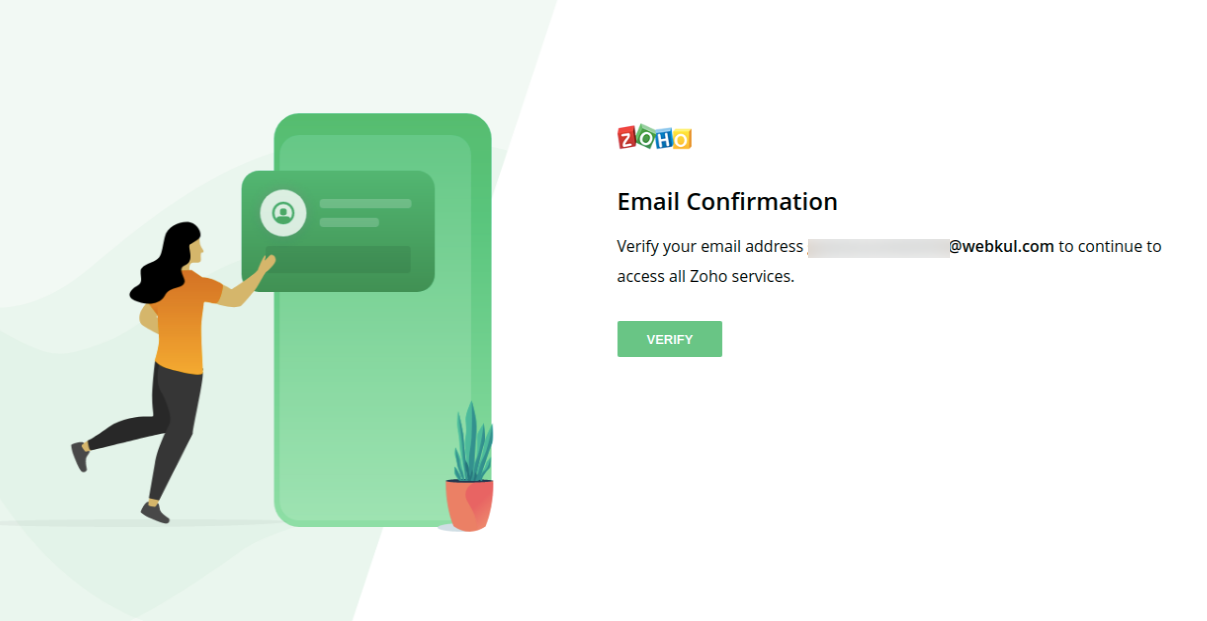
In the next step, the users will receive a confirmation mail on the mail Id they add while adding the details.

The mail view that the user receives is as shown in the image below. The user needs to click on the Confirm Your Account button.

It redirects to the Email Confirmation page as shown in the image. The user needs to click on the Verify button.
This verifies the account and a success message pop up displays as shown in the image.

Step 3:
Clicking the Access Your Account button redirects to the Zoho CRM page where the user needs to click on the Get Started for Free button.

Step 4:
In doing so, another page as shown in the image below opens up, where the user needs to add the Company Name and the Phone Number.
The user needs to click on the Get Started button.

This further navigates the user to the Zoho CRM Homepage as shown in the image below.

Step 5:
To create an app click on the following link
The image as shown below appears.

Step 6:
The user needs to click on or select Server-Based Applications in the above image, that further opens up the Create New Client page as shown below.
The user needs to add the details such as Client Name, Homepage URL, and Authorized Redirect URIs and click on Create button.
 Step 7:
As the user clicks on the Create button, it redirects to the Client Secret section, where the user can find the Client Id and Secret Key as shown in the image below.

The Client ID and Client Secret retrieved will be required for configuring the module.
Adding Zoho Account
After successfully getting credentials and then admin can create an Zoho account Webkul Zoho Connector>Zoho Accounts>Add Zoho Account.

After clicking on the add account then new page is open to fill all the requirements fields-
Client ID- Admin can insert the client ID.
Secret Key- Admin can fill Secret key.
Datacenter- Select the data center of your Zoho account, which want to import from the particular country.
Zoho Account Email- Admin can fill the email which is used in Zoho account creation

After adding the client id, secret id, data center, Zoho account email and click on the save button and then show in the Zoho account list as shown in the given below image.

Admin can also edit the client account as per further requirements as shown in the below image.

Zoho Account Configuration
Also, a key option with the Key icon will become visible as shown in the image below. The admin needs to click on the same in order to retrieve the Access Token and the Refresh Token.
As the admin clicks on the Key icon, a sign-in pop-up displays. The admin must enter the email id a click on Next.

In the next page, the admin must enter the password and click on the Sign In button.

This redirects to the “Choose the services for ocartwebkul” page as shown in the image below.
The admin should select Webkul under the Production section and click on Submit.

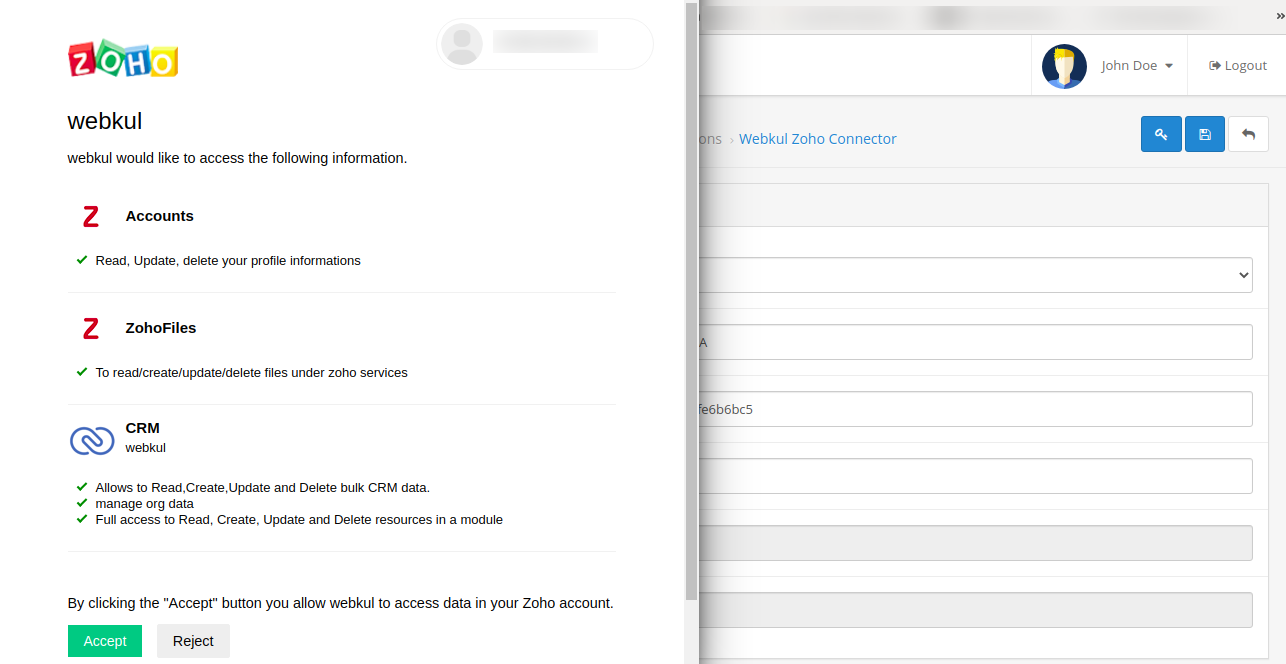
In doing so, another page as shown in the image below opens up, where the admin needs to click on the Accept button.
This will redirect to the Zoho account detail page that displays a success message, “Access Token and refreshes token has been added” as shown in the image below.

Webkul Zoho Connector: Zoho OpenCart Integration
As the admin configures the basic configurations, the Webkul Zoho Account details menu option are visible.

The admin will have to configure the following sections under Webkul Zoho Account-
- Customer
- Product
- Order
Let us discuss each section in detail.
Customer
Admin can go to customer page ie Zoho Accounts>Edit Account>Customer
On clicking the Customer option, the Zoho Customer Synchronization page opens up.
In this section, the admin can synchronize the customers with Zoho by simply clicking on the Export Customer or Import Customers buttons.
The synced customer list will display under Synchronized Customer as shown in the image below.

Product
Admin can go to product page ie Zoho Accounts>Edit Account>Product
In the Product, the admin can sync the store products with Zoho by simply clicking on the Export Product or Import Product buttons.
The synchronized product listing will display under the Synchronized Product as shown in the image below.

Moreover, one can update the Products and Customers (unlike Orders) on both sides, i.e. Zoho and the store.
Order
Admin can go to order page ie Zoho Accounts>Edit Account>Order.
On clicking the Order menu option, the admin will land upon the Zoho Order Synchronization page.
The admin can only export the orders to Zoho by clicking on the Export Order button.
The synchronized order listing will display under Synchronized Order as shown in the image below.

Synchronizing Customer, Product & Orders: Zoho OpenCart Integration
Lets a take a tour and see how Customer, Product, and Order are synchronized in Zoho CRM.
One can follow the link to navigate to the Zoho CRM Customer, Product, and Order pages view.
Customer Sync View
To check the customer sync view, the admin can navigate to the Contacts tab.

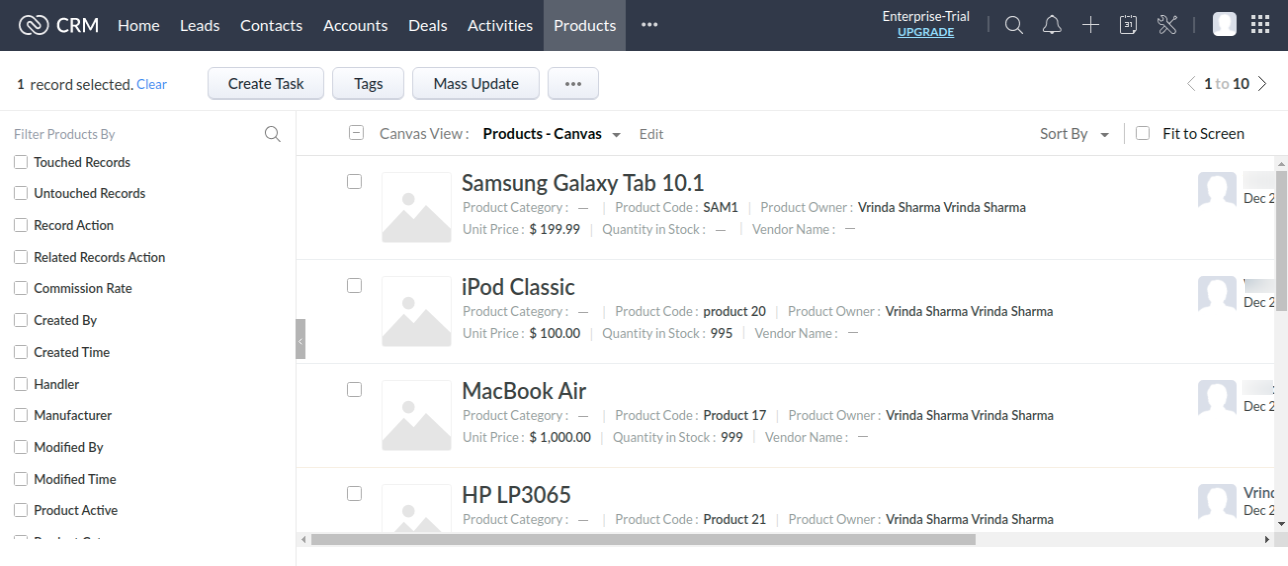
Product Sync View
The admin needs to navigate to the Products section thereafter to have a view of the Product Sync View.
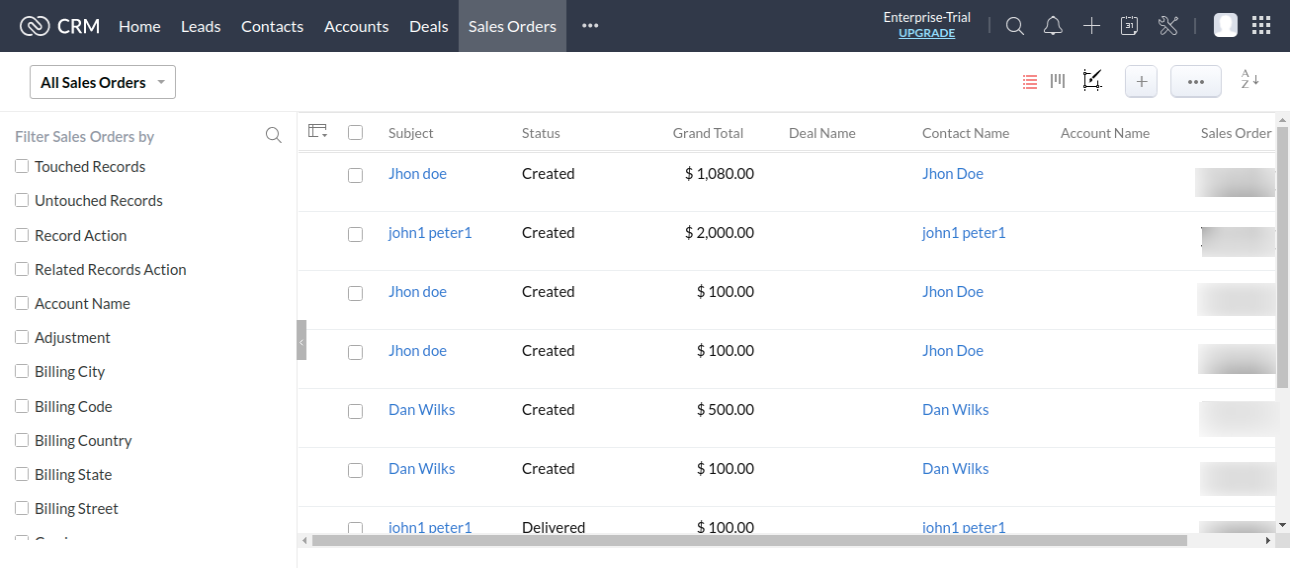
Order Sync View
Further, the admin will navigate to the Sales Order section to have a view of the Order Sync View.
One can edit an order to view the complete details. The details will be visible under the Edit Sales Order page as shown in the image below.

However, the admin can navigate to Sales > Orders in the admin panel and view the details of a respective order as shown in the image.

That’s all for the Zoho OpenCart Integration. Still, have any issues feel free to add a ticket and let us know your views on our Webkul Support System.
Current Product Version - 2.0.0.4
Supported Framework Version - 3.x.x.x

Be the first to comment.