Salesforce provides multiple tools to automate your organization’s repetitive business processes: Approvals, Process Builder, Workflow, and Visual Workflow.
Workflow Rule
Workflow lets you automate standard internal procedures and processes to save time across your org. Many of the tasks you normally assign, the emails you regularly send, and other record updates are part of your organization’s standard processes. Instead of doing this work manually, you can configure workflow rules to do it automatically.
Workflow rules can be broken into two main components.
- Criteria: the “if” part of the “if/then” statement. In other words, what must be true of the record for the workflow rule to execute the associated actions.
- Actions: the “then” part of the “if/then” statement. In other words, what to do when the record meets the criteria.
To set the criteria for a workflow rule, you configure:
- The object determines the records on which the workflow evaluates, as well as the fields available for setting the rule criteria.
- Evaluation criteria that determine which changes trigger the workflow rule—such as only when accounts are created.
- Rule criteria that identify what must be true about the record for Salesforce to execute the associated actions.
Example: If an account is created or updated and it’s located in New York, you want Salesforce to automatically perform certain actions. Here’s how that if-statement breaks down into workflow rule criteria.
- An account (object)
- is created or updated (evaluation criteria) and
- is located in Texas (rule criteria)
First, figure out when to execute the action. You have two options.
- Immediate actions, like their name suggests, are executed as soon as the workflow rule finishes evaluating the record. Example: when a new high-value opportunity is created, email the opportunity team.
- Time-dependent actions are executed at a specific time, such as 10 days before a record’s close date. When that specific time passes, the workflow rule re-evaluates the record to make sure that it still meets the rule criteria. If the record does, the workflow rule executes those actions.
| Evaluation Criteria | Description |
|---|---|
| Created | Evaluate the rule criteria each time a record is created. If the rule criteria is met, run the rule. Ignore all updates to existing records.
With this option, the rule never runs more than once per record. |
| Created, and every time it’s edited | Evaluate the rule criteria each time a record is created or updated. If the rule criteria is met, run the rule.
With this option, the rule repeatedly runs every time a record is edited as long as the record meets the rule criteria. Note
If you select this option, you can’t add time-dependent actions to the rule.
|
| Created, and any time it’s edited to subsequently meet criteria | (Default) Evaluate the rule criteria each time a record is created or updated.
With this option, the rule can run multiple times per record, but it won’t run when the record edits are unrelated to the rule criteria. For example, suppose that for an opportunity record to meet the rule criteria, the opportunity probability must be greater than 50%. If you create an opportunity with a probability of 75%, the workflow rule runs. If you edit that opportunity by changing the probability to 25%, the edit doesn’t cause the rule to run. If you then edit that opportunity by changing the probability from 25% to 75%, the edit causes the rule to run. With this last edit, the rule runs, because the record is changed from not meeting the rule criteria to meeting the rule criteria |
Rule Criteria:
- Choose criteria are met and select the filter criteria that a record must meet to trigger the rule. For example, set the filter to “Opportunity: Amount greater than 5000” if you want opportunity records with an amount greater than $5,000 to trigger the rule. Note : You can add up to 25 filter criteria, of up to 255 characters each.
- Choose formula evaluates to true and enter a formula that returns a value of “True” or “False.” Salesforce triggers the rule if the formula returns “True.”
When a record meets all the criteria for a workflow rule, that rule’s actions are executed. Workflow rules can help automate the following types of actions based on your organization’s processes:
- Tasks: Assign a new task to a user, role, or record owner.
- Email Alerts: Send an email to one or more recipients you specify.
- Field Updates: Update the value of a field on a record.
- Outbound Messages: Send a secure, configurable API message (in XML format) to a designated listener.
To create or change workflow rules and actions:
- Go to Setup | Create | Workflow & Approvals, then select Workflow Rules.
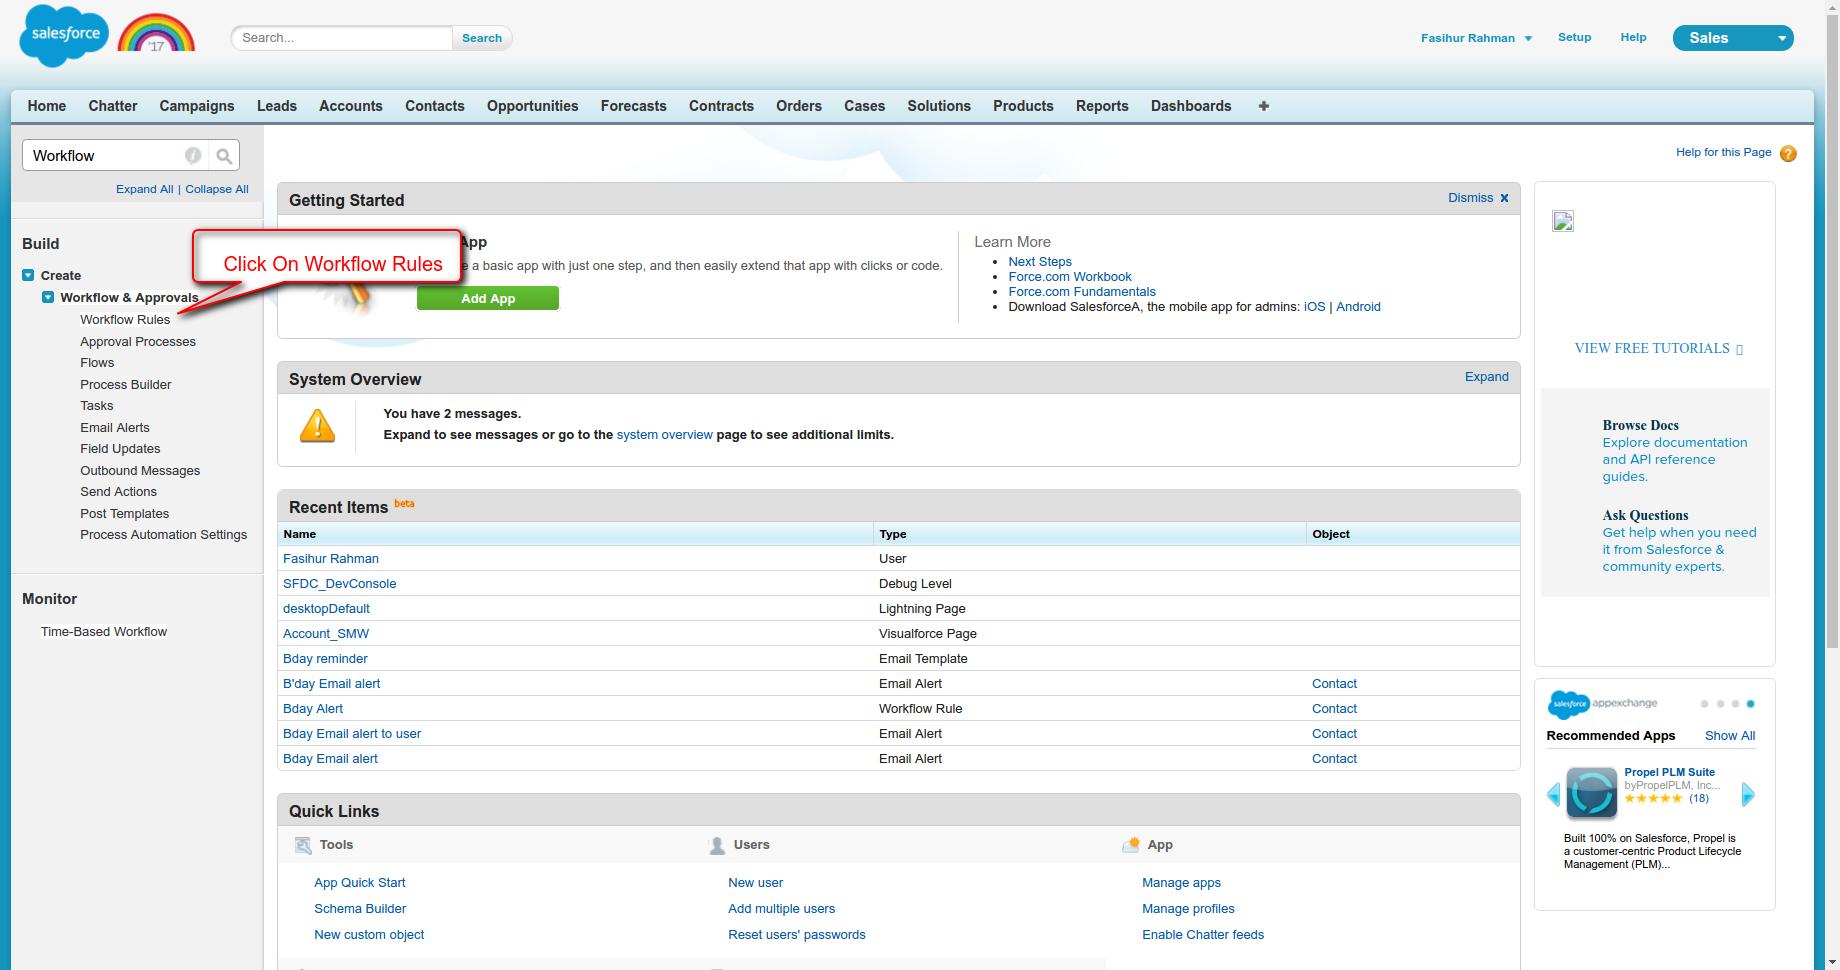
2. Click Continue.

3. Click New Rule.

4. Choose the Object on which you want this workflow rule to apply and click Next.

5. Give rule a name and description. Set the Evaluation and Rule criteria to meet and click Save & Next.
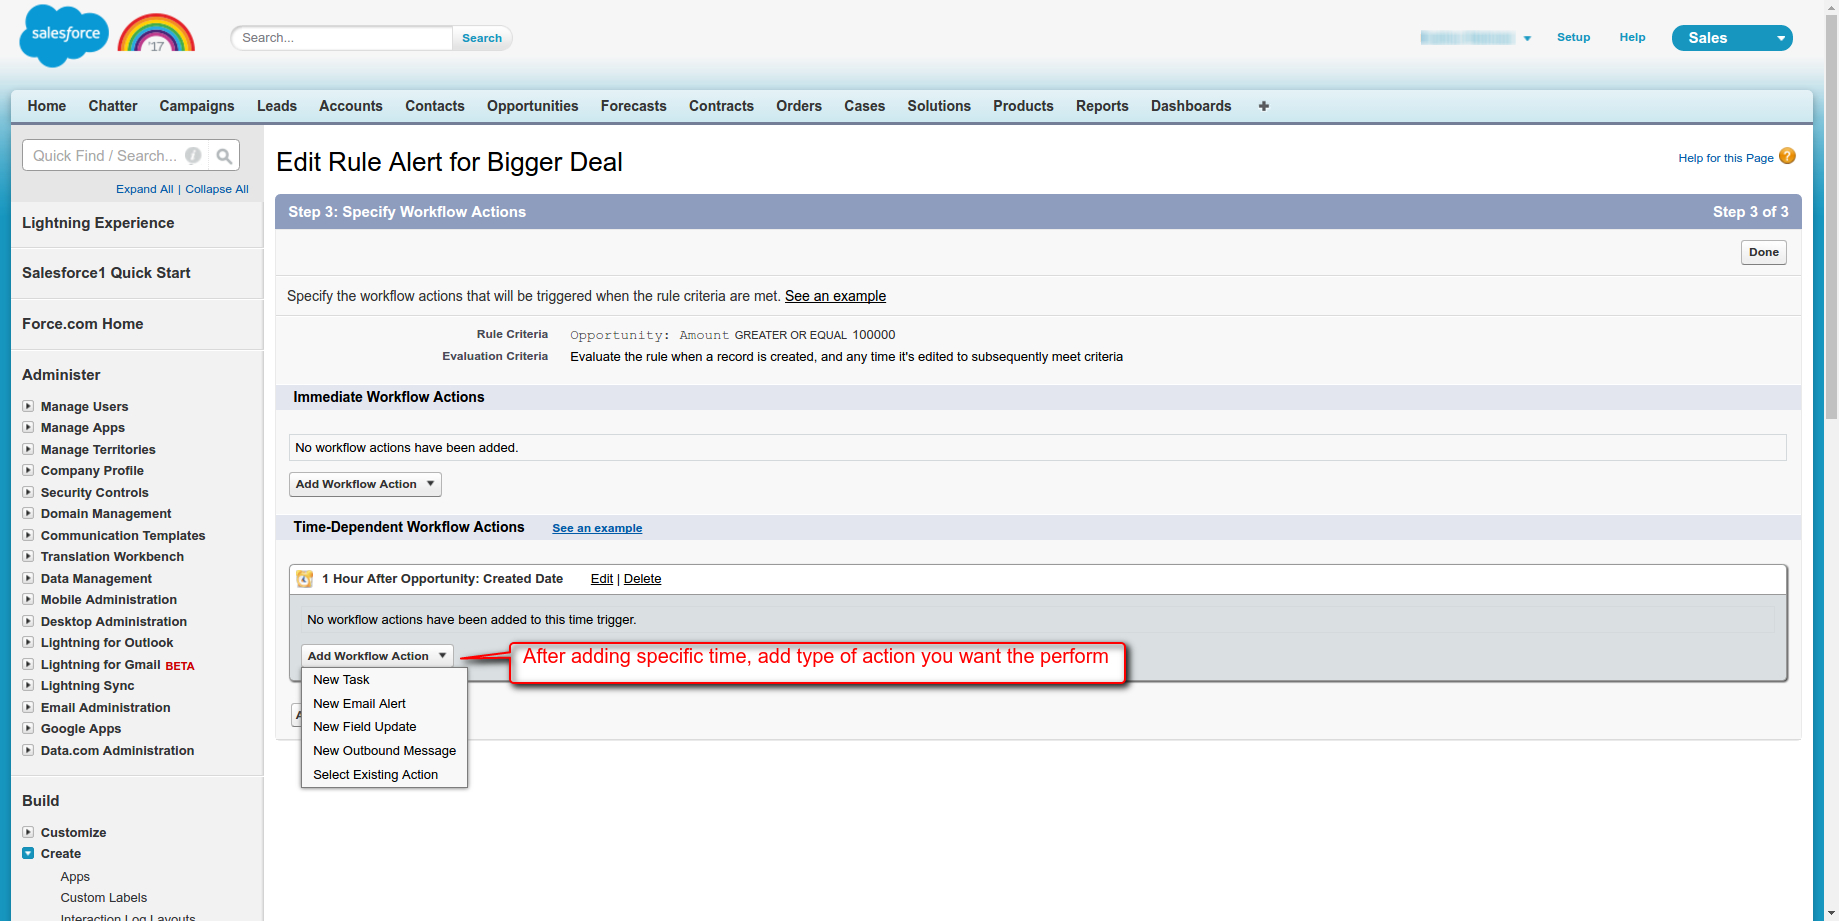
6. Select the type of action to perform when evaluation and rule criteria results true.

a> For immediate action, select appropriate action to perform from the drop down.

b> For Time Dependent action, click on Add Time trigger and select the specific time to execute the action and click Save.

> After adding specific time for Time trigger, select appropriate action to perform.
7. Enter the details about the Email alert, select email template and add the User. Then, click Save and then Done.

8. Click on Activate to make this workflow rule active.

Add or update action in existings workflow :
- From Setup | Create | Workflow & Approvals, then select Workflow Rules.
- Select the workflow rule that you want to add the action to.
- Click Edit.
- Click .
- Select the type of action that you want to add.
- Move the appropriate actions from Available Actions to Selected Actions by selecting them and clicking the left arrow.
- Click Save.
- Click Done.
Approval Process
Approval process takes automation one step further, letting you specify a sequence of steps that are required to approve a record. It automates how records are approved in Salesforce. It specifies each step of approval, including who to request approval from and what to do at each point of the process.
Example :
If your org has a three-tier process for approving expenses. This approval process automatically assigns each request to right person in your org, based on the amount requested.
If an expense record is submitted for approval, lock the record so that users cannot edit it and change the status to Submitted.
If the amount is $50 or less, approve the request. If the amount is greater than $50, send an approval request to the direct manager. If the amount is greater than $5,000 and the first approval request is approved, send an approval request to the vice president.
If all approval requests are approved, change the status to Approved and unlock the record. If any approval requests are rejected, change the status to Rejected and unlock the record.
Before you create an approval process, determine which wizard is best for your needs.
- To make it easier for you to get started with a simple approval process, the jump start wizard automatically chooses some default options for you.
- When your approval process is more complex and you want to define specific steps, use the standard wizard.
Prepare to Create an Approval Process :
Plan each approval process carefully to ensure a successful implementation. Review the following checklist before creating your approval process.
- Prepare an approval request email template :
- The email template you specify on an approval process is used when notifying users that an approval request is assigned to them.
- Prepare an approval request post template :
- If your org has Approvals in Chatter enabled, specify an approval post template to use when notifying a user via Chatter about an assigned approval request. You can use the Salesforce default post template or create your own.
- Determine the approval request sender :
- Approval request notifications are sent from the user who submitted the record for approval. When you configure an email alert, you can add a different return email address for these notifications.
- Determine the assigned approver : Any of the following can approve or reject a request.
- A user or queue that the approval request submitter chooses.
- A queue specified by the administrator.
- A user listed in the Manager standard field on the submitter’s user detail page.
- A user listed in a custom hierarchy field on the submitter’s user detail page.
- Any combination of users and related users (users listed in a standard or custom field on the submitted record) specified by the administrator.
- Determine the delegated approver :
- An approver can designate a delegate to approve requests, but you can disable this option. To assign delegates, for each user, populate the Delegated Approver field on the user’s detail page.
- Decide if your approval process needs a filter :
- Determine what attributes a record must have to be included in your approval process. If necessary, create the custom fields to store this information so that you can use it in your filter criteria
- Design initial submission actions :
- When users submit a record for approval, Salesforce automatically locks the record so that other users cannot change it while it is awaiting approval.
- Decide if users can approve requests from a wireless device :
- Determine if you want to require users to log in to Salesforce to approve requests. You can also set up your approval process to allow users to approve requests remotely using a mobile browser.
- Determine if users can edit records that are awaiting approval :
- Records submitted for approval are locked. Users with the “Modify All” object-level permission for the given object or the “Modify All Data” permission can always unlock a record and edit it.
- Decide if records should be auto-approved or rejected :
- You can set entry criteria for each step of your process and configure Salesforce to approve, reject, or skip the process if a record doesn’t meet the criteria.
- Determine how many levels your process has :
- An approval process can have several layers of approvals. Determine how many users need to approve requests and in what order.
- Determine the actions when an approval request is approved or rejected :
- When a request is recalled, approved, or rejected, Salesforce can perform up to 10 instances of each of the following types of actions—up to 40 actions total.
To create Approval Process :
- Go to Setup | Create | Workflow & Approvals | Approval Process, select Approval Process.
- Select the Object on which you want to create Approval Process, then select the Wizard as per your requirement.

3. Enter the details mentioned below in the screenshot and click Save. On next page, click on View Approval process detail page.

4. In the Approval Process details page, select the actions same as explained in Workflow rules that you want to execute for different steps like Submission/ Approval/ Rejection/ Recalled.

5. Click Activate to make Approval Process active. Further, to review the schema of the created Approval Process, Click on View Digram.

FYI’s
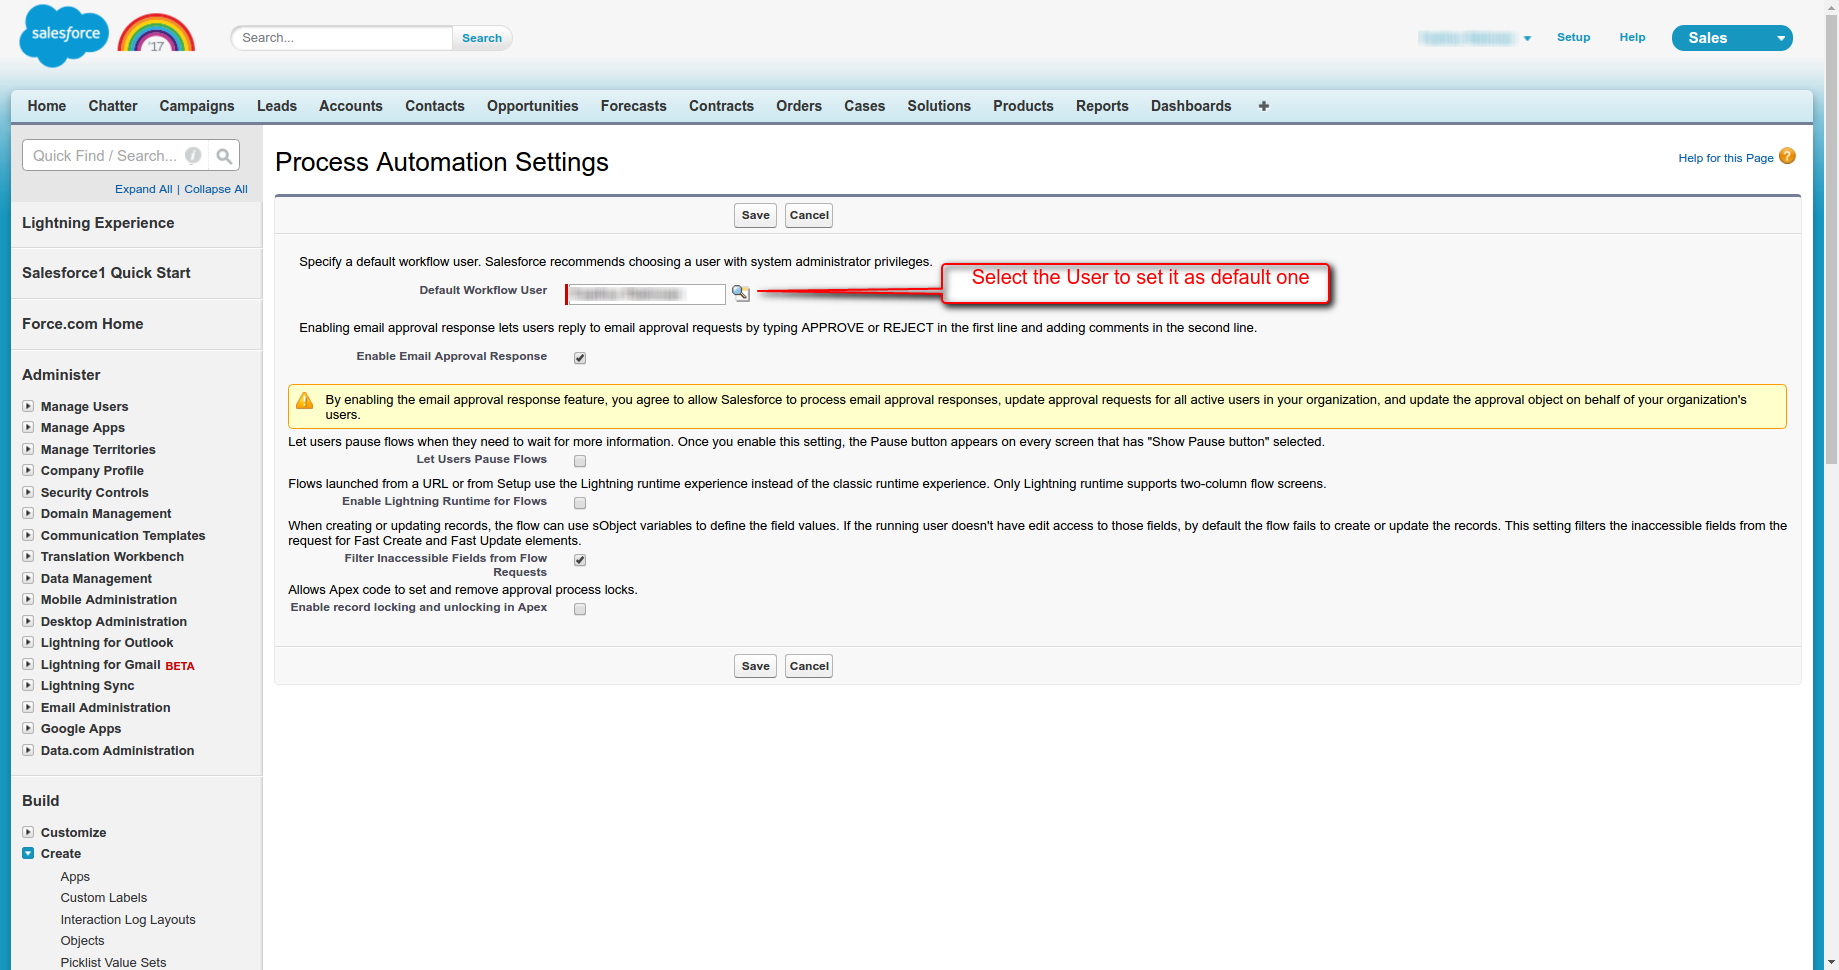
Identify Your Salesforce Org’s Default Workflow User
Default Workflow User that you want Salesforce to display with a workflow rule when the user that triggered the rule is not active. If your organization uses time-dependent actions in workflow rules, you must designate a default workflow user. When the user who triggered the rule isn’t active, Salesforce displays the username of the default workflow user in the Created By field for tasks, the Sending User field for email, and the Last Modified Byfield for field updates. Salesforce does not display this username for outbound messages.
1. From Setup | Create | Workflow & Approvals | Process Automation Settings
2. Select the Default Workflow user and click Save.
Daily Limits for Email Alerts
After your org has reached its daily workflow email limit:
- Any emails in the workflow queue left over and not sent that day are discarded. Salesforce doesn’t try to resend them later.
- If a workflow rule with an action and an email alert is triggered, only the email action is blocked.
- Final approval, final rejection, approval, rejection, and recall email actions are blocked.
- An error message is added to the debug log.
The following items don’t count against the workflow email limit:
- Approval notification emails
- Task assignment notifications
- Lead assignment rules notifications
- Case assignment rules notifications
- Case escalation rules notifications
- Force.com sites usage alerts
The limit restriction is based on activity in the 24-hour period starting and ending at midnight GMT. Adding or removing a user license immediately adjusts the limit’s total. If you send an email alert to a group, every recipient in that group counts against your daily workflow email limit.
Workflow Terminology
Workflow Rule : A workflow rule sets workflow actions into motion when its designated conditions are met. You can configure workflow actions to execute immediately when a record meets the conditions in your workflow rule, or set time triggers that execute the workflow actions on a specific day. If a workflow action hasn’t executed yet, you can view and modify it in the workflow queue.
Workflow Action : A workflow action, such as an email alert, field update, outbound message, or task, fires when the conditions of a workflow rule are met.
Email Alert : Email alerts are actions that send emails, using a specified email template, to specified recipients. Workflow alerts can be sent to any user or contact, as long as they have a valid email address.
Field Update : A field update is an action that automatically updates a field with a new value.
Flow : A flow is an application that can execute logic, interact with the Salesforce database, call Apex classes, and collect data from users. You can build flows by using the Cloud Flow Designer.
Flow Trigger : A flow trigger is a workflow action that launches a flow. With flow triggers, you can automate complex business processes—create flows to perform logic, and have events trigger the flows via workflow rules—without writing code.
Outbound Message : An outbound message sends information to a designated endpoint, like an external service. Outbound messages are configured from Setup. You must configure the external endpoint and create a listener for the messages using the SOAP API.
Approval Process Terminology
Approval Actions : An approval action occurs when a step is approved by all the required approvers.
Approval Process : An approval process automates how records are approved in Salesforce.
Approval Request : An approval request is an email, Salesforce1 notification, Lightning Experience notification, or Chatter post notifying the recipient that a record was submitted for approval and that his or her approval is requested.
Approval Steps : Approval steps define the chain of approval for a particular approval process. Each step determines which records can advance to that step, who to assign approval requests to, and whether to let each approver’s delegate respond to the requests.
Assigned Approver : The assigned approver is the user responsible for responding to an approval request.
Delegated Approver : A delegated approver is a user appointed by an assigned approver as an alternate for approval requests.
Email Approval Response : Email approval response lets users respond to approval requests by replying to an email notification.
Initial Submission Actions : An initial submission action occurs when a user first submits a record for approval. By default, the record is locked.
Final Approval Actions : Final approval actions occur when all required approvals have been given for a record.
Final Rejection Actions : A final rejection action occurs when an approver rejects the request and it goes to the final rejection state.
Process Instance : A process instance represents one instance of an approval process. A new process instance is created each time a record is submitted for approval.
Process Instance Node : A process instance node represents an instance of an approval step. A new process instance node is created each time a record enters a step in an approval process.
Recall Actions : A recall action occurs when a submitted approval request is recalled. By default, the record is unlocked.
Record Locking : Record locking prevents users from editing a record, regardless of field-level security or sharing settings. By default, Salesforce locks records that are pending approval. Only admins can edit locked records.

5 comments