WordPress WooCommerce Salesforce Connector extension is an integration between WooCommerce and the Salesforce platform.
It is the next-generation extension enhancing the features of e-commerce and CRM.
WooCommerce content can sync with Salesforce to give a brand new picture to the concept of B2B.
B2C deals, synchronization of Users, and Bi-directional synchronization for Categories & Products with Real-time order sync available.
The idea behind the concept is to increase data integrity, maintain proper inventory of stock, real-time order generation, provide brilliant customer care services, and much more.
Features
- It gives the concept of a ‘Service-first’ approach.
- Acts as a bridge between WooCommerce and Salesforce.
- The synchronization process will run in the background when you export the records.
- Lightning features support and provide you with an interactive design.
- Can process bulk data synchronization from WooCommerce to Salesforce.
- Option to Map WooCommerce Order Status to Salesforce Order Status and/or Opportunity stages.
- Option to check the Custom error and success message logging while importing or exporting objects.
- Provided a feature to Synchronize individual Tax rates to Salesforce fields when syncing orders from Woocommerce to Salesforce.
- Option to Synchronize WooCommerce users as Business or Person accounts in Salesforce.
- Dynamic field mapping is provided for users, products, and Orders, you can add/remove field mappings as per your need.
- Option to enable or disable Real-Time synchronization of users, products, categories, and orders from WooCommerce to Salesforce.
- Manual synchronization of WooCommerce Users, Products, Categories, and Orders to Salesforce is also provided.
- Users can navigate to Salesforce by clicking on the Salesforce IDs from WordPress WooCommerce Salesforce Connector end.
- Option to synchronize the Product/Category image in Notes and attachment or folders to Salesforce.
- Synchronize Products Price to the selected Price book of Salesforce.
- Only Synchronization of Simple products from WooCommerce site to salesforce.
- Fully based on REST API using OAuth2.0 of Salesforce to provide an easy, fast, and secure setup for the user.
Note: For real-time bi-directional sync, including product variations and custom Salesforce-WooCommerce data flow, paid customization is available as per your business needs.
Additionally, while we provide a production version by default, a development version is available at extra cost. For both, kindly contact our support at [email protected].
For more details about Plans with features & Pricing: Click here
Pre-Configuration settings
Once you install “eShopSync For WooCommerce” from AppExchange. Go through the links mentioned below to update the required settings.
Update Field Accessibility: Learn to update field accessibility
If you want to avail Salesforce Lightning experience, you need to register your domain first.
Domain Registration: How to Register Domain in Salesforce
How do I find my Salesforce Security Token: Check Steps Here
How to Configure
WordPress WooCommerce Salesforce Connector Configuration
Install The WooCommerce Salesforce Connector Plugin
Go to Plugins | Add new as shown below in the snapshot.

Then click on the Upload Plugin button.

Now, upload the zip file of the WordPress WooCommerce Salesforce connector.

When the package installation is done. Go to the Plugin option and Activate the connector.

Establish A Connection Of WooCommerce With Salesforce
The steps to establish a connection are as follows with snapshots. Follow the process carefully:
-
- When installed and activate the plugin will show on the left navigational panel.
- Click on the desired button to connect it with your Salesforce Org.

-
- You did not need to enter the Salesforce Org Credentials. It would fetch from the browser.

-
- In the Connection Settings tab, users can refresh the connection, disconnect the account & reset the mapping, and delete the logs from these tabs.

-
- Open the Category and Product tab, configure the toggles as required, and then click on the Save button to save the settings.


-
- Click on Account and Contact tab, configure the toggles as required, and then click on the Save button to save the settings.

-
- In the Order and Opportunity tab, configure the toggles as required and then click on the Save button to save the settings.

-
- Go to Advanced Settings tab, and click on the Account option. Then match the fields as per the data entry you want. It must contain at least one mapped field.
- After that, click on the Save button to save the settings.

-
- In the Advanced Settings tab, click on the Contact option. Then match the fields as per the data entry you want.
- It must contain at least one mapped field. After that, click on the Save button to save the settings.

- In the Advanced Settings tab, click on the Product option. Then match the fields as per the data entry you want.
- It must contain at least one mapped field. After that, click on the Save button to save the settings.

You can set Matching Criteria to prevent duplicate records to be created in Salesforce.
You can match the records from both platforms based on different fields and the records will only sync if the values in these fields match.
View Of Entities At Salesforce And WordPress WooCommerce End
Products
View of Products List View in WordPress WooCommerce Salesforce Connector

Note- The same functionalities can be performed in other entities as per their availability.
Users
View of Users List View in WordPress WooCommerce Salesforce Connector

Orders
View of Orders List View in WordPress WooCommerce Salesforce Connector

Categories
View of Categories List View in WordPress WooCommerce Salesforce Connector

Field Mapping At WordPress WooCommerce Salesforce End:
Account and Contact Field Mapping
For the Custom field Mapping, users have to map the meta fields of WooCommerce with the salesforce custom fields, and by making it activated
Users would able to get the specific field information at the salesforce end once it was synchronized.


Similarly, you can proceed with the Product and order field mapping.
Product Field Mapping:


Order & Opportunity Field Mapping:


Click here to Map the WooCommerce Order Stage to the Salesforce Order Status.


Click here to Map the WooCommerce Opportunity Status to the Salesforce Opportunity Status

Bi-Directional Synchronization in WordPress WooCommerce Salesforce Connector
Updating information on two separate platforms can be overwhelming for businesses. This can lead to errors, inconsistencies, and lost opportunities.
Our WordPress WooCommerce Salesforce Connector solves this problem with easy bidirectional syncing. Now, your data will always be up-to-date and consistent eliminating manual data entry.
You will get a single reliable view of your customer information, but before that, you should know our connector’s bidirectional sync setup process.
Setup at Salesforce End
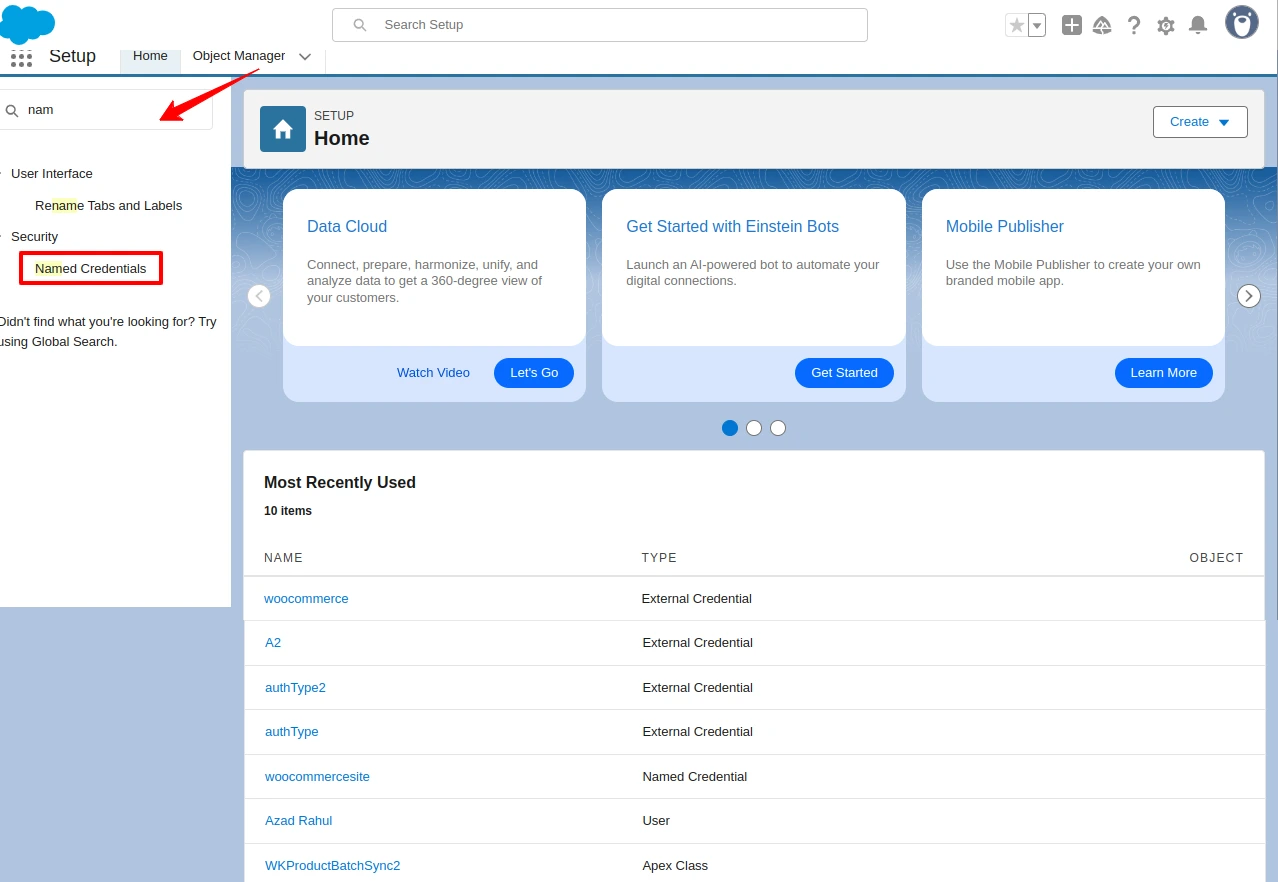
After installing the WooCommerce Salesforce connector on the Salesforce. First, click on the gear icon and go to setup.

In the Quick Find box, search for Named Credentials. Click on it to open the Named Credentials setup page.
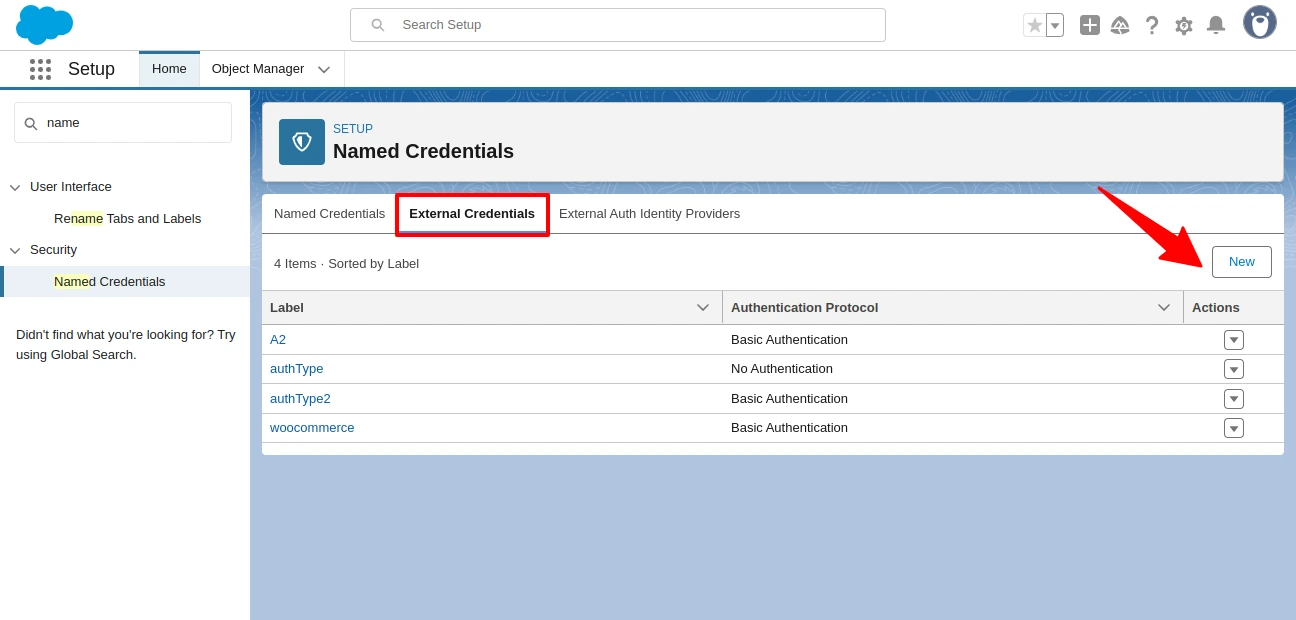
Once inside Named Credentials, click on the External Credentials tab, then click New to create your external credentials.
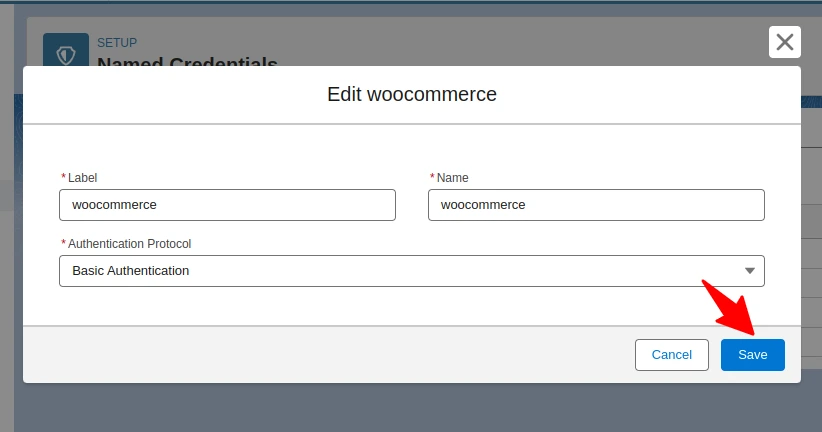
After clicking New, enter the Label and Name, select the Authentication Protocol (only choose No Authentication or Basic Authentication), and finally click the Save button.
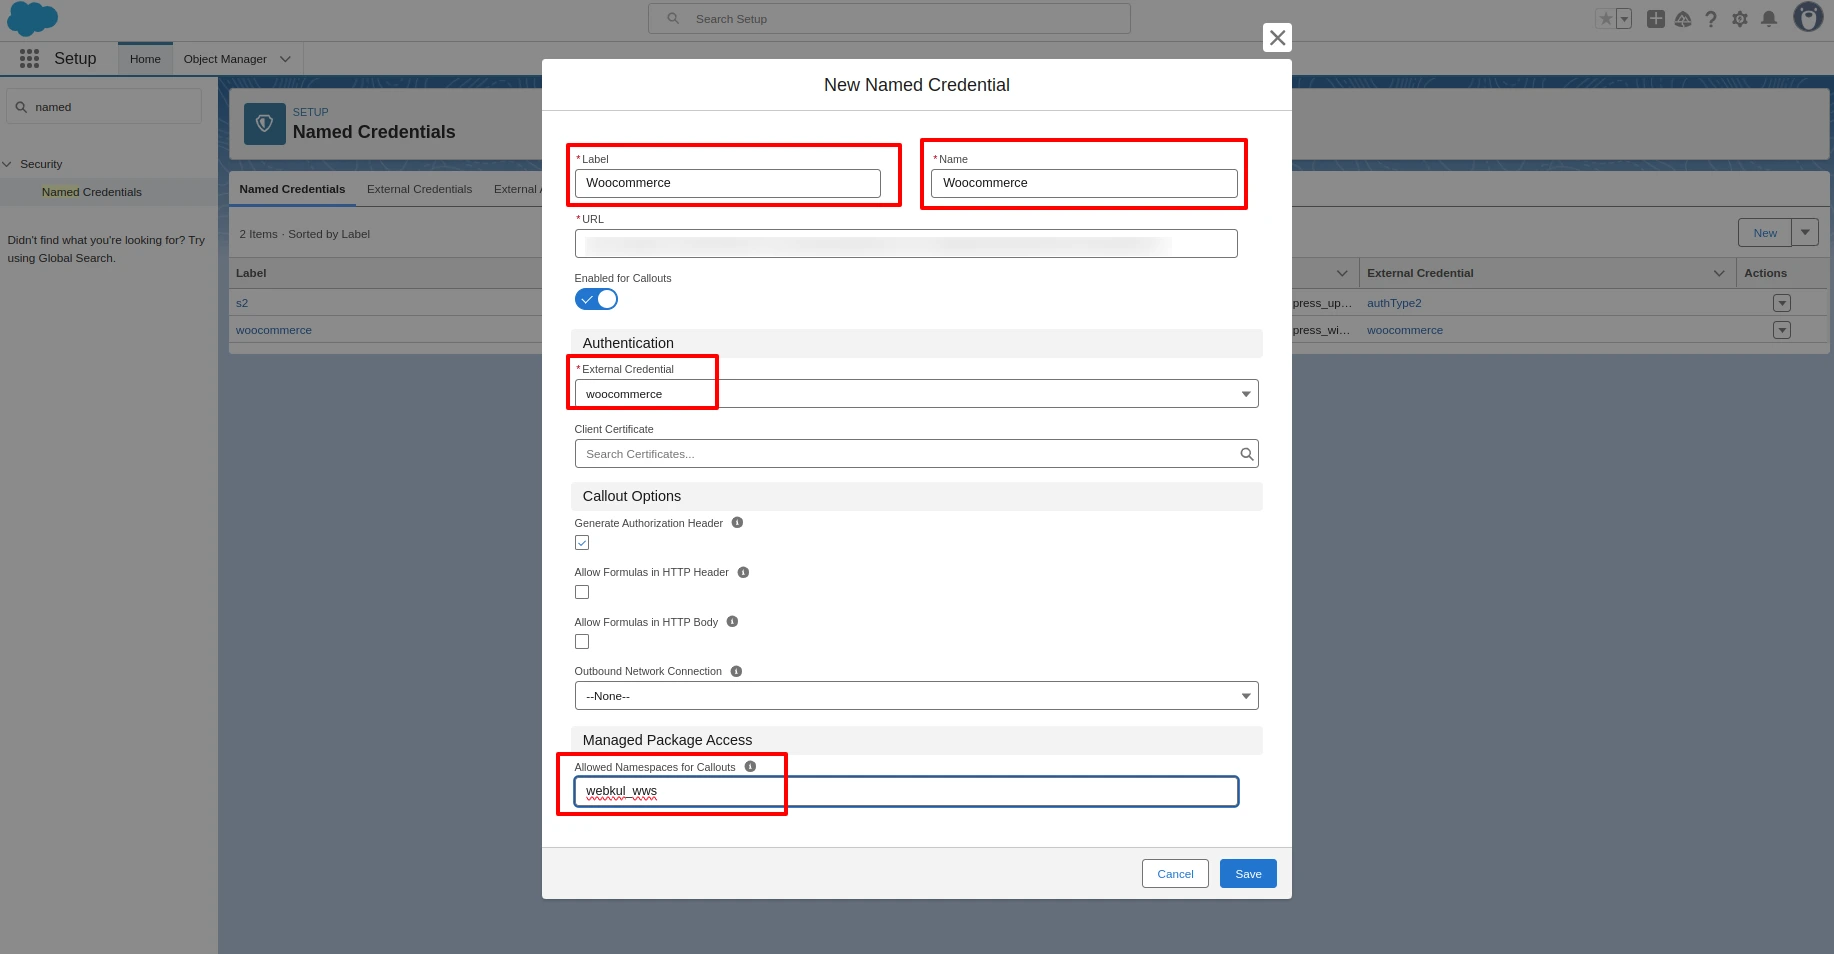
- Next, go back to Named Credentials
- Choose your Label.
- Enter the Name.
- Select your previously created External Credentials.
- Under Managed Package Access, set the access using this name: webkul_wws.
Note: Make sure your Woocommerce Site Name and Named Credential name are the same.
Further, add your site to the Picklist Value Set. Again go to the Search Bar and find Picklist Value Set. Click on the wk Site Detail.

Scroll down and edit the value from there.

Enter the Label and API name and click on the Save button. Remember, the label name and API name should be the name of your WooCommerce site name.

Open WooCommerce Salesforce Connector and press the new button to add a new site.

In this new window add the site details like Site Name and Site URL.
Meanwhile, generate Consumer Secret and Consumer Key from your WooCommerce Store dashboard.

Go to your WooCommerce dashboard under the Settings section>Advance>Rest API. Click on the Add Key button.

Further, enter the key details as in the image below and click on the Generate API key.

Finally, copy and paste the key when adding a new site in Salesforce.

Thereafter, check if the bi-directional sync has been successfully activated or not. To check that, go to the WooCommerce Connector on the left side of the dashboard.
Click on the Configuration option. Now, you can see in the image below that the site is connected and the bi-directional sync is activated.

Add WooCommerce Site Synced Field In Salesforce Objects
Another key point is adding a “WooCommerce Site Synced To” field in Salesforce Object to get bi-directional synchronization.
The purpose of adding this field is to enable businesses to sync their customer’s data from their different sites.
Businesses may have multiple stores and syncing their data from multiple stores to Salesforce requires this multi-site feature.
To add the field, first Go to the Gear Icon and click on Setup. Now Shift to the Object Manager tab.

Let’s add the field for Product in Salesforce. Search for Product in the search bar then click on the product.

Next, go to Page Layouts under the Product Section.

Click on the edit in the dropdown section.

Press the “WooCommerce Site synced To” field, then drag it below in the field section.

Lastly, click on the save button to save changes.

Thereafter, you can check the added field in the Connector under Product and check if the bidirectional feature is working.
Click on New to add a new product.

Next, enter the details related to the products. You can see that the “WooCommerce Site Synced To” field has been successfully added.
Here you can choose your preferred site to sync the data between Salesforce and WooCommerce.

After saving the product details, Shift to Related to add the Standard Price for the product as shown in the image.

Finally, save the Price Book Entry.

Now, go to the WooCommerce Store. You can see that the Product has been successfully synced automatically in real-time.

Moreover, let’s also see if the product syncs to Salesforce automatically when we add the product to WooCommerce.
To do that, go to the WooCommerce dashboard under Products then click on Add New Product.

After successfully adding a product on Woocommerce, go to the Salesforce dashboard and refresh your Product section. You can see that the product synced successfully in real time.

We have shown that the Bi-directional sync feature is working fine on the connector. Make sure to follow all the steps as shown above for a successful implementation.
Note: To enable the bi-directional feature on all the objects such as Account, Contact, Orders, and Opportunity, add the “WooCommerce Site Synced To” field in all objects as shown above.
Additionally, you can check the Record Mapping for the synced data from WooCommerce.
To do that, click on the dots on the left side of your Salesforce Org and search for “WooCommerce Field Mapping”.

When you come to the new window, select All from the drop-down section and see the same synced product information that we had created on WooCommerce.
You can see that the product name and WooCommerce Record ID is synced for the same product.

Frequently Asked Questions
Question: What is the best way to test the purchased connector file?
Answer: Install the connector on your WordPress platform, connect it to the Salesforce Sandbox, and configure it according to your preferences.
Finally, sync your data to see the functionality of the connector.
Question: What are the benefits of purchasing the connector along with Installation fees?
Answer: Purchasing a connector along with Installation fees, just brings you into a comfort zone where you just need to share the required details to initiate the installation process.
Our concerned team will effectively proceed with the installation process as soon we get complete details.
Your trust and satisfaction are highly important to us so your data will be completely secured.
Question: What will be covered by Installation fees?
Answer: We will install and set up Connector at the WooCommerce end and get things ready to go situation for you.
Installation of eShopSync For WooCommerce as well, in case it is not installed at the Salesforce end.
We will sync a test record on each object to make sure that synchronization is working fine. Further, you may proceed with synchronization on your own.
Question: What are the required details mandatory to share for the Installation procedure?
Answer: You need to share the following details to proceed with the installation and setup of the connector:
- Would be preferable to install it in the Development site first in connection with Salesforce Sandbox, so create a Dev site and share the details accordingly.
- WooCommerce Admin URL of the concerned site with login credentials.
- Salesforce login credentials
- SFTP/FTP Details such as Host Name, Port, User, and Password.
NOTE: Mandatory to share SFTP/FTP details and all of the concerned sites such as Host Name, Port, User, and Password.
If we experience any issue while connector installation due to any plugin conflict.
Question: What are the conditions to pay Installation fees?
Answer: If you are stuck and having trouble while proceeding with configuration then you need to pay Installation fees along with the required details to install and set up the connector properly.
To pay the Installation fees: Click Here
NOTE: We have already provided helpful links and video tutorials to install and set up the connector.
Question: When you can avail benefits of free support?
Answer: Free support comes into the picture once the connector is installed and configured properly.
If there is any issue while the connector installation then it will fall under the Installation process and will be treated as per the Installation procedure.
In case, you have not paid the installation fees and want support to install and configure the connector.
Then you need to pay the installation fees and must share the required details to initiate the Connector installation procedure.
Question: What will be covered under the Free 3 months of support availed with connector purchase?
Answer: Post successful connector installation and configuration, if you are experiencing any issue while data synchronization that would fall under free support.
You may find steps to resolve the issue under the Frequently Asked Questions section as per the error received.
Else, you may create a ticket on the link mentioned under the Support section with steps to reproduce and provide all required login details.
Question: What are the details mandatory to be shared to debug the issue?
Answer: You need to share the following details to investigate the issue:
- WooCommerce Admin URL of the concerned site with login credentials.
- SFTP/FTP Details such as Host Name, Port, Username, and Password.
- Salesforce login credentials. Or, you may grant login access for Salesforce as well: How to Grant Login Access
NOTE: Mandatory to share SFTP/FTP details and all of the concerned sites such as Host Name, Port, User, and Password if required while investigating.
Question: What if you can’t share SFTP/FTP details or Login credentials of WooCommerce and Salesforce due to privacy/security concerns?
Answer: Your data is highly secured with us and it is mandatory to share SFTP/FTP details and login credentials of WooCommerce and Salesforce while investigating any issue.
Without having complete details, we can’t proceed any further.
Question: Can you provide support on screen sharing sessions via any medium like Team Viewer/ GoToMeeting/ etc?
Answer: No, we don’t provide any support on any of the screen-sharing sessions like Team Viewer/GoToMeeting/etc.
Hence, it is mandatory to share complete details to provide seamless support.
Question: What does WWS Connector sync using both ways or bi-directionally?
Answer: By default, WWS Connector supports manual sync for Products and Categories. Meanwhile, real-time bi-directional sync auto-syncs records created in Salesforce.
NOTE: Specific customizations of real-time data synchronization in a bi-directional way can be done as per your business requirements; kindly contact our support team.
Question: What if you can’t share asked details on the support ticket to debug the issue and want a full refund?
Answer: In this case, the refund will process as per the Refund Policy: Check Refund Policy Here
Questions: What are the other options to get support if you have privacy concerns sharing Live Site details?
Answer: You need to provide a development environment (complete replica of the Live site) with the following details:
- Steps to reproduce
- Login credentials
- SFTP/FTP details such as Host Name. Port, User, and Password
We will debug the issue and provide a proper resolution on the Development site. Upon successful testing, you can implement it on the Live site.
Question: Error FIELD_INTEGRITY_EXCEPTION: There’s a problem with this country, even though it may appear correct. Please select a country/territory from the list of valid countries.
Answer: It seems that you have “enable” the feature of State and Country/Territory Picklists in your Salesforce Org.
WooCommerce Salesforce Connector doesn’t support the sync feature with this enabled feature.
You need to disable* State and Country/Territory Picklist in Salesforce by the following path Go To Setup | Data Management | State and Country/Territory Picklist | Click Disable | Save it.
Then try to sync the user and it should be working fine.
- *NOTE: Make sure to get confirmation from your Salesforce team prior to disabling this State and Country/Territory Picklists feature. It might be used internally in your Salesforce processes.
- You can raise customization requests for WooCommerce Salesforce Connector to sync data with State and Country/Territory Picklists feature enabled.
- You need to share your custom requirement on the link mentioned under the Support tab below.
Q: Error FIELD_INTEGRITY_EXCEPTION: AccountId, ContractId – account mismatch
A: This occurs after switching the sync type from Single Account to Individual Account.
To resolve it:
-
First, sync users after updating the sync type.
-
Next, delete the “WooCommerce” account from Salesforce (this will also remove its related orders and contracts).
-
Then, re-sync orders — they’ll now link correctly to the respective accounts.
-
Lastly, no changes are needed for guest users, as their functionality remains the same.
Question: Error API_DISABLED_FOR_ORG: API is not enabled for this Organization or Partner.
Answer: You need to enable API in your Salesforce Org. For the Enterprise edition & up, you get the “API enable” by default.
To verify follow the steps: From Setup | Users | Profiles | Choose the specific Profile of the User | Scroll down to Administrative Permissions | Check mark API Enable”
option: https://qsnapnet.com/snaps/76f7fwl3rk65hfr
Note: For Professional Edition, you have to get Professional Edition (with the “API enable” option) to avail of connector Sync features.
Question: Error INVALID_FIELD_FOR_INSERT_UPDATE: bad field names on insert/update call
Answer: Ensure the fields are visible to the concerned profile: Setup → Object → Fields → Field Name → Field Accessibility → Mark as Visible for the profile → Save.
- Repeat this for each field mentioned in the error.
- Follow this step for all the fields with the concerned object thrown in error.
Question: Error while installing eShopSync For WooCommerce: (Order.Woo_Order_Status__c) Entity not available. The Entity ‘Order’ was not found. Contact the vendor for more details.
Answer: Follow the below path to enable Orders in order to avoid this error
Go to Setup | Customize | Order | Order Settings | Checkmark ” Enable Orders ” then Save
Once you enable Orders, try to install eShopSync For WooCommerce and it will install successfully.
Question: How many Salesforce User is allocated eShopSync For the WooCommerce module license?
Answer: By default, the allocation of a module license per Org is only 1 Salesforce User. An additional module license is chargeable.
Feel free to contact us to get more licenses (One-time payment only).
Question: Error : webkul_wws: Too many query rows: 50001
Answer: Check the existing version of eShopSync For WooCommerce, it should be 1.13 and up.
You may verify the installed version by the following path: Setup| In the quick find, Search for Installed Packages and Select it | Check eShopSync For WooCommerce: Version Number.
If it is below 1.13.0 then Click here to Upgrade eShopSync For WooCommerce
After installation, follow the steps mentioned below to make some required changes:
- Go to eShopSync For WooCommerce from the App Menu drop-down | Click on the Customers section | Copy the web link from the address bar to force.com | Paste this link in the Remote site settings section guided in 2 steps.
- Go to Setup | In quick find, search for Remote Site settings and select it | Click New Remote site | Enter details as guided here: https://qsnapnet.com/snaps/yz23zeza9vzvkj4
Now, proceed WooCommerce-Salesforce Connector tab and verify the records. It should be working fine.
Question: Document Error: No document folders are selected in the options.
Answer: Make sure that you have selected a folder in WWS Connector | Settings | Choose Document Folder. Select a folder to store category and product images in Salesforce.
Question: While Clicking on Orders under the WooCommerce Salesforce Connector tab getting the error: Attempt to de-reference a null object.
Answer: Field Level permission is missing in the Order field. Follow the path to update accessibility.
Go to Setup | Customize | Orders | Fields | Click PO Number | Click Set Field-Level Security | Check Mark Visible for desired Profiles | Click Save
Now, go to the Orders section and it should be working fine.
Support
For any technical assistance, please raise a ticket or reach us by mail at [email protected]Thanks for Your Time! Have a Good Day!
Also, Hire WooCommerce Developers for all kinds of services for web and mobile development, plugin development, mobile app, design services, and much more.
If you need custom WordPress Development services then feel free to reach us and also explore our exclusive range of WordPress WooCommerce Extensions.
Thanks for Your Time! Have a Good Day!
Current Product Version - 4.0
Supported Framework Version - 4.4.2

15 comments
Thanks
Sorry for the inconvenience caused. It should be working fine now and credentials will be auto filled there. Click login to proceed for further testing. For more details about connector plans and pricing, visit here: https://eshopsync.com/wordpress
Also, you can book a demo session here: https://eshopsync.com/booking
Looking forward to talking to you soon. Thanks,
Quick question: will it only synchronize your products when you manually click the button in the backend or is there also an auto-sync option available? Or is that the ‘Enable Auto Order Synchronization’ option? Thanks!
Thanks,
I’ve sent you a skype invite, please let me know when we can have a quick discussion.
Thank you so much
Florent
Would like to hear it soon. Thanks.
Yes, you are correct. Once you synchronize Products, it will export available products at WooCommerce end to Salesforce and vice-versa.
Please feel free to ask your concern at [email protected]. I would be glad to schedule demo session for the same. Also, you can add me on Skype ID : Webkul.salesforce
Regards,
Fasihur Rahman