Quick Order for WooCommerce facilitates buyers to quickly purchase a bulk number of different products without visiting every product page.
It is design to reduce the number of steps required to place an order and allow customers to add products quickly.
It provides the most convenient steps for a wholesaler to place orders with an autocomplete search box and displays the auto-suggestions for products.
When customers enter the product’s name into the field which helps to pick-up items instantly.
Additionally, this allows customers to import CSV files to add to their cart a bunch of Products.
Quick Order for WooCommerce plugin enhances the overall shopping experience for your customer by adding a simple, intuitive way to purchase your products.
Note –
- This plugin does not support External/Affiliate and Grouped product types.
- Quick Order for WooCommerce is compatible with multisite.
- This plugin is now compatible with WooCommerce’s latest High-Performance Order Storage (HPOS) and Cart and Checkout block.
- We provide a production version of the plugin. If you want a development version, you can get it for an additional cost. Please contact [email protected] for it.
Module Activation
Check the working of the implemented feature in the video mentioned below –
Features
- Allow customers to purchase products from a single page.
- Auto-suggestion along with ajax search to find the product quickly.
- One-click action to add multiple products to the shopping cart.
- CSV import feature to add to cart bunch of products in one go.
- Customers can search for a product using the product name.
- Allow customers to search for products by uploading an image.
- OCR-based product search to extract product information from uploaded images.
- AI-powered product recognition using the Gemini model for improved product search accuracy.
- The admin can enable or disable OCR-based product search.
- Update product quantity on the quick order page.
- Add multiple different products to quick order.
- Select variable product options such as – color, size.
- The customer can add additional rows as needed.
- The admin can allow the customer to view an empty set of fields while quickly ordering the products.
- Save Quick Order rows as reusable lists and reorder previous orders in one click from My Account.
- Apply bulk discounts based on quantity, number of items, or cart total.
- Search products using GTIN, UPC, EAN, ISBN, product name, or SKU.
- Show live stock availability instantly when products are added.
- Add Quick Order using Gutenberg blocks and Elementor widgets.
- Export current Quick Order rows as a CSV file.
- New settings page with 6 organized tabs for easy management.
- Modern popup dialogs replace old browser alerts.
- Hidden products are automatically excluded from search and CSV export.
Installation
Configuration
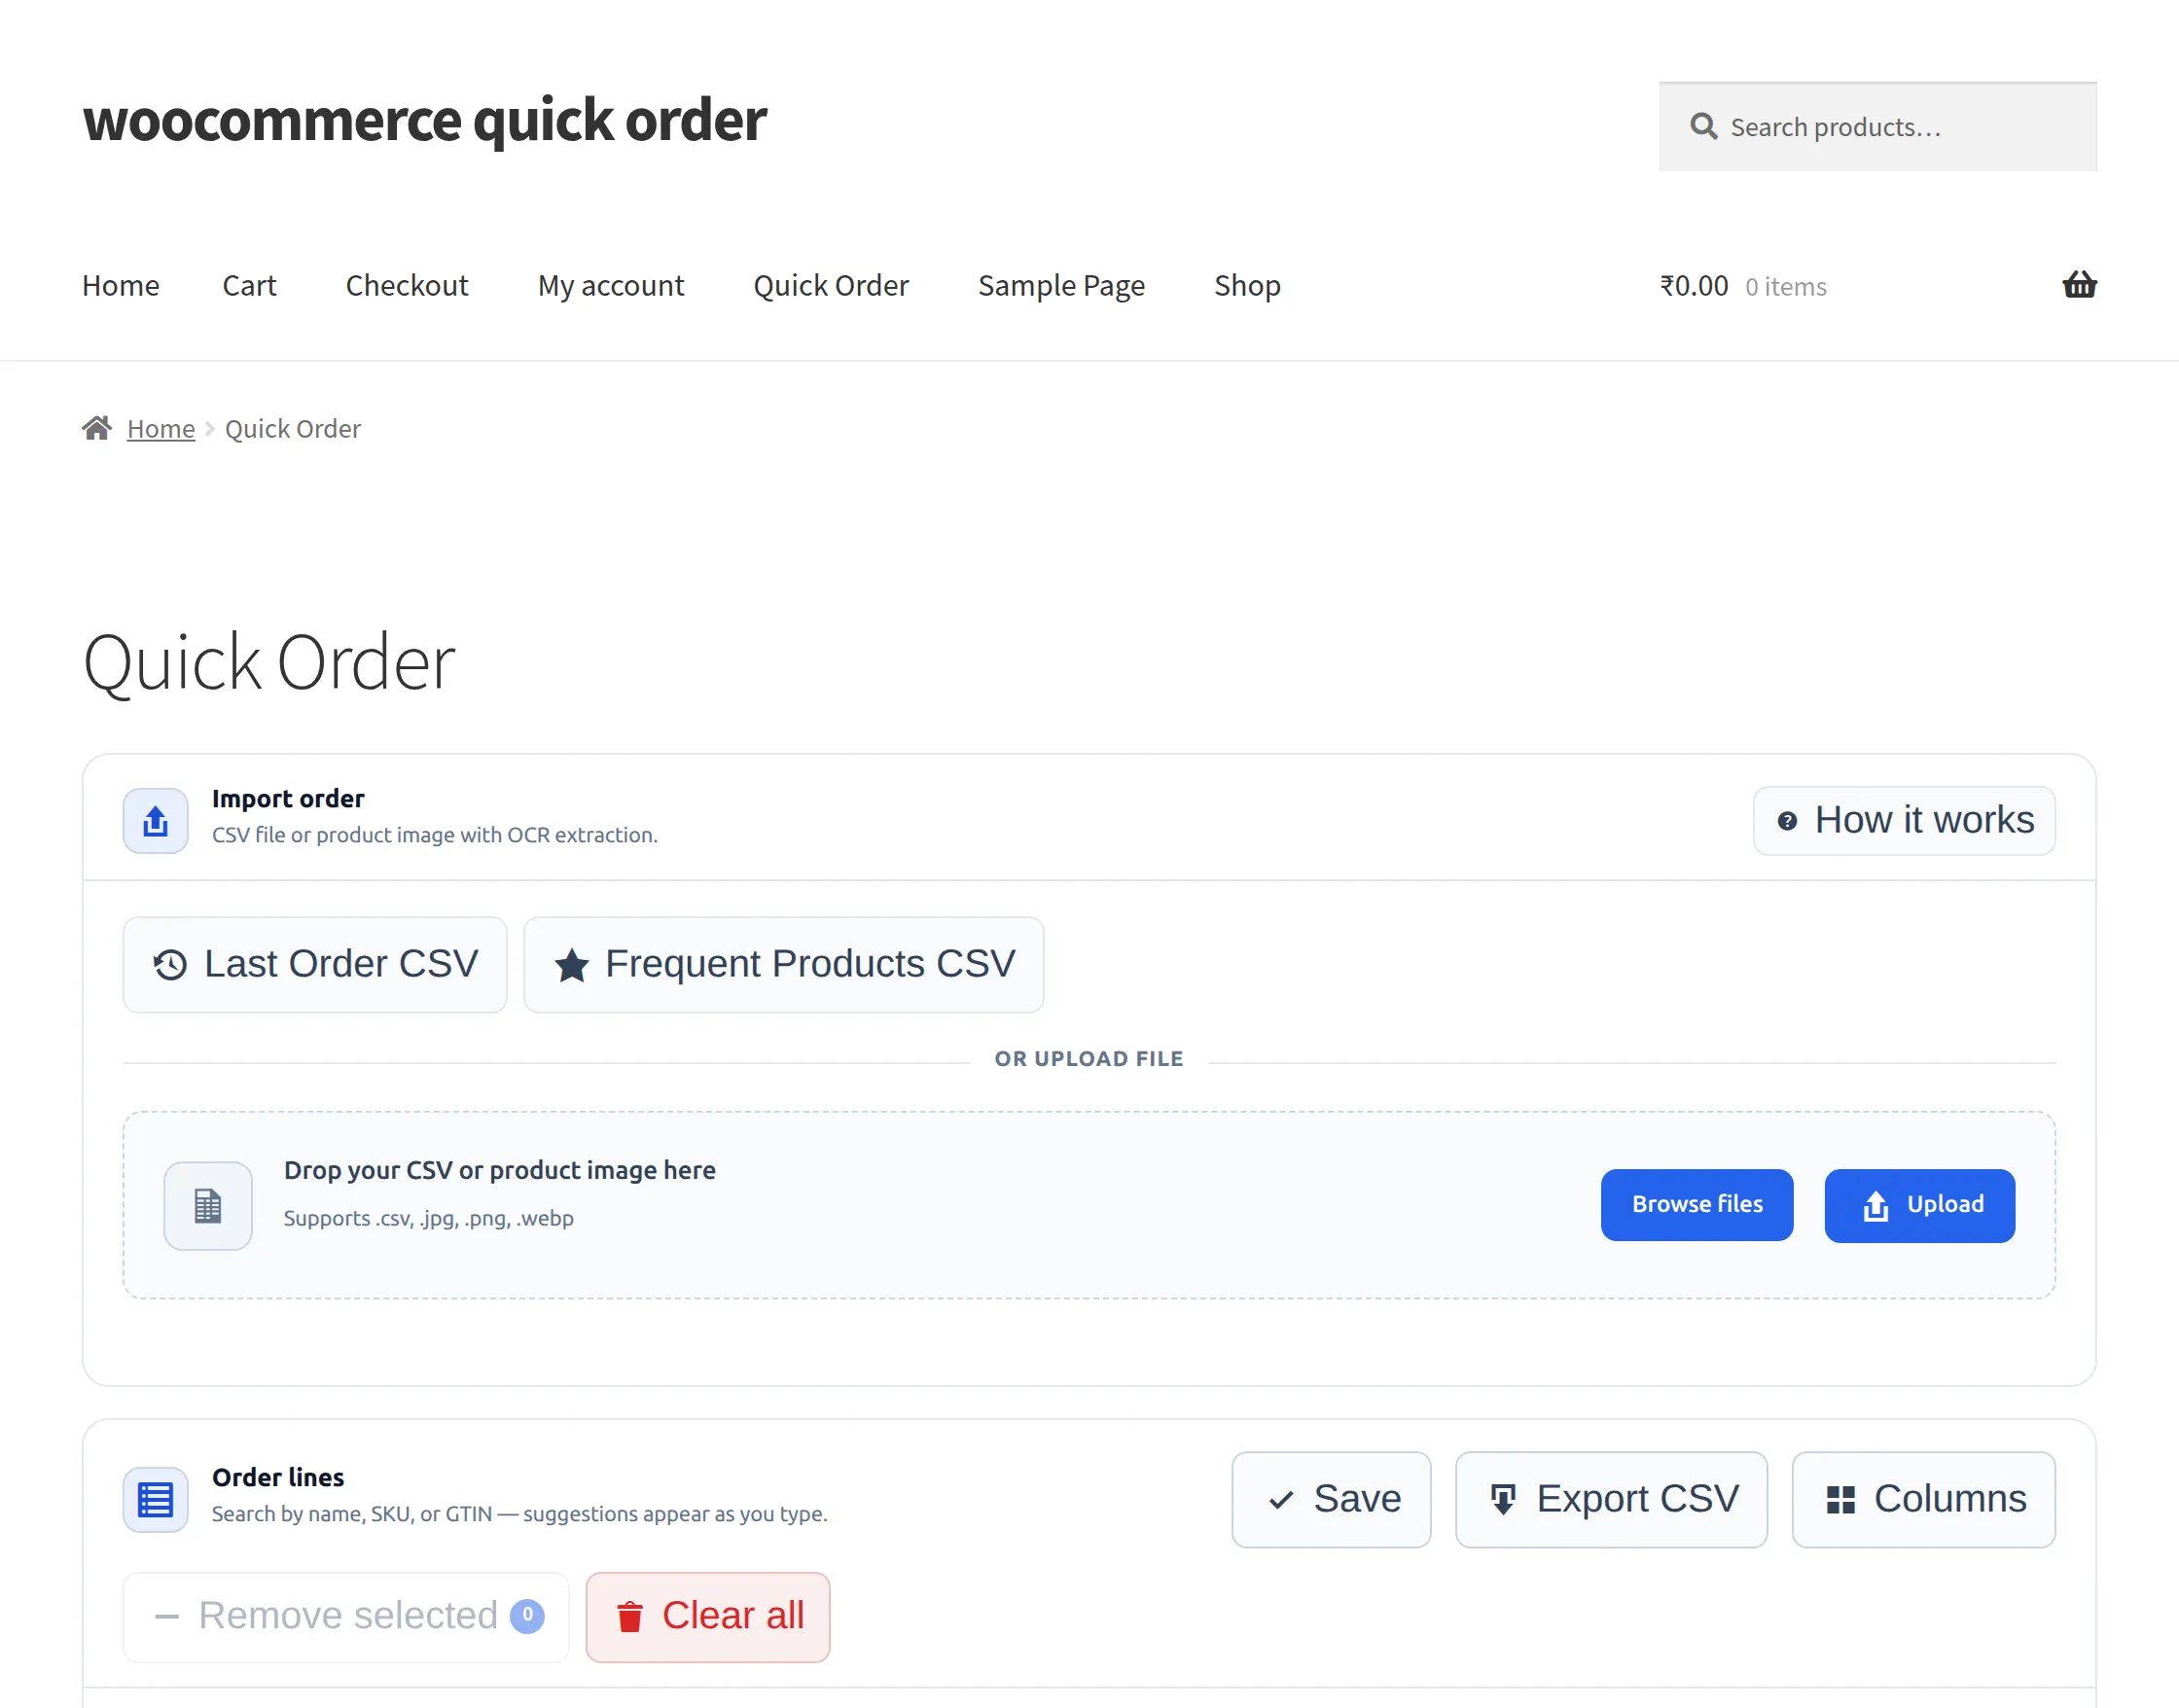
After the successful installation of the WooCommerce Quick Order plugin, the admin can navigate to the admin dashboard and access the “WC Quick Order” configuration panel from the sidebar menu. The plugin settings are now organized into six distinct tabs:
The plugin settings are organized into multiple tabs, including:
General, Search & Catalog, OCR AI, Tier-Based Pricing, Frontend Labels, Appearance
Using these configuration tabs, the admin can manage Quick Order functionality, product search behavior, OCR uploads, pricing discounts, frontend labels, and appearance settings as shown in the image below.
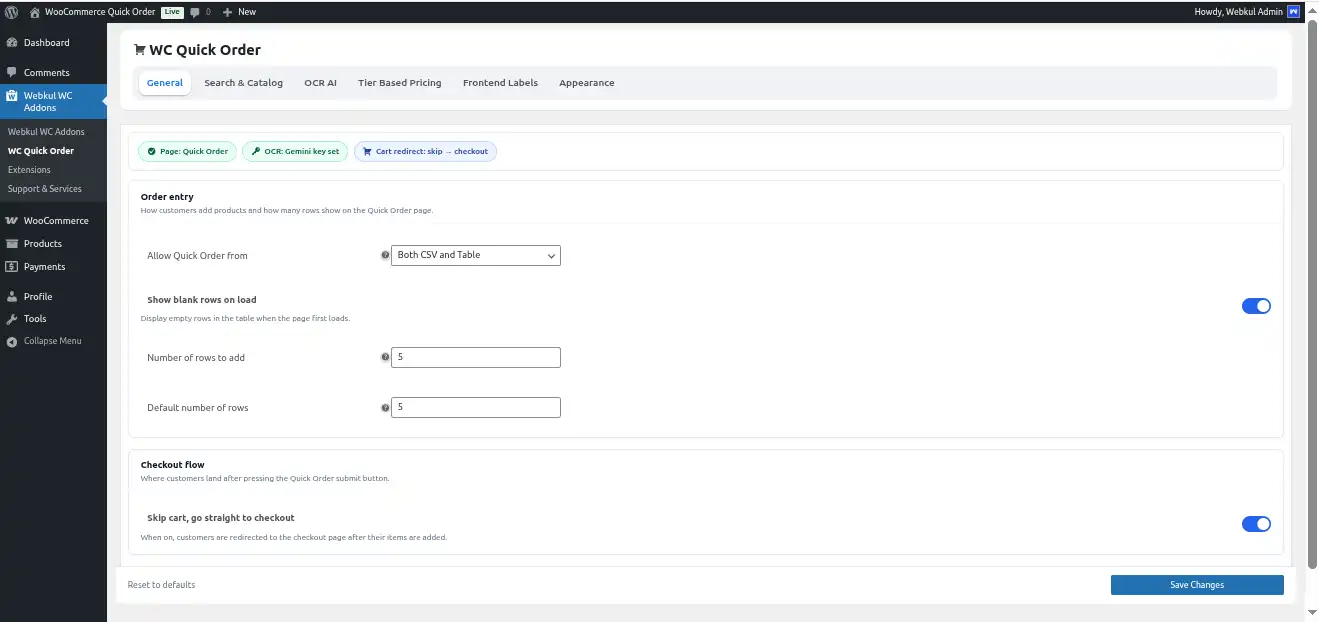 The admin can set the configurations for WooCommerce Quick Order as under-
Allow Quick Order from- The admin may set this field as ‘Both CSV and Table,’ ‘Quick Order Table,’ or ‘Upload CSV.’
- If the admin configures “Both CSV and Table,” the customers can upload products through a CSV file or directly in the table itself.
- On configuring the “Quick Order table,” the customers can add products directly to the table.
- If the admin configures ‘Upload CSV’, the system will upload products only through the CSV file.
- If the admin enables “Show blank rows on load,” empty product rows will automatically appear when the Quick Order page loads. Disabling this option will hide the blank rows initially.
- If the admin enables “Skip cart, go straight to checkout,” customers are redirected directly to the checkout page after products are added to the cart.
- If the admin disables this option, customers are redirected to the cart page before proceeding to checkout.
Show Blank Rows- The admin can set this field as Yes or No. Setting it as ‘Yes’ will introduce an empty set of fields in the Quick Order section.
Search & Catalog
Controls how products are searched and filtered in the Quick Order search results.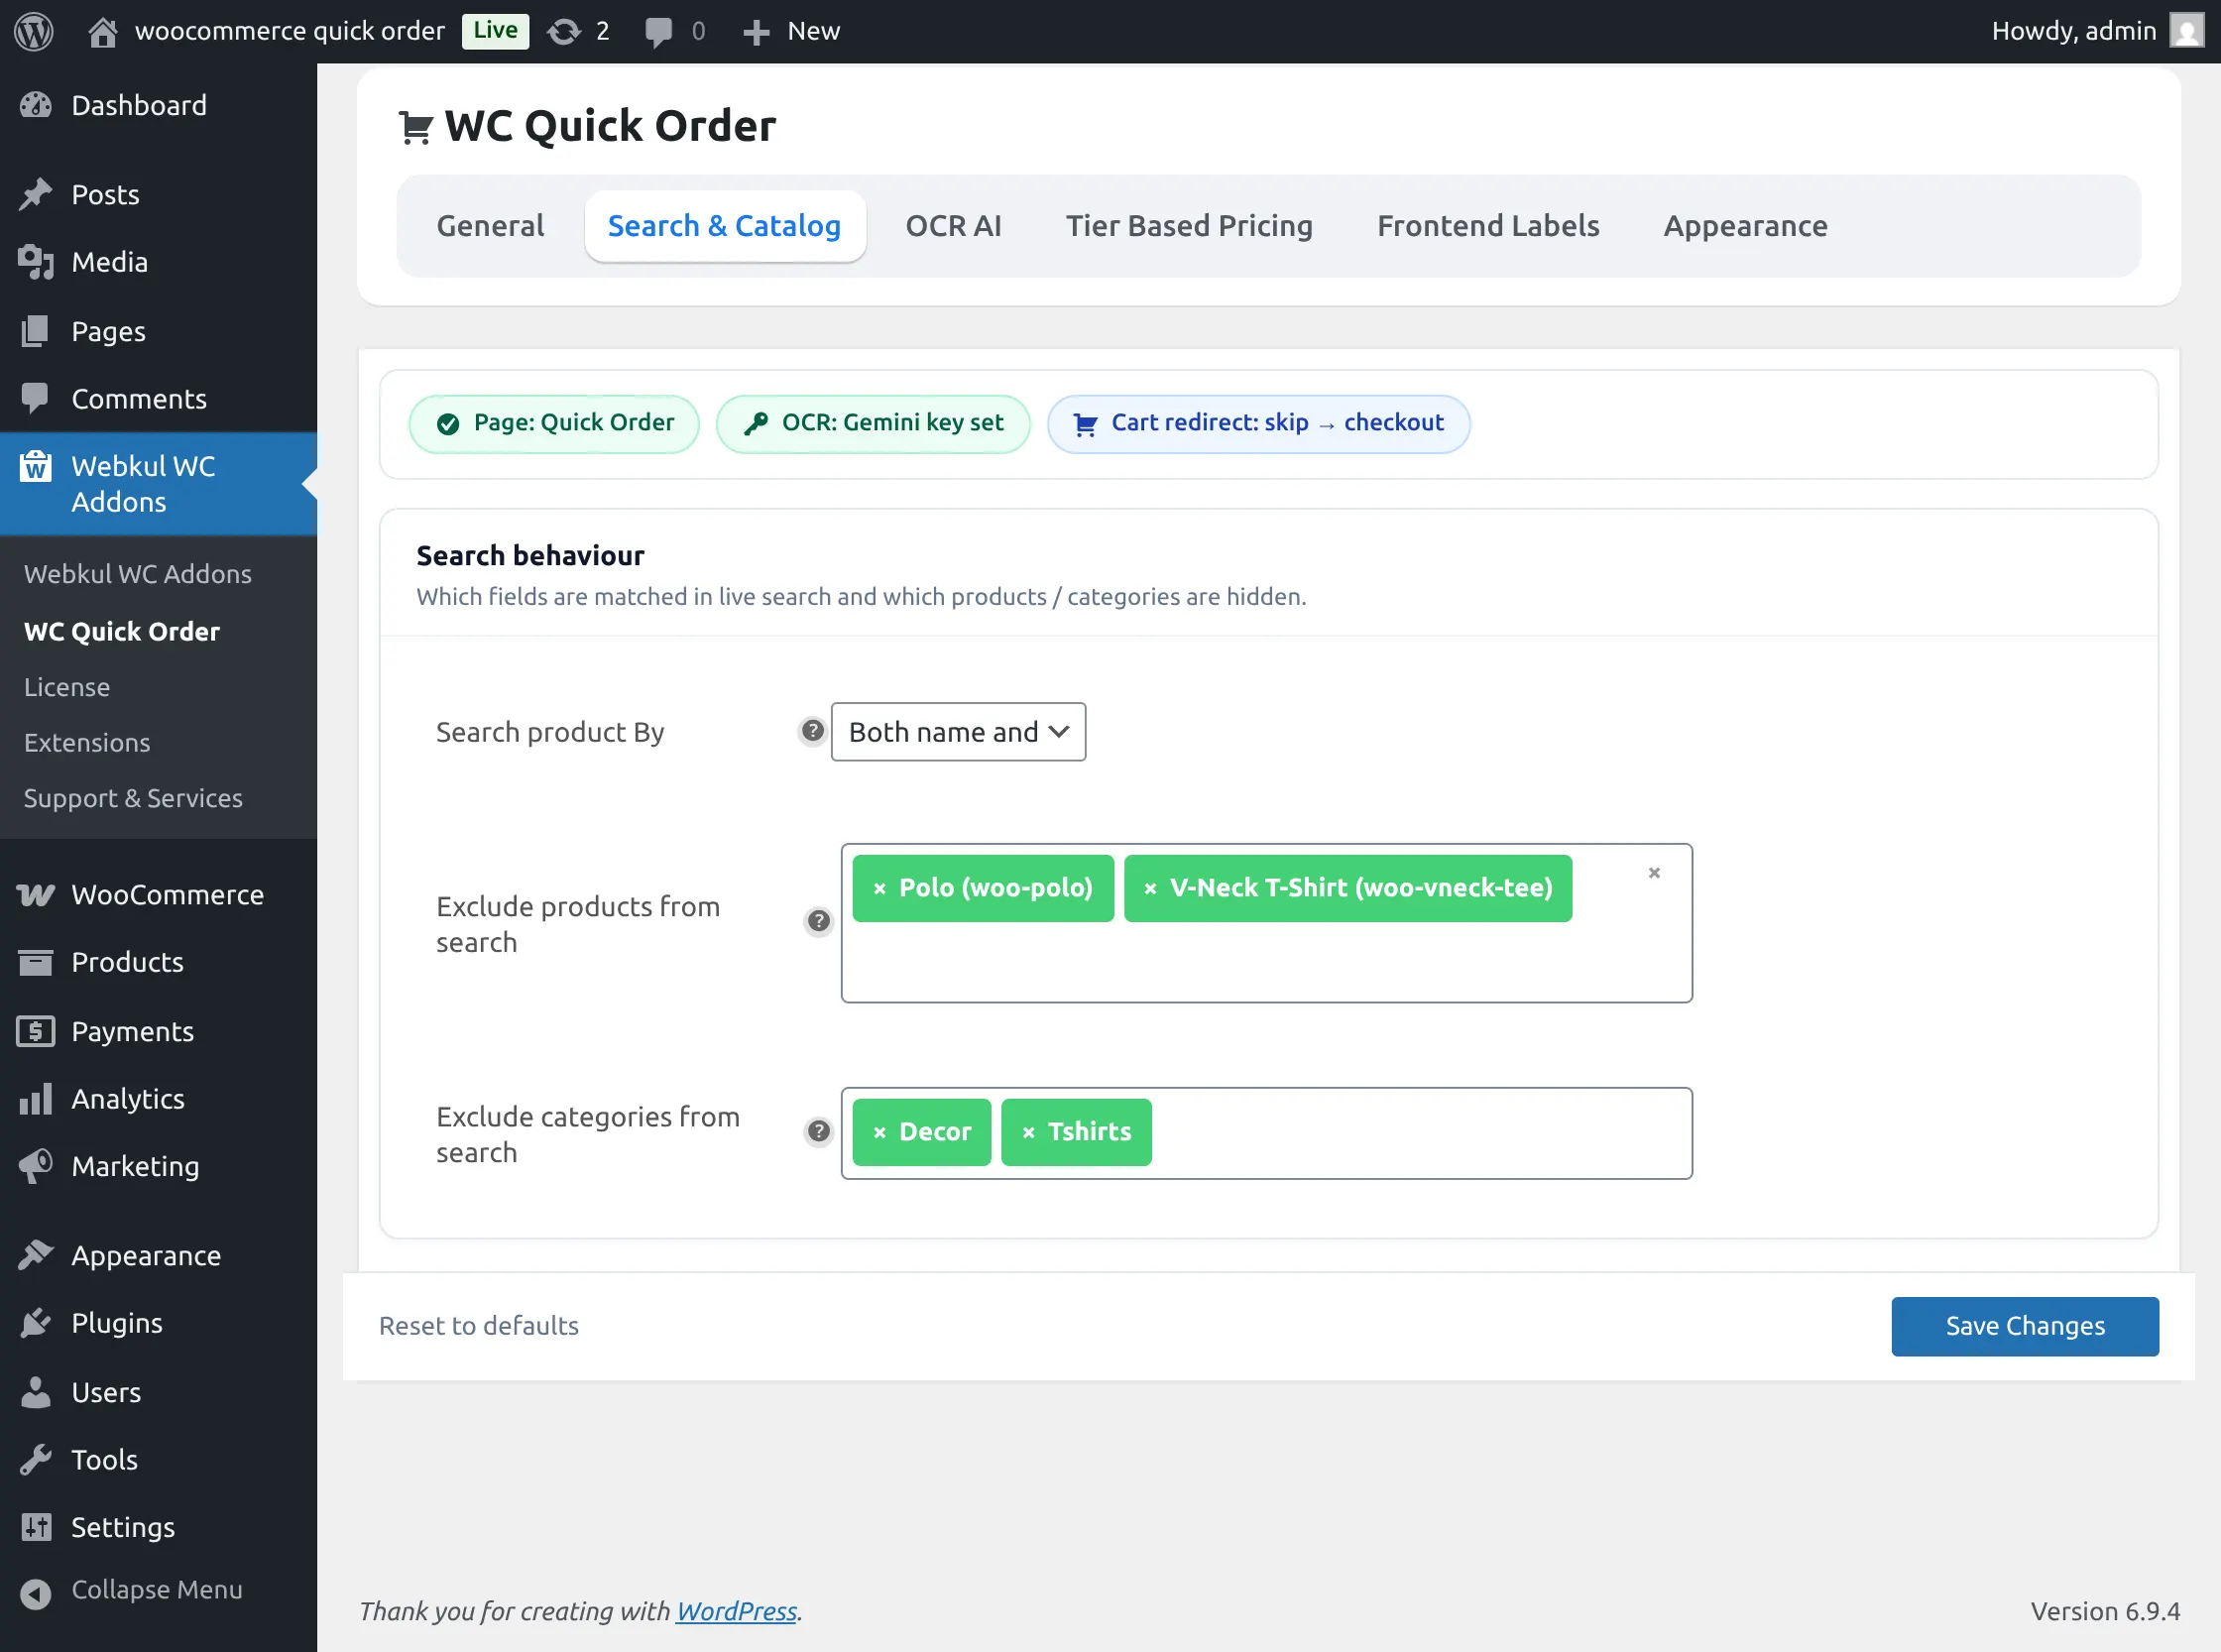
- If the admin configures “Both name and SKU,” customers can search products using either the product name or SKU.
- If the admin configures “Product Name,” customers can search products only by product name.
- If the admin configures “Product SKU,” customers can search products only by SKU.
- If the admin adds products under “Exclude products from search,” those selected products will not appear in the Quick Order search results.
- If the admin adds categories under “Exclude categories from search,” all products belonging to those categories will be hidden from the Quick Order search results.
Additionally, product search and CSV import now recognize global unique identifiers including GTIN, UPC, EAN, and ISBN. An info tooltip on the SKU/GTIN column header explains all accepted product identifiers.
OCR AI
OCR Upload
Controls the OCR-based product upload functionality in the Quick Order page.

- If the admin enables “Enable OCR uploads,” customers can upload an image or PDF file, and the system will automatically extract SKUs to populate the Quick Order table.
If the admin disables this option, the OCR upload feature will not be available on the Quick Order page.
Model & Credentials
Configures the OCR provider and API credentials used for SKU extraction.
- The admin can select the OCR provider from the “Select OCR Model” dropdown.
- The admin needs to enter a valid API key in the “Gemini Key” field to enable OCR processing functionality.
- If the API key is invalid or missing, OCR-based SKU extraction will not work properly.
Tier-Based Pricing
Allows the admin to configure percentage-based discounts for Quick Orders based on cart quantity, line items, or subtotal amount. Three matching rules are available: by total units in cart (e.g., 5–10 units = 2% off), by number of distinct line items, or by cart subtotal amount (e.g., $99–$199 = 2% off). Customers can see the applied discount on the Quick Order table before adding to cart, as well as on the cart page, checkout, and order emails.
If the admin enables “Enable tier-based discounts,” the system automatically applies discounts according to the configured tier rules.
If the admin disables this option, no tier-based discount will be applied to Quick Orders.
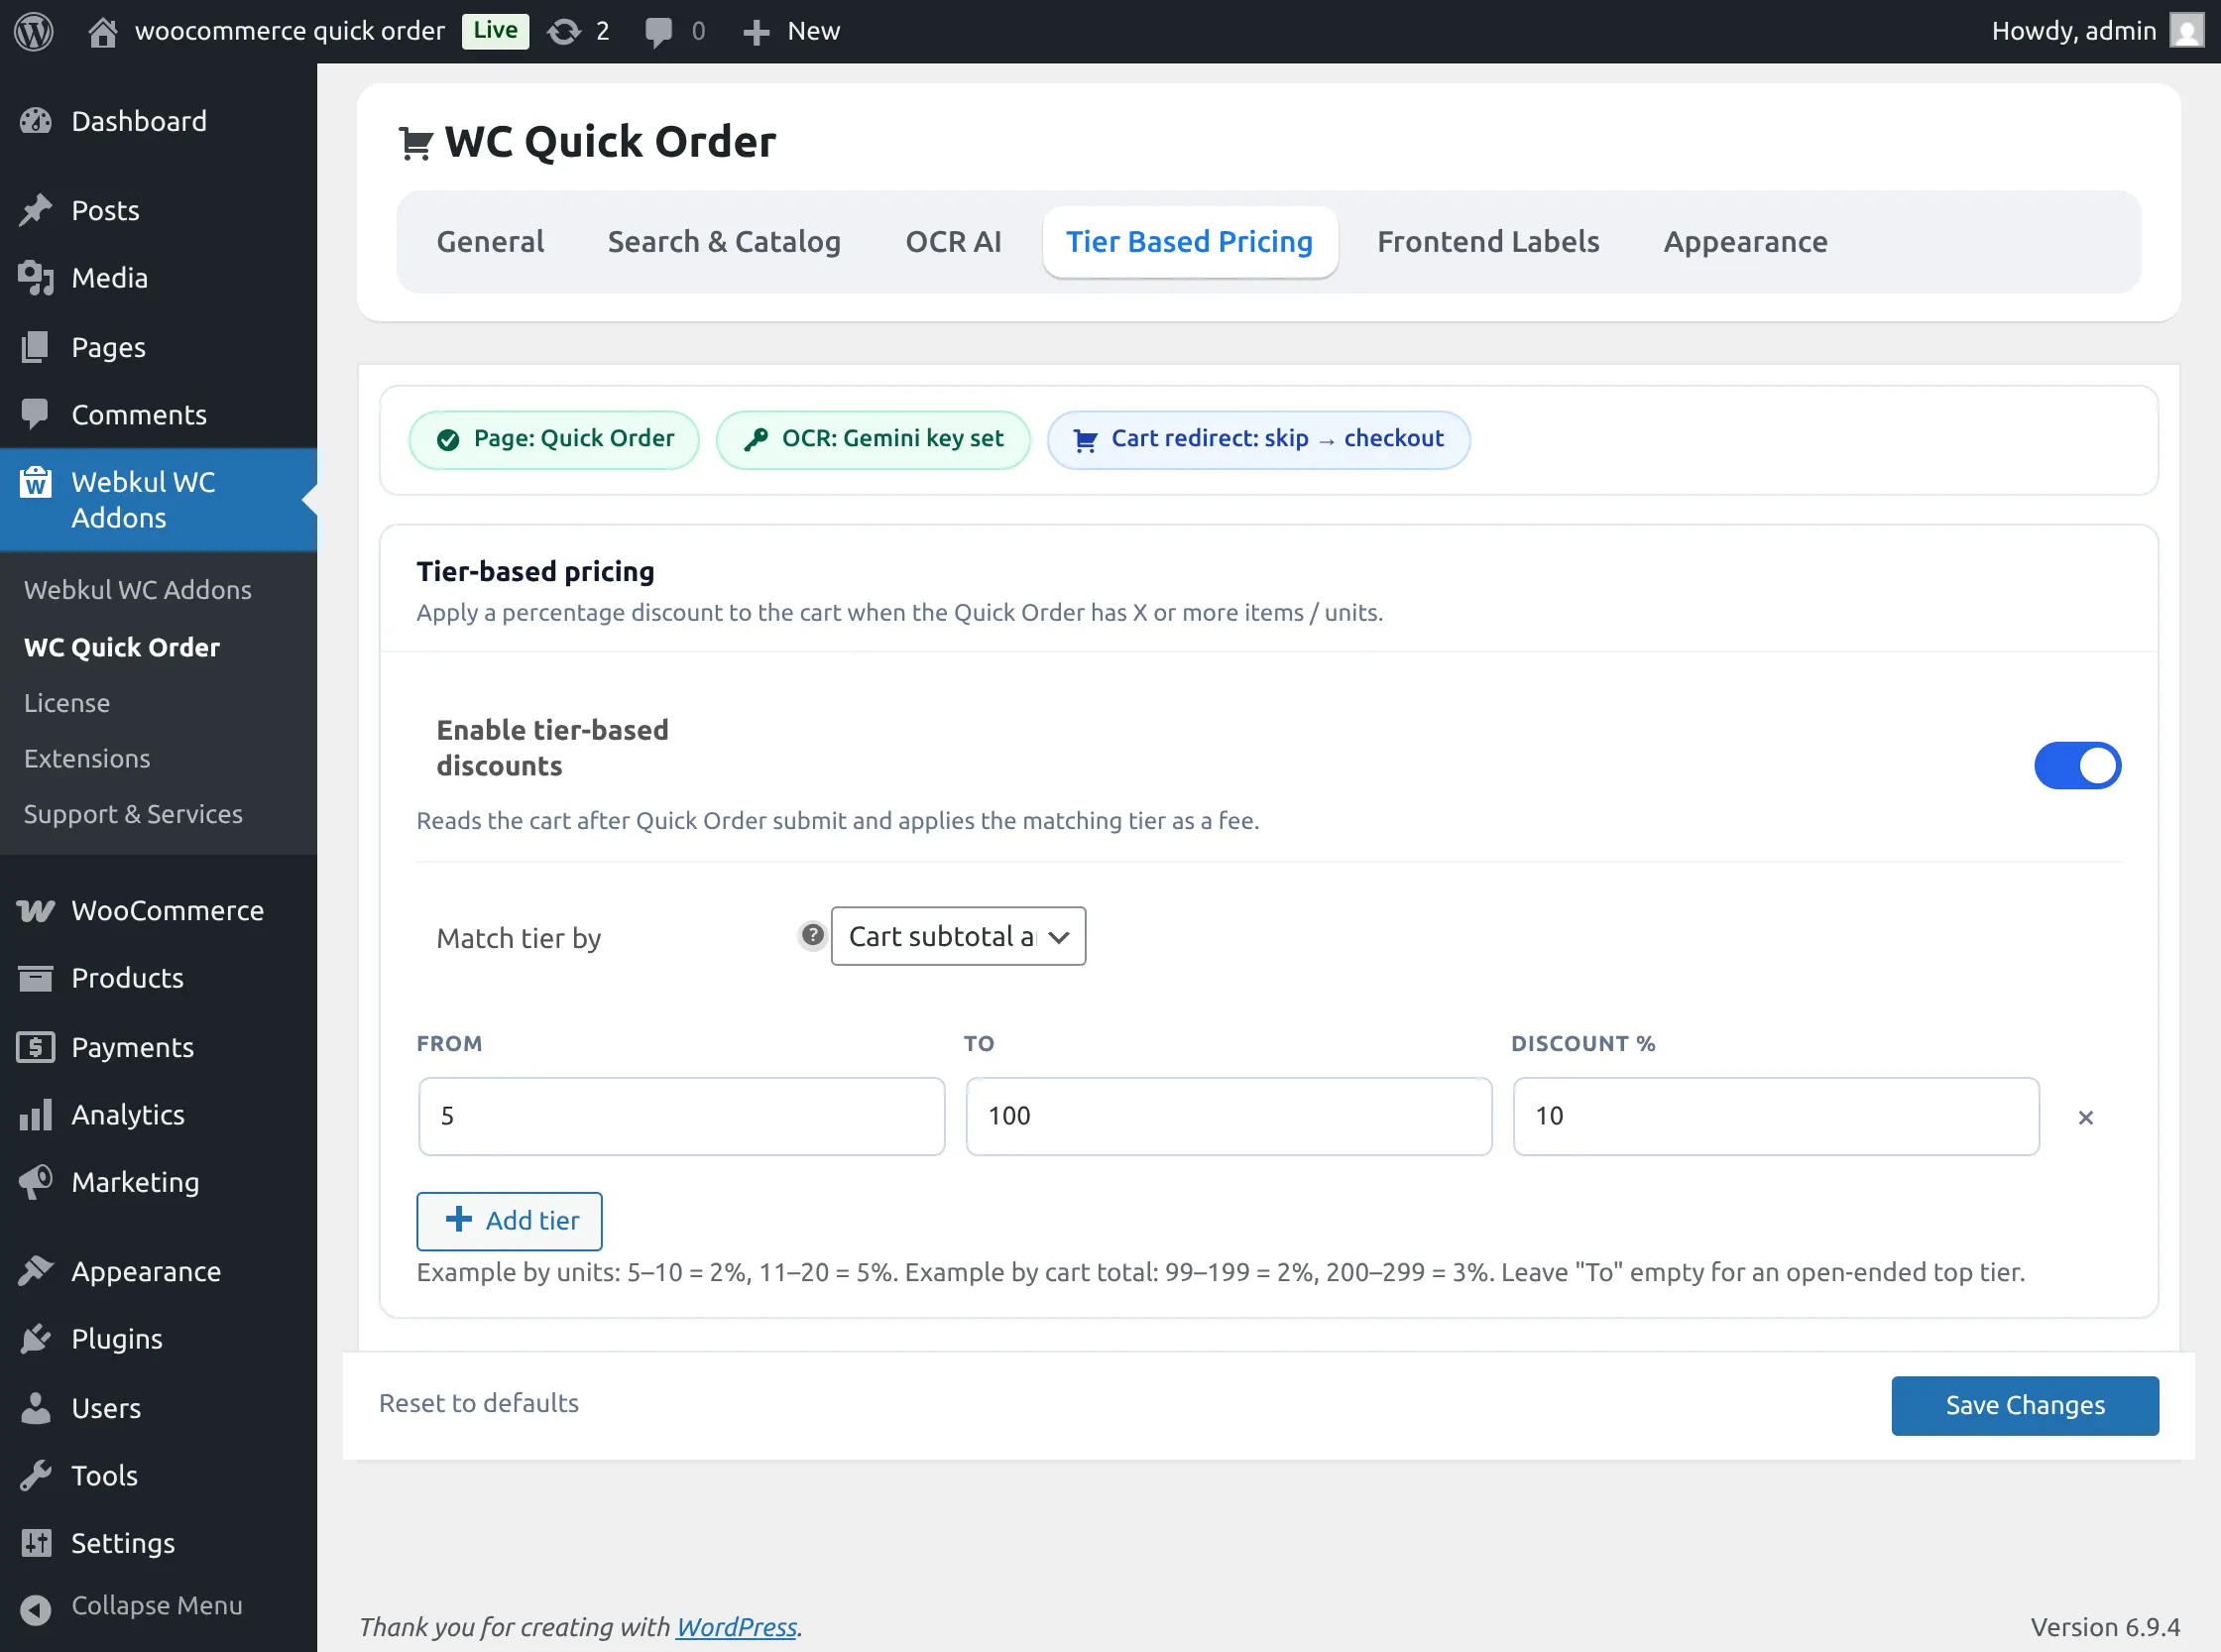
Tier Configuration
The admin can configure discount rules using the “Match tier by” dropdown.
- If the admin selects “Total units in cart (sum of all quantities),” the discount will be applied based on the total quantity of products added to the cart.
- If the admin selects “Number of distinct line items,” the discount will be applied based on the total number of unique products added to the Quick Order table.
- If the admin selects “Cart subtotal amount (currency),” the discount will be applied according to the cart subtotal value.
- The “From” field defines the minimum range value required for the tier to apply.
- The “To” field defines the maximum range value for the tier.
- The “Discount %” field defines the percentage discount that will be applied when the configured range matches.
- The admin can create multiple discount ranges using the “Add tier” button.
- If the “To” field is left empty, the tier will apply to all higher values beyond the minimum configured range.
Frontend Labels
Allows the admin to customize the text labels displayed on the Quick Order frontend page.
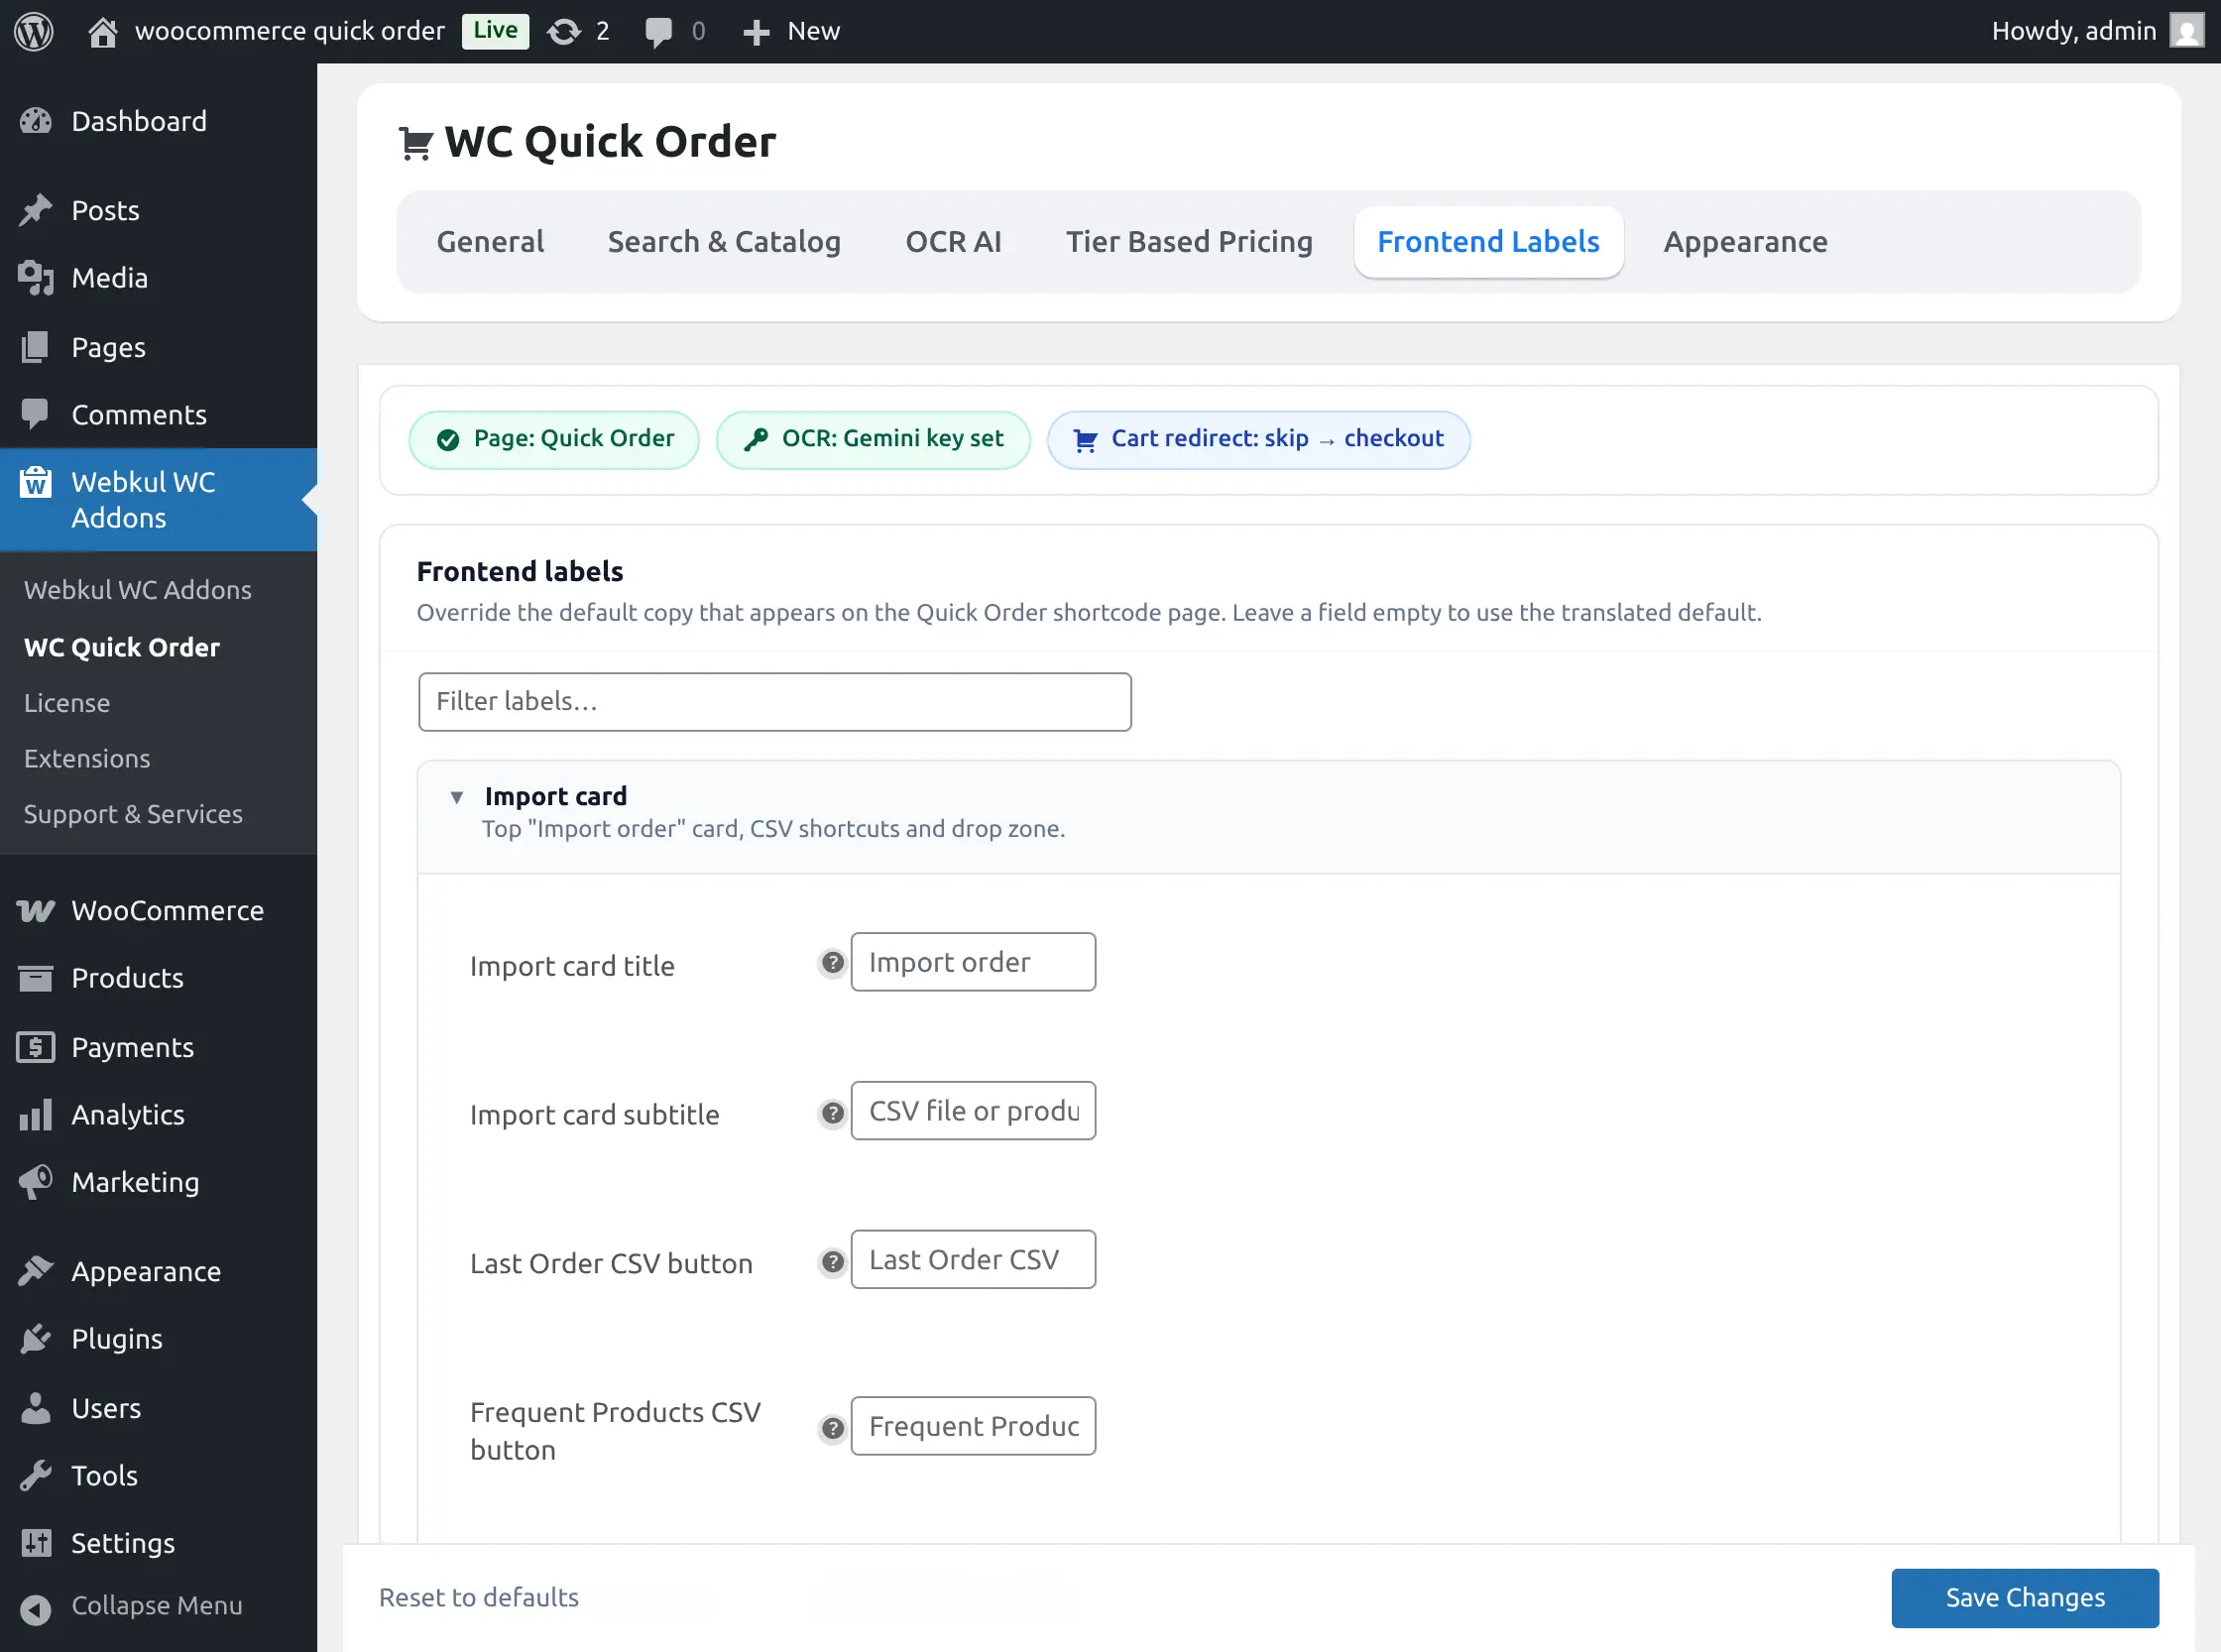
- The admin can modify labels and button text shown to customers on the Quick Order page.
- The admin can search specific labels using the “Filter labels” field.
- If a label field is left empty, the system will use the default translated label.
- The admin can restore the original text for any field using the “Use default” option.
- The admin can reset all customized labels using the “Reset to defaults” option.
Changes will be applied on the frontend after clicking the “Save Changes” button.
Appearance
Allows the admin to customize the visual appearance and styling of the Quick Order page.
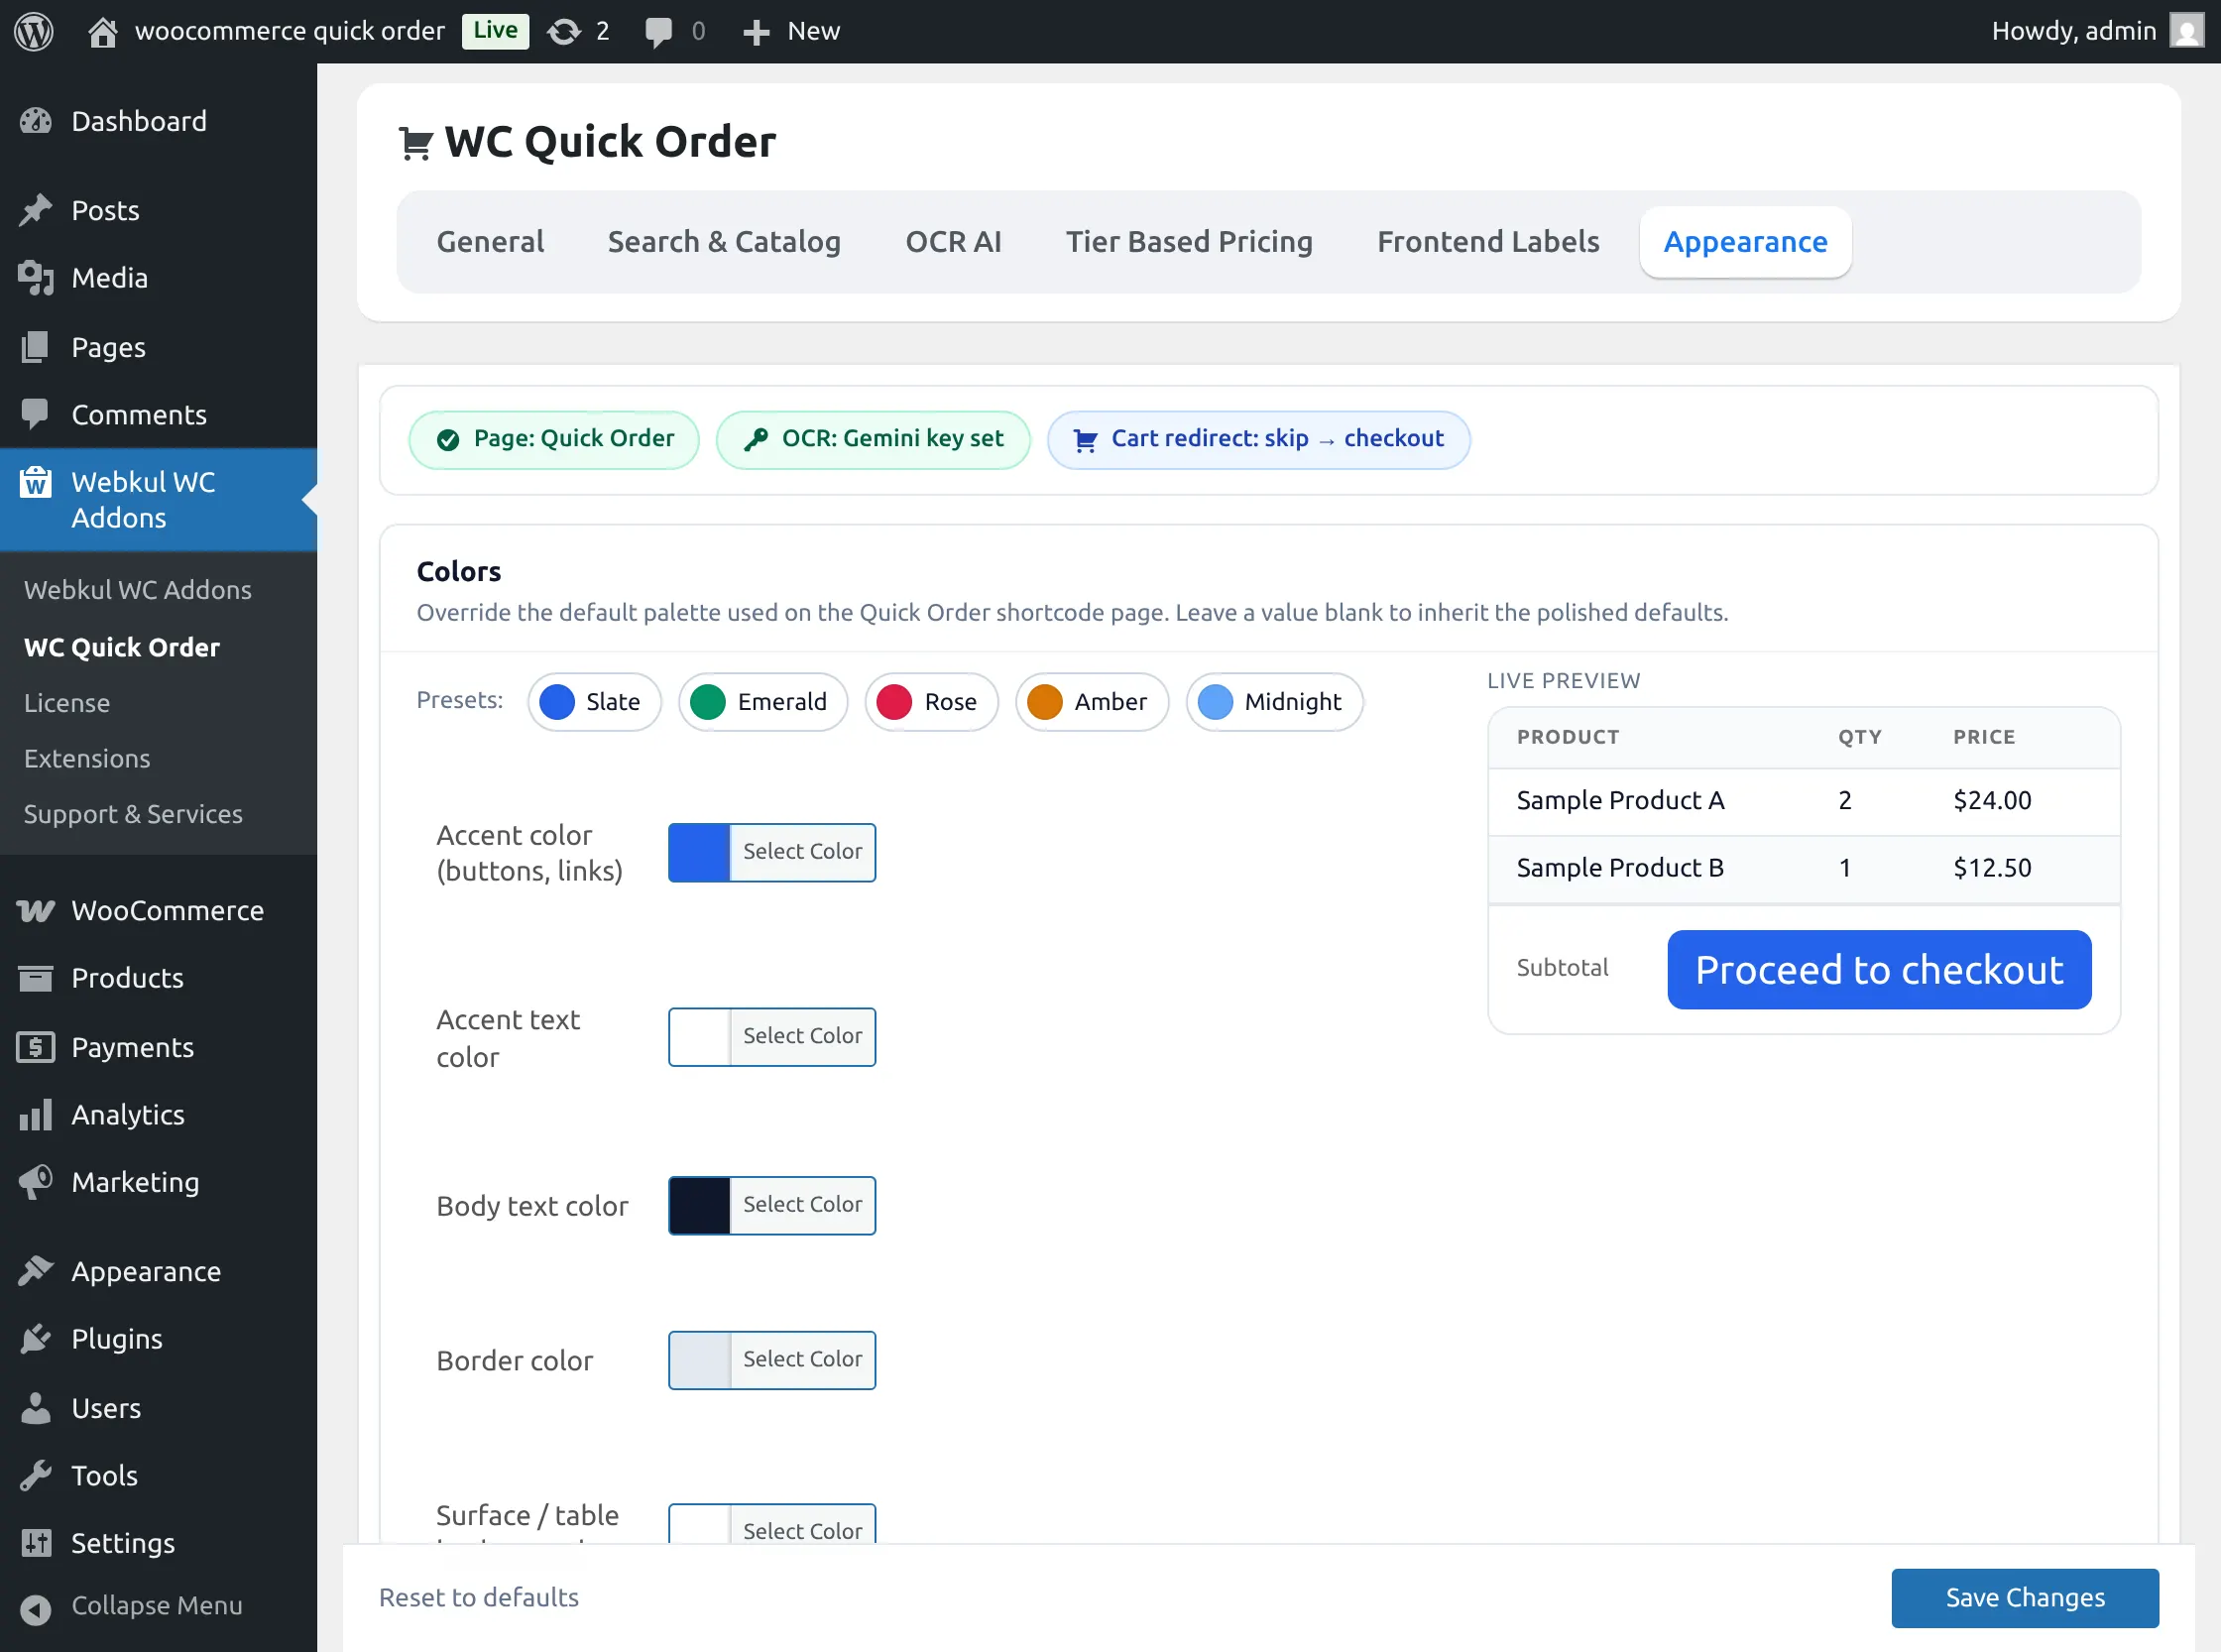
- The admin can configure colors, typography, and button styling for the Quick Order interface.
Changes made in this section are reflected in the live preview area. - If a styling field is left blank, the system will inherit the default Quick Order styles.
- The admin can restore all appearance settings using the “Reset to defaults” option. Changes will be applied after clicking the “Save Changes” button.
Thus, the Quick Order Section in the front end will appear as below-
No. of rows to add: The admin can define the number of rows to add to the quick order to add products.
Default no. of Rows: The admin can define the default number of rows present on the quick order page.
Want to see combination field: They may set this as “Yes or No.”
Search Product By – The admin may set this as ‘Both Name and SKU,’ ‘Product Name’ or ‘SKU.’ If the admin selects:-
- “Both Name and SKU”: The customer can search for products either by the product name or its SKU.
- “Product Name”: You can search for the products using their names.
- “SKU”: The admin can search for products using their SKUs.
Based on the configured number of rows, the system will auto-fill the page with the latest products.
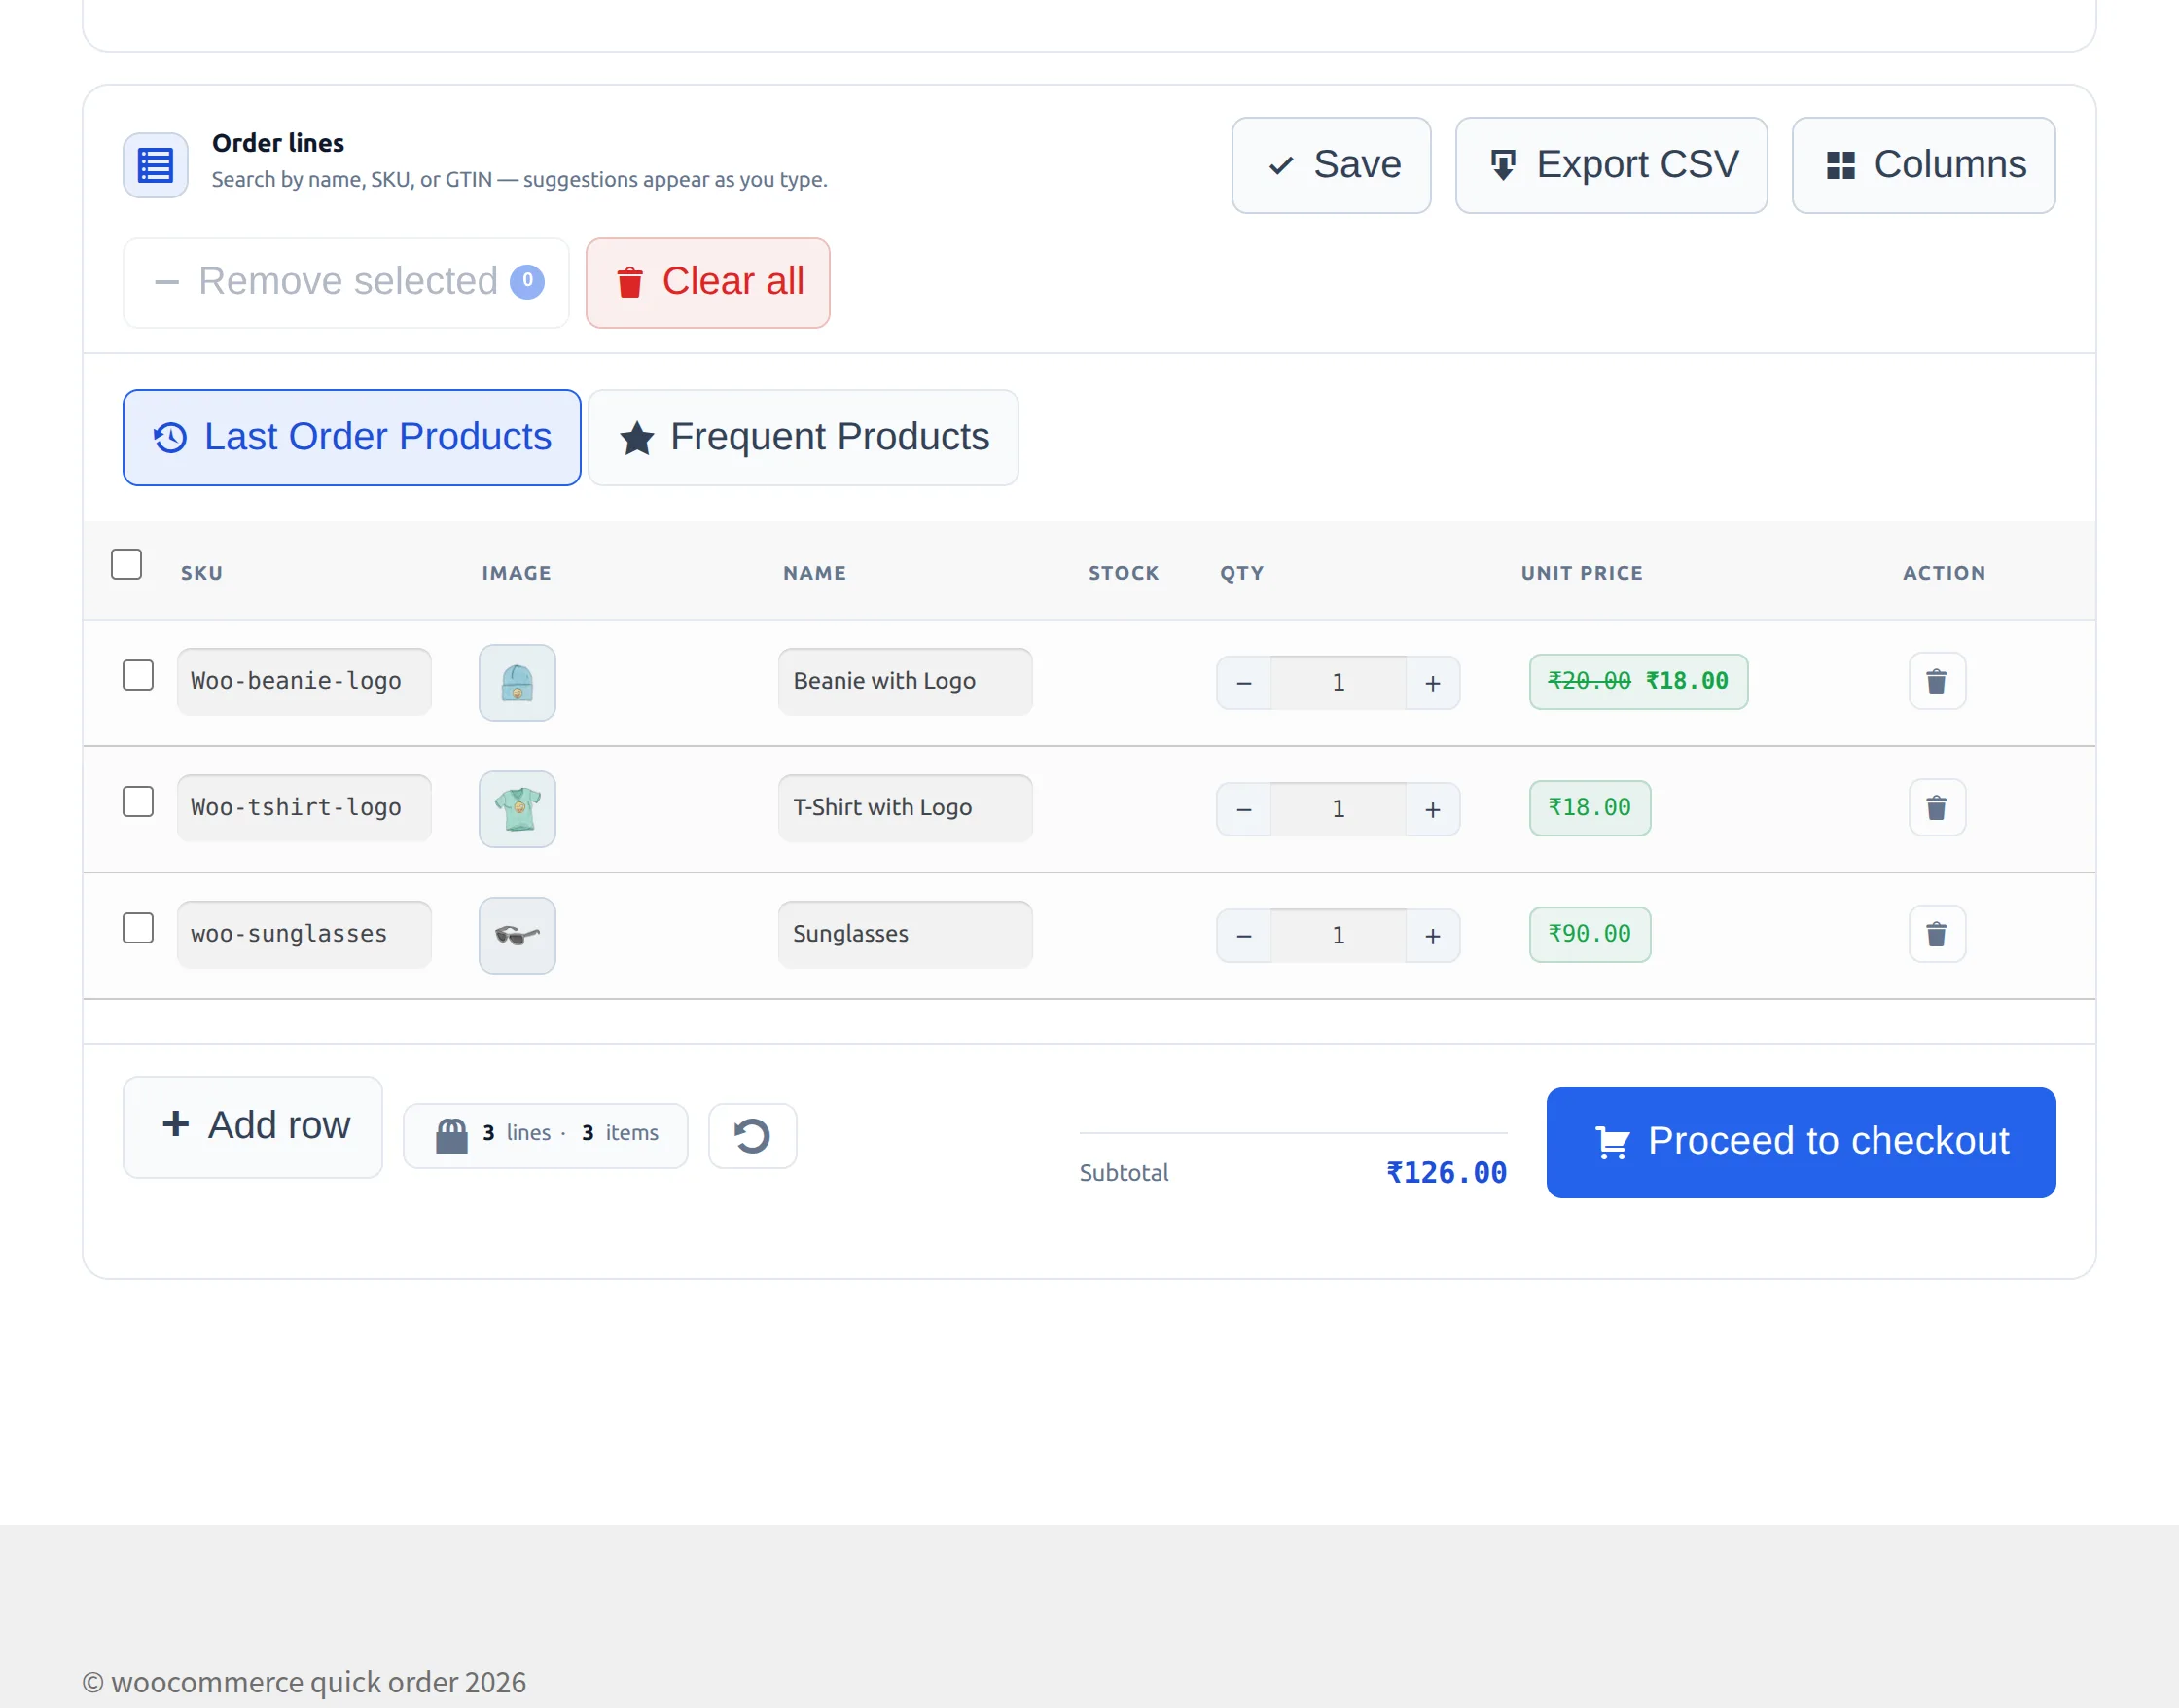
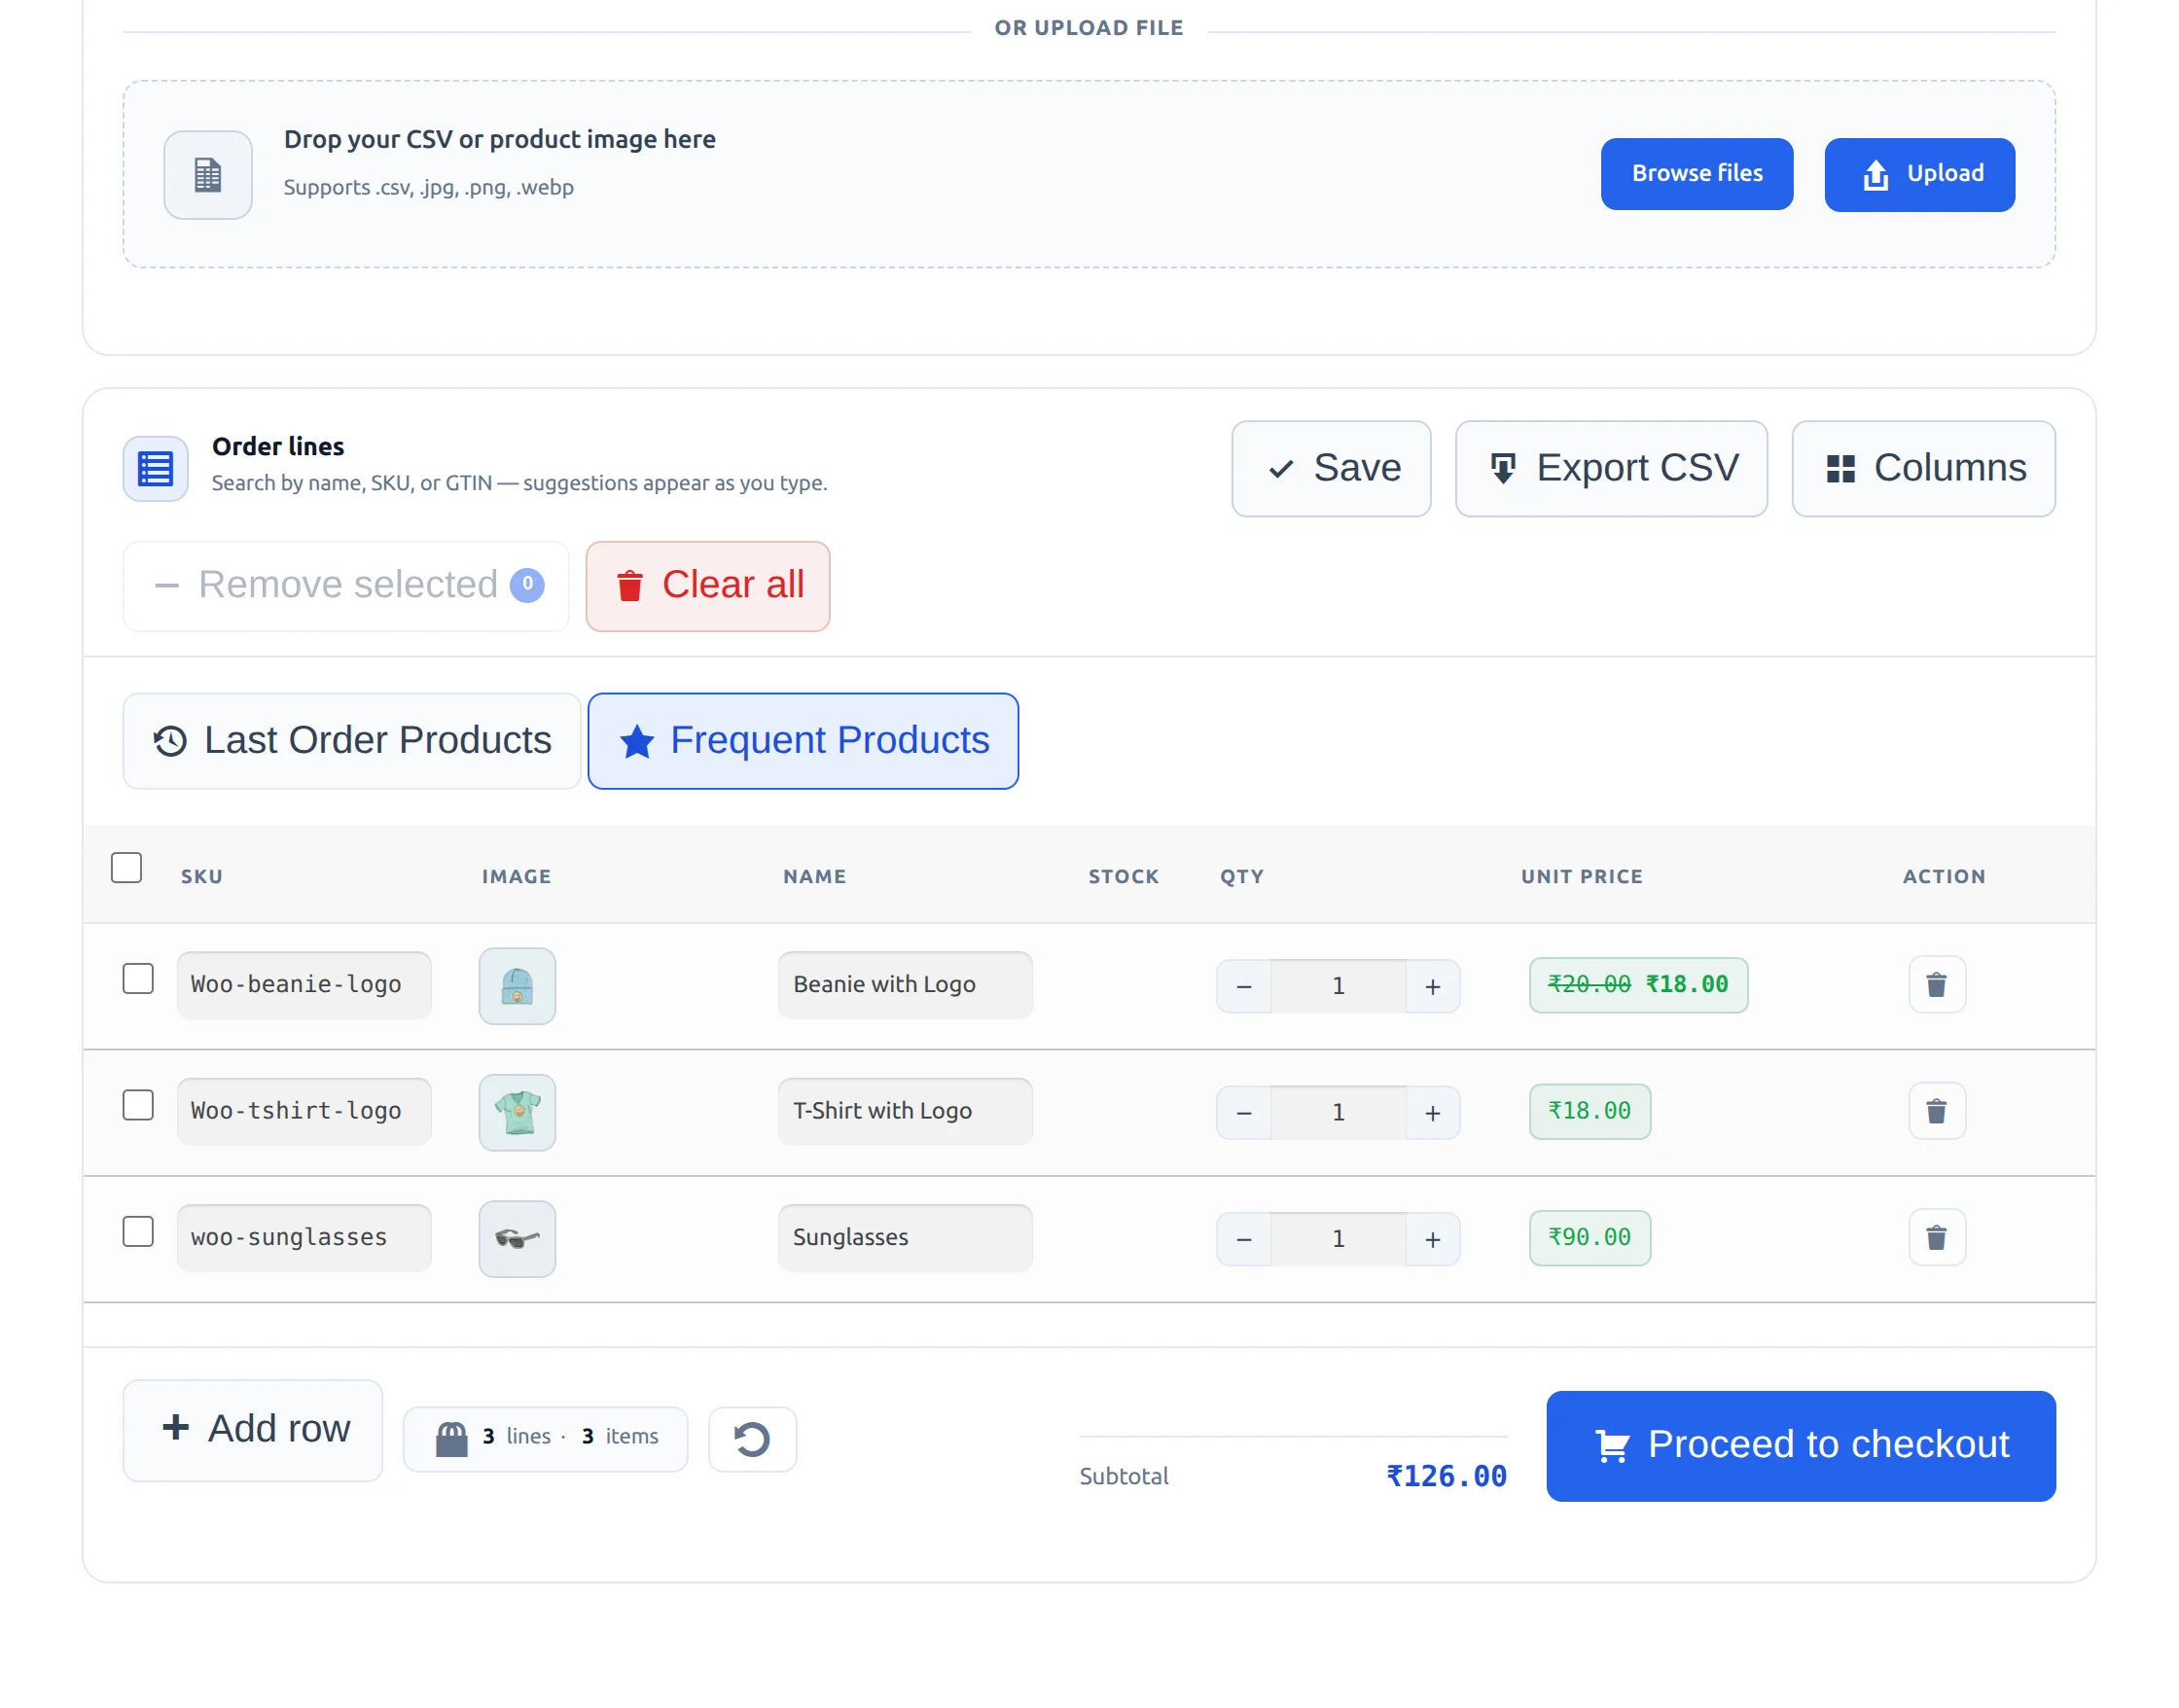
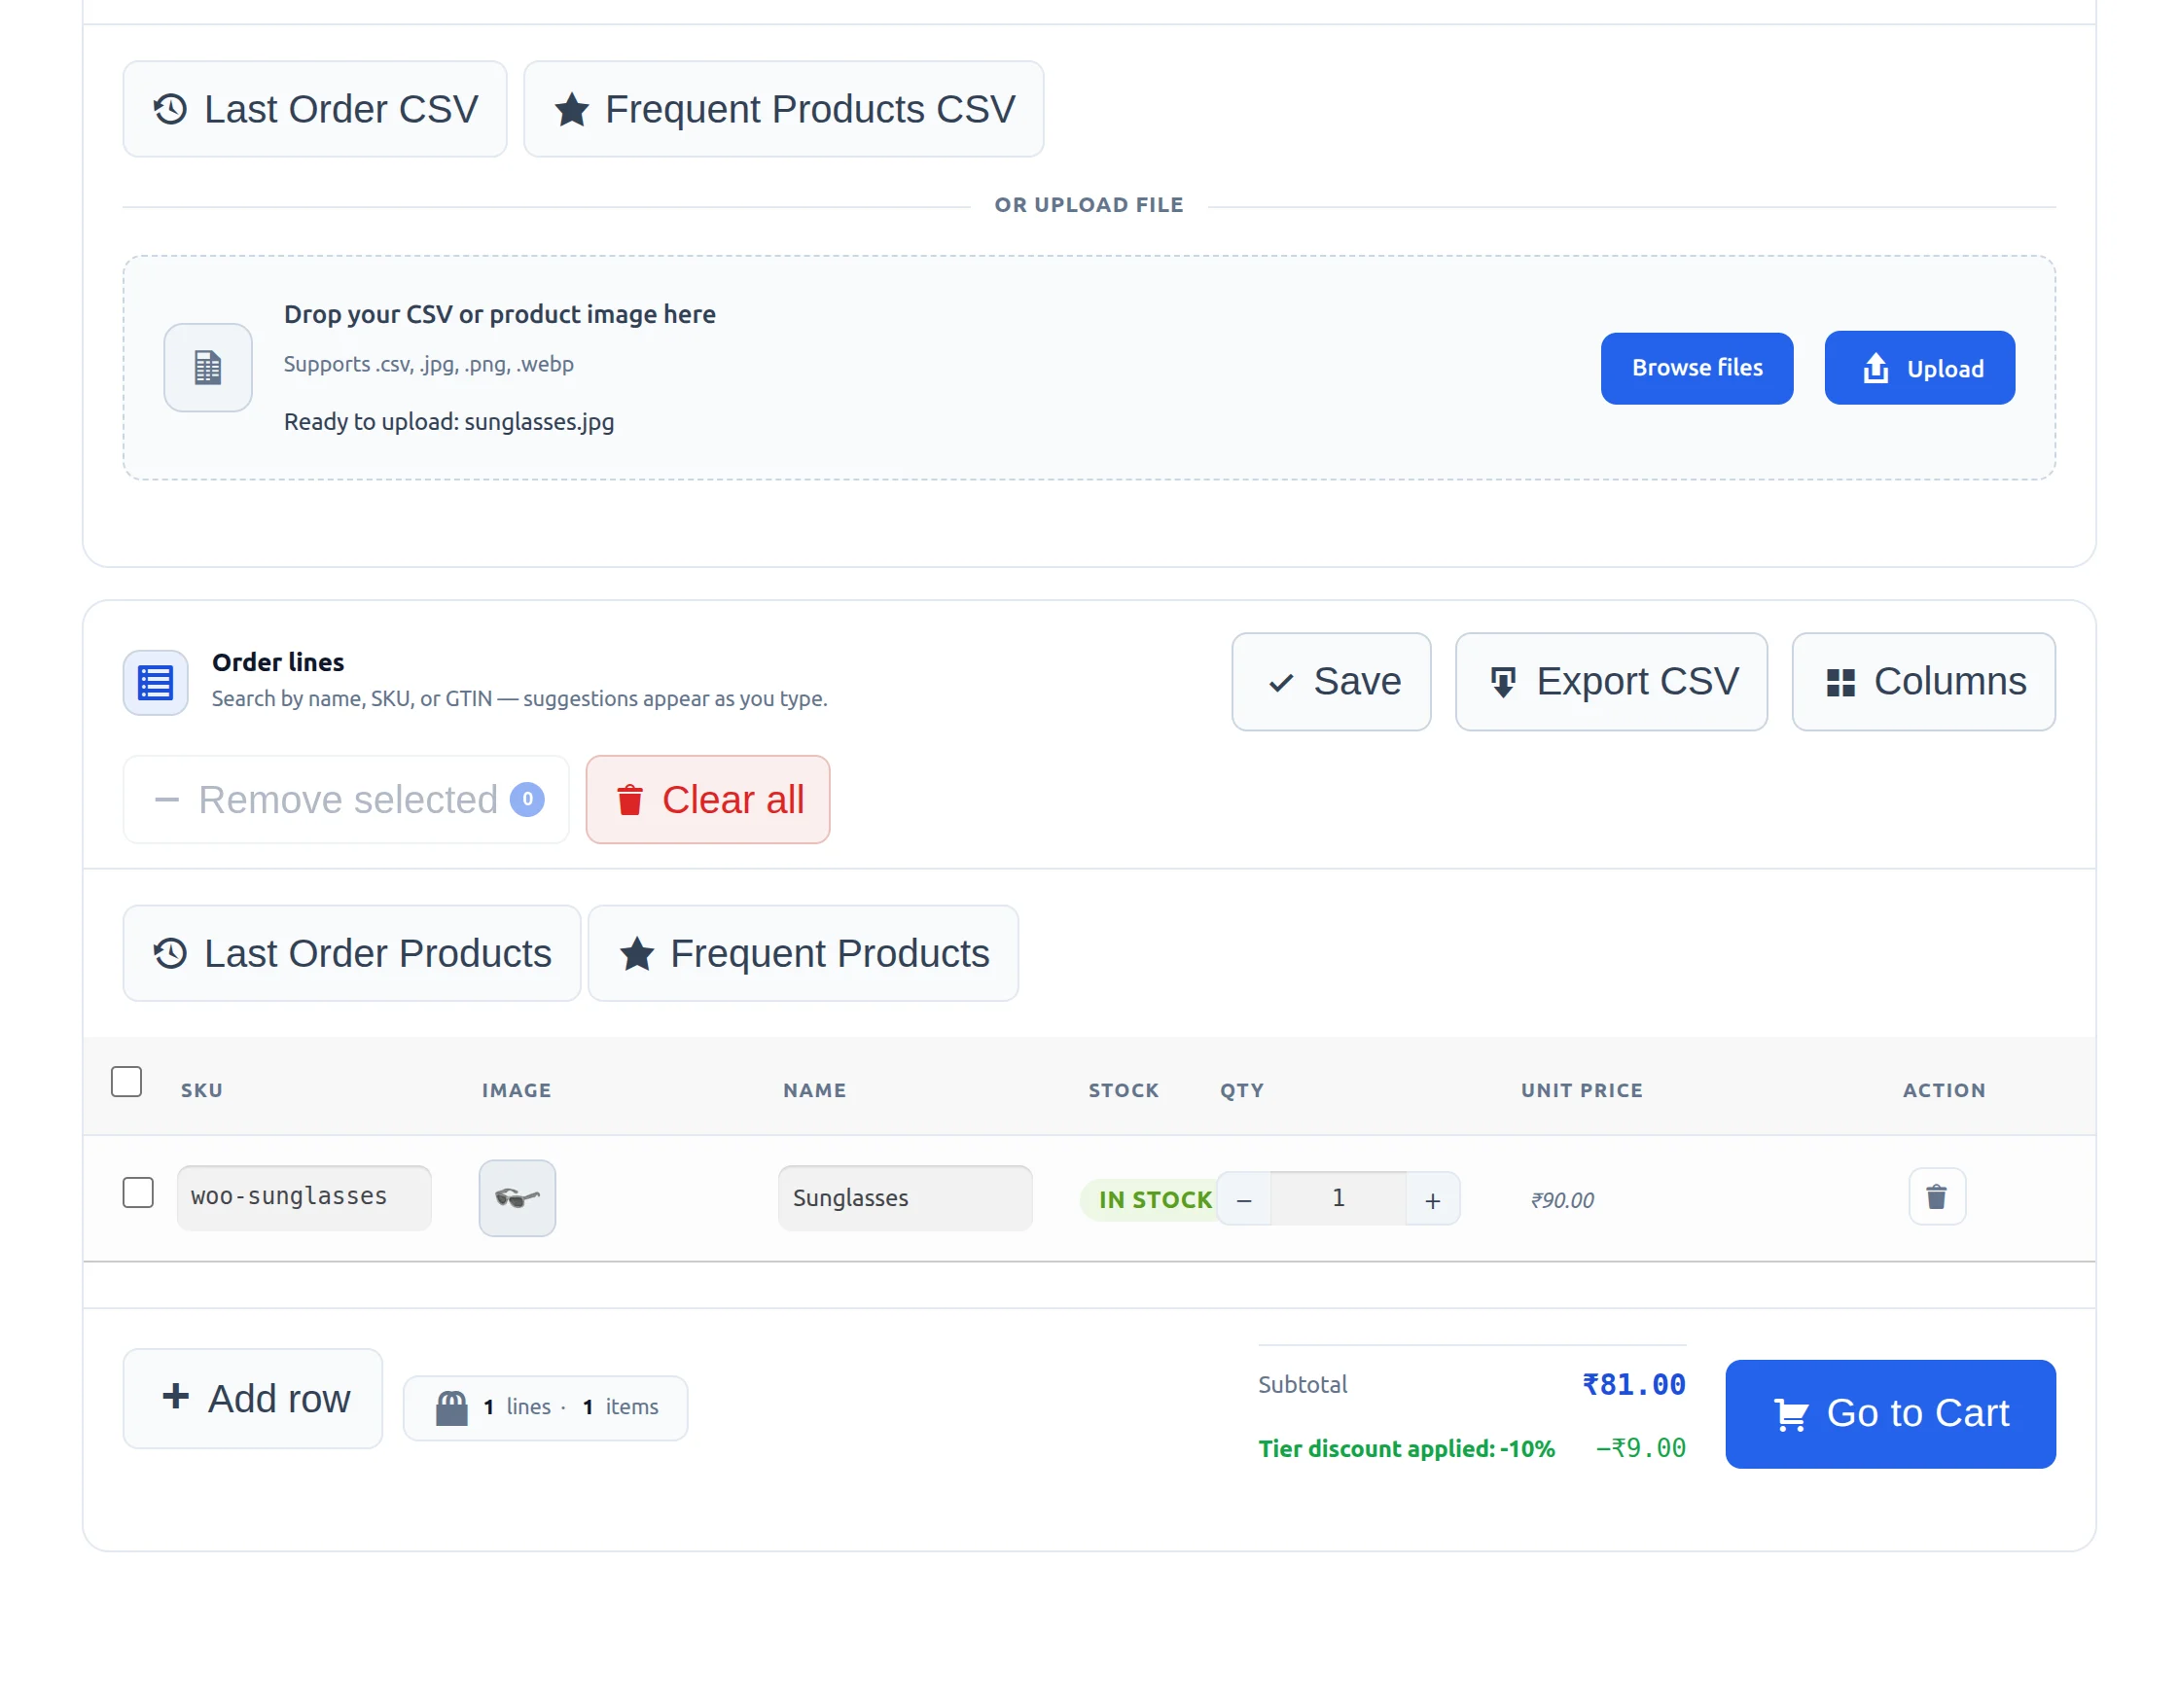
Customers can also view ‘Last Order Products’ and ‘Frequent Products’ as shown in the images below.
Workflow
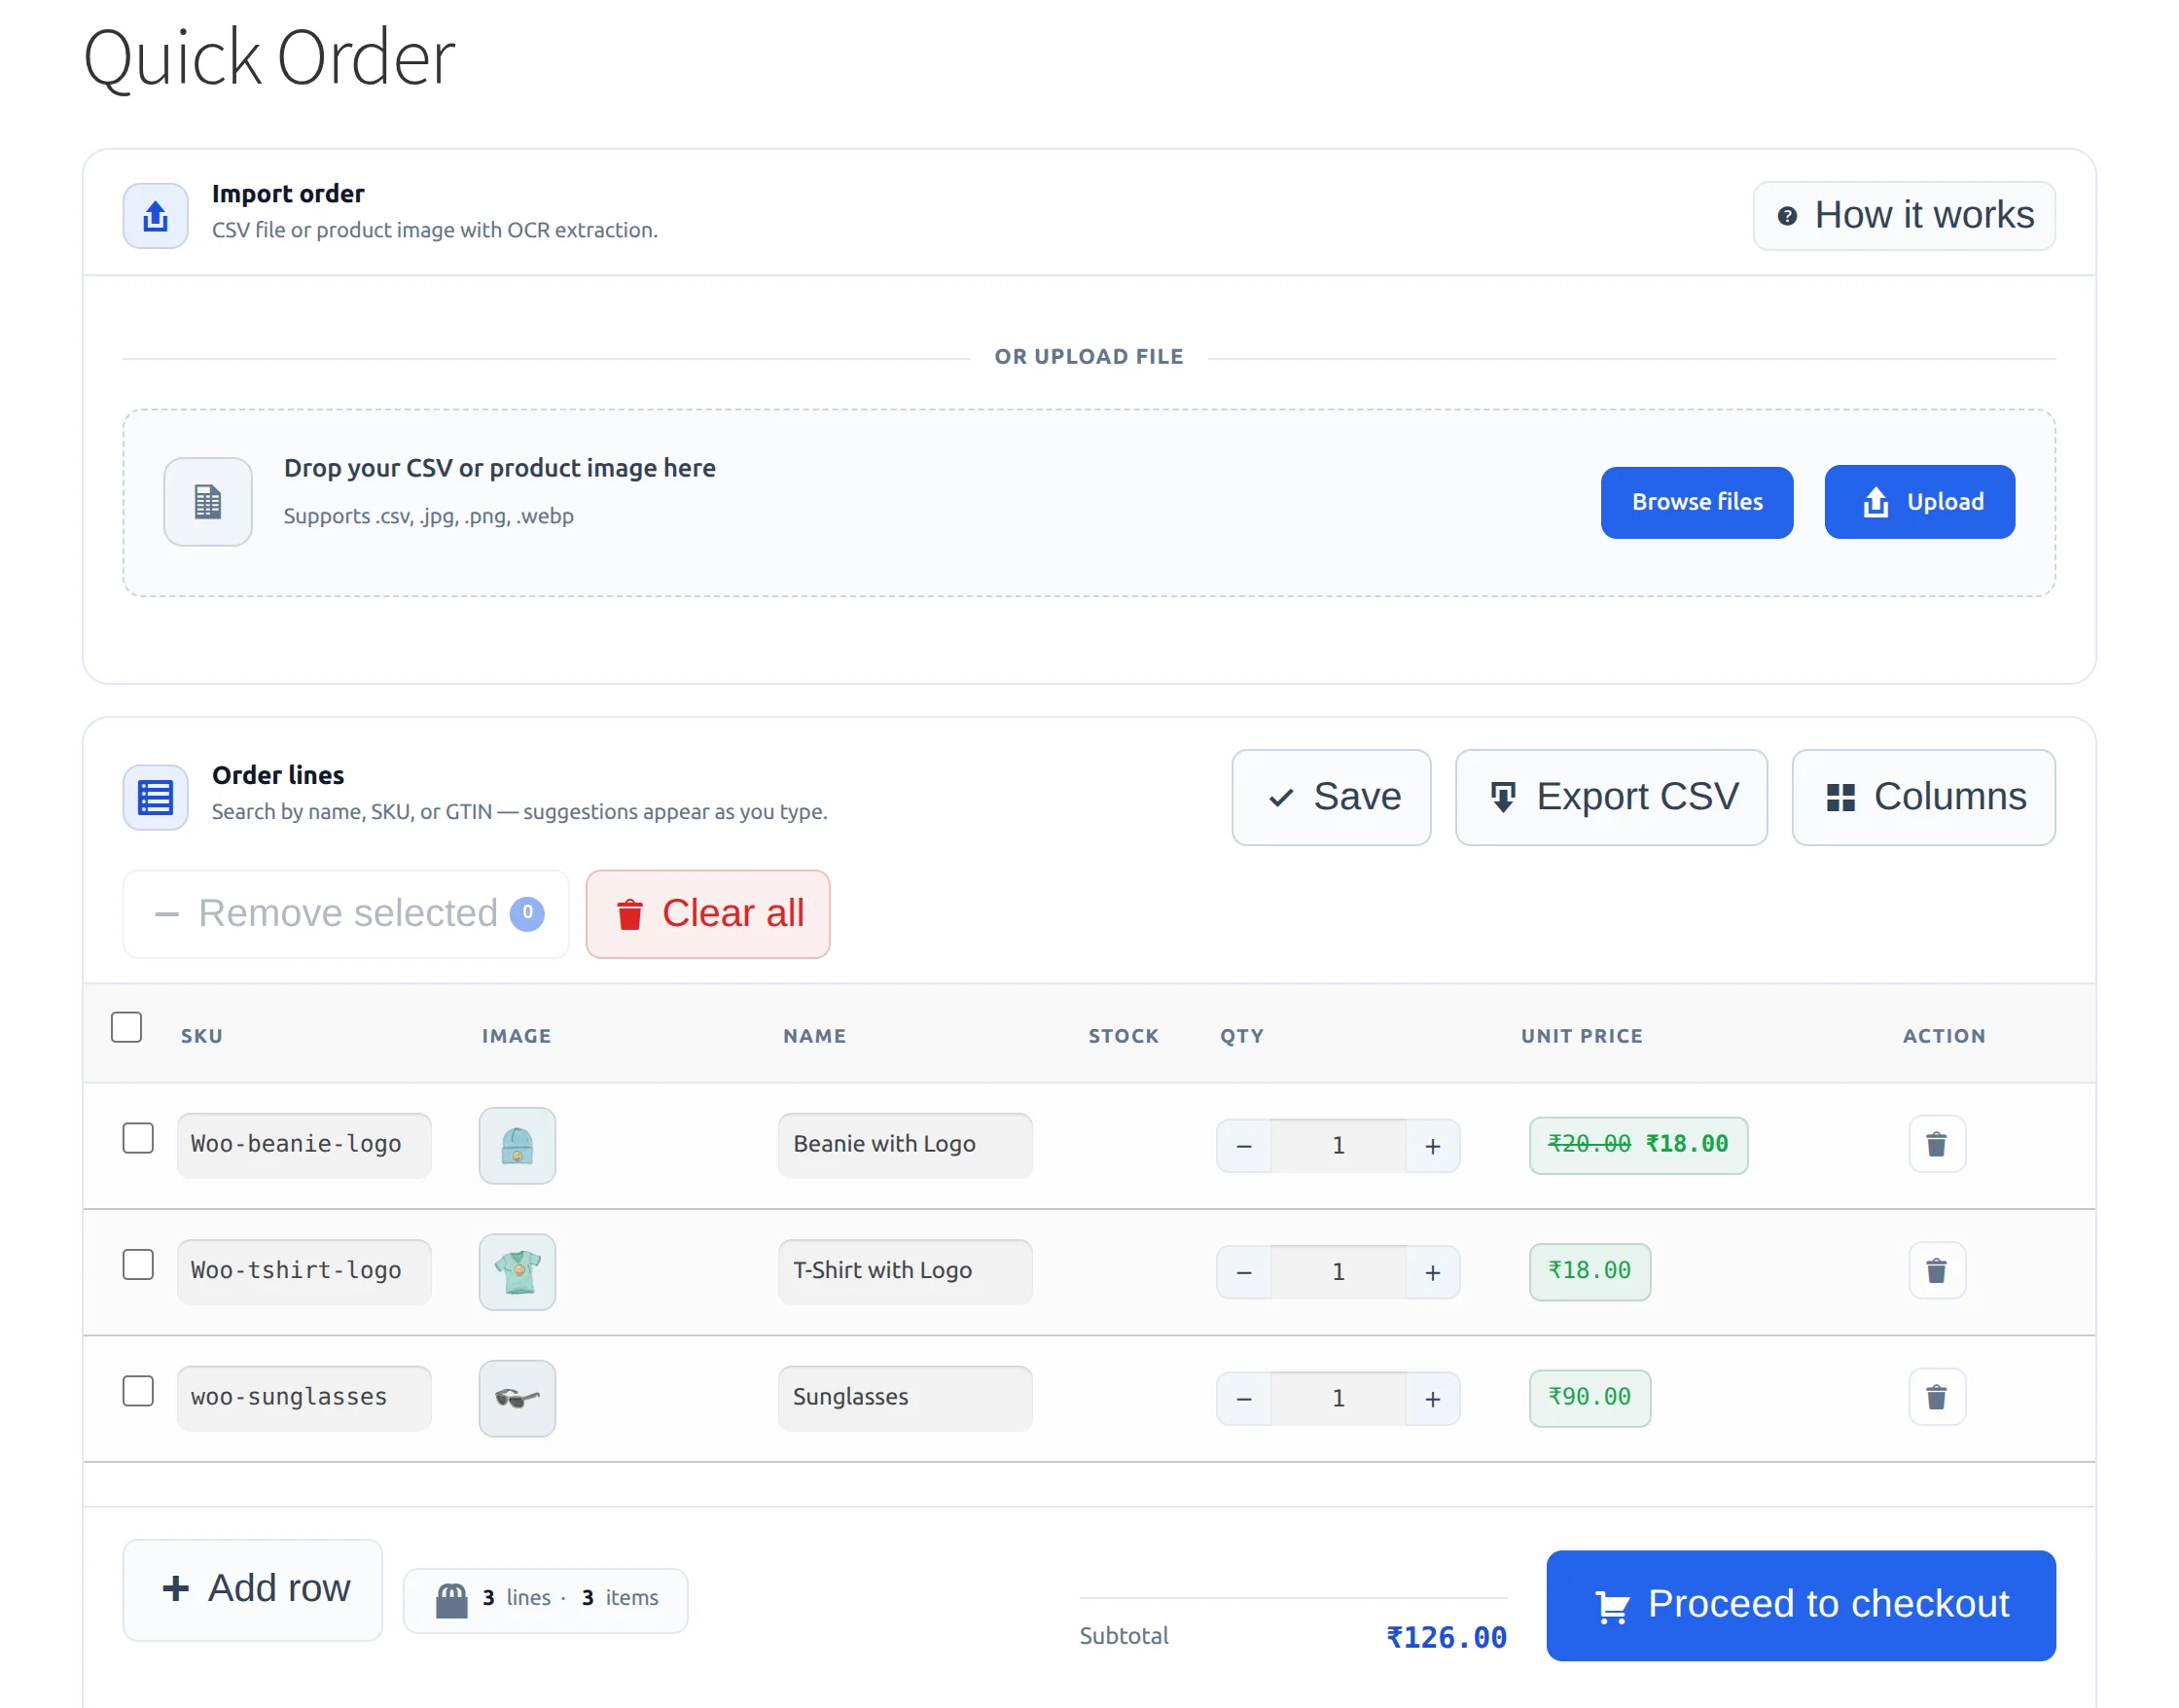
As per the configuration, the system will display the quick order page as shown in the image below on the front-end.
It has 3 rows configured by default, and the system has enabled quick order CSV upload.
The buyer can add more rows to the quick order by clicking “Add more rows”.
Here the buyer can search the product with the product name and pick the product from the auto-suggestion.
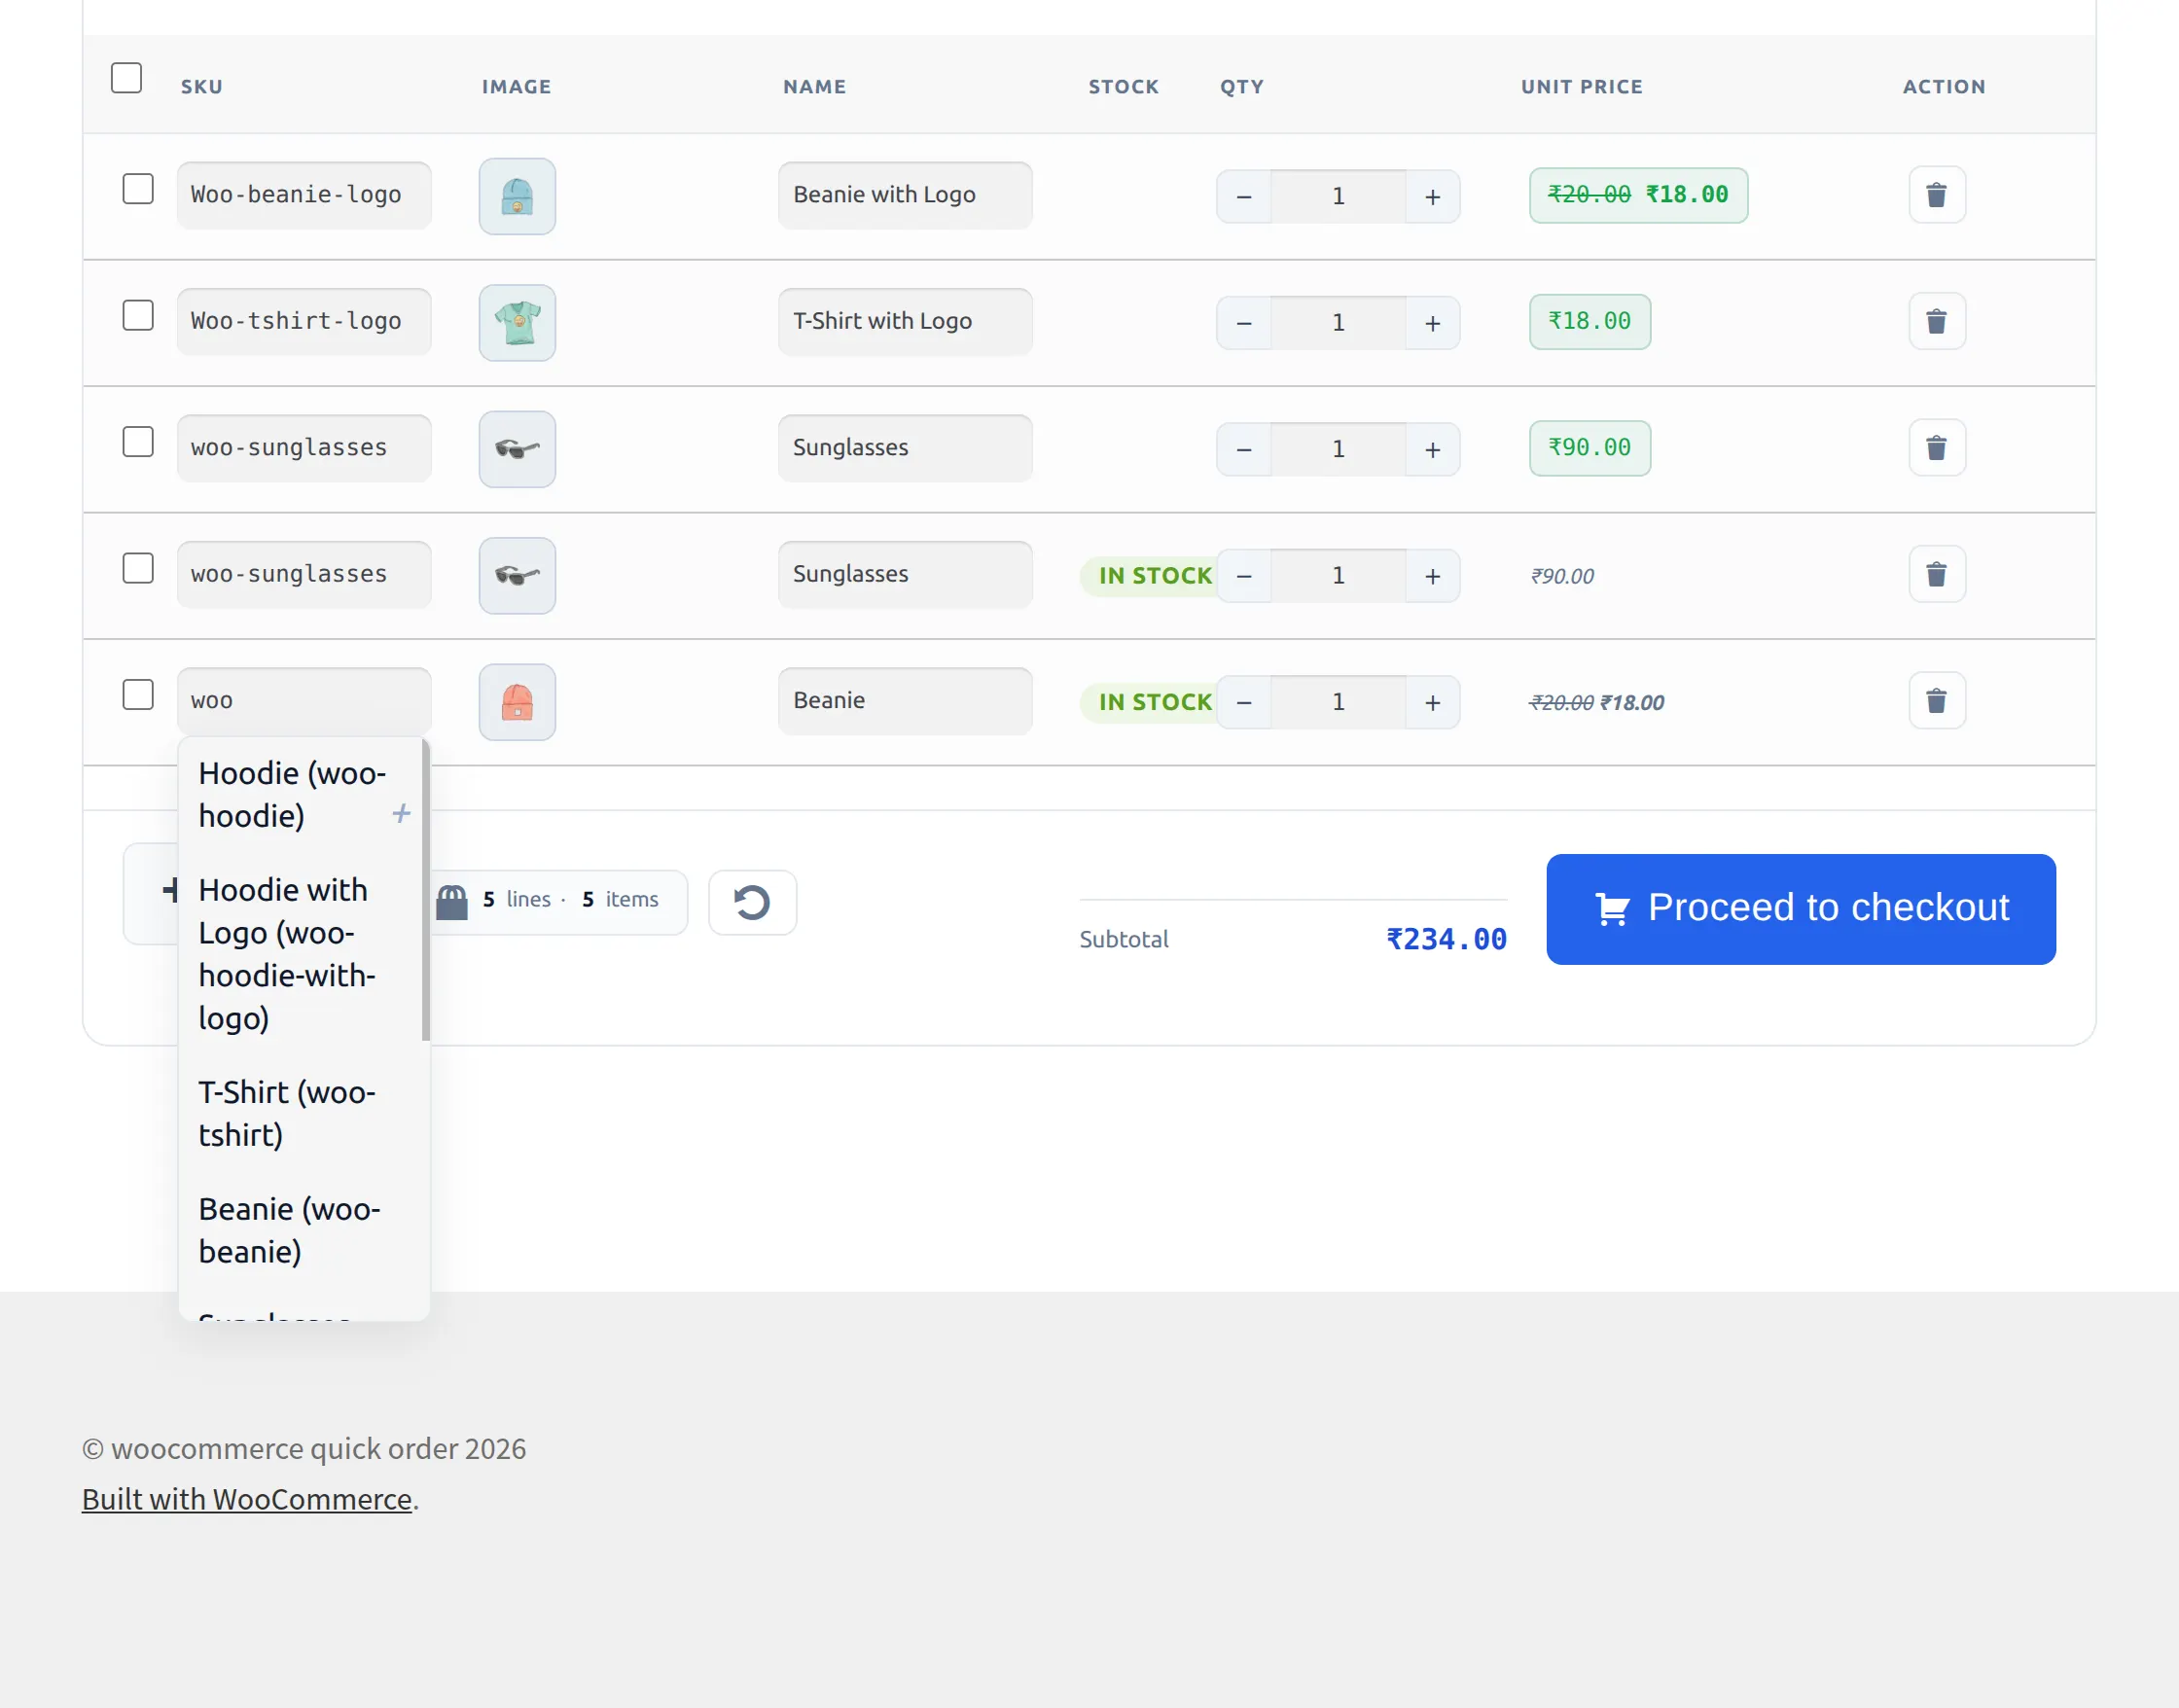
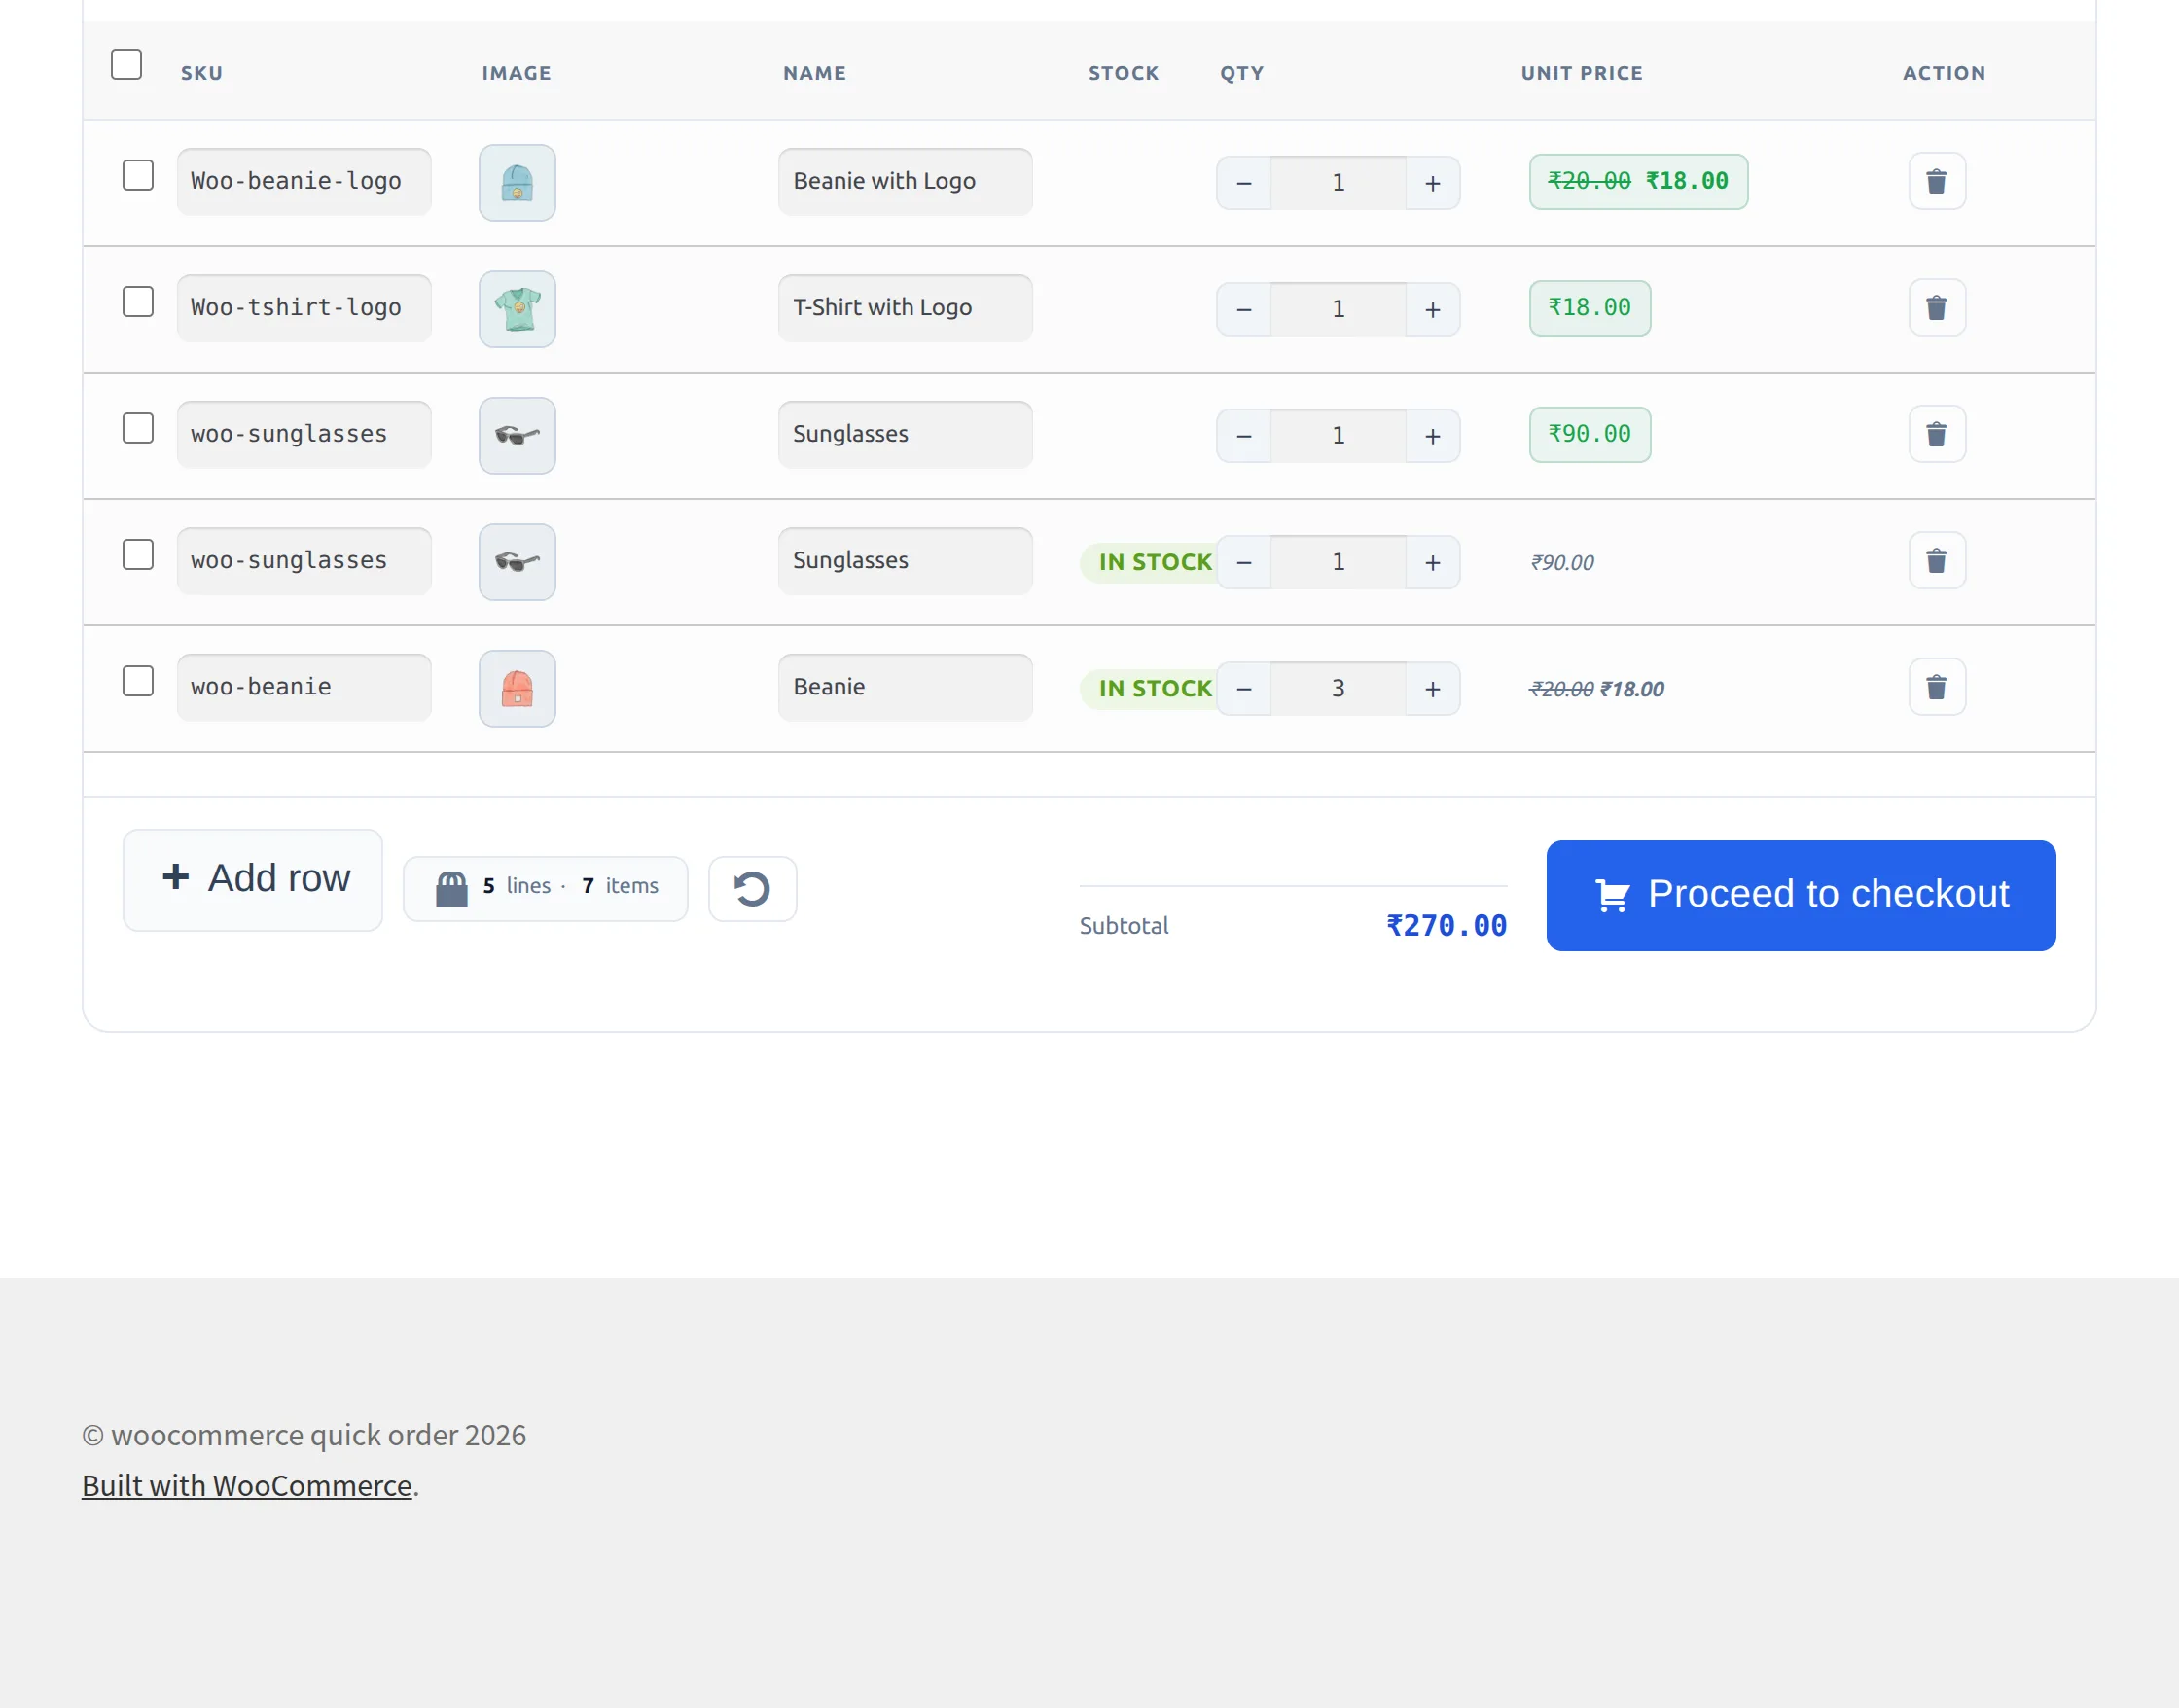
After selecting the product, it will display in quick order like the below image. The buyer can edit the quantity as per the desired requirement.
The table now includes a live stock column showing “In stock: N” immediately when a product is added, helping customers avoid selecting out-of-stock items.
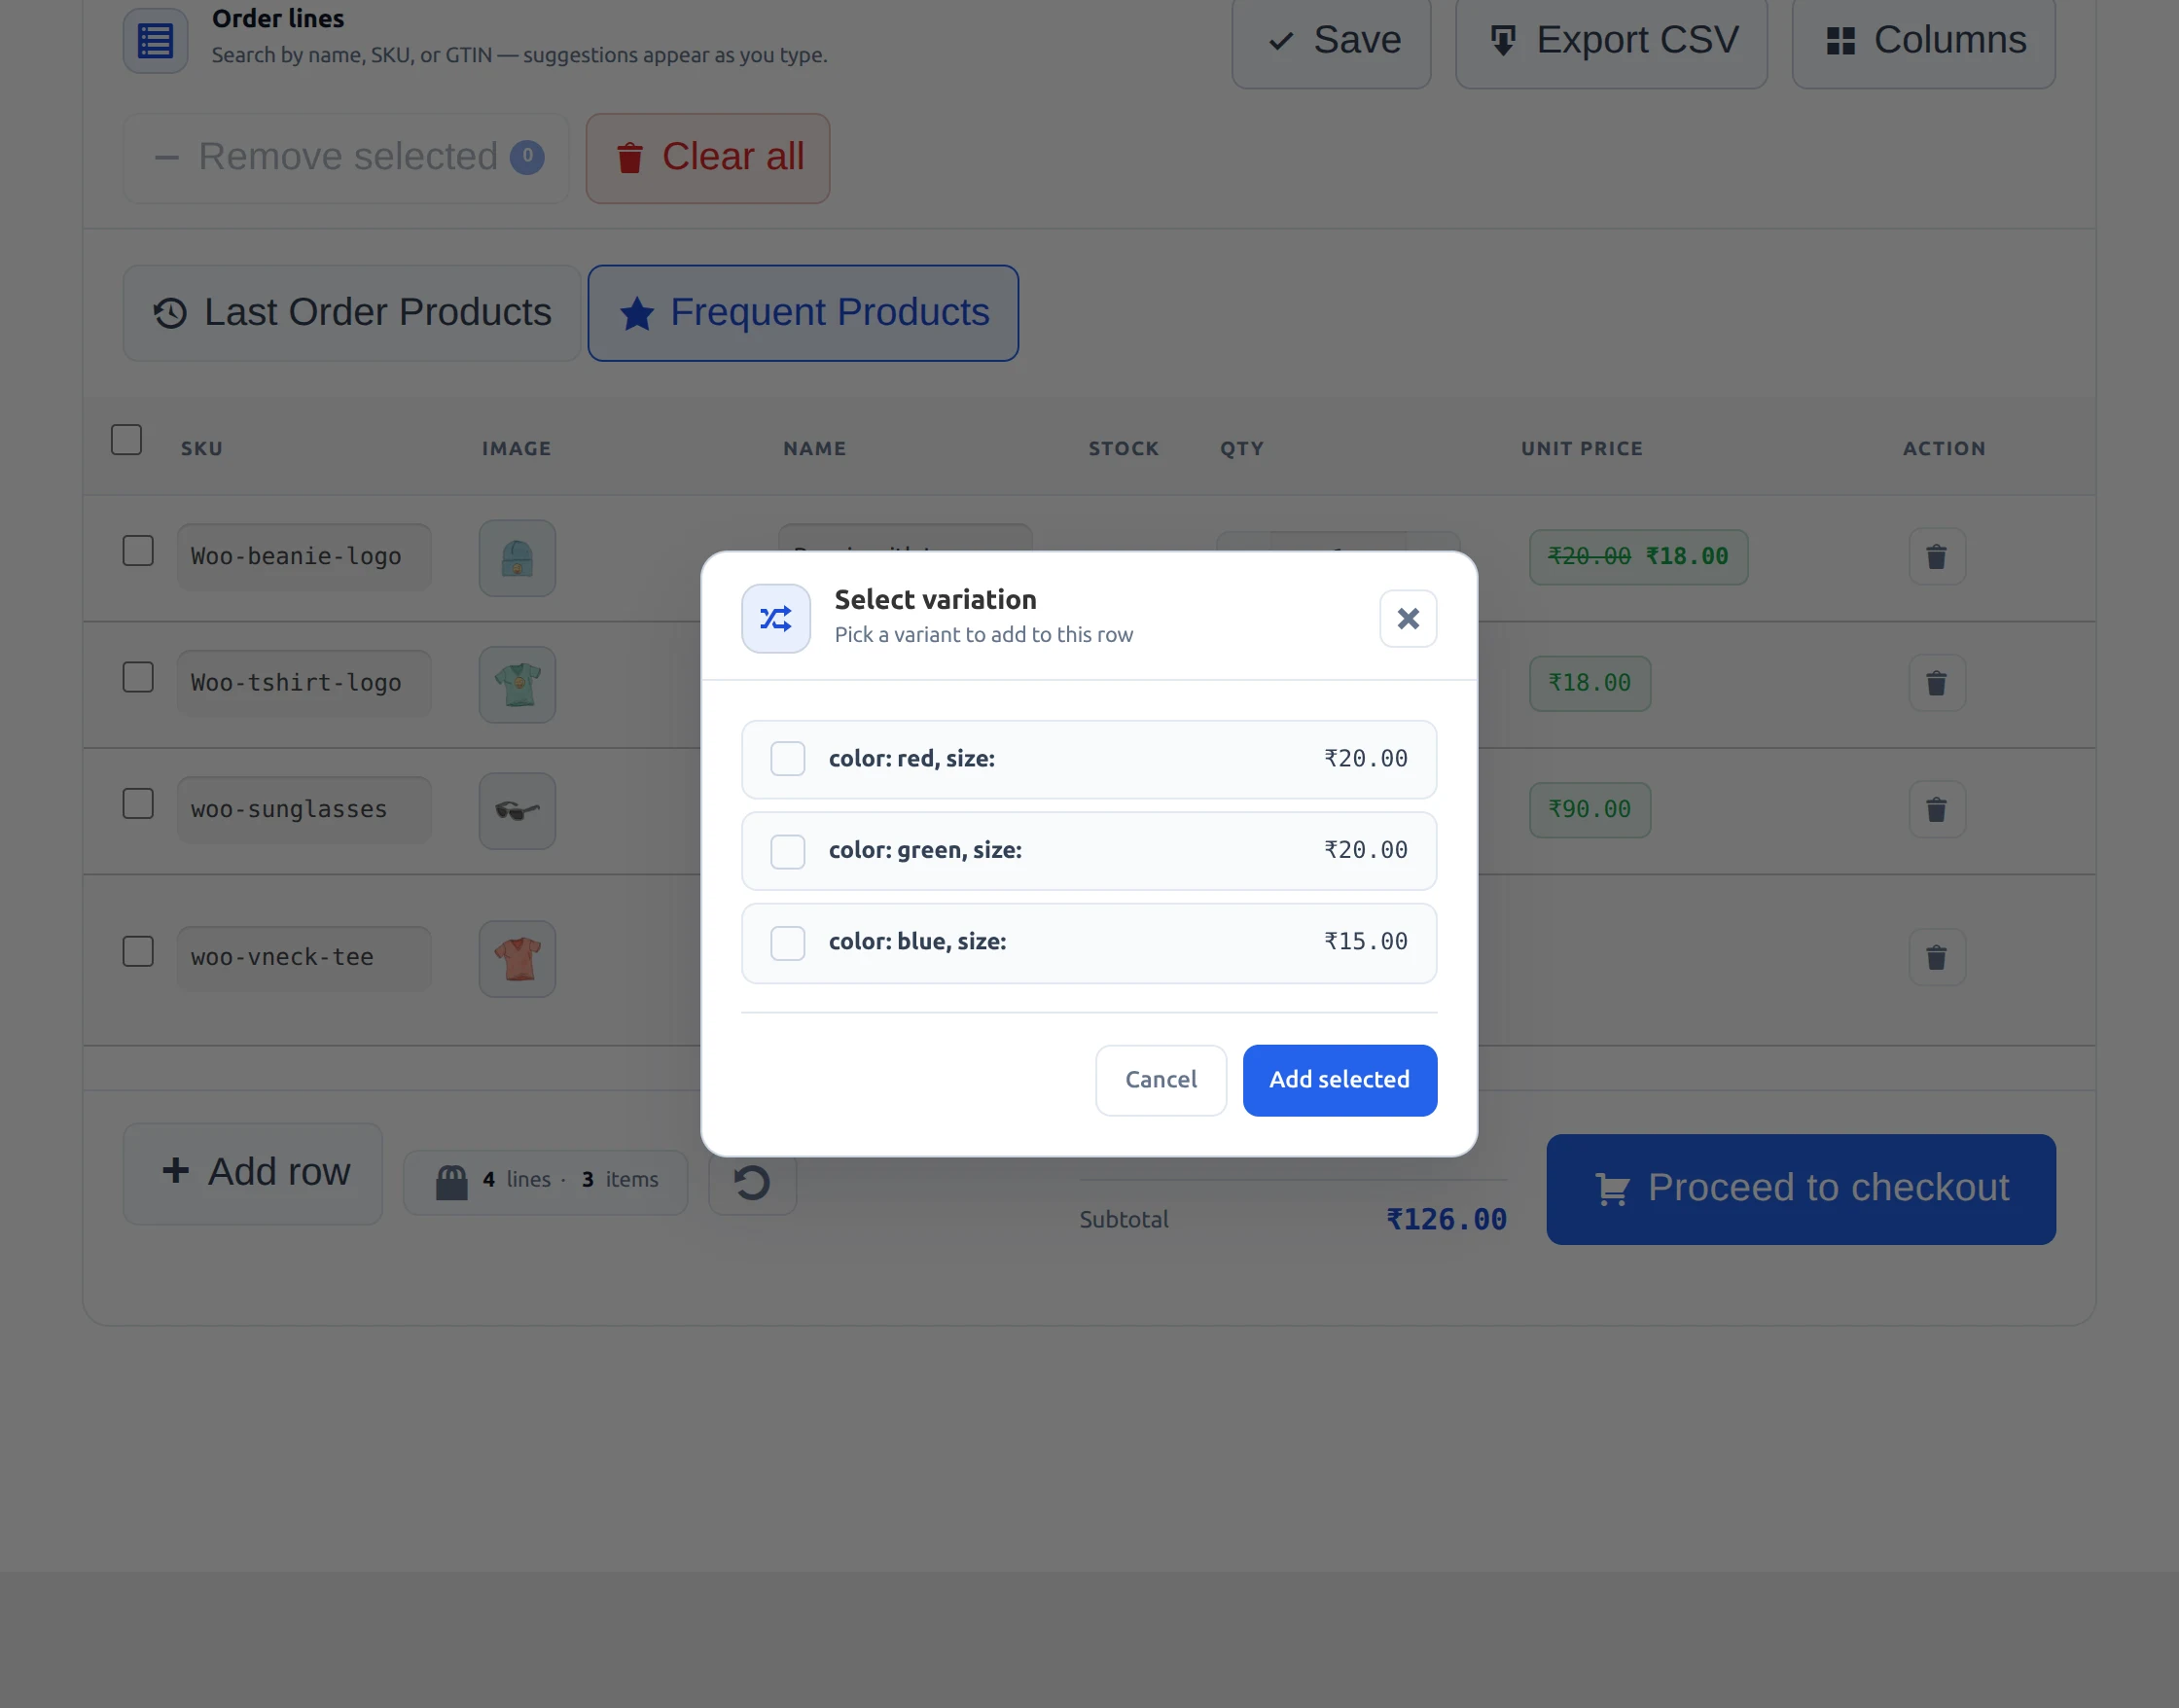
If the product is a variable product, then the buyer can select the desired variation under “Combination” as below image.
The buyer can create an order by clicking ‘Create Order’. The system will add the products to the cart, and the customer can proceed with the checkout.
My Account Integration – Reorder Management
The Quick Order plugin now offers powerful reorder capabilities directly from the customer’s account dashboard, transforming order history into a fast reordering tool
Saved Quick Order Lists
Customers can save their current Quick Order rows as named lists (e.g., “Weekly Restock”) directly from the quick order page. These lists are stored under a new “Quick Orders” tab in My Account, where customers can view, re-run, or delete them anytime. One-click reordering is also available from My Account → Orders list and the View Order page, allowing customers to add all items from a past order back to their cart instantly.
One-Click Reordering from Past Orders
Customers can reorder an entire previous purchase with a single click. A “Quick Order” action button now appears in two locations:
- My Account → Orders list – next to each completed order
- View Order page – prominently placed for easy access
Clicking this button automatically adds every item from that past order back to the cart. For variable products, the exact variations (size, color, etc.) are preserved. This eliminates manual re-entry for repeat wholesale buyers and significantly reduces reorder friction.
Add products by CSV
The buyer can add products to the quick order with the help of CSV as well. The buyer just needs to download the Sample CSV file. Sample CSV file is available under “Get Direction”.
Customers can click on ‘Last Order CSV’ and ‘Frequent Products CSV’ to download a file with SKU/Product Id and Quantity columns for quick and easy reordering.
Customers can also click the “Export CSV” button on the Quick Order toolbar to download their current table rows as a CSV file for creating reorder templates.
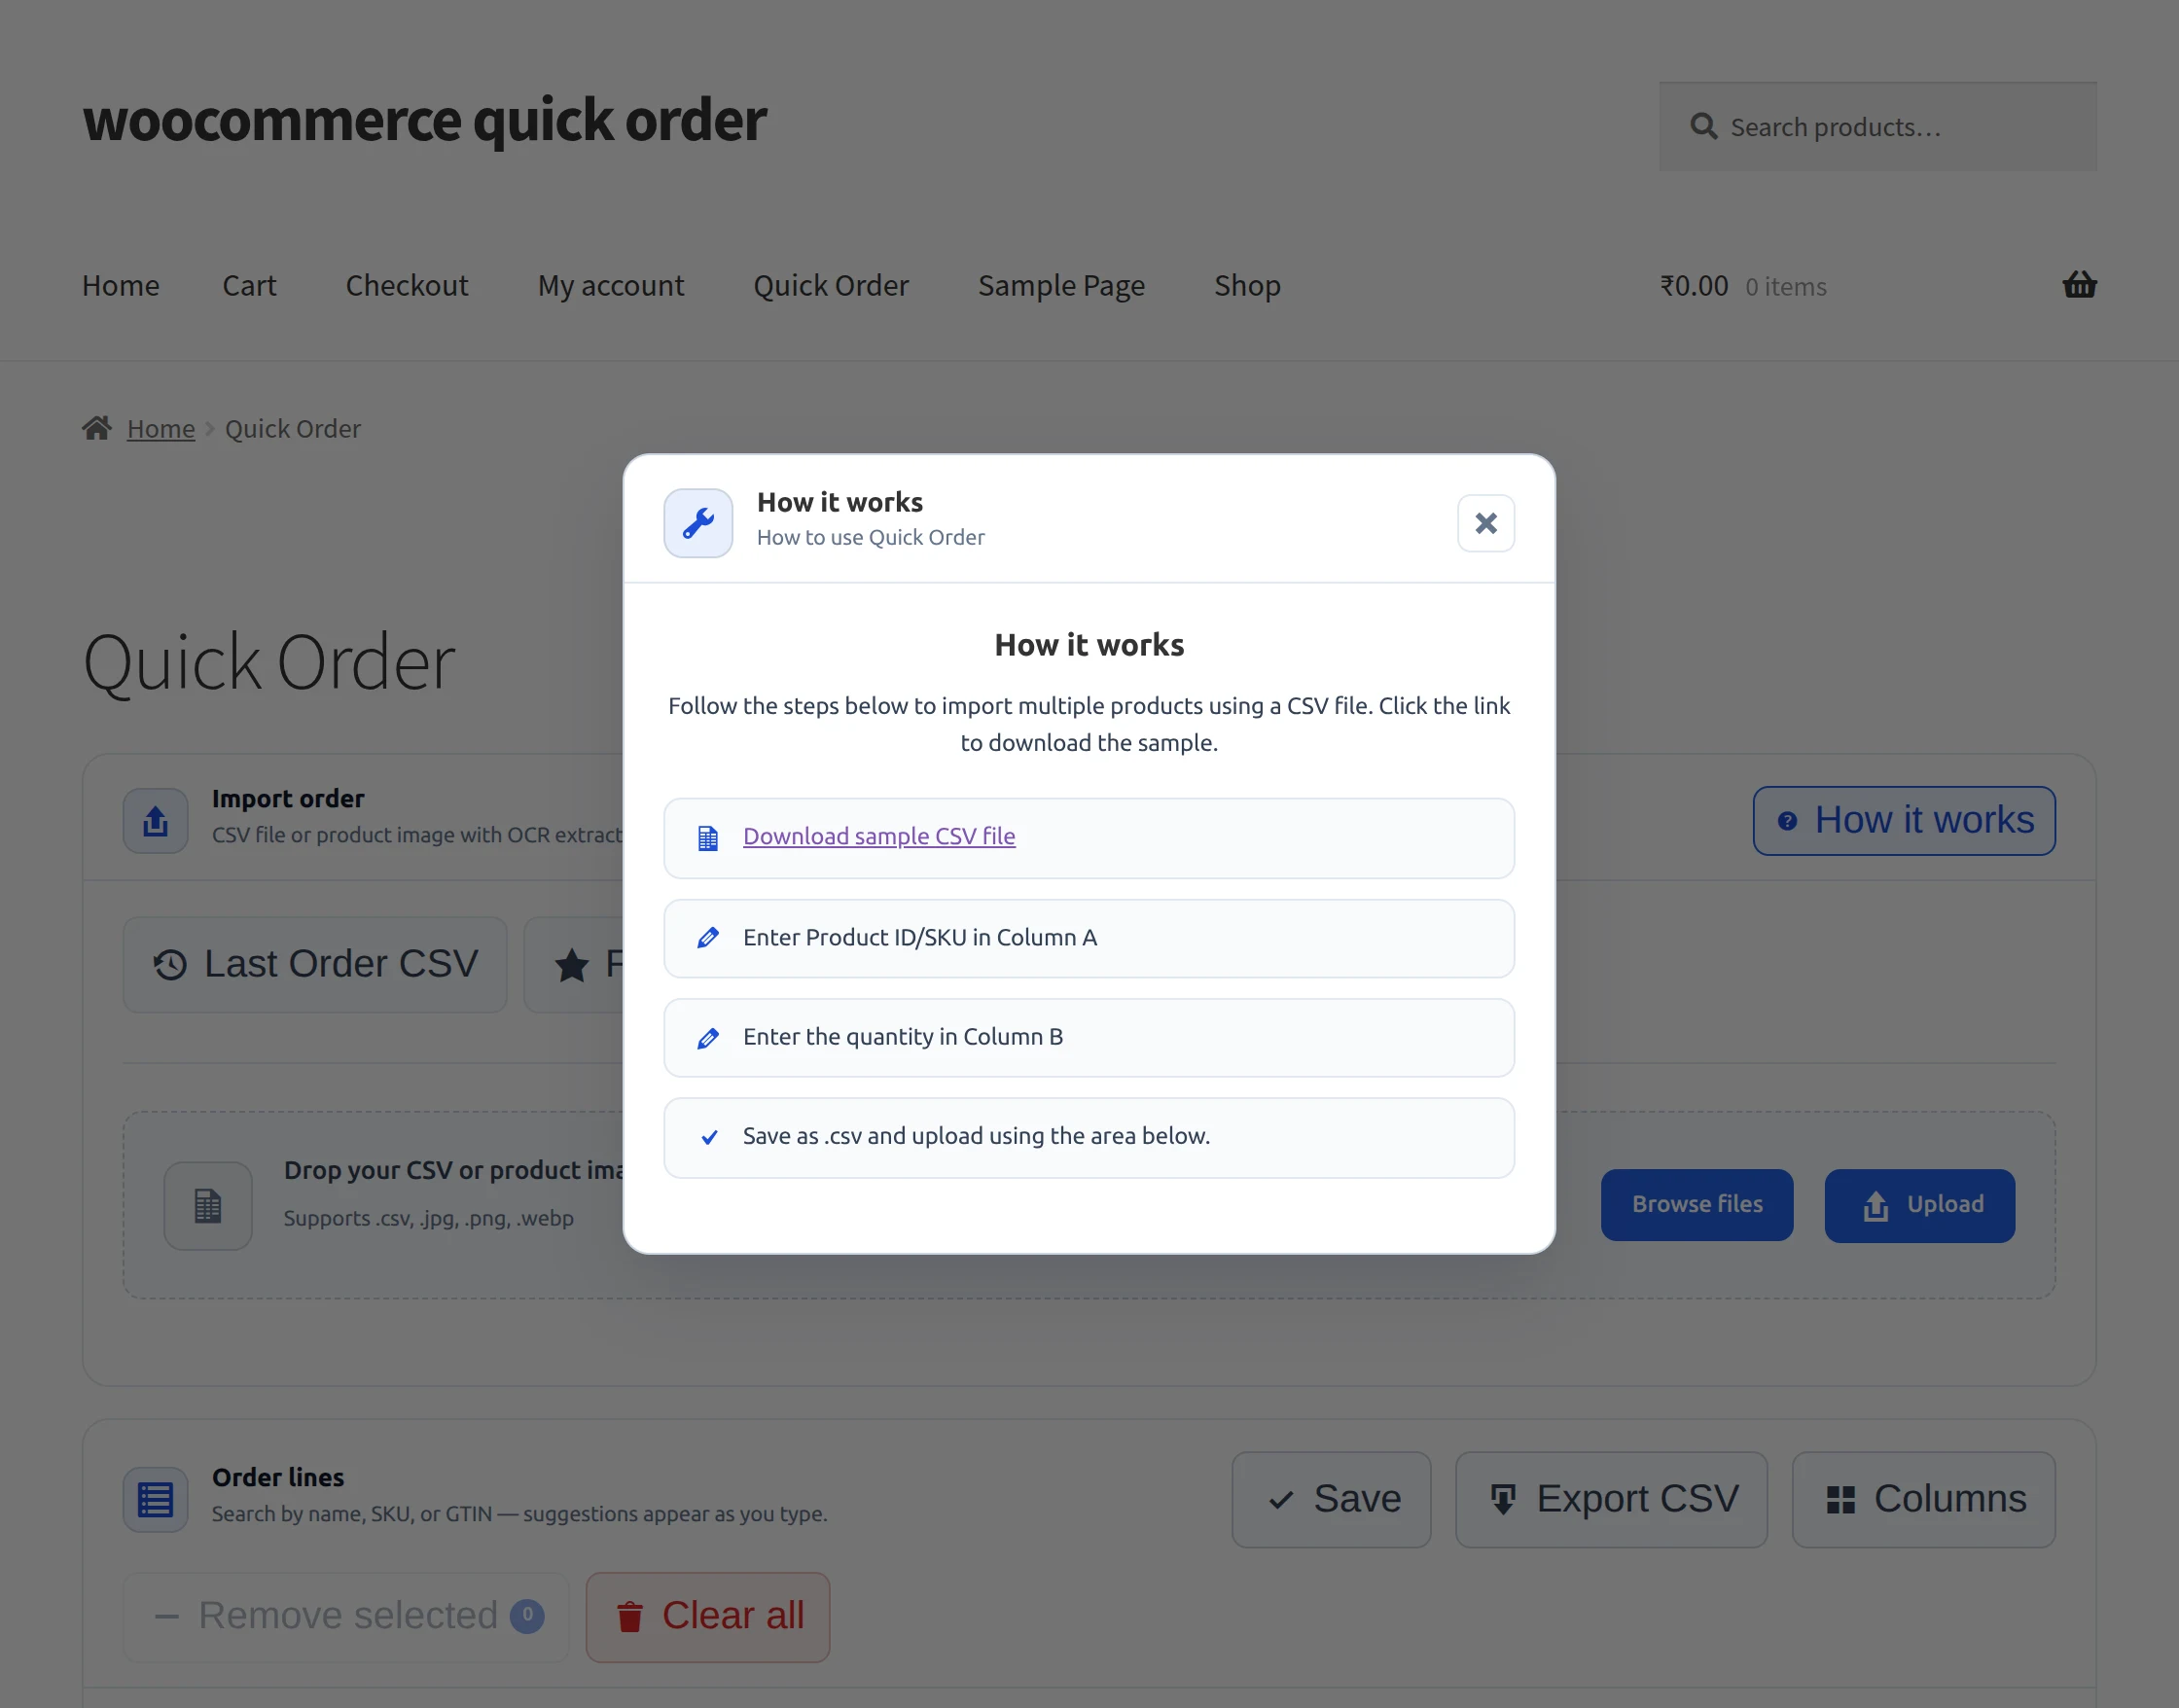
After downloading the file the buyer can enter the product information into the CSV file as per the requirements.
Here only two fields are available. The first is SKU/Product Id and the second is the desired number of Quantity.

Clicking ‘Upload’ will upload the selected CSV file to the quick order.
After a successful upload, the system will add the products to the cart and display them in the image below.

Search Products using Image (OCR)
Customers can also search for products by uploading an image if the admin has enabled the OCR-based search.
The customer needs to upload an image containing product information such as the product name, label, or packaging. The system will process the uploaded image using the configured OCR model and extract the text from the image.
The extracted text is then used to search the products in the store, and the matching products will appear in the quick order table.
This allows customers to quickly find products without typing the product name manually.
Steps:
Click on the Upload Image option on the quick order page.
Select the image containing the product label or name.
The system processes the image using the configured OCR model (such as Google Gemini).
Matching products will appear in the quick order table.
The customer can select the product and proceed with the order.
Display Your Custom Shop Page
Now that you have registered your custom shop page, you can display it on your WordPress site.
Embedding Quick Order – Three Flexible Methods
Method 1 – Shortcode (Legacy/Universal)
Use the [quick_order] shortcode on any WordPress page or post.

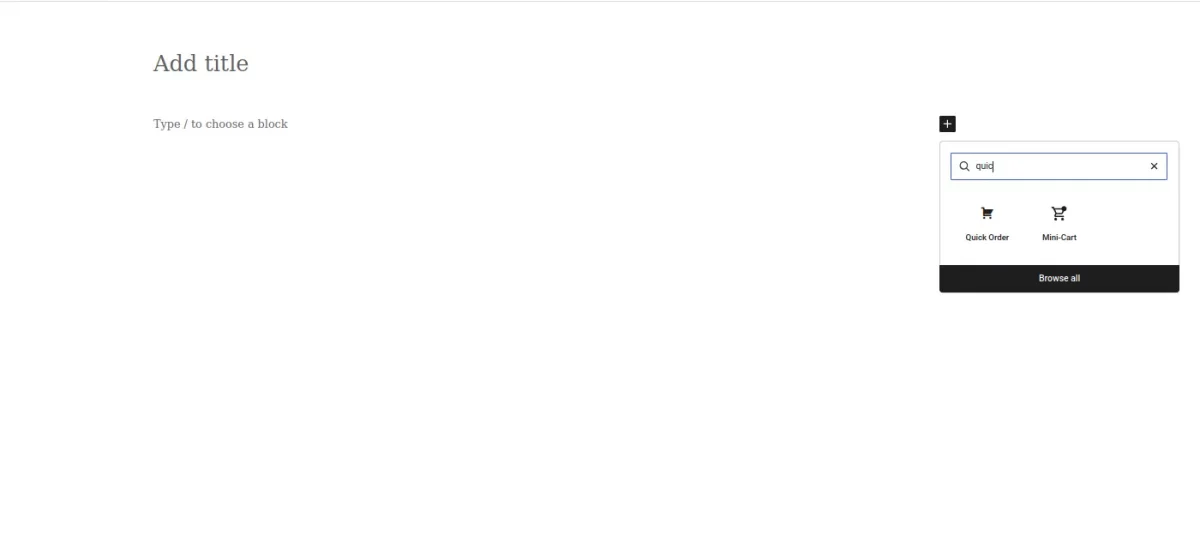
Method 2 – Gutenberg Block (Drag-and-Drop)
In the WordPress block editor, search for “Quick Order” in the block inserter. Drag and drop the block anywhere on your page. No shortcode handling required ideal for non-technical users.
Method 3 – Elementor Widget
If you use the Elementor page builder, the Quick Order form is available as a dedicated widget. Simply drag it into your layout from the Elementor panel.

All three methods produce the same fully functional quick order table. Choose the one that best fits your page-building workflow.
With these steps, you’ve created the foundation for your custom shop page. However, this is just a basic setup.
That’s all for the Quick Order for WooCommerce.
If you need custom WooCommerce development or tailored quick order solutions, our team can help you build it as per your business needs.
In case of any query, you can create a ticket at webkul.uvdesk.com or mail us at [email protected] and let us know your views to make the plugin better.
Current Product Version - 2.0.0
Supported Framework Version - WordPress 6.9.4 WooCommerce 10.7.0

Be the first to comment.