Warranty is a promise that you make to your customers about the products you are selling on your eCommerce store.
This will not only elevate your online sales but also enable customers to build trust in your eCommerce site.
Considering these facts, Webkul is here to introduce a new app to manage warranty on products namely “Warranty Management“.
It helps the admin in adding warranties to products available on their Shopify store.
Through this app, you can select the product from your store and set a warranty on each of them with a proper description of warranty duration and warranty facilities.
It also helps you to add default as well as the extended warranty to products, in case, the customer wants to extend the warranty time duration.
Customers will also get registered and extended warranty options which help them to extend the warranty duration on products via the Warranty Management app.
Additional Features
- Admin can add, enable or disable warranties to products.
- Also, he can create default as well as extended warranties to products.
- Admin can view the extended warranty history of the customers.
- Also, he can send a reminder to the customers through the mail before and after the warranty expires.
- Customers can extend the warranty on products.
- Customers can view warranty history in his “My Account” section.
- Admin can create warranty for previously sold product using old warranty feature
- Customer can add warranty to purchased product depending upon the warranty set by admin as per product purchased time
- Admin can now view all the warranty orders from his/her Dashboard
Installation
In order to get the Warranty Management app on your store, all you need to do is visit the Landing Page of the app.
There you need to enter your store URL and then click on the Install button to get the app on your store.

How to configure Warranty Management app?
BACKEND CONFIGURATION
The configuration of the Warranty Management app for Shopify will take just a few seconds of yours.
It has four sections through which you can configure your general details, reset labels, configure emails as well as themes of your store.
Have a look at these four configurations.
- General configuration
From here, you can configure your general details such as domain name, business email, shop logo.

2. Warranty configuration
From here you can configure your warranty configuration details such as reminder mails before warranty expires.
Time duration to purchase damage protection warranty after placing an order, Auto Fulfill warranty products e.t.c .

Reminder mail before warranty expires
This feature sends emails to remind customers before their warranty runs out, suggesting they renew or extend coverage for their purchased products.

Time duration to purchase damage protection warranty after placing an order
This feature allows you to decide how many days after customers make a purchase they can still buy a Damage Warranty for their products.
If you set it to 0 days, they can’t add the warranty after placing their order.

Auto Fulfill Warranty Products
To enable automatic fulfillment of warranty product orders, you can enable the “Auto Fulfill Warranty products” setting.
By enabling this setting, the system will automatically fulfill orders for warranty products without any manual intervention required.

Allow customers to purchase mulitiple quantity of warranty product in a single order
Enabling this option lets customers buy more than one warranty product in a single order.
It allows flexibility for customers who want to protect multiple items they’ve purchased at the same time.
This makes it convenient for them to manage warranties for all their products in one go.

Choose where to Redirect Customer
In the app, you can choose whether you want to redirect customers to the cart page or to the checkout page while purchasing products with warranty.
Choose where to Redirect Customer
For this, you simply need to visit Warranty App admin panel>>Go to Configuration>>Warranty Configuration>>Select the option.

PLEASE NOTE:- If you select it for Cart Page, the customer will be able to add warranty as well as non-warranty products to cart at the same time.
But as we add one warranty product along with the product to be purchased with warranty.
You need to make sure that the customers are not removing that warranty product from the cart.
If the warranty product will be removed from the cart page, the product can’t be purchased with warranty.
When you want to register warranty
You can choose when to register a warranty: either when the order is paid for or when each item in the order is shipped out.
Selecting “on order Paid” means the warranty starts as soon as payment is made.
Opting for “when individual item is fulfilled” starts the warranty when each item is shipped to you.

After all the configuration click on save to save all the configuration that you have made .
3. Label Configuration

Here, the admin can configure the labels as per his choice to make it visible on the frontend.
4. Mail Configuration
Here, you can configure the reminder mail, expired mail as well as warranty confirmation mail.

In this way, you can configure the reminder mail which is sent to the customer before the warranty expires.

In this way, you can configure the expired mail that the customer receives after the product warranty expires.

You can configured the Warranty Confirmation mail which customer receives after purchasing the warranty.
5. Theme Configuration
Here, you can change the frontend look by resetting the theme color as per your choice.

Markets
Now, you can also show the warranty on the basis of Shopify Markets.
You need to enable the configuration named “Manage warranty Shopify Markets wise” in the Warranty configuration section

Now we have one new feature by enabling this , you can limit the product warranty unless a market is chosen.
However, if it’s disabled, the default warranty applies even if no market is selected

Now, after this, you will have a list of all the markets that you have on Shopift & from here you can select which markets you want

Warranty Products
This section of the Warranty Management App shows a list of products on which warranty is created.
You can create warranties on products simply by clicking the “Add Product” button on the upper right corner of the page.

In one click, you will get a list of products available on your store. Select the one to which You want to add a warranty.

Once you select any product, the “Add Warranty” section appears to you with the product name and price.
Here, you can set warranty type, warranty time duration, warranty facilities , warranty price as well as warranty site.


Admin Panel>>Warranty Management app>Click Warranty Products>>Click Add Product>>Select any product>>Fill warranty details>>Click on Save button.
The product on which you have created a warranty, you can edit, enable or disable the product warranty from this section only.
Take a glance at the screenshots to understand them properly.

Once you click this edit button “Update warranty” section appears to you.
Here, you can update the warranty type, time duration of product warranty, warranty facilities as well as warranty site.
You will also get the option to add some warranty description and terms & conditions of the product warranty.


Also, you will have a section of “Extended Warranty Detail” where you can add, edit, enable or disable the extended warranty on products.

From the warranty product section of the app, you can view the products on which you have created a warranty.
Just click on the product ID and view the product how it appears on the frontend.

Add Warranties Via CSV
You can now add warranty products via CSV upload.
Simply visit the Warranty Products section>>Click Add Product through CSV button and uplaod the CSV file.

We recommend you to download the instruction file and follow it carefully while preparing CSV file.
Note : You can upload a maximum of 100 records at a time.

Old Warranty Product
Customer can also add warranty to already purchased product as setup by Admin.
Admin needs to setup the old warranty product setting then only customer can purchase the warranty for previously purchased product from their accounts page.
This feature enables admin to setup the warranty time and price for previously sold product on the basis of product sold day, month or year.
Admin can setup the warranty duration and price on the basis of product sold time.
Old Warranty Products configuration
Admin can use old warranty feature to add warranty to previously sold products depending upon the product sold time.
Admin can add warranty time and price with respect to product age in days, month and year.

Customer End
Customer can add the warranty even after buying the product if admin has setup the old warranty feature for that product.
Add the old warranty from order page under his/her accounts.


Damage Protection Warranty
A Damage Protection Warranty is a type of warranty or insurance that provides coverage against damage to a product. I
t is typically offered by manufacturers, retailers, or third-party companies as an additional protection plan for items such as electronics, appliances, or other valuable goods.
Let’s check how to set it up!
First, you need to configure the Time duration to purchase a damage protection warranty after placing an order from the configuration section.

From here, you can add a number of days after the order, and the customer can able to add a Damage Warranty for their ordered products.
Here, In case of 0, the customer will not be allowed to purchase this warranty after placing the order.
How to edit mail templates of Damage Protection Warranty?
To edit the mail template you need to go to configuration >> mail configuration >> 3 dots (action tab) >>> DAMAGE PROTECTION EXPIRY REMINDER MAIL

Damage Protection Confirmation Mail

How to add a Damage Protection Warranty?
To add a Damage Protection Warranty to the product you need to go to warranty product >> add product >> select product from the list and proceed.

After that, you need to select Add Incidental Damage Coverage and fill in all the information as below mentioned.

How the customer can buy a Damage Protection Warranty
The customer will be able to buy the damage protection warranty from the product page on the storefront.
The customer needs to select the damage warranty from the product and proceed for the checkout.
Customer Account
Once the customer purchases the damaged warranty then the customer account section, you can check the warranty history.

If you wish to extend the damage warranty then you need to click on the action button >> extend warranty >>

After that, you need to select the warranty as shown in the given image.

Product Parts
Product parts refer to the individual components or elements that make up a larger product or item.
These parts are designed to work together and contribute to the overall functionality, structure, or appearance of the product.
How to add products part to the warranty?
To add the product part for warranty you need to go to warranty product >> add product >> select product from the list and proceed.
Also, from the edit section as well you can add the product parts for warranty.

How to add serial numbers for the product parts?
To add the serial number you need to go to the warranty customer >> 3 dots >> action button >> view details >> Add Product Part Serial Number.

Once you click on Add Product Part Serial Number then you can enter the serial number manually or auto-generate as well.

From where customer can check the list of product parts under the warranty?
To check the serial number of the product parts, the customer needs to go to customer account >> order >> action button / 3dots >> view all serial numbers.

After clicking on the view all serial numbers, the serials number list will be visible on your screen as shown below.

Warranty Customers
In this section, you will have a complete list of customers who have registered warranties on products.
You can view all the warranty details of the customer just by clicking the “View Details” option in the action menu.

You can sort the warranty customers by their order ID, name or number of products.
Once you click on “View Details” button, warranty detail page of that customer gets appeared to you.


There, you will get all the warranty products of that customer with all the product details.
View these details in the screenshot below.

You can also view as well as edit a unique serial number of the warranty product(if you have set the warranty type as Serial number).

Additionally, you will also get an option to add or auto-generate the serial number on the product.


In the warranty product detail section, two buttons will be visible to you.
“Send Reminder” button and “Extended Warranty History” button.
- Send Reminder- You can send reminder emails to the customers before and after the product expires.
- Extended Warranty History- Here, you can view the warranty history of that product on which the customer has extended the warranty.

In this section, you will also get the “Extended warranty option”. With this, you can add or edit the warranty period of any product from backend.
You can click this button to update warranty details of that product.

In this way, you as admin can manage the warranty on any product from backend.
Customer End
The customers will see the product warranty on the product description page:

In case, you have added the extended warranty to any product, the same will be visible like this on your store’s product page:-

In this Warranty Management App, customers will also get an option to view all the warranty product details in the “My Account” section.

Once they click on “View Warranty” button, a page appears on which customer can view all the warranty details.
In the action menu, the customer will get the option to extend warranty on products and he/she can view the warranty history as well.

Once the customer clicks “Extend Warranty” button, he can view all the product details and the duration up to which he can extend warranty on that product.

The warranty history page appears like this (as shown in the screenshot below) on customer end.

In this way, customer will get all these benefits from the “Warranty Management” app.
Warranty Orders
Admin can view all warranty orders in one place with their respective product name and warranty type.
Admin can click on the view button to get all the respective order detail.

Warranty Claim
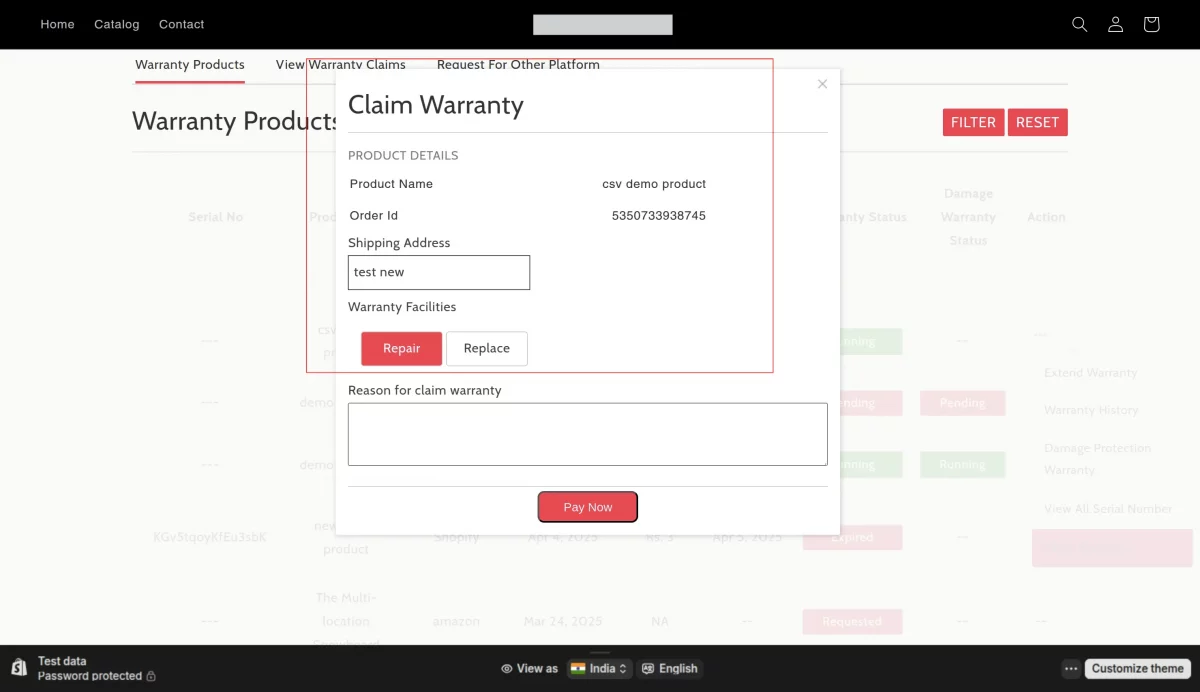
With this feature, you can now allow your customers to choose between Repair or Replace service when submitting a warranty claim.

To Enable:
- Go to Configuration → Enable the Allow Repair and Replace option.
- Once enabled, you can:
- Set a limit for the number of repair requests.
- Define the shipping address where the product should be sent for repair or replacement.
- Set a fixed cost for both repair and replace services.
Note:
The cost for repair and replace is universal across all products. You cannot set different costs per individual product

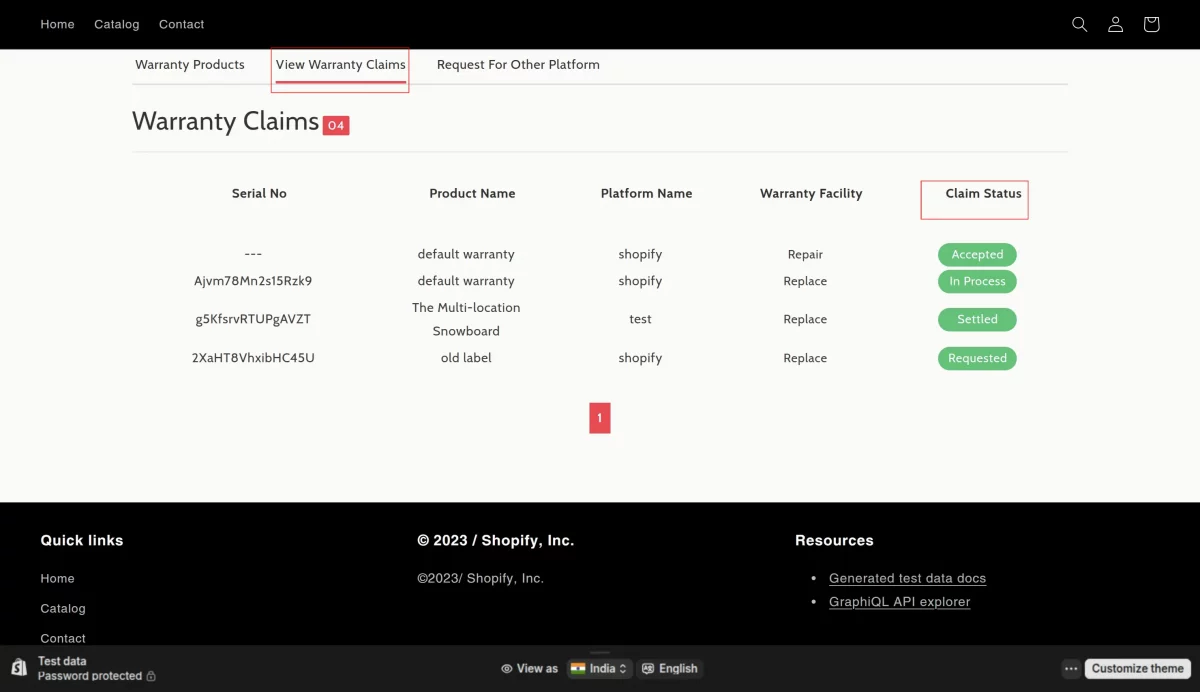
Admins can update the status of each warranty claim and view the reason for the claim through the claim warranty section .

They can also add or manage the product’s serial number as needed from the same section by clicking on three dots .
How customer can claim the warranty ?
To claim a warranty, customers need to log in to their account and click on View Warranty Details.
From there, they can navigate to the Warranty Products section and submit a warranty claim.
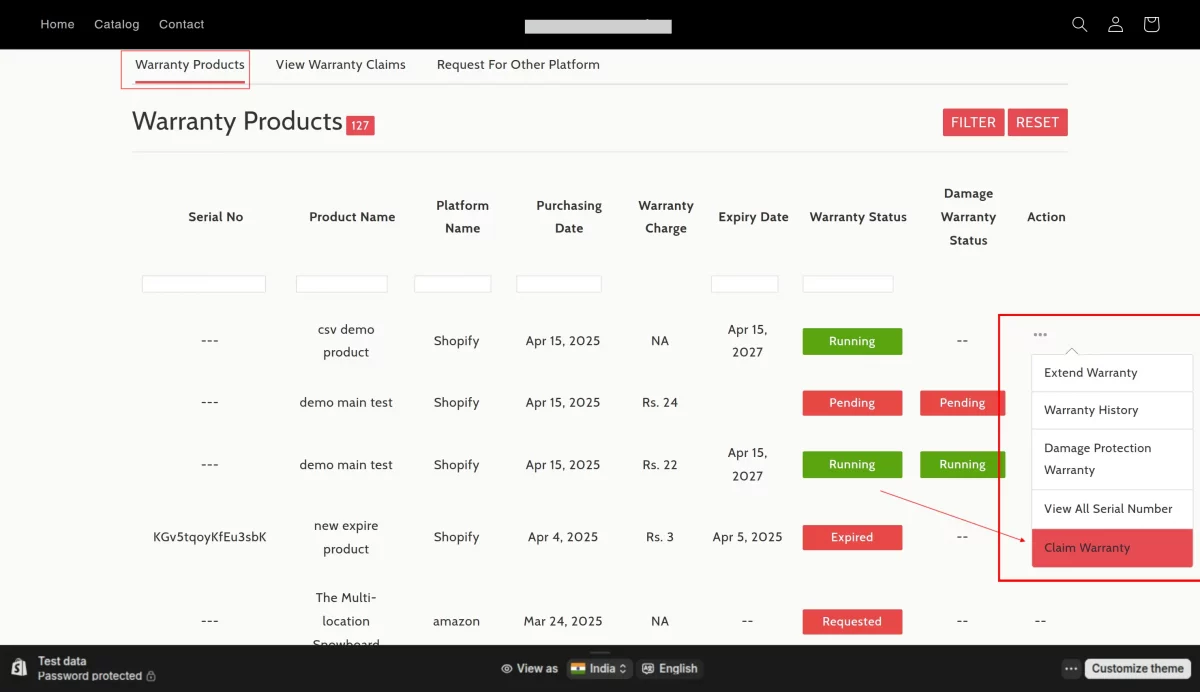
Once the customer clicks on Claim Warranty, a form will appear that they need to fill out and submit.
The admin can then review the claim, choose to accept or reject it, and the status will be updated in the View Warranty Claims section.
Request for Warranty
This new feature allows you to give your customers the option to request a warranty for orders that were placed on platforms other than your store.

To Enable:
- From the Admin Panel, navigate to the configuration settings and enable “Allow Customers to Request Warranty on Other Platforms.”
Once you enable this you have the option to:
- Enable “Proof of Purchase Required” – This ensures customers must upload an order invoice before submitting a warranty request, helping validate the authenticity of the claim.
- Set a Time Duration for Registration – Define the number of days within which a customer can register a warranty for past orders made on other platforms.
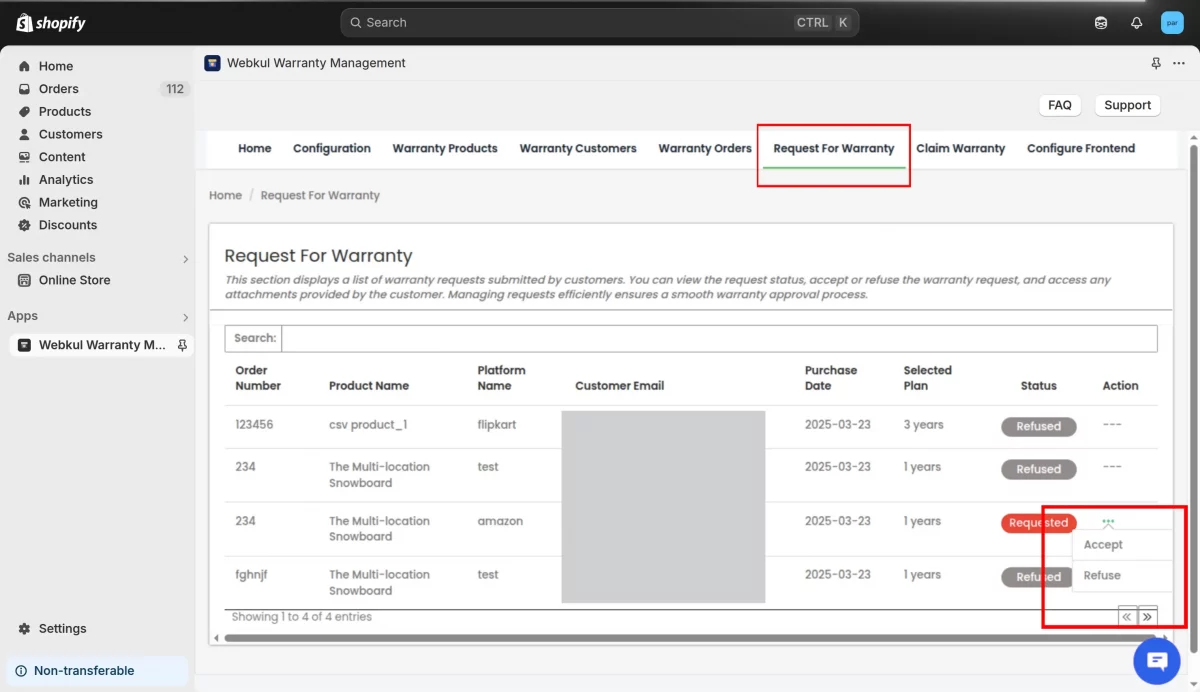
Once the feature is enabled, customers can submit their warranty request via the dashboard. As an admin, you can accept or refuse the request based on the information provided.
If accepted, the request will be converted into a warranty order, and an automated email will be sent to the customer confirming that their warranty has been successfully registered.
How customer can request for warranty ?
To request a warranty for orders from other platforms, the customer needs to navigate to their account and click on View Warranty Details.
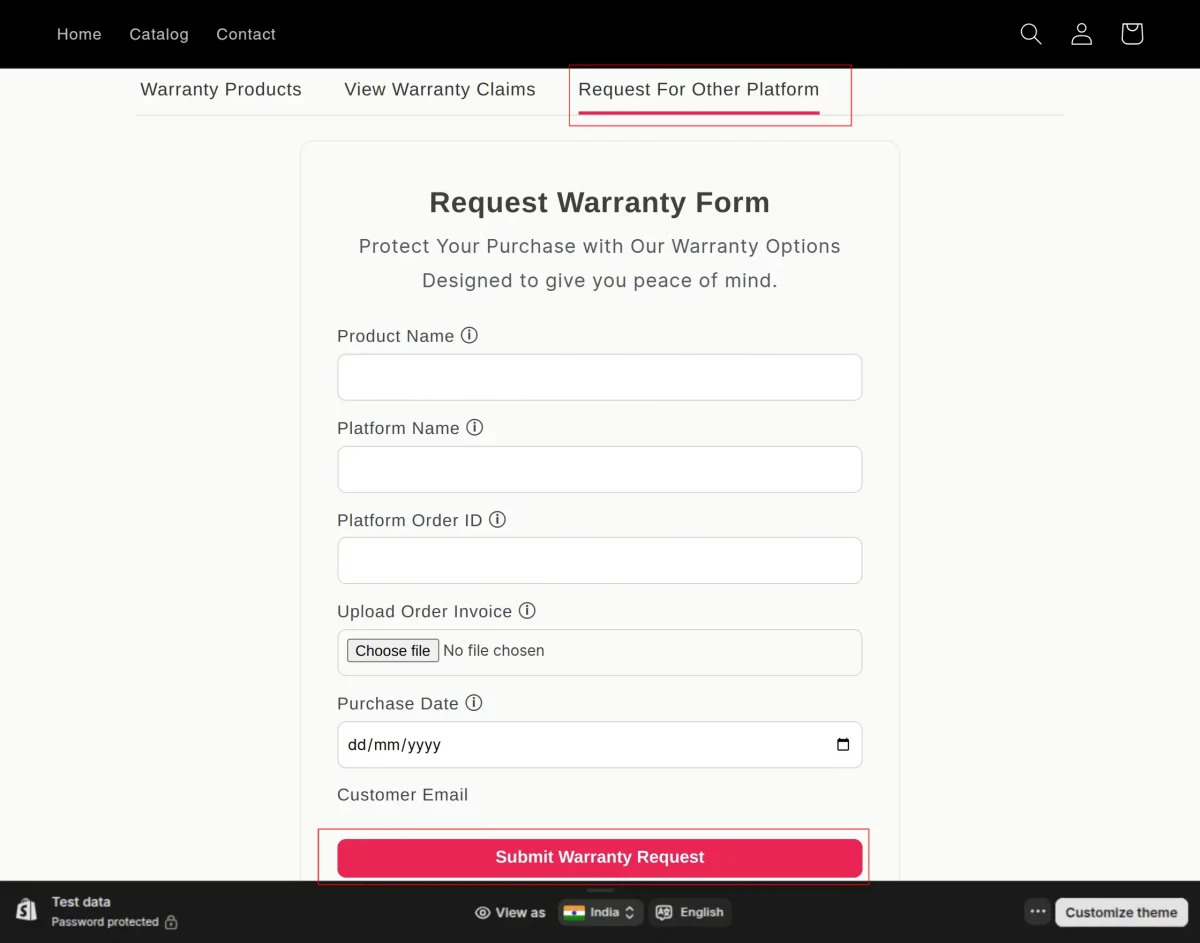
In this section, they will find Request for Other Platform, from where they can submit their warranty request.
How admin can add a warranty to a product?
We have introduced a new feature, where the admin can create a warranty for the products.
The admin needs to click the select product button under the order warranty section. After that admin needs to select the product.

Once the admin selects the products from the given list a new window will open. where the admin needs to select the platform.
By default, we do only provide two platform options.
- Shopify platform
- Other platform

Admin needs to select the platform,
If the product is sold on the Shopify platform then select Shopify and enter the order id.
Else the admin needs to select the other platform option and needs to enter the below-mentioned details.
- Platform name
- Platform order Id
- Customer Full Name
- Customer Email
- Product Warranty

After filling in all the details admin needs to click on submit button.

FRONTEND CONFIGURATION
The warranty Management system app will work once you configure its frontend.
To do so, you just need to copy the specified codes and paste it to their respective template file.
In order to show the “default warranty” information on the product page, just copy the below given code and paste it to sections/product-template.liquid file.
<div class="wk_default_warranty" customer_id = "{{ customer.id }}" product_id="{{ product.id }}" product_type = "{{ product.type }}"></div>
In order to show “view warranty button” on customer account page, copy the below given code and paste it to template/customers/account.liquid file.
<div id = "wk_view_warranty" customer_id="{{ customer.id }}" customer_email = "{{ customer.email }}"></div>;
Important Note:- A default product named “Warranty Product” is created to manage the extended warranty feature of the warranty management app. Please don’t delete that product.
Code Pasting for Online Store 2.0
To show the warranty information on the product page
You have to add the codes to sections/main-product.liquid file:-
<div class="wk_default_warranty" variant_available="{{ product.selected_or_first_available_variant.available }}" variant_id="{{ product.selected_or_first_available_variant.id }}" customer_id = "{{ customer.id }}" product_id="{{ product.id }}" product_type = "{{ product.type }}"></div>
To show “View Warranty” button on customer account page
You have to add the templates/customers/account.liquid file:-
<div id = "wk_view_warranty" customer_id="{{ customer.id }}" customer_email = "{{ customer.email }}"></div>
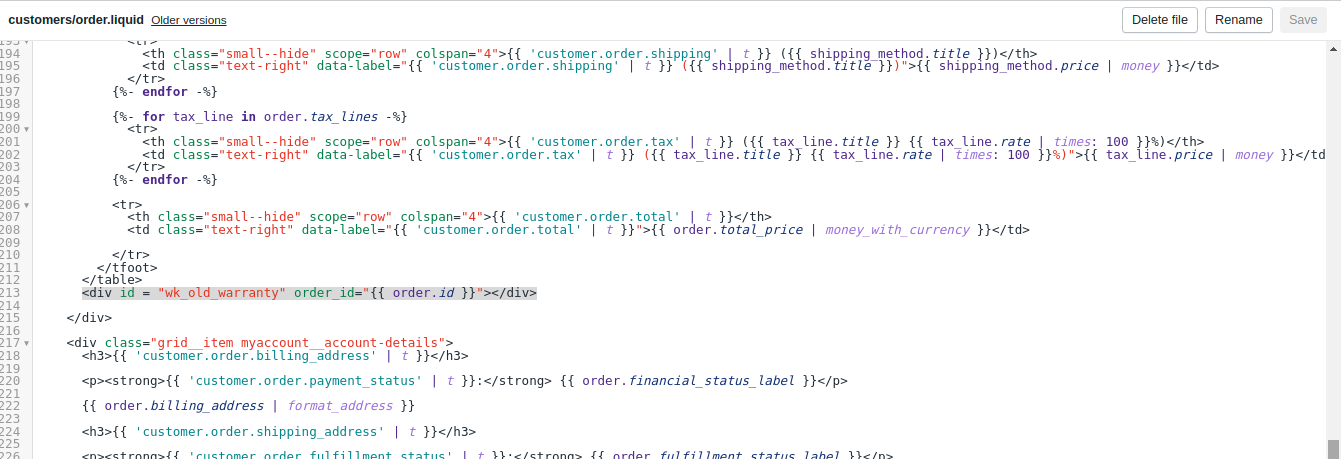
To show Previous order warranty button on customer order page
You have to paste the upper code here on templates/customers/order.liquid.
<div id = "wk_old_warranty" order_id="{{ order.id }}"></div>
You have to paste the upper code here on templates/customers/order.liquid.
<div id="main_popup_div"></div>
Demo
Click on the link below to get the backend as well as frontend demo links: https://warranty-management-demo1.myshopify.com/pages/demo
Need Help?
Hope you like this blog. To get more interesting blogs, keep in touch with us.
If you need any kind of support, just raise a ticket at https://webkul.uvdesk.com/en/. You can also contact [email protected] to get proper assistance.
Thank You for reading this Blog!
Don’t have a Shopify Store? Create Now!!!

Be the first to comment.