Multivendor Marketplace App for Shopify is here with yet another connector. This time it’s for the sellers having stores on Prestashop!
If the sellers register on admin’s marketplace have their stores on Prestashop and they want to connect their stores with admin’s store then,
this can be achieve using PrestaShop Connector Feature App.
With Shopify-Prestashop Connector, You as a Store Owner can allow your sellers to import their products from Prestashop to admin’s Shopify store.
To make this feature work, Seller needs to install a Module on Prestashop. Both admin & seller can download the Module from Multivendor App.
After installing the module, Products created on PrestaShop will be auto-update on Shopify while the pre-existing products will be imported within the app.
Once the customer orders any imported products on Shopify, the same order will create on Prestashop. And if an order is created on PrestaShop, inventory will be updated on Shopify.
To install this feature app, the admin needs to visit the “Feature App” section and approve the charge of $25 USD in addition to the Multivendor App plan.
Features
- Admin can allow his sellers to connect their Prestashop store with admin’s Store.
- Sellers can import the products by Product IDs from their Prestashop store to admin’s marketplace
- Moreover, seller needs to map their Prestashop store’s Collection with admin’s Store’s collection.
- the seller can easily enable the auto-sync for the new products.
- Also, Seller can map product type & product tags of Prestashop with admin’s Store.
- When imported product will be ordered on Shopify, the same order will be created on Prestashop.
- When imported product will be ordered on Prestashop, inventory will updatevon Shopify.
- Once a product is created at PrestaShop, the same will be updated automatically on Shopify as well.
- Slot Pricing is compatible with this connector.
- Both admin & seller can now sync the seller’s products in any state from the “Product Listing” section of their respective panels.

Limitations
- Sellers can import only Standard Products from PrestaShop to Shopify.
–Simple Product
–Product with Combinations - Admin can import a maximum of 250 Products at once from PrestaShop to Shopify.
- Variations should be less than OR equal to 100.
- Also, Option name should be less than OR equal to 3.
- It is mandatory to enable the visibility of the product available for order on PrestaShop.
- Tax & Discounts can’t be manage on Orders. Thus, the order amount at PrestaShop may differ from the actual order amount visible to the seller on the Multivendor App.
- The default currency set on admin’s Shopify store and seller’s PrestaShop should be the same.
- It is mandatory to enable “Guest Checkout” on PrestaShop as customers purchasing imported products on the store will add as “Guest” on PrestaShop.
Note:- Suppose a country (where the seller has to ship the order) is disabled from the Countries section of seller’s PrestaShop store.(International>>Locations>>Countries).
Then, in this case, the order will not be placed on PrestaShop if the customer has select the Shipping address of that particular country.
Seller needs to enable the countries again:-

Important Note:-
This connector is compatible with Prestashop 1.7.4 and Prestashop 1.7.5
To make it work with all the supported versions, it is mandatory to add the codes. Click here and follow the suggested path to add the codes.
This procedure is the same for all the versions.

If You get any issue in order or product updates, please make sure that you have added the above codes.
Permissions Required In PrestaShop For Sellers
The seller needs to allow certain permissions on PrestaShop. Allow the following webservices permissions:-
products
images
configurations
stock_availables
combinations
product_options
product_option_values
categories
tags
shops
currencies
countries
states
address
customers
carriers
cart_carrier_price
cart_rules
carts
orders
order_carriers
order_histories

How to Install
Admin can follow below-given steps to install the Shopify-Prestashop Connector App:
Step 1: Visit the Feature Apps Section.

2nd Step: Filter the Category by “Connector” and find the Shopify PrestaShop Connector Feature App and Click on the Enable button.

Step 3: Click on the “Agree” button and proceed further to Approve the Charge.
This way, admin can install the Shopify-Prestashop Connector Feature App.

As soon as you install the Shopify-Prestashop feature app, You need to share a Delivery URL, SID and a Prestashop Module with your sellers.
Go to the “Instruction for Marketplace” section of the Multivendor app & get the URL and download the module from there.
PRODUCT DETAIL CONFIGURATION
Now, admin needs to select the PrestaShop connector from the “Connector Configuration” menu of the app.
Go to Configuration>>Select the Prestashop Connector>>Product Detail Configuration.
Now, he can enable/disable other tabs for this section as well.

Image Limiter
The admin has the ability to enable a configuration that restricts the number of product images to a range of 1 to 20.
This ensures that sellers can only synchronize a specific number of images, as defined by the admin.

This feature allows for better control over the number of images associated with each product, providing a more streamlined and consistent experience for both sellers and customers.
Sync Customer Details
By enabling this tab, you can sync customer details in order with the seller’s PrestaShop store. Let’s understand this feature with two cases.
CASE 1: Sync Customer Details tab is ON (enabled):
Once a customer places an order, the customer will be created on the seller’s PrestaShop store with complete shipping.
Also, the customers will receive an email from the seller’s store regarding the same.
NOTE:- In this case, if you don’t want to send an email to the customer, you can configure a dummy email.

CASE 2: Sync Customer Details tab is OFF (disabled):
In case you disable this tab, you will get three options to choose whether you want to sync the customer’s shipping address, name, and email or not.
You can configure the settings as per the requirements with Seller’s PrestaShop store or not.

Note:- Once the order is created at the admin Shopify store for the connector product then the same order will be created on seller’s Prestashop store also.
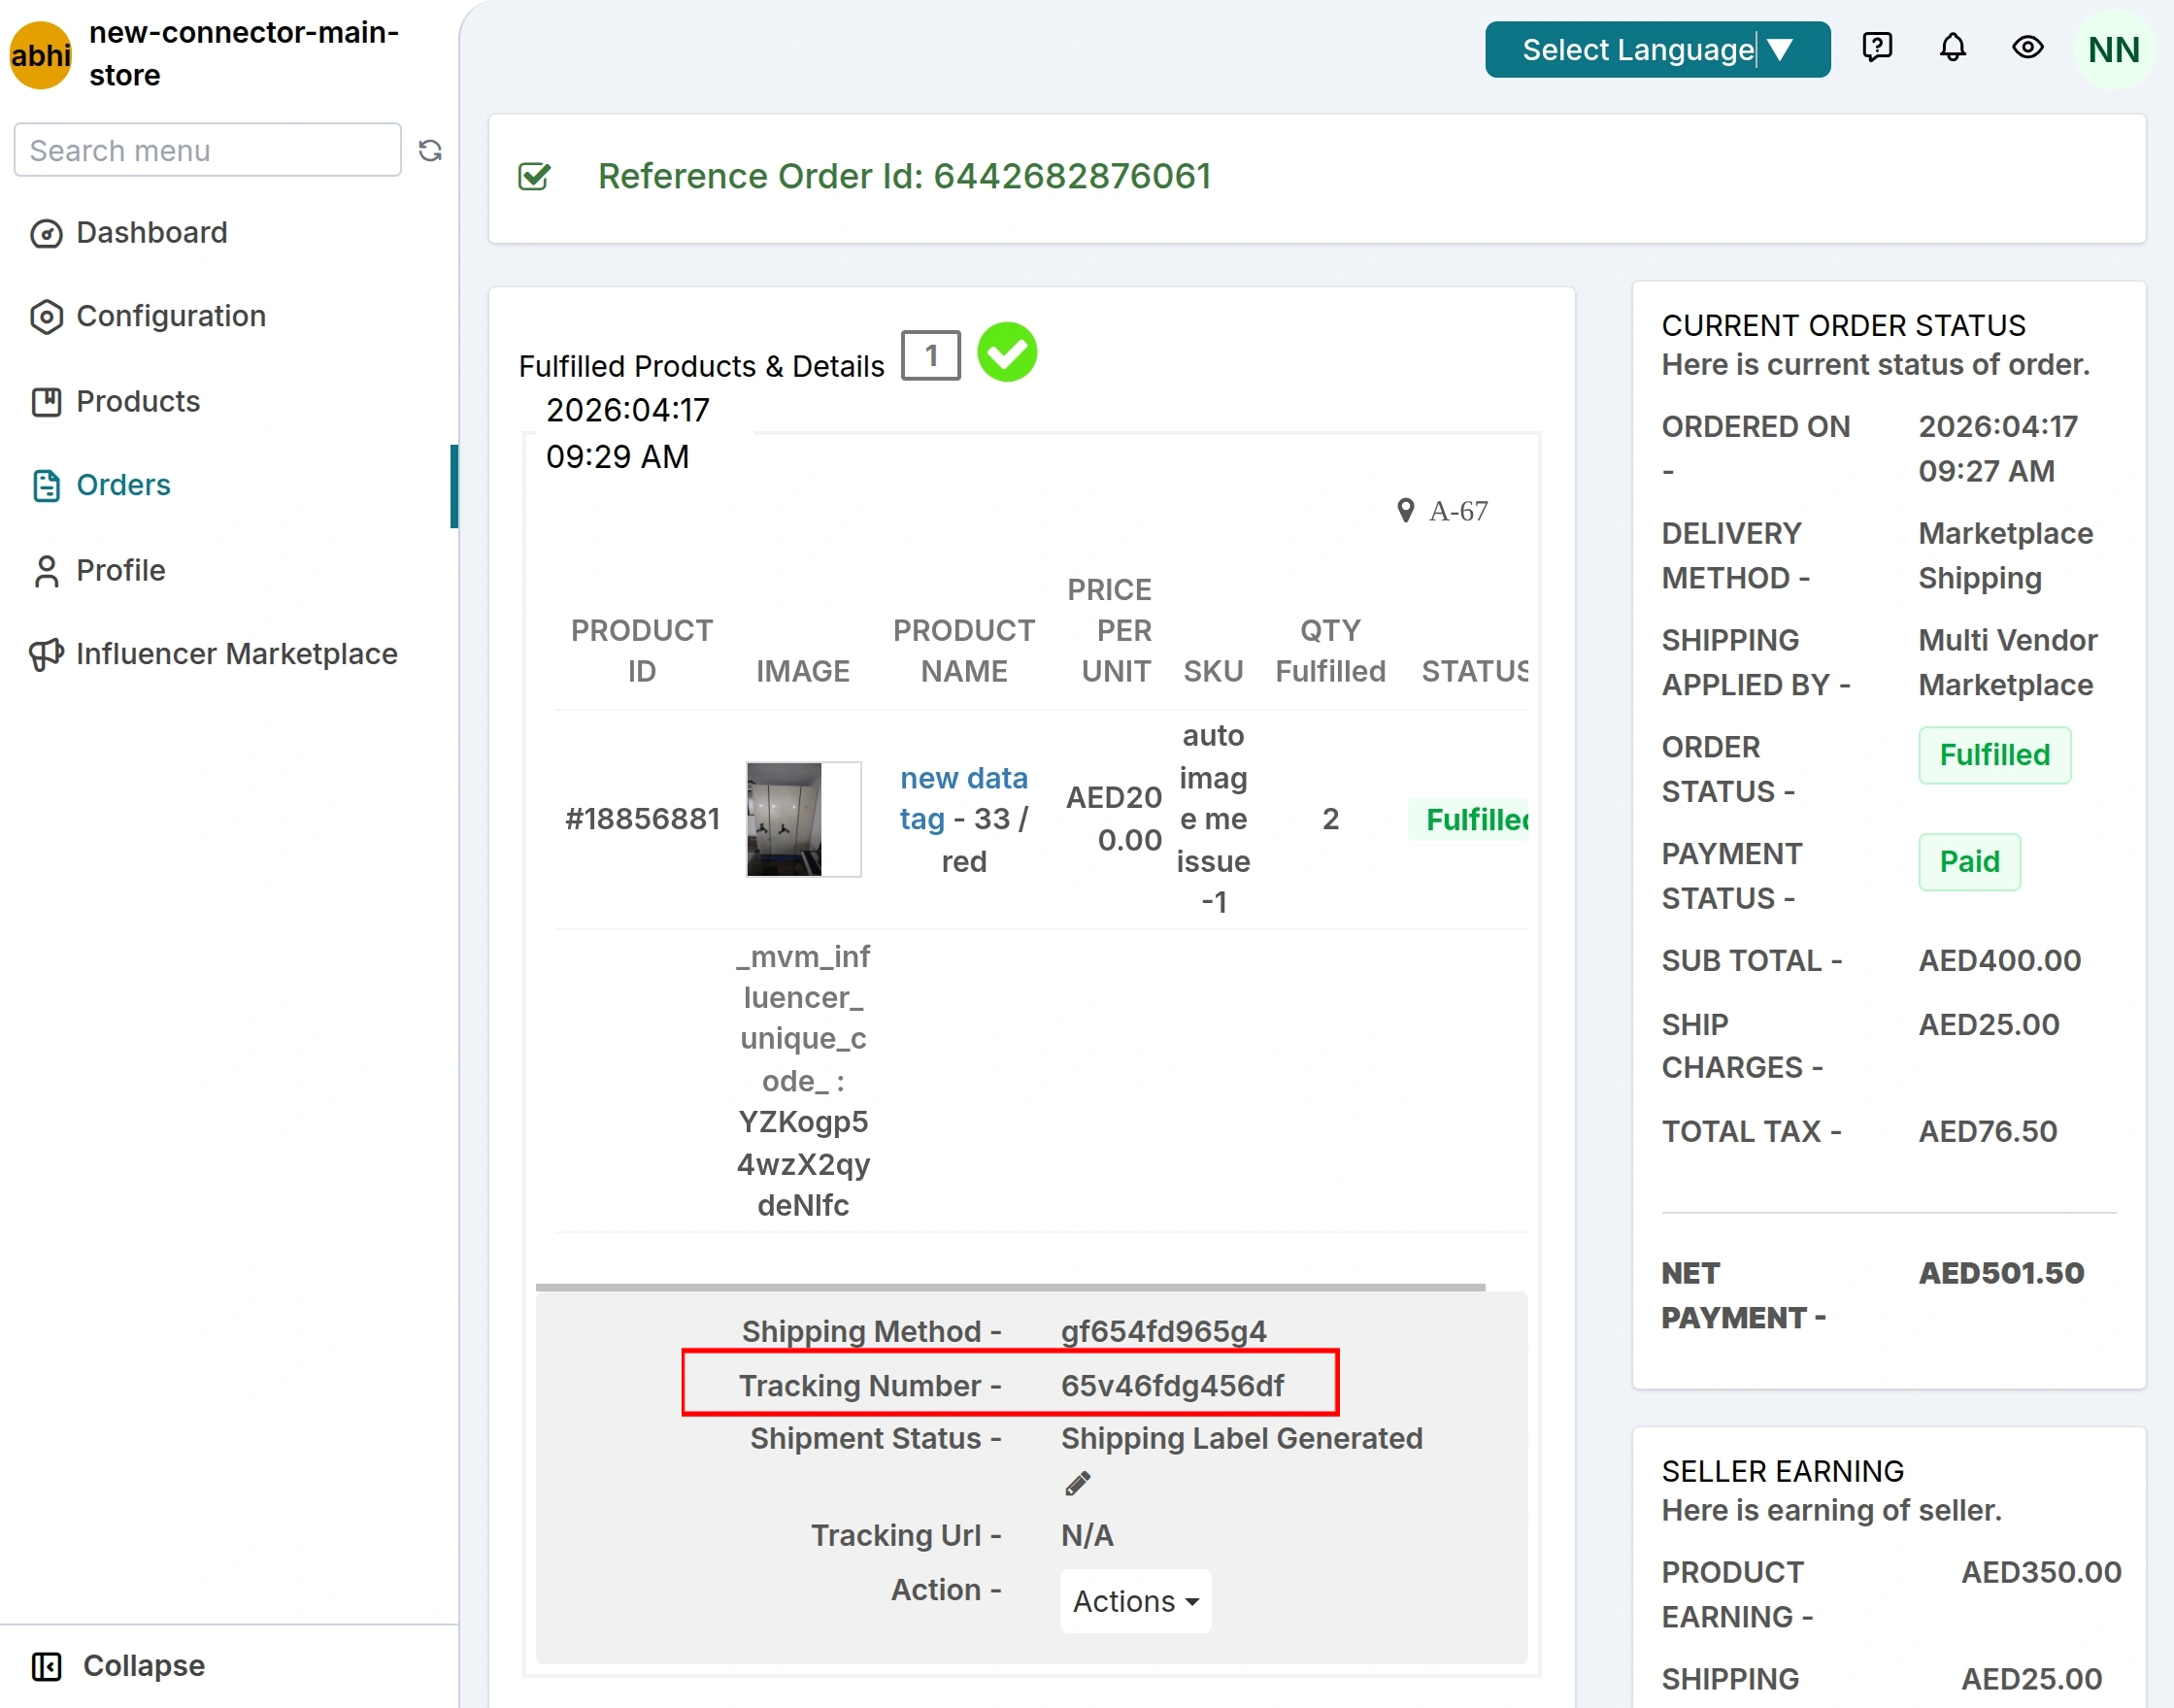
Even, the admin will get a reference order number like below that will be shown the order section of the seller’s Prestashop store.

How the Seller will install the Module on PrestaShop?
Once the admin provides the PrestaShop Module to the sellers, seller can upload the module on PrestaShop and configure its details to make the feature work.
Steps to Upload the Module:
- Seller will log in to PrestaShop.
- Go to Modules.
- Visit the Module Catalog and Click on “Install a Module“.

- Upload the Module and Configure it.
- Go to Module Manager to configure the Module.

- Seller needs to enter the Source URL and SID provided by the admin.

This way, a seller can install the module on his/her PrestaShop and configure it following the given instruction.
As soon as the seller installs the module, the products created at PrestaShop will be auto-updated on Shopify. Seller needs to import the existing products from the app.
How to Generate Access Token?
To generate access token on PrestaShop, Seller needs to follow certain steps that are as follows:
- Login to PrestaShop.
- Search to Configure.
- Go to Advanced Parameters.

- Click on Webservice.

- Click on “Add new Webservice Key“.

- Now, Click on “Generate” button & assign all the permissions.

- This way, you can generate the access token to make this feature work.

Note:- Once the Seller installs any module for the first time on his/her PrestaShop,
Make sure that the Seller has enabled the “PrestaShop Webservice” from the Configuration section (as shown in above screenshot).
PrestaShop Configuration
SELLER END
Once the admin installs the app, he/she will get a new sub-menu in the Configuration menu of the Seller Panel. Seller needs to configure the PrestaShop details from this section of the app.
PrestaShop App Configuration:
-Seller will enter the URL of his/her PrestaShop.
Note:- URL added must be added without the language code.
-Seller will enter the Weight Unit of PrestaShop.
-Seller will enter the Dimension Unit of his/her PrestaShop.
-Paste the access token generated from PrestaShop.
-Seller will enter the Payment Method Name and Payment Method Module of his/her PrestaShop.
-Seller can enable the auto-sync for the new products.

Sellers can directly download the PrestaShop Module from PrestaShop details section of their seller Panel.

PrestaShop Payment Details
While configuring PrestaShop details on admin’s store, the seller needs to enter Payment Method Name and Payment Method Module.
Sellers can get these details from the “Payment” section of his/her PrestaShop store.
- Login to PrestaShop.
- Go to Payment Section.
- Click Payment Methods.
- Choose any of the active payment methods.
- Click on it and get the Payment Method Module from the page.
For Payment Method Name, do refer the below-given screenshot:

For Payment Method Module, do refer the below-given screenshot:

By saving the details, Seller will move forward to map Collection, Product Type & Product Tag.
-Category Mapping
From this section, Seller will map admin’s pre-defined Shopify store collections with seller’s PrestaShop Collection.
Note:- Make sure that admin has enabled the “Restrict Collection” tab from MV admin panel.

Clicking on the Map Collection, the seller will get the option to select collection of admin’s store and map the same with the collections of his/her PrestaShop. This will be a One to Many Mapping.

-Tag Mapping
Seller will map all the Product’s Tags of admin’s Shopify store with the tags of his/her PrestaShop.
Note:- Make sure that admin has enabled the “Restrict Product Tag” tab from MV admin panel.

Clicking on the Map Tags button, Seller will enter the product tag created by admin and the tags of his/her PrestaShop to map them with each other. This will be a One to Many Mapping.

-Type Mapping
Seller will map the product type of admin’s Shopify store with product type of his own PrestaShop store. This will be a One to One Mapping.
Note:- Make sure that admin has enabled the “Restrict Product Type” tab from MV admin panel.

Moreover, the seller can enable/disable or delete the mapped Product Tag & Product Type.
Seller Importing Products
As soon as the Seller Configures the PrestaShop details, Seller will get the option to import his/her PrestaShop’s products to admin’s Shopify Store.
Clicking on the “Import Product” button added in the seller panel, Seller can import products using any of the three methods.
Method 1: By Selecting Duration
Using this method, Seller will select the From & To date and import the product between the chosen date.
2nd Method: By Selecting Product ID
Also, Seller will enter comma separated product IDs of his/her PrestaShop store and import them in one go.
Method 3: By Selecting Range
Using this method, Seller will enter the range of product IDs of his/her PrestaShop and import them at a time.

This way, Seller can import their PrestaShop Products to admin’s Shopify Store.
Product Listing
As soon as the Seller imports his PrestaShop products to admin’s marketplace, the imported products will be in “Approval Pending” state at both admin & seller panel.
You can view the imported products in the “Product Listing” section of the admin panel.

Admin can anytime enable or deny the imported product with a reason.
Once the admin approves the product, the same will reflect at seller side too.
Orders
Once an order is placed at the Shopify store for the seller product, then the same order will be created on PrestaShop also.
Accordingly, inventory will be managed at both the ends i.e. at PrestaShop as well as at Multivendor App.
Once an order is Shipped on PrestaShop, the same will be fulfilled on Multivendor App.
An order delivered on PrestaShop will be updated on Multivendor App.
If an order is canceled or refunded on Shopify, the order state will be updated on PrestaShop.Accordingly, you can update the inventory manually on PrestaShop.

Moreover, the same order is here on PrestaShop also.

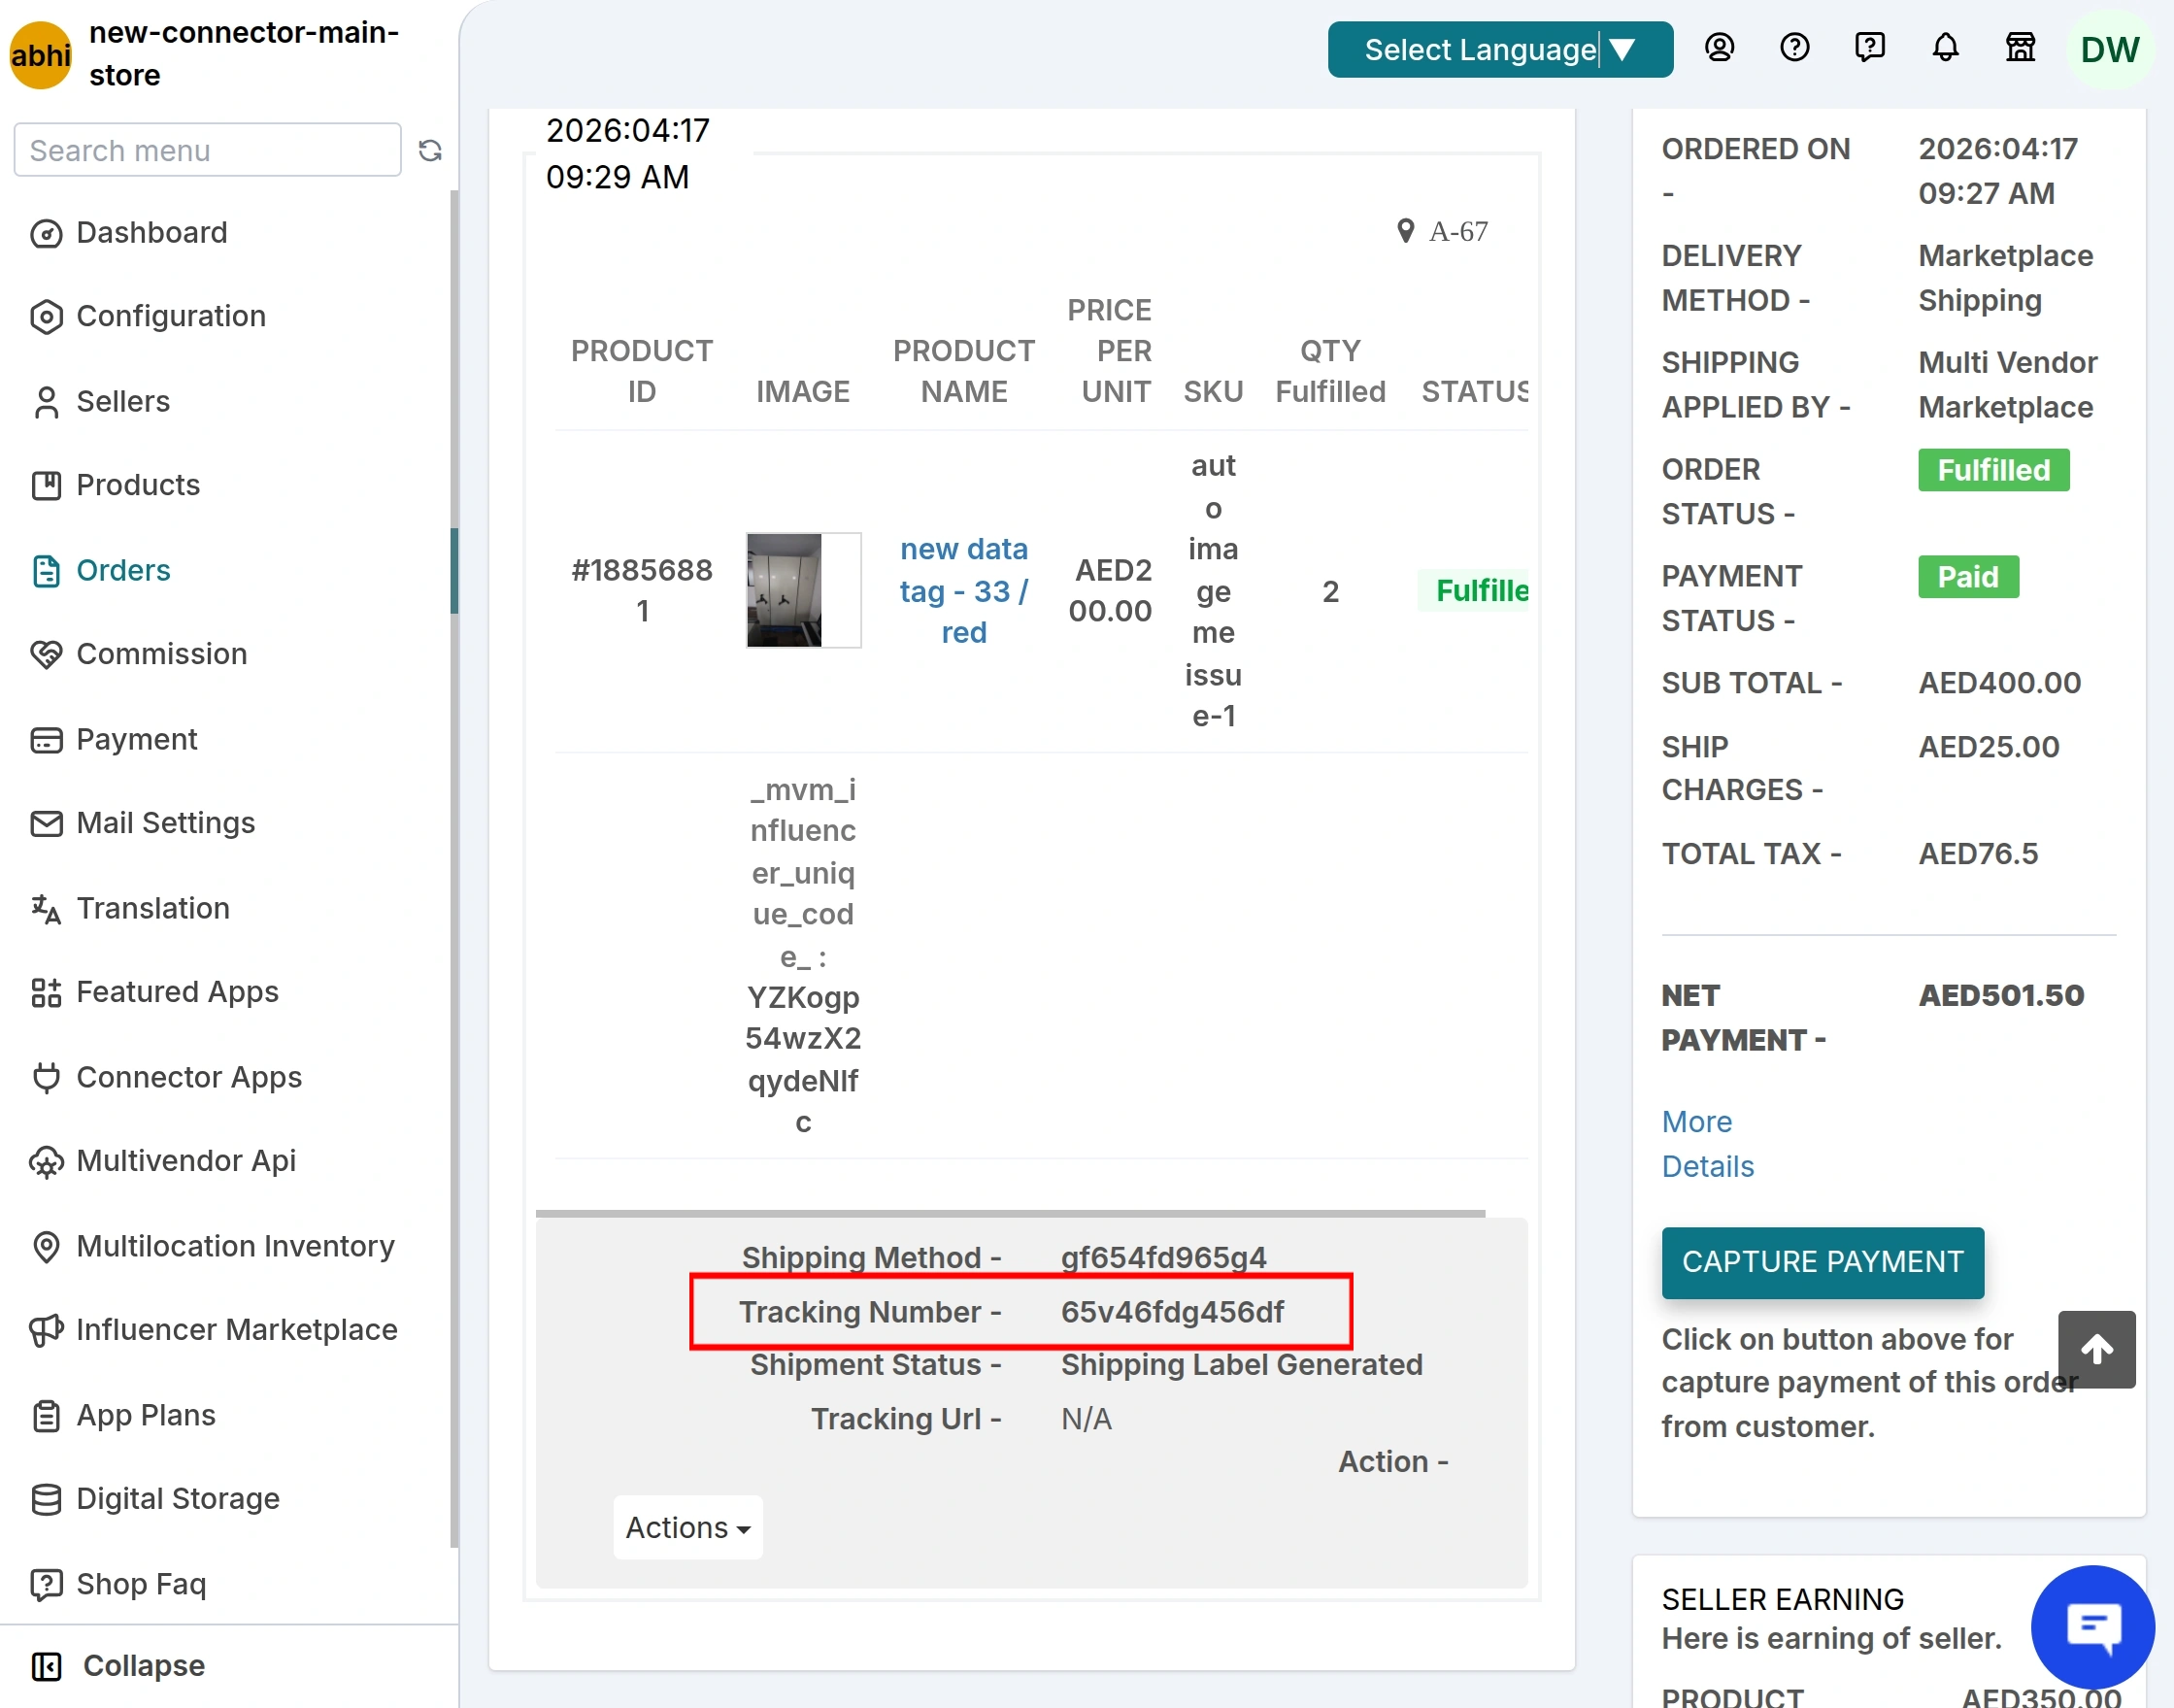
Auto-synced tracking number
Now, not only order details but also the tracking information like the tracking number will sync in our Prestashop connector automatically.
Admin end of order view.
Seller end of the order view.
Price Rule
Let the sellers create price rule to manage product price of their PrestaShop store to merchant’s store.
Sellers will have a new menu named Connector Price Rule in the configuration menu of the app.
From here, seller can create price rules based on which seller’s product price will be calculated on merchant’s store.

Furthermore, clicking the Connector Price Rule, seller needs to enable “Price Rule” status and select the options as increase/decrease price,
Price will be changed by a fixed amount or a percentage amount, enter the amount that needs to be changed.

Enable the checkbox to update already synced product’s price at merchant’s store as per the price rule created.
This way, sellers can create price rule from their respective seller panels based on which product price of the seller’s store will be calculated at merchant’s store.
Sync Barcode
Now the admin can allow their sellers to sync the product’s Barcodes (UPC, MPN, GTIN, etc) from their Prestashop store to the Admin’s Shopify store.
To do this, first Admin needs to enable this Configuration from Admin Panel>> Configuration>> Connector Configuration>>Choose Prestashop Connector>>Enable Product Barcode Option>>Save Changes.

After this is enabled, the seller can select the Barcode( MPN, GTIN, UPC, etc)
That he wants to sync with the Barcode field in Admin Shopify by navigating to Seller Panel>> Prestashop Configuration>> Select Barcode>>Save.

Option Name Mapping
Now admin can map the Prestashop option names with Shopify option names.
Admin can do this by navigating to the product listing section in the Admin Panel>>Select the product>>Edit>>Scroll down to the variant details section>> Click on the edit(pencil) icon

the option names can be then mapped with their desired Shopify option names.

The Multi-vendor Marketplace app server IP-
54.255.33.47
18.138.8.137
47.129.250.24
54.179.1.53
18.136.7.41
13.229.6.57
18.138.9.81
52.74.127.6
13.228.91.147
13.250.79.108
13.229.100.249
52.220.12.7
3.1.34.177
Demo Details
Moreover, follow the below link to check the demo of PrestaShop Connector app: https://egsma.io/shopify-multivendor-marketplace/
Need Help?
Hope you like this blog. To get more interesting blog keep in touch with us. If you need any kind of support, simply raise a ticket at https://webkul.uvdesk.com/en/.
You can contact [email protected] to get proper assistance.
Thanks for reading the blog.

Be the first to comment.