In Multivendor Marketplace App for Shopify, we have introduced Invoice feature which enables both admin and seller to generate an invoice from their respective ends.
NOTE: It is mandatory to have a Multi-Vendor Marketplace PRO plan to have the invoice feature.
The invoice can be generated in three ways:-
Admin to Seller: Both admin & seller can print this invoice from their respective panels.
Seller to Customer: Seller can generate & print this invoice from his seller panel.
Seller Bulk Invoice: Seller can generate the invoices in bulk from the Order Listing section of his seller panel.
So let’s understand its workflow:-
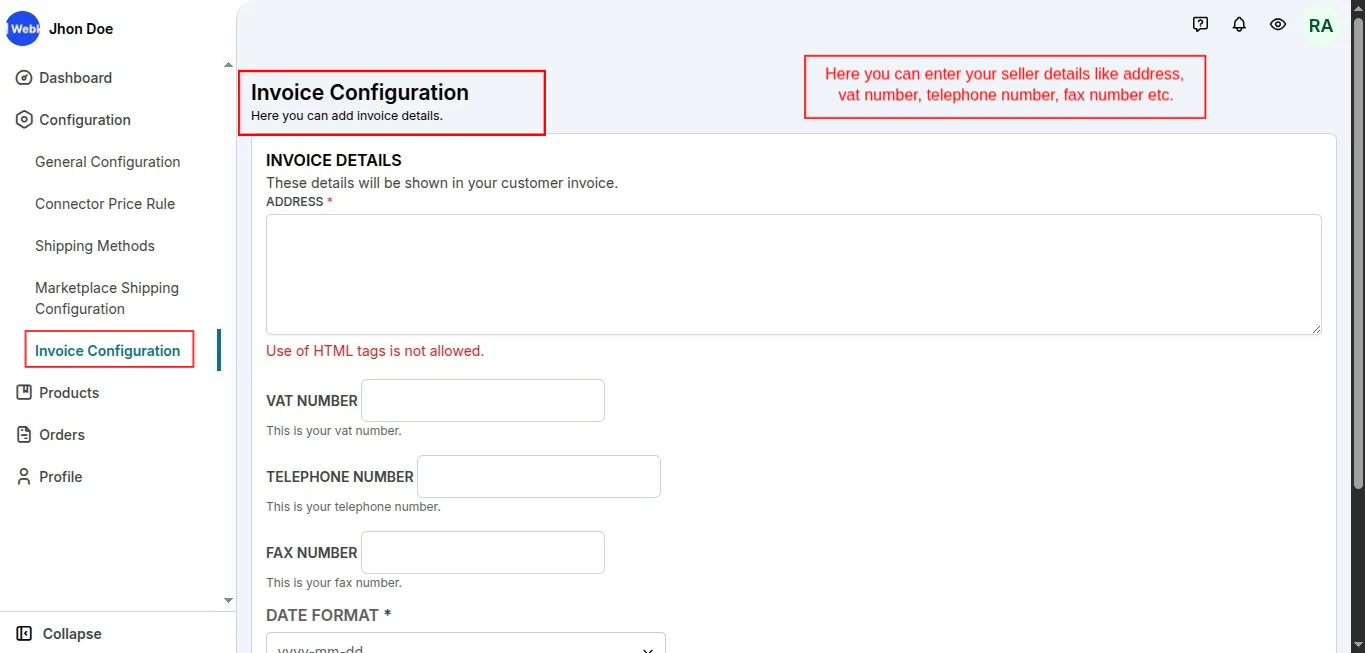
Invoice configuration
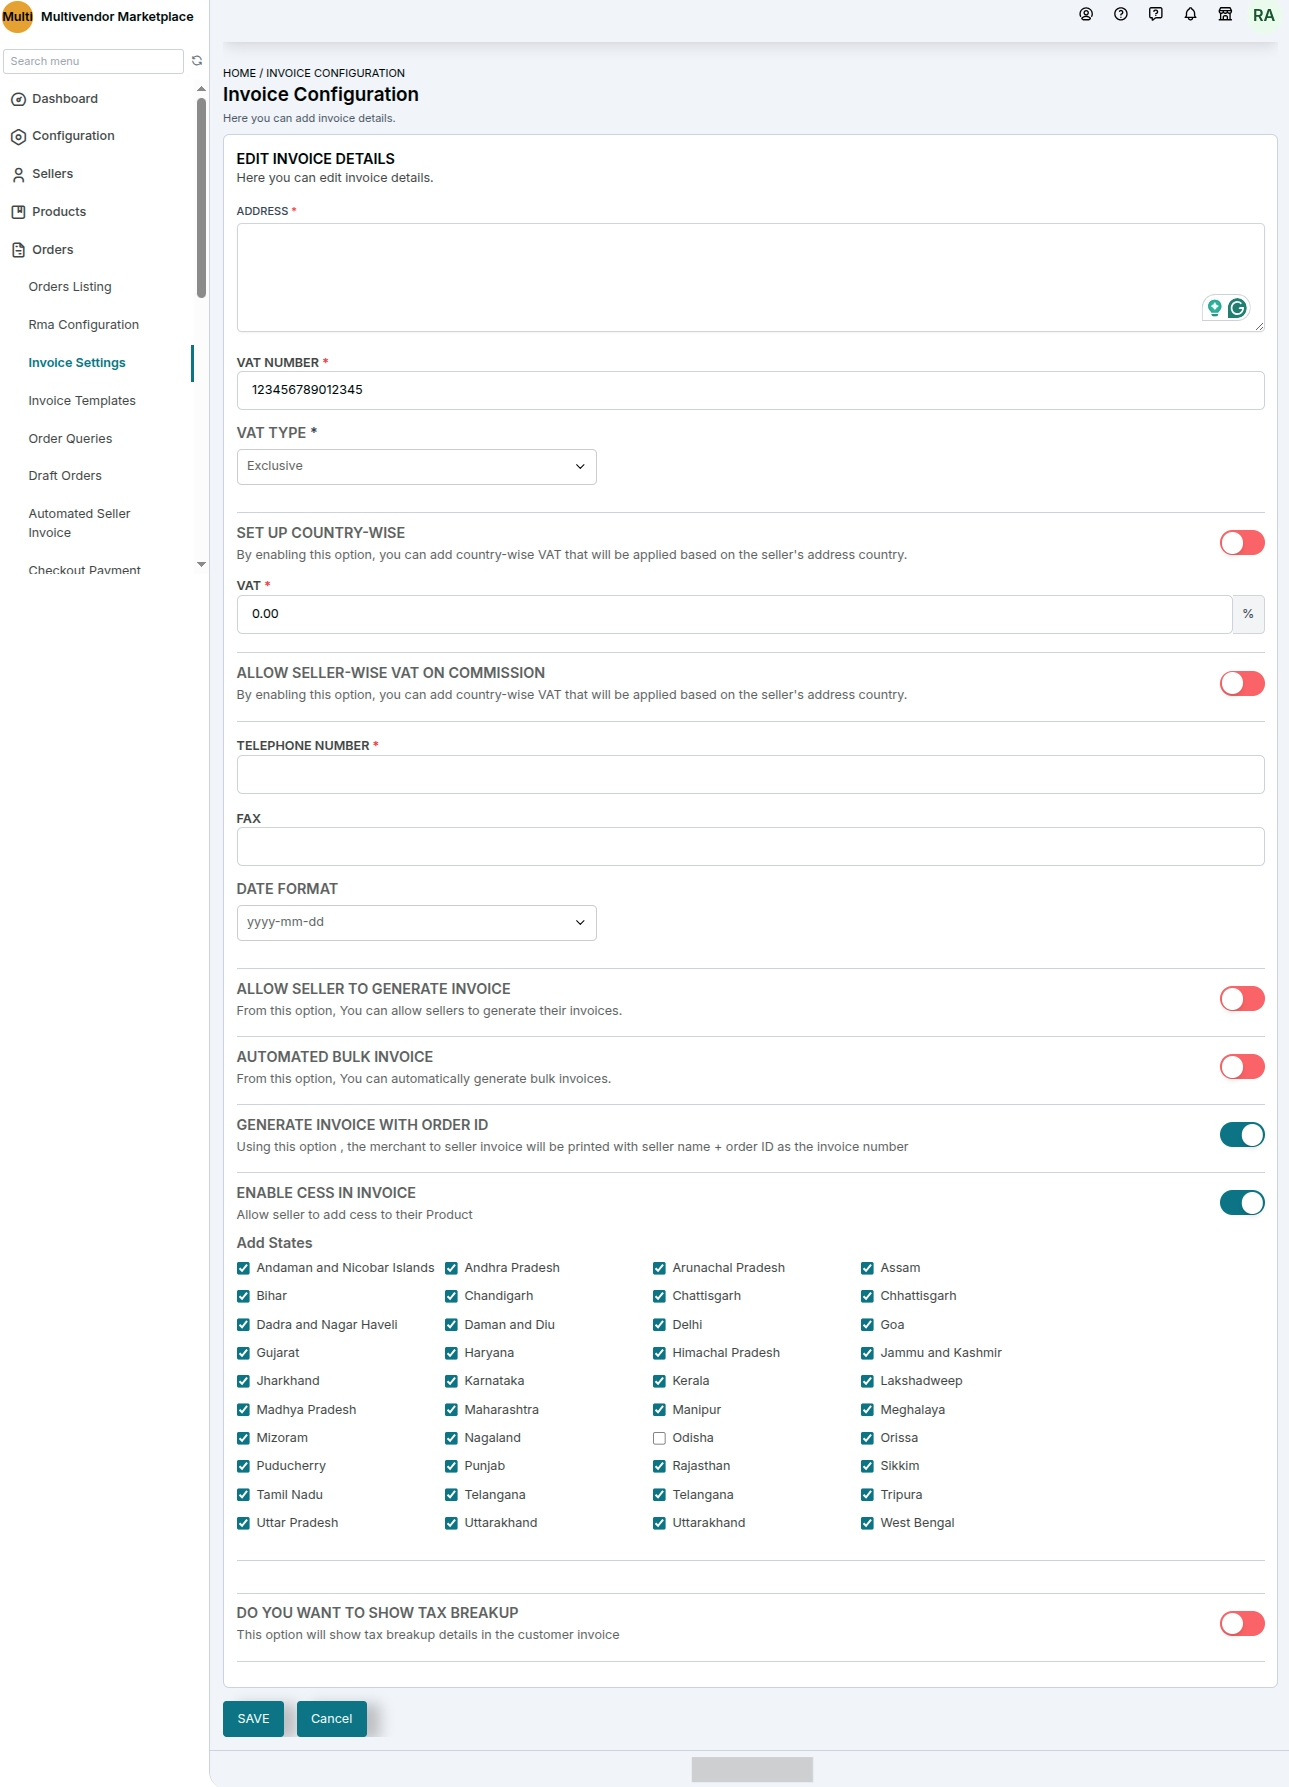
Firstly visit the “Invoice Configuration” section of the app and from here admin can configure the order invoices of his/her store.
From this section, you can enter or change the invoice details like Merchant Address, VAT Number, Fax, Date format, and much more.
Admin Panel>> Orders>> Invoice configuration >> Here add or edit the invoice details>>Save.

In addition to it, you can allow your sellers to generate invoices from their respective seller panels as well.
VAT on Commission
You can now manage the VAT (tax) calculation on the commission you set in the app.
Simply choose whether you want to include the VAT on the commission or you want to make it exclusive.
You can visit the Invoice Configuration menu under the Configuration menu to configure the settings.
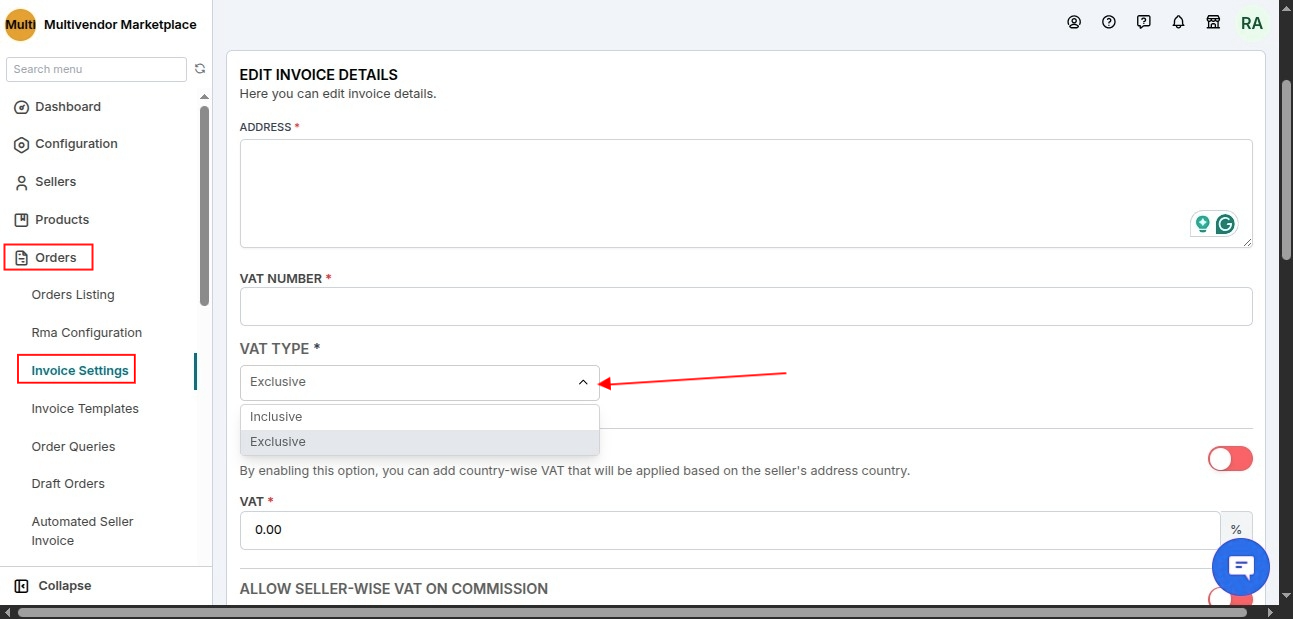
VAT Type:
You need to choose whether you want to include or exclude the Tax on the commission.
Let’s understand this with an example:-
Tax Inclusive Case:-
Suppose, Product Price is $100.
Admin’s Commission is 10% i.e $10.
Let’s say Y is the commission in $10 earned by admin and 18% is the VAT
So, now Y + (18% of Y) = 10.
This comes to 1.18Y=10
So, Y is 8.47.
The commission is 8.47 in the invoice and the remaining 10- 8.47 = $1.53 is VAT in the invoice.
This is the maths applied to such tax-inclusive calculations.
Tax Exclusive Case:-
The product Price is $100.
Admin’s Commission is 10% i.e $10.
Now, suppose you charge 10% VAT on commission i.e. VAT=10% of $10 (commission)
In this case, the admin’s earnings will be $11 ($10 commission + $1 VAT) and the rest amount $89 ($100- $11) will be the seller’s earnings.
This VAT on commission will be visible on the order invoice that you send to your customers.


Moreover, a new section is added to the commission listing section in the app.

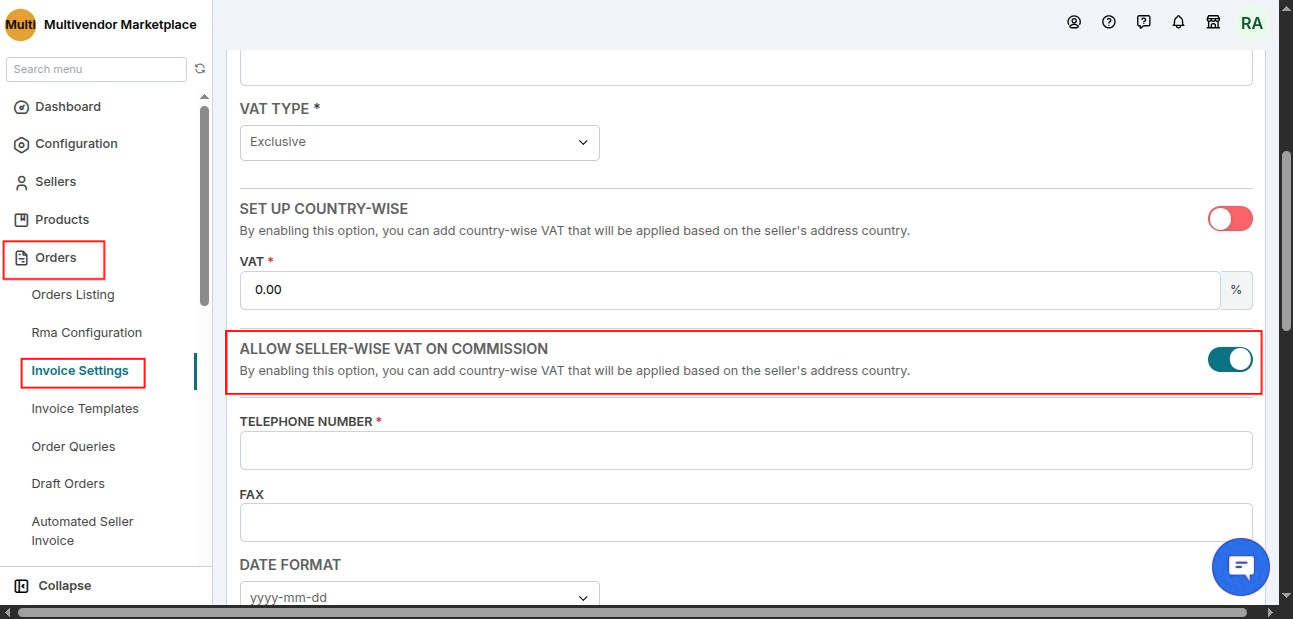
SELLER-WISE VAT ON COMMISSION
Now, the admin can manage the VAT ON COMMISSION seller wise which means the admin can enable or disable VAT ON COMMISSION for a particular seller.
For this, the admin can enable “ALLOW SELLER-WISE VAT ON COMMISSION” option in the invoice configuration as shown in the below image.
Then, the admin will see by default enabled “ELIGIBLE FOR VAT ON COMMISSION” option in seller detail which the admin can disable or enable for a particular seller.
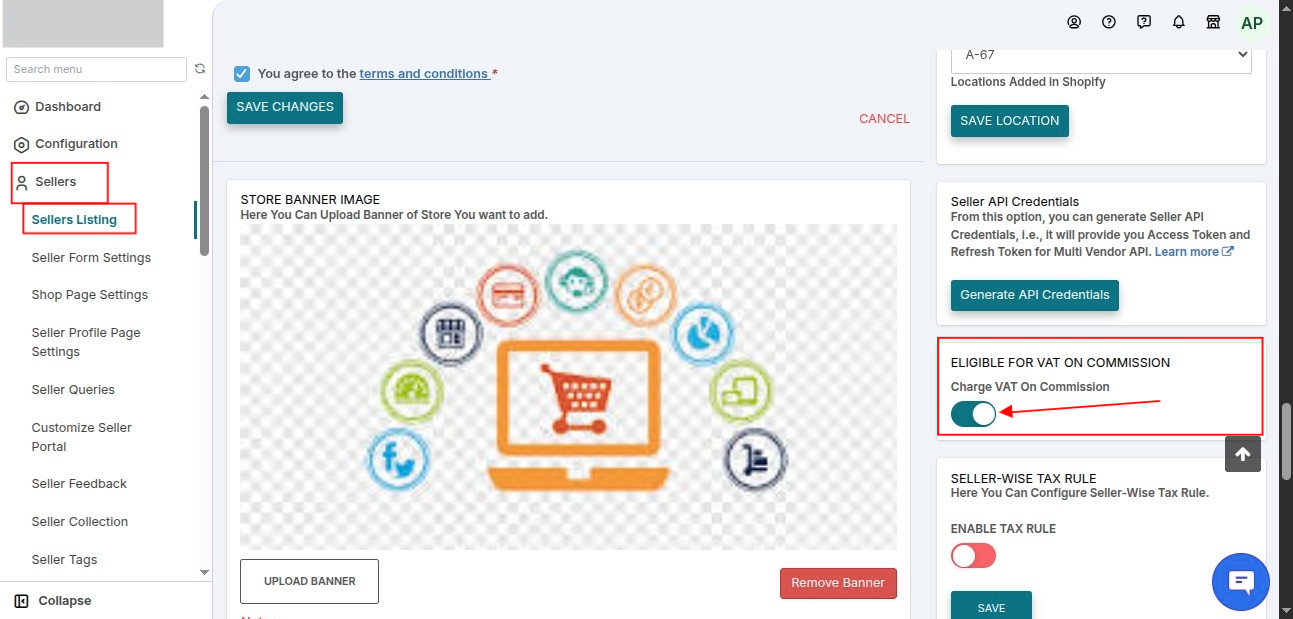
Now, if the admin disable “ELIGIBLE FOR VAT ON COMMISSION” option for a particular seller
Then “VAT on commission” will not work for that particular seller in both cases i.e. exclusive and inclusive.
And for that seller, 0 VAT value will be shown in the order invoice and commission listing section.
Note :-
If this seller-wise vat on commission is set up in between then it will be applied to new orders and the old orders will not be affected by seller wise vat on commission set up.
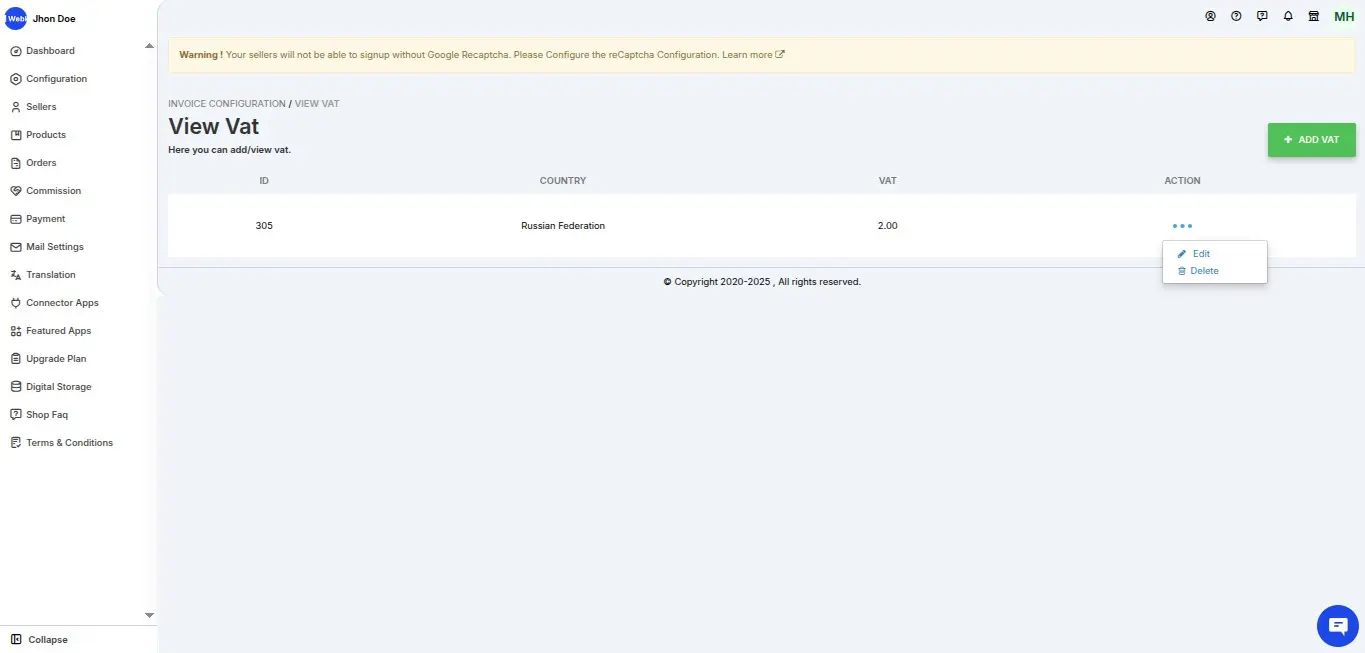
SET UP COUNTRY-WISE VAT
We have introduced a new feature that is set up country-wise vat. Once you enable the configuration you will find a green button on the top right-hand side.
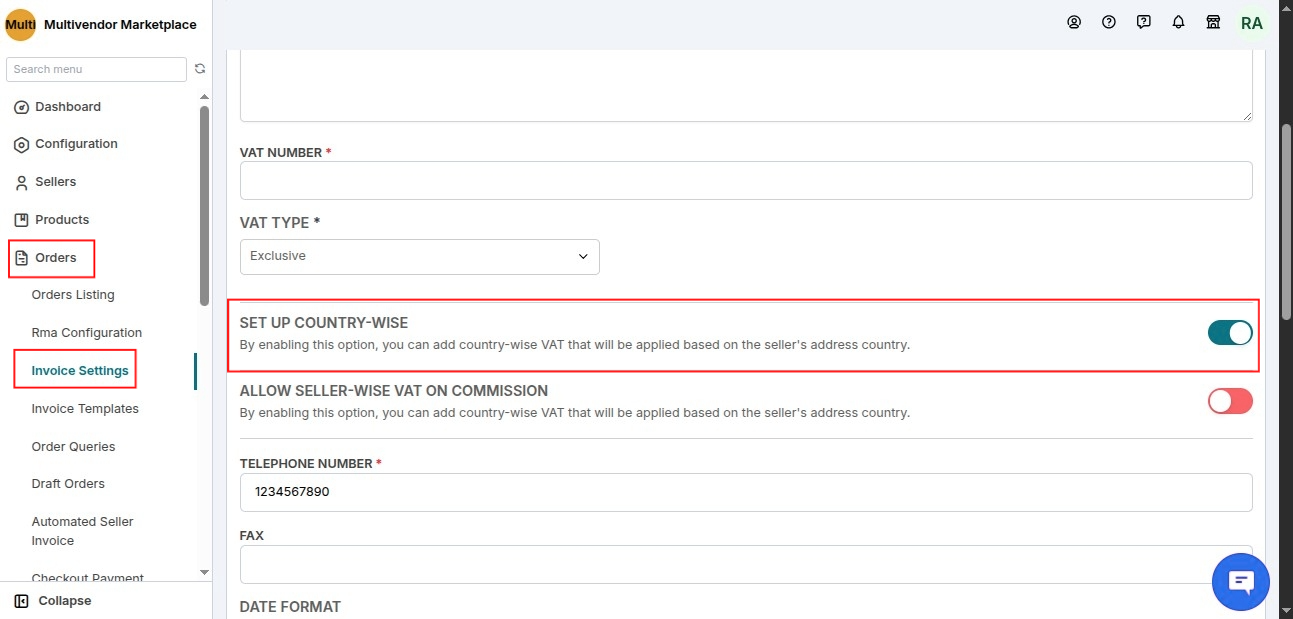
After clicking on the green button, you will see an option to select the country and VAT.
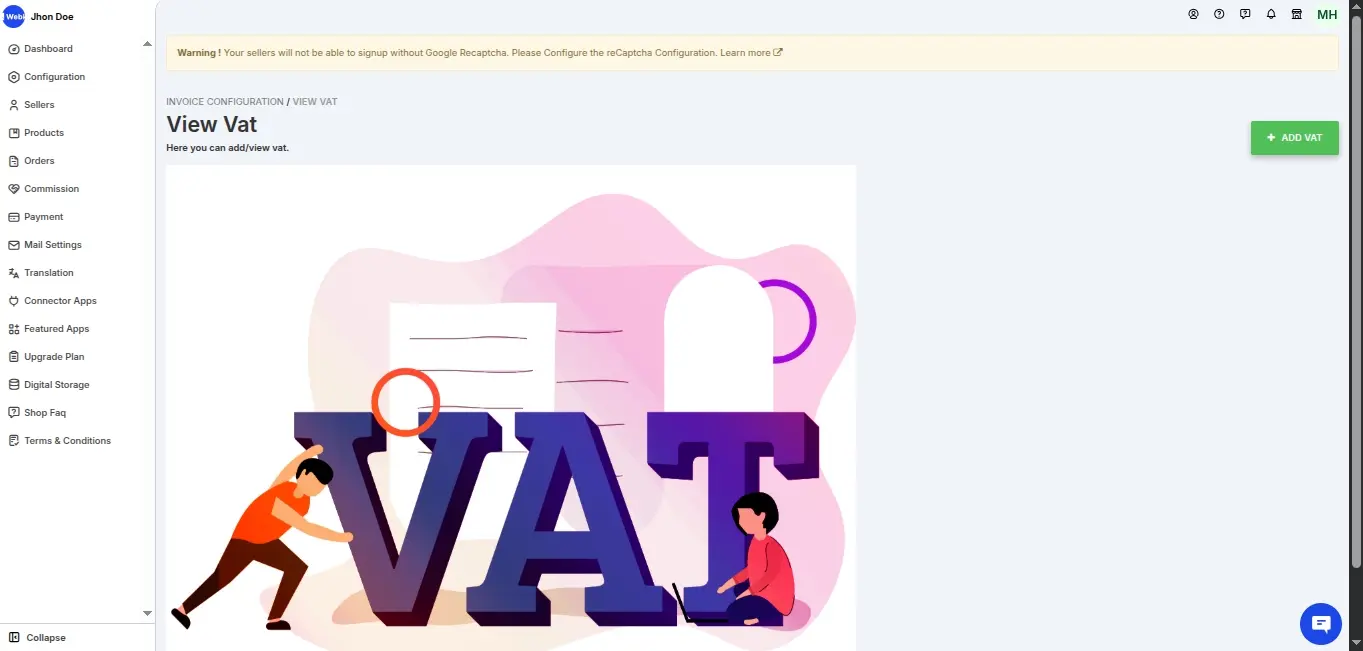
Here you can select multiple countries and add VAT as per your requirement.
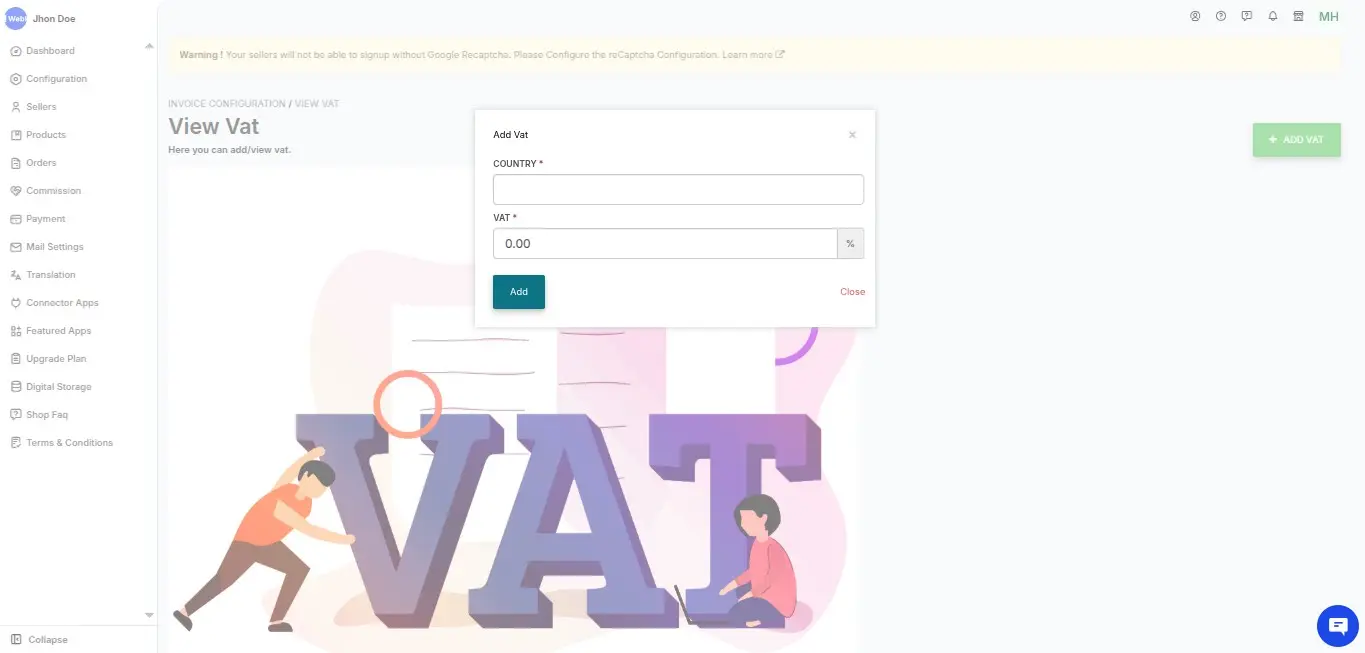
On the same page, you will get the list of added countries and the VAT, also you can edit and delete via the action button.
ADMIN PANEL
INVOICE: ADMIN TO SELLER:-
From the admin panel section of the app, the admin can generate Admin to the seller invoice.
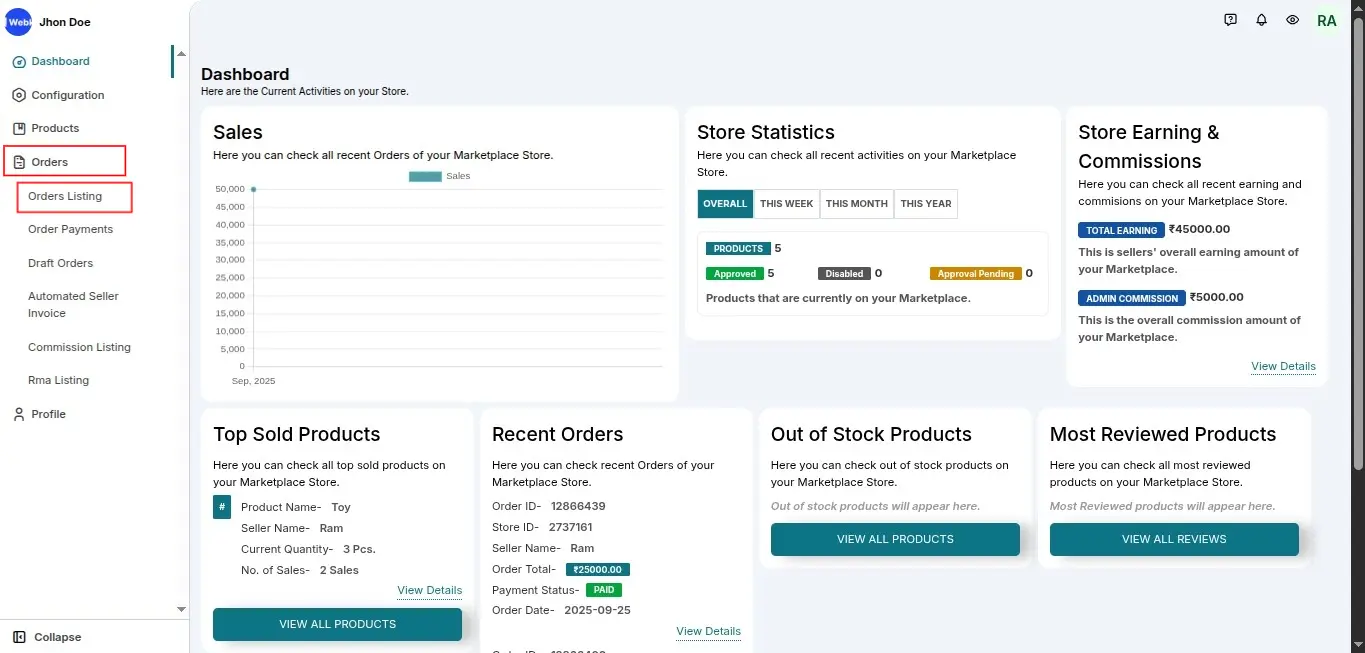
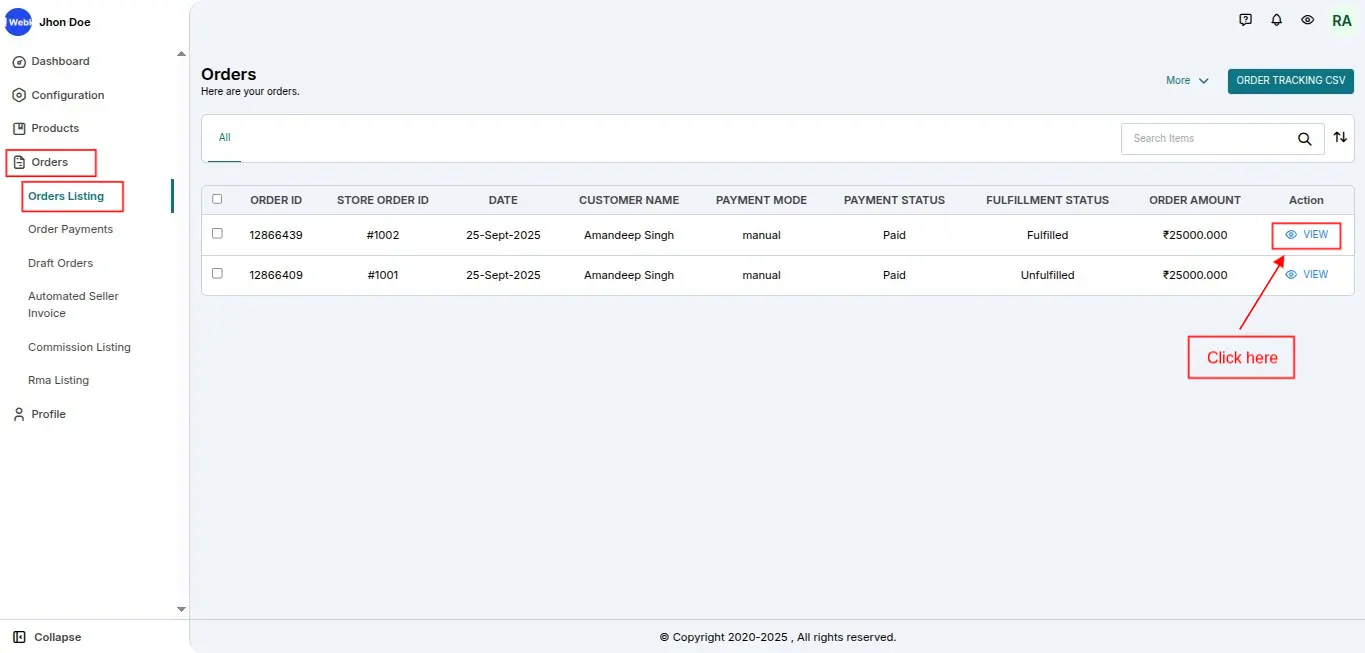
To generate the invoice you need to visit the order sections of the app.
Admin Panel>>Orders>> Orders Listing>>Click on the “View” button in from of Order ID>>Click”Generate Invoice”>> Print.


Hence from here, admin can generate the admin to seller invoice as shown in the screenshot.

So Admin to Seller invoice visible like this as showing in the screenshot.

INVOICE TEMPLATES:-
From this section, you can configure the template of the invoice sent from merchant to seller, seller to the customer, Seller bulk invoice.
Additionally, you can configure the template of Shipping Label as well.


SELLER BULK INVOICE:-
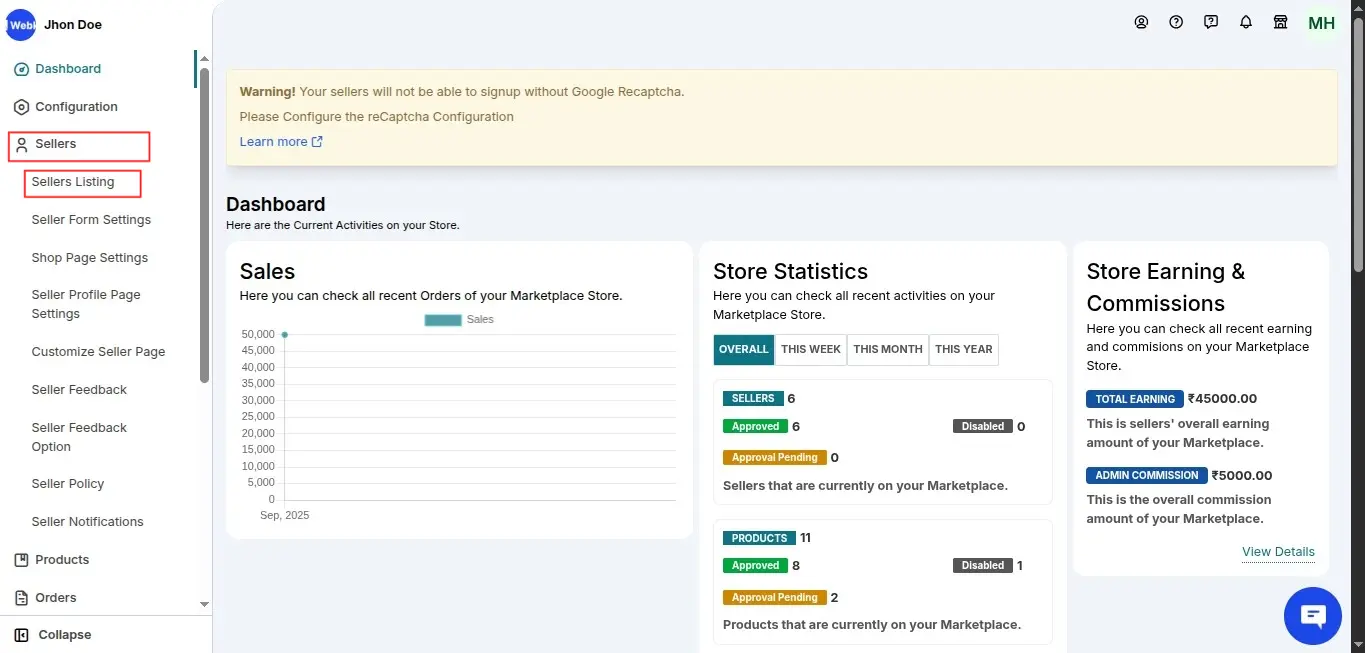
To generate the seller bulk invoice admin need to visit the seller’s section of the multivendor app.
Admin Panel>>Sellers>>Sellers Listing>> Click on “Edit” in front of SELLER ID>> More Action>> Generate Invoice>> Choose dates “FROM” and “TO” >>Print.
Refer to the below screenshots:-


So Seller Bulk Invoice visible like this as showing in the screenshot.

SELLER PANEL
INVOICE- SELLER TO CUSTOMER:-
From the seller panel section of the app, the seller can generate Seller to Customer Invoice.
To generate the invoice seller need to visit the order sections of their account in the app.
Seller Panel>>Orders>> Orders Listing>>Click on”View” button in from of Order ID>>Click”Print Invoice”>> Print.
Hence seller can printseller to customer invoice from here.

So Seller to Customer invoice visible like this as showing in the screenshot.

Seller will also get the option to print Merchant to Seller Invoice & the same will be shown like this:

INVOICE CONFIGURATION OF SELLER PANEL:-
From this section, the seller can enter or change the invoice details like seller Address, VAT Number, Fax, Date format and much more.

BULK INVOICE FOR ORDERS:-
The seller can also generate the bulk invoice for orders and for this seller need to visit the sections of the order of the app
Seller panel>> Orders>>Orders Listing>> Select the orders for which you want to generate invoice >> Bulk action>> Bulk Invoice>> Print
So from here, sellers can generate the bulk invoice’s for multiple orders at once.

Seller generated bulk invoice for orders:

Seller to Customer Item Fulfillment Invoice
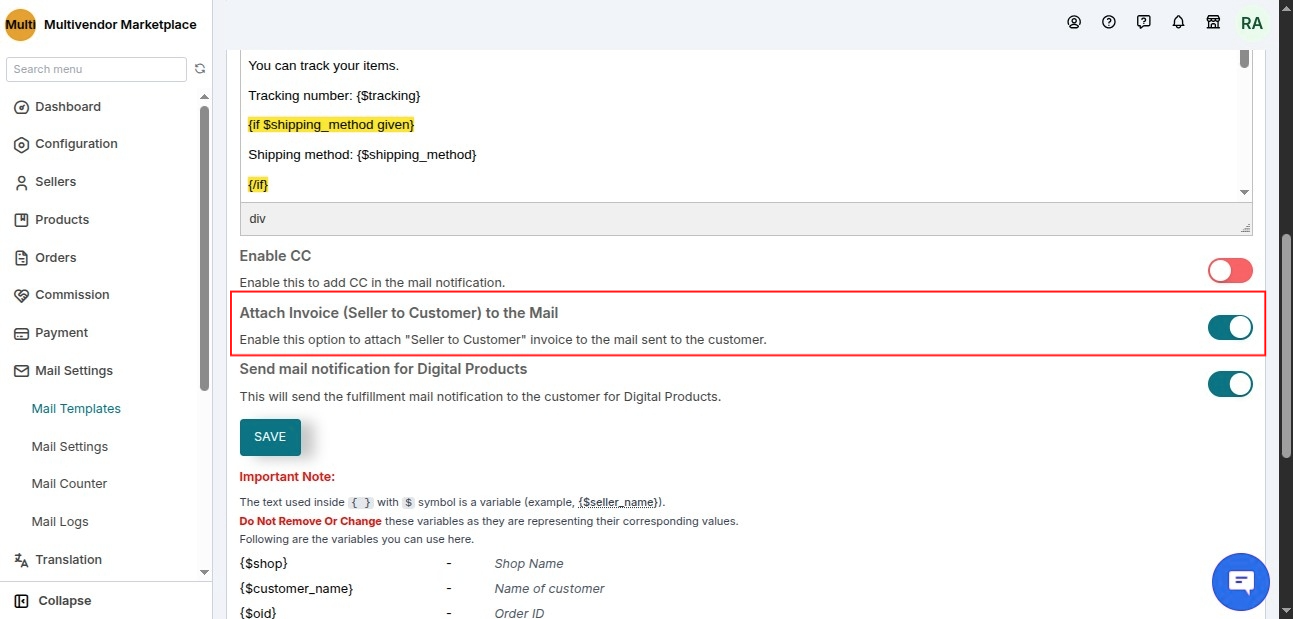
You can now send the order invoice in the fulfillment reminder mails sent to the customers from the respective seller.
Once a seller fulfills the customer’s order from the seller panel, the customer will receive a fulfillment mail with the order invoice attached to it. Know More
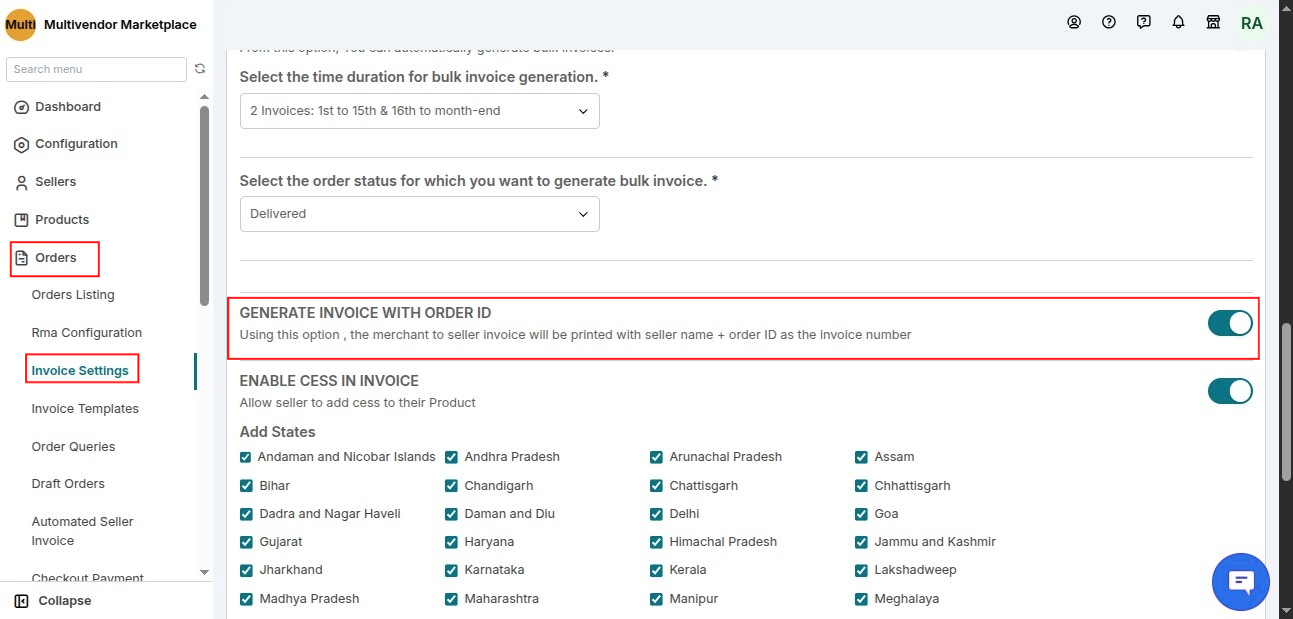
Generate Invoice with Seller Name+Order ID as Invoice Number
In the app, you can now generate “merchant to seller” invoices with the seller name+order ID as the invoice number.
Firstly, you need to enable this tab from the “Invoice Configuration” menu of the app.
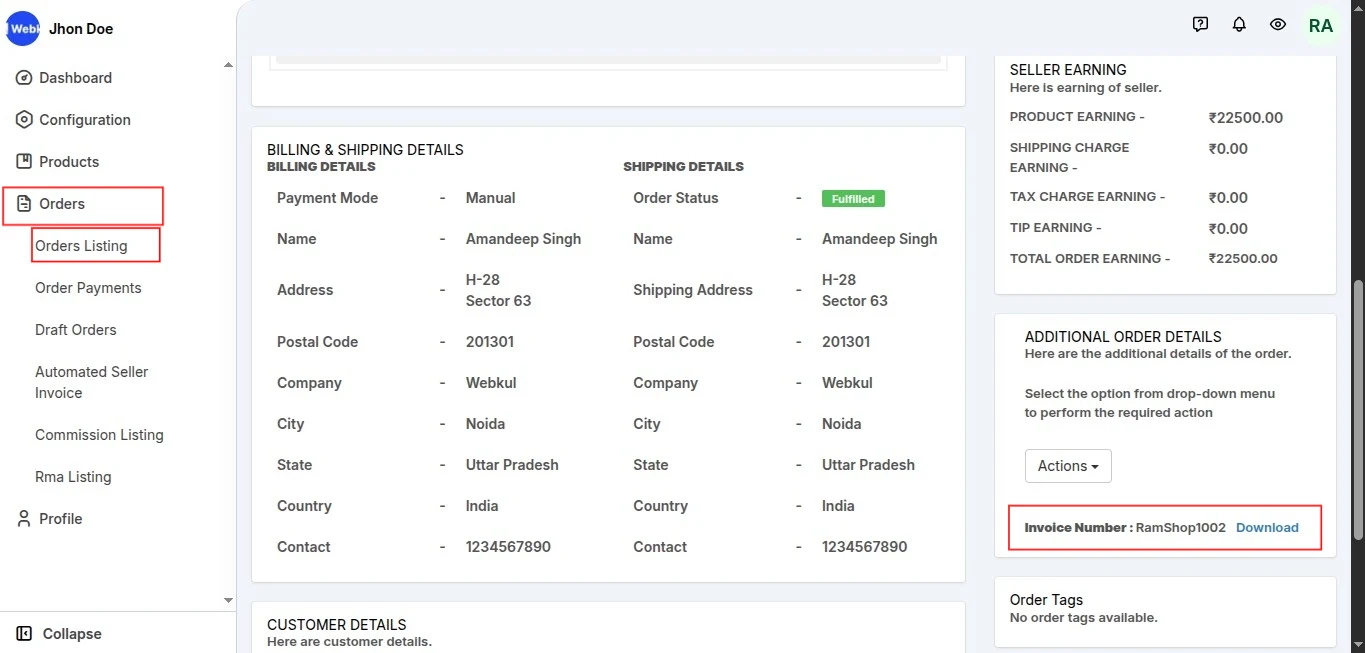
Go to the Order Detail page and generate invoices. This is how the invoice will be printed & the invoice number will be shown like this:

Moreover, the seller can download the invoice from their respective seller panels:
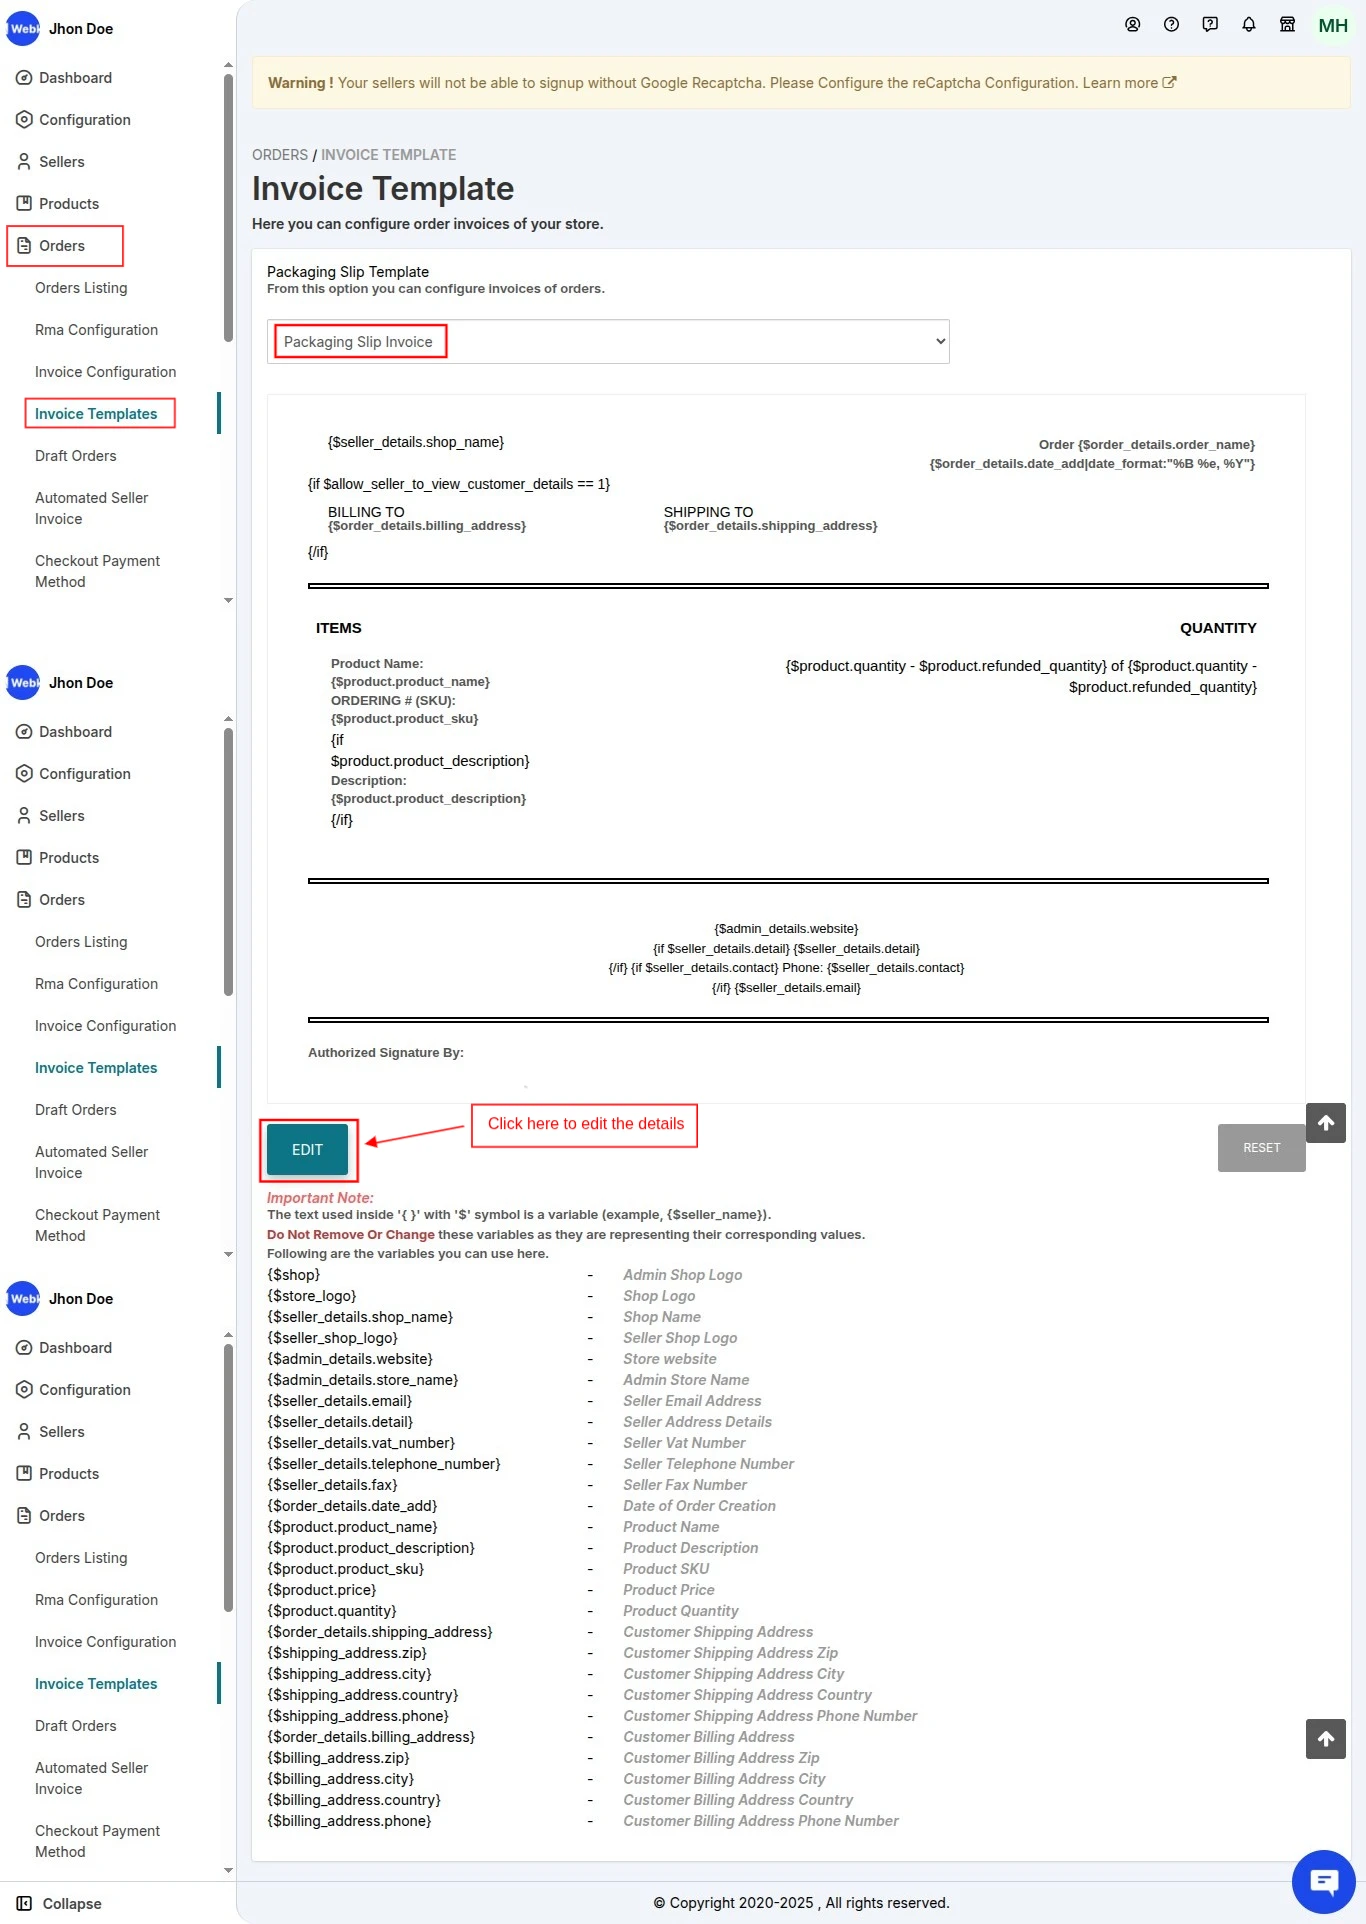
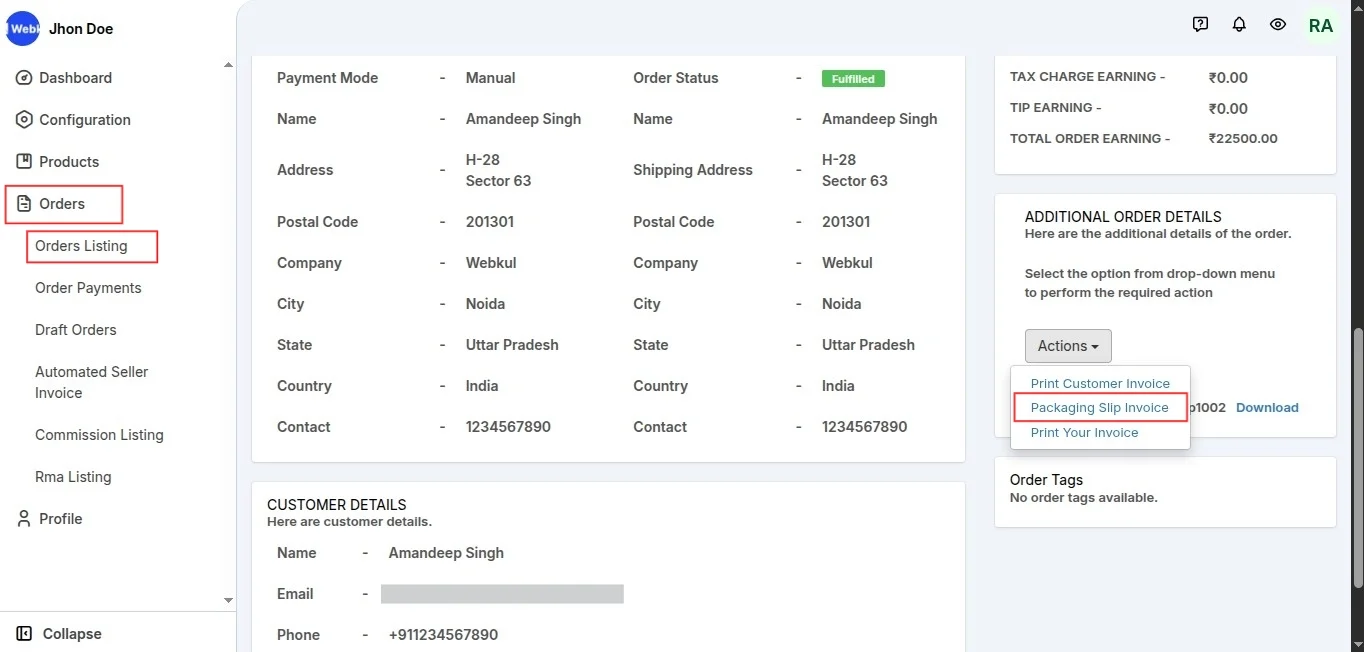
Packaging Slip Invoice
You can now allow sellers to generate packaging slip for the orders from their seller panels.
Packaging slips are different from the shipping labels as it contains information about
Package Origin/return address, Destination address, Package weight, Shipping class (Next Day Air and Priority Mail, etc.),
Electronic tracking number and shipping barcode (automatically generated by the carrier) and is stuck to the outside of the package.
Moreover, the packaging slip contains a place for signature and is signed by the management and is placed inside the package.
You will have the option to edit the template of the slip from the “Invoice Configuration” menu of the admin panel.
To customize the packaging slip, You need to visit the admin panel>>Go to Orders>>Invoice Configurations.

Clicking the Packaging Slip, you will get the option to edit the content as per the requirement.
SELLER END
The seller can download the packaging slip from the Order Detail page of the seller panel. Go to the seller panel>>Click Orders>>Order Listing>>Edit order.
Packaging Slip Invoice Generated:-


Printed Packaging Slip
Automated Seller Invoice
You can now auto-generate the order invoices in bulk by configuring the order status and date of order creation.
For this, you need to visit the Multi-vendor admin panel>>Orders>>Invoice Configuration menu in the app.
Visiting this section, enable Automated Bulk Invoice tab.
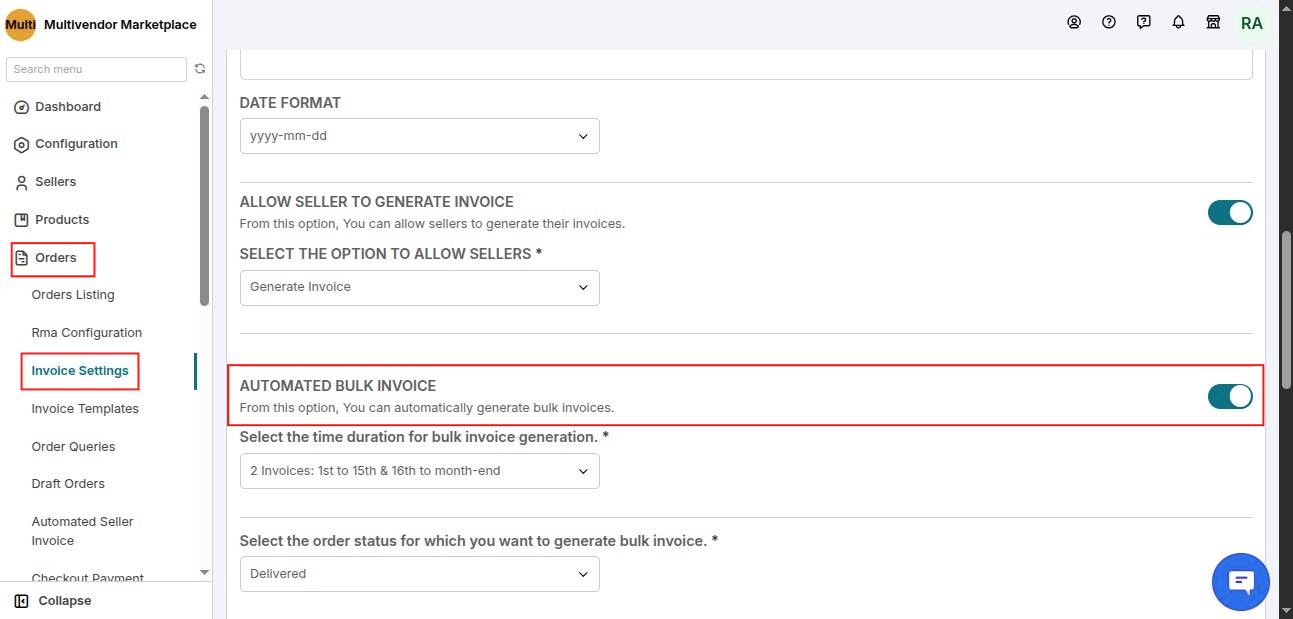
After that, select the time duration to auto-generate order invoice. You will have two options in this case:-
One Invoice:- If you choose to generate one invoice, one list of invoice will be generated for the orders placed from 1st date to end date of the respective month.
Two Invoice:- In case you choose to generate two invoices, invoice for a month will be generated on two dates,
One from 1st to 15th date of the month and second will be from 16th to last date of that month.
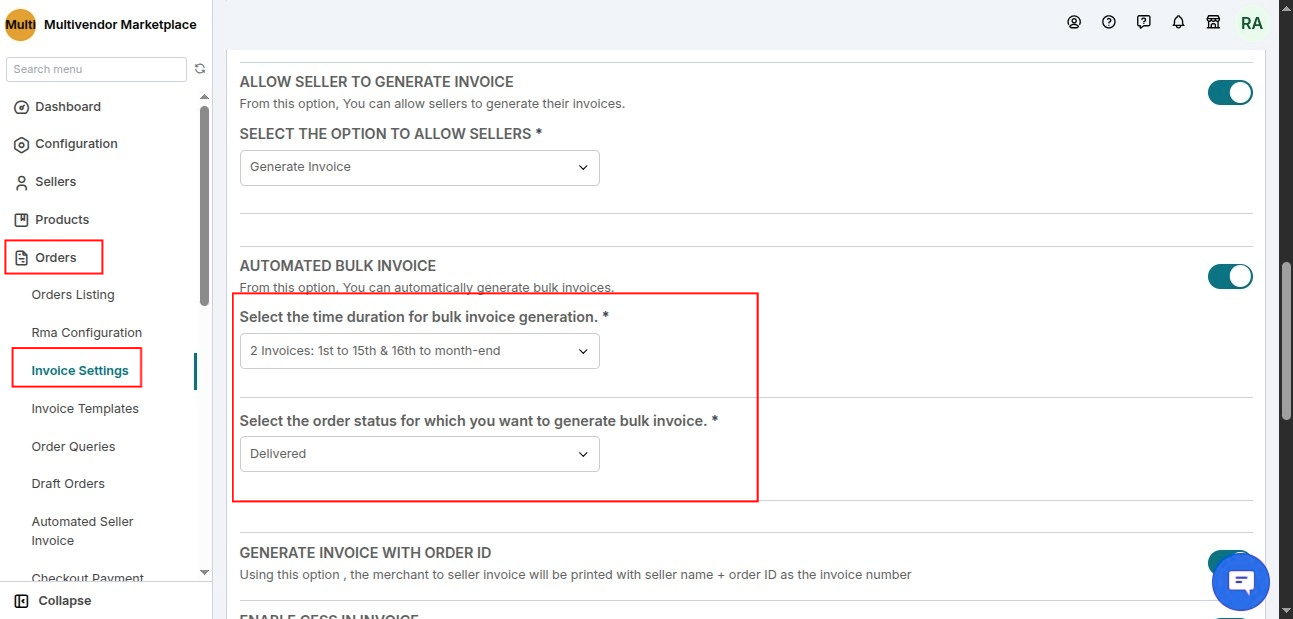
Moreover, you can select the order status if you want to auto-generate invoices for fulfilled orders or for delivered orders.
Now, the admin/seller can view the auto-generated invoices from the Automated Seller Invoice menu of their respective panels.
This is how the auto-generated invoices get listed:-
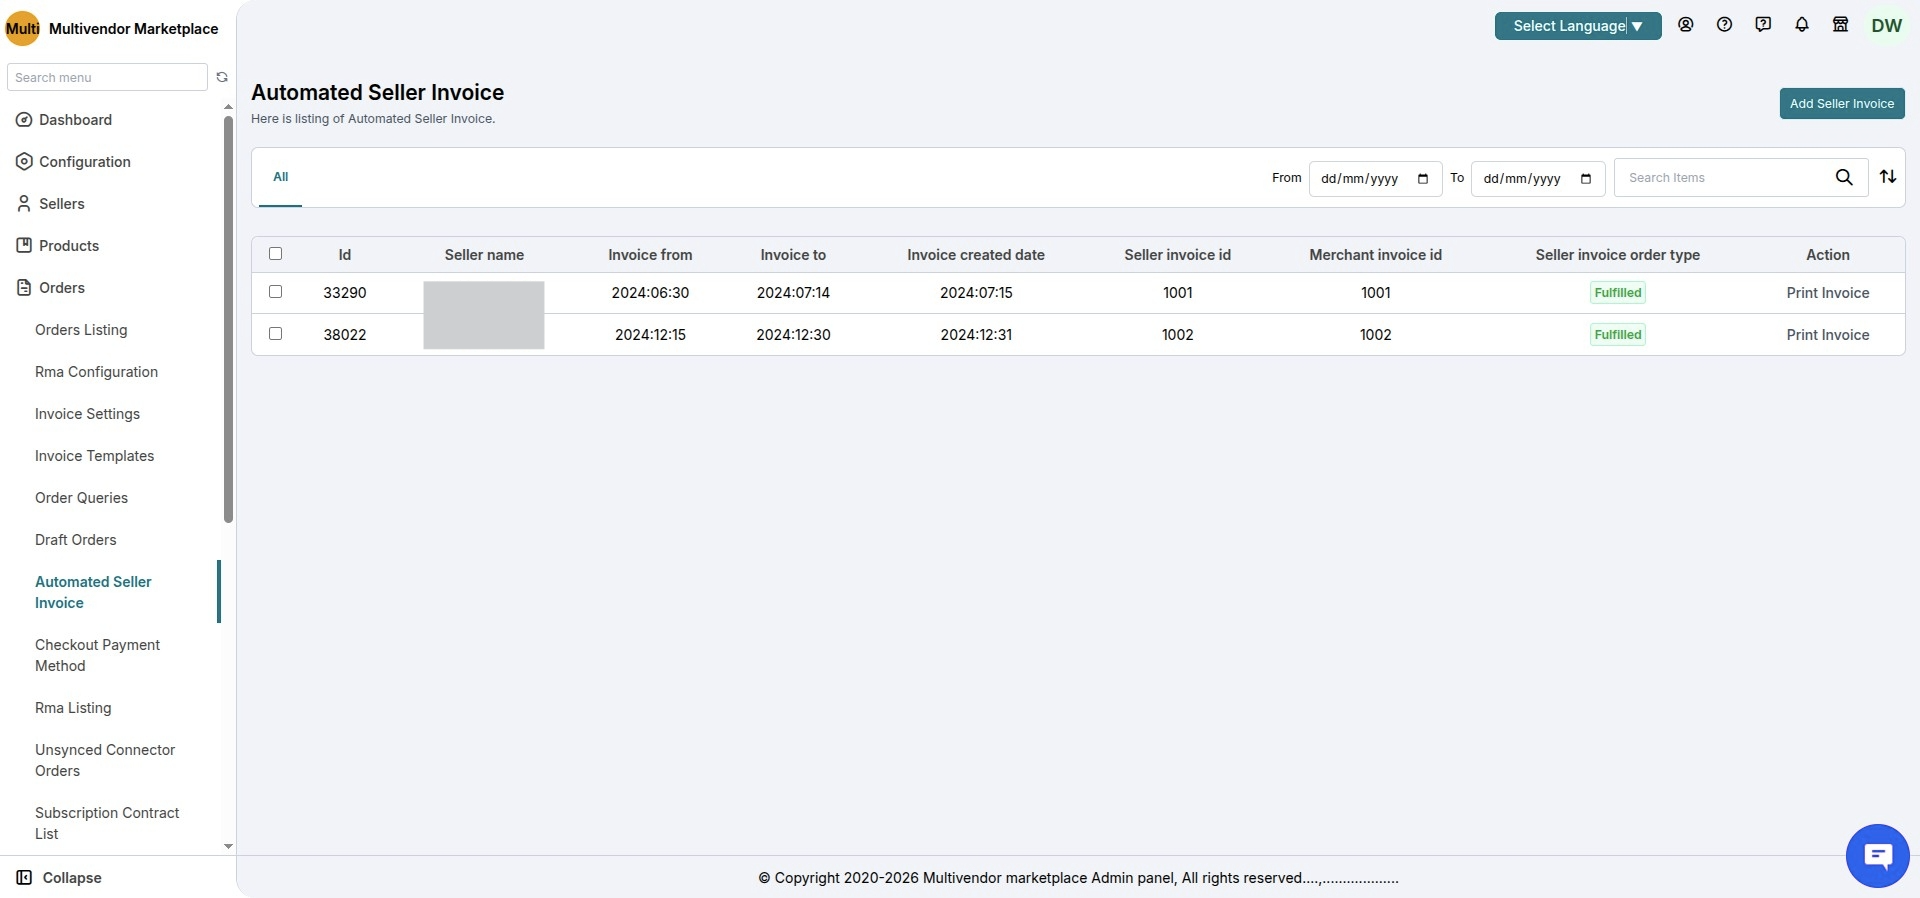
This section lists the invoices of the respective month. You can filter the invoices on the basis of date when the invoice is created.
You need to select the date range and click the Get button. Now, you can print invoices.
Similarly, the auto-generated invoices will appear in the Automated Seller Invoice menu of the seller panel. They can print invoices from this section.
Edit the Automated Bulk Invoice
Even, now the Admin has an option to edit the automated bulk invoice also.
Just Go to the Marketplace Admin dashboard >> Orders >> Invoice templates >>> choose “Merchant to Seller Automated Bulk Invoice” >>
click on Edit and rewrite the invoice template as per requirements and click SAVE button.

This is all about the Multi-vendor Invoice Feature.
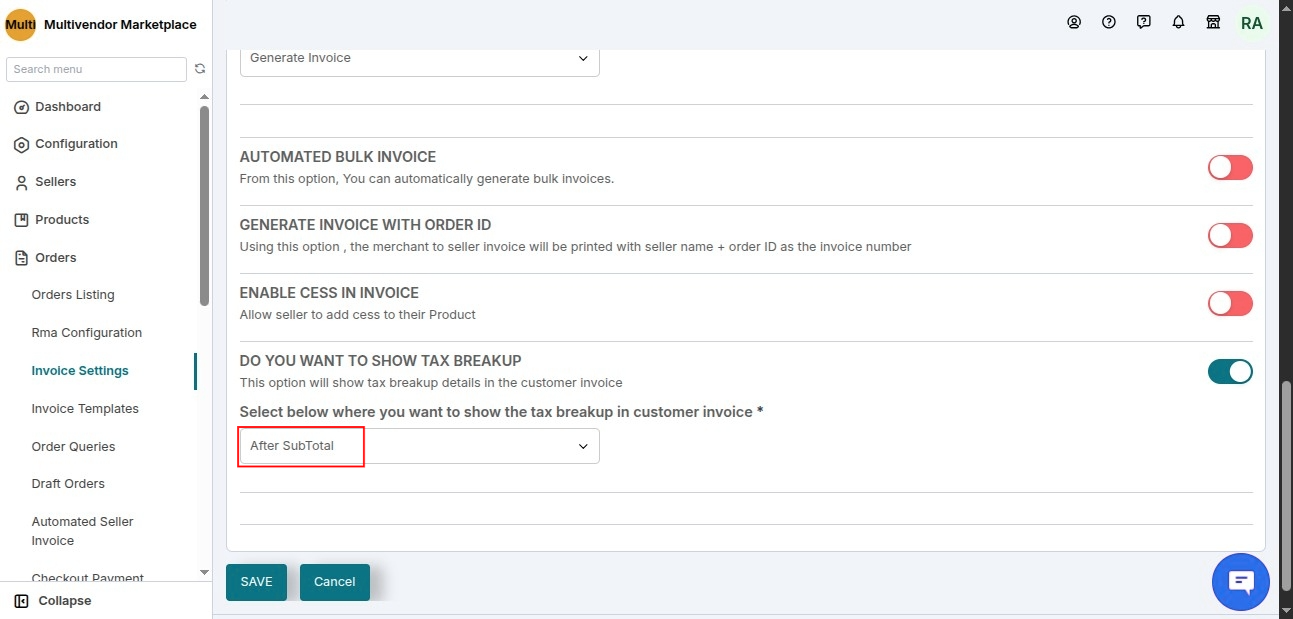
Tax Breakup in a Customer Invoice
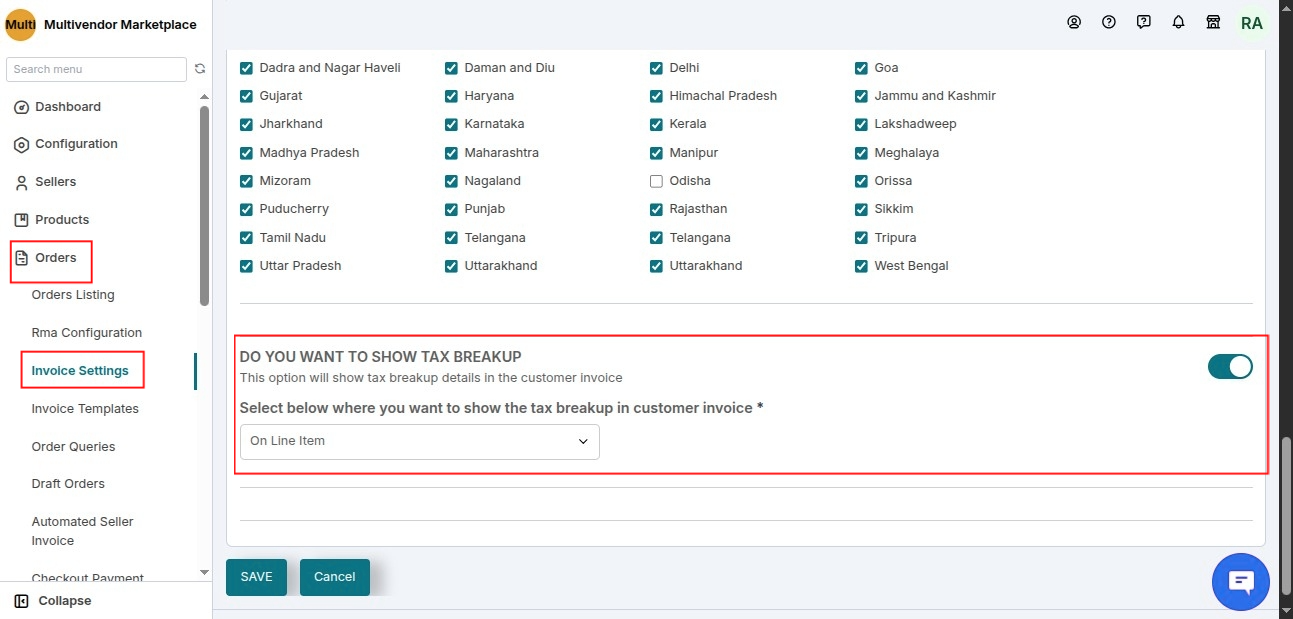
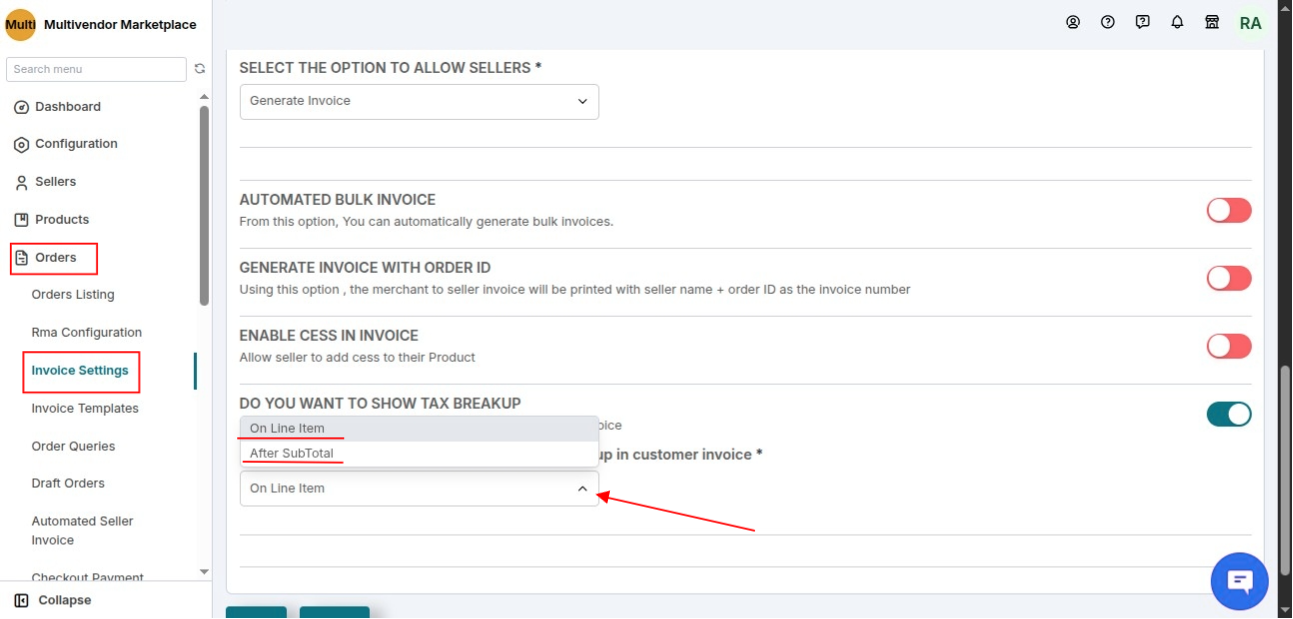
In a Multivendor Marketplace app, there is an option to generate a customer invoice with tax breakup details, in which you can see the tax details paid by the customer.
Admin can configure the settings, and there are two types to show the tax type, admin can choose the type according to their need.
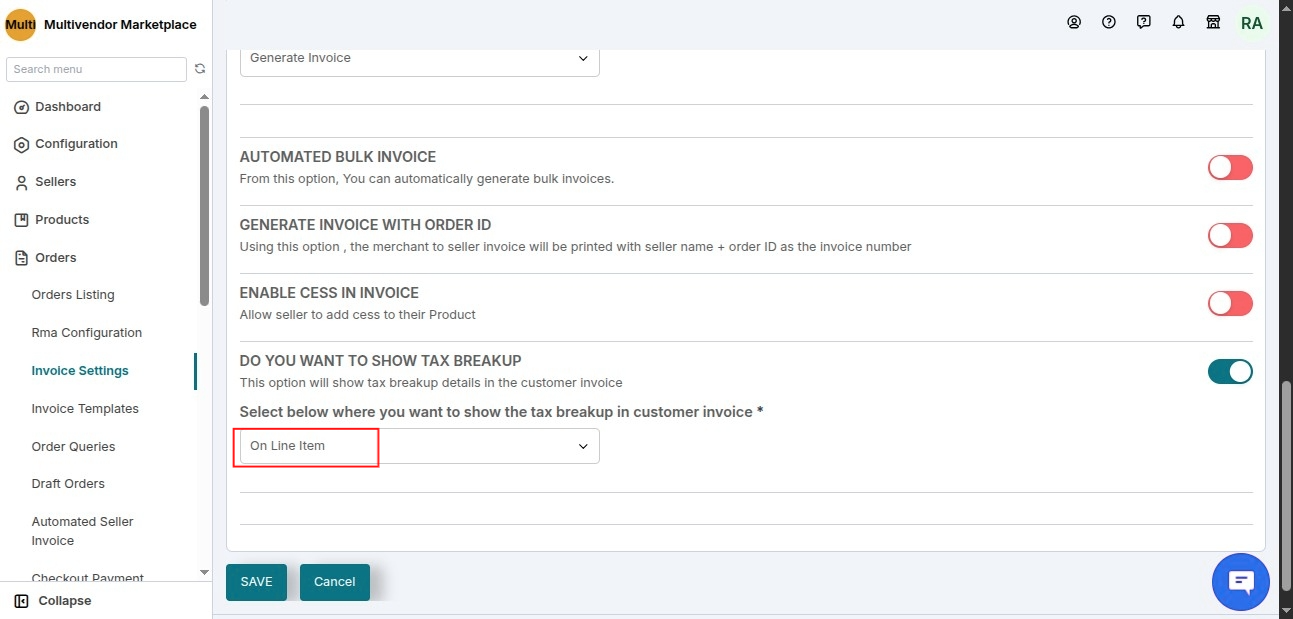
Kindly navigate to Multivendor Admin panel dashboard >> Orders >> Invoice Configuration >> Enable tab “DO YOU WANT TO SHOW TAX BREAKUP”.
Refer to the screenshots below:
Admin Panel: Generate Customer Invoice
To print the customer invoce in the admin panel, kindly navigate to the the Admin dashboard >> Orders >> Order listing >> Select product – View – Actions “Generate Customer Invoice”
Refer to the screenshots below:

On Line Item:

After SubTotal:

Seller Panel: Print Customer Invoice :
To print the customer invoice in the admin panel, kindly navigate to the Seller dashboard >> Orders >> Order listing >> Select product – View – Actions “Print Customer Invoice”
In the seller dashboard, the seller can print the tax breakup configured by the admin, but they cannot modify the type of tax breakup.
Refer to the screenshots below:

On Line Item:

After SubTotal:

Invoice feature DEMO
Use the link below to schedule the demo of the Multivendor marketplace App for Shopify:-https://egsma.io/shopify-multivendor-marketplace/
SUPPORT
Furthermore, if you will come across any question or issue,
please raise a ticket a https://webkul.uvdesk.com/ or send us an email at [email protected].

Be the first to comment.