Shopify Multivendor Marketplace | Payment Flow |
Multivendor Marketplace app for Shopify app is a great tool to convert your shop into a fully functioning marketplace.
This user manual perfectly guides you to understand the payment flow in Multivendor Marketplace app for Shopify from setting up the payment methods to sending the payments to your sellers.
So in Multivendor Marketplace app for Shopify, the flow of payment goes like this:-
By default, Admin receives the complete amount of the order paid by the buyer/customer and then Admin transfers it to the seller after deducting his/her commission.
Admin can pay to sellers/vendors by four payment methods in the multivendor app in which two payment methods are online and two payment methods are offline.
Online Payment Methods:-
By these payment methods, the admin can pay sellers online through the app. Both admin and sellers must have a business PayPal account.
- PayPal
- PayFast
- Razorpayx
Offline Payment Methods:-
Admin can use these payment methods offline and can just track the amount in the app and can have a record of the way you pay the seller.
- Internet Banking
- Bank Wire Transfer
Now, let’s understand its workflow:-
Shopify Multivendor Marketplace | Payment Flow |WORKFLOW
Payment Methods Setup:-
Firstly, the admin needs to set up the payment methods for the payment to the sellers from the admin panel of the app.
Admin end of Multivendor Marketplace app >> Payment >> Seller Payment Configuration >> Configure the payment methods from here >> Save


Separate Settings for “Shipping Tax Distribution”
This feature allows the admin to independently configure shipping tax settings, deciding whether it will be included in the admin’s earnings or the seller’s earnings.

To manage the “Shipping Tax Distribution” settings, follow these steps:
- Navigate to the Payment Configuration section.
- Select Seller Payment Configuration.
- Click on Payment Settings.
- Scroll down to the “Shipping Tax Distribution” option.
- Enable or disable the feature based on your requirements.
- Save the changes to apply the settings.
This streamlined setup ensures flexible and transparent distribution of shipping taxes.

Now the same payment methods will be available at seller end. And the seller can choose the payment methods from which he wants to be paid from admin.
Seller end of Multivendor app->> Profile->> Payment details->> Here choose any payment method from drop-down menu->> Save


Payment Methods added by the sellers from their respective panels can be edited/changed by the admin from his panel.
Steps using which admin can change the Seller’s Payment Methods:
Multivendor Admin Panel>>Sellers>>Select the Seller whose Payment method needs to be changed>>Click on the “Edit” button in the Action menu.

Now, Click on “Seller Payment Details” from the drop-down (More Action menu)>>Edit/change/add seller’s payment method>>Save.

This way admin can update Seller’s Payment Methods from his end.
HOW ADMIN PAY TO SELLERS
The admin needs to select the seller payment type based on how they wish to pay the seller — either by paying the total amount at once or on an order-wise basis.
Seller Payment Type
You will now have the option to pay to the sellers the whole amount of all the orders together OR pay for individual orders separately.
Go to the Payment >> Seller Payment Configuration >> Select an option & pay to your sellers.

1. Pay Total Amount
Now to pay to sellers admin needs to visit the “Seller Payments” section under the “payment” menu in the admin panel of the multivendor marketplace appSeller Payment Type
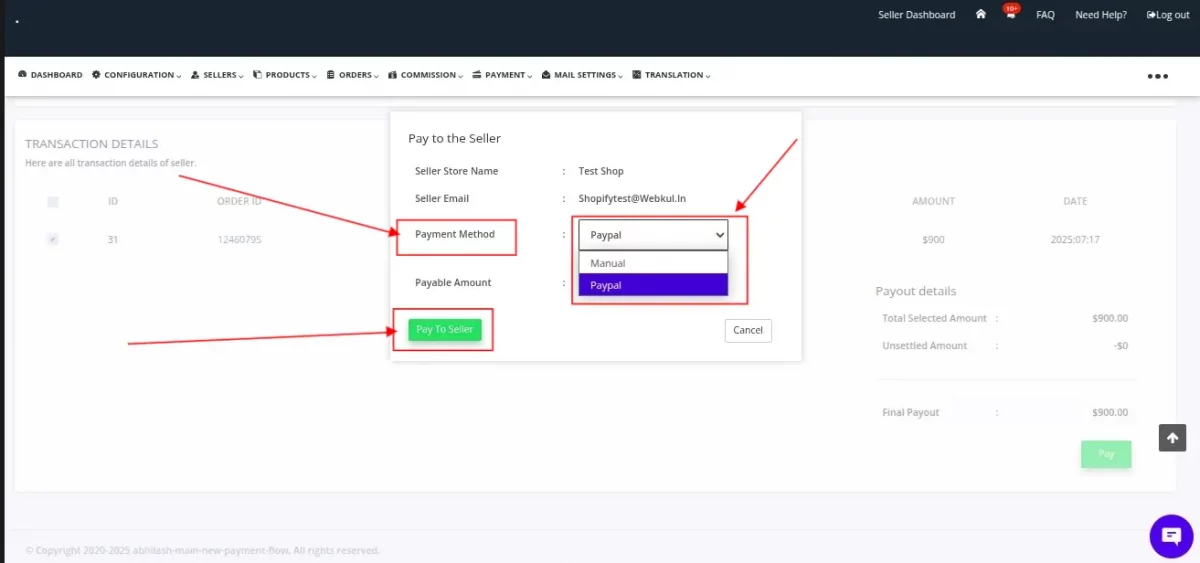
Admin Panel of Multivendor app->> Payment->> Seller Payments->> Click on “View”
After this, the admin needs to click on the ‘Pay’ button, which will redirect them to the next page displaying all order-wise payment transactions.
By default, all transactions will be selected, but the admin can modify the selection as needed.
Once the desired orders are selected, the admin needs to click on the ‘Pay’ button again. A pop-up will appear, allowing the admin to choose a payment method and proceed to pay the seller.
As mentioned in the image below.


This way admin/merchant can pay to the sellers/vendors.
Unsettled amount: When the admin pays the seller, we also display the ‘Unsettled Amount’ during the payment process.
This unsettled amount includes any refunded amounts or shipping label costs borne by the admin/seller. These adjustments are automatically handled at the time of payment.
Below the ‘Unsettled Amount’, there is a ‘View’ option that allows the admin to see the detailed transactions related to the unsettled amount.
For example, if the seller’s due amount is $10, but a $7 refund was issued to a customer on behalf of the seller, then during payment,
the total selected amount will still show as $10, but the unsettled amount will be – $7. As a result, the admin will only pay $3 to the seller, and the payment will be marked as complete.


2. Pay Order Wise:
If you choose ‘Pay Order Wise’, it means you want to pay your sellers separately for each individual order.
To make payments order-wise, the admin needs to navigate to the Marketplace Admin Panel > Orders > Order Listing.
Then, select the order you wish to pay for and click the ‘View’ button from the three-dot menu under the Action menu.
On the redirected page, you will find the ‘Pay to Seller’ option, through which the admin can process the payment.


Add Seller’s Total Due Earning
From the Seller Payment Configuration, you can choose when you want to add the total due earnings of the sellers.
i.e. on order placed, on paid order, on order delivered or on refund days completion.

How to Manage Payments in the Case of COD?
In case the order amount is paid via COD or the payment status is in the “Pending” state.
You can choose whether you want to receive the order payment by yourself or you want your sellers to receive the order amount.

You can visit the ” Seller Payment Configuration” menu of the app and configure the settings accordingly.
Click the Save button.
By default, the configuration is set to “Payment Received by Admin”.
But in case the admin wants the seller to receive the total order amount then, this can be done with this configuration.
This is mainly the case when the customer has paid for the order via COD.
From the Seller Payment section of the Multi-vendor admin panel, you can view your commission, the seller’s earnings & total due amount (amount to be paid to the seller).
There will be two cases here:-
Case 1. The total due amount is Positive.
Suppose $300 USD i.e You need to pay $300 USD to the Seller.
Once an order amount $100 is paid via COD and the seller will receive the complete order amount as per the admin’s configuration.
In this case, the total due amount reflected on the admin side will be $200 USD i.e previous total due amount ($300 USD)– current order amount received by the seller via COD ($100 USD).

Clicking the View button, the admin can pay the due amount to the seller.

So, this is the simple case when you can simply pay the due amount to the seller.
The seller can view the transactions in the “Order Payment” section of his/her seller panel.

Case 2. The total due amount is Negative.
Suppose it’s -$300 USD i.e Seller needs to pay $300 USD to the admin.
This is the case when the seller has received most of the payment via the COD payment method.
Thus, the seller needs to pay the admin’s share (as Seller has received the complete order amount received via COD).
So, if the total due amount is negative then, the seller will get the option to pay to the admin from his/her seller panel.

The seller can follow this procedure to Pay to the admin:
Go to Multi-vendor Seller Panel>>Visit Order menu>>Click Order Payment from the drop-down menu>>Click the Pay to Admin button.


From the Seller Payment section of the app, the admin can view the complete details of all the transactions that take place.
AUTO PAY
In the multivendor marketplace app, we have two automatic payment methods:
- Stripe Connect payment gateway: This is an add-on to the marketplace.
After the customer pays the amount for the order, the amount will go to the respective Seller and Admin account directly as per the share configured on the basis of commission.
Both admin & seller needs to have their respective Stripe accounts. Know more. - PayPal Payout: This is an inbuilt feature in the marketplace app.
This feature lets your sellers automatically receive their total earnings once they mark the order as delivered/fulfilled. Know more. - Razorpayx: This is an inbuilt feature of the multivendor marketplace app that allows the merchant to use the Razor PayX gateway to pay their Sellers. This feature only works for Merchants and Sellers based in India. Know more.
Export Seller Earning Details
From the admin panel section of the app, the admin can generate seller earning details.
To export the seller earning details admin needs to visit the seller’s section of the multivendor app.
Multi-vendor Admin Panel>>Sellers>>Seller Listing>> Click on “Edit” in front of SELLER ID>> More Action>> Export the seller earning details>>
Choose column (the details admin wants)>>Choose dates “FROM” and “TO” >> then “Export” or “Save and Export or “Export from Saved Lists”.
Admin can export a maximum of 30 days of details. Earnings for 30 days can be from any month or from a specific date to another date.
Refer to the below screenshots:-


So seller earning details visible like this as showing in the screenshot.

Export Earning transaction details on the Seller’s end
On Seller’s end
From the seller panel section of the app, the seller can export earning transaction details.
To export the transaction details, the Seller needs to navigate.
Multivendor Marketplace Seller panel >> Orders >> Order payments. As mentioned in the image below.

It will redirect you to the order payment page.
On the Order payment page, click on the “Export” button. A popup will open, allowing you to select dates “FROM” and “TO”. After selecting the dates, click on “Export”.
After clicking on Export, the transaction details will be downloaded in a CSV file.
As mentioned in the image below.


If the number of transactions exceeds 500, you will receive a CSV file via email.
Shopify Multivendor Marketplace | Payment Flow |DEMO DETAIL
SUPPORT
Furthermore, if you need any kind of support/Consultancy then please raise a ticket at http://webkul.uvdesk.com/ or drop a mail at [email protected]
Thanks for reading this blog!!! 🙂

4 comments
We have created a ticket on your behalf and our team will connect with you soon regarding your queries.
Thanks and Regards,
Team Webkul
Earlier we had the option of adaptive payments too which split the payments between admin & sellers automatically on run time(i.e Just after the customer pays the order amount) but adaptive payments have been depreciated by PayPal.
Currently, If you would like to payout to the seller automatically via PayPal then We do have the “PayPal Payout” feature available. In this feature, once the seller fulfilled/delivered the order then customer payment would automatically go to the seller account as per the share configured on the basis of commission.
For further queries, Connect here: https://webkul.uvdesk.com/en
Regards,
Pooja(Webkul)