If you are looking to build a marketplace with no restriction of shop type then Multi-Vendor Marketplace for Shopify is the solution.
Selling physical as well as digital products on this Multi-Vendor Marketplace is really flexible & easy.
So, in this blog, we’ll see how to add digital products on the Multivendor Marketplace for Shopify.
Note: In case the customers are paying for the digital product order via PayPal then the order will be fulfilled automatically.
But please remember High risks order will not be auto fufilled
Check the below video of Digital Products:
Configure Shop Type
Firstly, the admin needs to configure the Shop Type as digital or both (digital + normal).
For this, go to Multivendor Marketplace Admin Panel > Configuration > General Configuration:

On the redirected page, change the shop type as digital (if you only want to have digital products on your store) or both (if you want to have both digital & normal products on your store):

Digital Product Form Customization
The admin can configure the product form, i.e., the form for adding a new digital product.
For this, go to Multivendor Marketplace Admin Panel > Products > Product Form Customization:

On this page, mark the fields you want to have and further save the customization.

How to add digital products?
To add a digital product, go to Multivendor Marketplace Seller Panel > Products > Product Listing > Add Product:

Choose the product as digital:

In the Add Digital Product section; upload your digital product file (the file should be less than or equal to 100 MBs), enter the number of accessible days for which your customers can access it.
And enter the number of downloads allowed. (By default, the value is equal to zero which means unlimited access & downloading)
Note – By default, sellers can upload digital product files up to 100 MB. However, if you are on the Pro Plan, the upload limit is increased to 300 MB.

Furthermore, in the Inventory Details section, mark this option if you have variants for this digital product:

Checking this option will open a Variant Details section where you can add variants to this digital product:
Note: Variants can also be added after saving the product and while editing it.
The option to upload digital files to individual variants will only be present once you’ll save this product and edit it.

As explained above, save the product and then you can upload digital files to individual products:

The added product will be listed in the Multivendor Marketplace Seller/Admin Panel > Products > Product Listing.
Digital Product As Service
The admin can now have the option to add digital product as service in the Multi-vendor App.
In this case, both you & your sellers can directly create & sell digital products without uploading the digital files.
Instead, both can upload digital files after the order is placed for the digital product.
First, the admin needs to enable the configuration.
- Go to the Configuration menu of the app.
- Visit the Product Configuration.
- Enable the “ADD DIGITAL PRODUCT AS SERVICE” tab.
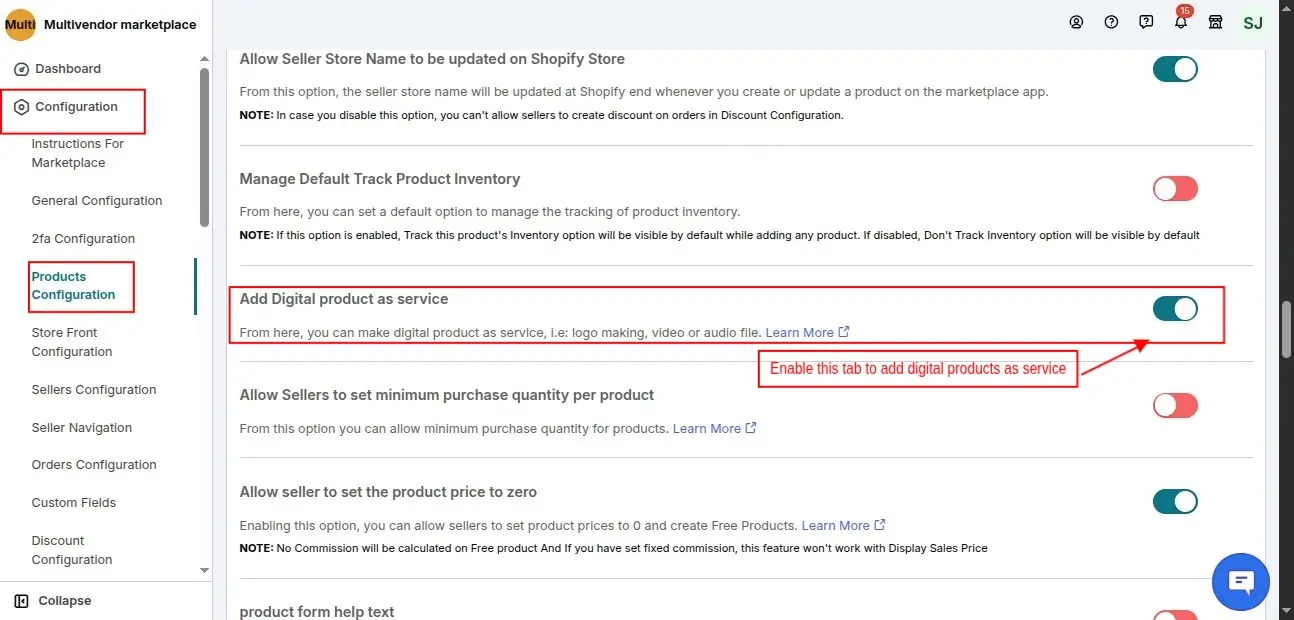
As soon as the admin enabled this tab, the option starts getting reflected in the admin & seller’s Edit Product sections respectively.
While adding/editing digital products, you can enable the “ADD DIGITAL PRODUCT AS SERVICE” option.
This action will disable the rest of the options (upload file, no of accessible days) for that digital product.

As soon as the customer places an order, both admin & seller will get the option to upload a digital file.
App>>Orders>>Order Listing>>Edit Order>>Upload the digital files.

After this, the customer will receive an email regarding the same from where they can download the digital file.
Digital Product As Link
Add link to your digital products. First, the admin needs to enable the configuration.
- Go to the Configuration menu of the app.
- Visit the Product Configuration.
- Enable the “ALLOW TO ADD LINK FOR DIGITAL PRODUCT” tab.

As soon as the admin enabled this tab, the option starts getting reflected in the admin & seller’s Edit Product sections respectively.
While adding/editing digital products, you can select the DIGITAL PRODUCT AS LINK option. Further add the link of the product and save.
This way the digital product will not take up your multi vendor digital space. It will be downloaded by the customers from the external link provided by you.

Configure Frontend
Furthermore, to display a downloadable link on the customer’s order page, the admin needs to do some code pasting.
Go to Multivendor Marketplace Admin Panel > Configuration > Instruction for Marketplace:

Here, the admin will have the code that needs to be pasted with all the instructions.
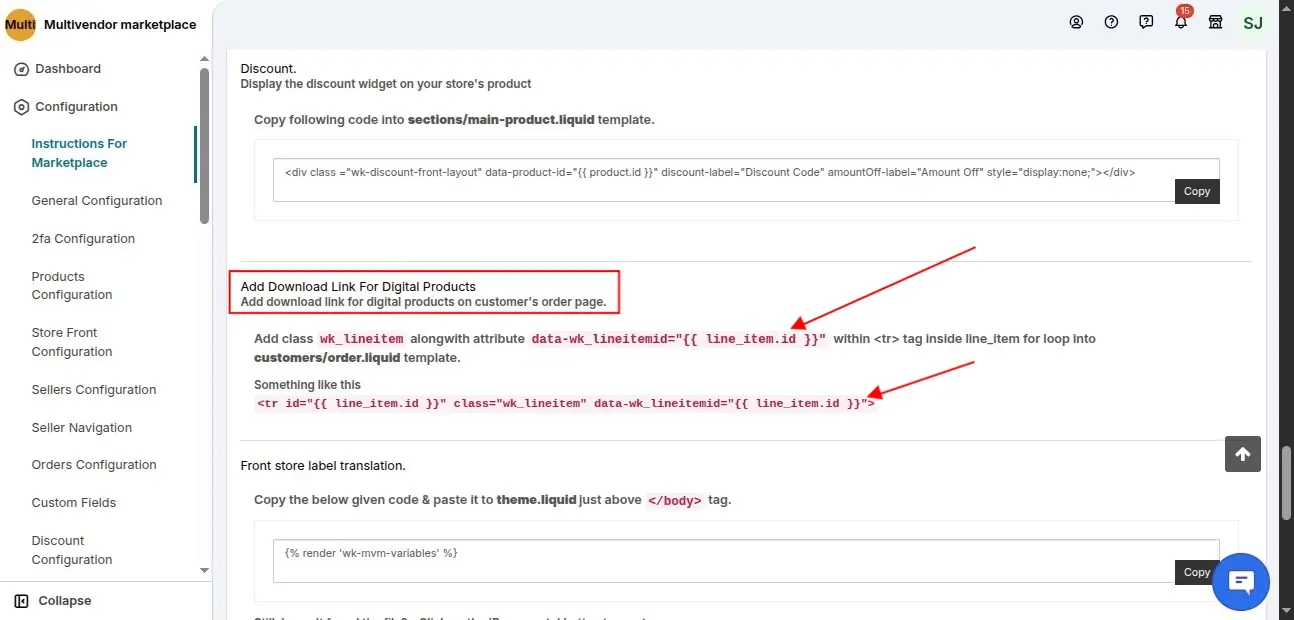
For pasting the codes, go to Shopify Backend > Online Store > Actions >Edit Code:

Search for customer/order.liquid template file, search ‘line_item’ in the code & paste the following code in the <tr> tag as shown in the image below:
id="{{ line_item.id }}" class="wk_lineitem" data-wk_lineitemid="{{ line_item.id }}">

Frontend View

Digital Product Storage
The digital storage provided in the Multivendor Marketplace for Shopify depends on the plan that you have activated:
- Pro Plan ($60/month)- 15 GB digital storage
- Executive Plan ($40/month)- 5 GB digital storage
- Basic Plan ($15/month)- 3 GB digital storage
Moreover, the admin can check this storage by going to Multi vendor Marketplace Admin Panel > Hover over the three dots (⋅⋅⋅) on the top right of the dashboard > click on the ‘digital storage’:

In case if the admin wants to increase this digital storage, then, he can go for either way:
- Upgrade Digital Storage Plan: Multi-Vendor Marketplace for Shopify: Digital Storage
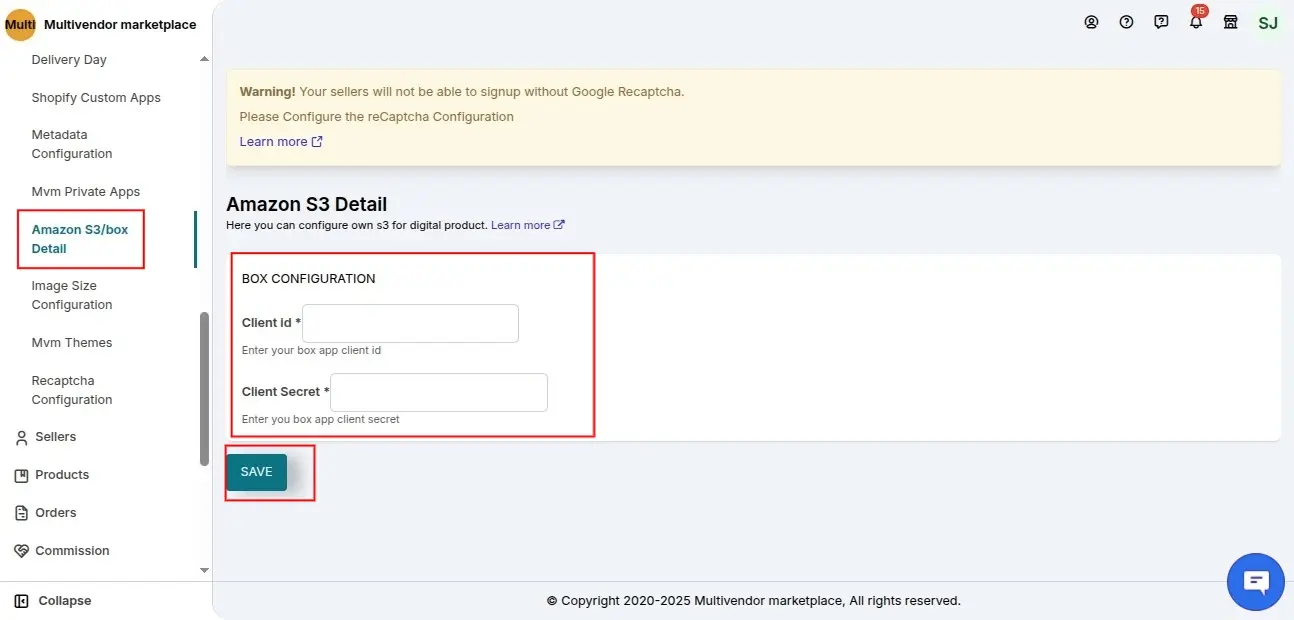
- Configure Amazon S3/Box: If you want to upload digital products using your own Amazon S3 or Box, then, follow the given steps:
Go to Multi vendor Marketplace Admin Panel > Configuration > Products Configuration:

- App S3 if you don’t want to have extra digital storage and you are good with the provided amount.
- Merchant S3 for Amazon S3 configuration.
- Box for Box configuration.
After selecting Merchant S3/Box, go to Multivendor Marketplace Admin Panel > Configuration > Amazon S3/Box Details > Fill the required details & save.
In the case of Amazon S3:

For more details on how to get the AWS details, refer: Merchant Amazon S3 Setup
In the case of Box:
To configure the new checkout page feature on your store, follow these simple steps:
- Go to the Checkout section on your store.
- Click on Customize to access the settings.

- On the new page, select the Thank You section.
- Choose Checkout-UI-Extension from the available add section option.
- Finally, click the Save button.

Your checkout page feature will now be added to your store!
This all about Multivendor Marketplace digital products!
Demo Details
https://multivendor-marketplace-5.myshopify.com/pages/demo
Need Help?
In the case of any query or suggestion, please drop a mail at [email protected] or raise your ticket at Webkul UV desk.

2 comments
Hello Theo,
Are you referring to how a seller can add more than one digital file to a product? If yes, please note:
For products without variants, only a single file can be uploaded to the product.
For products with multiple variants, a separate file can be uploaded for each variant.
If you were referring to something else, kindly specify so we can assist you accordingly.
For further assistance or detailed guidance regarding the application, please feel free to contact us at [email protected]. Our team will be glad to help with any queries you may have.