In this blog, I’ll show you how to display swatches product wise that means different images for same attribute option for different products. In Magento 2, the swatches are common for all products. That means the swatch of the attribute option will be common across all the products which are using it.
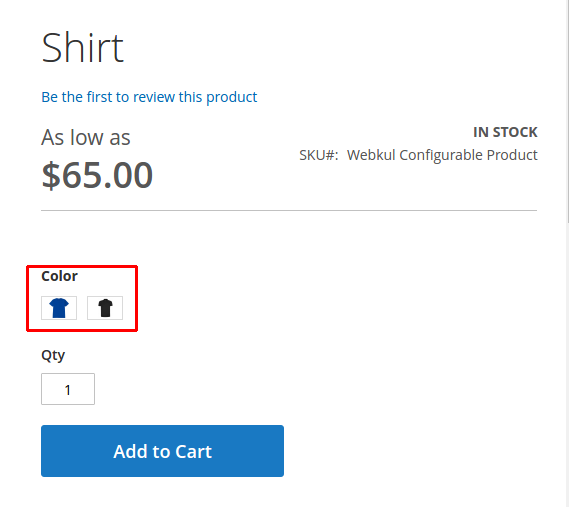
Let’s say we create a configurable product Shirt which has two variations Blue and Black and added the swatches according to the shirt,

Now this will look great for the shirt on product page,
But what if we create another product, let’s say Jeans. In that case these won’t be a good image swatch because these are shirts.

Magento 2 does not have any easy way deal with this. However we can override some classes and show our own images.
First create di.xml under app/code/Webkul/CustomSwatch/etc/ folder,
<?xml version="1.0"?>
<config xmlns:xsi="http://www.w3.org/2001/XMLSchema-instance" xsi:noNamespaceSchemaLocation="urn:magento:framework:ObjectManager/etc/config.xsd">
    <preference for="Magento\Swatches\Block\Product\Renderer\Configurable" type="Webkul\CustomSwatch\Block\Product\Render\Configurable" />
</config>
Then create Configurable.php under app/code/Webkul/CustomSwatch/Block/Product/Render/ folder,
<?php
namespace Webkul\CustomSwatch\Block\Product\Render;

class Configurable extends \Magento\Swatches\Block\Product\Renderer\Configurable
{
   public function getJsonSwatchConfig()
    {
        $attributesData = $this->getSwatchAttributesData();
        $allOptionIds = $this->getConfigurableOptionsIds($attributesData);
        $swatchesData = $this->swatchHelper->getSwatchesByOptionsId($allOptionIds);

        $config = [];
        foreach ($attributesData as $attributeId => $attributeDataArray) {
            if (isset($attributeDataArray['options'])) {
                $config[$attributeId] = $this->addSwatchDataForAttribute(
                    $attributeDataArray['options'],
                    $swatchesData,
                    $attributeDataArray,
                    $attributeId
                );
            }
        }

        return $this->jsonEncoder->encode($config);
    }
    protected function addSwatchDataForAttribute(
        array $options,
        array $swatchesCollectionArray,
        array $attributeDataArray,
        $attributeId=null
    ) {
        $_objectManager = \Magento\Framework\App\ObjectManager::getInstance();
        $storeManager = $_objectManager->get('Magento\Store\Model\StoreManagerInterface');
        $currentStore = $storeManager->getStore();
        $mediaUrl = $currentStore->getBaseUrl(\Magento\Framework\UrlInterface::URL_TYPE_MEDIA).'/customswatch/';

        $result = [];
        foreach ($options as $optionId => $label) {
            if (isset($swatchesCollectionArray[$optionId])) {
                $result[$optionId] = $this->extractNecessarySwatchData($swatchesCollectionArray[$optionId]);
                $result[$optionId] = $this->addAdditionalMediaData($result[$optionId], $optionId, $attributeDataArray);
                $result[$optionId]['label'] = $label;
                if ($attributeId) {
                    if($this->getProduct()->getId()==19 && $attributeId == 93) {
                        if($optionId == 7) {
                            $result[$optionId]['type'] = 2;
                            $result[$optionId]['value'] = $mediaUrl.'30x20/blue-jeans.jpg';
                            $result[$optionId]['thumb'] = $mediaUrl.'110x90/blue-jeans.jpg';
                        } elseif ($optionId == 8) {
                            $result[$optionId]['type'] = 2;
                            $result[$optionId]['value'] = $mediaUrl.'30x20/black-jeans.jpg';
                            $result[$optionId]['thumb'] = $mediaUrl.'110x90/black-jeans.jpg';
                        }
                    }
                }
            }
        }

        return $result;
    }
}
In this we have changed the swatches only for product with id 19 (which is jeans) and attribute id 93 (which is color) but you get the idea. Here we have replaced swatch thumbnails and swatch images with our own.
Now we will see our own images as swatch for jeans,

Note:- Do not use Object Manager instead use Dependency Injection
You can find the code on GitHub.
Thank you for reading. Feel free to comment if you face any issue.

Be the first to comment.