Prestashop Store Locator module allows the merchants to add physical stores and display their locations on Google map.
It is very beneficial for customers as they can search for the stores and products available with the stores.
Auto-detect user location functionality makes it even easier for the customers to locate the nearby stores.
Store Pickup facility allows customers to pick the product(s) from the store if its nearby to their location.
Merchants can allow their customers to pay in the store while picking up the product(s).
Note: Google Maps API key is required to use this module. You need to pay in order to use this service. Please visit the link to view the billing service.
Features of the Prestashop Store Locator
- The module is multi-shop compatible.
- Admin can add as many physical stores and display their locations on Google map.
- Allow the customers to search the stores by product on Google map.
- Store timings, email, contact details are displayed whenever a customer searches for the store.
- Set the date and time for store pickup.
- Choose to assign all the products to a store in one go.
- Select some of the products from the list to assign them to the store.
- Add the payment methods for store pickup.
- Auto Detect user location functionality allows the customers to find the stores nearby to their current location.
- A customer can search the stores on Google map by product.
- Store pickup facility for the customers.
- A customer can view the distance of a store from his current location on the store locator page.
- A customer can view all the products available in a particular store.
Obtaining Geolocation API Key
To configure this module, you will need a geolocation API key. You can get this API using the following steps :
- Go to: https://console.cloud.google.com
- Login in and go to API’s and Services > Credentials.

- Select API key from the option and Click on create credentials.

- Credentials are now available.

So this is how, you can create geolocation API key and use it to configure our module.
How to install the Prestashop Store Locator Module
- Firstly, Go to Module Manager in Back office and click on ‘upload a module’.
- Now, Drag and drop the module file or select the file from the system.
- In this way, the module installation will be successful.


How to configure Prestashop Store Locator Module
After the successful installation of Store Locator module, admin can configure the module by navigating through Manage Store->Configuration.

Store
Under “Store” tab, admin can configure map and store settings.

General Configuration

Store Configuration

Adding a new store
Admin can add a new store by navigating through Manage Store->Store Locations. Also, the admin can edit or delete store from here.

Admin can add a new store by clicking on ‘Add new store’ button.

Store pick up details – After entering all the store details, admin can set up the store timings.

After saving the details of the store, two new tabs add to assign the product to the store.

Assign products
You can assign the products in the following two ways:
- Either assign all the products
- Or assign products one by one
To assign products one by one, select the products and click on save to assign them to the store.

After assigning the products to the store, you can view the list under the store details page.

Front end functionality
If you assign a product to the store then on its product page, you will see a link from where you can view the stores associated with that product.

A customer can locate the store on Google map by clicking on ‘STORE’ button.

Display map on the product page– If you assign any product to the store then it displays on the Google Maps on the product page too.
Show stores on product page– You can also view the store to which you have assigned the product on the product page.

Display map on home page– If you enable this functionality then google map is visible on the home page too.

Enable Store Page
Admin can enable or disable the store page at front end.
If enabled then just by clicking on store’s name on google map a customer gets redirected to a store page where he can view all the products available in a store.

Store Page:

Display cluster on map
Suppose there are two stores located very close to each other than, in this case, a cluster will be displayed on the map by clicking on which a customer will be able to locate both the stores.

When a customer clicks on a cluster on Google map then he will be able to view the stores separately as shown below:

At front end, a customer can view all the stores available and its details by clicking on ‘Stores’ on navigation bar and footer.
Navigation Bar:

Footer:

When a customer clicks on “Stores” he will be redirected to a store locator page where he can view all the stores added by admin on Google map.
Store Pickup
Admin can configure store pickup details by navigating through Manage Store->Configuration->Store Pickup.

General Configuration
- Enable Country Restriction – Admin can apply restrictions on some countries where store pick up facility will be available for the customers.

Enable store pick up for a product
To display a store pickup shipping method at front end admin has to enable store pick up for the products assigned to the stores.
Admin can enable store pick up for a product by navigating Catalog->Products->Modules.,

Admin can enable a product for store pick up by clicking on ‘CONFIGURE’ button.

Enable pick up date selection –
- Admin can set the minimum and maximum number days for a product pick up by a customer from the store.
- Minimum Days – In this field, admin can set the minimum number of days a customer has to wait to pick up his product(s) from the store after placing an order.
- Maximum Days – In this field, admin can set the maximum number of days a customer has to wait for picking up his product(s) from the store after placing an order.
- Max pickups per days – In this field, admin can set the maximum number of customers who can pick up their product(s) from the store on a particular day.
Example – Suppose admin has set a pick up slot of 11:00 AM – 20:00 PM and minimum& maximum days as 2 and 30.
Now if a customer places an order on 06/05/2022, then he can pick up his product(s) after 08/05/2022 or on or before 05/06/2022.
Now while processing an order, a customer has to select store pick up as the shipping method.

Select store on the map
A customer has to click on ‘SELECT STORE’ button to search a store nearby to his current location.

Based on the location, customer can search the store.
A customer has to click on ‘Select Store’ button to enter the date and time of pick up.

After entering the date and time of pick up, a customer can view store details and pick up date under “SHIPPING METHOD” tab as shown below:

If admin has disabled “pick up date selection” then pickup date will not be displayed when a customer selects a store for product pickup.


Enable pickup time selection –
In this field, admin has to enter minimum number of hours a customer has to wait to pick up his product(s) from the store.
If “pickup time selection” has been disabled by admin, then pickup time will not be displayed at order page when a customer selects a store for product pickup.


Suppose there is a product P1 for which both “store pick up” shipping method and “Demo Shop” shipping method is available.
And a product P2 for which only “Demo Shop” shipping method is available in a single cart.
Now if a customer wants “store pick up” shipping method then he can select “store pick up” for a product on which its applicable by clicking on “Click here” link as shown below:

In clicking “Click here”, a pop will display for the confirmation.

Upon confirming, “store pick up” shipping method will get applied on product P1 and “Demo Shop” shipping method will get applied on product P2.

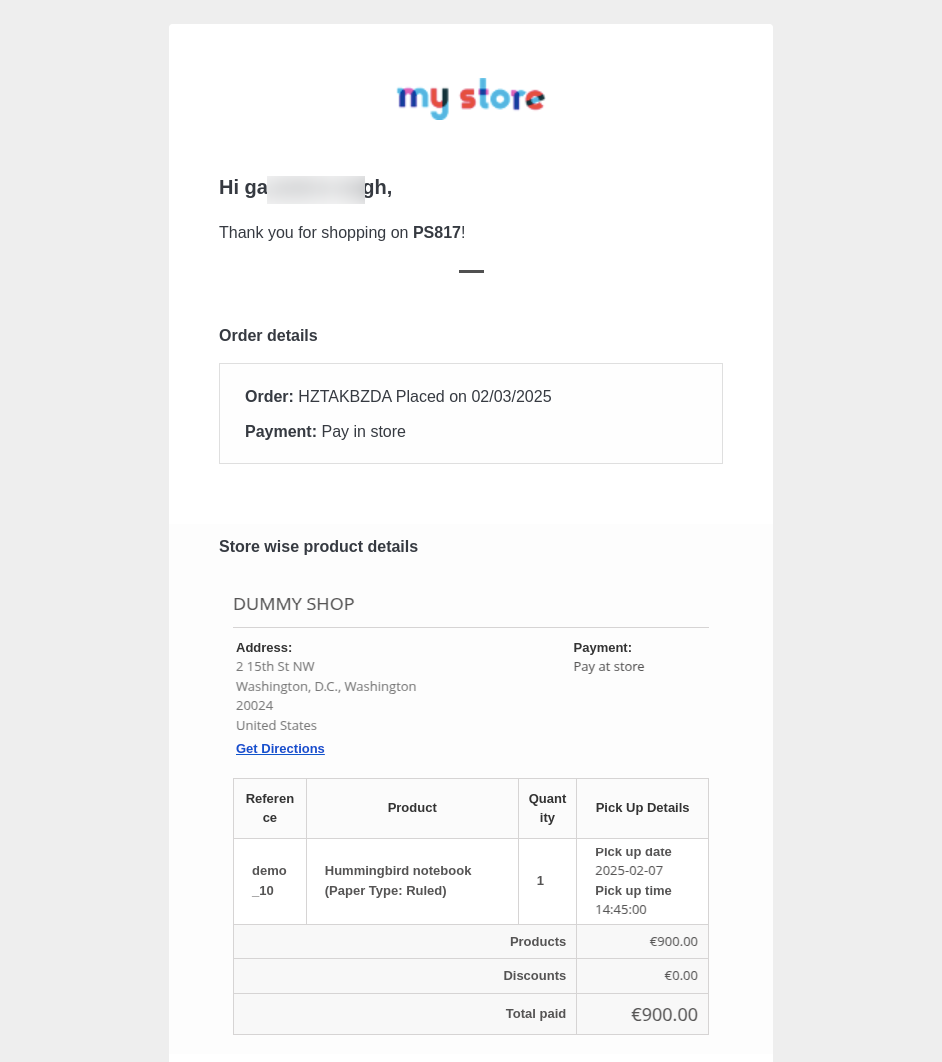
Confirmation mail for store pick up will be sent to customer after he has placed an order using ‘store pick up’ as shipping method.
Store Pickup Payment
Admin can configure Store Pickup Payment by navigating through Manage Store->Configuration->Store Pickup Payment.

Store Payment Configuration

Enable Store pick up payment – If enabled, then “pay in store” payment method will be visible to the customers on the checkout page at Front End.

- Display option for removing the product – If enabled, then an option is displayed under payment tab as shown below:

After clicking on the ‘click here’ button, the product unavailable for “Pay in Store” is removed from the cart.

Store Pickup Payment

Under “Store Pickup Payment” admin can add payment method which will be available with the store owner.
The customers can choose to pay using these payment methods at the time of store pickup.

Once admin has added a payment method for store pickup then he can select this payment method for in-store payment.

Store Payment Option will be displayed on:
- Order page while selecting a store for pick-up

- Checkout page under “Payment” tab

- The order confirmation page

- Order details page

- Admin order details page

NOTE: If a customer has ordered two products from two different stores then details of both the stores are available.
This was all about Prestashop Store Locator Module. I hope this document will help you in checking the functionality of the module in a better way.
Also, do let us know about your views in the comments.
Support
For any kind of technical assistance or query, please raise a ticket or send us a mail at [email protected]
Also, please explore our Prestashop development services and vast range of quality Prestashop addons.
Current Product Version - 5.1.5
Supported Framework Version - 9.x.x, 8.x.x, 1.7.x.x

1 comments