PrestaShop Razorpay Payment Gateway: Integrate your store with a secure and reliable Razorpay payment gateway to provide a seamless payment experience to your customers.
Accept credit cards, debit cards, wallets, and UPI payments in your store. Easily process the refunds for the orders from the back office.
Note: PrestaShop Razorpay Payment Gateway module is compatible with PrestaShop multi-store feature.
Features of PrestaShop Razorpay Payment Gateway
- Offer card, wallet, UPI, netbanking, and pay later payment options to your customers.
- A dedicated tab to view and track the transactions done via Razorpay.
- Enable/Disable Razorpay Magic Checkout on your store.
- Display Magic Checkout on product page, cart and checkout page.
- Refund the full or partial order amount to the customer.
- View refund logs for each transaction from back office.
- Test your setup before going into production by running in the sandbox mode.
- Select the payment actions as ‘Authorize’ and Authorize and capture’ for your store.
- Set the theme color of payment popup.
- Save payment error logs in the back office.
Important Notes:
- Wallet, netbanking, UPI, and pay later payment options are available for India rupee (INR) currency.
- To enable the full functionality of the Magic Pay checkout, all the required permissions must be enabled from the Razorpay side.
How to Install PrestaShop Razorpay Payment Gateway
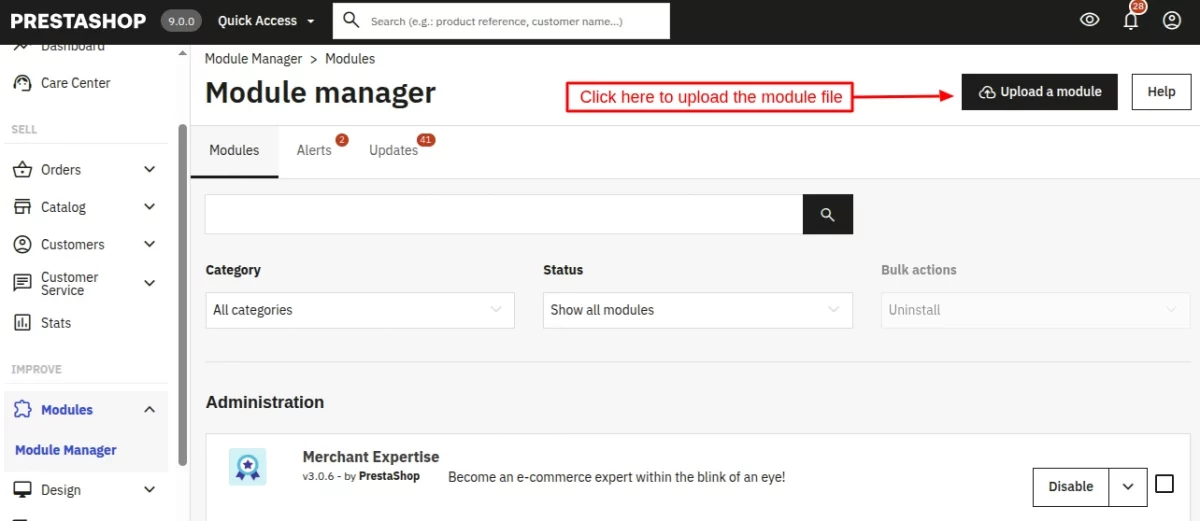
- Firstly, go to the module manager in the back office and click on ‘upload a module’.
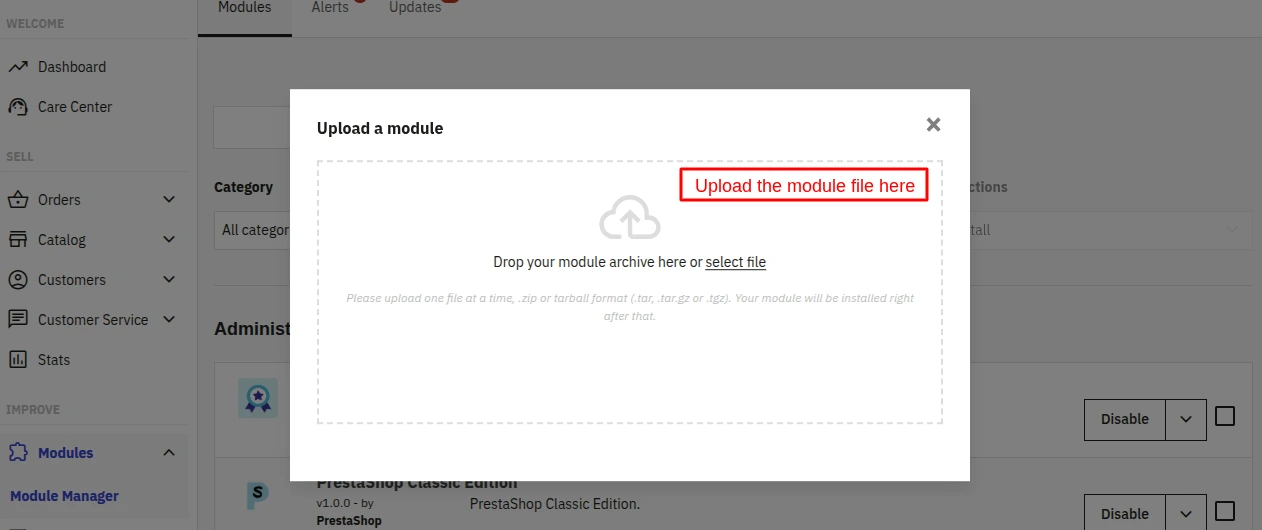
- After that, drag and drop the module file or select the file from the system.
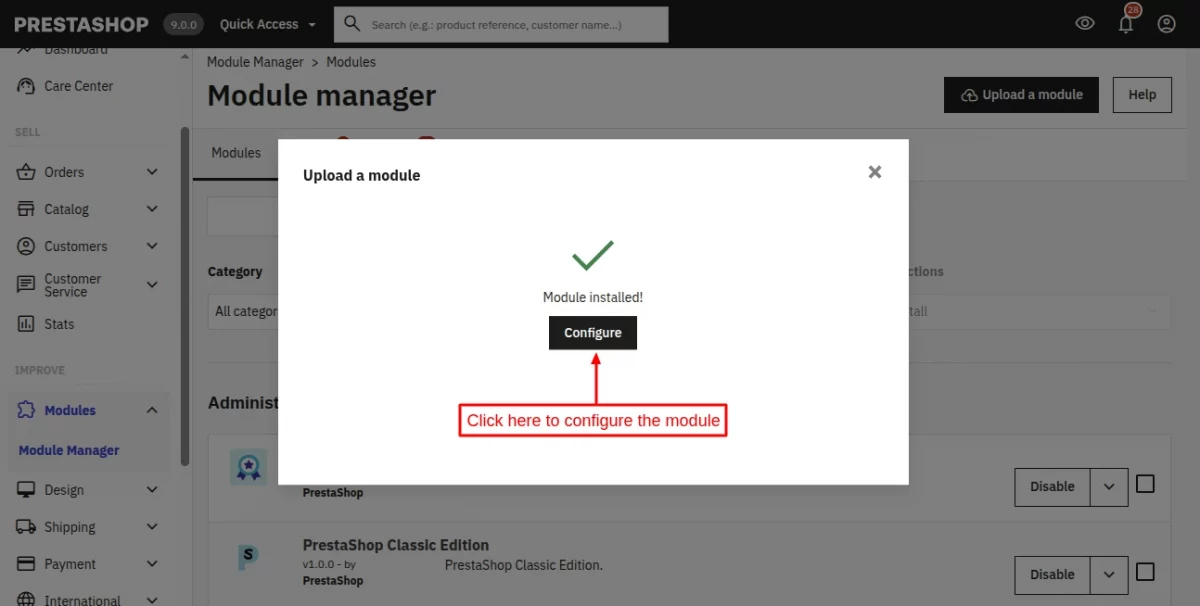
- In this way, the module installation will be successful.
General Settings
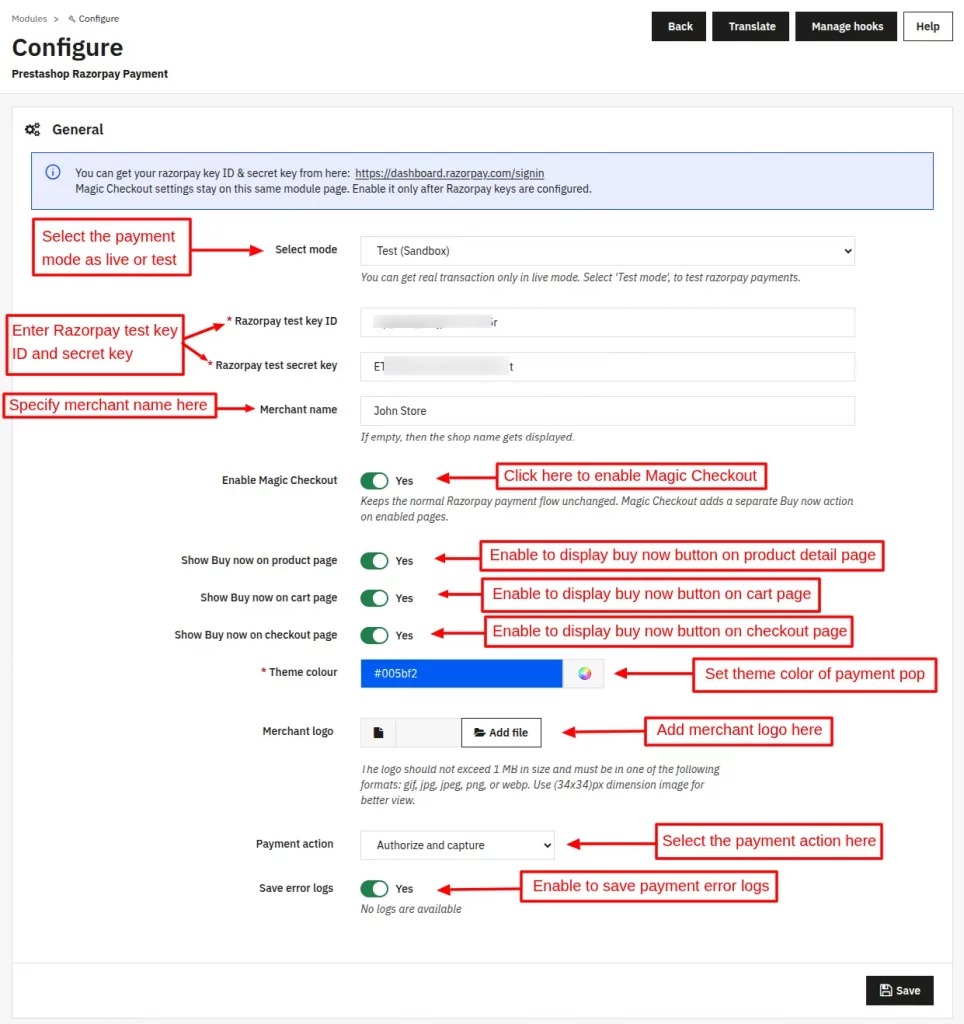
After the successful installation of the module, you need to configure it. Specify the Razorpay test key ID and secret key that you got from the Razorpay account.
Set the desired theme color for payment popup and save payment error logs.
Payment action
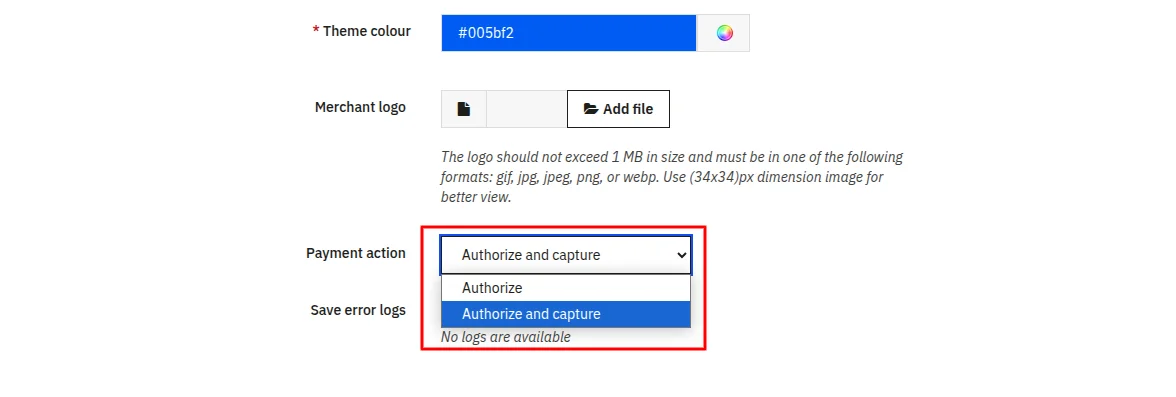
The admin select the payment state as ‘Authorize’ or ‘Authorize and capture’.
Authorize: This state means the bank has successfully authenticated the customer’s payment details. The money gets deducted from customer’s account by Razorpay.
The amount settled to your account after the payment is manually or automatically captured.
Authorize and capture: This state means the bank has successfully authenticated the customer’s payment details and the payment is verified as complete by Razorpay.
How to Get the keys
For getting the keys, you need to create an account on razorpay.com

Now, enter the details required to complete the registration.
Once completed, go to Account & Settings tab.

On Account & Settings page, click on API keys.

In the above screenshot, you can view Razorpay test key ID. While generating the test keys, you can view Razorpay test secret key and you need to save it.
You can also regenerate the test keys by clicking on ‘Regenerate Test Key’ button under the Action column.
On clicking the button, a popup appears on the page where you need to confirm and deactivate the old key to get new keys.

On clicking the ‘Confirm and deactive’ button, new keys get generated.

Switch to live mode to the get the Razorpay live key and secret.

Front End Workflow
Once you have configured the module settings, a new payment method ‘Razorpay’ gets available for store customers to make the payment.
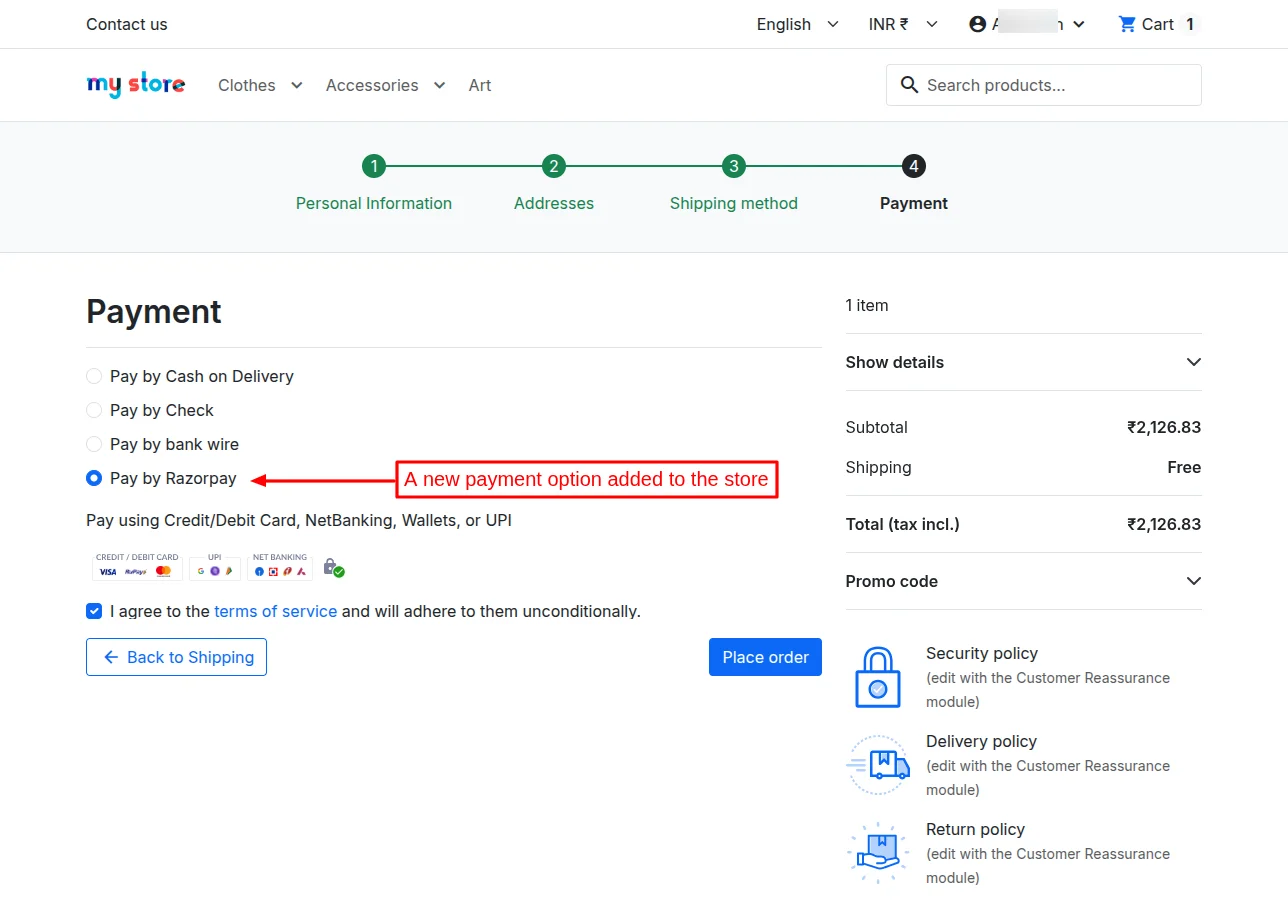
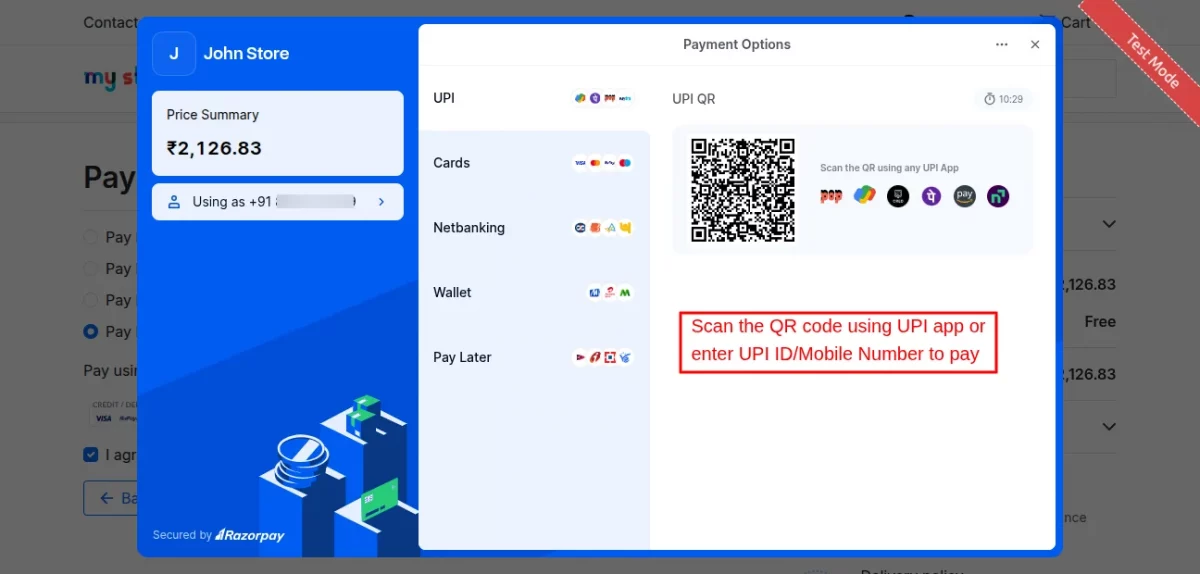
After selecting the Razorpay payment method, when a customer clicks on ‘place order’ button, a popup appears on page where a customer can view available payment options.
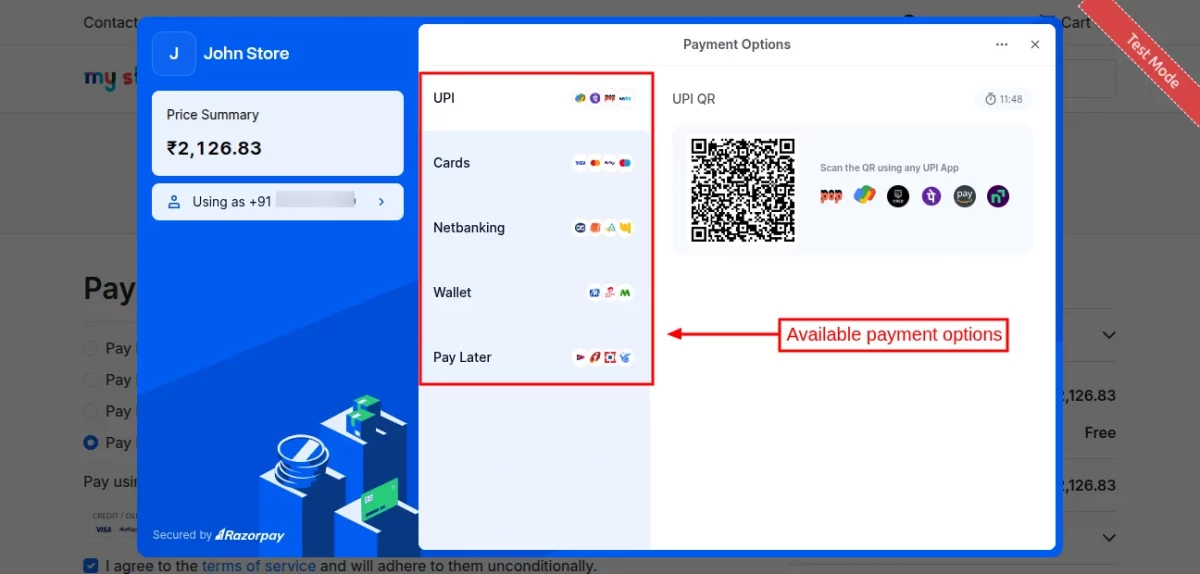
A customer can make payment for his order via:
- Credit/debit card
- UPI
- Netbanking
- Wallet
- Pay Later
If a customer has selected currency other than Indian rupee (INR), then only those payment options will display which are supported by Razorpay for the currency selected by customer.
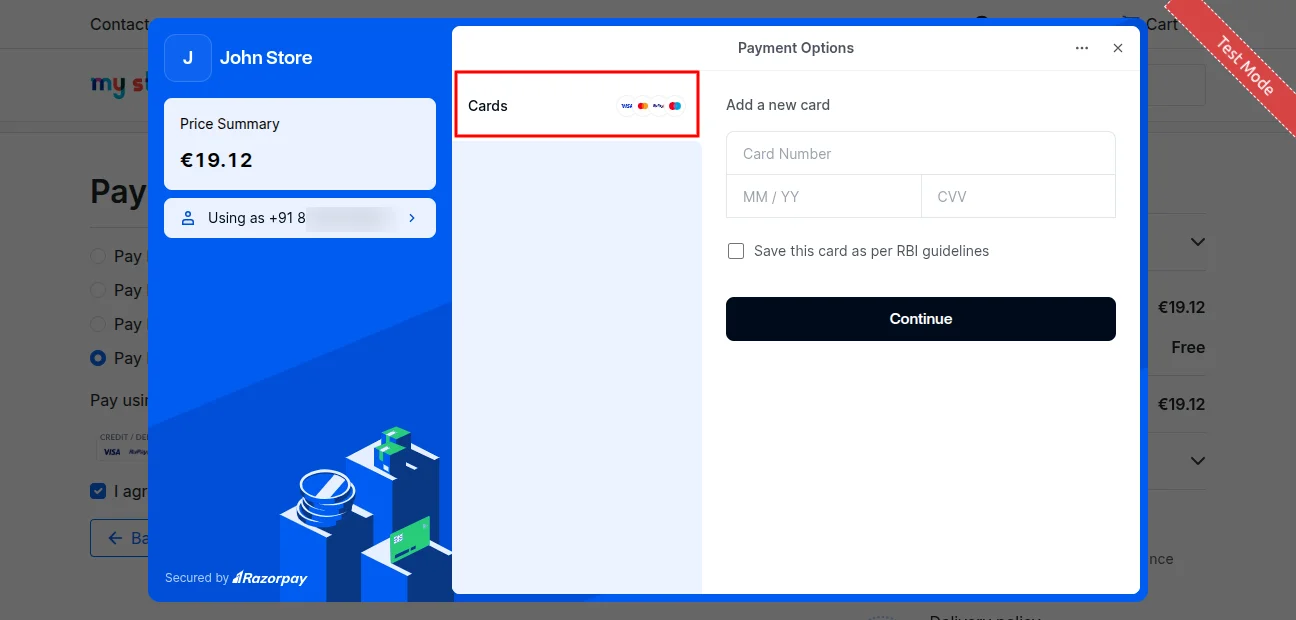
Pay via UPI/QR
Customer can pay by scanning the QR code using any UPI app on his phone or UPI ID/mobile number.
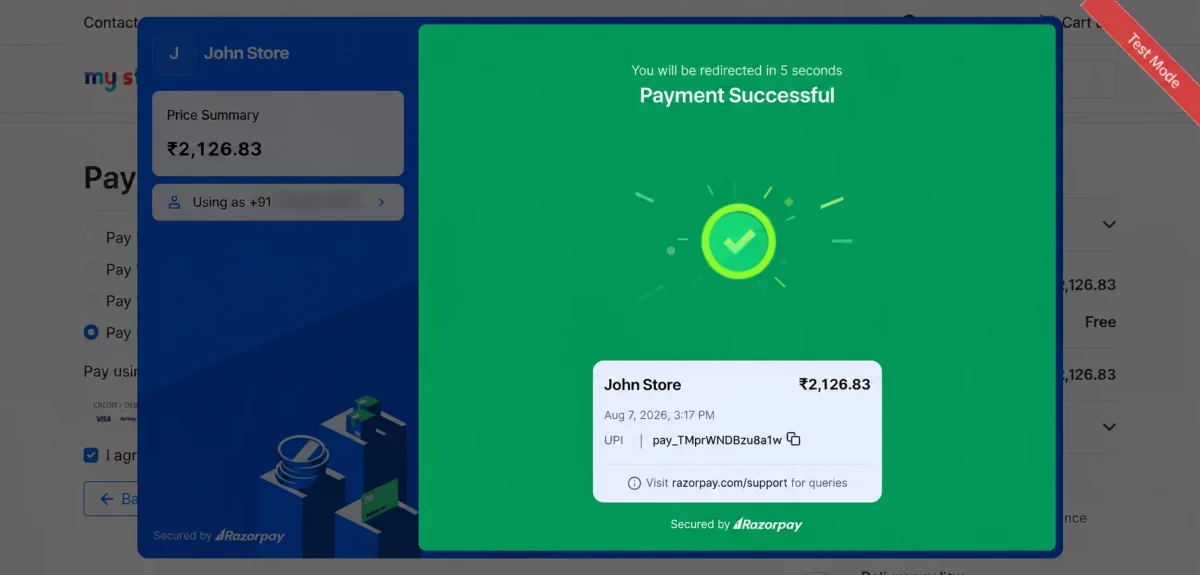
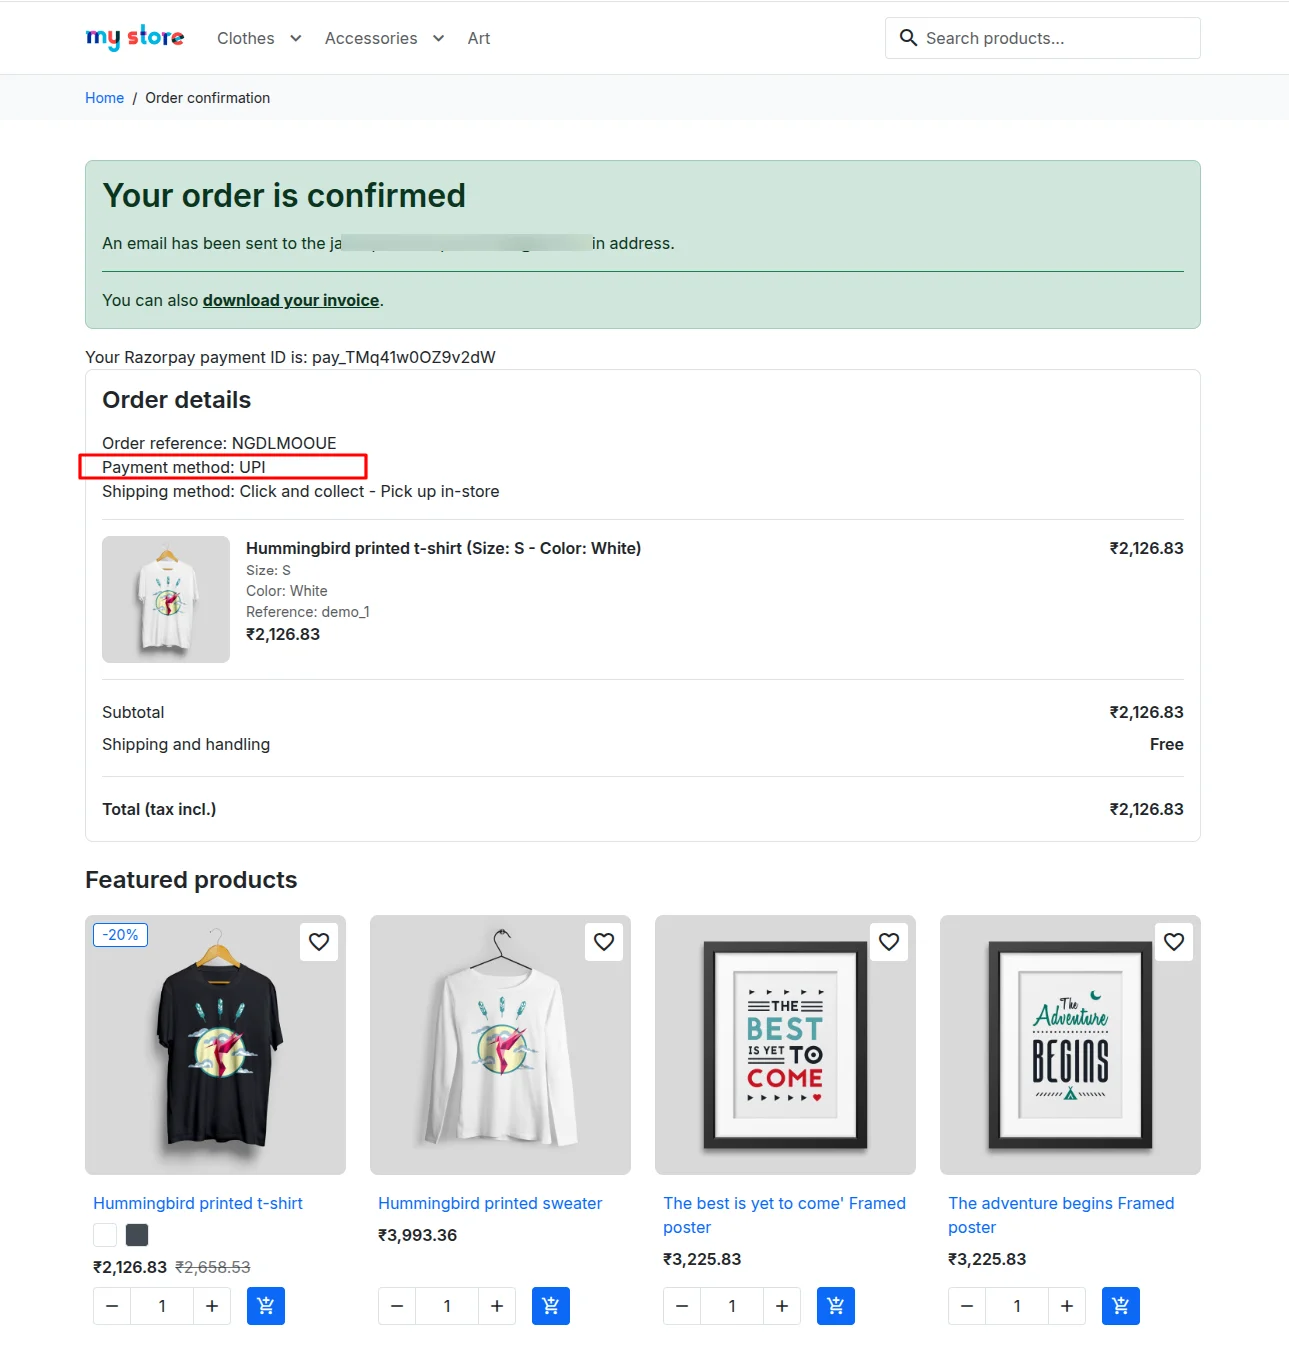
Upon successful payment, the customer gets redirected to order confirmation page.
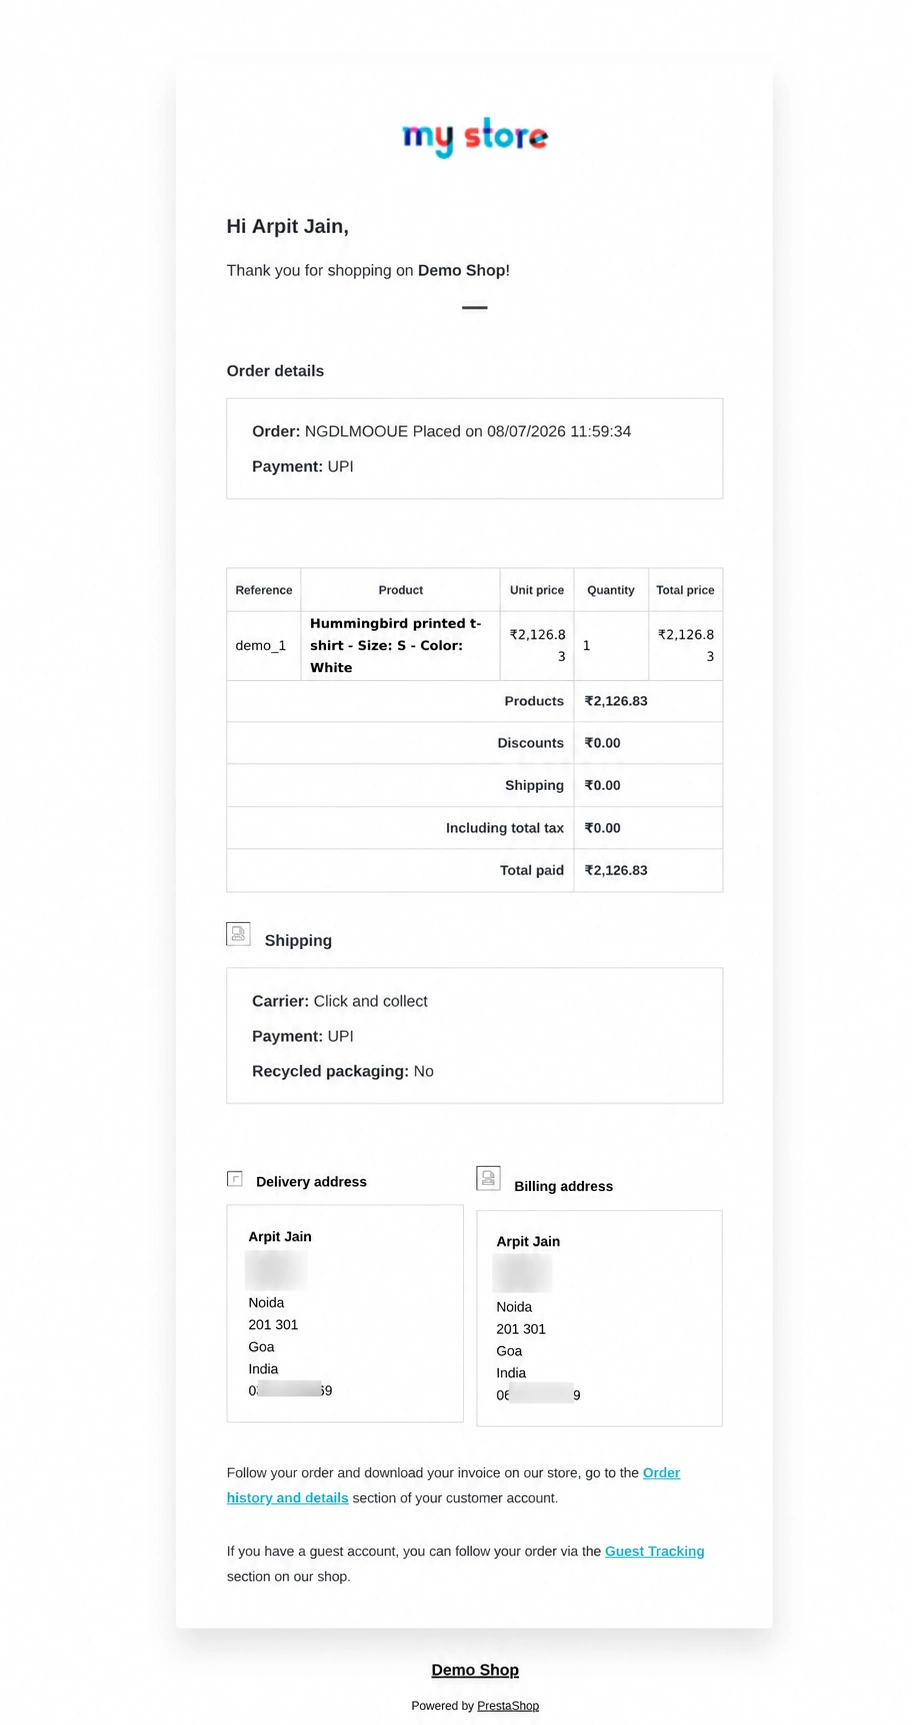
Also, a customer will receive an order confirmation mail on registered email address. In email, a customer can view order details and payment method used.
Razorpay Magic Checkout
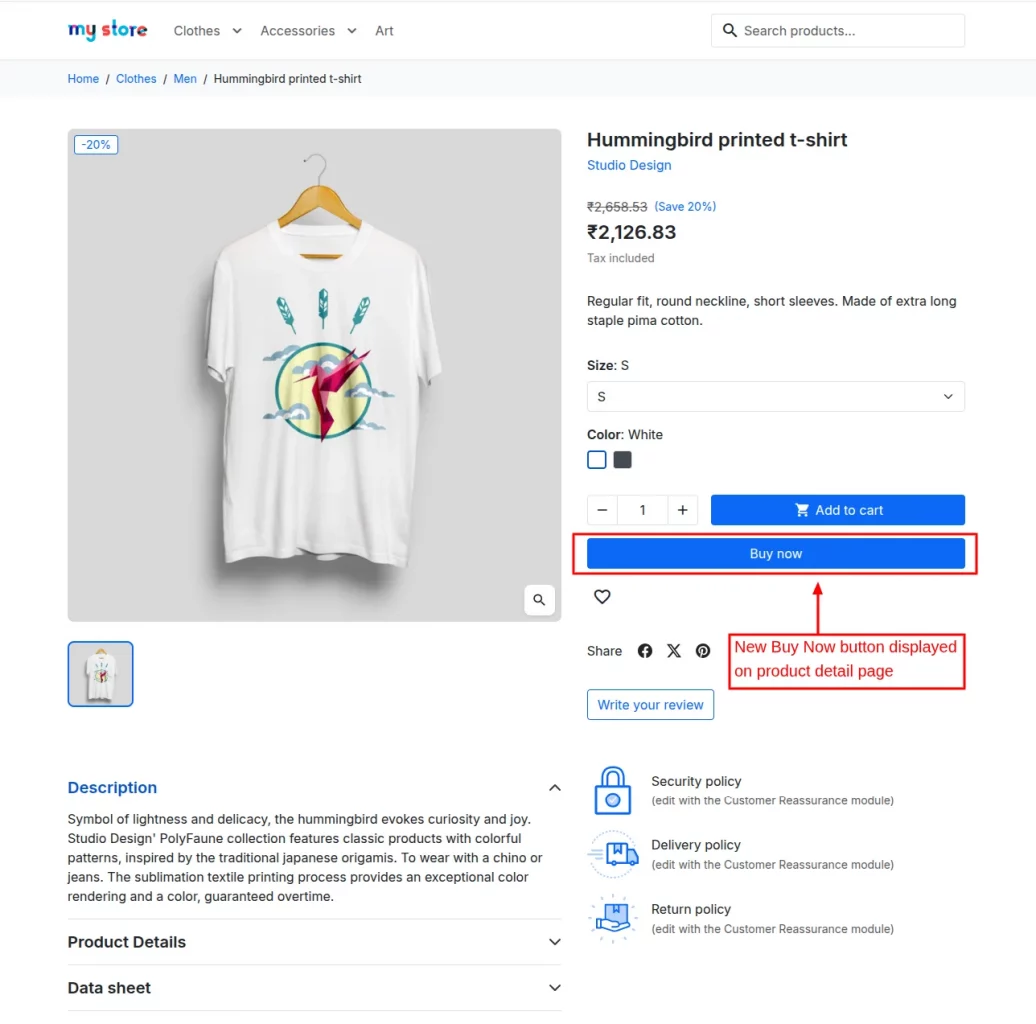
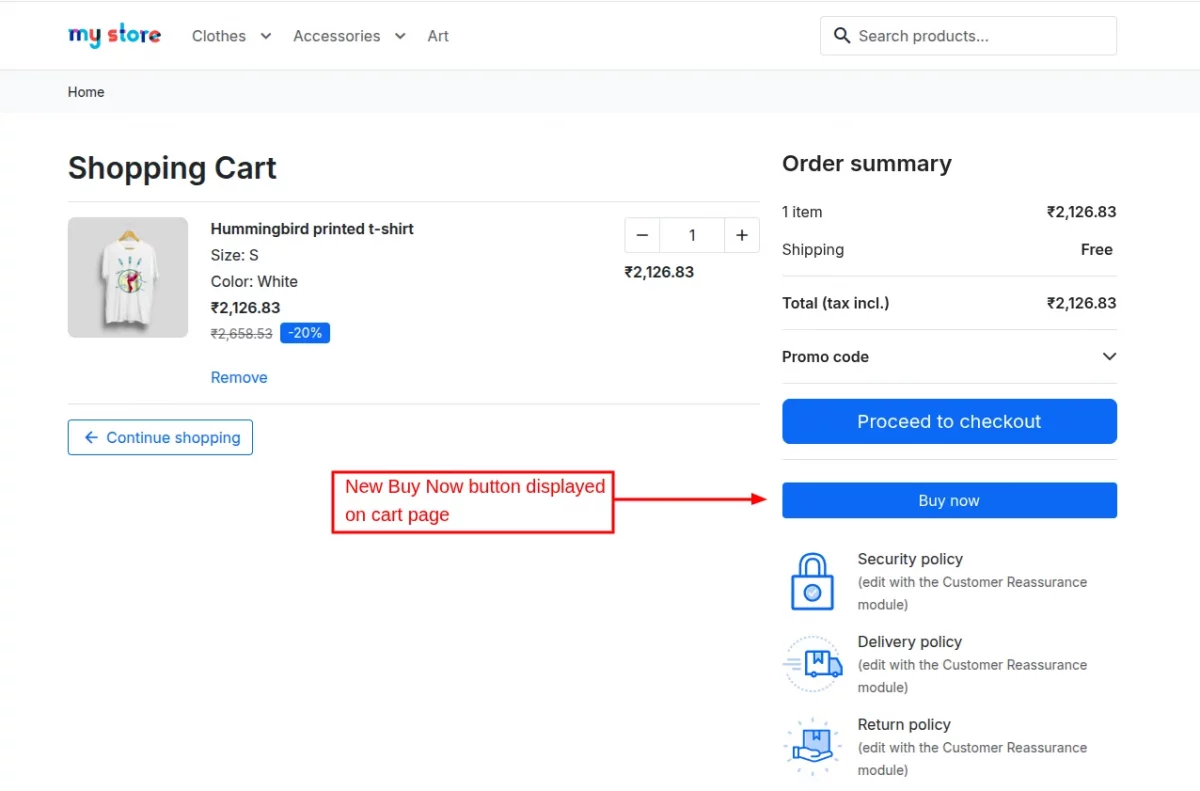
If the admin enables the Magic Checkout option from the module configuration, the admin can allow users to directly buy the product from the following pages:
a) Product detail page
b) Cart page
c) Checkout Page
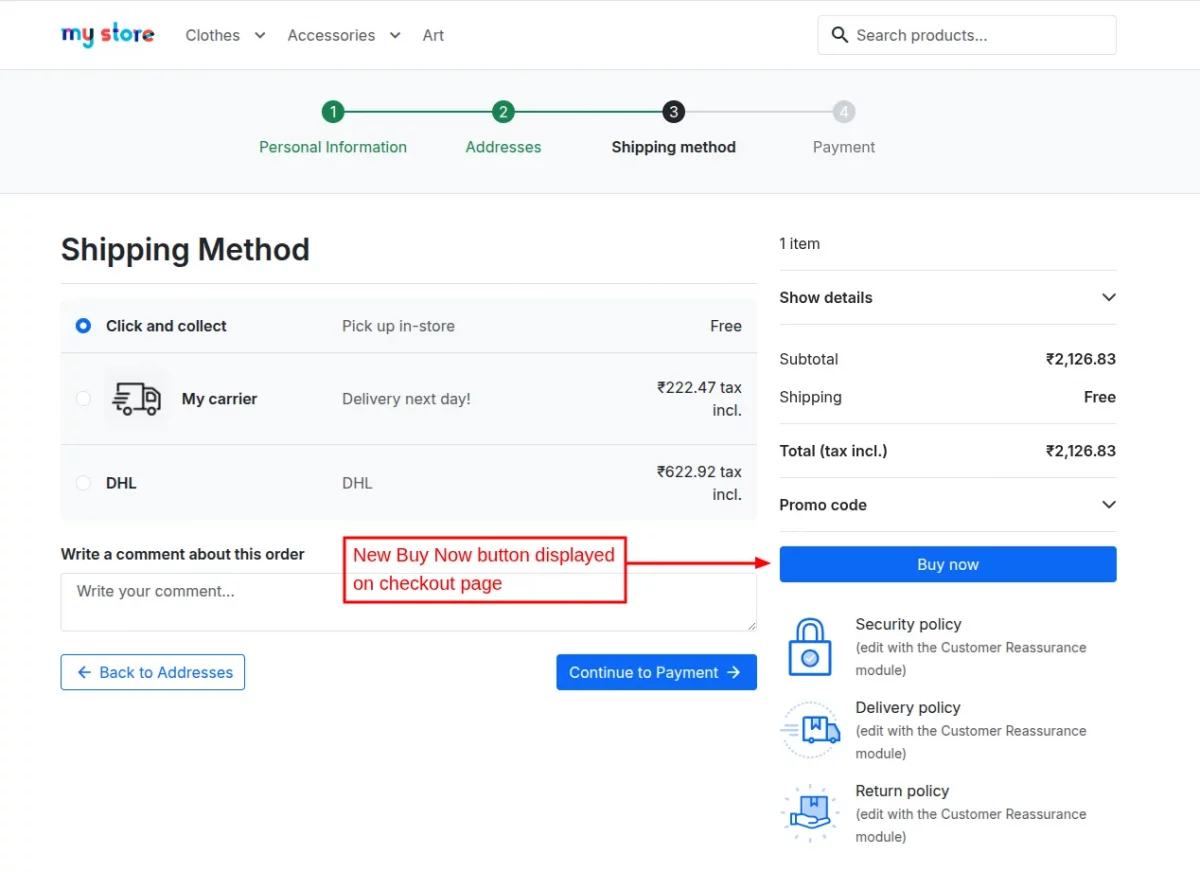
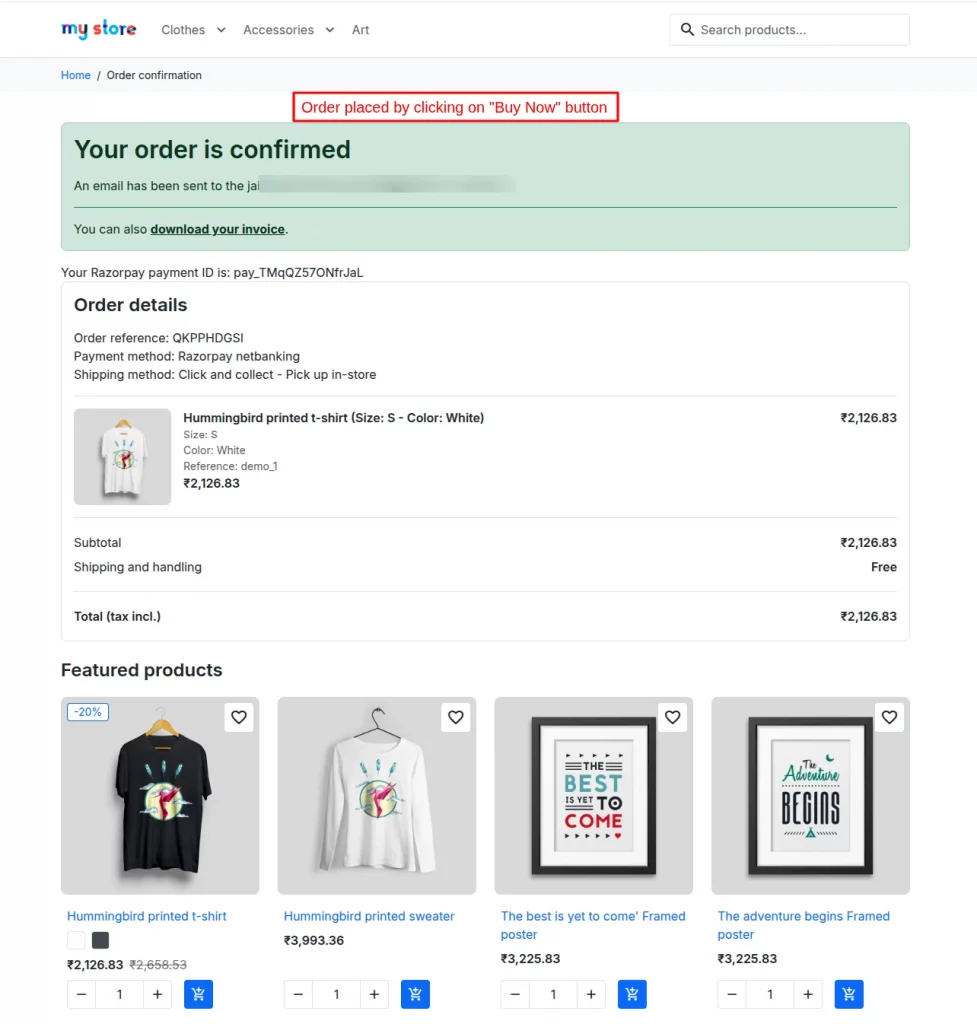
When any user clicks on the newly added “Buy Now” button, a pop-up box will appear to make the payment for the order.
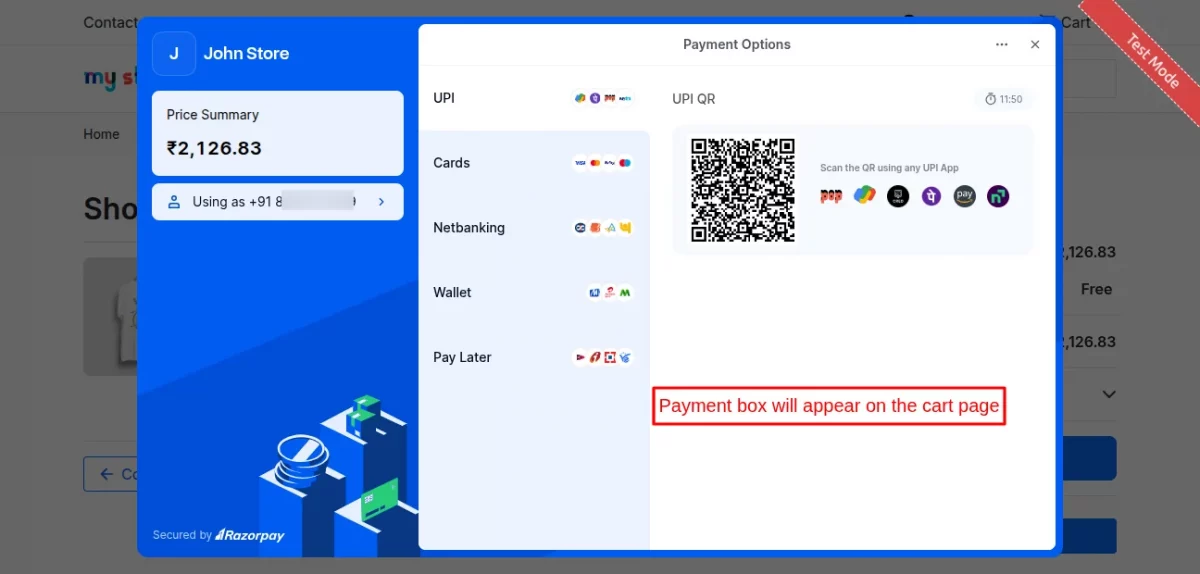
After successfully making the payment an order will be placed directly without selecting any address and carrier from the PrestaShop store’s end.
Razorpay Transactions
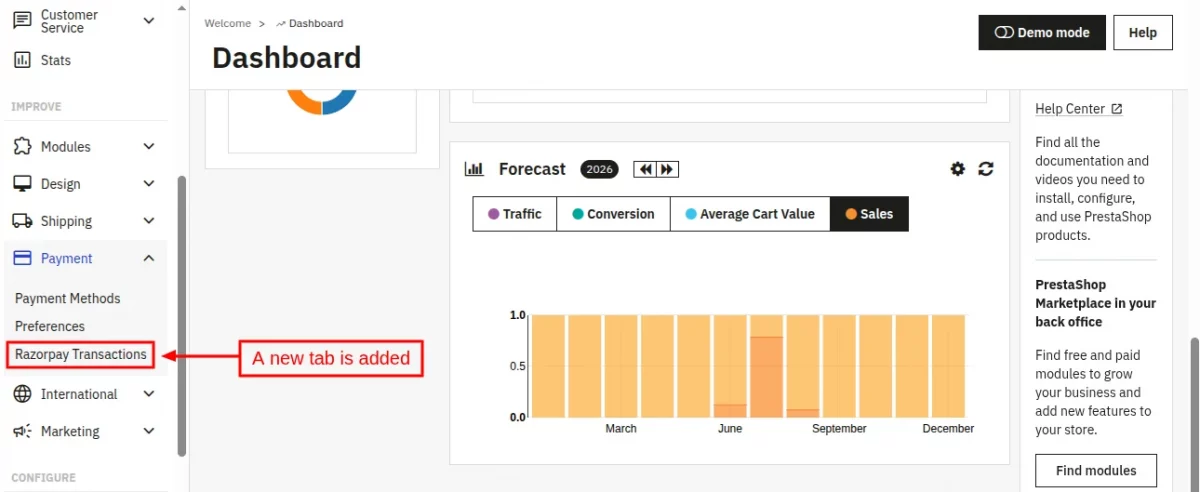
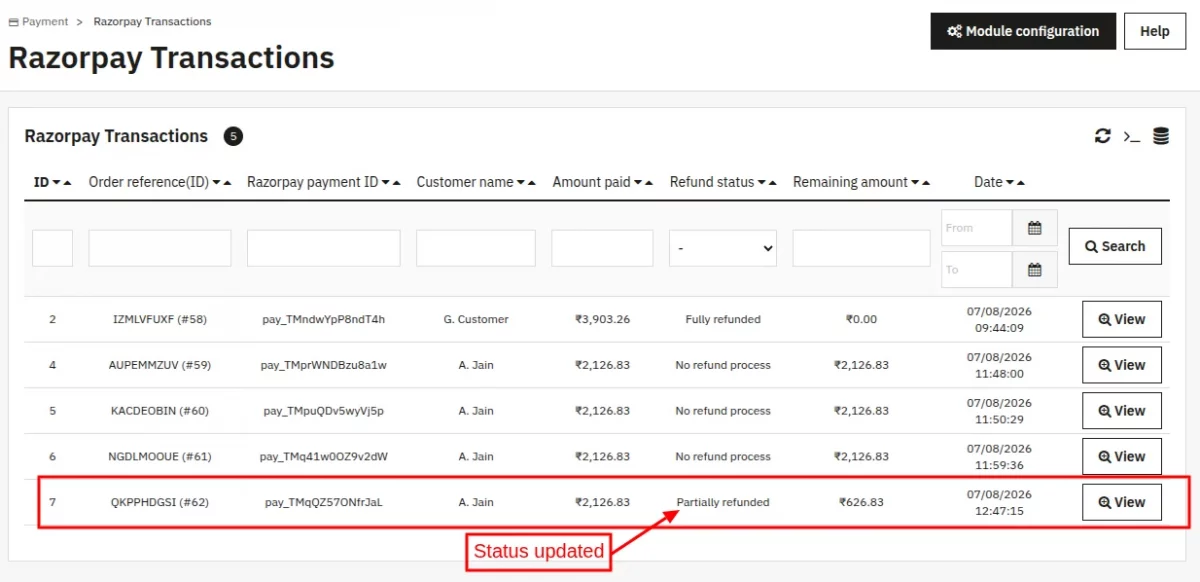
Post installation, a new tab “Razorpay Transactions” gets available in the back office where you can view a list of transactions done via Razorpay.
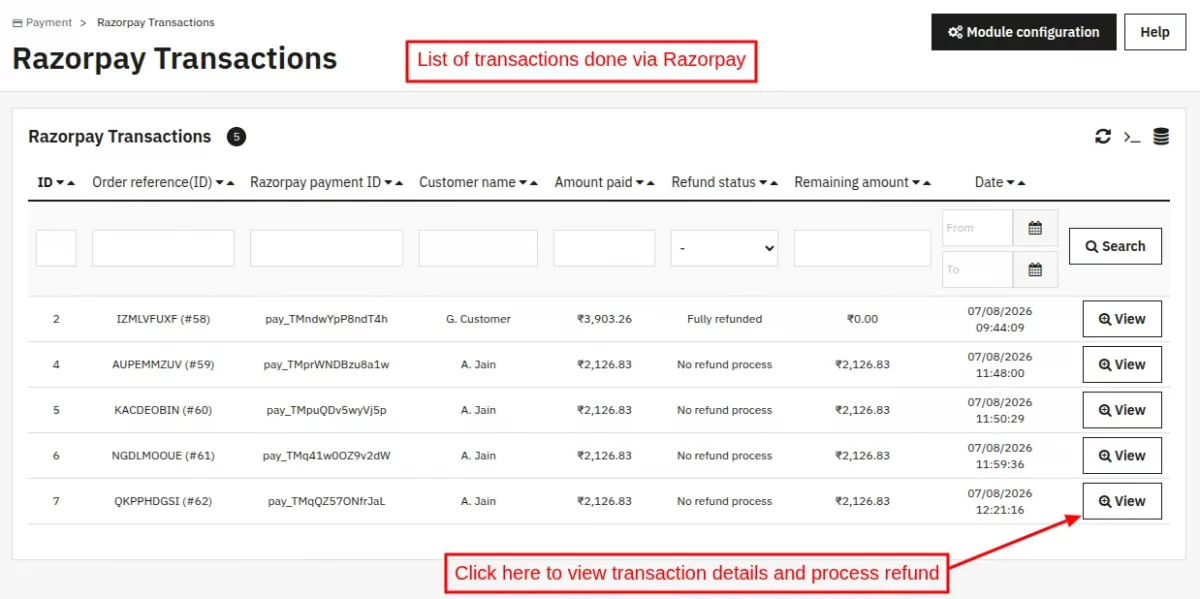
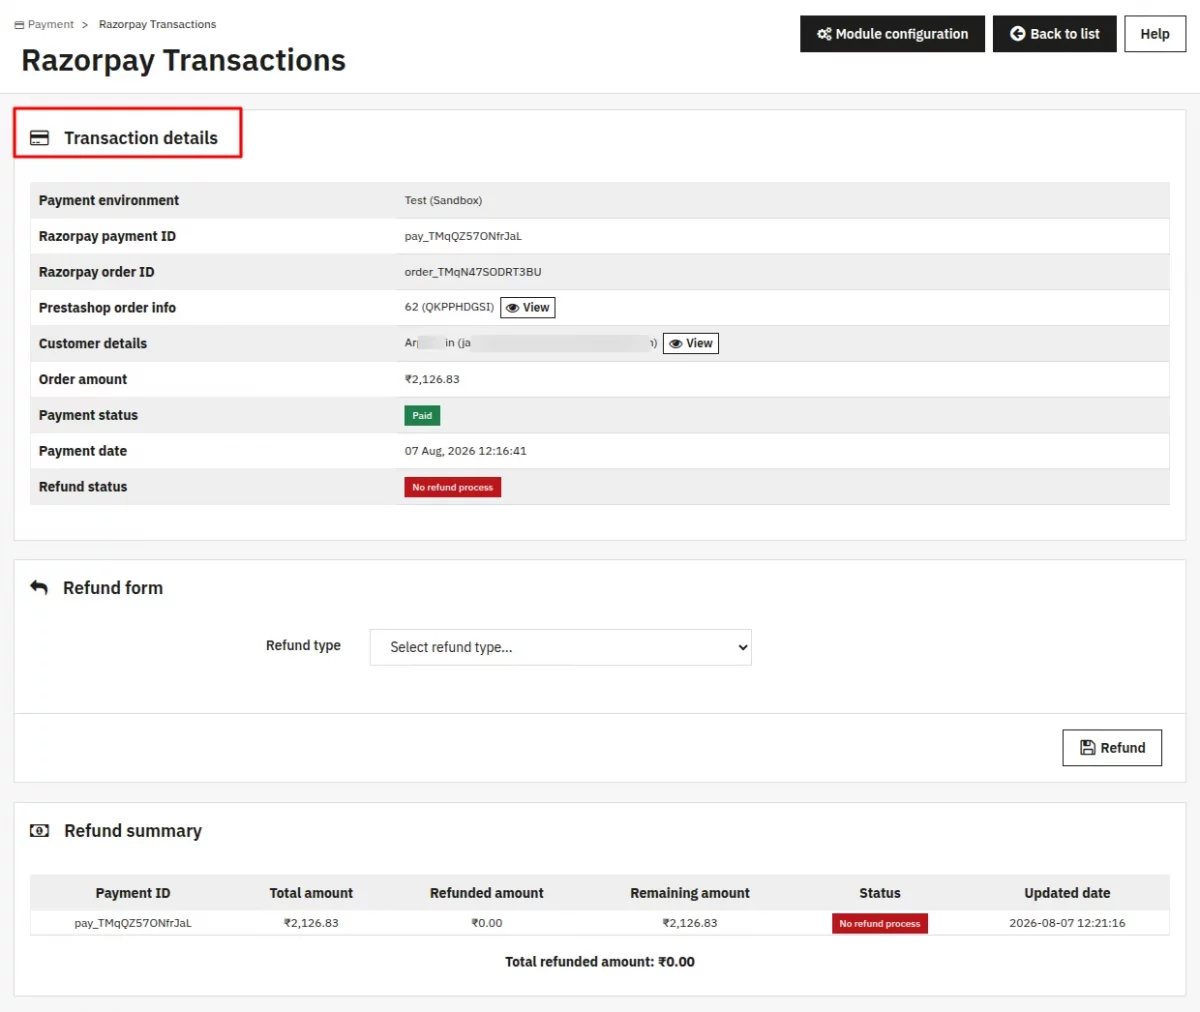
Click on the ‘View’ button to see the transaction details.
Refund Process
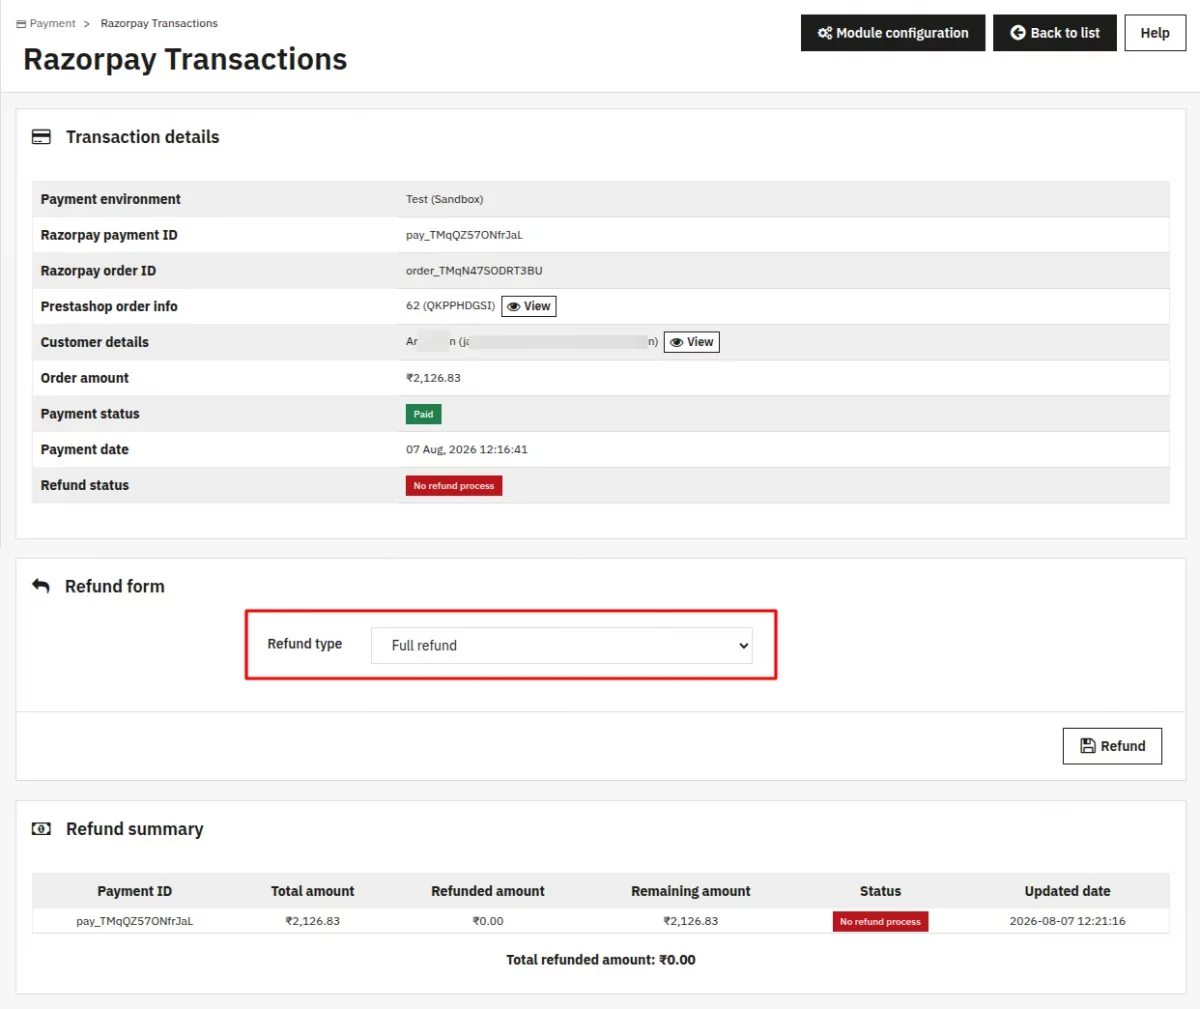
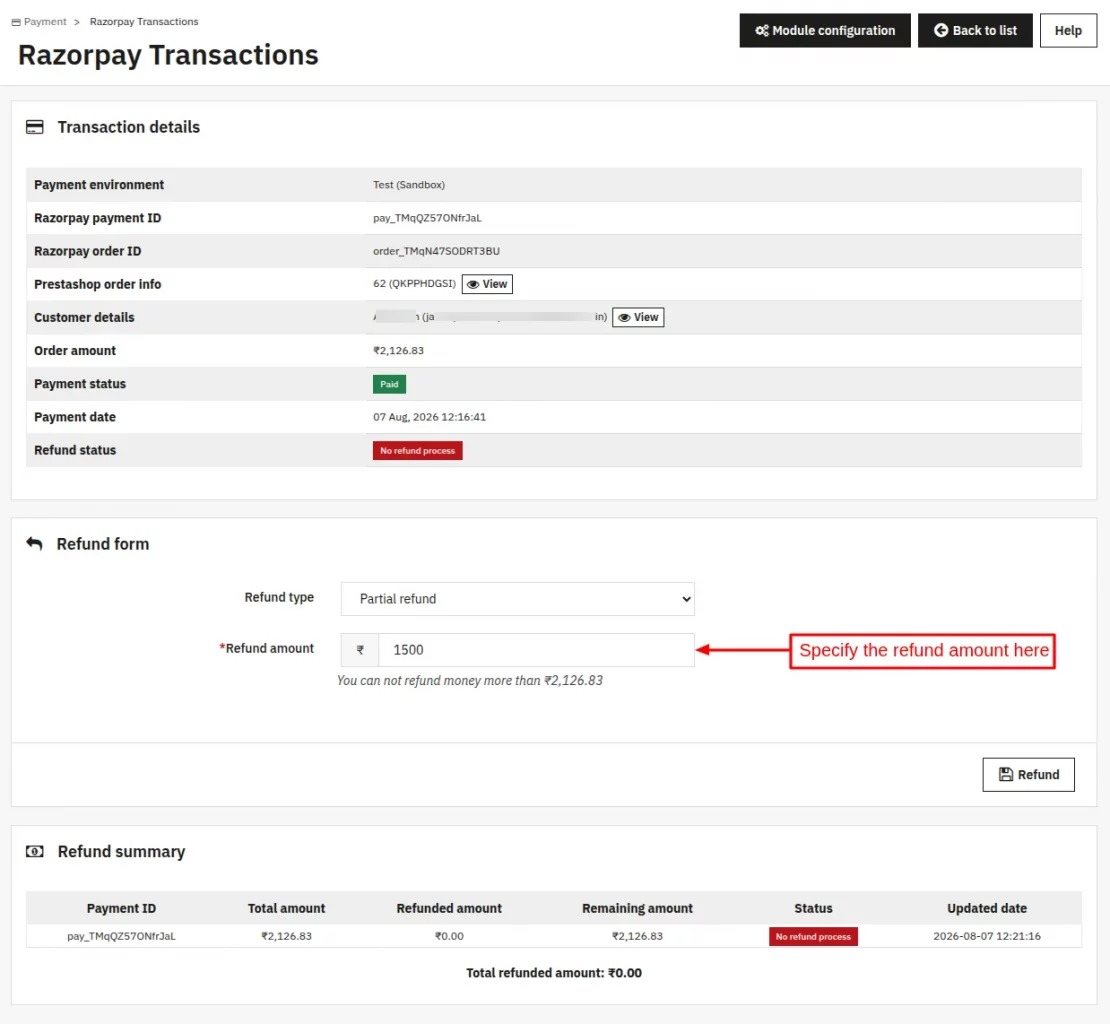
PrestaShop Razorpay Payment Gateway allows you to refund the order amount. You can refund full or partial amount to the customer.
Full refund
Partial Refund
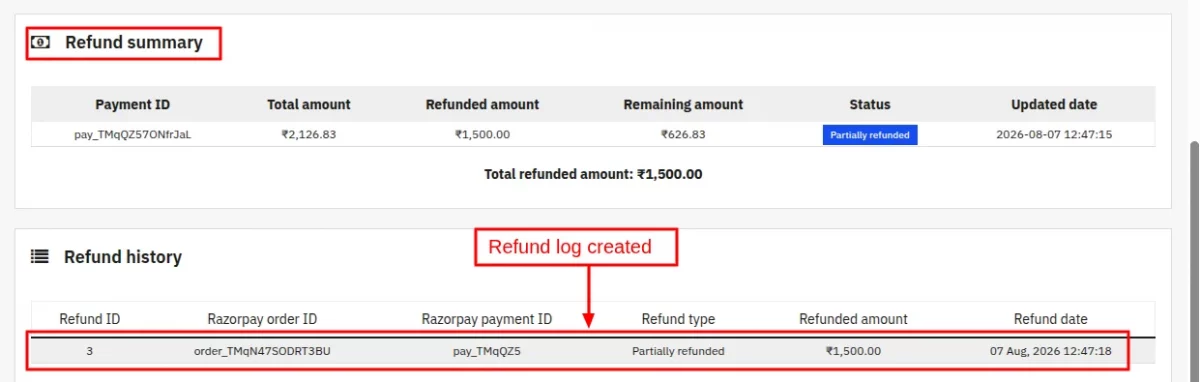
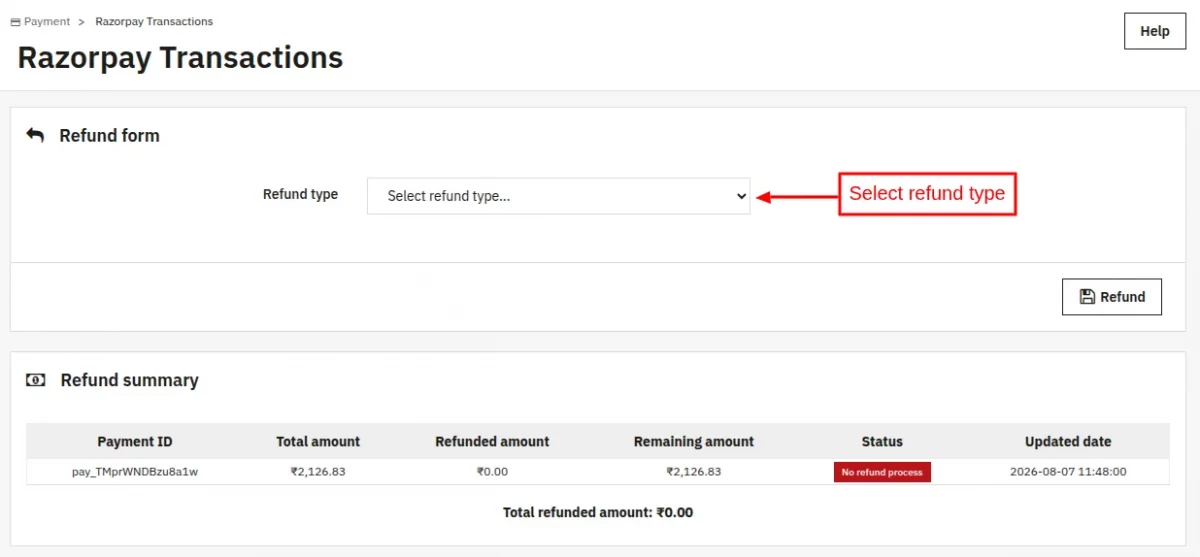
Once refunded, you can view refund details. You can view total amount, amount refunded, remaining amount, etc.
You can also refund amount to the customer from the order details page.
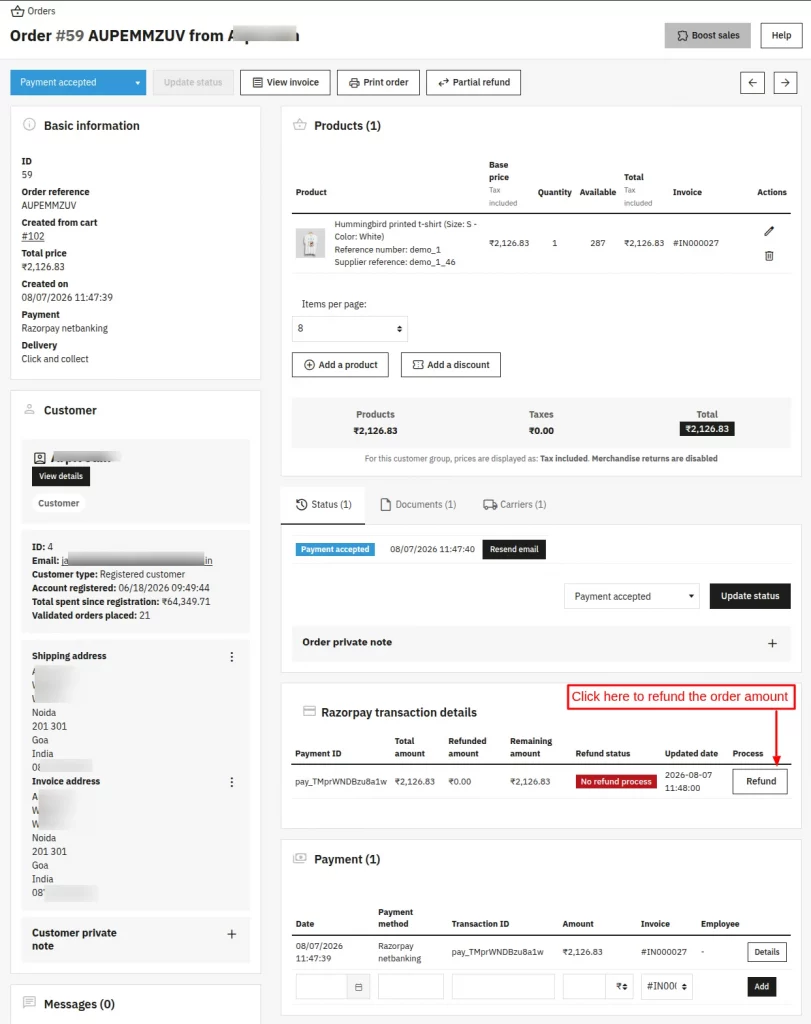
Click on the ‘Refund’ button to initiate the refund process. On clicking the button, you will be redirected to Razorpay Transactions where you need to select the refund type.
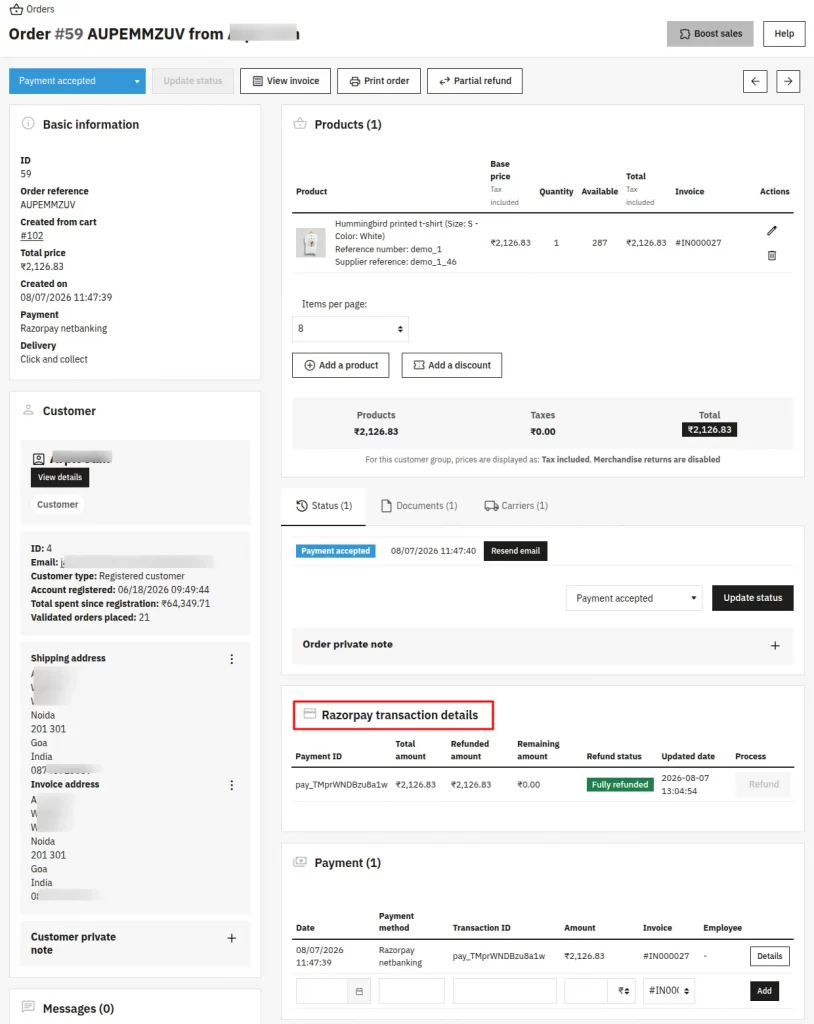
This was all about Prestashop Razorpay Payment Gateway. I hope this document will help you in checking the functionality of the module in a better way.
Also, do let us know about your views in the comments.
Support
For any kind of technical assistance or query, please raise a ticket or send us a mail at [email protected]
Also, please explore our Prestashop development services and a vast range of quality Prestashop addons.
Current Product Version - 5.1.0
Supported Framework Version - 9.x.x, 8.x.x, 1.7.x.x

Be the first to comment.