Reduce shopping cart abandonment, boost conversions, and enhance customer satisfaction by simplifying the checkout process with Prestashop One Page Checkout.
- Speed up the buying process by displaying all the checkout steps on a single page.
- Let customers log in via their social media accounts like Facebook and Google.
- Increase average order value by displaying related products on the checkout page.
- Enables customers to save cart products for later purchase.
- Allow users to checkout as guests.
Note:
Prestashop One Page Checkout module is compatible with:
- PrestaShop Google reCAPTCHA
- Multi-store feature.
- Prestashop Marketplace Cart And Order Split
- PrestaShop Checkout built with PayPal Module
Feature Highlights
There’s no question that single-page checkout is quicker than multi-page. With single-page, your shopper doesn’t have to wait for a next page to load.
The checkout process is undoubtedly faster because pages don’t have to be loaded for each step.
Moreover, fields respond to the user’s input in real time (thanks to AJAX), making the process that much more efficient.
1. SPEED
A quick and painless checkout process means less time for the user to get distracted or change his mind.
2. INTERACTIVITY
Because AJAX responds in real-time, fields are more interactive. They respond to the user’s activities, creating a more interactive checkout experience.
3. NAVIGATION
Single-page checkout simplifies navigation for the user. As it provides everything organised at one place giving the user fewer reasons to hit the back button.
4. DESIGN
A complete new, fresh look and feel of the checkout page.
Features of Prestashop One Page Checkout module
MAIN CONFIGURATION :
- Enable/disable the One Page Checkout option.
- Admin also has an option to decide whether the module will run on Sandbox mode or not.
- Admin can enter the IP address which will be able to use the One Page checkout Option.
LOGIN/ REGISTRATION / CHECKOUT BUTTON SETTINGS :
- Admin can easily Customise the Checkout Button.
- An admin can enable/disable One Page Checkout Option for Guests.
- Admin can choose the default customer group for guests using One Page Checkout Option.
- Allow users to save their address during the process.
- Immediate check of data entered in the fields using “Inline Validation”.
- Decide whether users need to enter Social Title and Date of Birth during One Page Checkout process.
- Allow/Restricts users to opt for Offers and subscribe to Newsletters during One Page Checkout process.
ADDRESS / SHIPPING / PAYMENT SETTINGS :
- Admin can enable/disable Same address usage for Delivery and Invoicing purpose.
- An admin can enable/disable the display of Carrier Logo and Carrier Description.
- Admin can allow login via Facebook or Google.
- Choose to Display/Hide Payment Gateway Logo.
- Allows admin to decide the default payment method for One Page Checkout.
CART SETTINGS :
- Allow/Restrict Users to view cart details before checkout.
- Allow Users to Save their Cart products for a Later purchase.
- Customers get a separate tab to view/add the product to cart. And, they can also delete the products that are saved for later purchase during one page checkout.
- Special Related “Who Bought this also Bought” products displayed to the customers during the checkout process.
- Admin can specify the number of related products to display.
- An admin can select the default product image size to display on one page checkout.
- Enable/Disable the display of reassurance block on checkout page.
- Admin can allow/restrict customers to choose terms and conditions checkbox before proceeding.
- Admin can link desired Prestashop CMS Page to the terms and conditions link.
How to install Prestashop One Page Checkout module
- Firstly, Go to the Module Manager in Back office and click on ‘upload a module’.
- After that, Drag and drop the module file or select the file from the system.
- In this way, the module installation will be successful.


Configuration
The Module Configuration consists of various sections keeping in mind the usability of the module.
1. General Settings
Here, an admin has an option to enable/disable the one page checkout option.
Admin also has the option to decide whether the module will run on Sandbox mode or not.
In case, if you enable the sandbox mode, then you must enter the IP address which will use this one page checkout option.

2. Customization
Here Admin has some additional option to match the checkout page with the theme of the site. Admin can choose the following options for the Checkout Button.
- Colour of the button
- The font size of the button
- Font colour of the button
- Font family of the button

3. Login and Register
Admin can decide whether one page checkout will be available for guests or not. There is an option to select the customer group for the user using one page checkout functionality too.
Admin can decide the default customer group for the user using one page checkout as a guest.
Also, the admin can choose the groups under which all those customers will come who have registered on one page checkout page.
An admin can allow/restrict customers from saving their addresses that have been entered on one page checkout.
You can also activate Inline Validations for each field. In this section, Admin can allow users various additional features like – Entering social title, date of birth, offers, newsletters etc.
Basically we allow admin to customise the whole One Page Checkout Page.

Note: For displaying Google reCAPTCHA for customer login or registration on one page checkout page, you need to install our PrestaShop Google ReCaptcha module.
4. Address
In this section, Admin can enable/disable the use of the same address for delivery and invoicing purpose.

5. Shipping
In this section, Admin can decide whether to show Carrier description or Carrier logo on One Page checkout Page or not.

6. Payment
Now it is upto admin to decide which payment gateway will be used as default payment method for One Page checkout. Admin can also enable/disable display of Payment Gateway Logo.

7. Social Login
Here, Admin can allow users to login via some social media like – Facebook / Google.
To enable login via Facebook, the admin needs to enter Facebook app ID and via Google, the admin needs to specify Google API key.

Note: Facebook app must be in LIVE mode.
8. Cart
Admin can enable/disable the feature to display cart details before checkout process starts.
Here, admin can allow new functionality to the customers where they can save their cart products for later purchase.
An additional striking feature of the module is that it displays already purchased products by other customers. Admin can configure the number of related products that will display.
Apart from that, an admin selects the default product image size on the checkout page.
Admin has an option to display to its customers a terms and conditions checkbox which they have to select while checking out.
Also, link the desired Prestashop CMS Page to this terms and conditions link.

How to get the Facebook API keys
This was all about the configuration setting of the module. Now, let’s just head to the front-end part.
In order to get the API keys & add new apps to the account, you need to create a developer account on Facebook. After logging in to the account, got to “My Apps” section.

On clicking the “My Apps” button, you will land on the following page. Here, you can see the list of all the previously created apps.
Now, in order to create a new app, click on the “Create App” button.

After that select the app category as “Consumer”.

Here, enter the name of the app and the contact email.

After clicking on the create app button, an app will be created. On this page, you can find the App ID which is required to configure the module.

Apart from this, you also need to add your website domain address in “App Domains” and enable Login with the JavaScript SDK. For this go to Facebook Login > Settings section in your App.

Now you can use the App ID to configure the module.
How to get Google App Client Id
To get the google app id, admin has to create an account on google developers console.
Now create a new project. Go to select a project->create a project.

Fill the required details of the project.

Go to APIs and Services > Credentials > Create Credentials.

Select OAuth client ID option.

Fill the requested details to create your credentials.

To view your Google API key and Secret key click on the edit button.

Google API key and Secret key information will be visible on this page. Use these credentials to configure the module.

Frontend View
This is how the default One Page Checkout Page will look.

As enabled by admin from the back office, Google reCAPTCHA will display in login popup and while registering on one page checkout page.


Prestashop One Page Checkout module is now compatible with Prestashop Checkout 2.0.
On clicking Pay with PayPal button, a popup appears on the page where a user needs to log into his Paypal account to proceed for the payment.


Social Login feature on Frontend
The users can also login via social profiles like Facebook and Google. This option will be available only when the admin has entered valid social login details in the module configuration.
If admin allows it, then one page checkout functionality will be available for guest users too.
Save Cart for Later Purchase Feature
If the user has logged in as a customer, he will have an option to save the product in the cart for later purchase.
When a user clicks on the login button, a popup appears on the page where he needs to enter email id and password to log into his account.


On clicking the edit button, address fields appear in the dropdown to update the address on the checkout page.

This module is now compatible with our Prestashop Marketplace Cart And Order Split module.
Now, if customers add products of different sellers in a single cart then they can select desired shipping methods for various seller products on the checkout page.

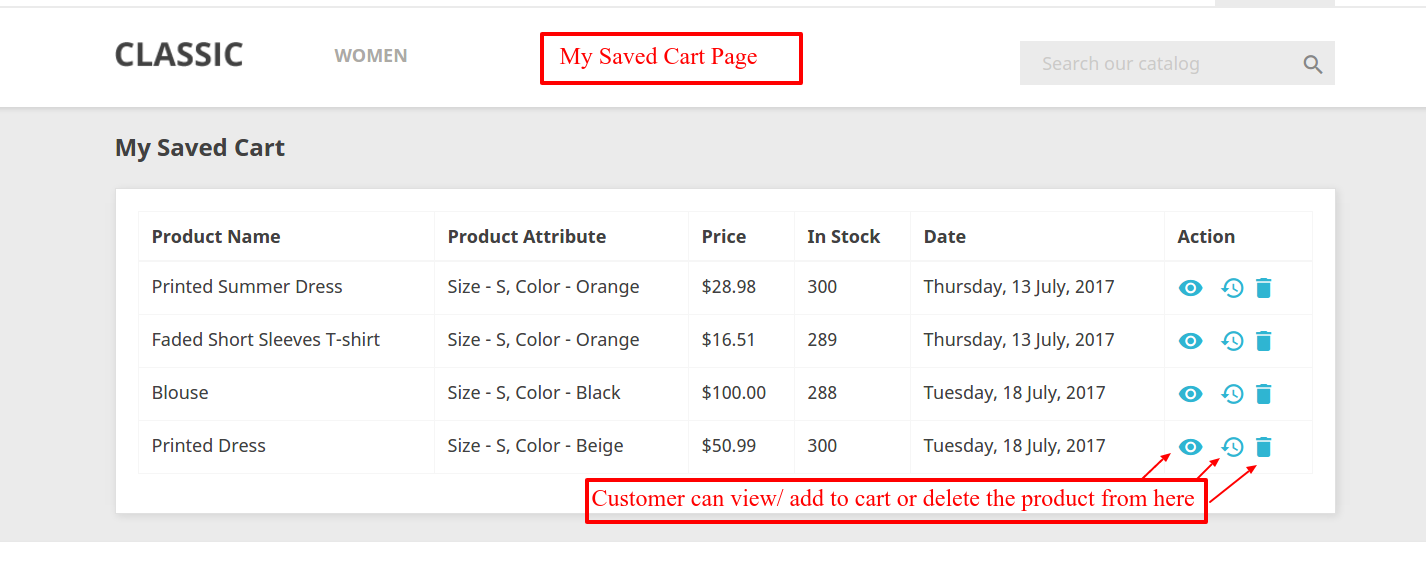
The customers can view all their saved carts under “My saved cart” from ‘My account’ page.

Under “My Saved Cart”, a customer can see all the products which are saved for later purchase from One page Checkout.
- They can view the product from “My Saved Cart” page.
- Customers can add the product to the cart from here itself, whenever they want to purchase it.
- Customers can also delete the product from this list if they have changed their mind.
Also, display the saved cart list on the cart page based on the configuration

Display Reassurance Block on Checkout Page
Admin can enable/disable the display of reassurance block on the checkout page from the module configuration section.
If this option is enabled, customers will be able to view the reassurance block on the checkout page.

Display Also Bought Products on Checkout Page
We human beings generally lookout for trends & others opinion before doing anything.
This is a simple buying tendency that customers buy the products which have high rating or reviews.
You can make use of this to influence your customers to spend more on products from your store easily.
This can be done by displaying the related products.
This is based on what others have purchased along with the products they have added in the cart.
And when they are in the mood to buy, a glimpse of related popular products is all they need to shell out more money. 😉

Grab this module and unlock its various other features and functionalities.
This was all about Prestashop One Page Checkout Module. I hope this document will help you in checking the functionality of the module in a better way.
Do let us know about your views in comments.
Support
For any kind of technical assistance or query, please raise a ticket or send us a mail at [email protected].
Also, please explore our Prestashop development services and vast range of quality Prestashop addons.
Current Product Version - 4.3.4
Supported Framework Version - 9.x.x, 8.x.x, 1.7.x.x

2 comments
You can check the demo for Prestashop 1.7 here : https://prestashopdemo.webkul.com/?module=wkonepagecheckout
For any queries regarding the module, please raise a ticket at http://support.webkul.com/
Best Regards,
Mehul Gupta