PrestaShop Multi-Warehouse Advanced Stock Management: Easily create multiple warehouses and manage stocks for them.
The extension enables you to distribute your inventory among multiple locations.
Add incoming shipments, internally move products inside the warehouse, and create delivery orders for the customers.
Note: PrestaShop Multi-Warehouse Advanced Stock Management is compatible with PrestaShop multi-store feature.
Features of PrestaShop Multi-Warehouse Advanced Stock Management
- Create multiple warehouses for managing the stock.
- Assign products to the warehouse in bulk or one by one.
- Add multiple locations for the warehouse.
- Create and manage incoming shipments for the suppliers.
- Option to split the incoming shipment.
- Create an internal transfer to move the products at a particular location inside the warehouse.
- Option to split the transfer.
- Create delivery orders for the existing customers.
- Change the location for Delivery and Incoming shipment order.
- Select multiple products and their quantity for which you want to create the delivery order.
- View and update the status of delivery orders from the back office.
- View products assigned to a particular warehouse.
- Admin can view at which location of the warehouse the products are assigned.
- Set the prefix for the warehouse.
- Specify the number from where the next warehouse identification number will begin.
- Add current year & month to the warehouse identification number.
- Enable, disable, or edit the warehouse details.
- Select the default destination location in the warehouse for the incoming shipment.
- Specify the order name prefix for incoming shipment.
- Set the incoming shipment order number from where the next shipment order will begin.
- Add current year and month to the incoming shipment order.
- View and update the status of delivery orders from the back office.
- Split the delivery order.
- Force validate the delivery order.
- Configure the order status for the creation of the delivery order.
- Select the default source location to be assigned to the delivery order upon its creation.
- View and update the internal transfer status.
- Set the prefix of delivery order name.
- Choose to add current year & month to the delivery order name.
- Enter the order number from where you want to start the delivery orders.
- Download the PDF of delivery order.
- Option to add the tracking URL of the delivery order.
How to Install PrestaShop Multi-Warehouse Advanced Stock Management
- Firstly, go to the module manager in the back office and click on ‘upload a module’.
- After that, drag and drop the module file or select the file from the system.
- In this way, the module installation will be successful.


How to Configure PrestaShop Multi-Warehouse Advanced Stock Management
After the successful installation of the module, the admin can proceed to configure it.
General Settings
The general settings divides into three sections:
- Delivery order settings
- Incoming shipment settings
- Warehouse identification number settings
Let’s discuss each of these sections one by one.
Delivery order settings

- Order Status: Select the order status on which you want to create the delivery order.
- Select default source location: In this field, you need to select the source location you want to assign to the delivery order once it gets created.
- Order name prefix: Enter the prefix for the order delivery name.
- Order number: Enter the number from where you want to start the orders. Set it to “0” to start it from 1.
- Add current year to order name: Enable this field to add current year to the order name. (For example 2021, 2022 etc).
- Add current month to order name: Enable this field to add current month to the order name. (For example 01 for January, 02 for February & so on).
Incoming Shipment Settings

- Order name prefix: Enter the prefix for the incoming shipment.
- Order number: The next incoming shipment will begin with the number specified by admin in this field and then increase with each additional order.
- Add current year to order name: If enabled, then current year will be added to the incoming shipment. (For example 2021, 2022 etc).
- Add current month to order name: Enable to add current month to the incoming shipment. (For example 01 for January, 02 for February & so on).
- Select default destination location: In this field, you need to select the default destination location you want to assign to the incoming shipment once it gets created.
- Select Purchase Order Status: Select the order status on which you want to create the incoming shipment in the warehouse.
Warehouse Identification Settings

- Prefix: Enter prefix for the warehouse identification number.
- Number: The next warehouse identification number will begin with number specified by admin in this field and then increase with each additional warehouse. Set it to “0” if you want to keep the number 2 for the next warehouse.
- Add current year: Enable to add current year to the warehouse. (For example 2021, 2022 etc).
- Add current month: Enable to add current month to the warehouse. (For example 01 for January, 02 for February & so on).
After the installation of the module few tabs get available under Warehouse in the PrestaShop back office.
From these tabs, the admin can add and manage warehouses and their locations, incoming shipments, internal transfers, and delivery orders.

Warehouses
After the installation of the module, a warehouse along with its 3 locations (1 physical and 2 virtual) gets added by default.

Admin can edit the warehouse’s details by clicking on the edit button.

On the edit warehouse page, the admin can:
- Update the warehouse’s name & address
- Enable or disable it
- Change the supplier virtual, customer virtual, and storage location.
Kindly note, that if the products are available in the warehouse, then the admin cannot delete the warehouse.
Admin can add a new warehouse by clicking on the Add new warehouse button.
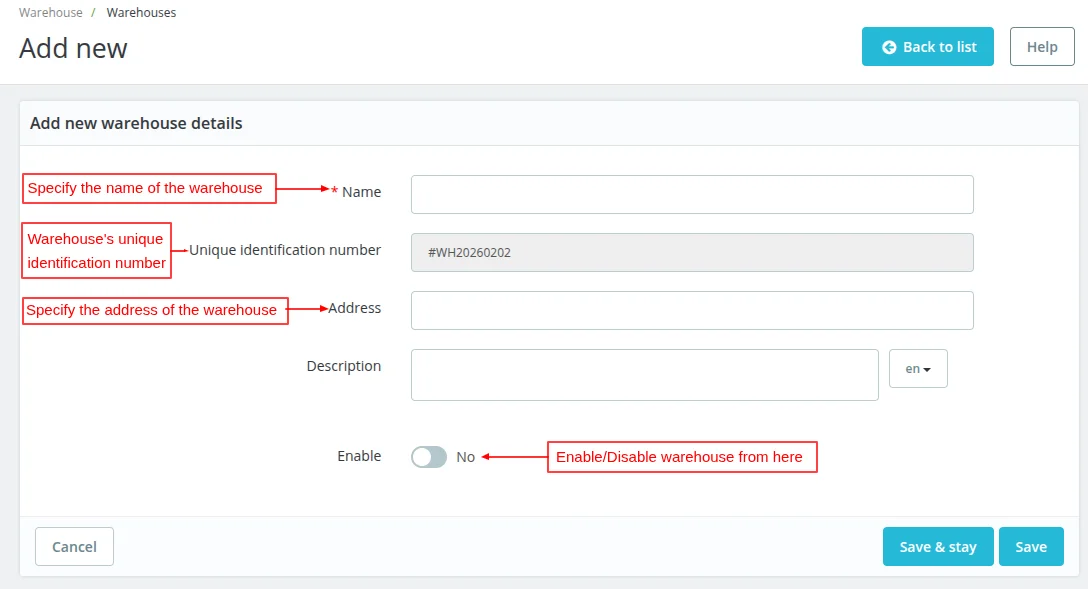
After adding the warehouse, the admin can view it under the Warehouses tab.

Assign Products to Warehouse
After the installation of the module, you can assign products to the warehouse from the catalog section. Click on the products tab under catalog.
Admin can assign individual or multiple products to the warehouse.

Under the products list, the admin can select the products he wants to assign to the warehouse. After selecting the warehouse, click on Assign to Warehouse option under Bulk actions.
On clicking Assign to Warehouse, a popup appears on the page where the admin can view the location name to which the products will be assigned.
The products are assigned to the default destination location selected by the admin from the module configuration. Also, admin can change the default destination location.

After assigning the products, the admin can view them by clicking on the View Products button.

Under Warehouse, the admin can add a new location for the warehouse by clicking on Add new location button.
Also, the admin can view the locations for a particular product by clicking on the View Locations button.
Kindly note, that the product’s current quantities are assigned to the default destination location. After that, the admin can manage the product quantities in warehouse locations only.
For example, if the admin assigns 100 quantities of product A to the warehouse.
Now, if the admin updates the product quantity to 120 in PrestaShop, then the product quantity in the warehouse will remain 100 only.

Statuses
Under this tab, the admin can view a list of all the pre-defined statuses added for delivery order, incoming shipment, and internal transfer after the installation of the module.

Locations
As mentioned earlier in the blog, whenever the admin adds a new warehouse, 3 locations gets add by default, One physical location and two virtual locations.

Under Location, the admin can view a list of all the locations of a particular warehouse. A column “Virtual” is provided that helps the admin identify whether the location is physical or virtual.
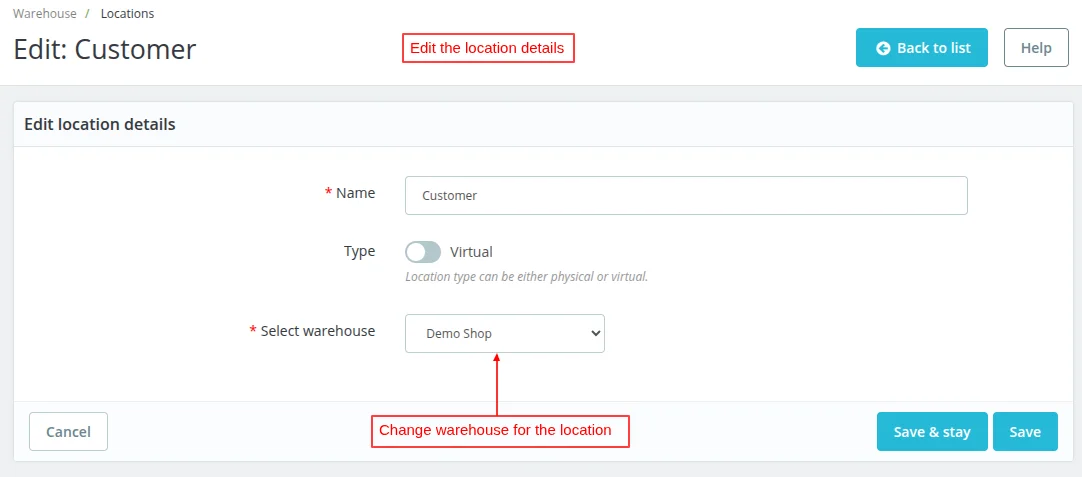
Also, the admin can edit or delete the location.
If the admin deletes a customer or supplier virtual location of a warehouse for which locations are used as default source or destination location.
Then a message will appear on the page as shown in the below screenshot.

Add New Location
Admin can add a new location for the warehouse by clicking on the “Add new” button.
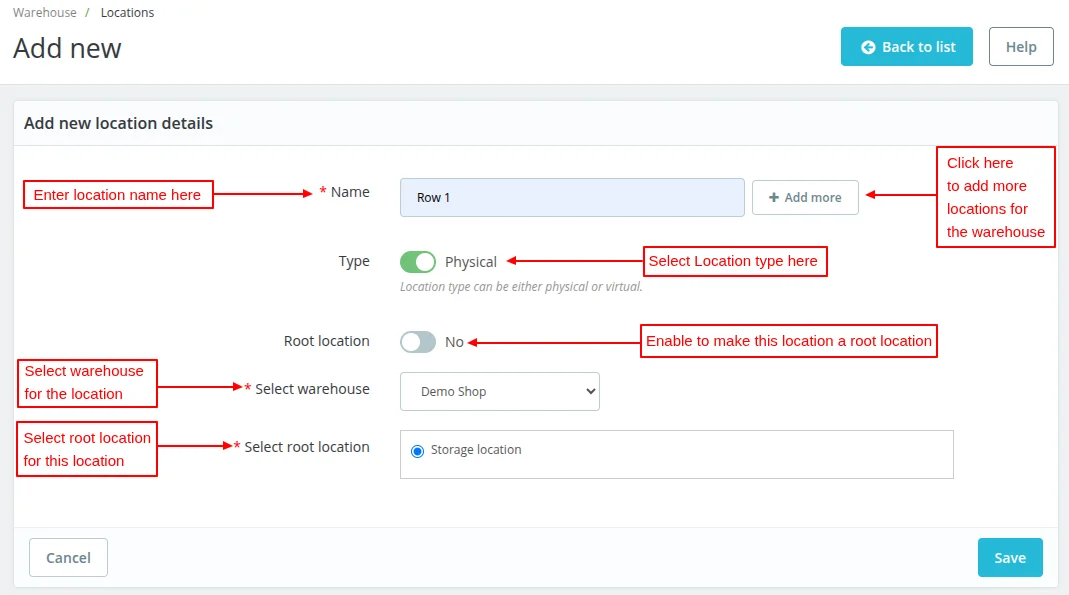
On clicking the Add new button, a form appears with the following options:
- Name: Enter the location name here.
- Type: Select the location type as physical or virtual.
- Root location: Enable the field to make the location as the root location.
- Select warehouse: In this field, admin needs to select the warehouse for which he want to add the location.
- Select root location: Select root location for this location.
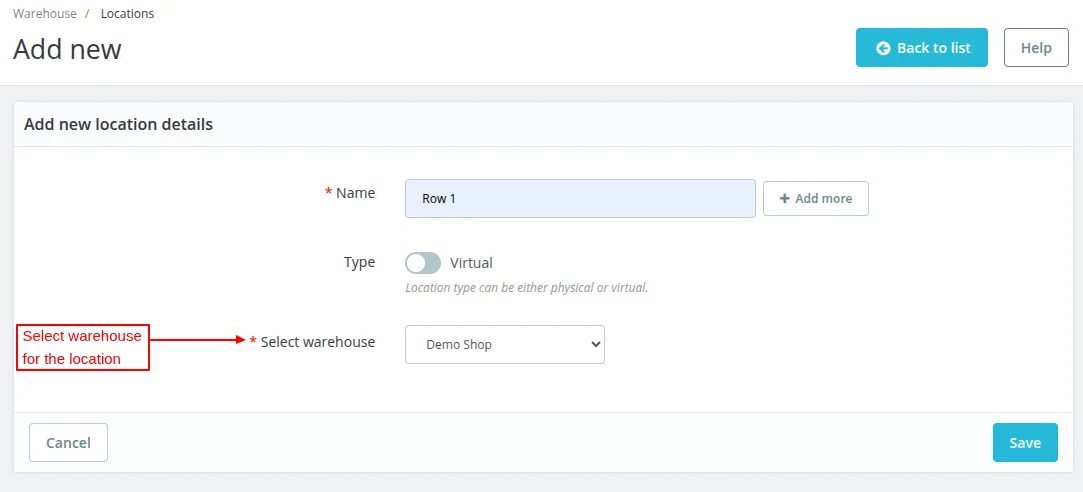
If the location type is selected as virtual, then the admin needs to select only the warehouse for the location as root location is not required in the case of virtual location.
While adding a new location, the admin can make the location the root location.
The admin can view the sub-locations by clicking on the View button.

As we know, there are 3 locations for every warehouse in the PrestaShop. If the admin deletes one of these locations by mistake, then he can create the location and associate it with the warehouse.


Kindly note, if the products are assigned to a location or sub-location, then the admin cannot delete it.
Incoming Shipments
Under Incoming Shipments, the admin can create and manage the orders placed to the supplier.

Admin can add a new incoming shipment by clicking on the “Add new” button.

For creating an incoming shipment, the admin needs to select the location, supplier and add the products for which he wants to place the order.
After selecting the supplier and adding the product that belongs to the selected supplier, when the admin clicks on the save & stay button, the order gets saved as a draft.

Once saved, the admin can view it under Incoming Shipments.

Once saved, a new button Place order gets available by clicking on which the admin can place the order.

On clicking the place order button, the status of incoming shipment changes from Draft to New. Also, some fields and options are added to the page. These options/fields are:
- Option to update the status of an order.
- Download the PDF of an order.
- Option to upload the invoice provided by supplier for future reference.
- An option to add the tracking URL of the order.
- Option to split the order.
- Details of the ordered product, their quantity, unit price & the total price

Split Order
When the admin clicks on the Split order button, a popup appears on the page where the admin can view the name, attributes, and quantity of products ordered.
The admin can set the quantity of products he wants to be delivered and receive the delivery of the remaining products later.

The split order will create as linked order as shown in the below screenshot.

The ordered quantity for the customizable mug is 25 and that for the hummingbird notebook is 55.
Currently, the available quantity of these products in the Warehouse is as follows:
- Customizable mug – 300
- Hummingbird notebook – 1200

Once the order status changes to received, the quantity of products gets automatically update in the default destination location.
When the admin changes the status to received and clicks on the update status button, a popup appears on the page asking the admin whether he wants to split the order before it is received.

Admin can click on the ok button if he wants to split the order. On clicking the Ok button, the order status is marked as received and order will be splitted.
If the admin clicks on the cancel button, then the order status changes to Received, and the quantity of products will update in the warehouse.

After the installation of the module, a new field “Email” gets available on the supplier page.
If admin has specified the supplier’s email id, then an email is sent to the supplier on incoming shipment creation.
NOTE
Kindly note, that this module is compatible with the PrestaShop Purchase Order Management module.
On installing this module, a new field “Select purchase order status” gets available under Incoming Shipment Settings on the Configuration page.

This option enables the admin to select the order status for the automatic creation of incoming shipment. The status of incoming shipment created automatically will be New.
Internal Transfers
Once the products have arrived in the warehouse, the admin can internally move them inside the warehouse from the Internal Transfers tab.

The admin can add internal transfer by clicking on Add new button.
Admin needs to search for the product he wants to move internally.

On clicking the search button, the admin can view the warehouse name to which he assigns the product and its location.

Admin can move the products internally by clicking on the Move button.
On clicking the button, a popup appears on the page where the admin needs to specify the quantity and location where he wants to move the products.

After selecting the quantity & location and clicking on the save button, the internal transfer will create with draft status.

When the admin clicks on the place order button, the status changes from the draft to new. Some options get available to manage the internal transfer of products.
Also, the admin can view product details and its location.

Split Transfer
When the admin clicks on the Split transfer button, a popup appears on the page where the admin can view the name, attribute, and quantity of products to transfer internally.
The admin can set the quantity of products he wants to transfer. Admin can transfer the remaining quantity later.

The split transfer will create as linked order as shown in the below screenshot.

Check Inventory
This option lets the admin check whether the quantity he is about to transfer is available at the source location or not.
On clicking the check inventory button, the status of internal transfer changes to Ready to Fulfill.

When the admin changes the status to fulfilled and clicks on the update status button.

On clicking the cancel button, the internal transfer status changes to fulfilled, and the quantity of products will move to the location.


Admin can also move product quantities from one location of the warehouse to another warehouse’s location
Delivery orders
Under the Delivery Orders tab, the admin can create delivery orders for the customers.

Admin can create a new delivery order by clicking on the Add new button.

On clicking the Add new button, a form appears with the following options:
- Customer: In this field, the admin has to select the customer for whom he wants to create a delivery order.
- Products: Here admin can select the products assigned to the warehouses and their quantities he wants to order.

After clicking on the save button, the delivery order will save as a draft.


On clicking the place order button, the delivery order status changes from draft to New. The following fields and options get available on the page.
- Option to update the status of delivery order.
- Download the PDF of delivery order.
- An option to add the tracking URL of the delivery order.
- Option to split the delivery order.
Also, the admin can view the products for which he has created the delivery order.

Check Inventory
Suppose the available and in hand quantity of Hummingbird notebook is 205.

Now, if the admin receives a delivery order for 10 quantity and clicks on the check inventory button, then 10 quantity of the product gets reserve.
The available quantity now will be 195 and in hand quantity 205.

On clicking the check inventory button, the delivery order status changes from New to Ready to Fulfill.

When the admin clicks on the Split order button, a popup appears on the page where the admin can view the name, attributes, and quantity of products ordered.
The admin can set the quantity of products he can deliver. Admin can deliver the remaining quantity later.

Split Order
The split order will create as linked order as shown in the below screenshot.

When the admin updates the order status to fulfilled, a popup appears on the page asking the admin whether he wants to split the order before fulfillment.

Admin can click on the OK button if he wants to split the order.
On clicking this cancel button, the order status changes to fulfilled, and now the admin cannot update the status or split the order.

When a customer places an order from the front office, a delivery order will automatically create when the order status reaches the status set for the creation of the delivery order.

Force Validate
Suppose the admin has placed a delivery order for 10 quantities of hummingbird printed t-shirt (Color – White, Size – S). The available quantity at the location is 5.
Now, if the admin clicks on check inventory, a warning message will display on the page as shown in the below screenshot.

If the admin feels he can arrange the remaining quantity, then he can click on the Force Validate button and fulfill the order.
On clicking force validate, a message will display on the page as shown in the below screenshot.

On clicking the Ok button, the order gets fulfilled and a negative quantity of unavailable products gets created at the location.

When a delivery order is created automatically, the status of that delivery order will be new.
“Kindly note, the admin can delete the incoming shipment, internal transfer, or delivery order in the draft stage only.”
This was all about Prestashop Multi-Warehouse Advanced Stock Management Module. I hope this document will help you in checking the functionality of the module in a better way.
Also, do let us know about your views in the comments.
Support
For any kind of technical assistance or query, please raise a ticket or send us a mail at [email protected]
Also, please explore our Prestashop development services and vast range of quality Prestashop addons.
Current Product Version - 4.0.3
Supported Framework Version - 9.x.x, 8.x.x, 1.7.x.x

Be the first to comment.