PrestaShop Marketplace Sponsored Products module allows sellers of the marketplace to do paid advertisements of products on the store.
Before we get to know how this could be done, let’s see why this is important?
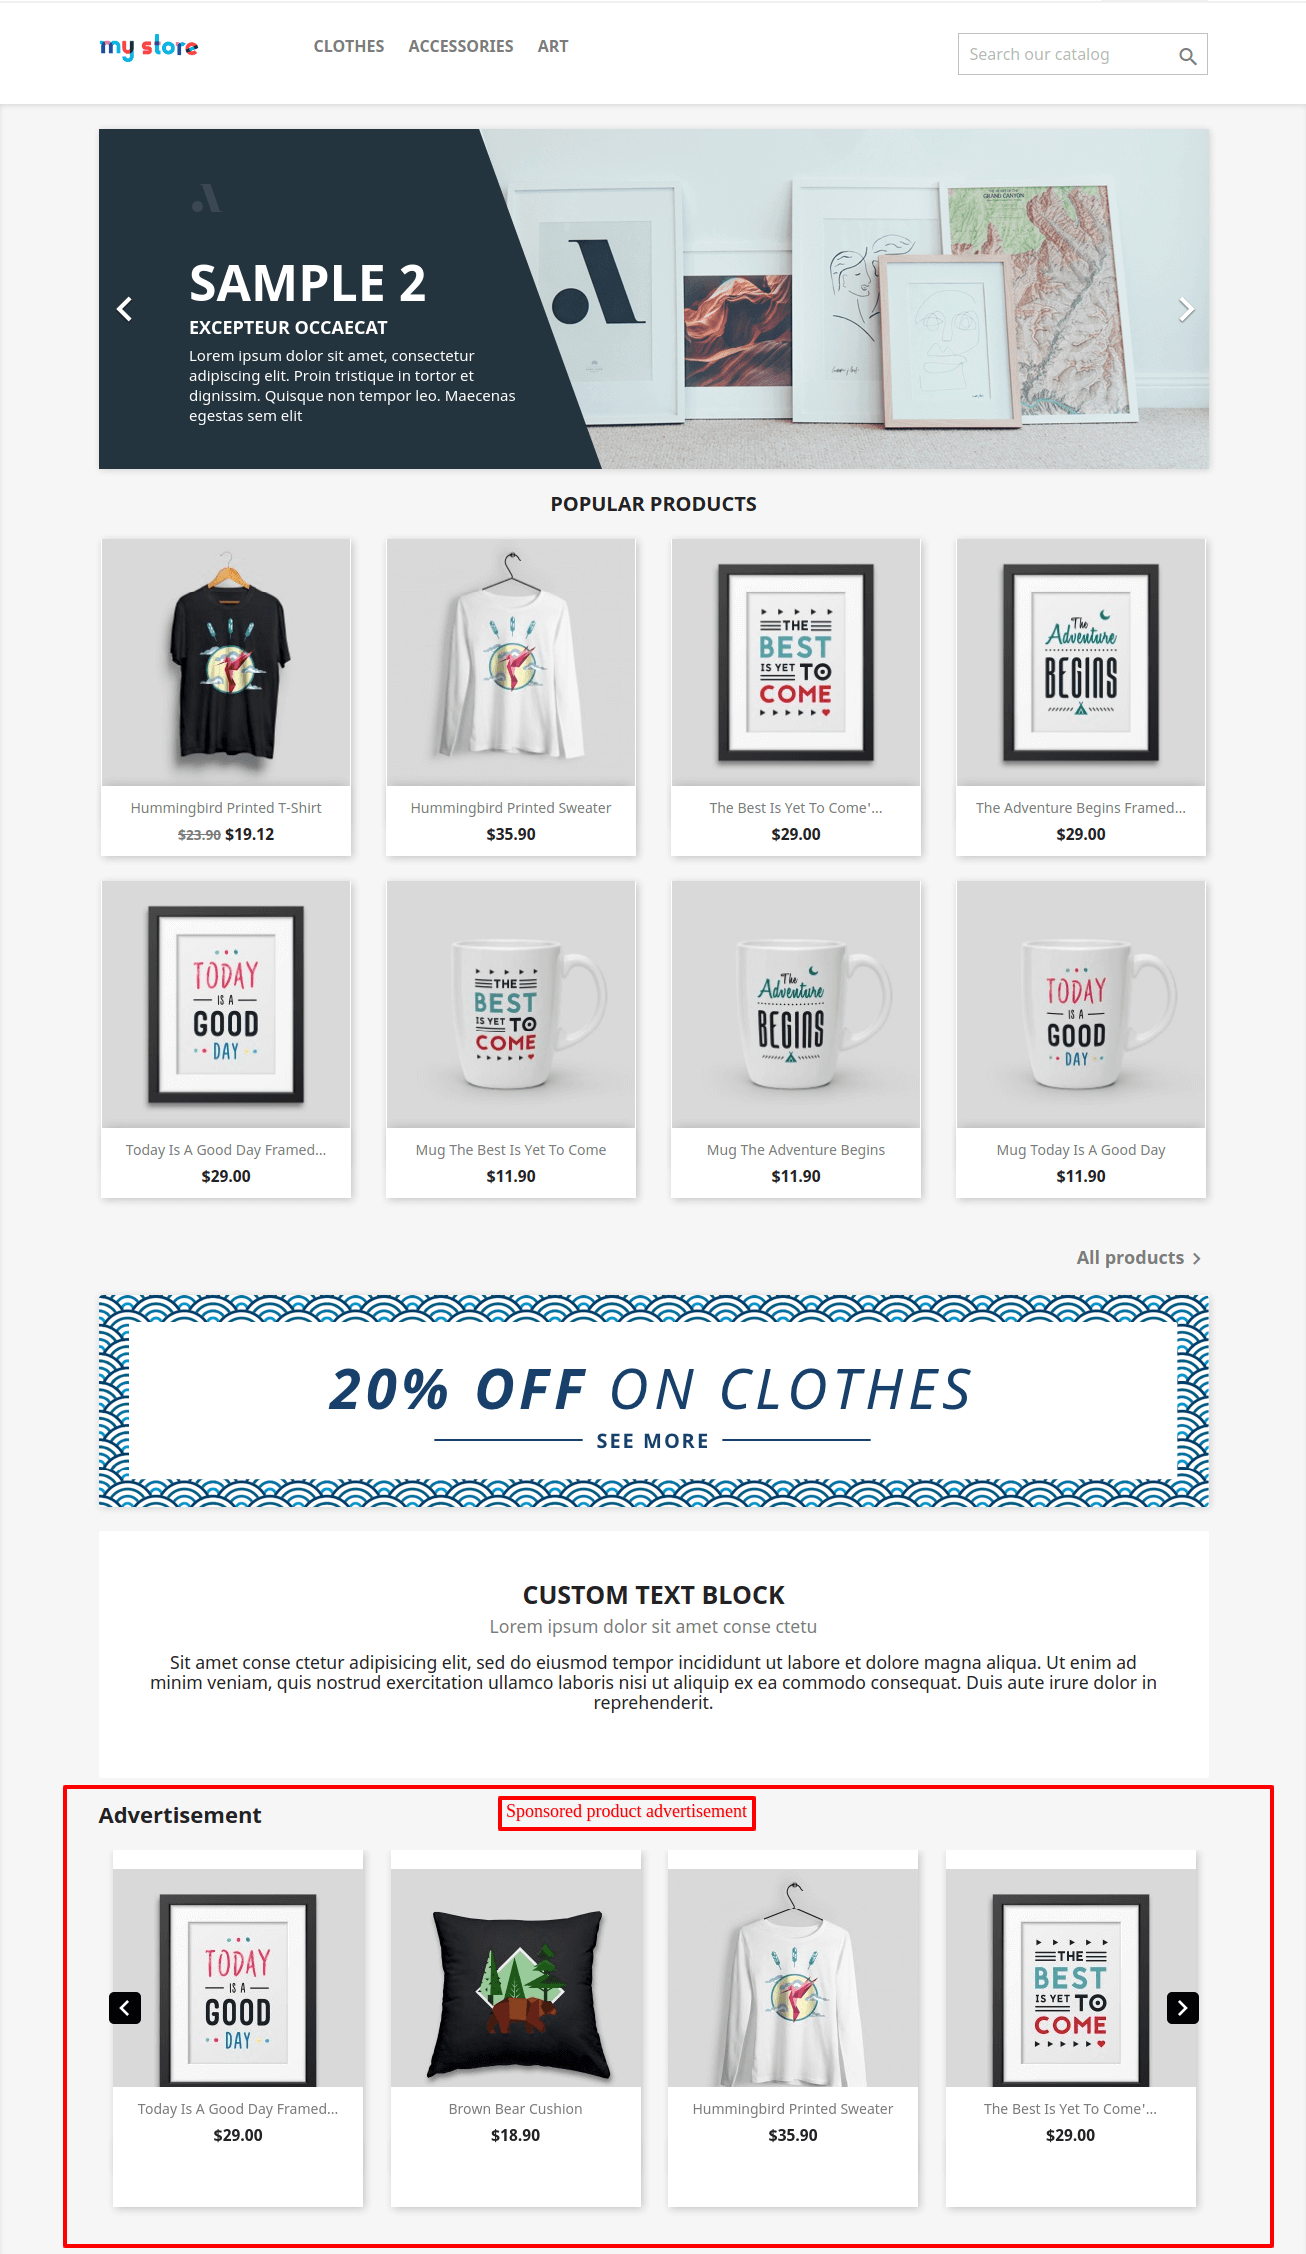
Sponsored products are generally displayed in a separate section of the store. Thus, making it more visible to potential clients.
Visibility plays a kind of an important role in the sale of the product. If the products that you want to sell is not adequately visible, how would a customer buy them?
Thus, it becomes very important to make use of paid sponsorship plans (if the store offers them) to make the product more visible.
Offering such plans to sellers of the marketplace is very beneficial for store admin too. This gives them another income generation channel.
Along with that, it also provides an equitable chance for every seller to promote their products from the promotional section.
Features of the PrestaShop Marketplace Sponsored Products module
- Allow sellers to sponsor the products on the store.
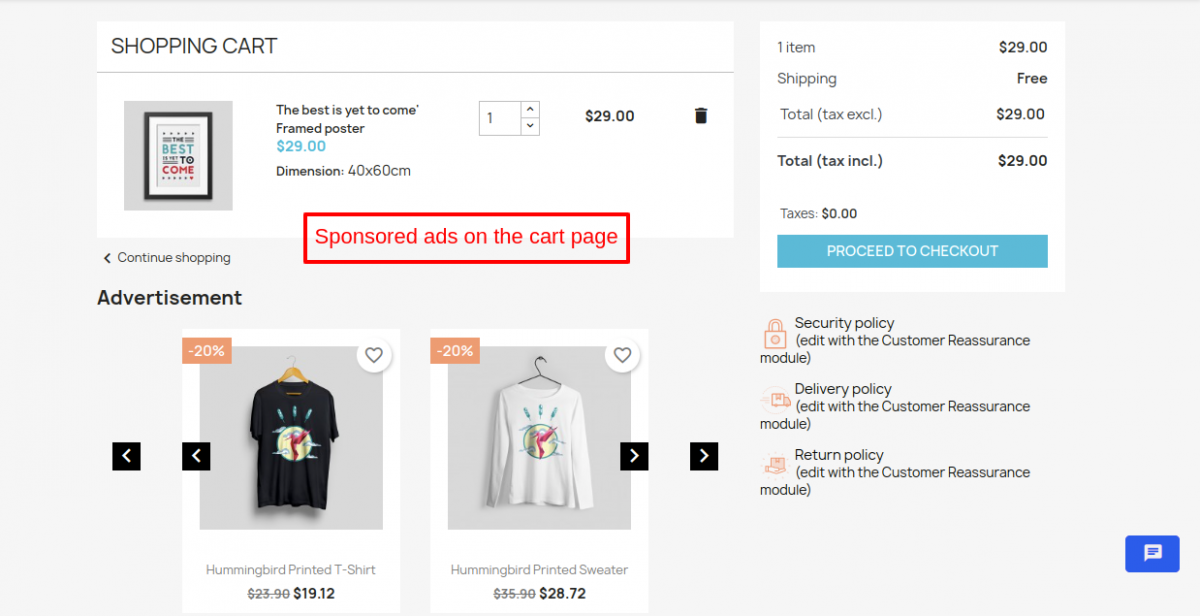
- Let sellers display sponsored products under advertisement section.
- Choose to show the advertisement on multiple pages of the shop.
- Let sellers buy clicks for the products.
- Assign clicks to products.
- Products will display under advertisement until the clicks for the product is remaining.
- Create multiple click ranges & define price for each click range.
- Show products under advertisement either in list mode or grid mode.
- Upload an image to show for advertisement plan.
- Select the pages to show the advertisement plan.
- Select the orders statuses on which seller sponsorship plan will activate.
- Also, choose to add/assign clicks to seller from the backend.
- Details of the remaining clicks to assign on a product is available on the seller as well as admin end.
- The details of remaining click for each product & product sold via advertisement is also available on the seller as well as admin end.
- Details of all the sponsorship plans active for each seller is available under “Sponsorship Plan” tab.
NOTE:
Prestashop Marketplace Sponsored Products module is Multi-Shop Compatible with PrestaShop Advanced Multi-Vendor Marketplace version 5.4.0/3.4.0 and above.
How to install the PrestaShop Marketplace Sponsored Products module
In order to install the module, you need to install the PrestaShop Advanced Multi-Vendor Marketplace module first.
After installing the marketplace module, you can now proceed to install the PrestaShop Marketplace Sponsored Products module.
- Firstly, go to the module manager in the back office and click on ‘upload a module’.
- After that, drag and drop the module file or select the file from the system.
- In this way, the module installation will be successful.


How to configure the PrestaShop Marketplace Sponsored Products module
After the successful installation of the module, an admin needs to configure the module.
In the configuration settings, there are basically three sections. We’ll see each option in every section one by one.
Sponsored Product Settings
- Advertisement Plan Image: Upload the image that you want to set as advertisement plan image.
- Show Price Range Table: Enable the option to show the price range table to the sellers. The price range table shows the price of the number of clicks to sellers. So, that they can accordingly decide to purchase clicks.
- Price Range Table: Add the ranges & define the price for each range individually.
- Price for Out of Range Clicks Value: Enter the price for the number of clicks that is out of range. Let’s understand this with example.
Say, you added the following clicks range.
The click range between 10 to 50 will cost $100 whereas the clicks 51 to 100 will cost $200 to a seller.
Suppose a seller comes & tries to buy 101 clicks. Then, he/she will need to pay $250 cause the price for out of range clicks is $250.
Note: For any value which is out of range, the seller will pay the out of range price. It doesn’t matter that clicks are out of range by 5 clicks or 500 clicks.

Advertisement Settings
- Per Seller Products to Show: Enter the number of products that you want to show for each seller.
- Advertisement Title: Enter the title of advertisement.
- Advertisement Title Alignment: Align the advertisement title to left, middle or right.
- Pages to Show Advertisement: Select the pages on which you want to show the sponsored product advertisement.
- Advertisement View: Choose to show the sponsored product advertisement either in list view or grid view.
- Autorun Slider: Enable to keep the slider running.
- Slider Navigation Button Background Colour: Select the colour of the slider navigation button.
- Algorithm to Show Advertisement: Select the criteria to show the sponsored product advertisement.

Order State Settings
In this section, there is only one option. Here, you only need to select the order status on which the seller sponsorship plan will activate.
Let’s say you select the “Awaiting check payment” as the order state on which seller sponsorship plan will activate.
Now, the seller places the order for a sponsorship plan(clicks). And, as soon as the order status updates to the above order state, the plan will automatically activate.

Add/Manage Sponsorship Plan
After the installation of the module, a new tab adds to the seller dashboard.
This tab helps sellers to manage their sponsorship plan details.

After clicking on the tab, a seller will land on the following page. Here, a seller needs to purchase clicks in order to sponsor products through advertisement.
Now, a question arises that why a seller needs to buy clicks to sponsor a product?
The answer is very simple. Sponsorship is something that helps a seller to promote products & increase visibility.
And, if the products are visible throughout the store, they are more likely to be sold. So, in order to give an equal & fair chance to each seller, this “clicks” method is introduced.
The sellers need to buy the clicks because they need to provide those number of “clicks” to their customers to click on the sponsored products.
And, say if “clicks” get over then the product will not be visible anymore under sponsored product advertisement.
So, this was all about the concept of clicks.
Add/Buy Clicks(Sponsorship plans)
To add/purchase clicks, just enter the number of “clicks” & click on the “Buy Clicks“.
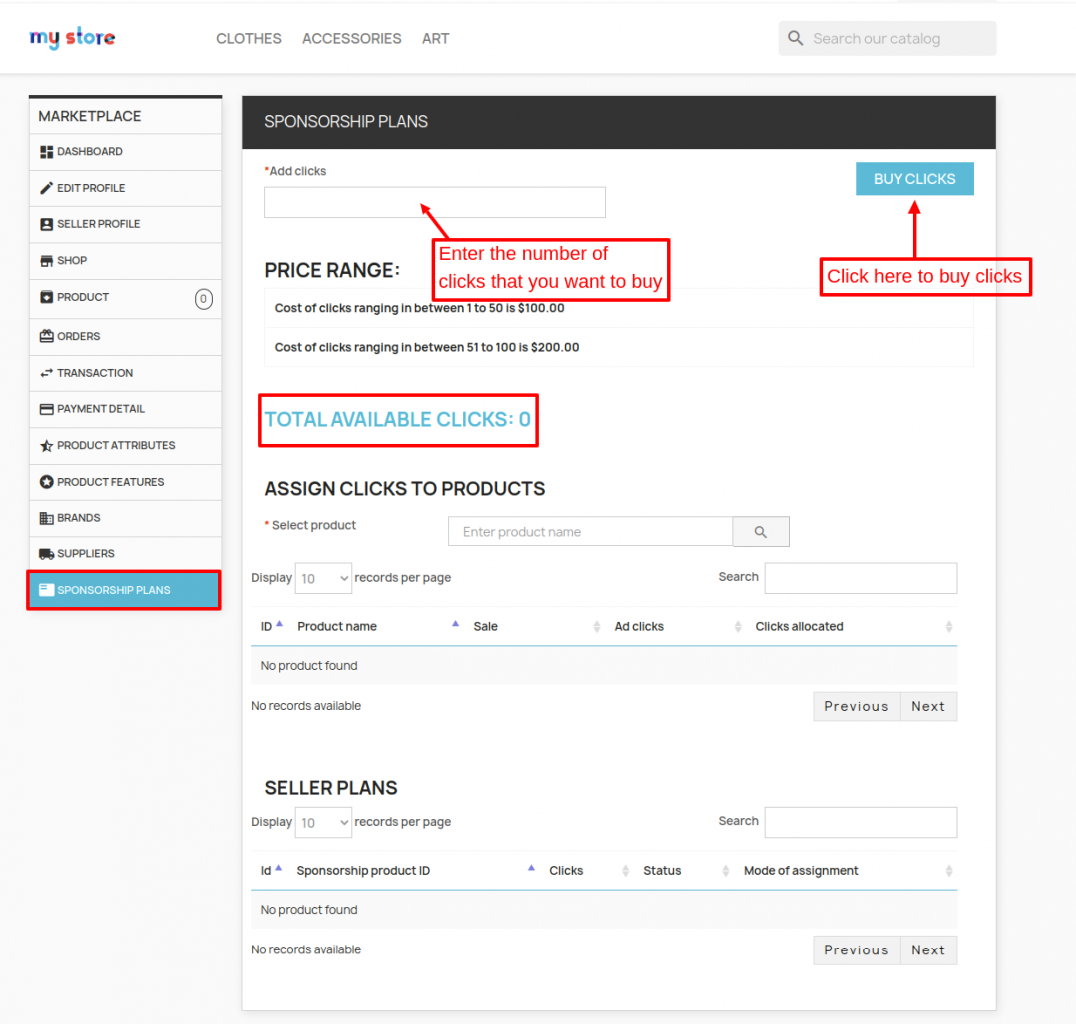

On clicking the “Buy Clicks” button, the customer will land on the checkout page directly. From here, the process is the same as ordering any product.

After making the payment successfully, “clicks” will list under the seller plans section.
The “clicks” are not added yet to the seller account as the order is still pending at the admin end.
Please note that the clicks add only after the order reaches a certain order state.
This certain order state to add clicks to the seller account is available to configure in the configuration setting.
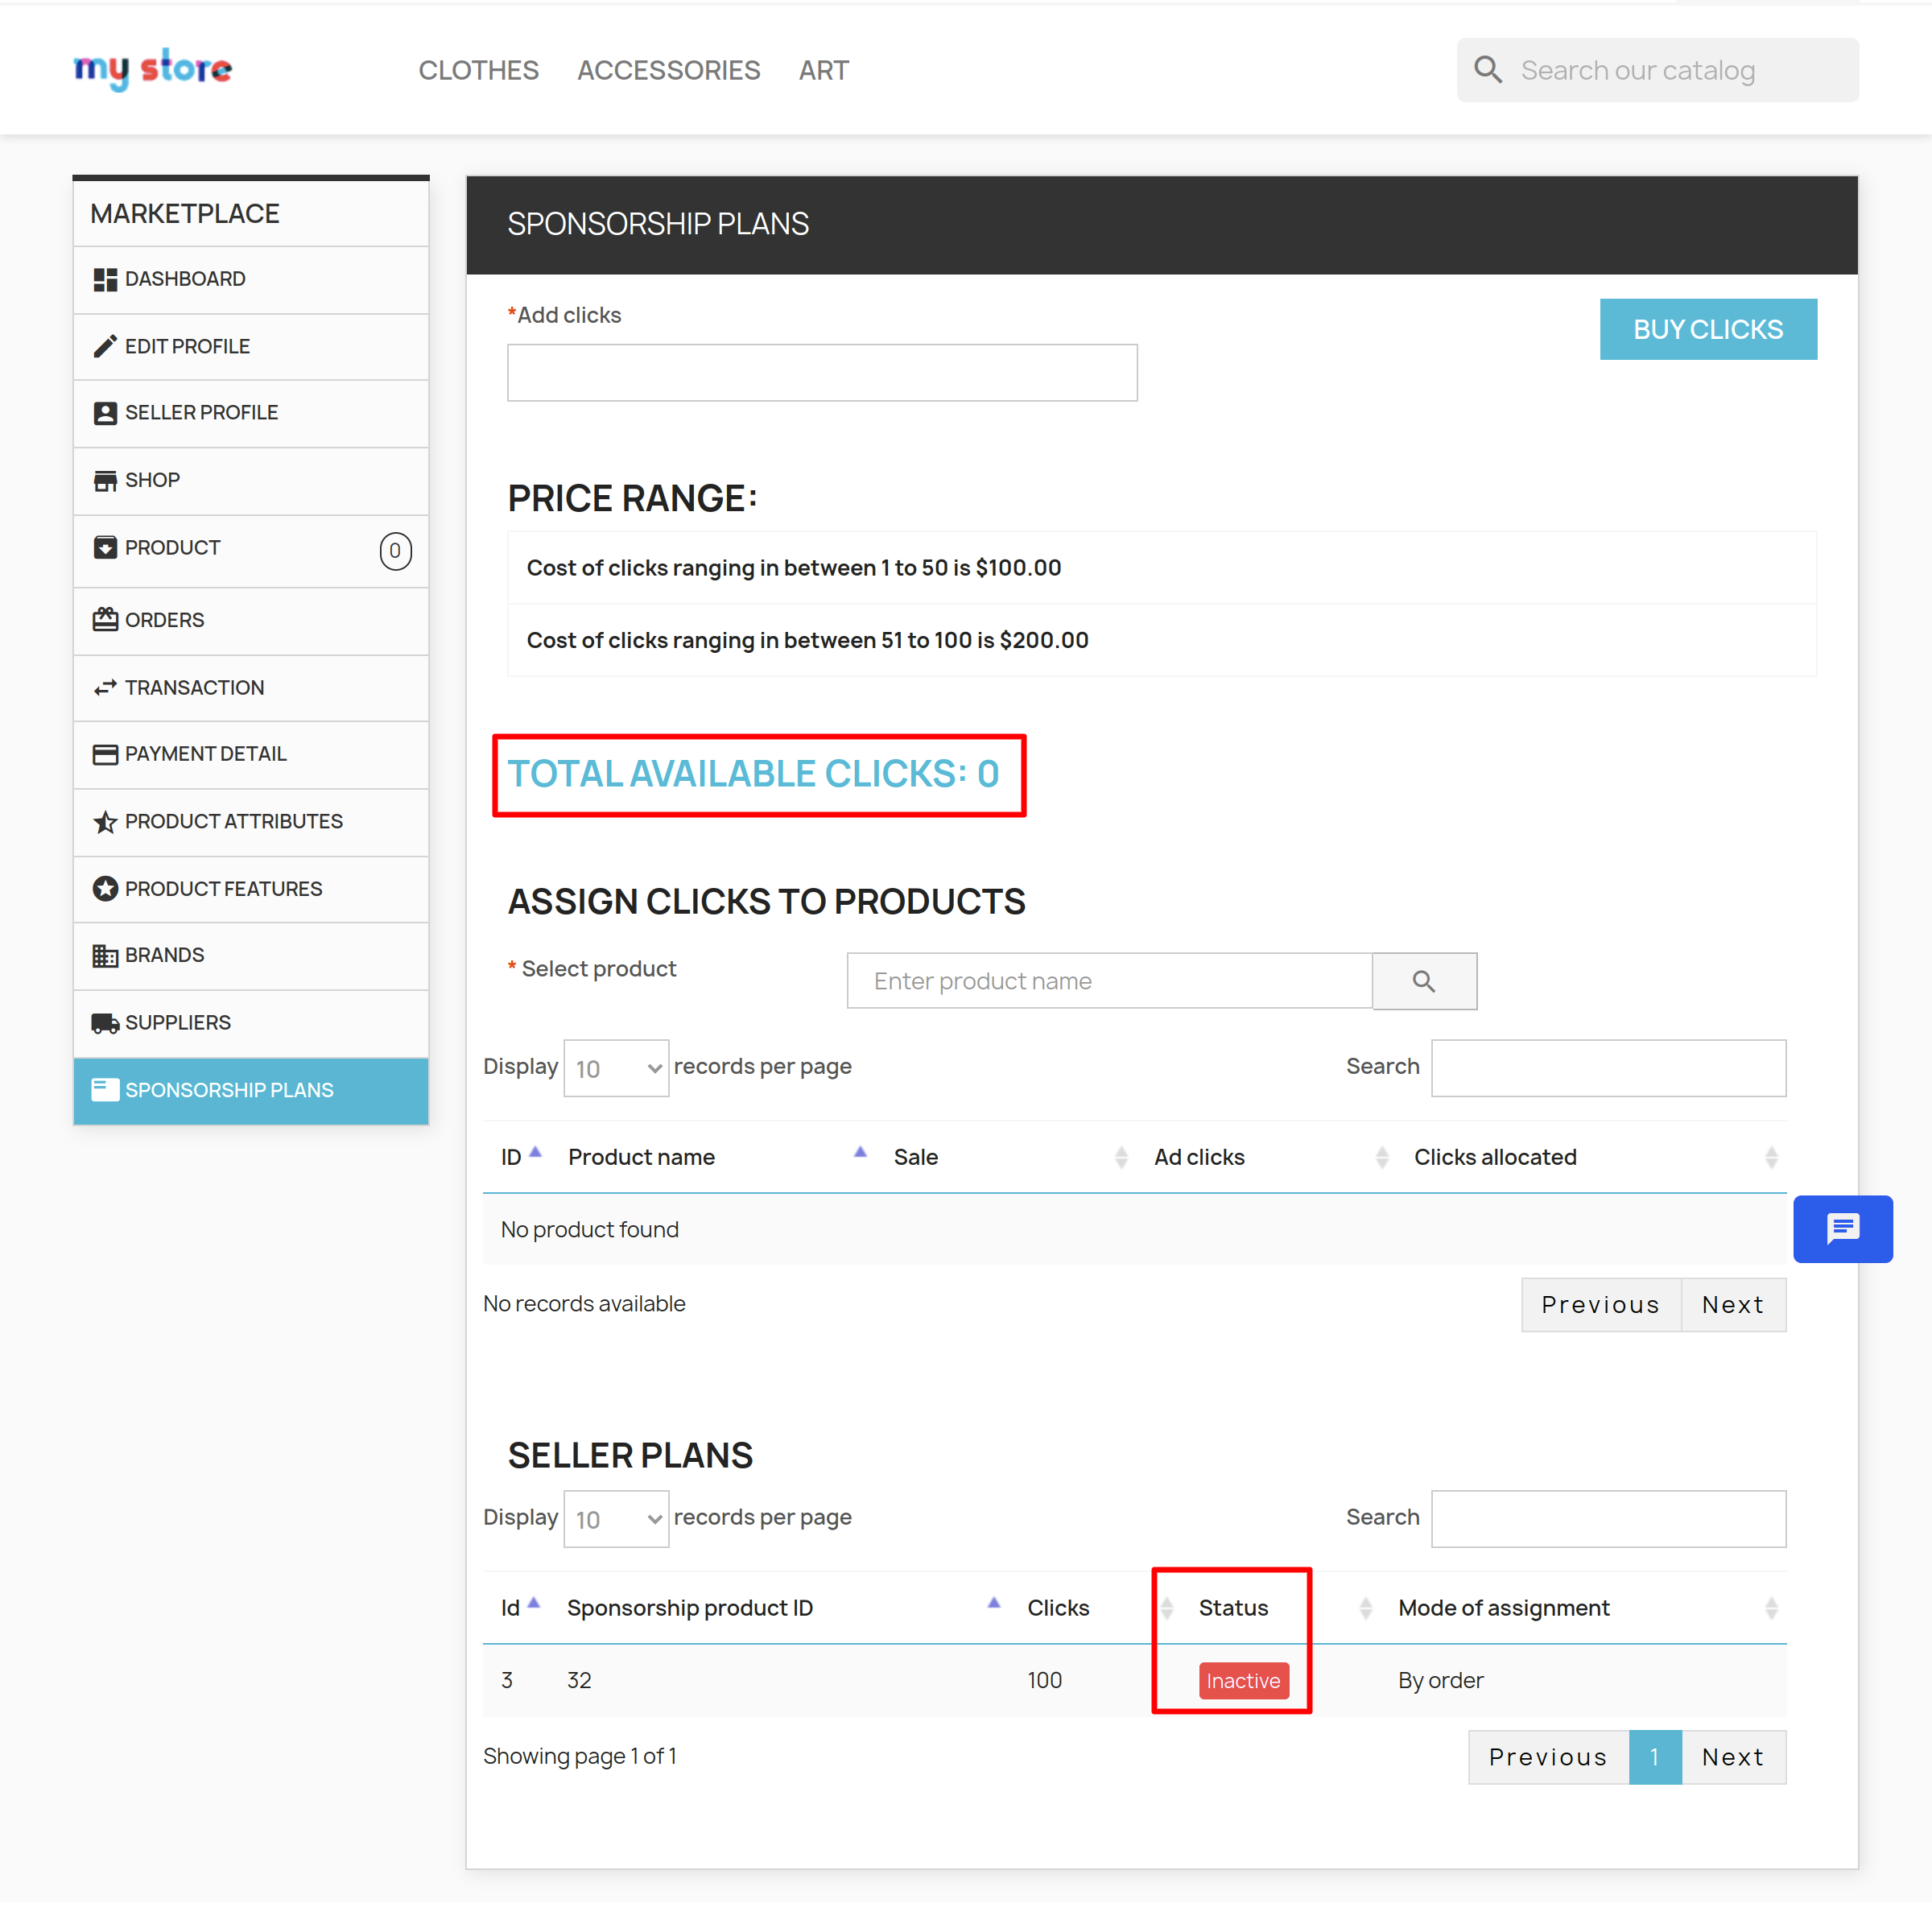
An admin has now confirmed the payment.

As you may notice, the clicks are now available under the seller account. And, the sponsorship plan is also active with details of “mode of assignment”.

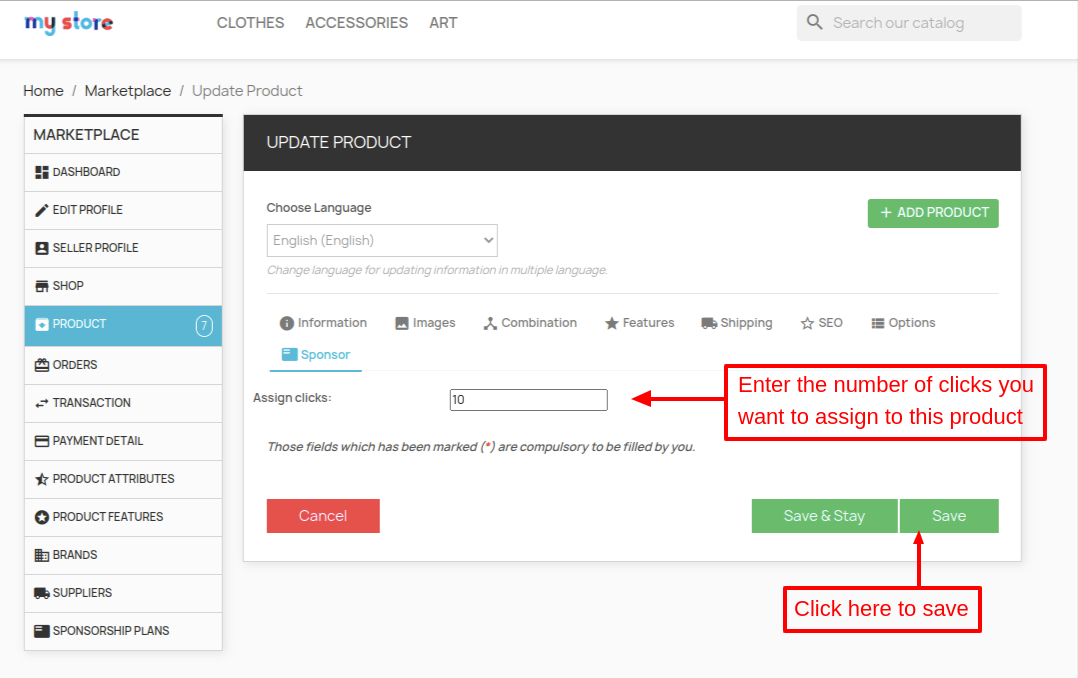
Assign Clicks to Products
To assign clicks to a product, just search the name & click on the product name that appears in the dropdown.
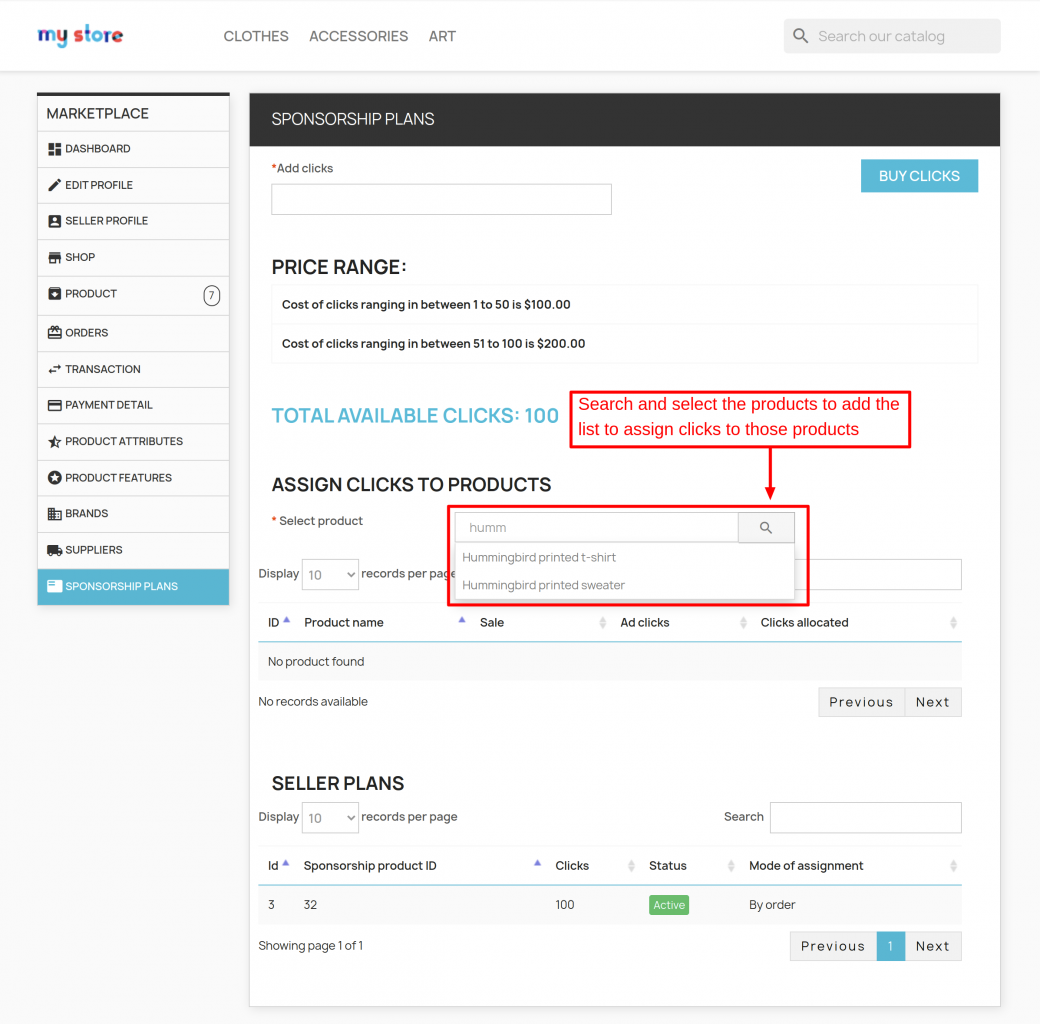
After clicking on the product name, they will start appearing just below the “select product” field. Now, just enter the number of clicks & it’ll be assigned to the product.

While adding/editing the product the seller can also assign clicks to the product. A new tab “Sponsor” will add to the product edit page.
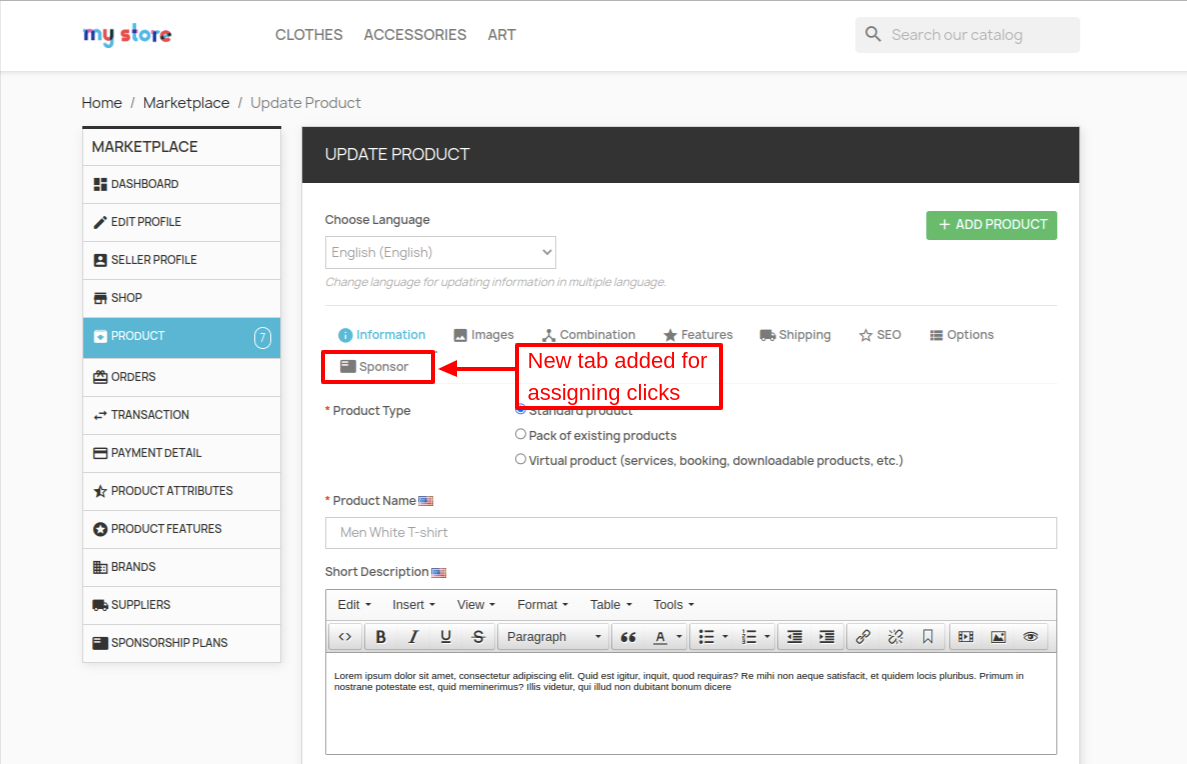
By clicking on the sponsor tab the seller will redirect to this page.
So, this was all about the process to add/buy clicks.
At the admin’s end
After the installation of the module, a new tab adds under the “Marketplace” tab.

Under “Sponsorship Plan“, a list of all the sponsorship plans that sellers bought or admin assigned are available.

After clicking on the plan, you can view the details of the sponsorship plan.

Moreover, an admin can also add a sponsorship plan to a seller from his/her end. To add a sponsorship plan for the seller, click on the “Assign clicks to seller“.
After clicking the button, an admin land on the following page. Here, just select the seller, enter the number of “clicks” & click on the “save” button.

On clicking the “save” button, clicks will be successfully assigned to a seller.

It’ll also appear under seller plans. And, the mode of the assignment will also be different i.e., “Admin Assigned” in this case.

The same details will also be available at the seller’s end. As you can notice in the image below.

How does sponsorship functionality work?
After assigning the clicks to a product, the products will become visible under advertisements.
Let’s see what happens when a customer buys a product from the advertisement section.


After successfully creating the order of a product from the advertisement section, the number of clicks will also update for the product.
Along with the update of clicks, the number of sales via clicks will also update. As you may notice in the image below.

The same will update on the admin’s end too.

So, this was all about the PrestaShop Marketplace Sponsored Products module. I hope this document will help you in checking the functionality of the module in a better way.
Also, do let us know about your views in the comments.
Support
For any kind of technical assistance or query, please raise a ticket at http://webkul.uvdesk.com or send us a mail at [email protected]
Also, please explore our PrestaShop development services & vast range of featureful PrestaShop Addons.
Current Product Version - 5.1.3
Supported Framework Version - 8.x.x, 1.7.x.x

Be the first to comment.