PrestaShop Private Shop module allows shop owners to provide access to the shop to only those customers who register on the website.
Additionally, this module also offers various options to customize the login as well as the customer registration page of the shop.
The module also allows the shop owners to make their shop private & restrict the users from accessing the store.
Although, registered customers are able to view the website content only after the approval of their dealership requests.
There are various options to make either the full website private or certain sections of the shop private.
Also, a shop owner can add(whitelist) some countries as well as the IP addresses for which the shop will not be private.
You can also choose the user groups (i.e., customer, guest & visitor) for which the shop will not be private.
It simply means the users of those countries or with certain IP addresses will be able to view the website content easily.
Features of the PrestaShop Private Shop module
- Show or hide the dealership message on the login & signup page.
- Customize the dealership message to show on the login & signup page.
- Choose to make the customer approval as a dealer by the admin mandatory.
- Send email to dealer for dealership confirmation.
- Enable default prestashop login and registration flow on the storefront.
- Show or hide the header and footer on the customer login page.
- Show or hide the date of the birth field from the customer registration page.
- Select the position of the login/signup form on the shop page.
- Choose to show the login/signup form in left, right or the centre of the page.
- Show or hide the background theme & also select a theme of your for the login & signup page.
- Also, choose to upload an image to set as the background theme on the login & signup page.
- Set the shop title to show on the login or signup form.
- Upload logo to show on the login & signup page.
- Allow Google to crawl the private pages of the shop.
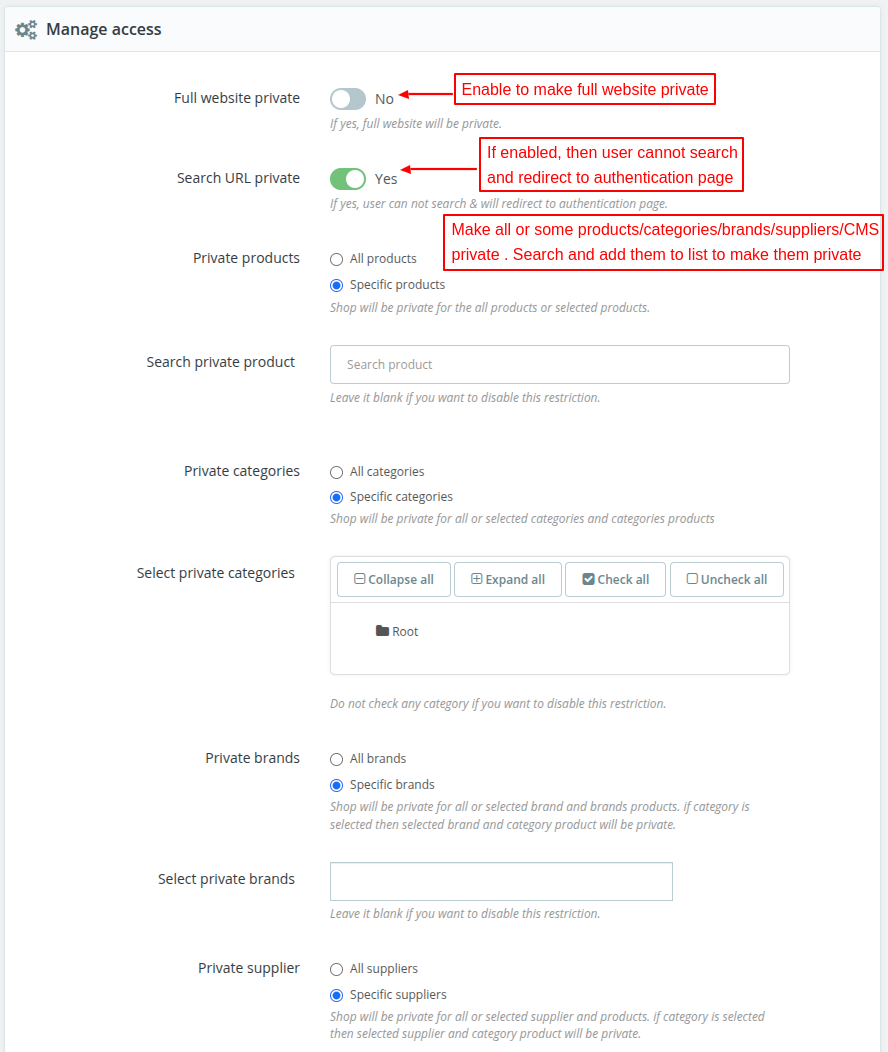
- Choose to make the full website private.
- Select the user groups to access the private pages of the website.
- Choose to make either all or the selected product, category, brand, and supplier pages private.
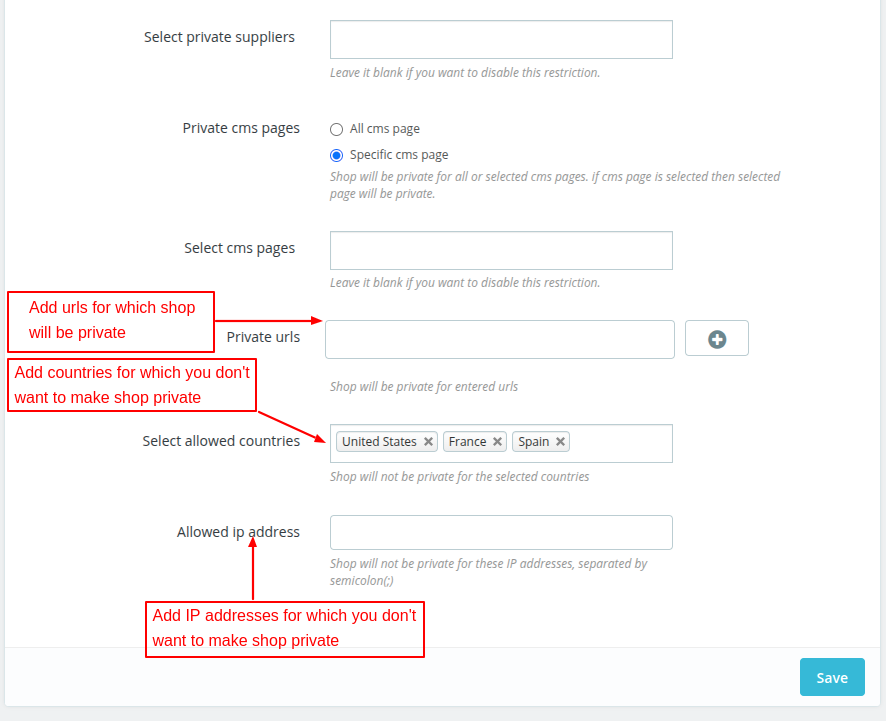
- Also, make the CMS pages of the shop private.
- Make custom pages private by adding the URL of the page.
- Add the countries for which the site will not be private.
- Also, add the IP addresses for which the site will not be private.
- Customers can only see the login and signup page until they register as a dealer & get approved.
- Add extra fields on the customer registration page using the PrestaShop custom registration field module.
- Restrict online customers from viewing your products or any other page of the website.
- Customers have to register on the store to become a dealer.
- The admin & the customer both receive the email notification regarding a dealership request.
- Also, an admin can approve or disapprove the dealership request of a customer.
- A customer also receives an email notification regarding the confirmation of the dealership.
- The module is multi-shop compatible.
How to install the module
- Firstly, go to the module manager in back office and click on ‘upload a module’.
- After that, drag and drop the module file or select the file from the system.
- In this way, the module installation will be successful.


How to configure the PrestaShop Private Shop module
After the successful installation of the module, an admin can proceed to configure the module.
In the configuration settings, there are multiple tabs & each tab consists of various options.
So, let’s see each of the tabs & options available in each of them one by one.
Private Shop Message
- Choose to show or hide the dealership message on the customer login as well as the registration page of the shop.
- Also, customize the dealership message that you want to show on the pages.

Login Page
In this section, there are various options available to customize the customer login page. Some of the significant options are as follows.
- Choose whether the approval of dealership request of customers will be mandatory or not.
- Show or hide the header & footer section from the login page.
- Option to show or hide the date of birth field from the customer registration page.
- Position of the login or registration form i.e., center, right or left.
- Add theme background on login & registration page & select the theme.
- Upload an image of your choice to set as background theme.
- Add customized title & logo for the page.

Send email to dealer
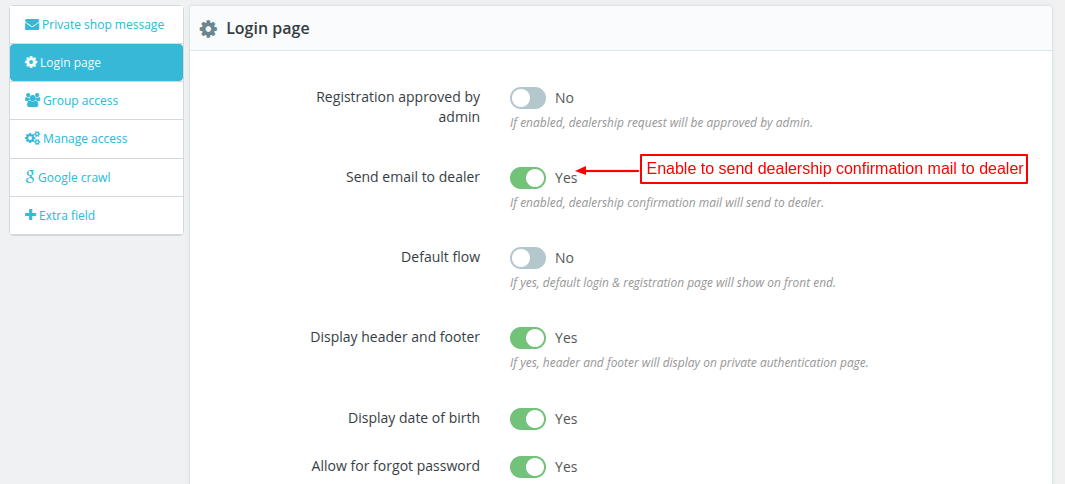
The admin can choose to send dealership confirmation email to dealer.
Default Flow
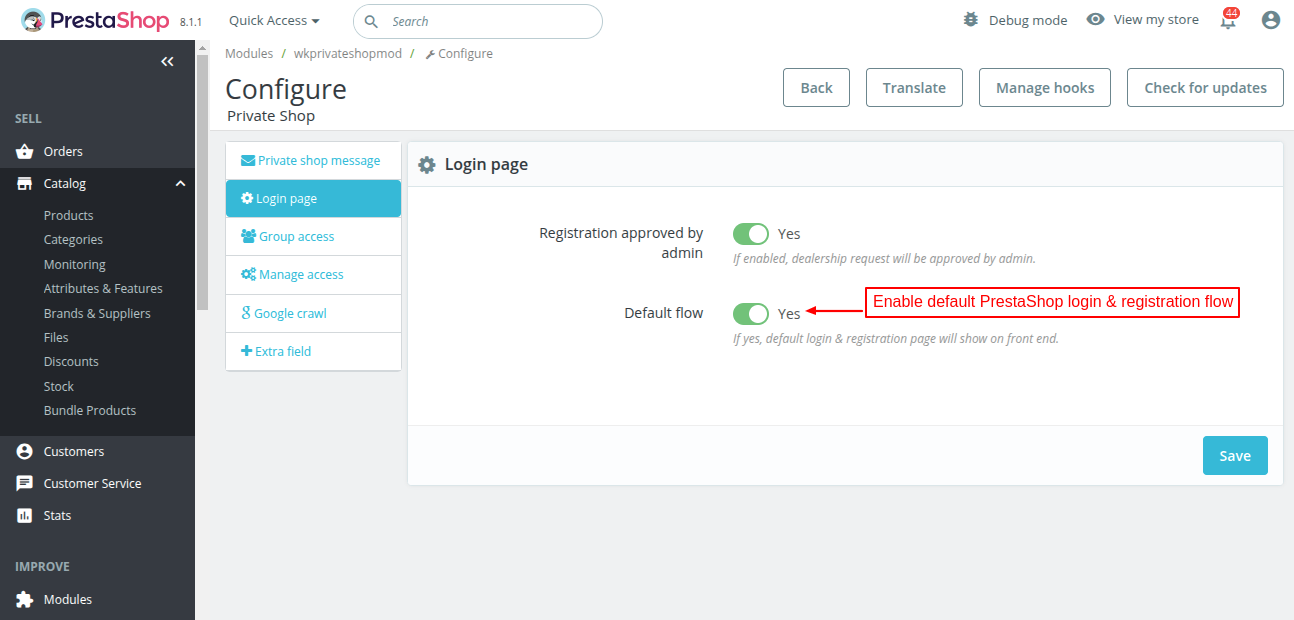
If enabled, then default PrestaShop login and registration will display on the front end.
Group Access
- You can enable the manage group access option to restrict the working of private setting for selected groups.
- Also, select the groups for which you don’t want the private settings of the shop to work.

Manage Access
This section particularly helps you to manage viewing access of the web store & also make some or the full shop accessible for the users.
- Make some or the full website private.
- Choose to make product, category, brand, supplier & CMS pages of the shop private.
- Add some countries for which you want to make your shop inaccessible.
- Add IP addresses for which the shop will not be private.
Google Crawl
In this section, you can enable the option to let Google crawl the private pages of the shop too.

Extra Field
Choose to add some extra fields on the customer registration page. But, in order to do so, you must install the PrestaShop Custom Registration Field module first.

Workflow of the PrestaShop Private Shop module
Whenever a customer lands on the website, the following dealership message will display.
Also, the other sections of the shop would be inaccessible for the user if the private shop setting is active.
A user would not be able to access any other page of the shop until he/she registers as a dealer on the website.

The dealership message is also visible on the customer registration page.

When a customer registers as a dealer on the website, a dealership request goes to the admin.
Also, a customer is not able to log in to the store until the admin approves the dealership request of the customer.
After registering on the website, an admin & the customer both receive a mail on their respective email address.
Email that an admin receives

Email that a customer receives

After getting the dealership request, an admin can also approve the dealership request from the customers section.

By default, all the registered customers are inactive. An admin can choose to enable or disable the customers as per their choice.
A customer will be able to log in to the store and view all the pages after the admin approves the dealership request.

So, this was all about the PrestaShop Private Shop Module. I hope this document will help you in checking the functionality of the module in a better way.
Also, do let us know about your views in the comments.
Support
For any kind of technical assistance or query, please raise a ticket at http://webkul.uvdesk.com or send us a mail at [email protected]
Also, please explore our PrestaShop development services & vast range of featureful PrestaShop Addons.
Current Product Version - 5.0.3
Supported Framework Version - 8.x.x, 1.7.x.x

I try the demo but it doesn’t work. Can you please assist?
The error state that “Your account isn’t available at this time, please contact us”