PrestaShop Checkout Custom Fields module lets you add various types of custom fields to every checkout step.
With this extension, the admin can take extra information from the users on the checkout steps.
Add various custom fields like text, checkbox, radio button, attachment, dropdown, date and time, etc on the checkout steps.
Key features of the module:
- Add unlimited extra fields on checkout steps.
- Create 11 types of custom fields.
- Display custom fields on the cart page, personal information step, address step, shipping step, and payment step.
- Display user input on the order confirmation page, order confirmation email, order detail page, delivery slip, and order invoice.
- Create custom field groups to display multiple custom fields on a step.
- Create conditions in the custom field group to display fields on the checkout step.
Features of PrestaShop Checkout custom fields module
- Create custom fields of several types like text, text area, checkbox, radio, attachment, dropdown, dropdown multiple selections, date, time, date & time, and readonly fields.
- Admin can set required custom field.
- Create custom groups based on conditions like category, minimum cart amount, date range, Country and currency, etc.
- Admin can assign created custom fields on the custom group.
- Display custom fields on the cart page, personal information, address step, shipping step, and payment step.
- Customers can provide additional information in these fields.
- Display custom fields on invoice, delivery slip, order confirmation mail, order confirmation page, customer order detail page, and admin order detail page.
- Also, the admin can display multiple custom-field groups in a single checkout step.
- Configuration to enable the display of custom fields on various pages.
- Module is Prestashop GDPR compliant
- This module is multishop compatible.
Note: PrestaShop Checkout Custom Fields module is compatible with PrestaShop version 9.x.x.
Installation
- Firstly, go to the module manager in back office and click on ‘upload a module’.
- After that, drag and drop the module file or select the file from the system.
- In this way, the module installation will be successful.


Custom Hooks Information
For proper functioning of the “PrestaShop checkout custom fields”, you have to add code on following tpl file:
/templates/checkout/_partials/steps/addresses.tpl file:
For the PrestaShop Version below 8.1.0, add the following hook:
{hook h='displayAddressSelectorBottom'}
Place: Add this hook under </form>
Refer the screenshot:

How to configure the Checkout Custom Fields module
After the successful installation of the module, you need to configure it. There are three sections in the module configuration.
- General
- Custom Fields
- Custom Field Groups
General

Under the general settings, the admin can enable options for the pages on which he wants to display the custom fields entered by the customer.
- Display attachment URL in invoice, delivery slip and order confirmation mail: Enable this option if you want to display the attachment URL on the invoice, delivery slip, and order confirmation email.

If the admin wants then he can display the attachment file URL to the customer by enabling the display attachment URL option.

Custom fields

Under the custom field option, the admin can create and view all the custom fields.
Custom field groups
Under the custom field group tab, the admin can create multiple groups and add multiple fields to a group to display the custom fields at the front end during the checkout process.

Creating custom Fields
After configuring the general settings the admin needs to create the custom fields to display the custom options at the checkout stages.

The admin can add the following types of custom fields to display at the checkout process:
- Text
- Dropdown
- Checkbox
- Radio
- Attachment
- Dropdown multiselect
- Text area
- Date
- Time
- Date and time
- Readonly field
Text

Dropdown
While adding the dropdown field, the admin needs to add the values so that the user can select them during the checkout process.

Checkbox
The admin can add a checkbox field in a similar way he added the dropdown field.

Radio

Attachment

Dropdown multiselect

Textarea
The admin can add a textarea field in a similar way he added the text field.

Date
With this field type, the admin can take user input as a date. The user needs to select the date from a calendar displayed on the front end.

Time
With this option, the admin can allow the customer to take input in time.

Date and time
With the field option the admin can input as a date and time format.

Readonly fields
This field is only used to display a message to the users at the checkout stage. The admin can not take any user input by using this field.

Creating custom field groups
After creating the custom fields, the admin needs to create the field groups to display the field at the checkout stage.
The admin can add multiple fields to a single custom field group. Also, the single field can be added in multiple custom field groups.

To create a custom field group the admin needs to click on “Add new group button”. After clicking on button the admin will redirect to a page from where he can create a new custom field group.

Group name: Enter the name of the custom group field.
Assign custom fields: By clicking on the add field button the admin can add and choose the fields he wants to add to the group.
Checkout step: Choose the checkout step on which the admin wants to display the options available in the group.
There are following five steps available in the module on which the admin can display or take user input by adding the custom fields.
- Cart page
- Personal Information step
- Address step
- Shipping step
- Payment step
Country and currency: Choose the country and currency on which the admin wants to display the custom fields available in the group.
Minimum Amount: Enter the minimum amount of the cart value to display the custom fields.
Availability date: Set the display validity date of the custom fields available in the group.
Status: Enable/Disable the status of the group.
Categories: Select the categories for those products the admin wants to display the fields.
Groups: Select the customer groups to display the custom fields.
Product restriction: Select the products to display the custom fields on the checkout step.
Note:
These custom field group conditions will be applied if one of the following products exists in the cart. If not selected any products, it will be applicable to all products.
All the set conditions must be fulfilled to display the custom fields on the selected step.
For example: If the admin made a group with the conditions available in the below image.

So, as per the conditions set by the admin for this custom field group in the above screenshot.
The user should belong to the customer group and there should be at least one quantity of “Hummingbird printed t-shirt” product in his cart to view the custom fields on the cart page.

As you can check in the above-mentioned image that the customer is registered and belongs to the customer group but the custom fields are not displayed on the cart page.
This is because the admin has not added any quantity of the “Hummingbird printed t-shirt” product, which didn’t fulfill the condition as set by the admin while creating the custom field group.

Now, after adding the “Hummingbird printed t-shirt” product to the cart the user can view the custom fields on the cart page.
Display custom fields at front end
Cart page

Personal information step

Address step

Shipping step

Payment step

Display custom fields on the order confirmation page
After successfully placing the order the user can view the custom fields data which he mentioned in the custom fields during the checkout process.

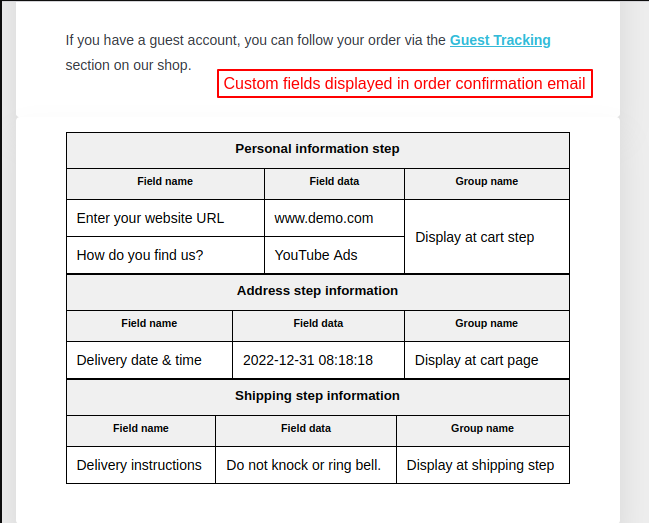
Order confirmation email
After placing the order the user can view the values in the order confirmation email too.
Custom fields on the invoice

Custom fields on the delivery slip

Order detail page (front office)

Order detail page (back office)
The admin can view the custom fields on the order detail page.

So, this was all about the PrestaShop checkout custom field module. I hope this document will help you in checking the functionality of the module in a better way.
Support
For any kind of technical assistance or query, please raise a ticket at http://webkul.uvdesk.com or send us a mail at [email protected]
Also, please explore our Prestashop development services and vast range of quality Prestashop addons.
Current Product Version - 1.0.2
Supported Framework Version - 9.x.x, 8.x.x, 1.7.x.x

Be the first to comment.