Content is the King. It’s a very popular saying these days among marketeers, professionals etc.
Thus, to help our eCommerce merchants with their content, we bring you the Prestashop Advanced Blog Module.
These days, articles & blogs are some of the best ways to communicate with your customers effectively. And, we know what problem you might face.
Generally, customers are from various demographics. Hence, it’s not possible to make them understand your articles/blogs in one language.
That’s why the module also allows you to add blogs in multiple languages.
As an eCommerce store owner, there might be a niche in which you’ll focus more. Even then, if you would ever like to touch down several topics, worry no more.
We are also offering you to add multiple blog categories.
Using these categories, your customers would be able to find exactly the content they are looking for. Like that, the module has several other useful features too.
So, Let’s dive right further into the blog to know more.
Note: Advanced Blog module is compatible with multi-store feature.
Check the overview of the plugin in the video mentioned-below –
Features of the Prestashop Advanced Blog module
- Admin can add an unlimited number of posts in multi-language.
- An admin can enable or disable the display of a post.
- Admin can display posts either in list view or grid view.
- Show grid view either with 2 columns or 3 columns.
- Admin can set the position of the sidebar.
- An admin can set the number of posts displayed per page.
- Admin can enable or disable the display of tags on the sidebar.
- Set the number of tags to display on the sidebar.
- Admin can enable or disable the display of categories on the sidebar.
- If the display of categories is active, then an admin can set the number of categories to display on the sidebar.
- Admin can enable or disable the display of recent posts on the sidebar.
- If the display of recent posts is active, then an admin can set the number of recent posts to display on the sidebar.
- Admin can enable or disable the display of popular posts on the sidebar.
- If the display of popular posts is active, then an admin can set the number of popular posts to display on the sidebar.
- Admin can choose to activate either the Disqus comment system or the default comment system.
- On enabling the default comment system, an admin can enable or disable the display of the comment system on the posts globally.
- If the display of comments is active globally, then an admin can enable or disable the display of the comment system for the individual posts.
- On enabling the Disqus comment system, an admin has to specify the admin Disqus name.
- Admin can set the publish date for posts.
- An admin can also display related products with the posts.
- Admin can also display related posts with a particular post.
- Admin can enable or disable the display of a particular post.
- Admin can add unlimited categories according to the need.
- An admin can set the featured image with the category.
- Admin can add thumbnail images with the blogs.
- Admin can also provide descriptions for the category.
- An admin can enable or disable the category anytime.
- Admin has to set one category as the default category.
- Admin can choose to edit or delete the category as per the need.
- If an admin wants to delete the associated category, then an admin will also get a notification.
- Admin can also provide group permission to the categories.
- An admin can add an unlimited number of tags.
- Admin can assign a new tag to a number of posts while creating a new tag.
- Admin can add tags in any language.
- An admin can manage the comments given by the default comment system in the “comments” tab.
- Admin can manage the comments given by the Disqus system in their Disqus account.
- Buyers can view the categories, tags, recent posts and popular posts on the sidebar.
- Customers can also bookmark the blogs.
- A customer can mark the blogs as favourite too.
- Customers can share blogs via Twitter & Facebook.
- Buyers can filter the posts according to language, categories, tags
- Buyers can comment & give reviews through emojis.
- Blog reading time is also available on blogs.
- If the buyer filters the posts according to the language, then the buyer will see the list of posts written in the selected language and default language.
How to install the Prestashop Advanced Blog module
- Firstly, go to the module manager in back office and click on ‘upload a module’.
- After that, drag and drop the module file or select the file from the system.
- In this way, the module installation will be successful.


How to configure the Prestashop Advanced Blog module
After the successful installation of the module, an admin can proceed to configure the module.
There is a list of options available in the configuration settings. The explanation of each option is available in the screenshots below.

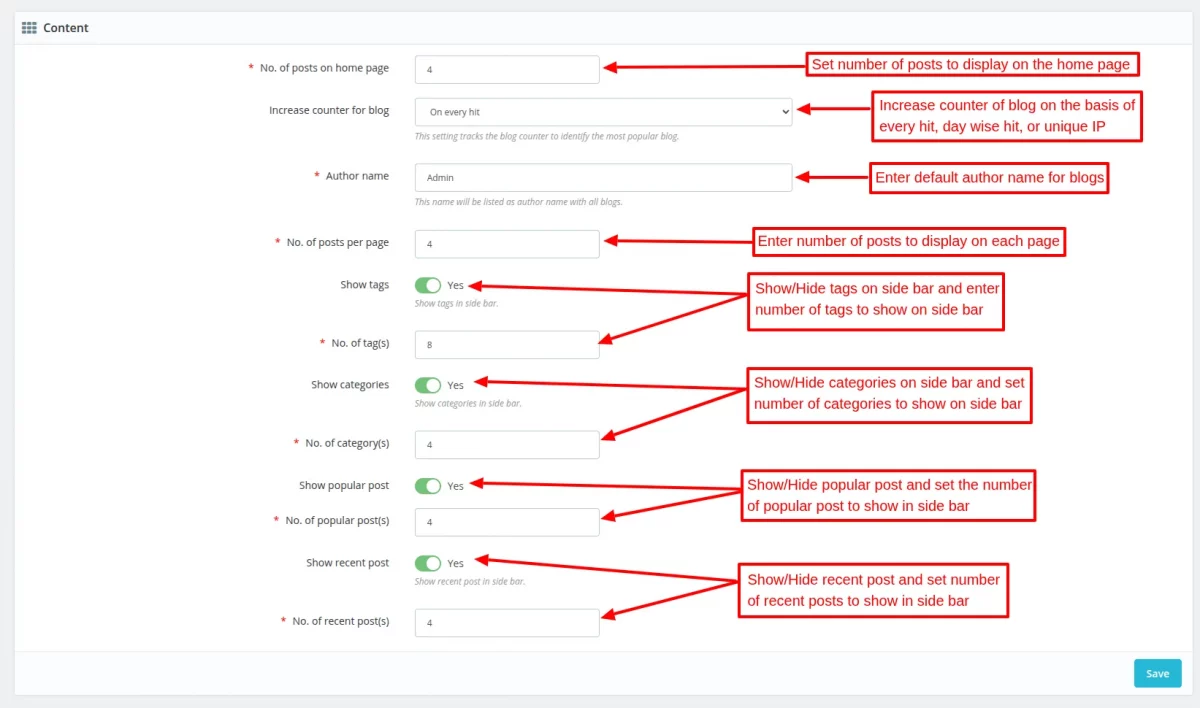

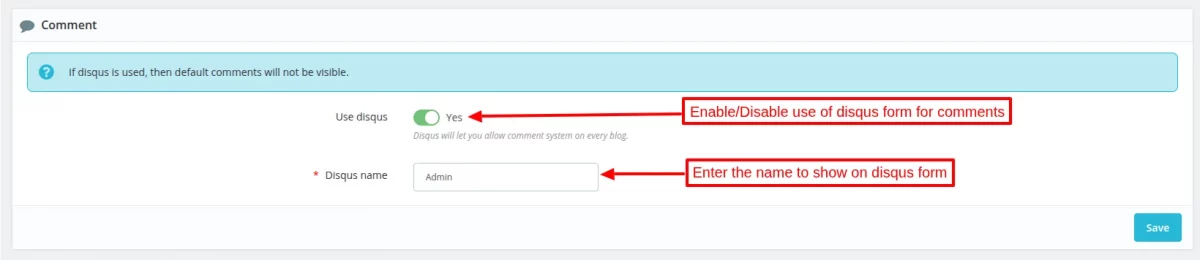
Note:- If an admin disables the Disqus forum, then he/she will need to enable the default comment system. So, that customers can comment on the blog using default system.
Apart from the list view, an option to show blogs in grid view is also available. Admin can choose to show grid view with either 2 or 3 columns.

In this way, the module configuration will be successful.
Tabs related to Prestashop Advanced Blog module at the admin’s end
After the successful installation of the module, new tabs add to the admin dashboard to manage settings pertaining to blogs.

Add a new blog post
In order to add a new post, click on the ‘Create New Blog’ button.

After clicking the button, the following page will open. Here, you will need to fill in all the details of the blog to create a new blog.

After creating the post, an admin can view it under the ‘Posts’ tab. An admin can also choose to edit, delete or preview the blogs from here.

Note: To add the posts in other languages, you will need to add the blog in the default shop language first.
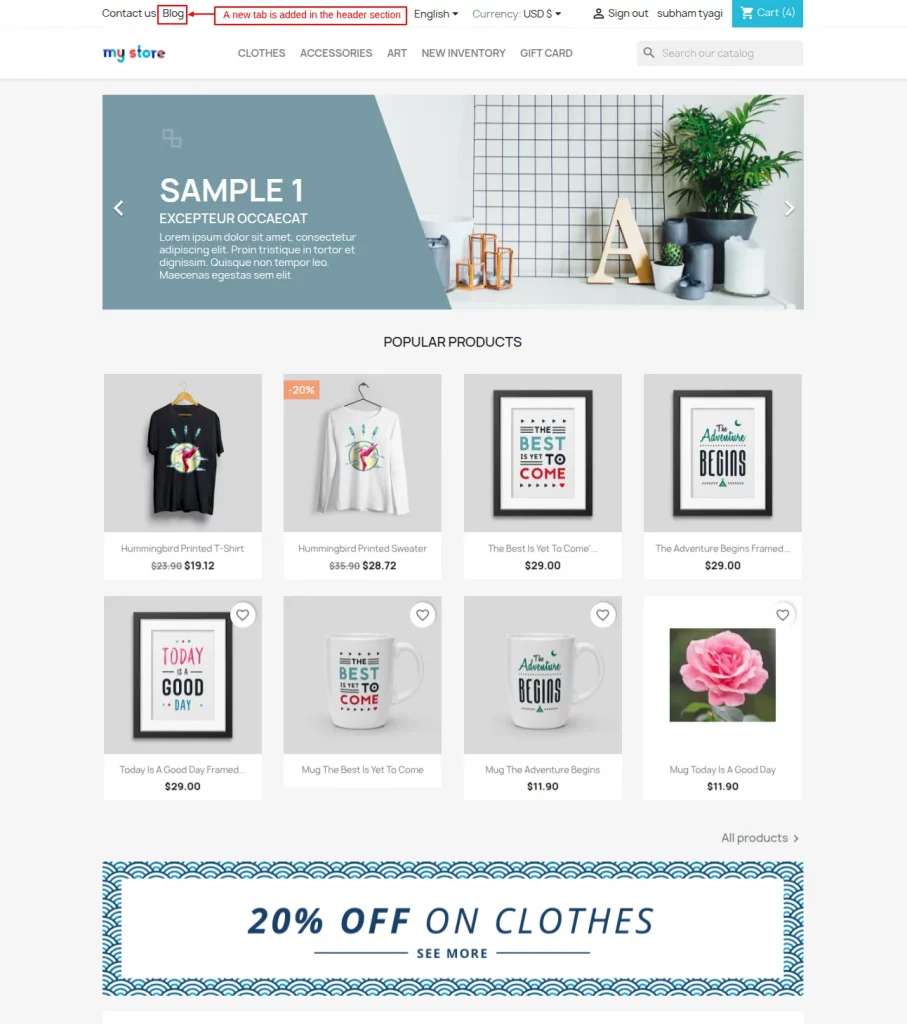
Home Page

As configured by admin, 4 recent posts are displayed on the home page.
View of the blogs at the front end
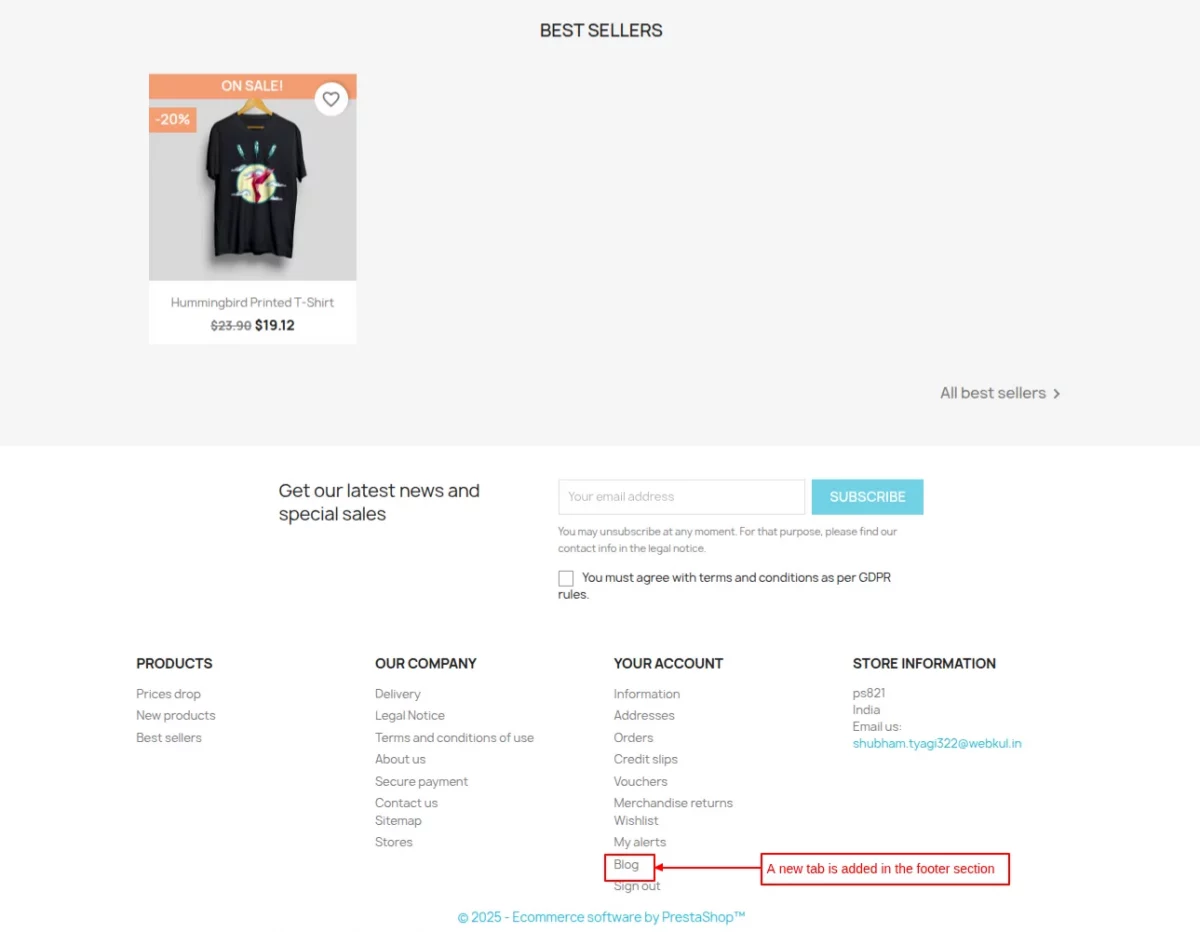
After the installation of the module, a tab “Blog” is added to the header and footer sections. On clicking this tab, users will be able to view all the posts.
Posts in grid view on the blog page
As you can see, currently the posts are being displayed in the grid view. Here, you can also choose whether you want to show posts in 2 columns or 3 columns.

Posts in list view on the blog page
Currently, the posts are being displayed in the list view on the blog page of the shop.

How to create categories for the blogs
In order to create a new category for the blogs, click on the ‘Create New Category’ button.

After clicking the button, a form opens to fill in all the details about the category.
You can add featured images, descriptions & also provide access to some specific customer groups while creating a category.

Note: An admin can not delete all the categories. He/she must need to set one of them as the default category.
In case, if you delete any one of the categories, then the posts of a deleted category will associate with the default category.


In case, if admin tries to delete the category containing posts then a warning message(same as in the screenshot below) will appear.

A customer can view all the blogs available in any specific category. The category page also shows the featured image and description of the blogs.

Note: Admin can set group permission for the categories. The customer groups would only be able to view posts from the categories allowed for them.
Add Tags
There is another functionality also available i.e., to add tags. The tags make the process of the search easier for the customers.
In order to create a new tag, click on the “Add New Tag” button. After adding the tags from here, they all display on the blog page too.
Using the tags, customers can also filter the list of blogs easily. It happens cause after clicking on any tag, only those blogs display which is associated with the tag.

After clicking on the “Add New Tag” button, the following form opens. Here, you can add the name of the tag & select the blogs with which you want to associate the tag.

Now, let’s see how this tag functionality works on the front end.
Firstly, all the tags will also appear on the blog page. As you may see in the screenshot below.
Now, whenever a customer will click on any tag, all the blogs with that tag will appear on the blog page.

For example, in the case below, a customer chose to select “Beauty” tag. So, the blogs with the “Bauty” tag is only appearing now on the blog page of the shop.

Comment System
In all the blogs, a box to comment on the blog appears. Currently, the module allows you to keep any one of the available two types of the comment system.
The two types of comment systems available with the modules are as follows.
- Disqus Forum
- Default Comment System
Let’s understand their functioning one by one.
1) Disqus forum – It is a type of commenting platform which allows users to comment on any article/blog publicly. The Disqus hides the comments of guests until authorization by the forum.
Disqus offers the best commenting tool for websites to increase engagement.
The platform offers various features such as social networking, spam and moderation tools, analytics, email notifications etc.

2) Default comment system – It’s a simple yet elegant commenting system available with the module. Using this system, users can comment on blogs by just entering their names & email.

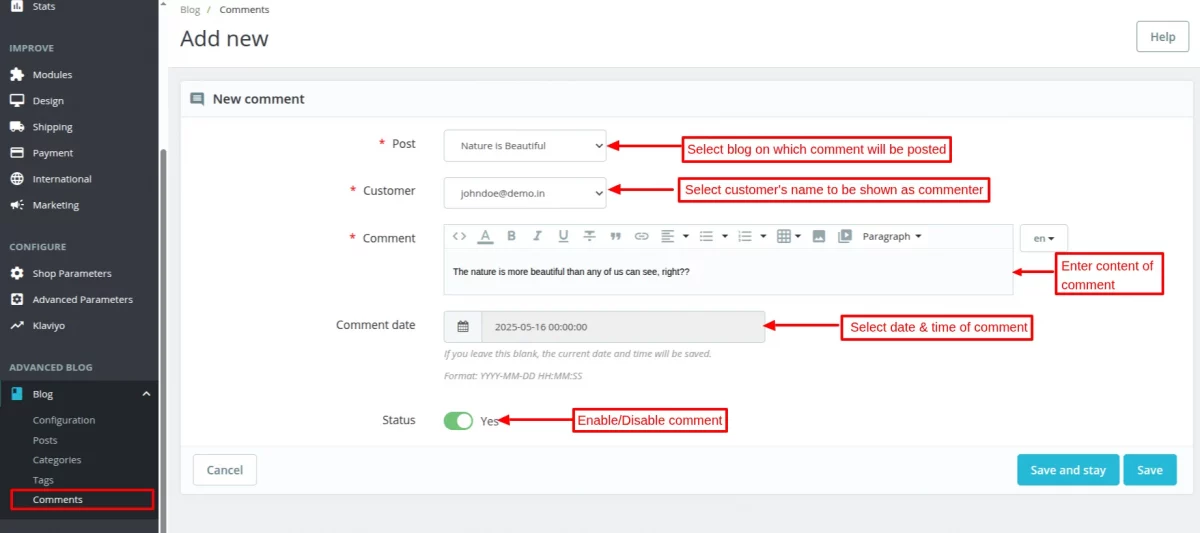
All the comments of the customers are also available at the admin end. An admin can view the list of user comments under the “comments” tab.
Please note that the comments section only lists the comments from the default comment system.
To manage the comments of Disqus, you need to manage them through your “Disqus” account.
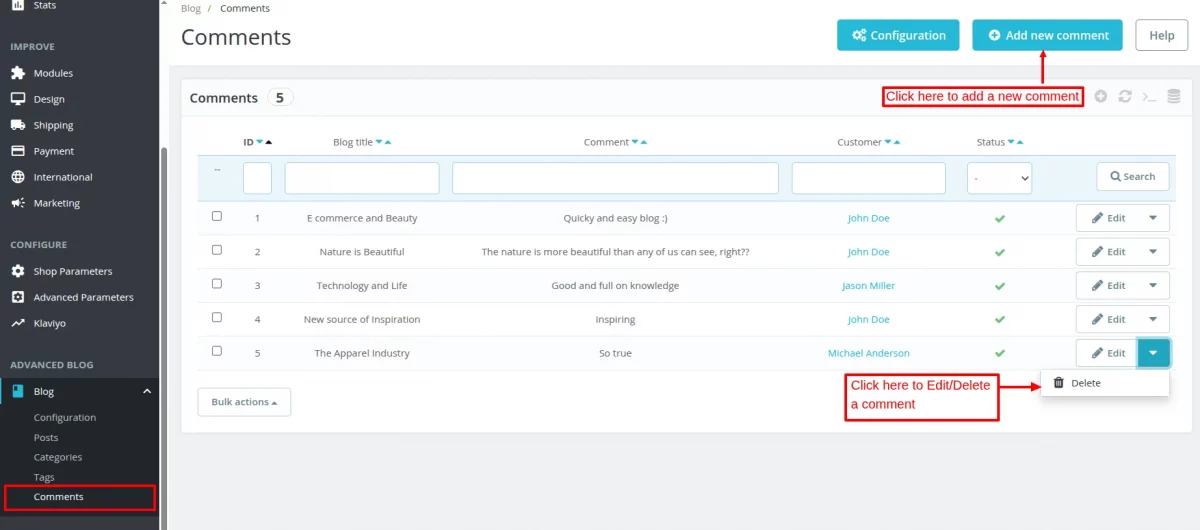
Also note that, you can not change the commenter while updating a comment.
Multi-language Posts
This is one of the most useful functionalities of the module. As eShops have customers of varying demographics. Hence, it’s simply not possible to communicate with each of them in one language.
That’s why we are also offering to add your posts in multiple languages. It means that you can add your blogs in all the active languages of your shop.
But, to add the posts in multiple languages, you need to add them in the default shop language first.
The following page contains the posts in the default language i.e., English.

Whereas, this other page shows the posts in another language i.e., French.

So, this was all about the Prestashop Advanced Blog module. I hope this document will help you in checking the functionality of the module in a better way.
Also, do let us know about your views in the comments.
Would you like to add blogs using WordPress in Prestashop, then do check out the blog.
Support
For any kind of technical assistance or query, please raise a ticket at http://webkul.uvdesk.com or send us a mail at [email protected]
Also, please explore our Prestashop development services and vast range of quality Prestashop addons.
Current Product Version - 5.1.3
Supported Framework Version - 9.x.x, 8.x.x, 1.7.x.x

1 comments