Check a brief overview of the plugin –
Features
- Enable or disable the module from the admin panel.
- Configure default minimum and maximum product quantity limits.
- Set product-specific quantity restrictions.
- Apply quantity rules for guest users and registered customers.
- Configure separate quantity limits for individual customers.
- Assign different quantity restrictions to customer groups.
- Allow registered customers to request changes to their purchase limits.
- Let customers include an optional message with their request.
- Review, approve, reject, or delete customer requests from the admin panel.
- Filter customers, customer groups, and requests for quick management.
- Send automatic email notifications to the admin and customers for request updates.
- Validate purchase quantity limits before customers complete their orders.
Removed/Updated Features
Installation
Extract the contents of the received zip folder on your system according to your Opencart version. The extracted folder has admin and catalog folders.
Now, upload the admin and catalog directories into the Opencart root directory as shown below in the snapshot.

Once you have uploaded the folders, login to admin and then from the catalog section go to Extensions> Extension Installer and upload the zip file.
The zip file is in the ocmod folder under module directory. In the ocmod folder, select the Opencart version that you are using and under it, you will find purchaselimit.ocmod.zip file.

After uploading the zip file go to the Extensions > Modification and click on the refresh field.

Now, Go to System -> Users -> User Groups >> edit ‘Administrator’ and choose to select all for both Access and Modify Permission for the permission that you want to provide and save it.

Now navigate to Extensions > Extensions > Modules. Find Product Quantity Restriction from the list. Click the Install button as visible in the screenshot below.
Select the module “Product Quantity Restriction”, and click on the Edit icon.

language translation
Opencart Product Quantity Restriction module supports multiple languages. To set up different language for this module, please click here to view the instructions.
Module Configuration
After successfully installing this module in your Opencart. Now navigate to Extensions > Modules > Product Quantity Restriction and click Edit button.
From here you will see the following option:
Status – Set this to Enabled to use this module or else set it to Disabled, if you don’t want to use.
Default Minimum Limit – This is the default minimum quantity limit for all products and all users.
Default Maximum Limit – This is the default maximum quantity limit for all products and all users.
Time – It is the default initial time after which previously made orders will be compared to check buy limit of the customer.
After editing all the necessary settings, kindly click Save button on top to apply changes.

Admin management
Customer List
The admin can access this option by navigating to Product Restriction > Customer List. Here the admin can find all the list of customers who have product quantity restriction. The admin can add any registered user(s) of the website to this list by clicking the Add button on top.
Use Filter button to search any specific customer. Using their id, customer name, maximum and minimum limit.

To edit any existing customer restriction click the Edit button under Action column.
Add/Edit Customer
In order to add a new customer to the list, click ADD button on top. Furthermore, to edit an existing customer, click EDIT button under Action column. After that, you will see product restriction for customer settings. Enter the following details. Please refer to the screenshot below:
Customer Name – Here you have to enter the name of any registered user.
Default Minimum Limit – This is the default minimum quantity limit for the customer.
Default Maximum Limit – This is the default maximum quantity limit for the customer.
To set any product specific quantity restriction for this customer. Click Add button below and enter the Product Name. After that enter the Minimum Limit and the Maximum Limit for that specific product.
Click Save button on top to save your changes.

Customer Group List
To access this option by navigating to Product Restriction > Customer Group List. From here you can find all the list of customer groups who have product quantity restriction.
The admin can add any new customer group by clicking the Add button on top.
Use Filter button to search any specific customer group. Using their id, customer group name, maximum and minimum limit quantity.
In order to edit any existing customer group click the Edit button under Action column.
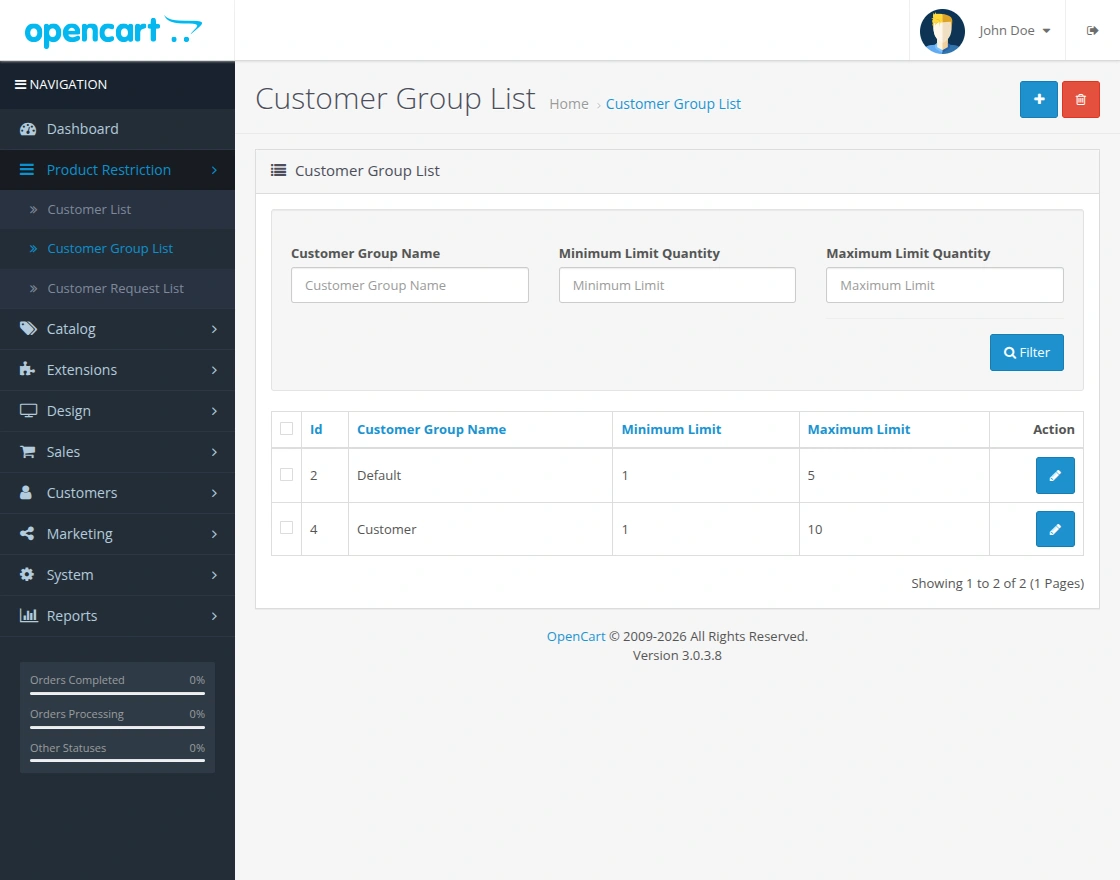
Add/Edit Customer Group:
To add a new customer group to the list, click ADD button on top. Moreover to edit an existing customer group, click EDIT button under Action column. After that, you will see product restriction for customer group settings. Enter the following details. Please refer to the screenshot below:
Customer Group– Here you have to select any one of the available customer group using the drop-down menu.
Default Minimum Limit – Set the default minimum quantity limit for this customer group.
Default Maximum Limit – Set the default maximum quantity limit for this customer group.
To set any product specific quantity restriction for this customer group. Click Add button below and enter the Product Name. After that enter the Minimum Limit and the Maximum Limit for that specific product.
Click Save button on top to save your changes.

Customer Requests List
To this option by navigating to Product Restriction > Customer Requests List. From here you can find all the customers who have requested to change their restrictions. The admin can view any customer request by clicking on the View button under Action column.
Use Filter option to search any specific customer request. Using their id, customer name, maximum and minimum limit quantity.
To delete any customer request, click the Delete button on top. Please refer from the below screenshot:
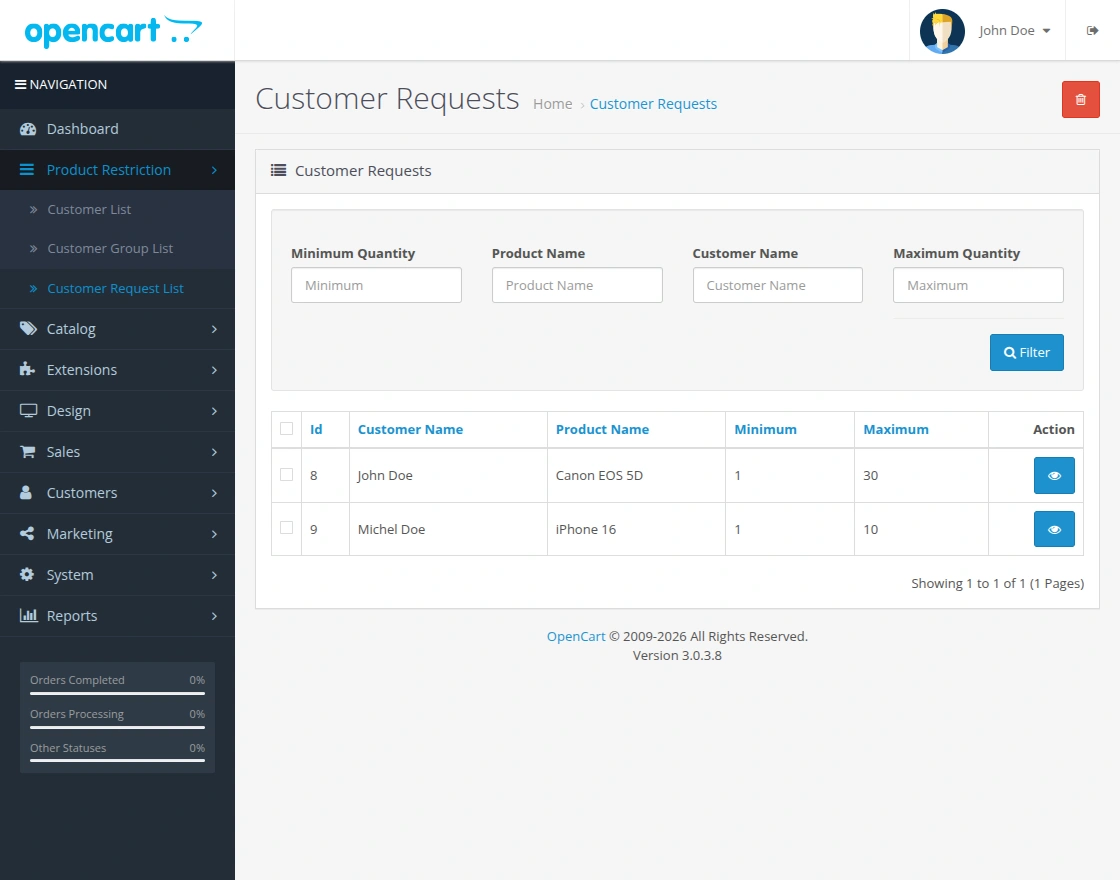
Manage Customer Request:
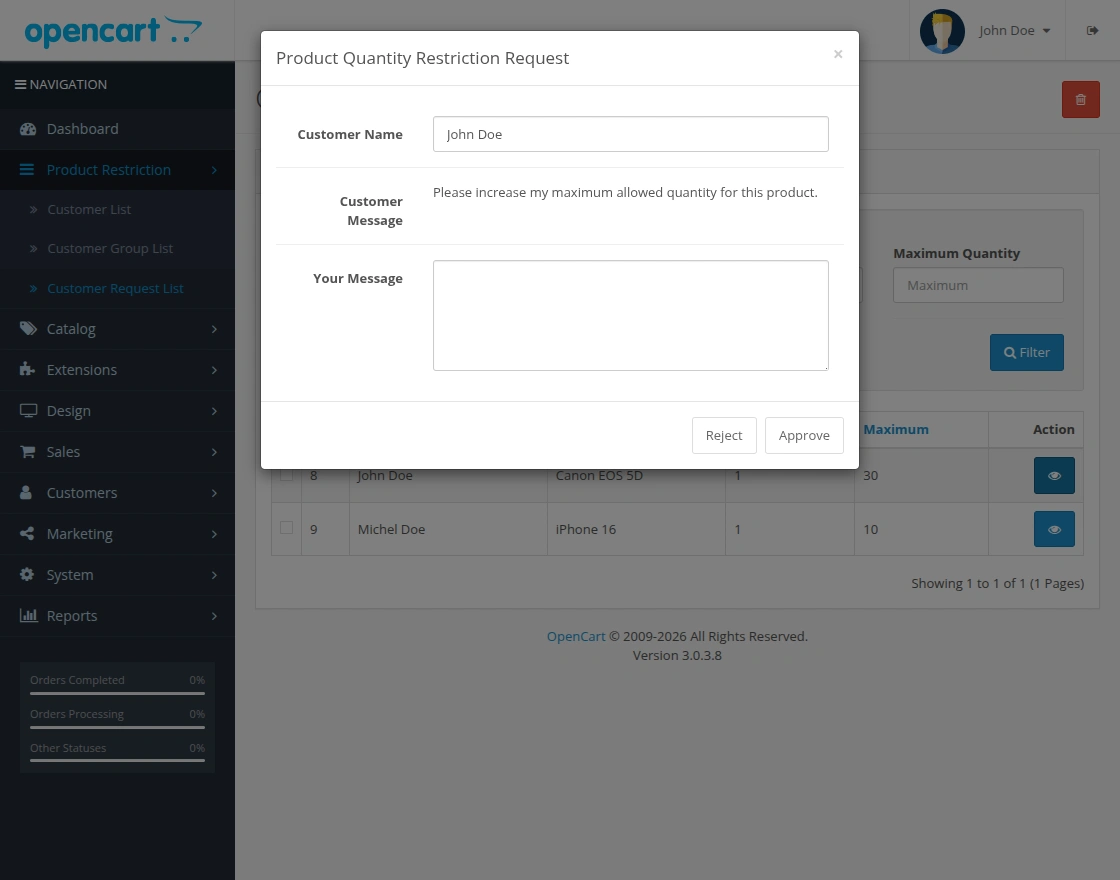
In order to Approve or Reject the customer request, click on the View button.
A pop-up display will appear. It will show the name of the customer who has requested for the change in product quantity.
If a customer has sent any message it will be visible. The admin has an option to send a reply message to the customer. Click Approve button to accept its request or else click Reject to decline.
User front-end View
When a user enters its desired quantity. And that quantity is either less or more than the allowed quantity. The customer will get different kind of error messages on top. The user can either enter the allowed quantity or can send a request to admin. Please note- Only registered users can request for changing their product quantity restriction.
Product Restriction Priority:
First -> Customer Product
Second -> Customer Default
Third -> Customer Group Product
Fourth -> Customer Group Default
Fifth -> Module Setting Default
Minimum Quantity Error
From the screenshot, you can see that the user wants to buy only one product. The error message “You have to buy minimum 10 products” is being displayed on the top.

Maximum Quantity Error
From the screenshot, you can see that the user wants to purchase 20 products. The error message “You can buy maximum 15 products” is being displayed on the top.

Subsequent Products
If a user tries to buy the same product again with a new order. It will get an error message on top displaying “You cannot buy more of this products.”
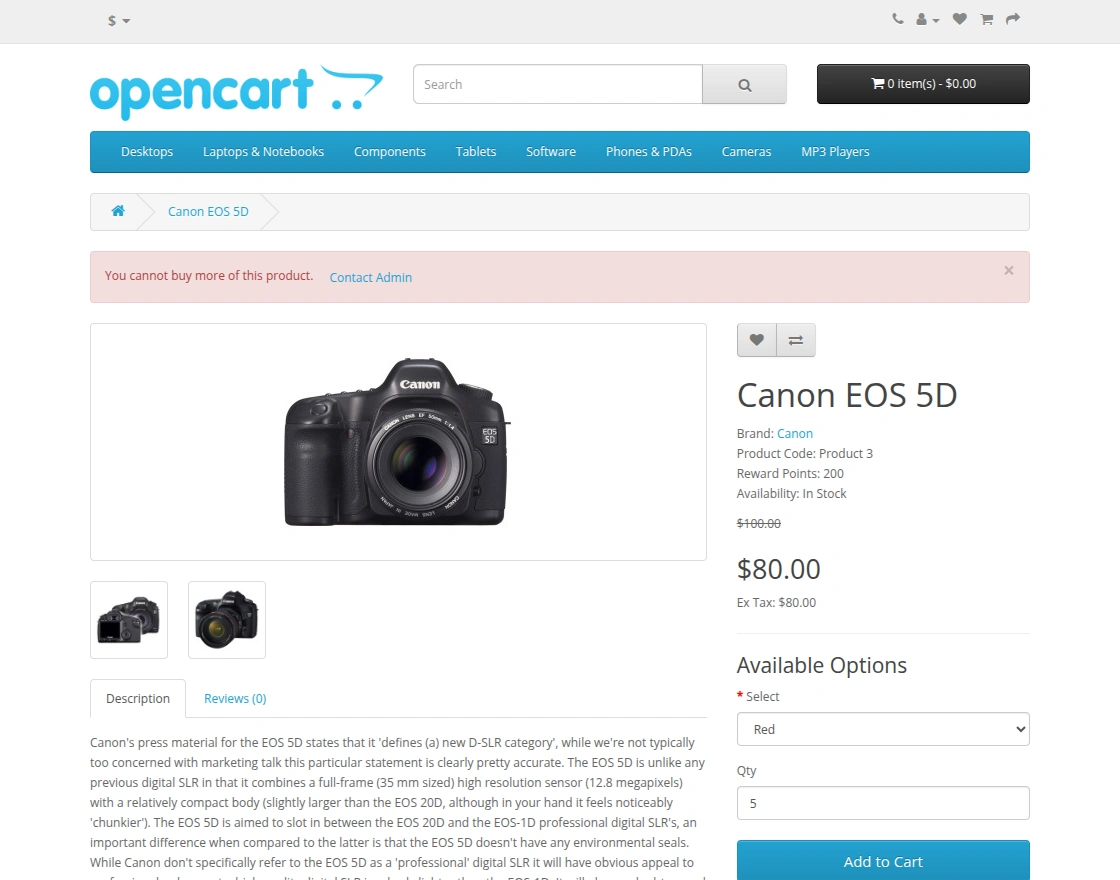
Contact Admin:
The registered user can create a request for changing its restriction. After clicking the Contact Admin link in the error message, a pop-up display will appear.
From here the user has to enter the requested minimum and maximum quantity values. The user can also enter any custom message for the admin.
Click SEND button to deliver the request message to the admin.
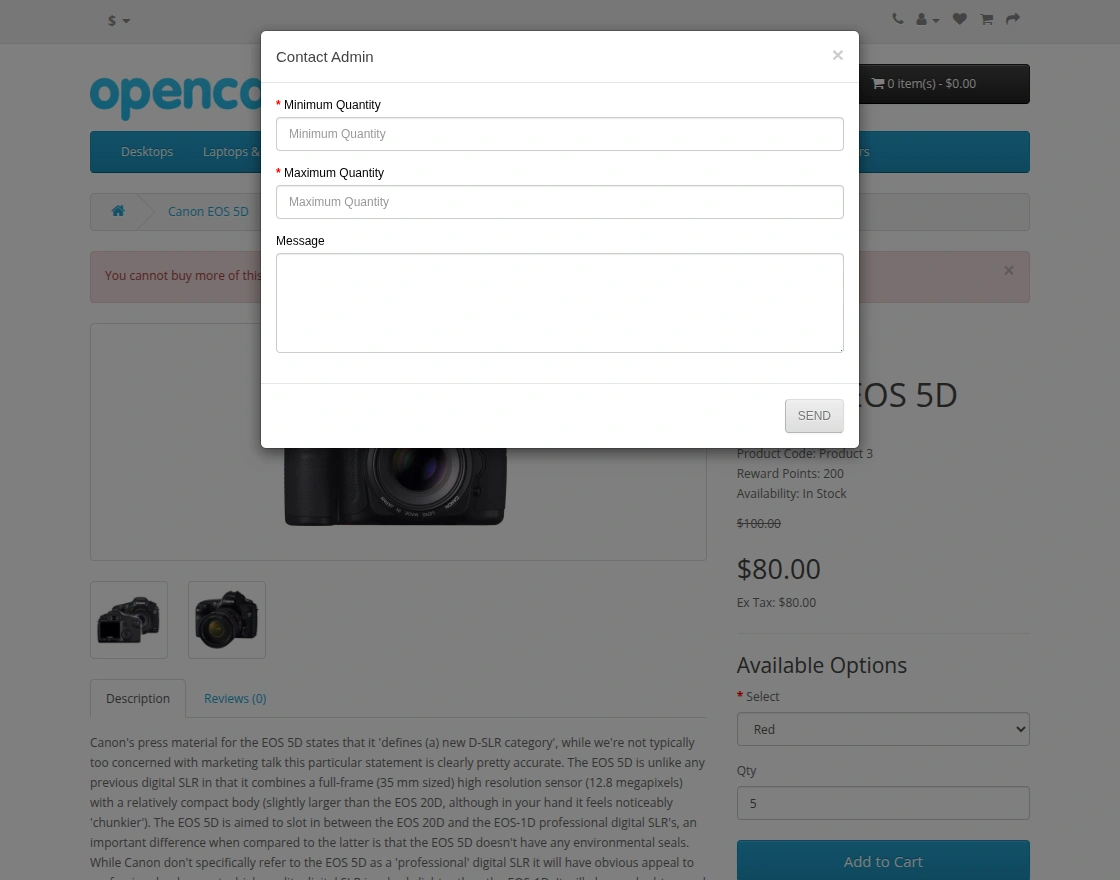
After clicking the SEND button. A confirmation message will appear as shown in below screenshot:
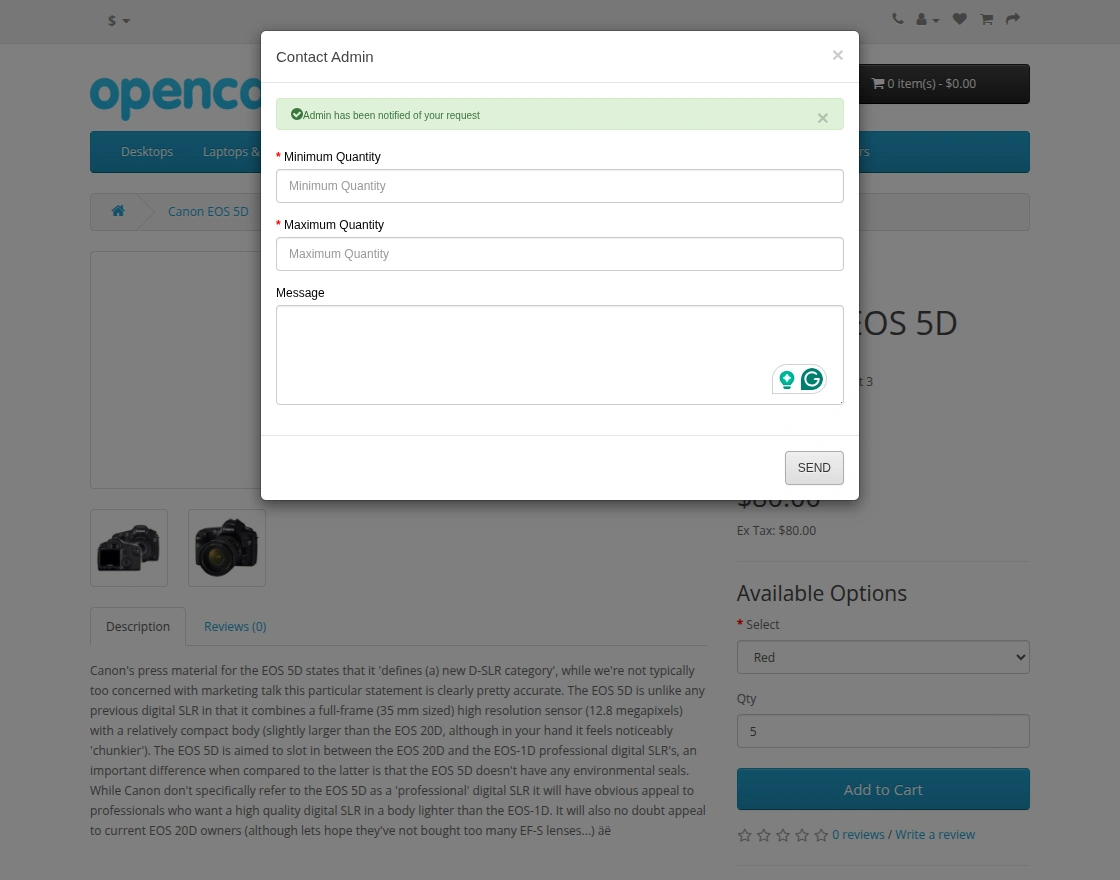
Subsequent Requests
Once a user sends any subsequent request for changing its product quantity restriction. An error message is visible on top as “Admin has already been notified of your request.” The user should wait for the admin to respond to its request.

Support
If you have any questions, suggestions, or customization requests, feel free to contact us at [email protected] or submit a ticket at webkul.uvdesk.com.
Explore our premium-quality Opencart Extensions to enhance your store functionality.
Current Product Version - 3.3
Supported Framework Version - 3.x.x.x

Be the first to comment.