Opencart PreOrder Pro module helps to make a product as PreOrder. Using this module, the customers can order out-of-stock products.
Opencart PreOrder Pro is also available as Marketplace Multi-Vendor Pre-Order as well.
Check the plugin flow –
Features
- Customers can order out-of-stock products.
- The customers can see the Order status for the PreOrder status.
- Customers can add multiple preorder products to the cart at a time for checkout.
- The customers can enquire about the pre-order product from the preorder product page.
- Customer Login is essential for Preordering a preorder product.
- Using this module customers can make a full or partial payment.
- The admin can set the custom message to display on the preorder product.
- The admin can set the pre-order product stock status.
- Admin can apply a discount to the PreOrder Products.
- The discount can apply as a percentage or fixed as required.
- Admin will get a push notification for the purchase of PreOrder products.
- A counter is available to display the number of left days for the preorder product.
- The admin can make out-of-stock products as PreOrder products Manually & Automatically by using Cron Job.
- Admin can set the pre-order text displayed on the add to cart button.
- The admin can set a custom percentage of the amount to pay for the pre-ordered product.
- The admin can check Pre-order and Pre-order inquiries in the admin panel.
- Admin and customers can receive notification mail.
- The admin can set the mode of notification as Automatic or Manual.
- When the admin adds any product for PreOrder then it will become out of stock automatically.
- The module supports the multi-store features of the default Opencart.
Installation
The installation of the Opencart module is very simple. After you unzip the main module directory, you will find admin, catalog, theme patch, and ocmod folders. You just need to move the admin and catalog folder into the root directory of your Opencart website.
If you are using a custom theme like Journal then we provide a Journal theme patch (directory) in the module zip.
While installing the module, navigate through Theme Patch->Journal2 folder and you will get the “Catalog” folder. Just upload the “Catalog” folder into your Opencart root directory for the proper functioning of the module with the Journal Theme.

Once you have uploaded the file then login to admin and from the catalog section go to Extensions> Extension installer and upload the XML file. The XML file can find on ocmod folder under the module directory.
Under the ocmod folder, you will find the folders for different open cart versions. You just need to select your version and upload the XML file.

After uploading the file, navigate to Extensions > Modifications and click on the refresh button on the right-hand side.

Then in the admin panel, go to System -> Users -> User Groups and edit ‘Administrator’ and choose to select all for both Access and Modify Permission and save it.

Get the – Re-captcha Site Key and Secret Key

1: Go to Google’s reCAPTCHA page and click on the MyRecaptcha button on the right.
2: You must have a Google Account to log in. Enter your Gmail user name, password and click the Next button to proceed further.

3: Now on the page that comes up you have –
- Enter a label that will make it easy for you to identify the site in the future.
- Choose the type of reCAPTCHA as – reCAPTCHA V2.
- Enter the Domain name(registration for domain.com also registers subdomain.domain.com) where you want to use it.
- Accept the reCAPTCHA Terms of Service by checking the checkbox.
- Lastly, click the Register button.

4: Now, you will have the Recaptcha Site Key and Secret Key.

Module Configuration Settings

To configure the module for use, navigate to Extensions>Extensiobs>Modules>Pre-order Pro and click the edit button as shown below in the snapshot.
This brings up the section to show the General and Mail configuration settings as per the snapshot below.

General Settings:
Here, the admin will –
- Enable the status of the extension for use.
- Select your store’s time zone.
- Enter the Google re-captcha Site key.
- Then enter the Google re-captcha Secret key.
- Enter the appropriate Server Key for push notifications.
- Next is the Messenger ID for the Push Notification.
- Enter the text that will be your Add to Cart button label text.
- Enter the text that you want to display on the product page.
- Choose what would be the preferred mode of notification – Automatic, Manual, or both.
- Enable or Disable the option Pre-order Discount to apply Discount on the Pre-Order Products list.
- Choose the Discount Type as Fixed or Percentage.
- Select the option to convert the Out Of Stock Products to PreOrder products – Manually or Automatically.
Note: For Creating Pre-Order Product Automatically
The admin needs to set up the cron for a user, first login ssh to the server then run the command corn tab to edit the cron and add the below the mentioned command.
Site url/preorder_cron.php so if the website is https://oc.webkul.in/preorder/ so command that you need to run is https://oc.webkul.in/preorder/preorder_cron.php
For opencart version 4 : Site BaseURL/index.php?route=extension/wk_preorder/account/preorder_cron so if the website is https://oc.webkul.in/preorder/ so command that you need to run is https://oc.webkul.in/preorder/index.php?route=extension/wk_preorder/account/preorder_cron
- Set the Default Number of Days for the PreOrder Products.
- Then set the Total Quantity of Selected products that will be on PreOrder.
- Set the product Quantity that a single order can contain.
- Now set how many orders can be placed per customer.
- Choose the status – when the automatic notification will be sent to the buyer.
- Select the stock status which will be applied when the products are being set as a pre-ordered products.
- Choose the Order Status for PreOrdered Products – From the provided order statuses.
Mail Settings:

Here, the admin will –
- Find the Mail Keywords that can be used to configure the various mails.
- Select the mail which will be sent to notify the customer about product availability.
- Pre-Order email: Set this as enabled if you want Pre-Order email other than open cart update email else select this as disabled.
- Admin Email: Enter the message that you want to send to the customer on Pre-Order with order mail.
- Lastly, click the Save button on the top right-hand side.
Product Configuration

- Set the status to enable the module.
- Set Product status for applying Pre-Order if it is similar to the selected value then pre-order will enable.
- Enter the Pre-order Quantity.
- Select the mode of the Pre-order full or partial.
- Enter a quantity for the selected pre-order product.
- Enter a pre-order quantity for single order.
- Add how many pre-order orders a customer can place.
- Add pre-order discount only applicable on selected pre-order product status.
- Enable/disable one Ip one order.
- Set the start date for pre-order and date for pre-order.
Pre-order Discount
The admin can enable the pre-order discount to the customer end. Discount will apply at the time of checkout. To enable the discount for use, navigate to Extensions> Extensions> Order total> pre-order discount.
Furthermore, click on the edit button and enable the option as per the below image.

Pre-order Product List – Admin Management
To add the products for preorder, the admin needs to navigate to the Pre-Order->Pre-Order Product List. Here, under the Pre-Order product list section, the admin will find all the created Pre-Order products if any

Here, the admin can –
- Add a new Pre-Order product(manually one by one) by tapping the Add button that is adjoining the refresh button.
- Delete/Edit already created pre-order products, and
- Tap the refresh button to convert the out-of-stock products to PreOrder Products in bulk. Thereafter a success message is also shown to the admin that products have been converted to preorder. In the above image, we can see that only 16 products were converted to PreOrder.
 After tapping the refresh button, all of the products are converted to PreOrder products.
 The stock status of the preorder product is set to the stock status as chosen by the admin from the module configuration settings.
Add New Pre-Order Product
To add a new Pre-Order product, click on the Add button at the top right-hand corner of the Pre-Order product list page and this opens a page to add a new one.

Here, you have to –
- Search and select the product within your product catalog to which you want to add the Pre-Order.
- Then select Pre-Order mode as – Full.
- Set the Pre-Order quantity that will be available for this product. Make it as ‘0‘ or empty to allow unlimited quantity for pre-order.
- Now set the Quantity per order that will be contained within a single order. Make it as ‘0‘ or empty to allow an unlimited quantity of products per order.
- Set the number of orders a customer can place. Make it as ‘0‘ or empty to allow an unlimited quantity of products per order.
- Enter the PreOrder Discount that will apply to the product.
- Enable the option One IP one Order option so that the same IP address can not place multiple pre-order.
- Select the Start Date for the pre-order.
- Then select the Date for the pre-order.
- Select the status as Enabled or Disabled.
- Lastly, click the Save button top to save the pre-order product.
Add New Pre-Order Product(With pre-order mode as Partial):

Here, you have to –
- Search and select the product within your product catalog to which you want to add the Pre-Order.
- Select Pre-Order mode as – Partial
- Add Price – The entered percentage of the price of the product will be taken initially and the remaining when the pre-order will be complete.
- Set the Pre-Order quantity that will be available for this product. Make it as ‘0‘ or empty to allow unlimited quantity for pre-order.
- Next set the Quantity per order that will be contained within a single order. Make it as ‘0‘ or empty to allow an unlimited quantity of products per order.
- Set the number of orders a customer can place. Make it as ‘0‘ or empty to allow an unlimited quantity of products per order.
- Enter the discount that will apply to the product.
- Enable the option One IP one Order option so that the same IP address can not place multiple pre-order.
- Select the Start Date for the pre-order.
- Select the Date for the pre-order.
- Now select the status as Enabled or Disabled.
- Lastly, click the Save button top to save the pre-order product.
PreOrders – Admin End Management
In Pre-order management admin can check pre-ordered products order, payment details, shipping details, and product details as per the following image.

Notifications –
As per the selection made in the configuration settings for the notifications, the admin can choose the mode of notification as Automatic, Manual, and Both.
Automatic:
In the case of automatic, the notifications are sent automatically to the customer on a particular event.
Manual:
Manual selection for the notifications, when the admin reaches the Pre-orders section, he can see a Notify button at the top right-hand side. Here, the admin can check the check-boxes of the customers to whom he wants to send the notifications and click the Notify button.

After this, click OK on the pop-up to send the notification.

Now, you can see the notification has been sent to the customer with a success message.

Both:
In case both are selected for the notifications, then the admin can send notifications manually as well apart from the notifications that are sent automatically to the customers for whom the notifications have not been sent automatically.
Pre-Order Enquiries – Admin Management
The admin can check all Pre-Order inquiries of customers by navigating to Pre-Order->Pre-Order Enquiries. Admin can also filter the inquiry list using the Customer Name, Email, Status, Subject, and Product Name. The admin can also delete the inquiry list as required.

To view an inquiry, just click the View button under the Action column for the particular customer. Here, the admin can revert to the customer’s inquiry by entering the query and selecting the status as Close or Resolved as required.
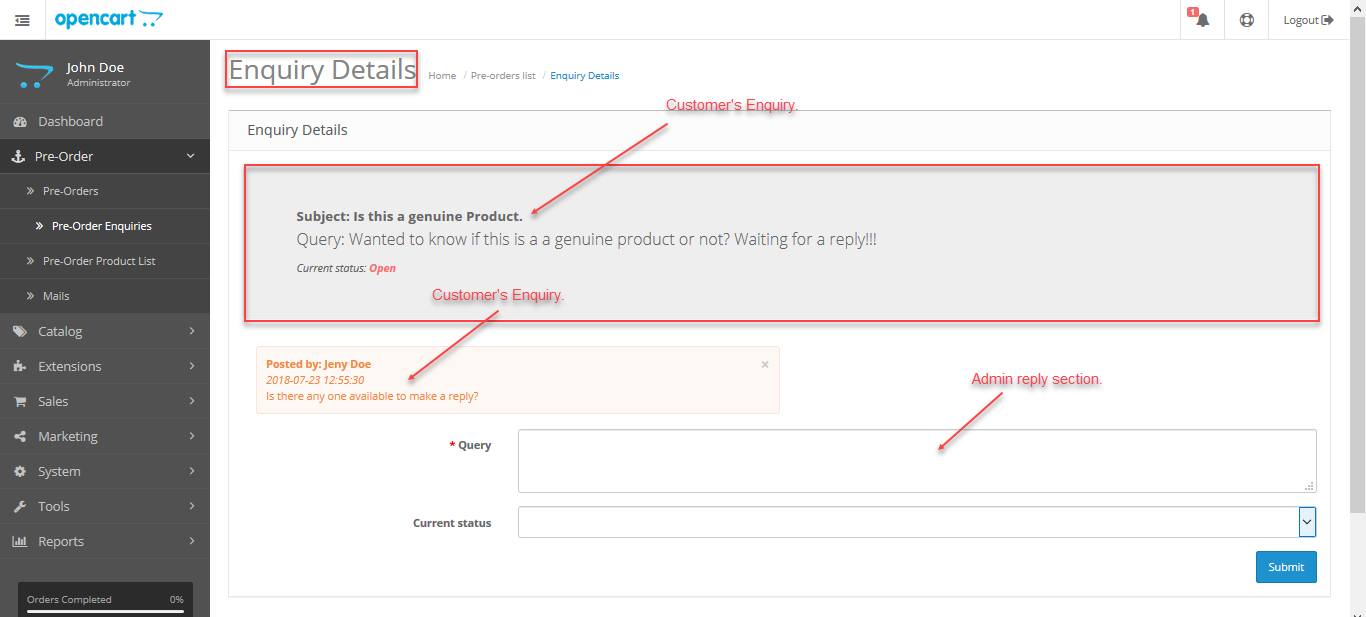
To reply, the admin will enter the query and select the current status as open/resolved, and lastly, click the Submit button to send in the reply to the customer.
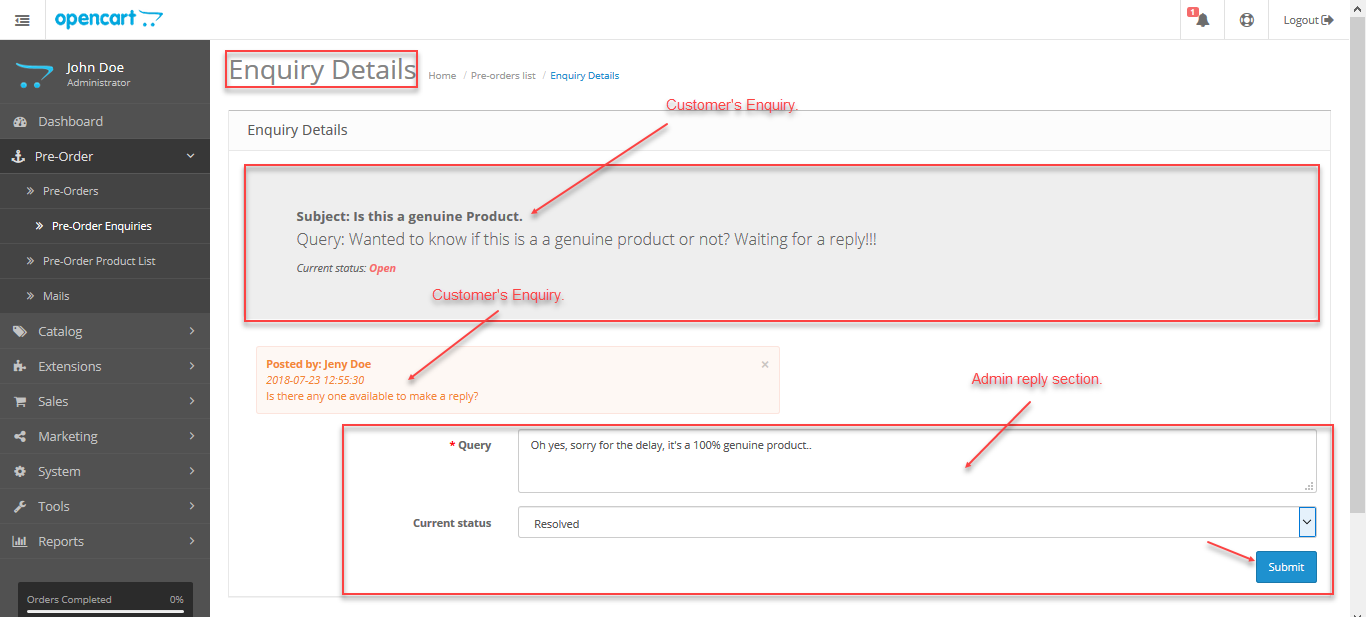
After sending the reply, the admin can see the complete conversation.

Mails – Admin Management

Under this section, the admin can create the pre-order emails. The admin can also filter the emails using the Id, Name, Subject, and the message and edit the created emails.
To create one click on the Add button at the top right end corner. This brings up the section to create the email as shown below in the snapshot.

Here, the admin will enter –
- Name: The entered name will display at the time of selection.
- Subject: Enter the subject of the email.
- Message: Add the mail message.
Before saving the mail, you can check the info. section tab. Here, you will find various keywords that you can make use of within your emails.

- Lastly, click the Save button to save the mail.
Workflow – Customer End
Purchasing a Pre-Order Product at Frontend:
Pre-Order Type – Full
The customers can see the Pre-Order option for the available Pre-order product on the category page.

When the customer will go to the product page they will find a “Login” button, if they already haven’t logged in. Click the Login button to log in. Please note that a Login is required for pre-ordering a pre-order product.

After login, go back to the pre-order product and you will see the Pre-Order button.

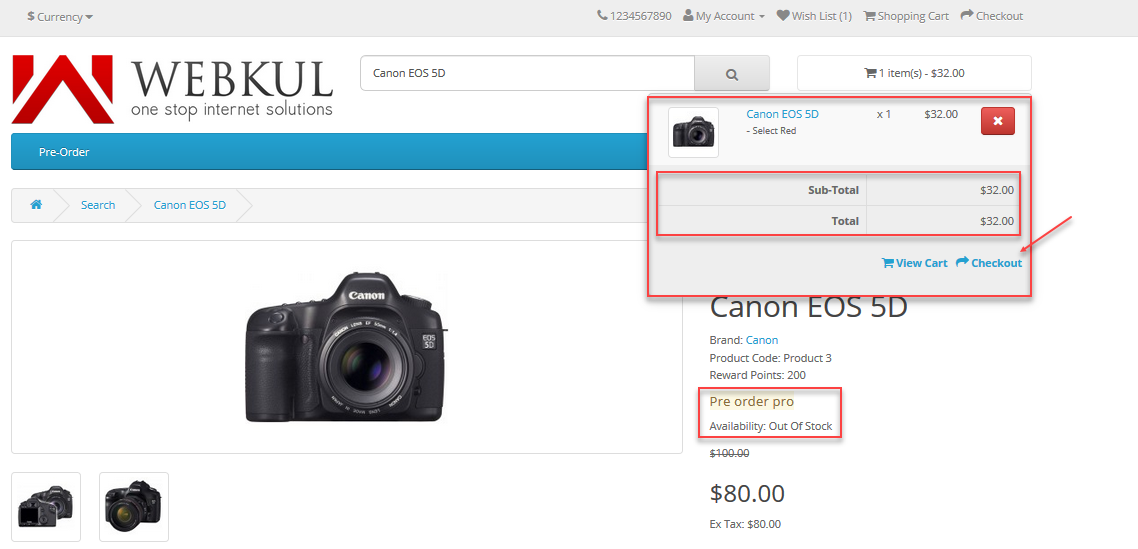
As this pre-order is type – full, the customer will have to pay the complete cost at a time. And when the product will be in stock the product will be shipped to the customer directly.
Clicking the Pre-Order button will add the product to the cart. If the pre-order discount is enabled then that discount will display as per the following image.

Now, click the checkout button to proceed further. On the checkout page, click the Confirm Order at the last.

Now, whenever the pre-order product availability date arrives the product will be shipped directly to the customer’s address.
Pre-Order Type – Partial
As it’s a partial payment pre-order product, you will see the message displayed that “Pre Order price – 40% before completion of the Order” and that would be $32. Depending upon the percentage set by the admin in the backend configuration settings, this message will display.

If you add more than what is set by the admin as maximum product quantity, you will see an error message that “You can not buy this much quantity, minimum 1 quantity is allowed ” as shown below in the snapshot.

The admin has set a limit on how many orders a customer can place, like – the admin has set the limit of 1 order per customer then when the customer goes for purchasing the same pre-order product again a message will display.

Now, select options if any for the product and click on the Pre-Order button to add it to the cart.
Click on Checkout and lastly, click on the Confirm Order button as shown below.

Pre-order list
To check your pre-orders navigate under your account panel to Pre-Order Pro->Pre-Order List.

In the image above, the order Id 60 has done the partial payment and under the Action column, the add to cart button is inactive. Now, when the product gets in stock this in-active button will become active so that the customer can add the product to the cart and make the rest of the left-over payment.
Also, at this time when the product gets back in stock email notification for the same is sent to the customer as shown below in the snapshot.

Add to cart button is active after the product gets in stock.

For the partially paid amount, whenever that product comes in stock the customers will receive an email to complete their payment for that pre-order product as per the snapshot below.

Customers can click on the add to cart button to make the rest of the payment. This will add the product to the cart and the pre-order session will get enabled. Now, the customer can make the checkout by clicking the checkout button within the shopping cart.

Furthermore, clicking the checkout button will bring the checkout page, here click the Confirm Order button to complete the purchase of the pre-order product with the partial payment.

Lastly, navigate to the Pre-order List section to check the status and remaining amount for the partial order.

Order Status for PreOrder Products
After a customer places an order for the PreOrder product, the status that gets visible to the customer depends upon the selection made by the admin from the module configuration settings(Order Status for Pre-Order Products).

The order status depends upon the admin’s selection and not on the default order status.

That’s all for the OpenCart Pre-Order Pro. Still, have any issues feel free to add a ticket and let us know your views to make the module better at our HelpDesk System.
Current Product Version - 4.0.0.0
Supported Framework Version - 3.x.x.x

waste of time