Opencart Marketplace Advanced Custom Shipping module will allow the marketplace sellers and the admin to add custom shipping to their products. Now the sellers and the admin can add their charge list.
The formula list to generate the shipping cost for shipping their products.
This module calculates shipping based on Quantity, Price(with or without tax), Zip Code(country-wise), Volume(according to the volume of the products), Weight, Per Item, and Flat Rate.
This module is an add-on of the Opencart Marketplace module. To use this module you must have first installed the Opencart Marketplace.
Note:
1. This module supports all templates and themes including the Journal theme.
2. Opencart Marketplace Advanced Custom Shipping module supports the Multi-Store feature of default Opencart.
Features – Opencart Marketplace Advanced Custom Shipping
- Sellers can Add/Edit and Delete their own Charge list.
- The Sellers can add their own Combinational Formula.
- Sellers can upload Postal Code, Price, Quantity, Weight, & Weight values in the range table.
- The Sellers can select uploaded CSV type as Fixed or Range.
- Sellers can also add values for Fixed table entries.
- The admin can select the Categories that will be available for the sellers for Creating the Charges.
- Admin can select the Seller Allowed Rules that will be available for the marketplace sellers.
- The Admin can Add/Edit and Delete their own Charge list.
- Admin can Approve/Disapprove the Charge list and Formula List of Opencart marketplace seller.
- The Admin can Add/Edit the charge list for the marketplace sellers as well.
- Admin can upload Postal Code, Price, Quantity, Weight, & Weight values in the range table for himself and the marketplace sellers via CSV.
Installation – Opencart Marketplace Advanced Custom Shipping
Installation of Opencart Marketplace Advanced Custom Shipping for Opencart is very simple. After extracting the zip file, choose your Opencart Version Folder and in that, you will find folders admin, catalog, and ocmod.
Now, copy the admin and catalog folders into the root directory of your Opencart website. Please view the screenshot below for a better understanding.

Once you have copied the folders in the previous step, then login to admin and from the main menu go to Extensions->Extension installer and upload the XML file – wkadvancecustomshipping.ocmod.xml. The XML file can be found inside the ocmod folder of the downloaded zip. Please choose the correct Opencart Version Folder.

After uploading the wkadvancecustomshipping.ocmod.xml file, go to the Extensions > Modification and click on refresh field.

Also after that in Admin Panel, go to System -> Users -> Usergroup and edit ‘Administrator’ and click on select all for both Access and Modify Permission and save it.

After that navigate to Extensions -> Shipping-> Opencart Marketplace Advanced Custom Shipping. Now click on the edit button to edit the module.

Module Translation
This Opencart Marketplace Advanced Custom Shipping module supports multiple languages so this section will describe how to make the module work in different languages. Please check this link for language translation.
Module – Configuration
After the successful installation of the module, the admin will navigate to Extensions->Shipping->Marketplace Advanced Custom Shipping and tap the Edit button to configure the module for use.

Here the admin can:
- Enable/Disable the module.
- Select the Seller Allowed Category (Flat Rate, Per Item, Post Code, Price, Quantity, Total, Weight, & Volume) by which the seller can create the charges.
- Set the Seller Allowed Rules (Round, Adjust, Maximum, Minimum, Zone, City, Country, Post-Code, and Currency) which can be used by the sellers to apply rules on the charges.
- Also, set “Seller Override” to Enabled/Disabled (If no shipping charge has been made by the seller and the Override option is set to “Enabled” then the sellers shipping cost will be calculated on the basis of the admin’s shipping formula else sellers shipping cost will be calculated on the basis of the seller’s shipping formula).
- Select the Tax Class as required.
- Also, select the Length Class (Whatever option you select, the length of the product will be converted into that).
- Select the Weight Class (In this weight class, the weight of the product will be converted into selected weight class ie: Kilogram, Gram, Pound, Ounce).
- Set the Sort Order for the shipping module.
After the configuration of the module, the admin will tap the save button to save the configuration.
Seller Allowed Category:
- Flat Rate
With this option, the seller can set Flat Rate for his shipping. - Per Item
Here, with this option, the seller can set Per Item shipping cost. - Post Code
With this option, the seller can set the shipping cost by using the zip code of the customer. - Price
Here, the seller can set the shipping cost by using the total cost of products without tax. - Quantity
With this option, the seller can set the shipping cost by using the total quantity of products. - Total
Here, the seller can set the shipping cost by using the total cost of products with tax. - Weight
With this option, the seller can set the shipping cost by using the total weight of products. - Volume
Here, the seller can set the shipping cost by using the volume of the product. Price, Quantity, Total, Weight, Volume can set as fixed, ranged, or apply rules on these charge types.
Seller Allowed Rule:
- Round
The round will change the amount by which the shipping charge will be calculated.
Also, the round has three options to select from –- To the nearest (Value nearest to the integer value is selected)
- Down to the Nearest (Value nearest to lower integer value)
- Up to the Nearest (Value Nearest to the Upper integer value)
For example:
A) If the shipping cost is $10
and value is 3
then the total shipping cost would be
In Case of:
1)To the nearest
factor-> 10/3=>3.33 then nearest integer value is 3 and the total shipping cost would be $3*3=$9
2)Down to the nearest
Also, factor-> 10/3=>3.33 then down to the nearest integer value is 3 and the total shipping cost would be $3*3=$9
3)Up to the Nearest
factor-> 10/3=>3.33 then up to nearest integer value is 4 and the total shipping cost would be $4*3=$12
B)If shipping cost is $17
and value is 3
then total shipping cost would beIn Case of:
1)To the nearest
factor-> 17/3=>5.66 then nearest integer value is 6 and total shipping cost would be 3*$6=$18
2)Down to the nearest
Now, factor-> 17/3=>5.66 then down to the nearest integer value is 5 and the total shipping cost would be 3*$5=$15
3)Up to the Nearest
factor-> 17/3=>5.66 then up to nearest integer value is 6 and the total shipping cost would be 3*$6=$18
- Adjust
This will allow the seller to adjust the shipping amount after shipping the calculation of that charge.
Here you can select with-in two options:
- Final Charge: the Final charge will be the sum of all final charges which will be added in charge formula after shipping charges.
For example:
In a shipping charge formula: “sum(max(4,5,6),min(7,8,9))”
and we have given sub charge in all charge id.
Final charge in charge id 4 -> $5 and per-item cost is -> $10
The Final charge in charge id 5 -> $3 and per-item cost is -> $15
Final charge in charge id 6 -> $4 and per-item cost is -> $20
Then from formula max(4,5,6) the sub charge will be $12 (add all final charges) and item cost will be $20(max value of per item cost).
so shipping cost => max(4,5,6) -> $32
Now Final charge in charge id 7 -> $5 and per item cost is -> $8
Final charge in charge id 8 -> $4 and per item cost is -> $10
Also, final charge in charge id 9 -> $3 and per item cost is -> $12
Then from formula min(7,8,9) the Final charge will be $12(add all final charges) and item cost will be $8.
So shipping cost => min(7,8,9) ->$20
And with the formula sum(max(4,5,6),min(7,8,9)) total shipping cost would be $52. - Sub Charge: Sub charge will be the last charge that was applied in charge formula. It will override all previous charges.
For example:
In a shipping charge formula: “sum(max(4,5,6),min(7,8,9))” and we have given sub charge in all charge id.
Sub charge in charge id 4 -> $5 and per item cost is -> $10
The Sub charge in charge id 5 -> $3 and per item cost is -> $15
Sub charge in charge id 6 -> $4 and per item cost is -> $20
Then from formula max(4,5,6) the sub charge will be $4 (Override other sub charges).
Item cost will be $20(max value of per item cost).
so shipping cost => max(4,5,6) -> $24
Sub charge in charge id 7 -> $5 and per-item cost is -> $8
Sub charge in charge id 8 -> $4 and per-item cost is -> $10
Sub charge in charge id 9 -> $3 and per-item cost is -> $12
Then from formula min(7,8,9) the sub charge will be $3(Override other sub charges) and item cost will be $8.
So shipping cost => min(7,8,9) ->$11
Now sum(max(4,5,6),min(7,8,9)) => sum($24,$11) => $35
So the total shipping cost would be $35.
-
Maximum
This will be the maximum amount that the seller can charge from the customer.
For example:
The shipping charge is $80 and the seller has maximum amount to $50, then a shipping charge will be 50$.
- Minimum
This will be the minimum amount that the seller can charge from the customer.For example:
If the shipping charge is $30 and the seller has set the minimum amount to be charged as $50 then the shipping cost will change to $50.
- Zone
Here the seller can select the Zone as – Is or Is Not. - City
The seller can select the City as – Is or Is Not. - Country
Here the seller can select the Country as – Is or Is Not. - Post Code
The seller can select the Post Code as – Is or Is Not. - Currency
Here the seller can select the Currency as – Is or Is Not.
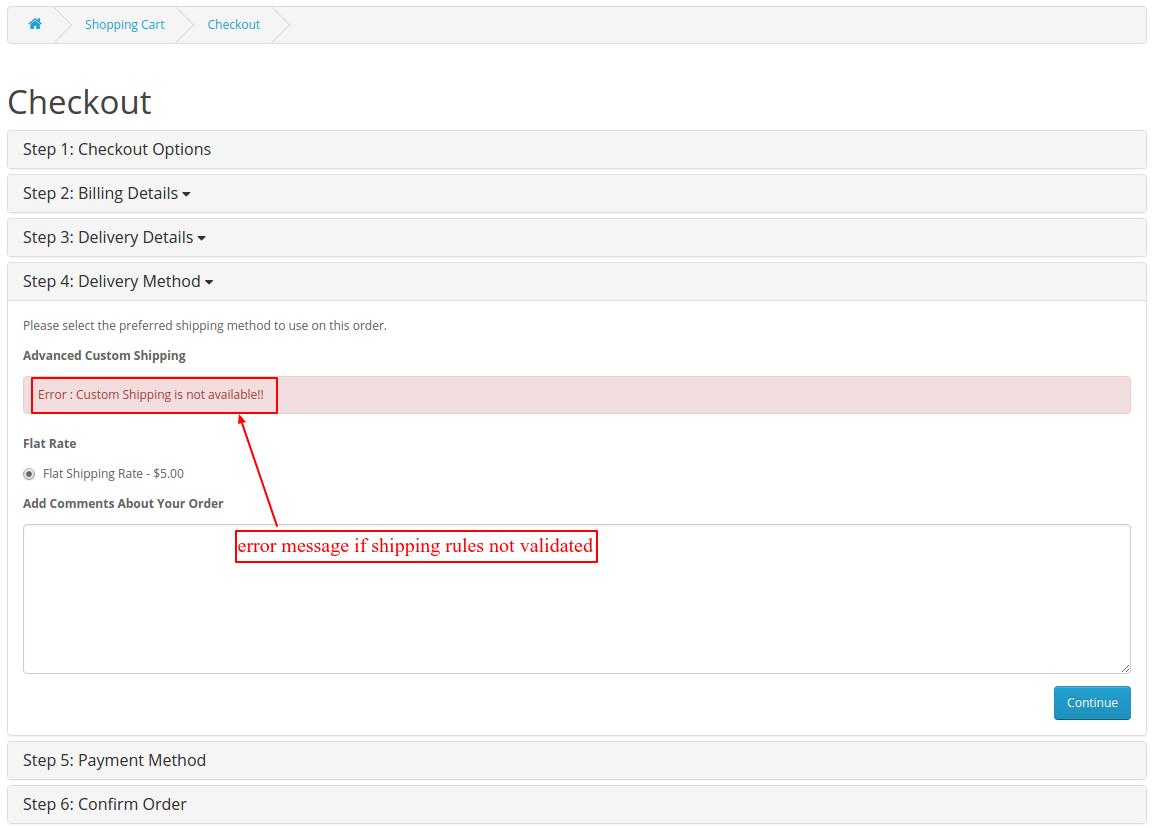
Note: Shipping charges will be calculated on the basis of rules. If there are more than one rule created then all of them must be validated to calculate the total shipping. If shipping rules not validated then it gives an error as Custom Shipping is not available.
Seller Configuration – Opencart Marketplace Advanced Custom Shipping
After the successful installation of the module, the sellers will find two menu options under their account panel to manage their shipping –
- Advance Shipping List
- Charge Combination

Advance Shipping list:
After clicking on the “Advance Shipping List” menu option, another page opens up and here you can find a list of all the shipping charges.

Here, the seller can add a new charge, delete a charge, and can edit any previously created charges. To create a new charge, click on the “Add” button.
After clicking the add button, another page opens up where the seller has to input the Charge Name, Choose Shipping Charge Type (From the allowed charge types allowed by the admin), input the Price Per Item (according to the shipping charge type selected the seller). After this, the seller will click on the “Rule” button to define the rules that will be applicable to this configuration.
Clicking on the “Rule” button will bring up the option to select how the rules will be applicable for the current configuration.
If the shipping charge type is “Post Code” then the seller selects a country and the seller can upload CSV for value for the “Range table” or “Fixed table“. A seller can also fill these details manually.
In the case of Range table entry, there are four columns-
1. From–
- If Postcode selected as charge type then the initial postcode has to fill.
- When Price selected as charge type then the minimum price has to fill.
- If Quantity selected then starting quantity to be set here.
- When Total selected as charge method than starting total have to fill.
- If Weight selected then the initial weight has to fill.
- When Volume selected then initial volume have to fill.
2. To–
- If Postcode selected as charge type then the last postcode has to fill.
- When Price selected as charge type then the last price has to fill.
- If Quantity selected then the highest volume to be set here.
- When Total selected as charge method then the last total has to fill.
- If Weight selected then final weight have to fill.
- When Volume selected then the final volume has to fill.
3. Price(fill shipping price here)
4. Per(fill per quantity/volume/weight value)

In the case of the fixed table entry, there are three columns-
1. Fixed– seller can fill fixed value here ie. postcode/price/quantity/total/weight/volume
- If Postcode selected as charge type then postcode has to fill.
- When Price selected as charge type then price have to fill.
- If Quantity selected then volume to be set here.
- When Total selected as charge method then total have to fill.
- If Weight selected then the weight has to fill.
- When Volume selected then the volume has to fill.
2. Price(fill shipping price here)
3.Per(fill per quantity/volume/weight value)

The seller can select from the below-mentioned rule options –
Adjust –
- Round
- Adjust
- Maximum
- Minimum
Location –
- Zone
- City
- Country
- Post Code
Order –
- Currency
After setting up the rules applicable for this configurations setting, click the “Save” button to save the charge list.
Charge Combination
Under this menu option, the sellers will be able to set the charge combination/charge formula that will be applicable on the shipping charges to generate the final shipping price.
To add a new charge formula click the “Add” button as per the snapshot below.
Note: Always remember that the number of left brackets used should equal the number of closing brackets. Also, remember to use the comma separator for separating the charge list Ids.
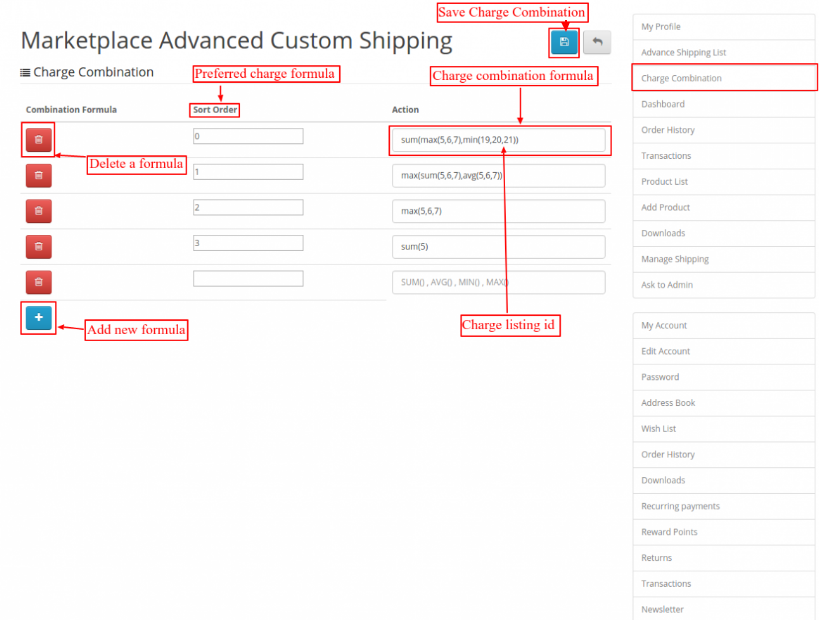
Sellers can get charge list id from the Advance Shipping list column.

Sort Order:

A formula gets applied according to the sort order of the formula. The minimum value of sort order will apply preferred.
Formula example: max(sum(5,6,7),avg(5,6,7)) [The numbers 5,6,7 here signify the Charge list IDs].
If charge combination is sum(5,6,7) and shipping cost for charge list id 5 is 7$, for charge list id 6 is 8$, for charge list id 7 is 9$.
then total shipping cost on the basis of charge combination formula ie. sum(5,6,7) = 24$
Buyer-End Workflow
When Buyer will place an order of seller’s product, the buyer can see Advanced Custom Shipping under the shipping methods like the below screenshot.

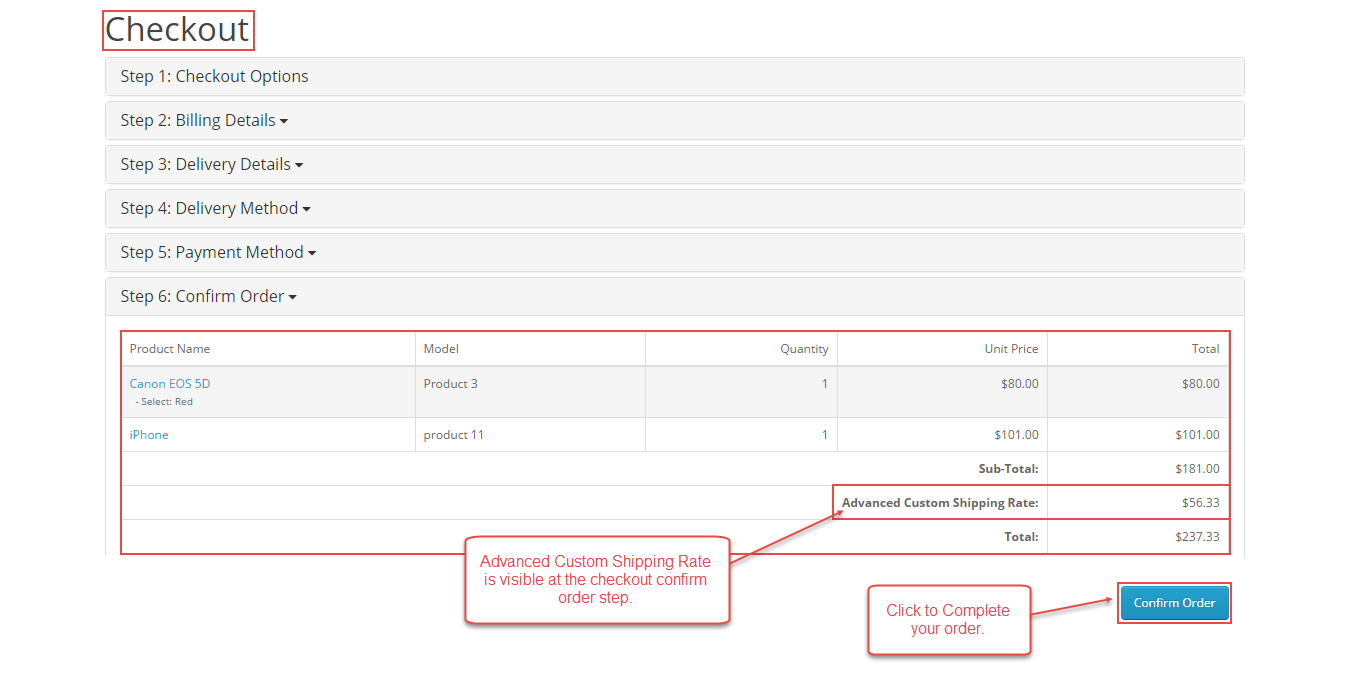
Buyers will be able to see the selected shipping method again at “Order Review” section, and then the buyer can tap on “Confirm Order” button to complete their order.
After the invoice gets generated, the customers can also see the selected shipping method for the ordered products under Order History ->View Order page as shown below in the snapshot.

Admin Management – Opencart Marketplace Advanced Custom Shipping
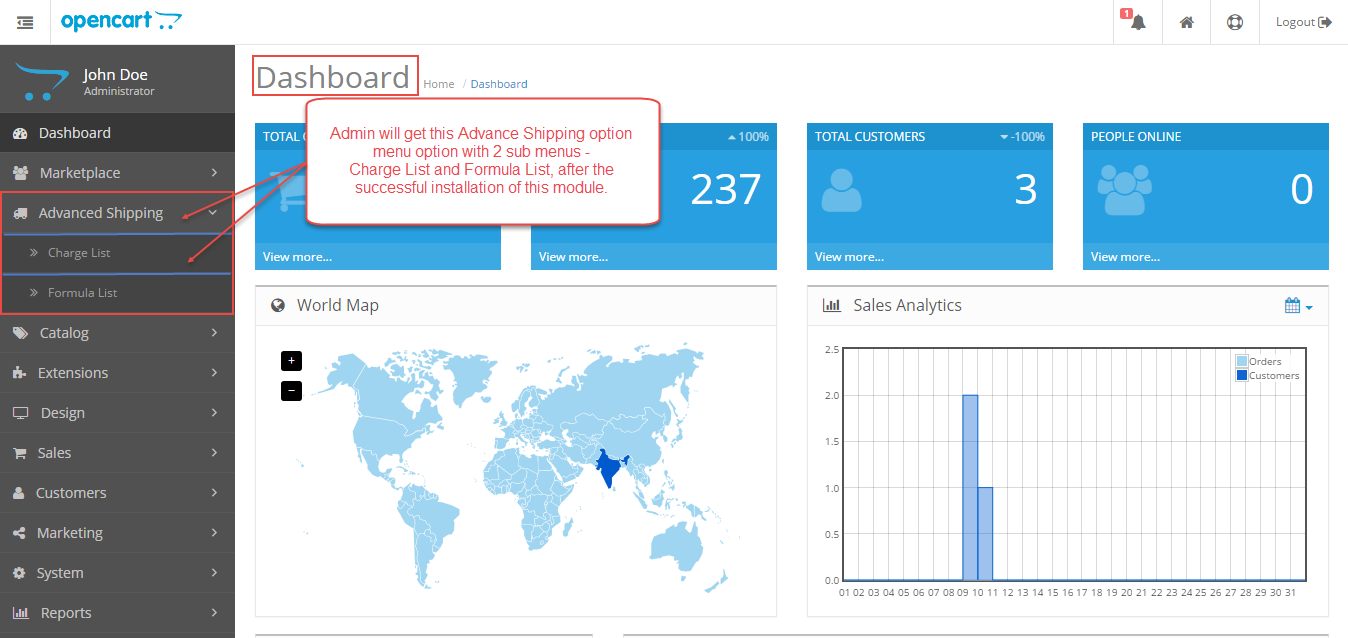
After the installation of the module the admin will see “Advanced Shipping” menu option on the admin side panel with two sub-menus – Charge list and Formula List.
The admin can set the configuration for himself or for the Marketplace sellers.
Charge list –
Under this sub-menu option, the admin will find all “Charge list” of the marketplace sellers that they have created under their own account panel. Here the admin can edit/delete any charge list, approve/disapprove the charge list of any marketplace seller.
The admin can also add the charge list for himself and the marketplace sellers.
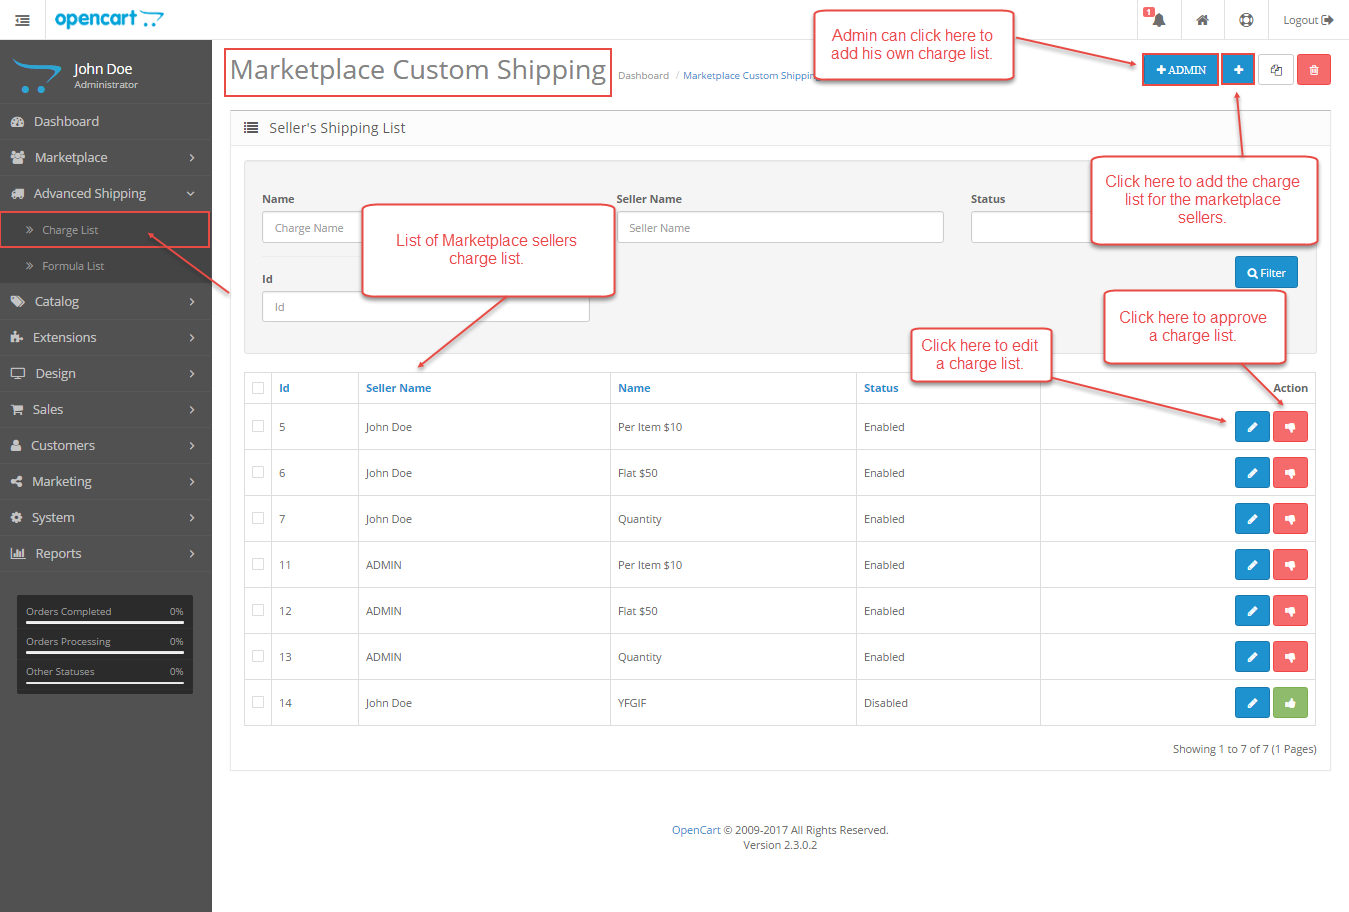
Note: After the charge list has been added, it has to be approved by the admin first. Else, the charge list won’t appear under the charge list menu option in the seller panel.
To add a charge list for himself, the admin will click on the “Admin” button visible on the top right-hand side. After clicking the button, another page opens up where the admin can add his own charge list as shown below in the snapshot.

Here the admin will:
- Enter the Charge Name that is easily recognizable.
- Set the Status as Enabled/Disable as required.
- Choose the Shipping Charge Type from the drop-down.
- Select the country for which the shipping type will apply.
- Click here to upload the CSV file.
- Select the Uploaded CSV table type as Fixed or Range.
- Also, Select the Separator for the file.
Now click the save button on the top right-hand side to save this CSV file. After saving the file you can see another page to map the CSV values. After selecting the corresponding values click the save button to save the charge list.

To add the charge list for the marketplace sellers click on the “add” button at the top right-hand side of the charge list page. Now, another page to add the seller charge list will open as shown below in the snapshot.

Here for the seller, the admin will –
- Select the Seller Name.
- Enter the Charge Name.
- Set the Status of the charge list as Enabled or Disabled.
- Choose the Shipping Charge Type from the drop-down option.
- Enter the value for the Flat Rate and select it as Fixed or Percentage.
- Admin will set the rule to apply by tapping the Rule button.
Lastly, the admin will click the save button to save the configuration for the seller.
Formula List
Admin can easily add the Formula list for his own usage. To do so click on the “Admin” button on the “Formula list” page as shown below in the snapshot.

After this, another page opens up where the admin will fill and select the required fields. After filling all the data click the save button to save the formulas as shown below in the snapshot.

Admin can also add the Formula list for the marketplace sellers. To do so click on the add button on the “Formula List” page as shown below in the snapshot.
After this, another page opens up where the admin will fill and select the required fields as shown below in the snapshot.

After configuring the setting, the admin will click the save button to save the charge list for the selected marketplace seller.
Seller End Management
Sellers will also be able to see the shipping method is used for their orders by going to account ->order history->order information as per the screen shot below.

The shipping method name used can be seen in the order’s invoice as well as shown below in the snapshot.

That’s all for the Opencart Advanced Custom Shipping module still have any issue feel free to add a ticket and let us know your views to make the module better https://webkul.uvdesk.com/.
Current Product Version - 3.0.0.5
Supported Framework Version - 3.x.x.x

Be the first to comment.