Opencart Image Gallery Version2 module is the single best Gallery module for OpenCart platform. Admin has many options to configure the gallery.
With the help of this module, the admin can add/manage images into various galleries according to need.
Moreover, If you want to remove the background from the images check the OpenCart AI Image Background Remover module.
Features of Opencart Image Gallery
- All browser compatible(IE7+,FF,Chrome etc).
- Various images and gallery add to your site.
- Add various effects for display images.
- This Module Has Endless Utility.
- Awesome controls you can zoom images ,change the image using scroll or mouse enter etc.
Installation Of Opencart Image Gallery
Installation of Opencart Image Gallery module is very simple. In the zip file, you will find 3 folders admin, catalog, and ocmod . You just need to move admin and catalog folders into the root directory of your opencart website.

Once you have uploaded the file then login to admin and from catalog section go to Extensions> Extension installer and upload the xml file. The xml file can be found on the ocmod folder under module directory.

After uploading the XML file go to the Extensions > Modification and click on refresh field.

After that in Admin panel go to System -> Users -> Usergroup and edit ‘Administrator’ and select all for both Access and Modify Permission and save it.

Now navigate to Extensions->Modules to install and edit the Opencart Image gallery module.

Module Translation
As this Opencart Image Gallery Version2 module supports multiple languages so this section will describe how to make the module work in different languages. Please check this link for language translation
Configuration of Image Gallery
After the installation of the module, admin can configure the image gallery module.
Thumbs: If this is set as yes then the thumbnail images of all the images in the gallery are visible under the slide show. Also if the Thumbs option is set as ‘yes’ then controls of the slide will not appear.
Cyclic: If it is set as yes then the image slide show will work in a cyclic form.
Autoplay: Set it as yes to play slide show automatically.
Interval: Here admin can enter the time interval between two image slides.
Mouse Wheel: If it is set as yes then the next and previous options os slides will work on mouse wheel control.
Border: If it is set as yes then users can see the image with border.
Slide Count: If it set as yes then users can see the image gallery list with image count.
Controls: If it is enabled then users can see the controls on the slide show. This option will only work when Thumbs option is set as ‘No’.
Control Position: This option is to set control position on the bottom of the slide or on the top of the slide.
How Admin can create Image Gallery
After enabling the module, admin can see Image Gallery on the main menu like this.

Under Image Gallery the admin can add/manage images and gallery. First admin needs to add images using which admin can create the image gallery. To add image click on ‘Add/Manage Images’.

Click on the Add button to add a new image.

After adding images admin can create image gallery from ‘Add/Manage Gallery’.

Next, After clicking on add button admin can select the images for the gallery.

After selecting the images admin can enter the gallery information from the ‘Gallery Information’ tab.

Front end Of Image Gallery
After adding the gallery it is ready to display on the website. Customers can see the list of galleries like this.

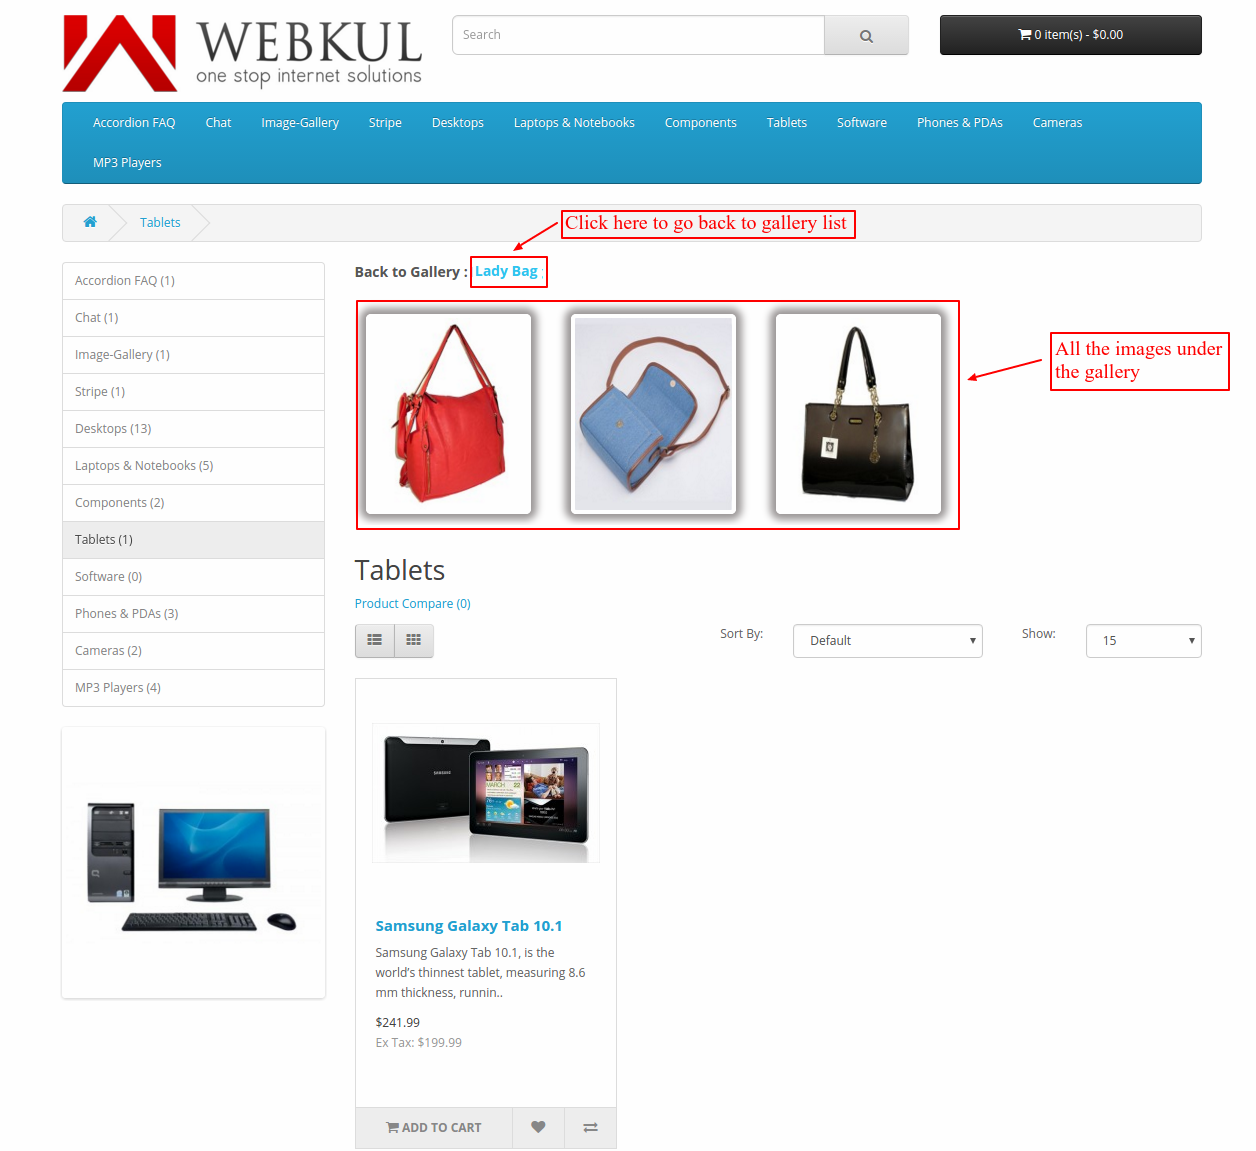
After selecting the image gallery customer can see all the images in the gallery.
After clicking on the image it is popped up and you can see the image slides like this

That’s all for the Opencart Image Gallery Version2 module, If you still have any issue feel free to add a ticket and let us know your views to make the module better https://webkul.uvdesk.com/.
Current Product Version - 3.0.0.0
Supported Framework Version - 3.x.x.x

Be the first to comment.