Google Shopping Feed : If you have ever searched for any product then you must be aware of the Google Shopping Ads which are available on the top right page of the Google search.
With the help of Opencart Google Shopping Feed extension, the store owner will be able to display their products on the Google search page in an attractive and visual manner.
Allowing the Opencart store owners to create Google Product feeds for their store’s products, exporting the products to the Google Merchant account.
The admin can also map the categories of the Opencart Store with the Google Shopping Feed Categories.
Features
- Store products add to Google Feed using content API.
- Products get updated on Google Feed once synced on the store.
- Dynamic Attribute mapping.
- Map store category with Google shopping feed categories.
- Export all products in a single go.
- The admin can add unique shopping feed product value for each product.
- Supports Simple and Downloadable products.
- Option to Authenticate the Merchant account of the user.
- Cron functionality added to export products for google shopping feed.
Video Tutorial
Get the Keys/ Consent Screen –
Installation
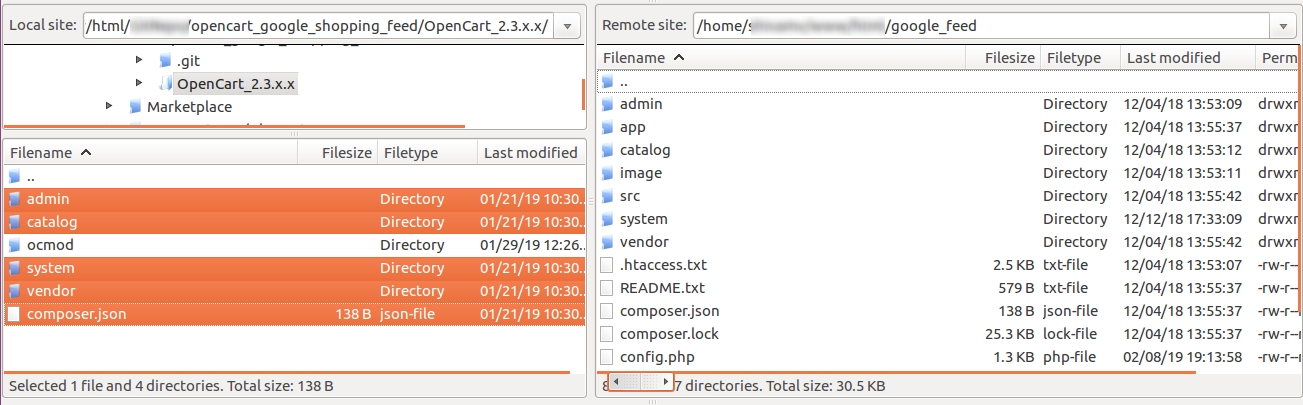
Customers will get a zip folder then they have to extract the contents of this zip folder on their system. The extracted folder has – admin, catalog, system, vendor folder, composer file, and ocmod file.
You need to transfer the admin, catalog, system, vendor folders, composer file, and ocmod file into the Opencart root directory on the server as shown below.
Run Commands
After uploading the files, run the following commands in the terminal for installing the composer.json file.
curl -s http://getcomposer.org/installer | php
php composer.phar install
Note: – You have to increase post_max_size to 200M.
After that, you will navigate to-> Extension Installer then upload the file google_shopping_feed.ocmod.xml which you will find inside the ocmod folder.
After uploading the file click continue as shown below.

Now navigate to->Extensions->Modifications then click refresh on the top right-hand side as shown below.

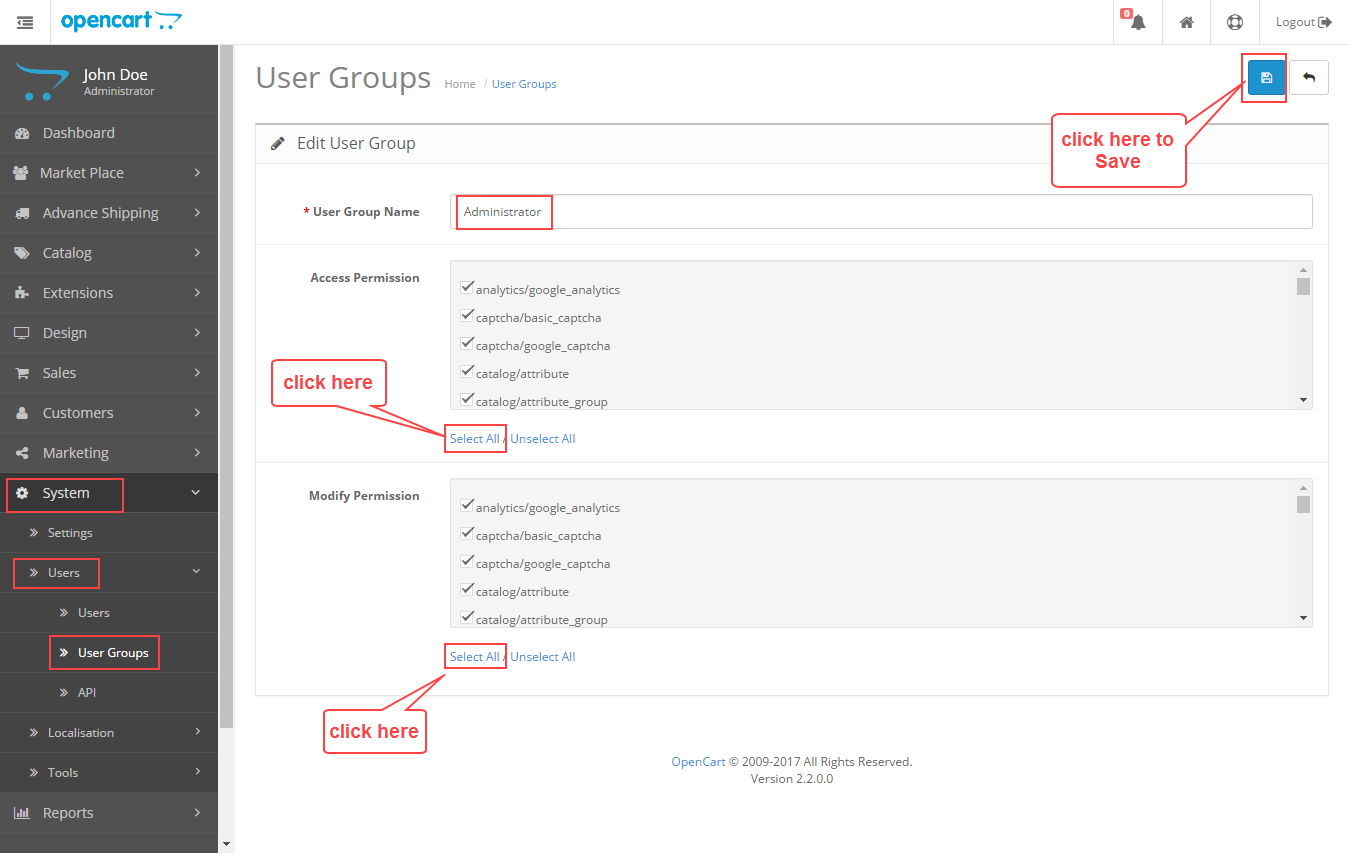
Edit User Groups
After that, go to System>Users>Usergroups. And then edit ‘Administrator’. Click Select All for both Access Permission then Modify Permission and Save it.
After that under Extension > Modules>Google Shopping Feed. You can install the Opencart Google Shopping Feed by clicking on the plus option as shown in the image below.

Module Configuration
After the installation is completed, the admin can navigate to Extensions > Module > Google Shopping Feeds. After that, the admin can click on the edit button as shown in the image below.

By clicking on the edit button, the admin can configure the module. The following sections will appear:
Status: The admin can select the status of the module as enable or disable.
Configuration Setting: The admin needs to enter the Consumer Key ID and the Consumer Secret ID which the admin can get by clicking on the here button.

After entering the credentials, the admin needs to click on the authenticate account to authenticate the credentials.
The admin needs to verify with the registered email ID via which the Google Shopping Feed credentials are created.

After the authentication, the admin can export all the products by clicking on the Export Product as shown in the image below.

Category Mapping Setting:
The admin can set the default Google Feed Category which will be applied when the category is not mapped for the product.

Product Setting:
The admin can set the default setting which will be applied to the products whose details are not filled.

The listed settings that can be set are as follows:
Age Group:
The admin can set the default Age Group for which the product is suitable like Adult, Infant, Kid, Toddler, and Newborn.
Product Available For:
The admin can set the product availability for the Male, Female, and Unisex.
Product Condition:
The admin can set the default conditions of the products like New, Used, and Refurbished.
Apply Tax on Ship:
The admin can choose to set the tax on a product or not.
Note: Tax on ship will only be applicable in the US if set as “Yes”
Tax Rate(%):
The admin can set the tax rate under the following entity.
Target Country:
The admin can set the target country in which the product feeds are to be displayed.
Content Language:
The admin can set the language in which the product content will be displayed.
Product Color:
The admin can set the product option which is to be displayed on the color description of the product.
Cron settings:

The admin can enable the cron functionality in the module to sync the data automatically.
Automatic Cron Execution Status – Admin can enable or disable the cron functionality.
Time Zone – Set the time zone for your cron setup.
Cron Frequency – Set frequency for the cron like daily, weekly, monthly, fortnightly (15 days), and quarterly(90 days).

Start Time – Set the start time for the cron job.
How To Get The Google Shopping Feed Credentials
Create an APP, Get the Client ID & Secret:
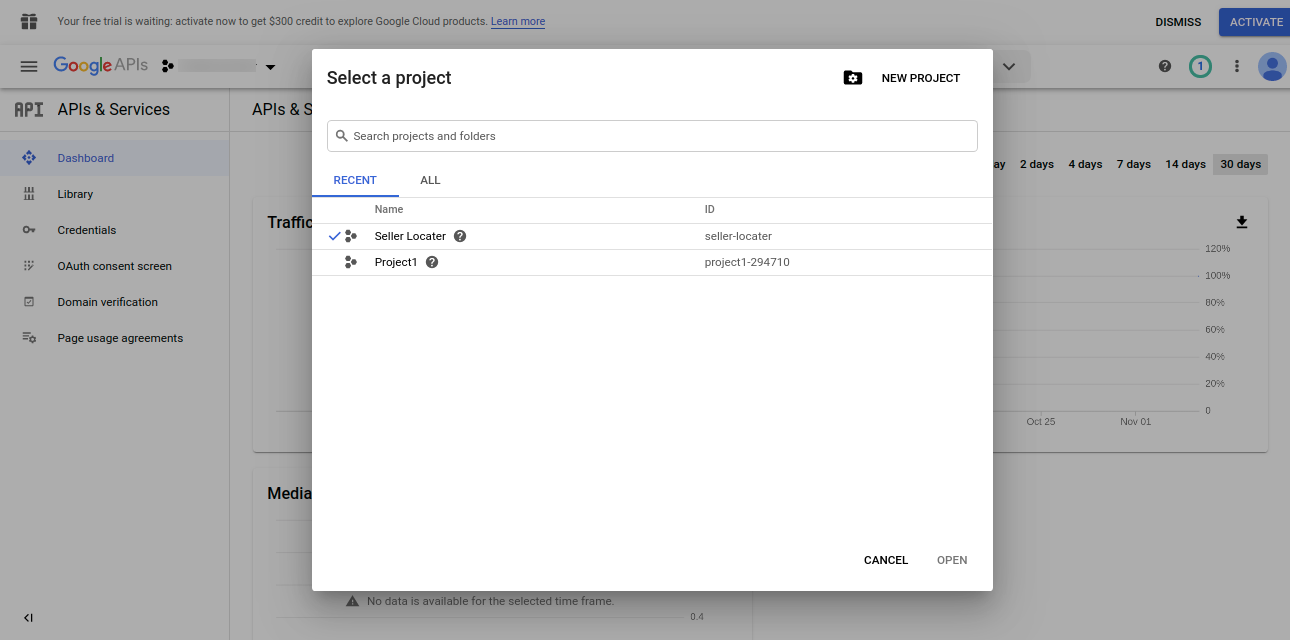
1: Go to console.developers.google and log in using your Gmail ID. After login click a dropdown arrow for the Select a Project option.

2: Click the NEW PROJECT option.
3: Enter your project name select the location and click the Create button.
 4: Select your created project and then click the ENABLE APIS & SERVICES button.


5: Now in the search box type in Shopping.

6: The results will populate and then select – Content API for Shopping.

On clicking the same, another page, Content API for Shopping will become visible as shown below.
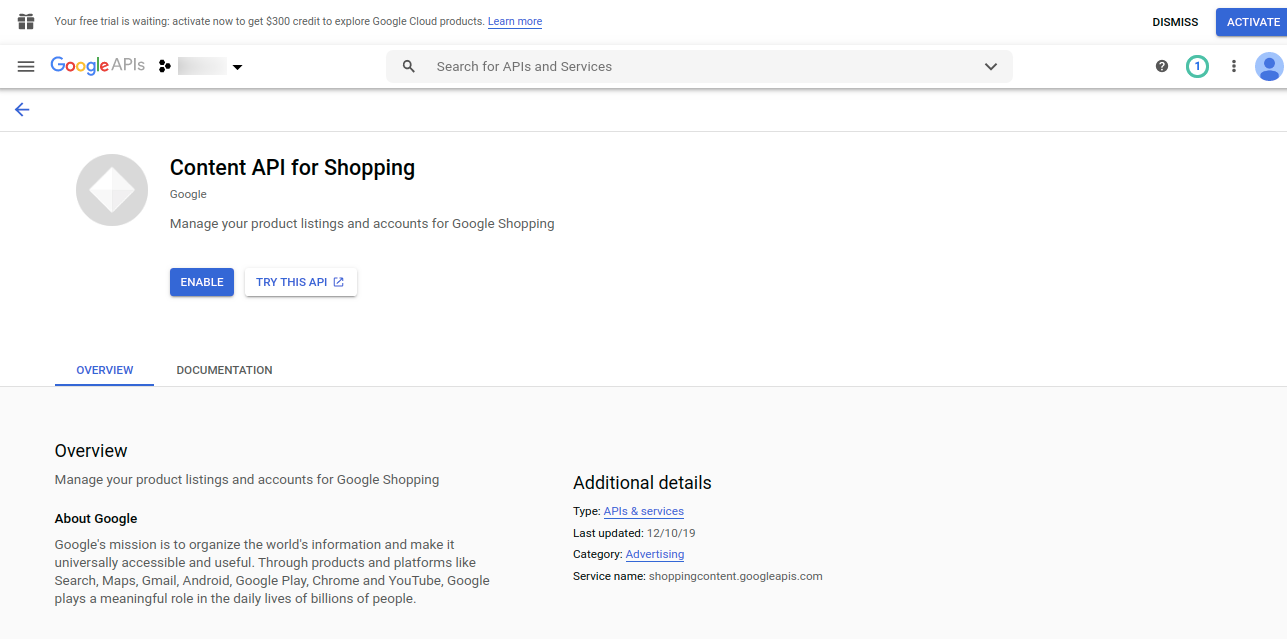
7: After clicking on the “Enable” button now select the created app and then click on the Create Credentials button.

8: Now select the OAuth client ID as shown below in the snapshot.

9: Now on the next screen to create an OAuth client ID, you must first set a product type on the consent screen. For that, the admin will click on the “Configure consent screen”.

Configure And Register The App
After that from the OAuth consent screen, the admin will choose how you want to configure and register your app, including your target users. You can only associate one app with your project.

Selecting the user type will click on the “Create.”
After clicking on the Create, now on the next screen, the admin needs to configure the consent screen for all applications in this project.
- The name of the app asking for consent.
- An image on the consent screen that will help users recognize your app.

After adding details under OAuth consent screen, click on Save an Continue. This takes your to the Scopes section.
Here, you can Add or Remove Scopes and further Save and Continue.

This takes you to the Optional Info Section, under which one can add the details necessary, and click on Save and Continue.

This navigates to the Summary section, under which all the details are visible as shown in the image below.

The one needs to click on the Back to Dashboard button. It navigates to the OAuth consent screen and displays the App name its Verification Status and User Type.

After that move to the credentials section again.
The admin will click on the OAuth client ID as shown below in the snapshot.
Step 10: Under Application, type select the Web Application, and under the Authorized redirect URIs enter the redirect URL.
Example:
For version 3.x.x.x & 2.3.x.x:
https://www.example.com/index.php?route=extension/module/google_feed/callback
For version 2.2.x.x & lower versions:
https://www.example.com/index.php?route=module/google_feed/callback
Now, click the Create button.
Note-
- The authorization URL should be in this format: https://example.com/googleshoppingfeed/oauth/index/

Step 11: Now you can see the client id and the client secret key. Copy them into the module configuration settings.

Sign Up for Google Merchant
1: Go to Merchant Center and click on the Sign-Up button.

2: Log in with the Gmail address that you have used for creating the credentials and click the Next button.

3: On the Terms & Conditions page check the checkbox to agree to the terms & conditions and click the Continue button after that.
4: Now, you need to verify and claim your website URL as shown in the image below.
 After the above steps click Verify URL button.
5: After clicking the verify button a pop-up will appear. Click Continue to proceed further for verification.

6: After clicking the Continue button in the image above, you can see that the website is verified and claimed. Lastly, click the Finish button.
 Now, you can see the Google Merchant Center dashboard.

Google Shopping Feeds – Admin’s End
After the configuration of the module is completed, the admin will be able to see the Google Product Feeds menu with two sub-options:
1. Category Mapping
2. Product List
Category Mapping
The admin can map the Opencart Category with the Google Category, by navigating through Google Product Feed >Category Mapping as shown in the image below:
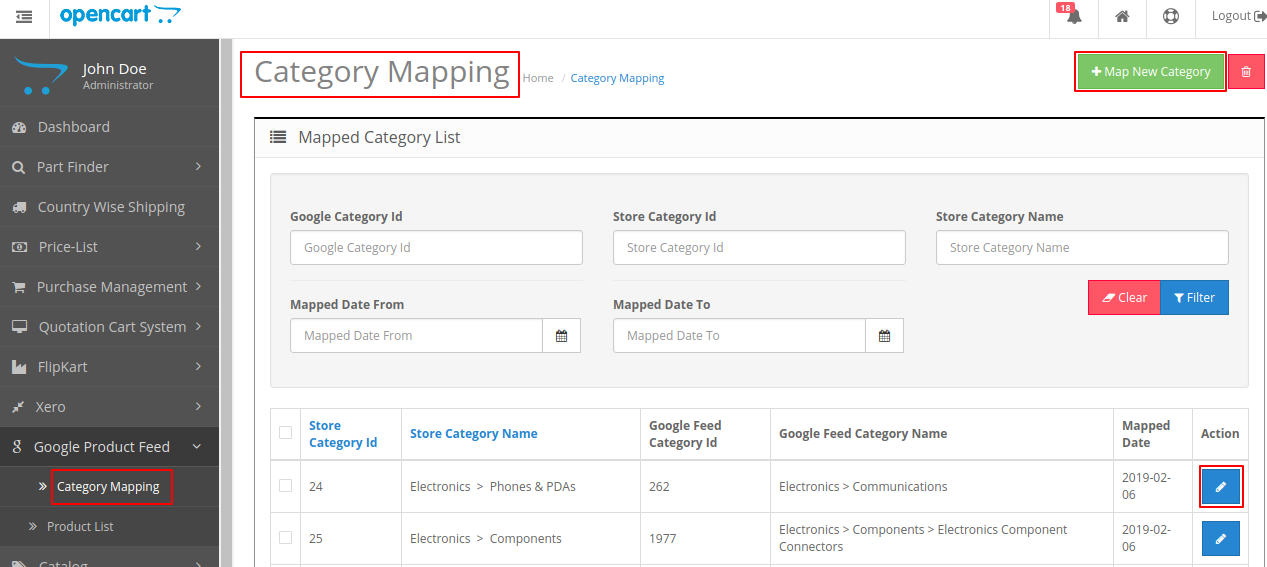
The admin can edit the existing Mapped Category or Map New Category. On clicking on the Map New Category, the following page will appear as shown in the image below.

The Opencart category will be mapped with the Google feed category and its subcategory. After the category is selected, the admin needs to click on the Save Mapped Category button to map the categories. The Saved Categories will get listed on the Map Category List.
If require the admin can also filter out the map categories based on Category Id, Category Name, Mapped Date From, Mapped Date To.
Product List
The admin can view the export products under this section as shown in the image below.

The admin can delete the selected products. To do so admin needs to click on the delete button.
If the export product listing is not visible then the admin can click on here button. After that, the admin can authenticate the credentials again.

If the admin requires to access the Google Merchant Account, then he/she can click on the here option as shown in the image below.

Google Merchant Account
After the admin has configured the extension, mapped categories, and exported the products to Google’s Merchant Account, the exported products will be visible under the Products>List section.
List:

Final Attributes:
The admin can select any product and view the details of the respective products as well under the Final Attributes section as shown in the image below.

Product Edit Page
Apart from adding the products setting as default, the admin can edit the product feeds for any particular product as well. For this, the admin needs to navigate to the Catalog>Products>Edit Product.
Under the Google Shopping Feed Fields section, the admin can enter the following fields that with the corresponding values that are needed to be sent.
The admin needs to save the values for them before saving the product otherwise the default values set in the admin panel will be applicable for these new attributes.

That’s all for theOpencart Google Shopping Feed. Furthermore, If you have any queries or doubts get back to us at [email protected] or raise a ticket at webkul.uvdesk.com.
Current Product Version - 2.2.0.0
Supported Framework Version - 3.x.x.x

6 comments
Greetings for the day!
You need to add the same url as to where the admin will be redirected after they have authenticated the Google Feed Account.
Thanks & Regards
Team Webkul
Greetings for the day!
The product image link gets exported to the Google Merchant account and you can map any option with the product color option in the admin configuration. If you still have any issue or query then please mail us at [email protected].
Thanks
The module will work with any Opencart website, you just need to have a Google Merchant account. In case of any issue, you can mail us at [email protected].
Thanks & Regards
Team Webkul