Opencart Flipkart Connector: Now you can connect you Opencart Store with the India’s biggest online store.
The Opencart Flipkart Connector allows you to connect with the Flipkart store. With the help of this amazing extension, the admin can easily list the products from their Opencart store to the Flipkart Store.
In addition to this, the extension also facilitates the Opencart admin to manage the orders generated from the Flipkart.
Check a brief overview of the configuration and the options under the plugin –
Benefits of using Opencart Flipkart Connector
- Now you can manage your Opencart Store and your Flipkart store products from the same panel.
- Ability to export Opencart store products to the Flipkart makes it profitably amazing by augmenting product sale by taking advantage of the larger customer exposure rate of the Flipkart.
Note: You need to have seller App Id and key details of the Flipkart. For the seller App key and Id, you need to register as a seller with Flipkart. Click on the link to register as a seller with Flipkart.
Features
- Products can be saved one by one for listing on Flipkart.
- Multiple products can be saved for listing on Flipkart by using CSV file mass upload.
- Single products can be saved and listed simultaneously on the Flipkart.
- Ten products can be listed at once on the Flipkart.
- Flipkart saved and listed products can be easily updated from the Opencart admin panel.
- Orders generated from the Flipkart store can be managed from the Opencart admin panel.
- Flipkart orders can be approved or canceled from the Opencart admin panel.
- Invoice and Shipping labels of the Flipkart orders can be generated from the Opencart admin panel.
- Advance filter based search option for Flipkart orders.
Installation
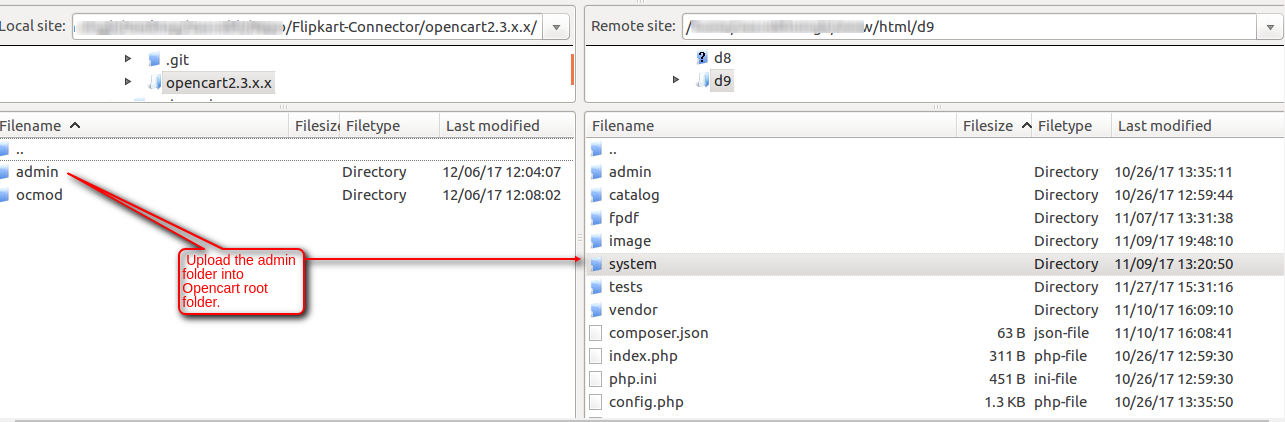
Customers will get a zip folder and they have to extract the contents of this zip folder on their system. The extracted folder has – admin and ocmod folders. You need to transfer the admin folder into the Opencart root directory on the server as shown below.
Now, navigate to Extensions->Extension Installer and upload the file wk_fkconnector.ocmod.xml which you will find inside the ocmod folder.

Now navigate to ->Extensions->Modifications and click refresh on the top right-hand side as shown below.

After the above step, the admin needs to navigate to System->Users->User Groups->Administrator(Click the edit button). Now, select all for “Access Permission” and “Modify Permission” and then tap the save button.

Now go to Extensions-> Modules-> FlipKart Connector and click the install button to install the module as shown below.

Admin Configuration
After the successful installation of the module, the admin needs to configure the module. The module can be configured by navigating through the following path of the Opencart admin panel – Extension > Module > Flipkart Connector > Edit.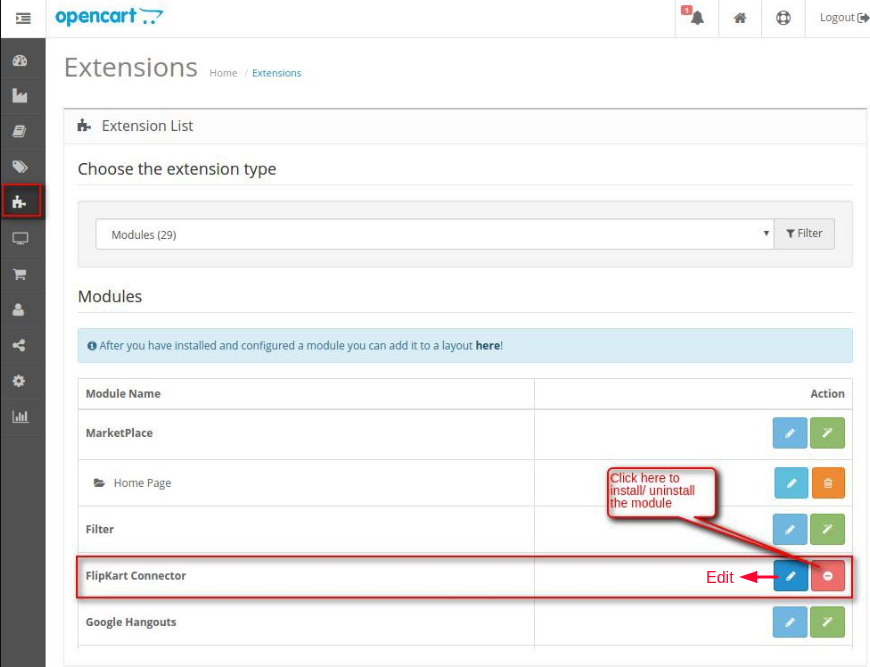
On clicking the Edit button of the module, the admin will be redirected to the module configuration page.
- Status of the module can be Enabled or Disabled.
- App Mode can be set to Sandbox Mode if you need to test the functionality or it can be set to Production Mode if the admin wants to use the module functionality with live Flipkart seller account.
- App Id acquired from the Flipkart seller account needs to be set in this field along with the below App Secret Key to generate the access token, for communicating with Flipkart Seller account through APIs.
- App Secret Key acquired from the Flipkart seller account needs to be set in this field along with the above App Id to generate the access token, for communicating with Flipkart Seller account through APIs.
- Access Token can be generated from the Generate Token button, the access token will be only generated only if the App Id and App Secret Key is provided.
How to get API Keys
Note 1: You need to have seller App Id and key details of the Flipkart. For the seller App key and Id, you need to register as a seller with Flipkart. Click on the link to register as a seller with Flipkart.
Note 2: After the registration, you need to login to Seller APIs – Developer Admin portal.
- Sandbox: Write to [email protected] to get your credentials to log into https://sandbox-api.flipkart.net/oauth-register/login.
- Production: Use your https://seller.flipkart.com username and password to log into https://api.flipkart.net/oauth-register/login

Either you create a new application or in case you have already created an application you can get the App id and App secret key. A form needs to be filled in with necessary details to create a new application.
Once you have created the application, you will receive the App id and App secret key.
Manage Listing Products
The admin can manage the Flipkart listing products by navigating through the following path in the admin panel. The admin can manage the listing products by adding the listing product, updating the listing product, adding the listing product in bulk by the CSV file upload, listing the product on Flipkart and deleting the listing product.
Flipkart Tab > Create/Update List
Add Listing Product One by One
To add the new listing product click on the Add New icon. After clicking the Add New button, the admin will be redirected to add new listing product page. Now, the admin needs to fill all the required fields to add the new listing product.
- Product: Select the product from the auto-suggestion selection field.
- FSN: Provide the unique Flipkart Serial Number for the product.
- SKU ID: Provide the seller SKU Id for the corresponding Listing Id.
- HSN: Provide the Harmonized System of Nomenclature code of the product.
- GST: Provide the Goods and Service Identification Number.
- Listing Status: Set the status to Active to activate the listing of the chosen product or set to INACTIVE to deactivate the listing of the chosen product.
- Procurement Type: Choose the procurement type for the product. The procurement type can be Express, Regular, International Procurement, Made to order or Domestic.
- Procurement SLA: The procurement SLA here is for setting the number days according to the above-selected procurement type.
- MRP: Provide the Maximum Retail Price of the product. (The value should be an integer)
- Selling Price: Provide the selling price of the product. (Selling Price should be less than MRP and the value should be an integer)
- Stock Count: Provide the number of stock of the product.
- National Delivery Charge(per Qty): Provide the delivery charge if the delivery address is out of your locality and zone but the country is same as yours.
- Local Delivery Charge(per Qty): Provide the delivery charge if the delivery address is within your locality.
- Zonal Delivery Charge(per Qty): Provide the delivery charge if the delivery address is out of your locality but the zone is same as yours.
- Package Length: Provide the length of the package which will contain the product.
- Package Breadth: Provide the breadth of the package which will contain the product.
- Package Height: Provide the height of the package which will contain the product.
- Package Weight: Provide the weight of the package which will contain the product.
After filling all the required fields, the admin can do the following actions which are shown in the image below.
- Save the Listing Product: By clicking this button the product will be only saved.
- Save and List the Product: By clicking this button the product will be saved and listed on the Flipkart.
Add Listing Product in bulk via CSV file upload
The admin can save the listing product in bulk via CSV file upload. To upload the CSV file click on the CSV file Upload button.

After clicking on the button, the admin will get a pop-up window from where the CSV file will be uploaded.
- Click on Upload to choose the CSV file of listing products.
- To know more about the CSV attributes you click on the Here link present in the notification.
- Click on the List to save the listing product.
- Click on the Cancel to cancel the chosen CSV file.
Listing the saved products on the Flipkart
After saving the listing products, the admin can list the product on the Flipkart and can get the Listing IDs for the products. To list the product, the admin will navigate through Flipkart tab > Create/Update List.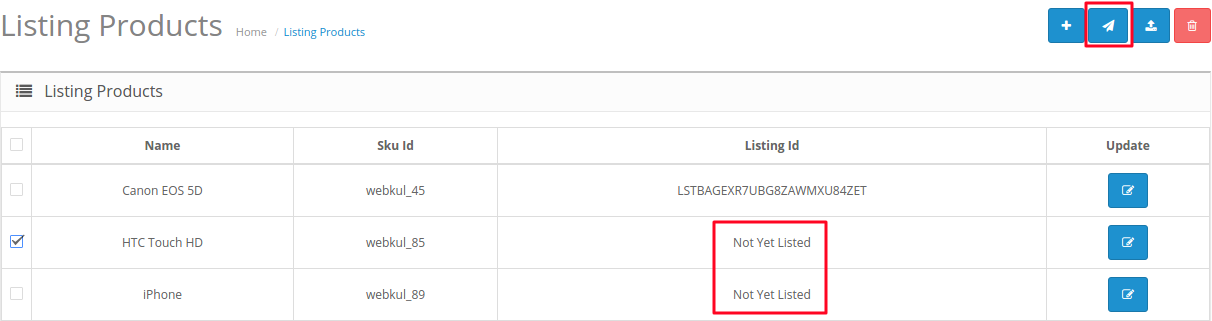
- The admin can select the non-listed product from the Listing Products. The admin can identify the non-listed product by checking their values in the Listing Id column. If the value is Not Yet Listed then that product is not listed.
- After selecting the non-listed products, the admin can click on the “Listing to the selected products” button to list the product on the Flipkart.
Note: The admin cannot select the already listed products for listing and deleting.
Deleting the Saved Listing Products
After saving the listing products, the admin can delete the saved products. To delete the products, the admin will navigate through Flipkart tab > Create/Update List.
- The admin can select the non-listed product from the Listing Products. The admin can identify the non-listed product by checking their values in the Listing Id column. If the value is Not Yet Listed then that product is not listed.
- After selecting the non-listed products, the admin can click on the “Delete” button to delete the selected products.
Note: The admin cannot select the already listed products for listing and deleting.
Manage Flipkart Orders
After listing the products, the admin can also manage the orders generated from the Flipkart store by the customers. To navigate to Flipkart orders navigate through the path in the admin panel.
Flipkart Tab > Order List

After navigating through the given path, the admin will be redirected to the Order List page. The above image shows the Order List page view. The order list contains following informational columns like:
- Order Item Id
- Order Id
- Status
- Order Date
- Dispatch After Date
- Dispatch By Date
- Delivery Date
- Updated At date
- SLA
- Quantity
- Title
- Listing Id
- FSN
- SKU
- Shipping Pin Code
- Dispatch Service Tier
- Payment Type
- Shipment Id
- Shipment Type
Advance Filter Search for Flipkart Orders
The admin can search the Flipkart orders with the help of Advance filters. The image below shows the filter options for Flipkart orders.

- Filter From Order Date: The orders can be filtered on the basis of order’s date range.
- Filter From Dispatch After Date: The orders can be filtered on the basis of order’s dispatch after date range.
- Filter From Dispatch Date: The orders can be filtered on the basis of order’s dispatch date range.
- Filter From Modified Date: The orders can be filtered on the basis of order’s modified date range.
- Filter Based On SKU: The orders can be filtered on the basis of SKU.
- Filter Based On Status: The orders can be filtered on the basis of order’s status like Approved/Packed/Ready To Dispatch/Cancelled.
Actions on the Flipkart orders
The admin can take various actions on the Flipkart orders. The action taken at the Order List panel will simultaneously change the status at the Flipkart end. There are various statuses of orders which can be changed by the admin.
- APPROVED – When the order is placed the order is received as approved by default.
- PACKED – When the order’s labels can be generated and it is marked as packed.
- READY_TO_DISPATCH – When the packed order is made to be ready for dispatch.
- CANCELLED – When the order is canceled.
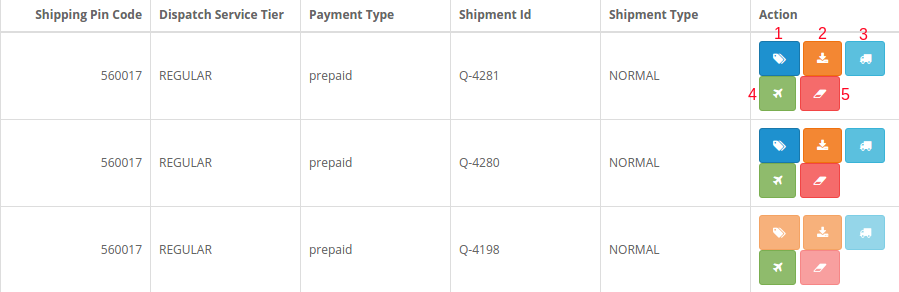
- The first icon is for creating the labels and marking the Approved Order as packed. (Only on orders with Approved status). For creating the labels and marking as packed there are some details which need to be provided like Invoice Date, Invoice Number, Tax Rate and Serial Number(Mandatory if items need FSN).

- The second icon is for generating and downloading the invoice and shipping labels. (Only on orders with Packed status)

3. The third icon is for making the order ready for dispatch. (Only on orders with Packed status)
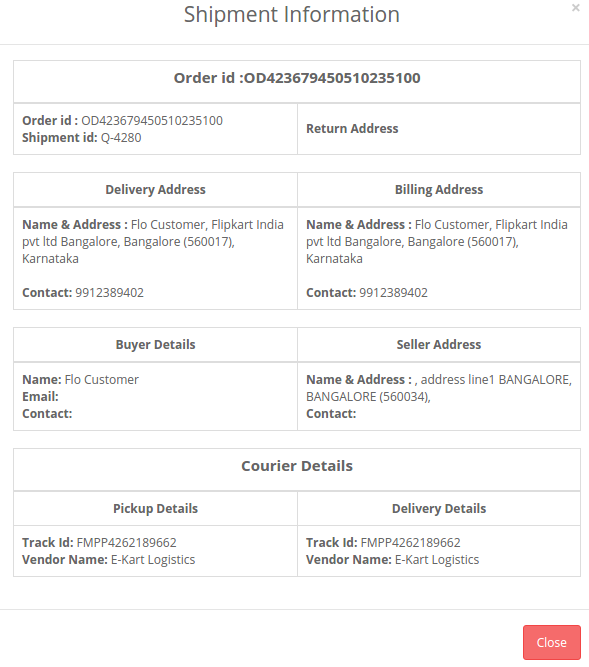
4. The fourth icon is for viewing the shipment details of the order.
5. The fifth icon is for canceling the order.
Support
That is all for the Opencart Flipkart Connector. In case you need more information or require any customization, then please send an email to [email protected]
Current Product Version - 2.1.0.0
Supported Framework Version - 3.x.x.x

Be the first to comment.