OpenCart Amazon Connector helps merchants expand their eCommerce business on Amazon.
Managing sales on both Amazon and an OpenCart store separately can be challenging, but this connector simplifies the process.
With this integration, you can manage Amazon products and orders directly from the OpenCart admin panel.
It helps centralize marketplace operations and reduces the need to switch between multiple dashboards.
The connector allows product import and export between Amazon and OpenCart, ensuring your product catalog remains synchronized across both platforms.
You can also update product details on Amazon directly from the OpenCart admin panel.
In addition, it supports category mapping, allowing you to map Amazon categories with OpenCart categories for accurate product synchronization and listing.
It also enables order synchronization by importing Amazon orders into your OpenCart store, making order management more efficient.
You can manage all your marketplace orders from a single place.
Overall, the OpenCart Amazon Connector simplifies multi-channel selling by managing products, categories, and orders within your OpenCart store.
Additionally, if you would also like to connect your eBay store with Opencart, then you can check Opencart eBay Connector.
Also, you can connect your Opencart Store with the Amazon cloud using the OpenCart Amazon S3 extension.
Understand the extension workflow:-
Features
- Seamlessly integrated with OpenCart for smooth and efficient Amazon marketplace management.
- Provides Private App (Client Credentials) integration to securely connect your Amazon Seller account with OpenCart.
- Allows admins to easily import and export products between OpenCart and Amazon.
- Provides cron synchronization settings to automate order import, product synchronization, and FBA inventory updates.
- Enables importing Amazon orders directly into the OpenCart store.
- Allows admins to fetch and synchronize Amazon orders within a specific date range.
- Enables real-time product updates on Amazon directly from the OpenCart admin panel.
- Supports category mapping and attribute mapping to accurately match Amazon products with your OpenCart catalog.
- Provides the option to export products individually or in bulk, allowing admins to export OpenCart products that are not available in their Amazon Seller account.
- Lets admins select the Amazon order statuses to import into the OpenCart store.
- Supports fulfillment modes such as FBM (Fulfilled by Merchant), FBA (Fulfilled by Amazon), or both.
- Includes a Sync Queue and Failed Jobs section to monitor synchronization tasks and retry failed operations.
- Provides payment method mapping and shipping method mapping for accurate order processing.
- Includes FBA Inventory synchronization to keep inventory levels updated between Amazon and OpenCart.
- Maintains Sync Logs to help monitor synchronization activities and troubleshoot issues when required.
Use this extension only in the regions listed on this page: Click here
Note: The demo environment does not include Amazon Seller Central credentials. To test the connector, configure it with your own Amazon Seller Central account credentials.
Installation
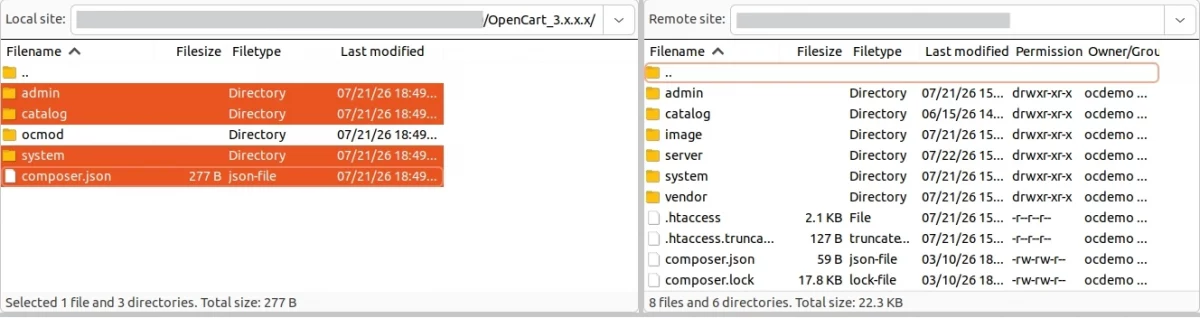
Extract the contents of the received zip folder on your system according to your Opencart version. The extracted folder has admin, catalog, image, and composer.json folders.
Now, upload the admin, catalog, image and composer.json directories into the Opencart root directory as shown below in the snapshot.
Once you have uploaded the folders, login to admin and then from the catalog section go to Extensions> Extension Installer and upload the zip file.
The zip file is in the ocmod folder under module directory. In the ocmod folder, select the Opencart version that you are using and under it, you will find wk_amazon_connector.ocmod.zip file.
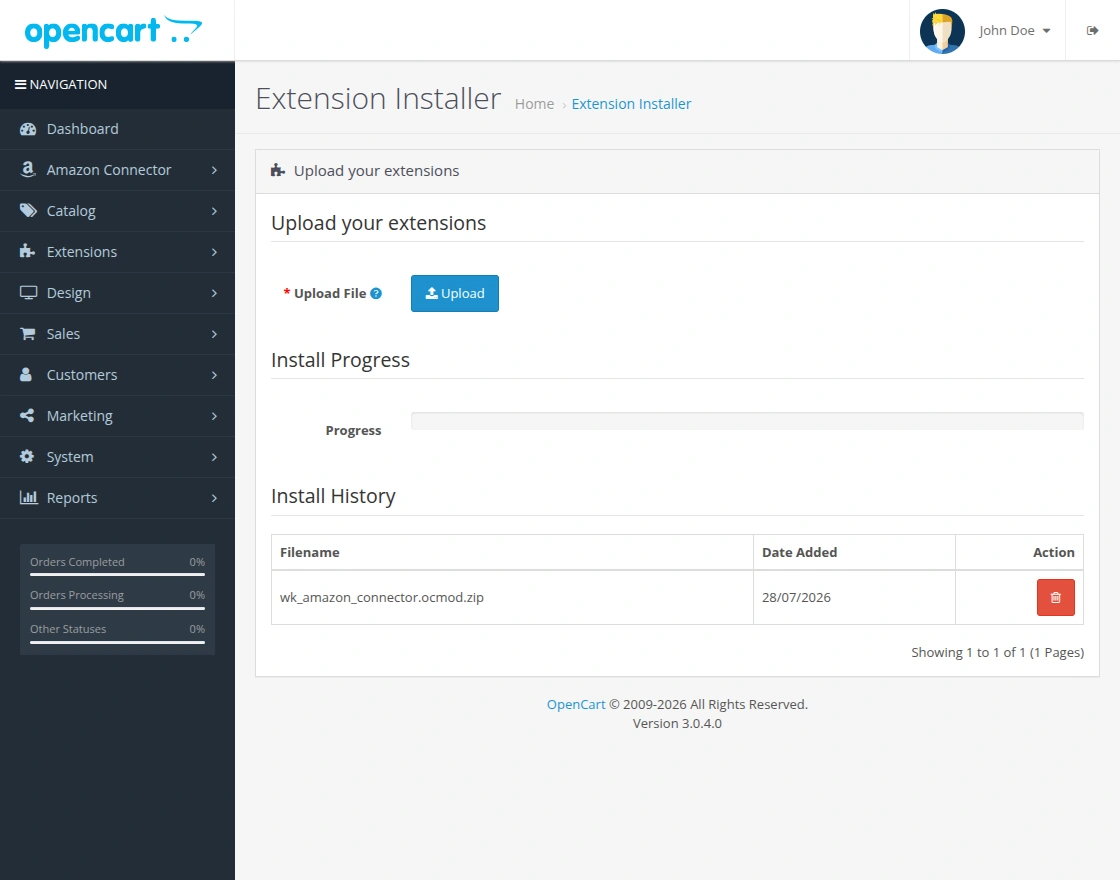
Click Continue after uploading the Zip file.
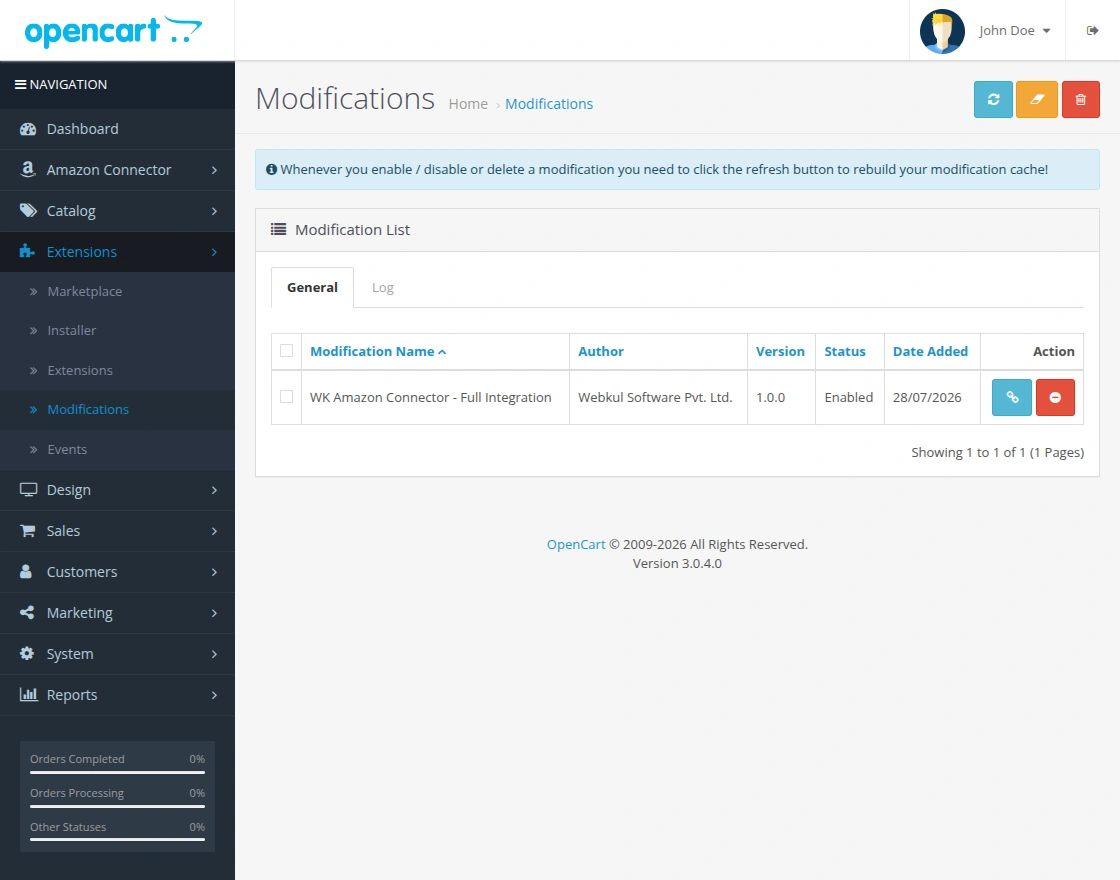
After uploading the Zip file, please navigate through Extensions>Modifications. Next, click the Refresh button, as shown in the screenshot below.
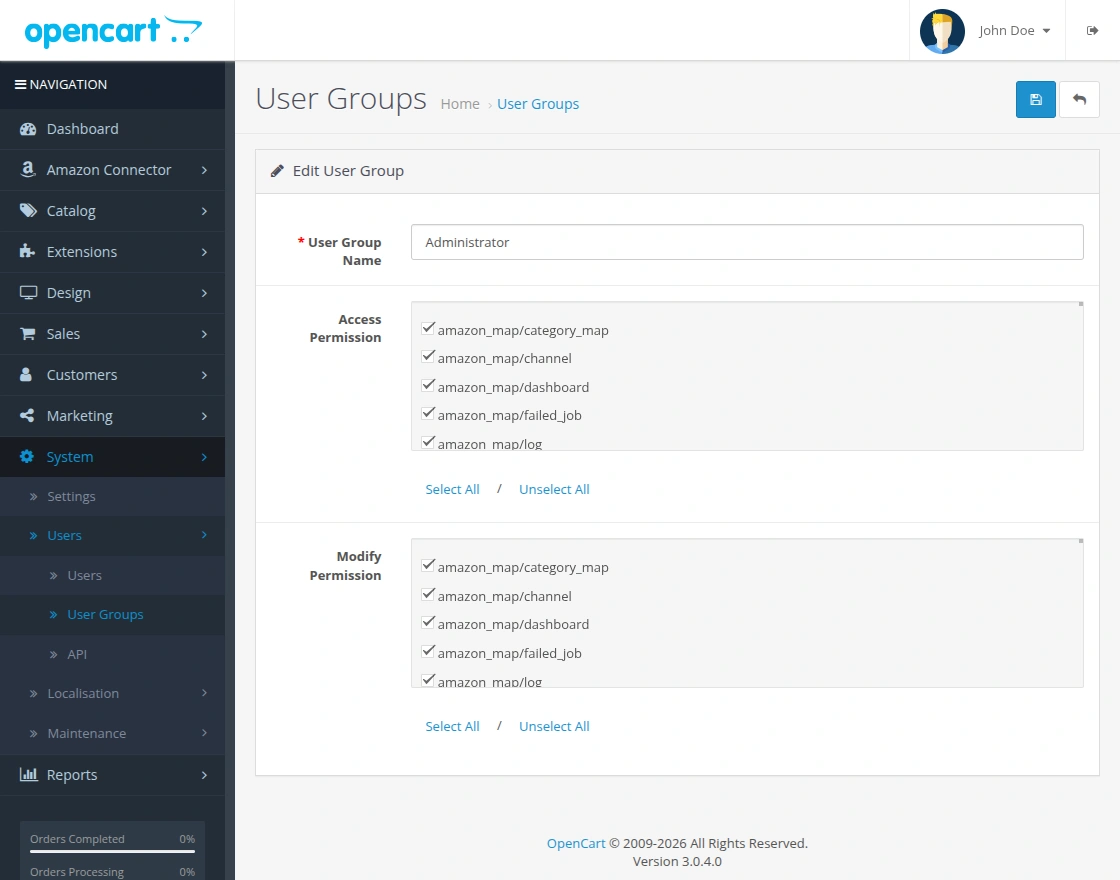
Now, Go to System -> Users -> User Groups >> edit ‘Administrator’ and choose to select all for both Access and Modify Permission for the permission that you want to provide and save it.
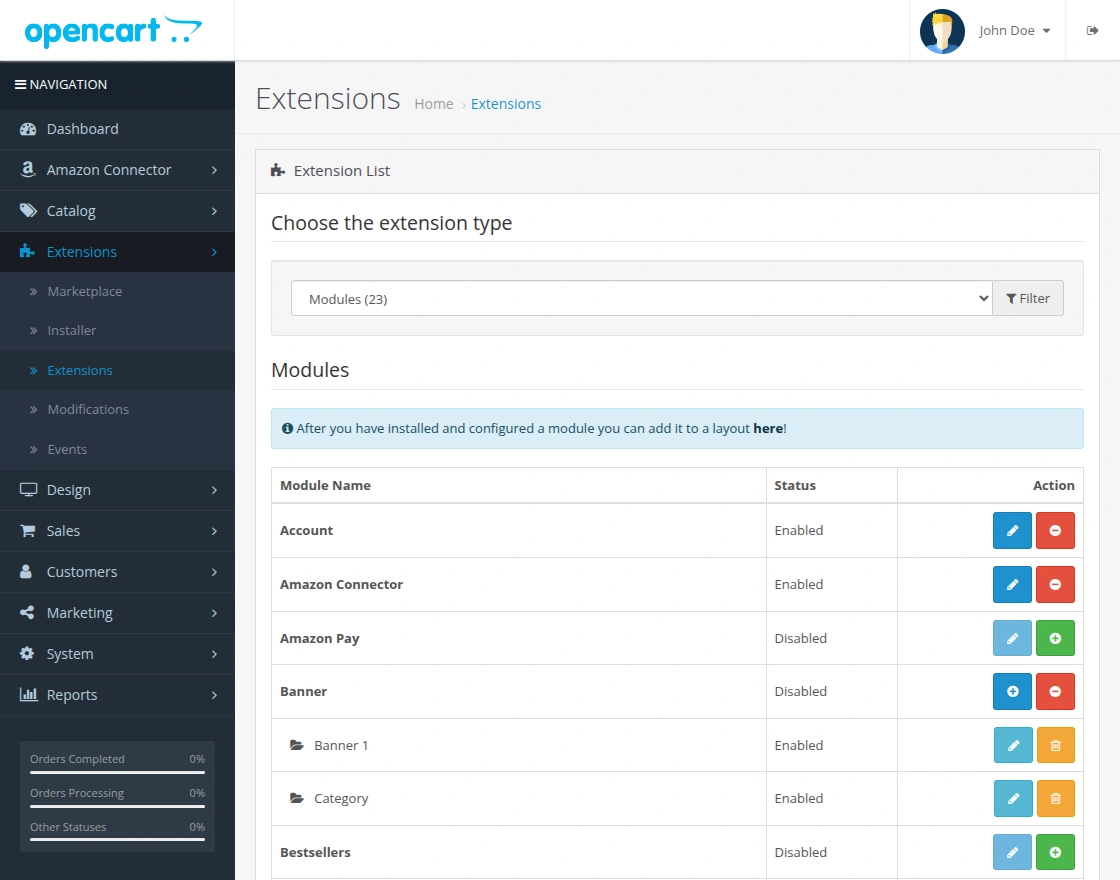
Now navigate to Extensions > Extensions > Modules. Find Amazon Connector from the list. Click the Install button as visible in the screenshot below.
Select the module “Amazon Connector”, and click on the Edit icon.
How to Add Cron Job:
By using a cron job, all new add Opencart products will export only to the first add Amazon seller’s account.
1)Go to your Cpanel and click on cron jobs under Advanced.
2)Move to Add New cron job, select common settings, and set your time when you want to run the cron file.
3)Go to command and add your path where amazon_cron.php exist.
ex- public_html/opencart_root_directory/amazon_cron.php.
4)Click on “Add New Cron Job”.
OpenCart Amazon Connector Configure
After the successful installation of the module, the admin can configure the Amazon Connector settings from the admin panel.
To configure the module, navigate to:
Extensions > Extensions
The configuration page includes three main sections:
1 – General
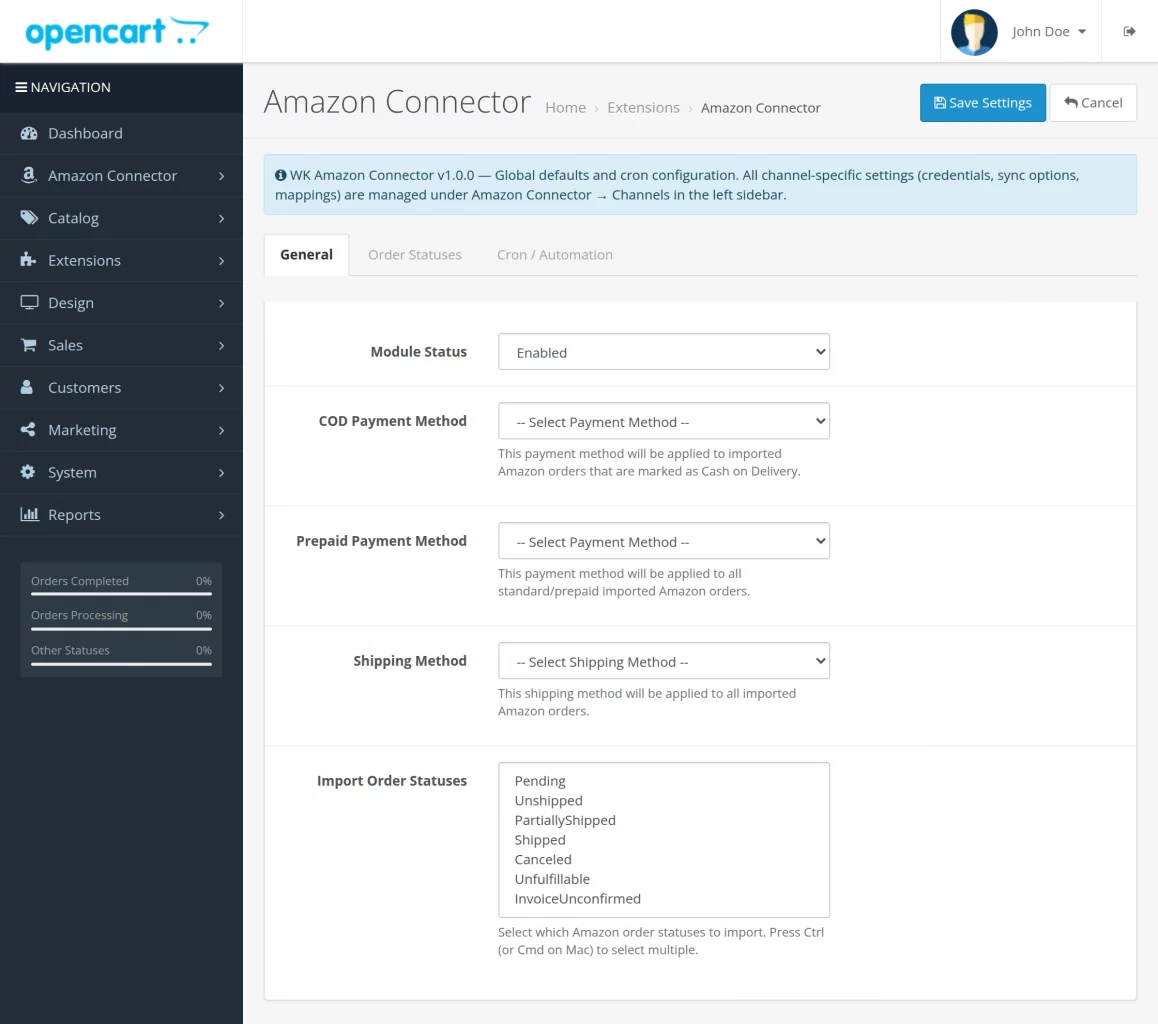
In the General tab, you can configure the basic settings required for importing Amazon orders into your OpenCart store.
- Module Status – Enable or disable the Amazon Connector module.
- COD Payment Method – Select the default payment method for imported Cash on Delivery (COD) Amazon orders.
- Prepaid Payment Method – Select the default payment method for imported prepaid Amazon orders.
- Shipping Method – Select the shipping method to apply to all imported Amazon orders.
- Import Order Statuses – Select the Amazon order statuses to import into your OpenCart store. You can choose one or multiple statuses based on your business requirements.
2 – Order Statuses
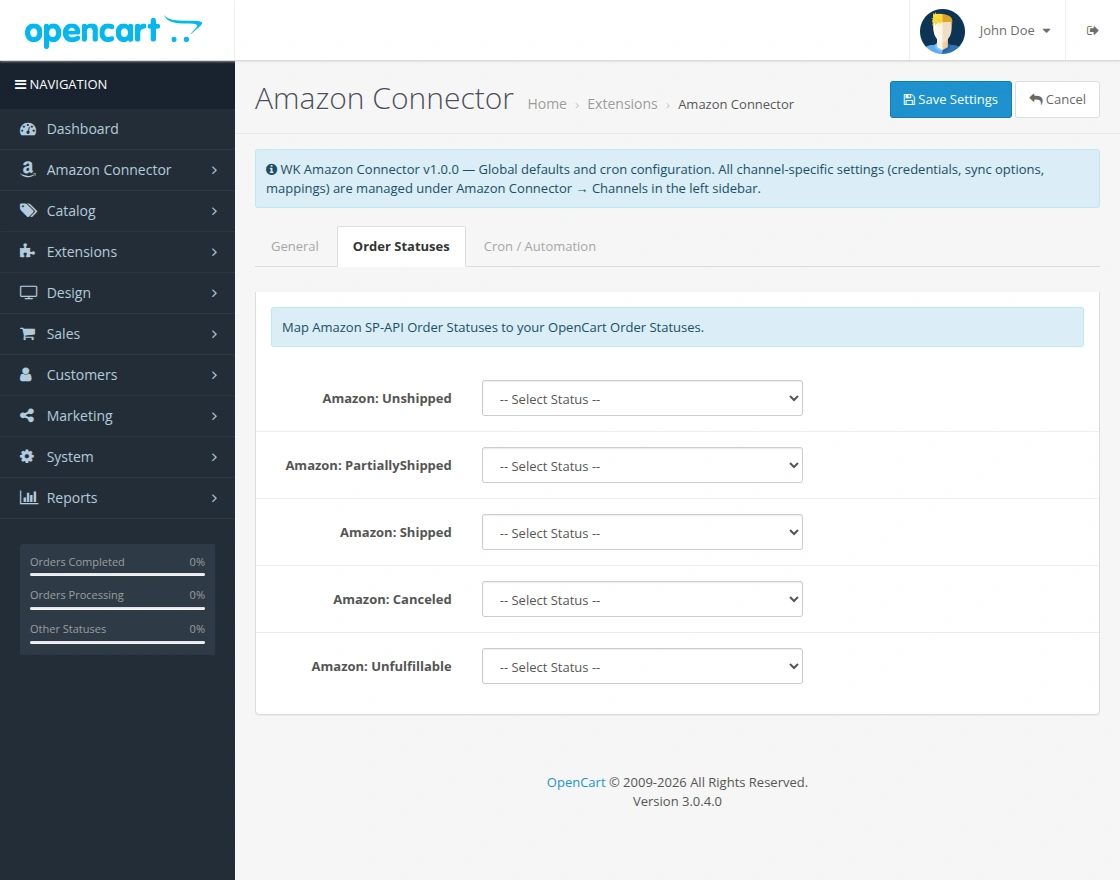
Navigate to the Order Statuses tab to map Amazon order statuses with your OpenCart order statuses.
Use this mapping to assign the correct order status to imported Amazon orders in your OpenCart store.
The available Amazon order statuses include:
- Unshipped
- Partially Shipped
- Shipped
- Canceled
- Unfulfillable
Simply select the corresponding OpenCart order status for each Amazon order status and save the configuration.
3 – Cron / Automation
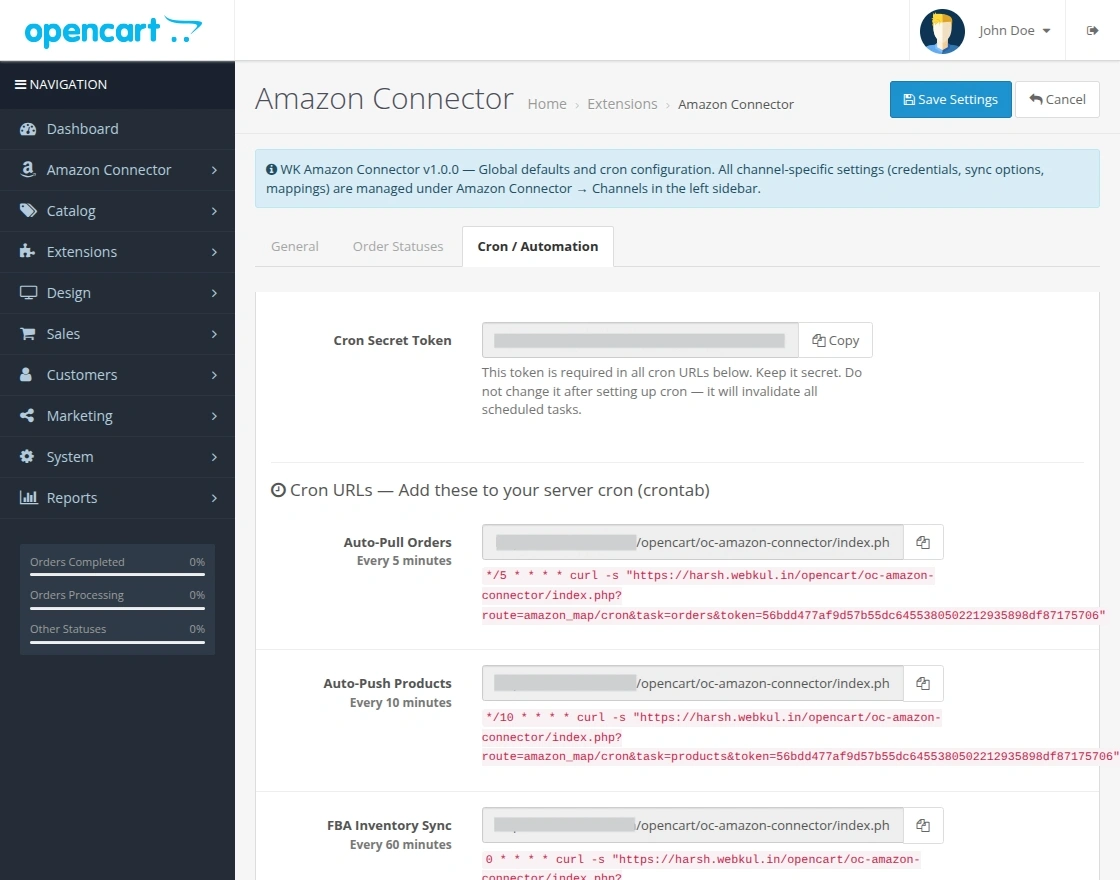
Open the Cron / Automation tab to configure automatic synchronization between Amazon and your OpenCart store.
This section provides a Cron Secret Token along with ready-to-use cron URLs for different synchronization tasks.
The available cron jobs include:
- Auto-Pull Orders – Automatically imports new Amazon orders into your OpenCart store.
- Auto-Push Products – Automatically updates product information from OpenCart to Amazon.
- FBA Inventory Sync – Synchronizes Fulfilled by Amazon (FBA) inventory with your OpenCart store.
Simply copy the required cron URL and configure it on your server to automate the synchronization process.
After completing all the required configuration, click the Save Settings button to apply and store your changes.
How to Get Your Amazon Credentials?
Step 1: Create an Amazon Seller Central Account
Register for an Amazon Seller Central account to get started. Use this account to manage your products, orders, and marketplace data.
Without an Amazon Seller account, you won’t be able to connect your OpenCart store with Amazon.
Steps to follow:
- Visit Amazon Seller Central.
- Click on Sign Up.
- Enter your business and personal details.
- Complete the verification process.
Finding your Amazon Seller ID
After creating your seller account, sign in to your Amazon Seller Central account.
Once logged in, search for your store or one of your product listings to locate your Seller ID.
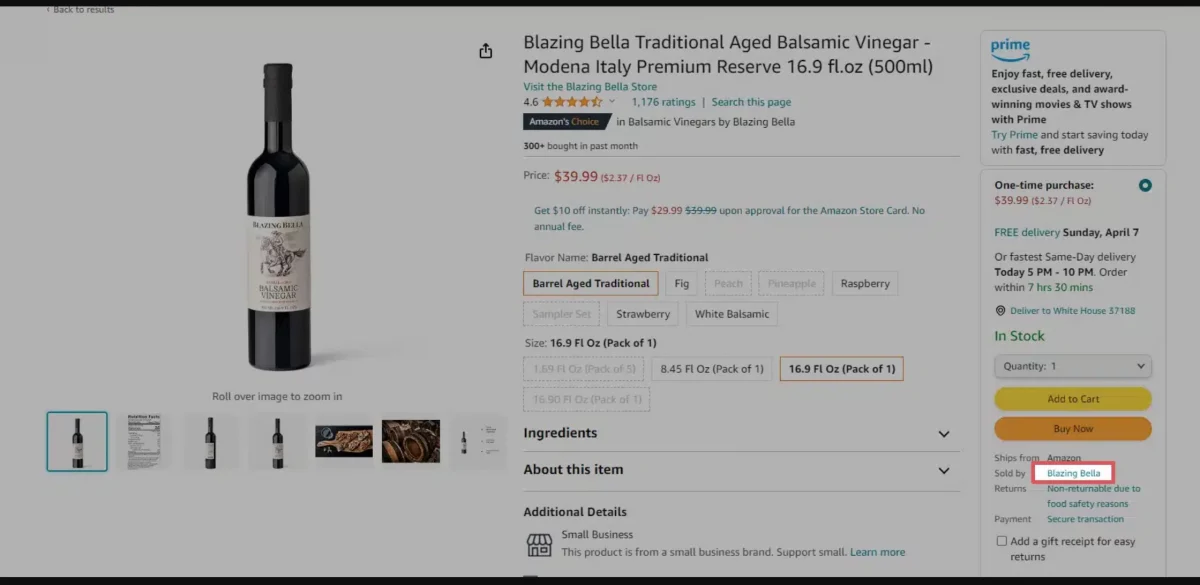
To find your Seller ID:
- Open one of your product listings on Amazon.
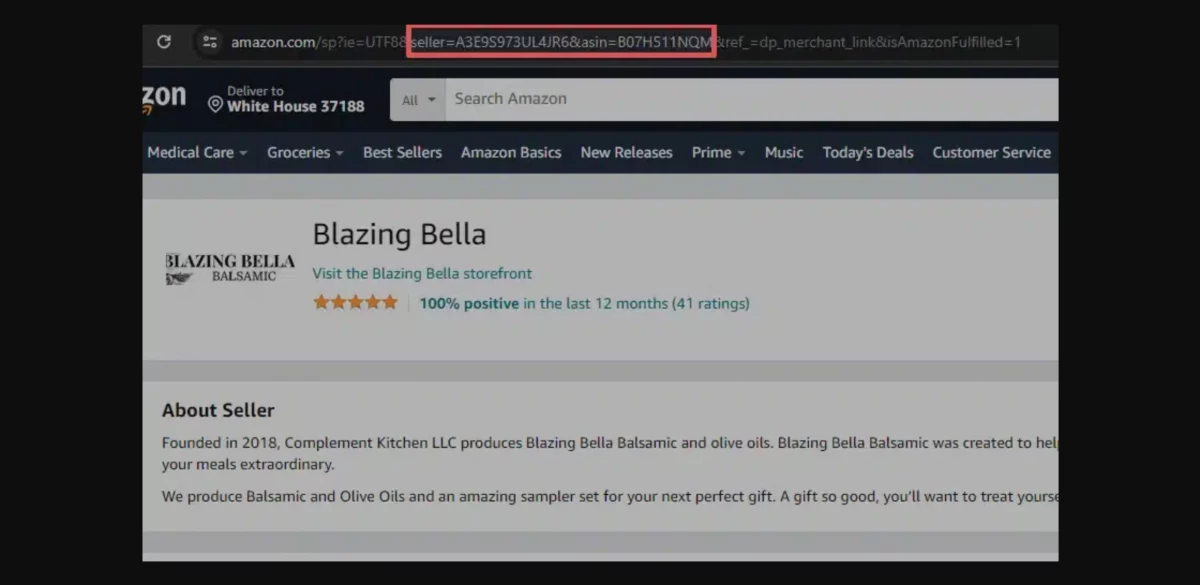
- Click Sold By [Your Company Name] to open your About Seller page.
- Your Seller ID is available in the page URL as:
seller=XXXXXXXXXXXXX
Step 2: Create an Amazon Developer Profile
After setting up your seller account, the next step is to create a developer profile on the Amazon Developer Console.
Use this account to generate the API credentials required to connect your OpenCart store with Amazon.
Steps to create a developer profile:
- Sign in to the Amazon Developer Console using your Amazon account.
- Navigate to the Developer Console.
- Register as a developer by providing the required information.
Step 3: Generate LWA Credentials
Once your developer profile is ready, create Login with Amazon (LWA) credentials. Use these credentials to authenticate your OpenCart Amazon Connector with Amazon SP-API.
Steps:
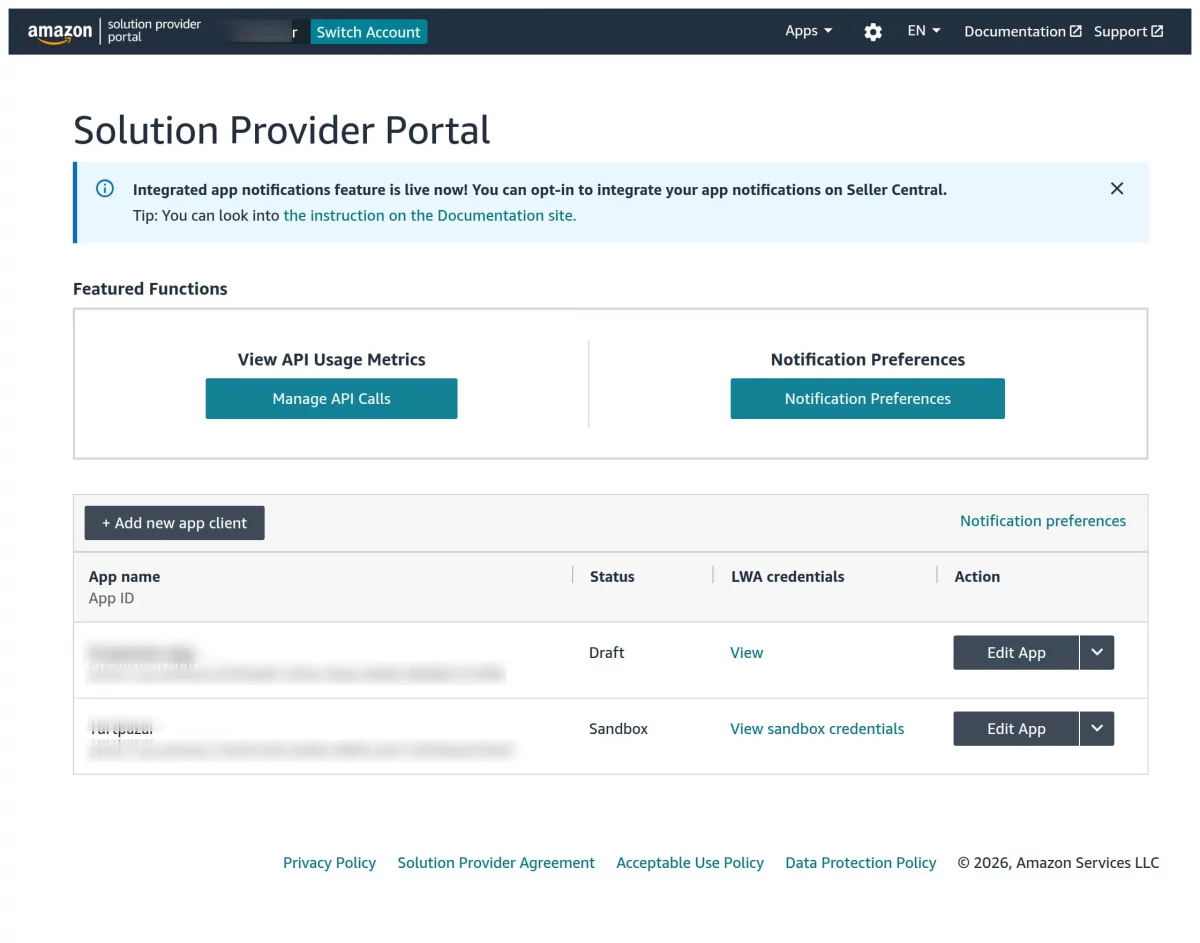
- Navigate to Apps & Services > Login with Amazon in the Amazon Developer Console.
- Click Add New App Client.
- Enter the required details such as App Name, API Type, App Type, and other necessary information.
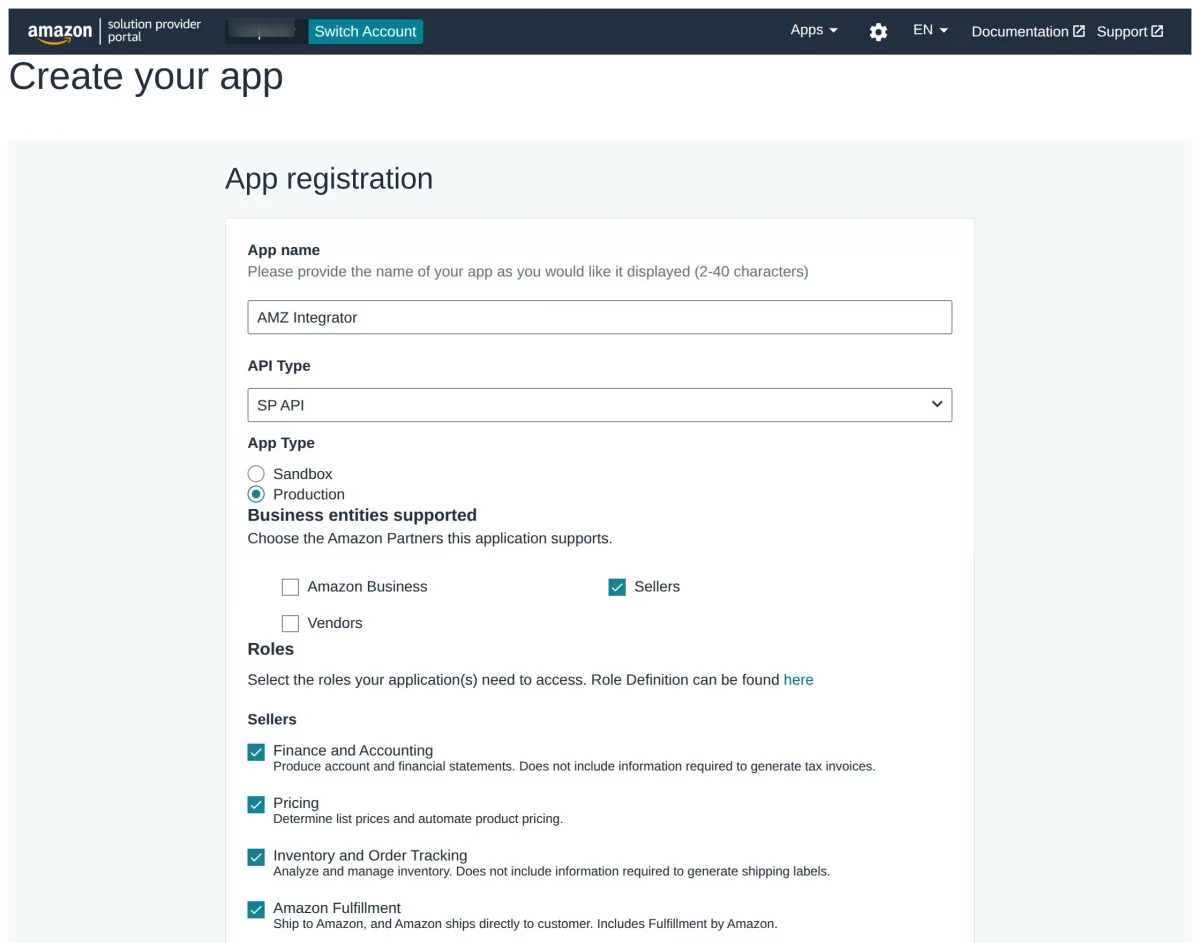
- Click Save and Exit to complete the configuration.
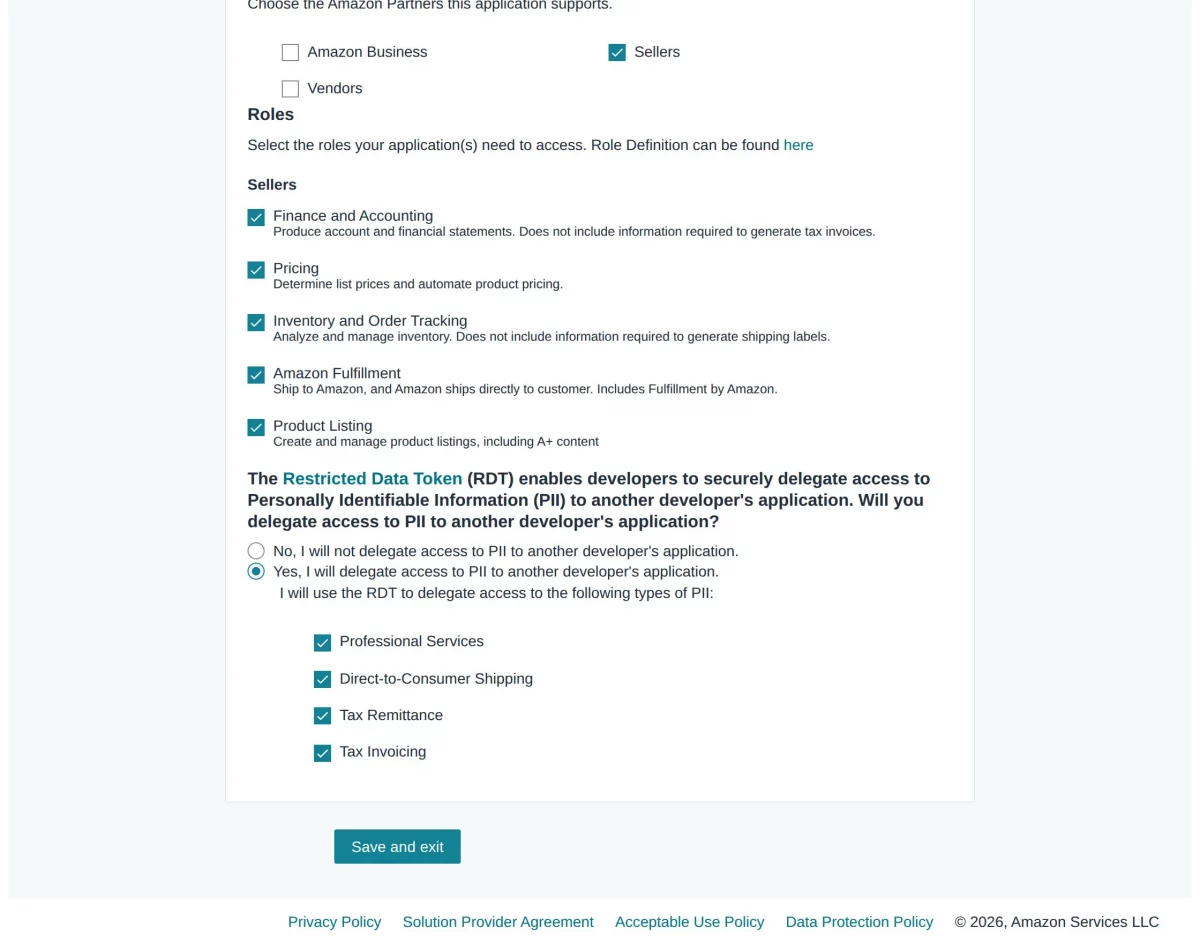
Note: Enable PII (Personally Identifiable Information) access in your Amazon Developer App by selecting “Yes, I will delegate access to PII” and enabling all four PII types.
Enable PII access to import complete customer details with Amazon orders.
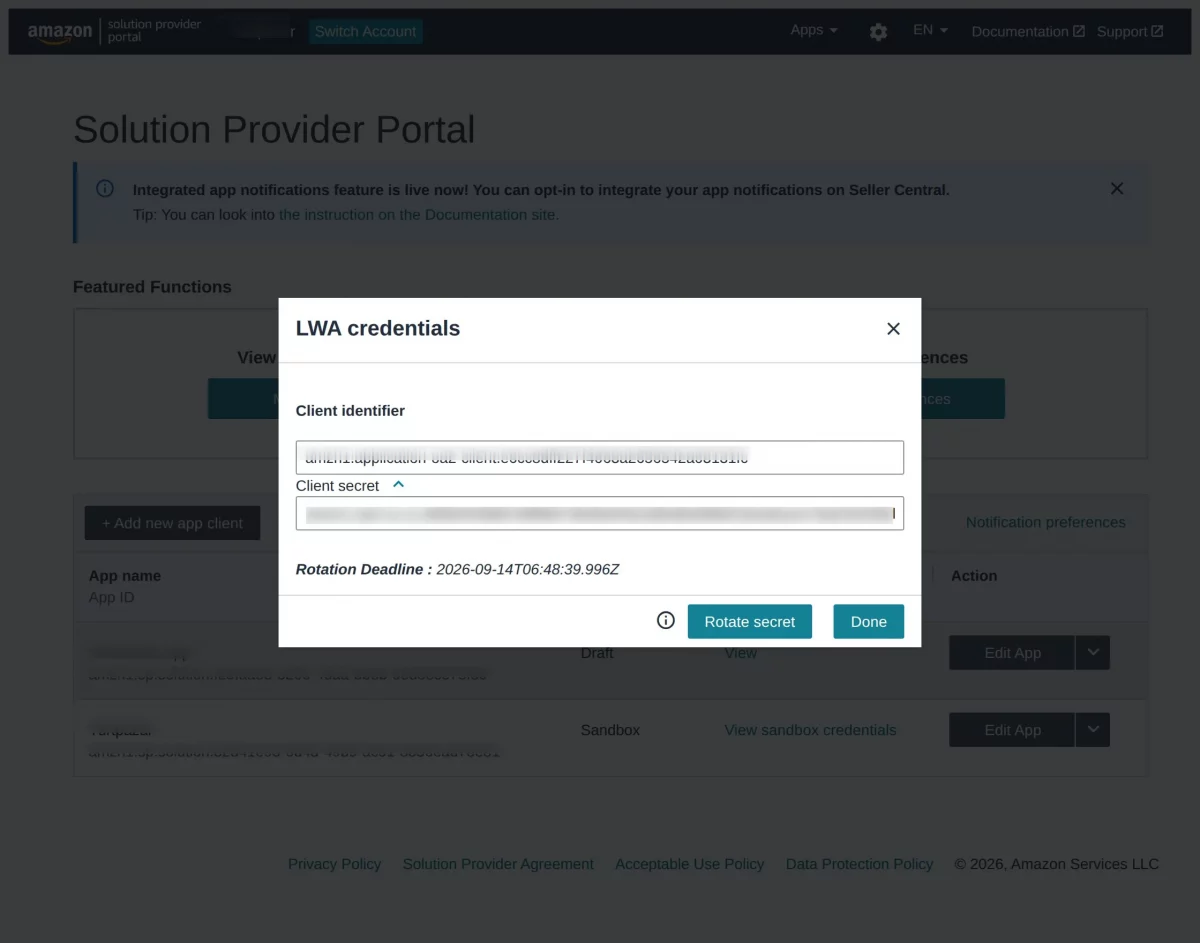
After creating the application, you can view all your registered applications along with their status and credentials.
Click the View option to access your LWA Client ID and Client Secret.
Note: Amazon provides a Rotate Secret option for LWA credentials with a mandatory rotation deadline.
Whenever you rotate the Client Secret, update the new Client Secret in the OpenCart Amazon Connector configuration.
Update the new Client Secret to keep the connector authenticated and ensure uninterrupted synchronization.
For more information, refer to the official Amazon SP-API documentation on rotating LWA credentials.
Step 4: Generate a Refresh Token
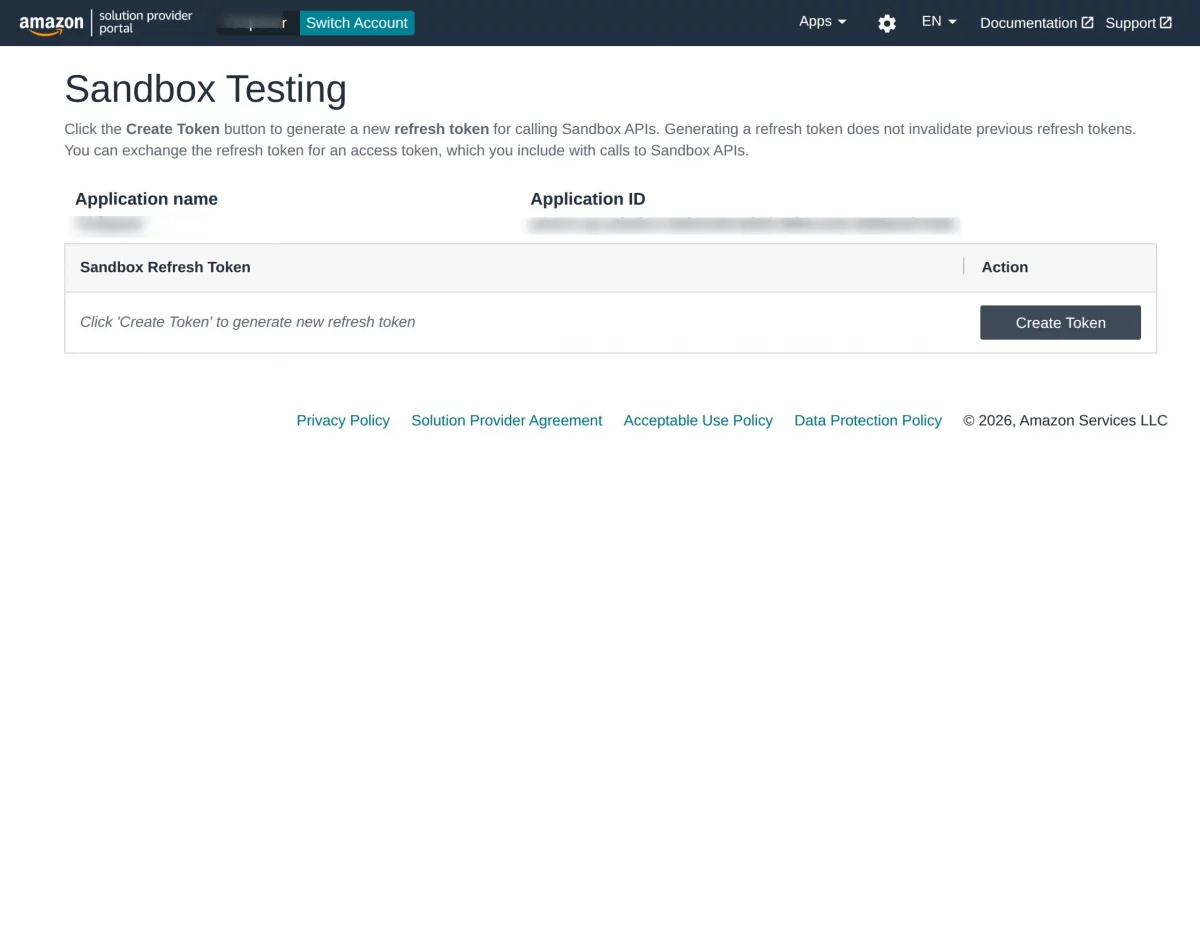
Create your LWA application, then generate a Refresh Token to authenticate the connector with Amazon SP-API.
Steps:
- Select the application from your application list.
- Click the Create Token button.
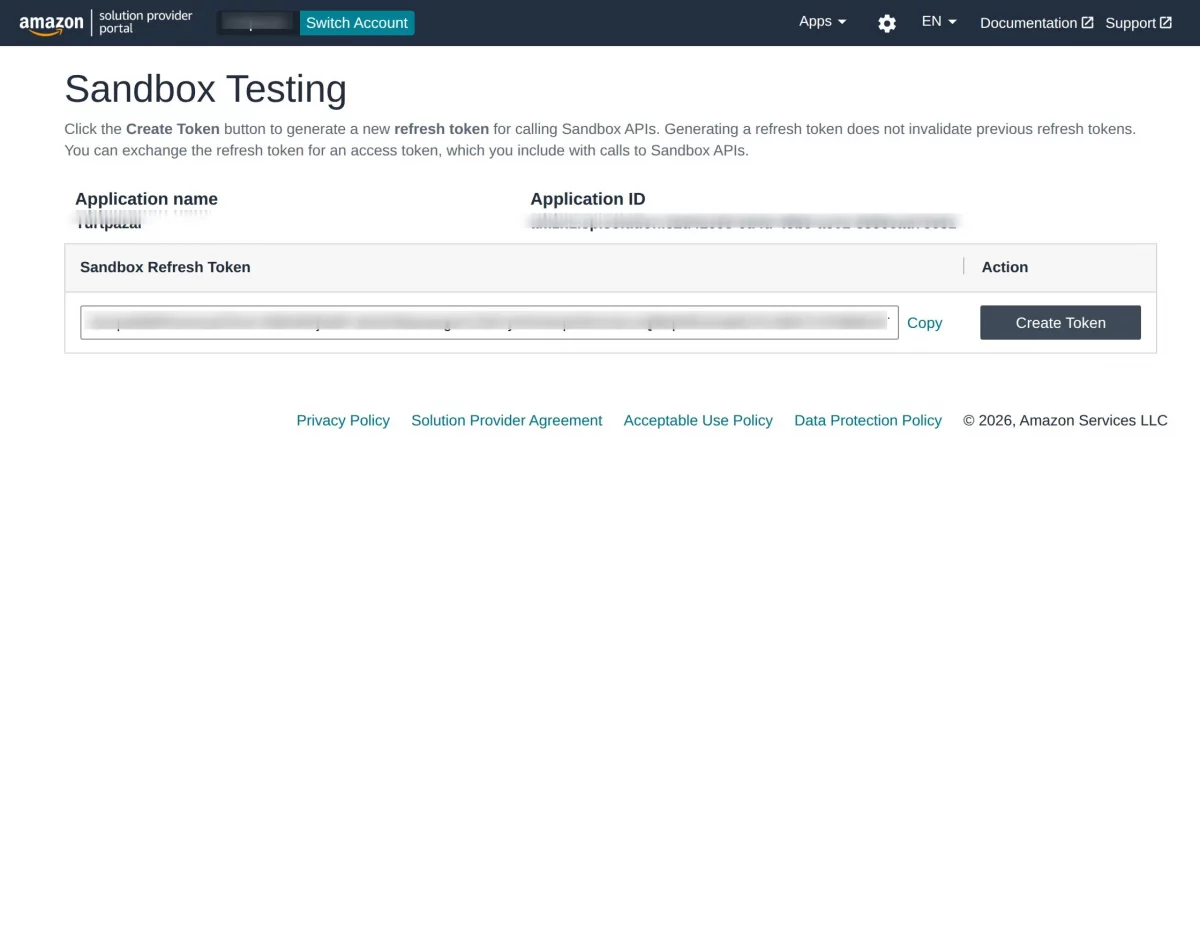
- After generating the token, copy the Refresh Token and use it to configure the OpenCart Amazon Connector.
Create a New Amazon Channel
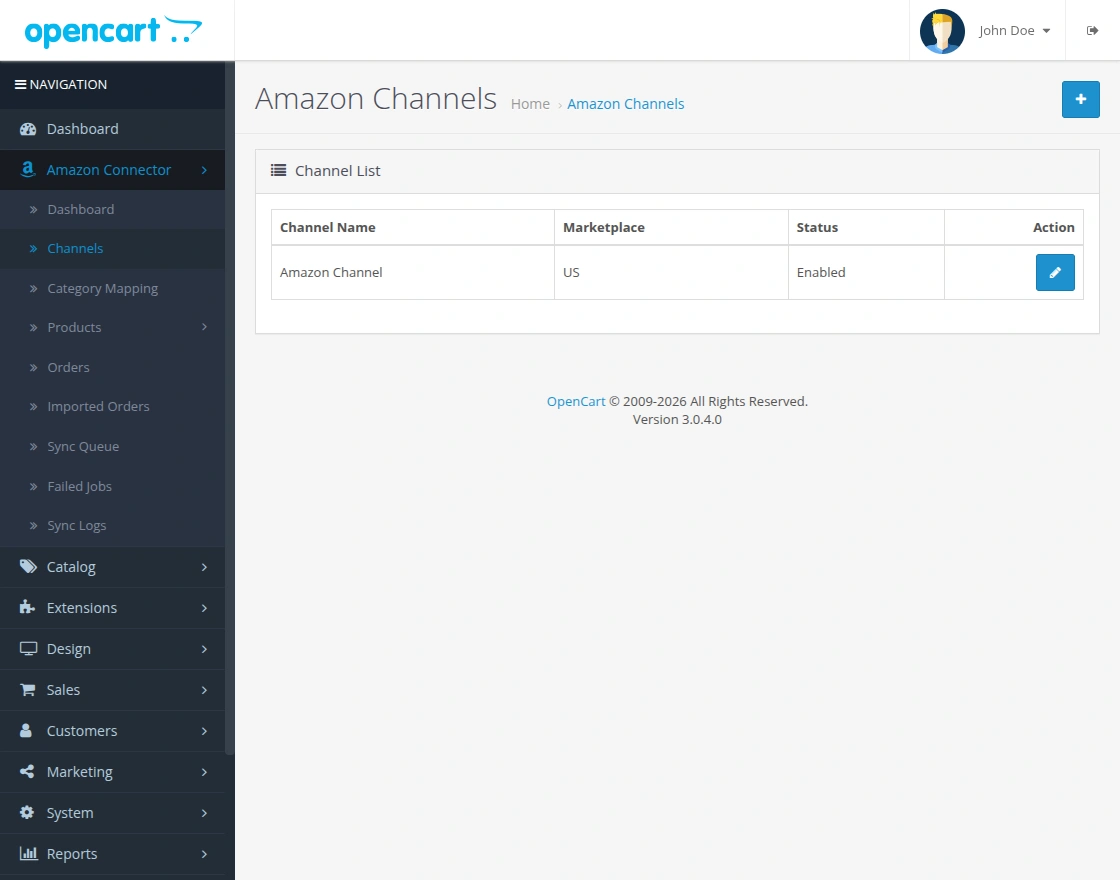
To create a new Amazon channel, first log in to your OpenCart Admin Panel. Then navigate to Amazon Connector > Channels from the left navigation menu.
Here, you can view the list of all configured Amazon channels along with details such as the Channel Name, Marketplace, and Status.
You can also edit an existing channel anytime to update its credentials or modify the channel configuration whenever required.
The connector also provides a Category Mapping feature, allowing you to map OpenCart categories with Amazon categories for accurate product synchronization and listing management.
Click on the “+” (Add) button to create a new Amazon channel.
Steps to Create a New Amazon Channel
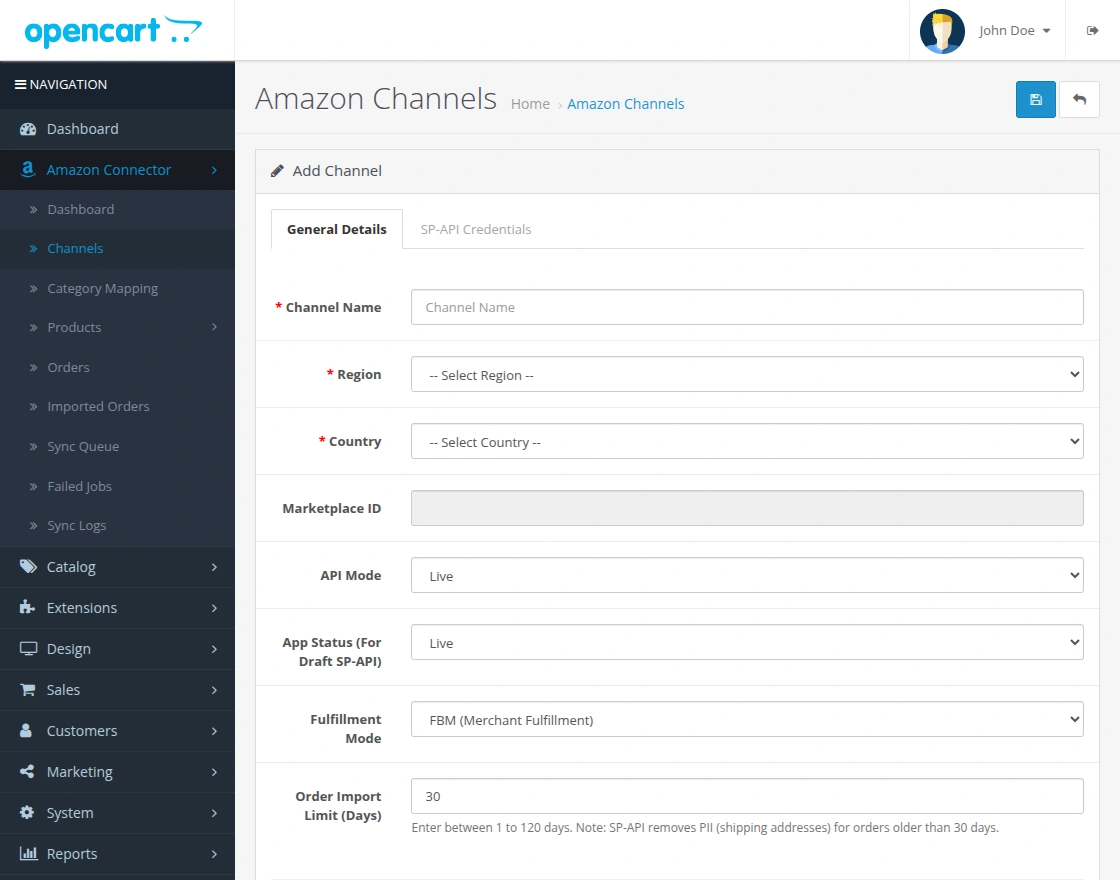
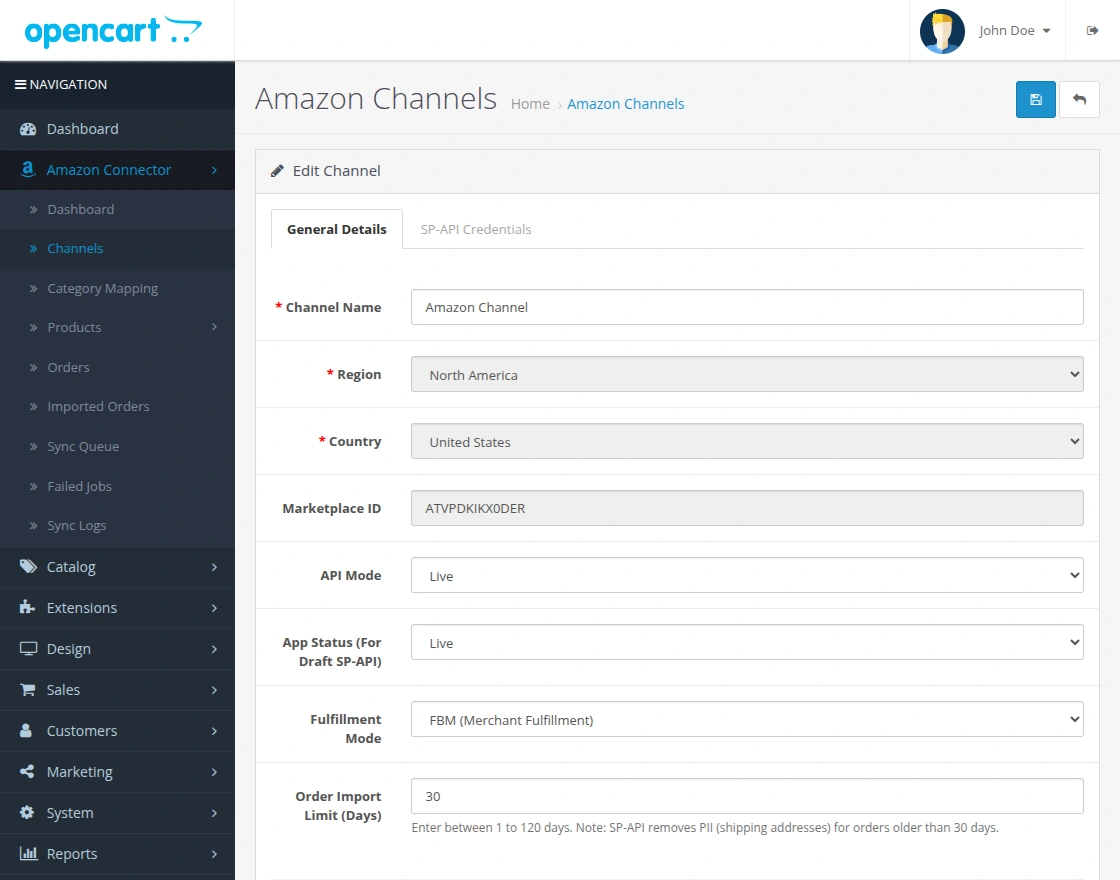
After clicking the “+” (Add) button, enter the required channel details in the General Details tab.
- Enter a unique Channel Name.
- Select the Region based on your Amazon marketplace.
- Choose the Country associated with your Amazon Seller Central account.
- Select a marketplace to automatically populate the Marketplace ID, then verify the value.
- Select the API Mode and App Status as required.
- Choose the appropriate Fulfillment Mode (FBM, FBA, or both).
- Set the Order Import Limit (Days) to define how many days of Amazon orders to import.
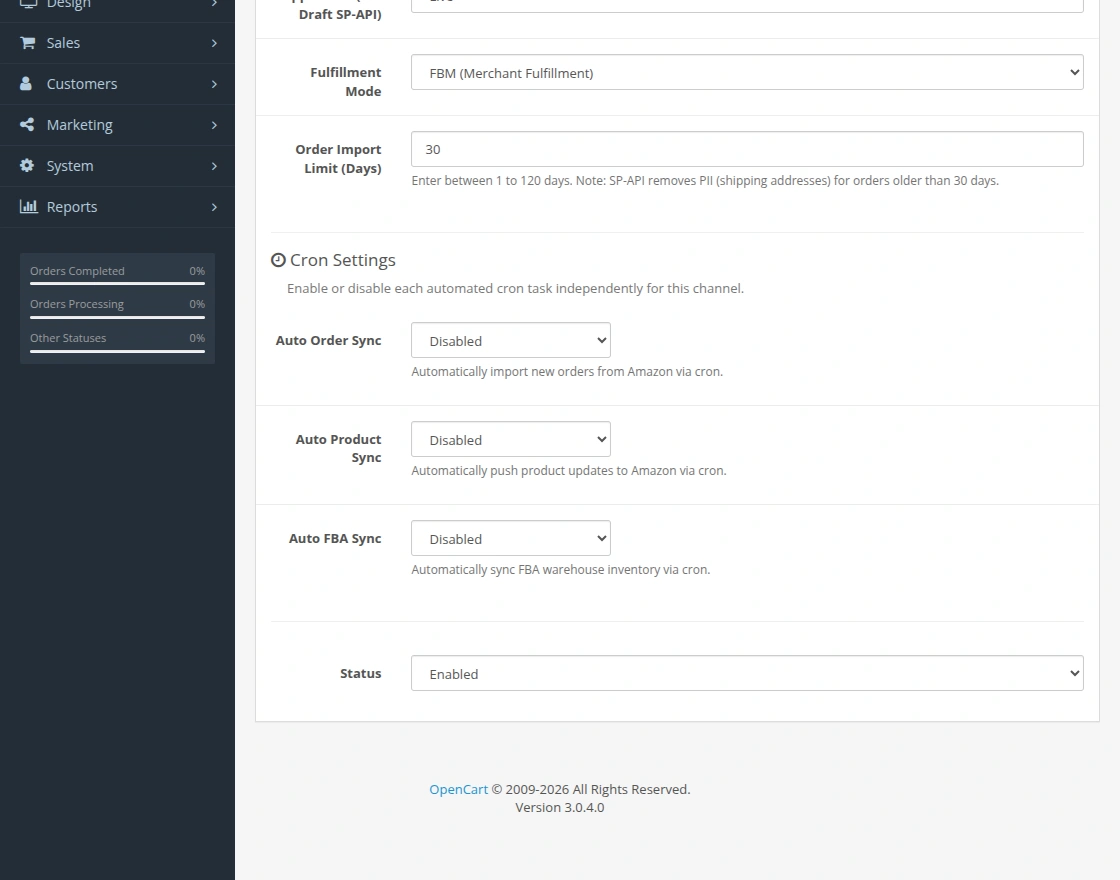
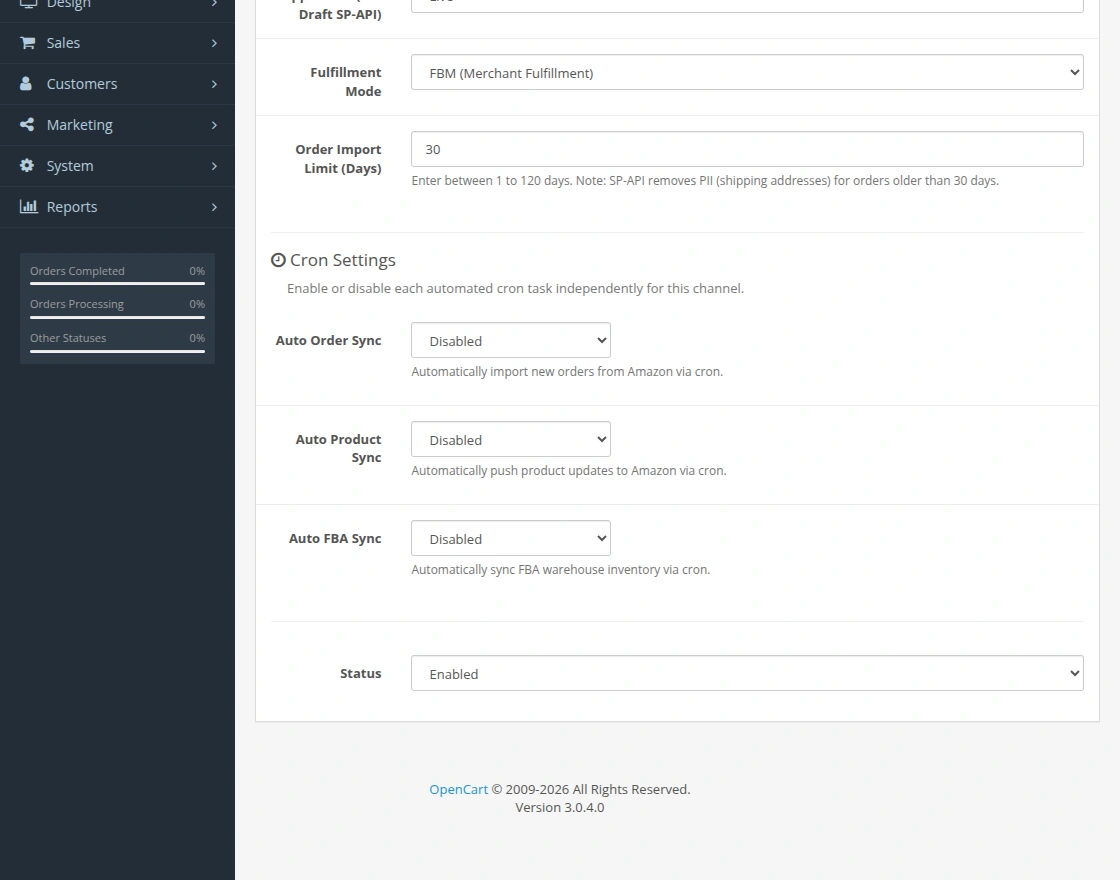
- Configure the Cron Settings by enabling or disabling Auto Order Sync, Auto Product Sync, and Auto FBA Sync based on your synchronization requirements.
- Set the channel Status to Enabled.
Next, open the SP-API Credentials tab and enter the required Amazon SP-API credentials.
- Enter the LWA Client ID.
- Enter the LWA Client Secret.
- Enter the AWS IAM Access Key (For SQS).
- Enter the AWS IAM Secret Key (For SQS).
- Enter the Seller ID (Merchant Token).
- Enter the SP-API Refresh Token.
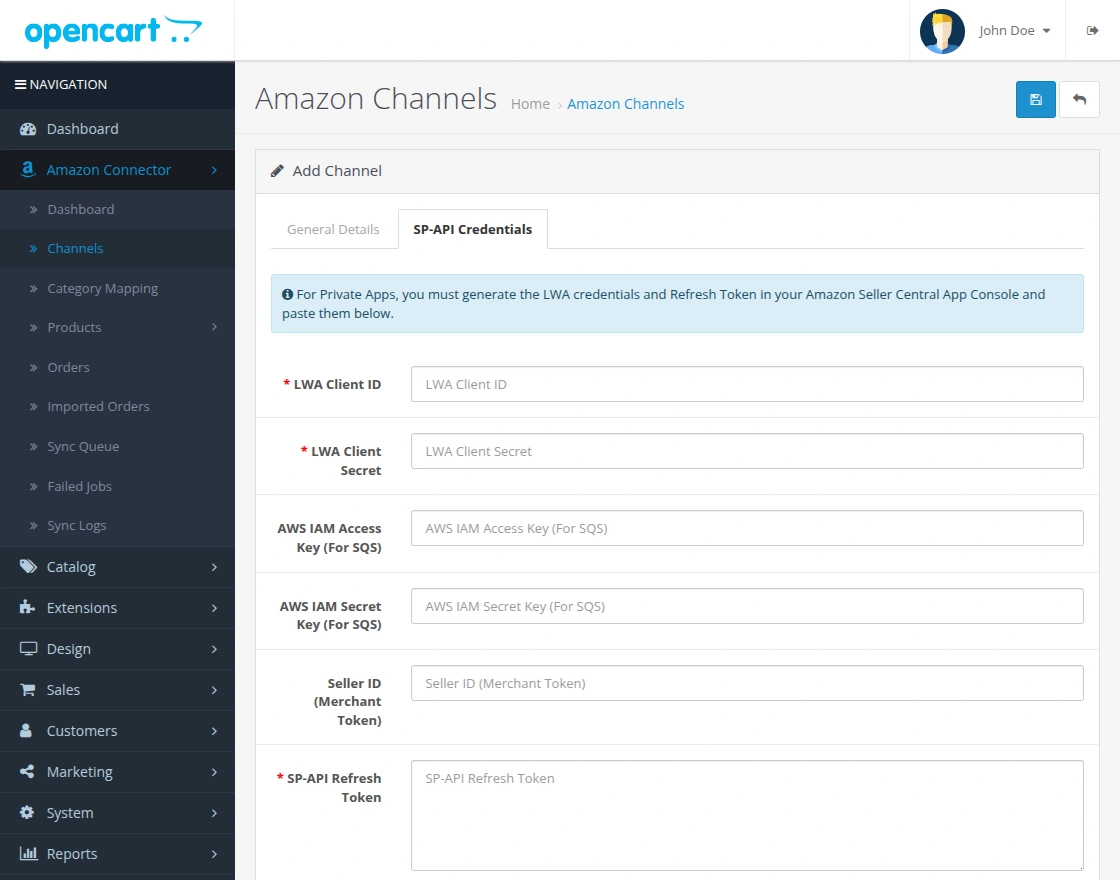
After entering all the required information, click the Save button to create and configure the Amazon channel successfully.
Edit Amazon Channel Settings
Admin can easily edit an existing Amazon channel whenever required. Navigate to Amazon Connector > Channels from the OpenCart admin panel.
Here, you can view the list of all configured Amazon channels. Click the Edit icon under the Action column to modify an existing channel.
Admins cannot delete a channel after creating it. However, they can disable the channel whenever it is no longer required.
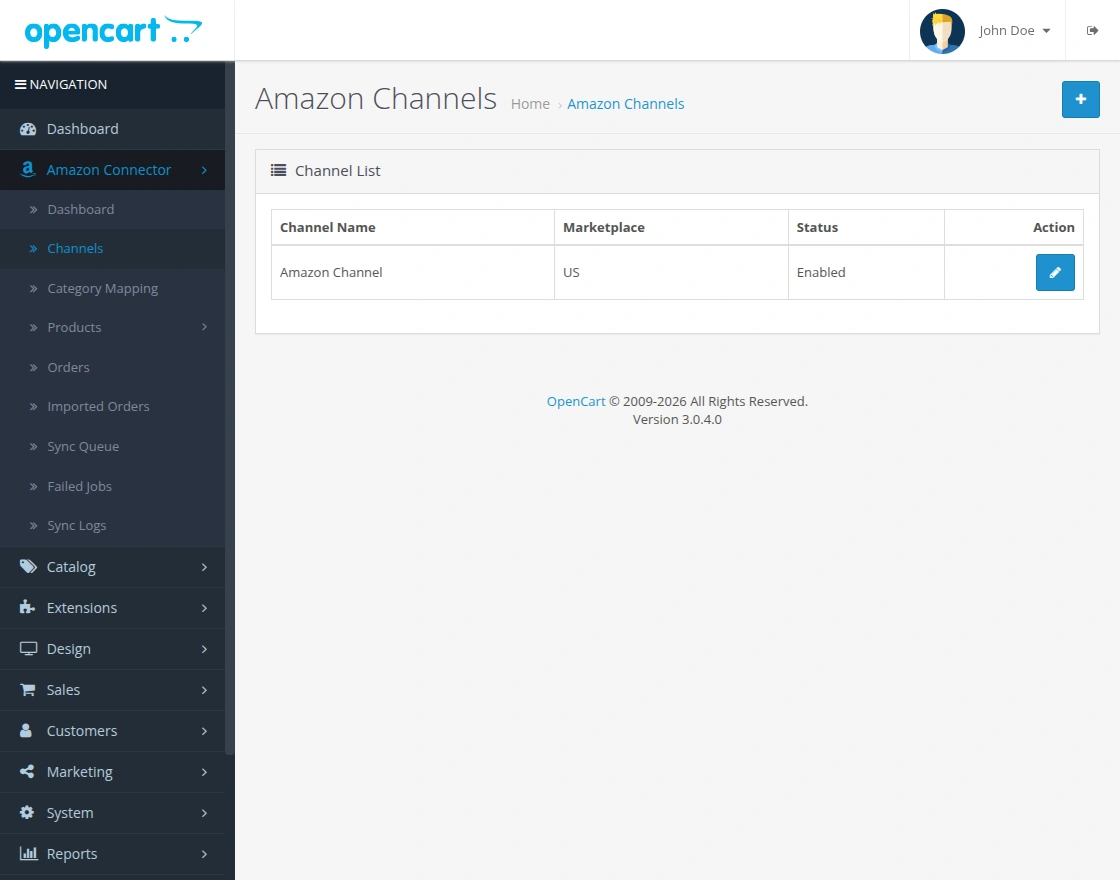
The Edit Channel page lets you update the channel configuration and Amazon SP-API credentials as required.
General Details
Under the General Details tab, you can update the basic channel configuration.
- Channel Name – Update the channel name for easy identification.
- API Mode – Choose Live for production SP-API calls or Draft for testing purposes.
- App Status – Select the appropriate application status according to your Amazon SP-API configuration.
- Fulfillment Mode – Choose FBM (Merchant Fulfillment), FBA (Fulfilled by Amazon), or the appropriate fulfillment option for your business.
- Order Import Limit (Days) – Select the number of days (1–120) for importing Amazon orders.
Cron Settings
The connector also allows you to configure channel-level automation for synchronization.
- Auto Order Sync – Automatically imports new Amazon orders using cron.
- Auto Product Sync – Automatically pushes product updates from OpenCart to Amazon.
- Auto FBA Sync – Automatically synchronizes FBA inventory with your OpenCart store.
Finally, set the Status of the channel to Enabled or Disabled as required.
SP-API Credentials
Open the SP-API Credentials tab to update the authentication details required for connecting your Amazon Seller account.
Provide the following credentials:
- LWA Client ID
- LWA Client Secret
- AWS IAM Access Key (For SQS)
- AWS IAM Secret Key (For SQS)
- Seller ID (Merchant Token)
- SP-API Refresh Token
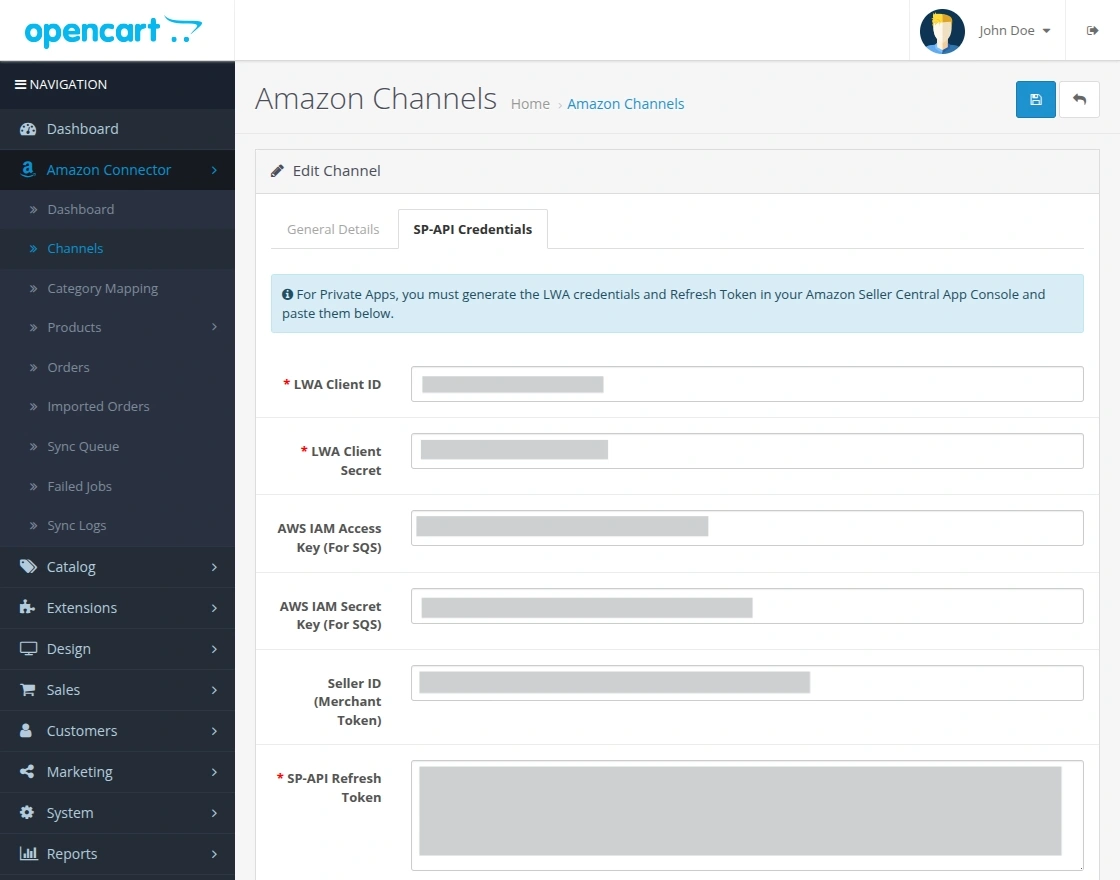
Note: All credentials are securely stored by the connector. Update these values whenever your Amazon SP-API credentials are changed or regenerated to ensure uninterrupted synchronization.
After completing all the required configurations, click the Save button to apply and store the updated channel settings.
Manage Category Mapping
To manage category mapping, navigate to Amazon Connector > Category Mapping from the OpenCart admin panel.
Here, you can view all the existing category mappings. The page also allows you to filter mappings by Amazon channel, download Amazon categories, delete existing mappings, or create a new category mapping.
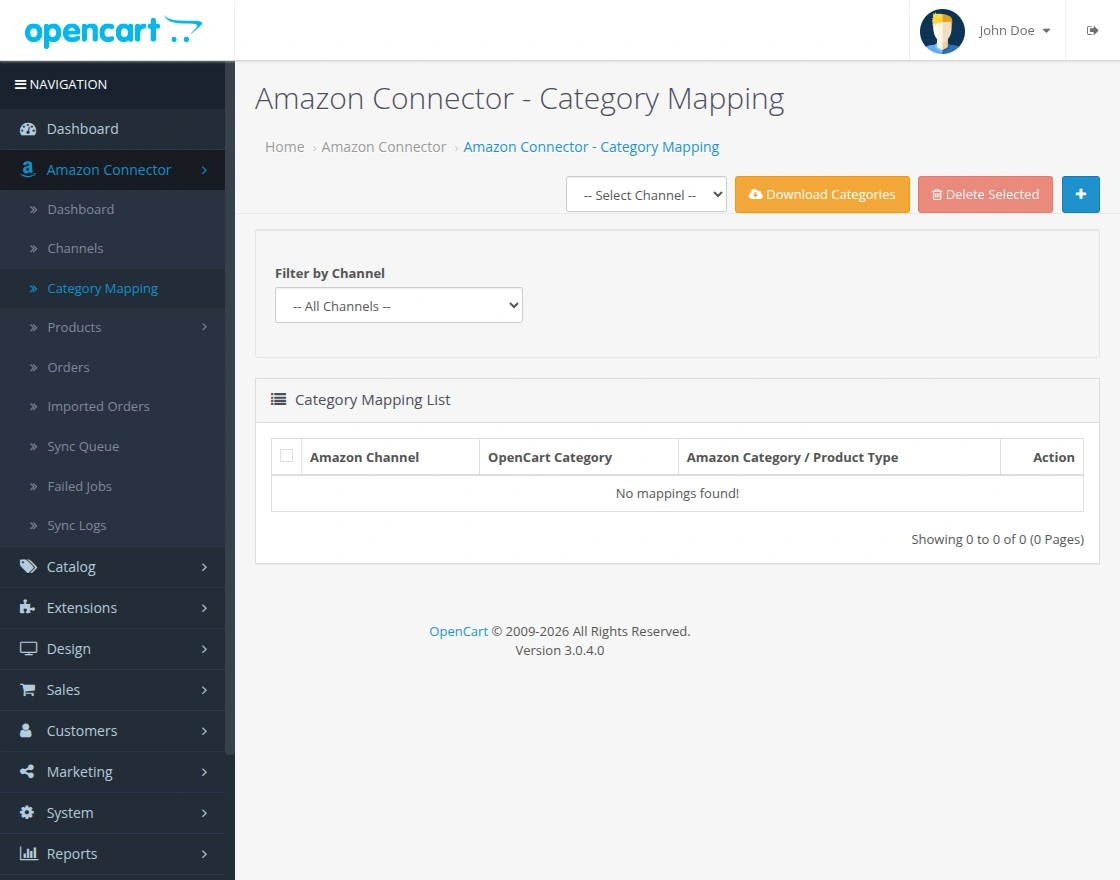
Before creating a category mapping, select the required Amazon channel and click the Download Categories button to fetch the latest Amazon categories.
Note: If cron synchronization is enabled, the category download request is added to the queue and will be processed through cron. Otherwise, the categories are downloaded immediately.
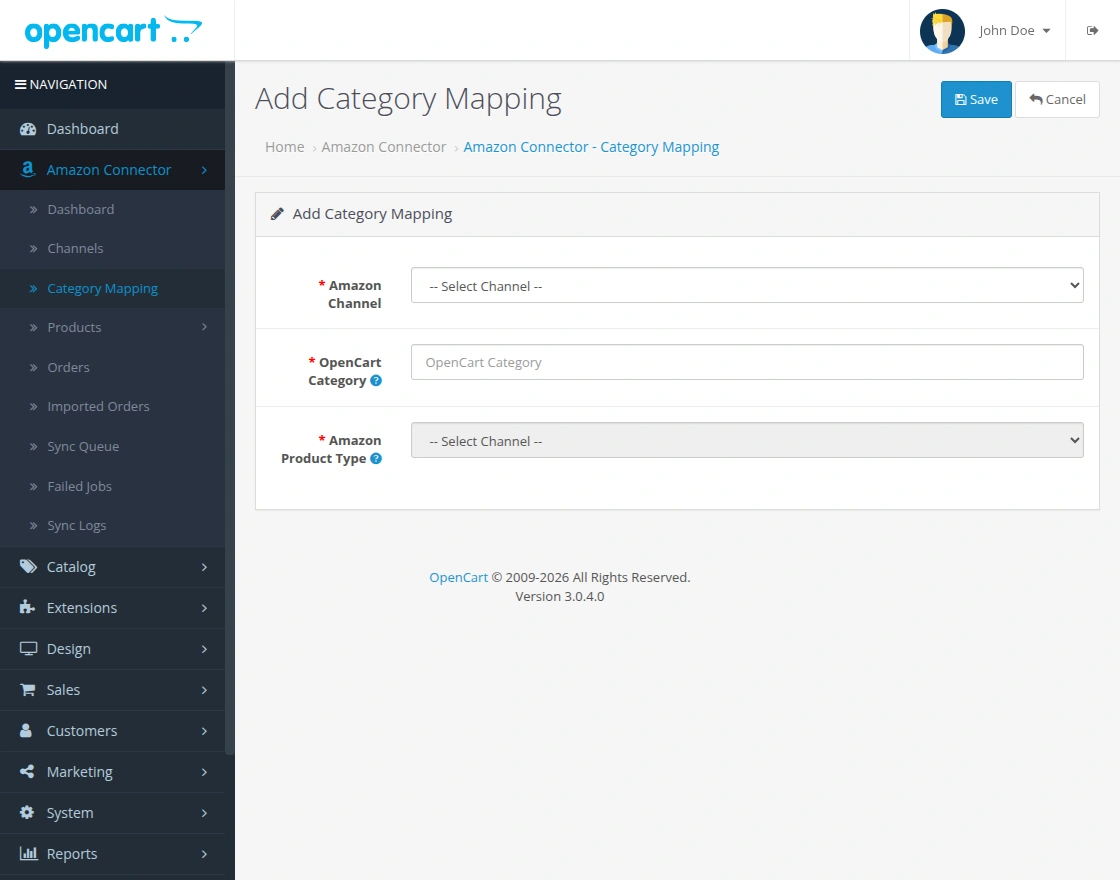
After downloading the categories, click the “+” (Add) button to create a new category mapping.
On the Add Category Mapping page, select the Amazon Channel, OpenCart Category, and the corresponding Amazon Product Type.
After entering the required details, click the Save button to create the category mapping.
After you create the mapping, it appears in the Category Mapping List.
The mapping list displays the configured Amazon Channel, OpenCart Category, and the corresponding Amazon Category / Product Type.
This allows you to easily review and manage all the mapped categories from a single place.
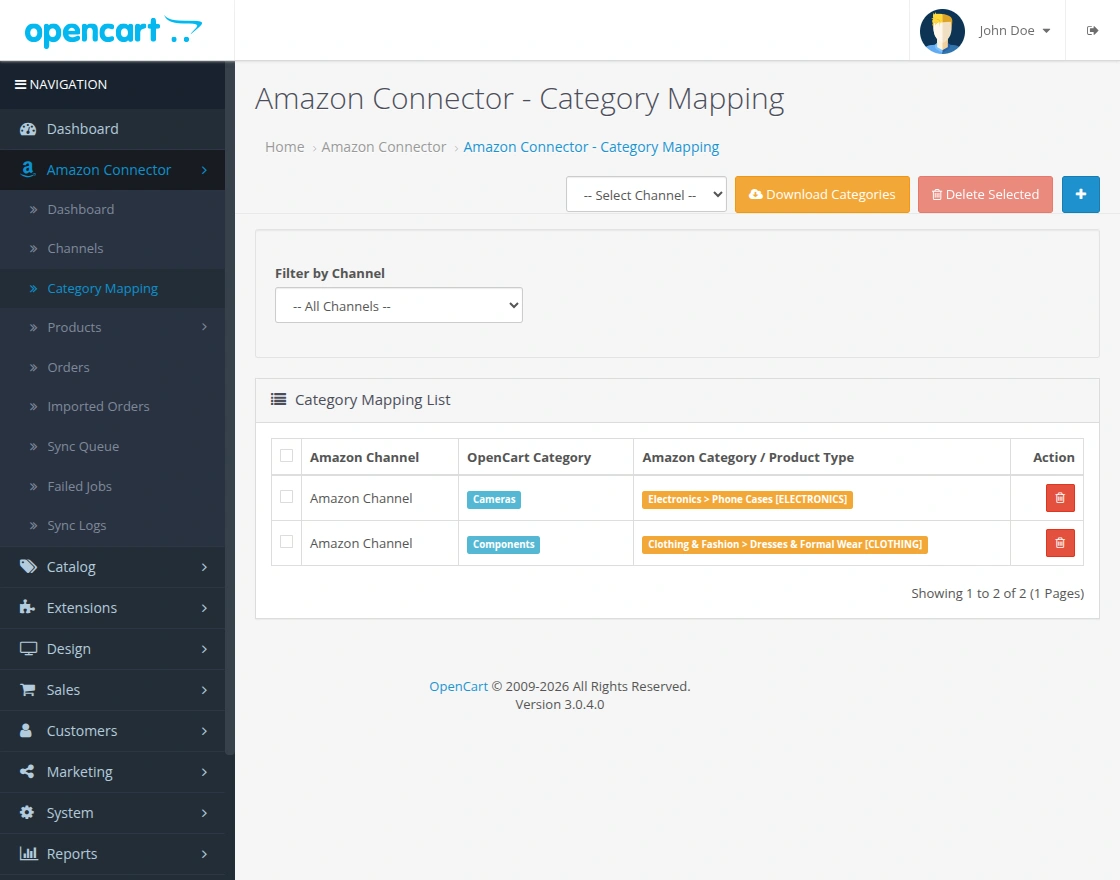
Note: Make sure the selected Amazon Product Type matches the mapped OpenCart category. Otherwise, required product attributes may not be retrieved correctly, resulting in incomplete product data or import failures.
Once the mapping is created, it will appear in the Category Mapping List.
The mapping list displays the configured Amazon Channel, OpenCart Category, and the corresponding Amazon Category / Product Type.
This allows you to easily review and manage all the mapped categories from a single place.
Import Products from Amazon
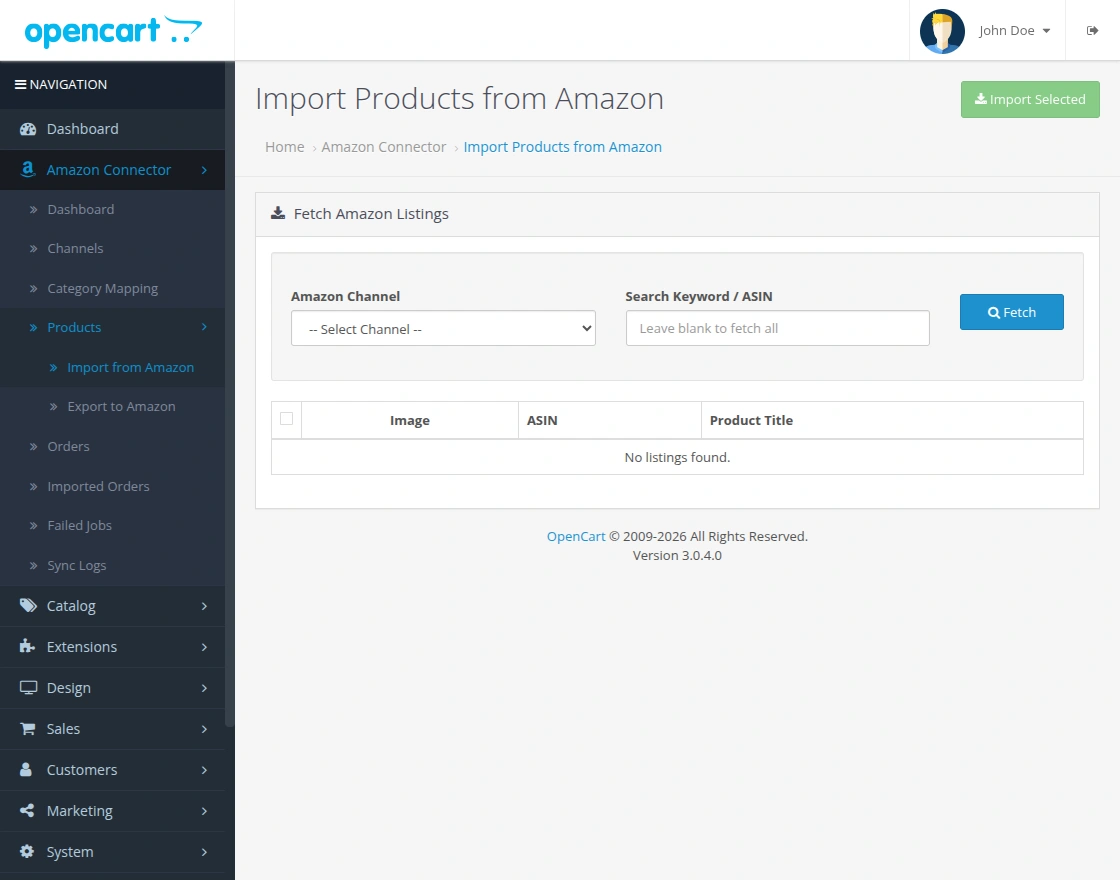
To import products from Amazon into your OpenCart store, navigate to Amazon Connector > Products > Import from Amazon from the OpenCart admin panel.
On the Import Products from Amazon page, select the Amazon Channel and optionally enter a Search Keyword / ASIN to fetch specific products. Leave the search field blank to fetch all available listings.
Export Products to Amazon
OpenCart allows you to export products to Amazon from a dedicated export page. You can export one or multiple products to the selected Amazon channel.
Before exporting a product, open Catalog > Products, edit the required product, and navigate to the Amazon tab.
Select the Amazon account, enter the required Amazon product attributes, and save the product. You can also enable Exclude from Amazon Sync to skip the product during synchronization.
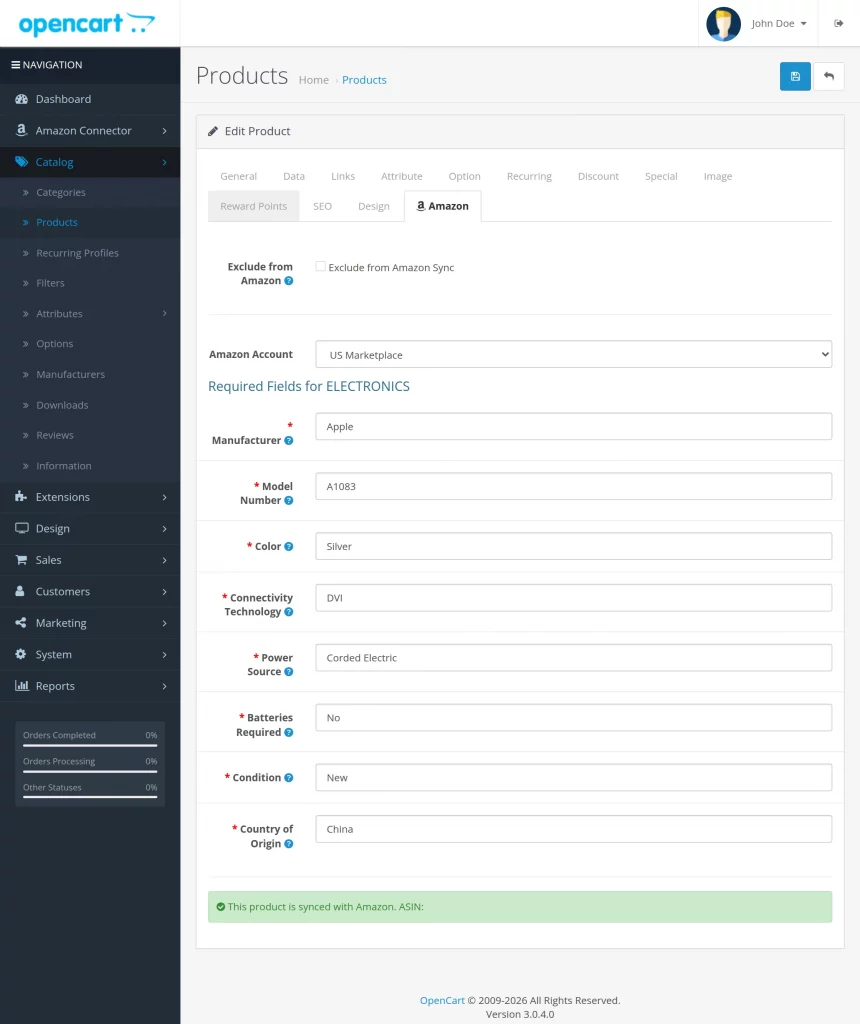
Next, navigate to Amazon Connector > Products > Export to Amazon from the OpenCart admin panel.
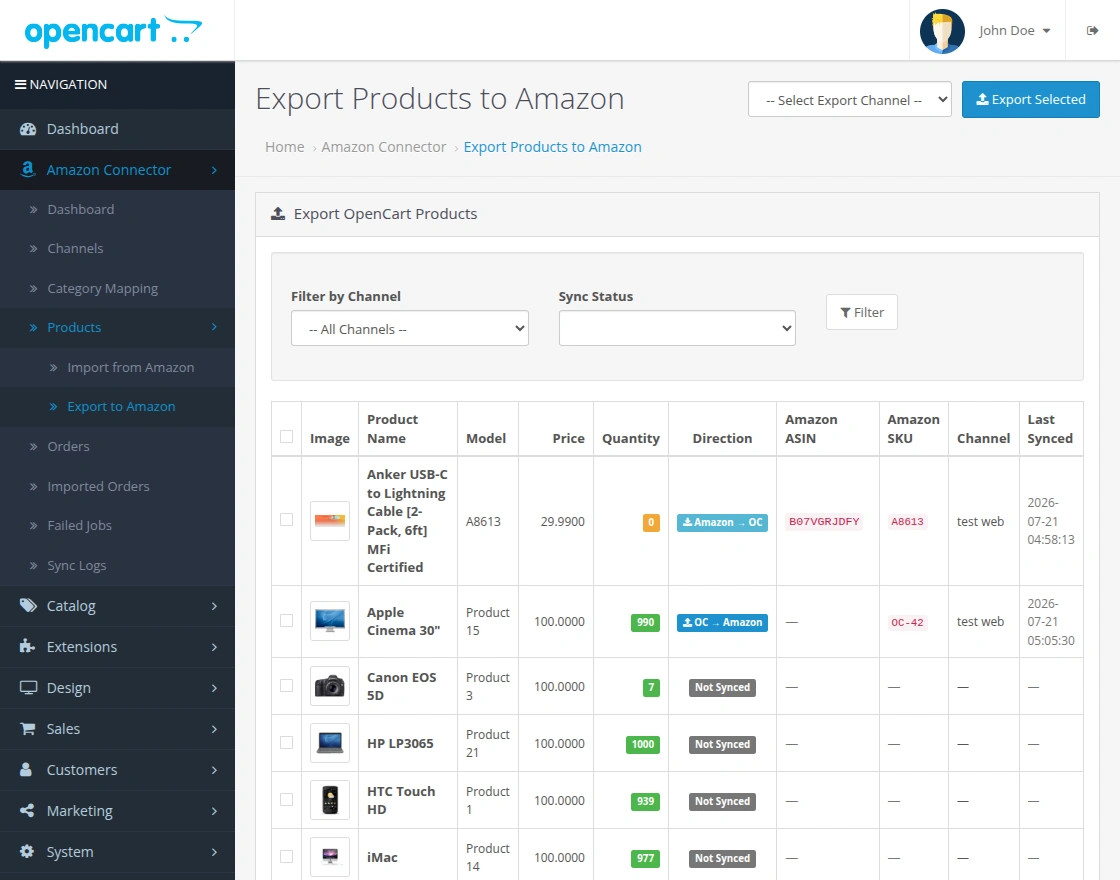
Select the required Export Channel from the top-right corner of the page.
You can also use the Filter by Channel and Sync Status options to quickly find the required products.
The product list displays details such as the Product Name, Price, Quantity, Sync Direction, Amazon ASIN, Amazon SKU, Channel, and Last Synced status.
Select the products you want to export and click Export Selected to export them to Amazon.
Note: Before exporting products, make sure their categories are mapped with the corresponding Amazon product types. Also, complete all required Amazon product attributes in the Amazon tab. Otherwise, the products may not be exported successfully.
Import Orders from Amazon
To import Amazon orders into your OpenCart store, navigate to Amazon Connector > Orders from the OpenCart admin panel.
Select the Amazon Channel, choose the Date From and Date To range, and optionally filter the orders by Amazon Order Status.
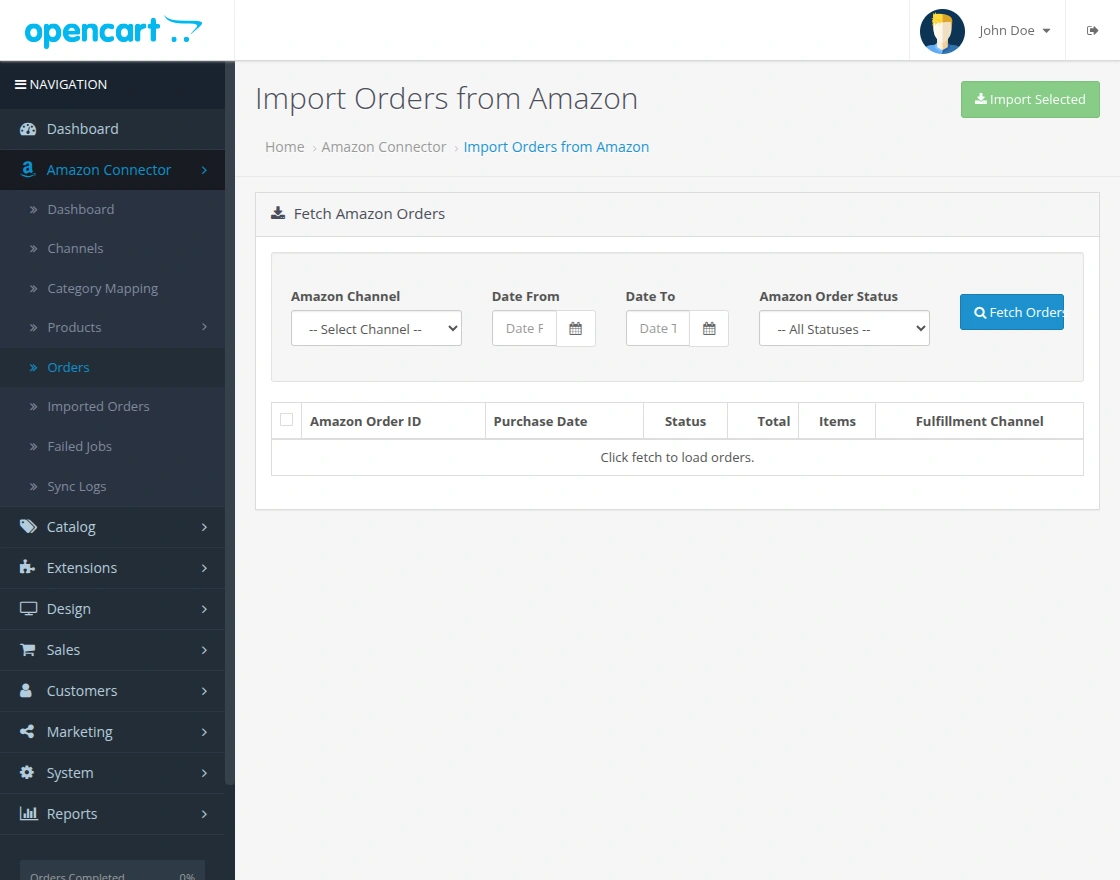
Click the Fetch Orders button to retrieve the Amazon orders matching the selected filters.
The fetched orders will appear in the order listing along with details such as the Amazon Order ID, Purchase Date, Status, Order Total, Items, and Fulfillment Channel.
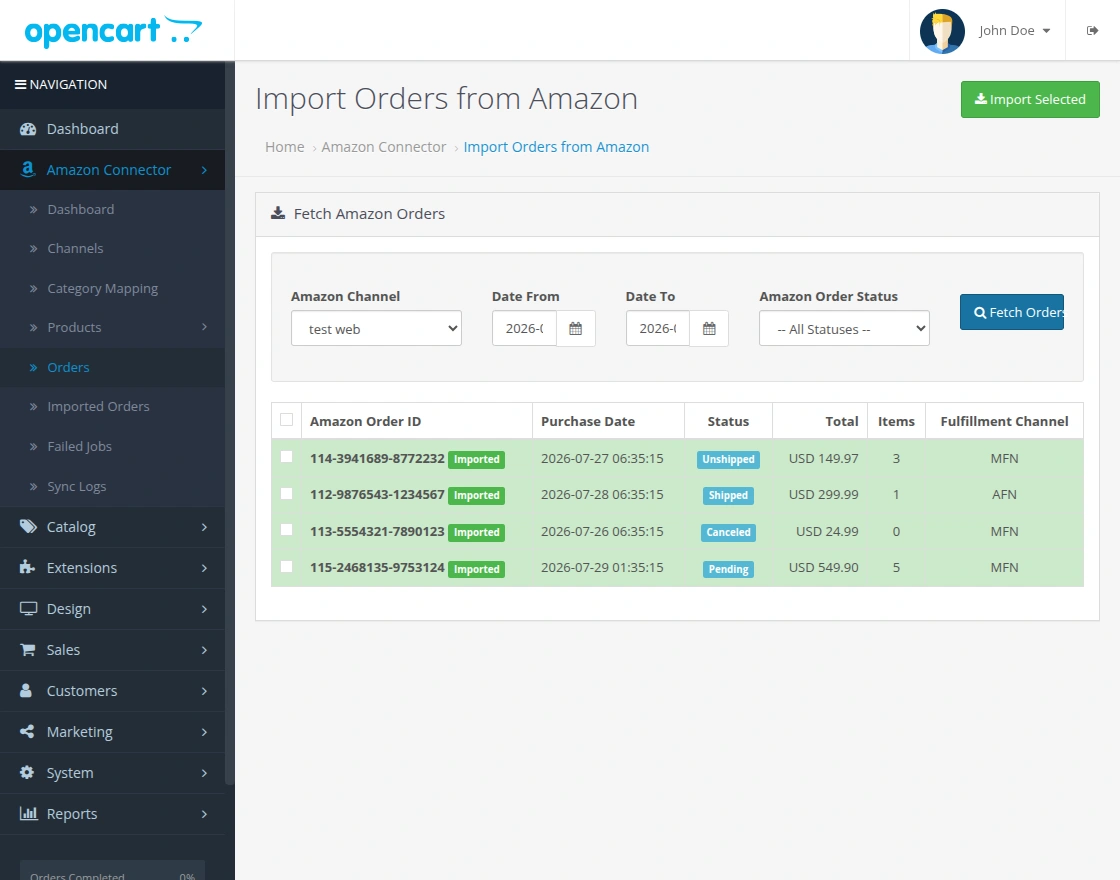
Select the orders you want to import and click the Import Selected button to import them into your OpenCart store.
Note: Only the orders retrieved for the selected Amazon channel and date range are available for import. Make sure the channel is configured correctly before fetching the orders.
Imported Orders
To view the imported Amazon orders, navigate to Amazon Connector > Imported Orders from the OpenCart admin panel.
The Imported Orders page displays all the Amazon orders that have been imported into your OpenCart store. You can also filter the orders by Amazon Order ID, Amazon Status, or Channel.
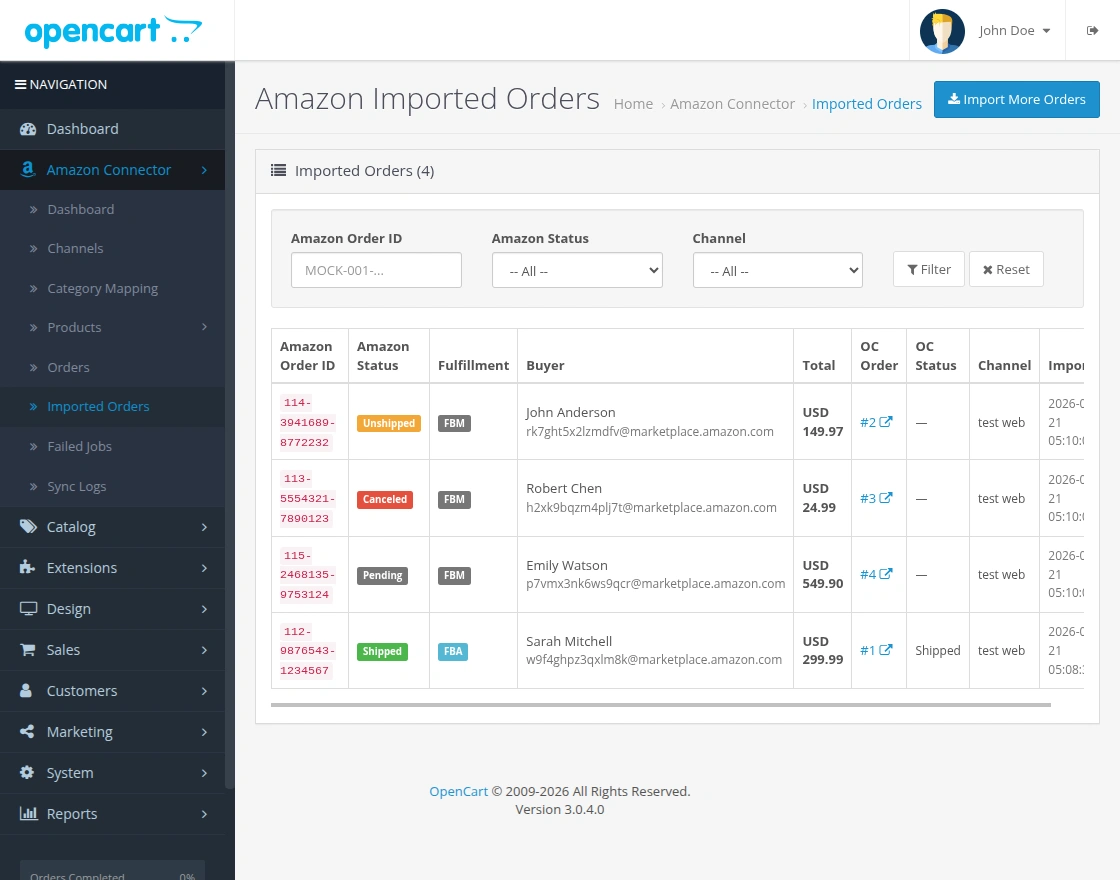
The order list displays details such as the Amazon Order ID, Amazon Status, Fulfillment, Buyer, Order Total, OpenCart Order ID, OpenCart Order Status, Channel, and Import Date.
Click the OC Order to open and view the imported order directly in your OpenCart store.
If you want to import additional Amazon orders, click the Import More Orders button at the top right. This will redirect you to the Import Orders from Amazon page, where you can fetch and import more orders.
Note: Only orders imported through the Amazon Connector are displayed on this page. Use the available filters to quickly find specific imported orders.
Failed Jobs
To view the failed queue jobs, navigate to Amazon Connector > Failed Jobs from the OpenCart admin panel.
The Failed Jobs page lists all queue jobs that failed during processing. Use this page to identify failed operations and take the required action.
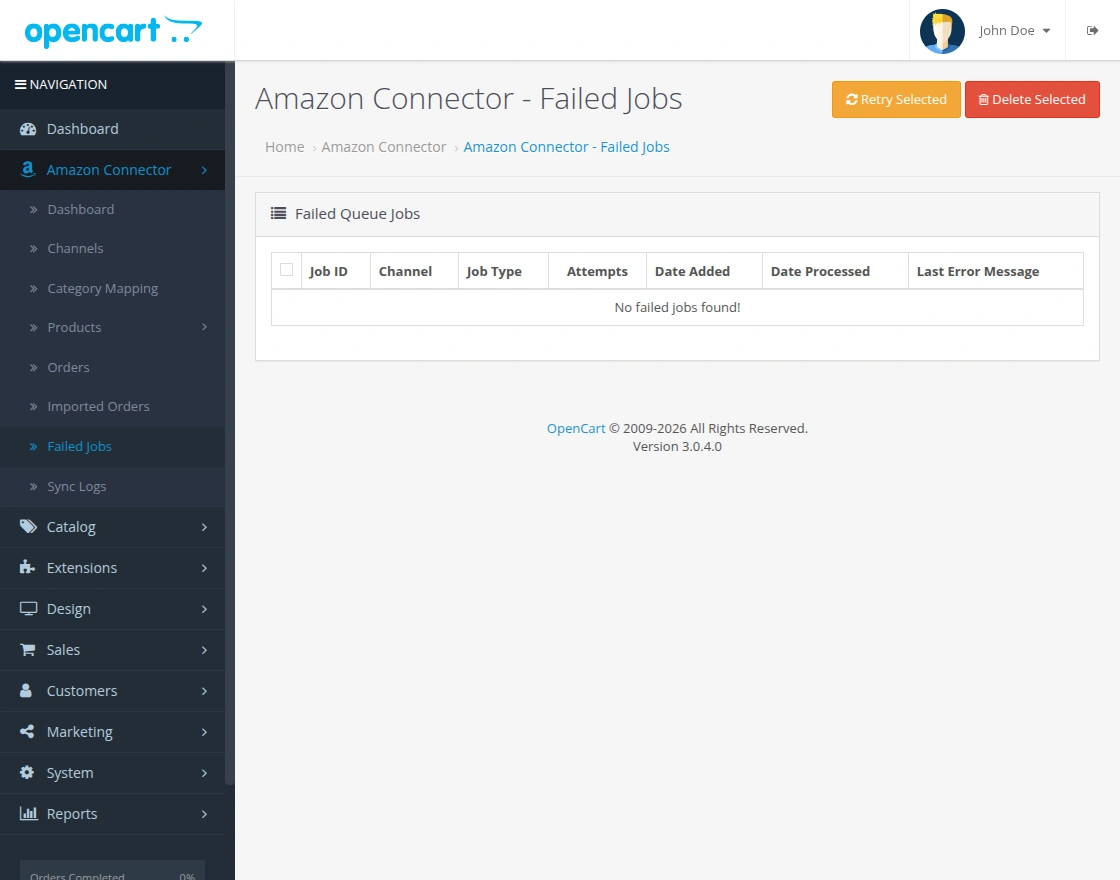
The listing displays details such as the Job ID, Channel, Job Type, Attempts, Date Added, Date Processed, and the Last Error Message.
Select one or more failed jobs and click Retry Selected to process them again. Click Delete Selected to remove unwanted jobs.
Note: Failed jobs are generated only when a queued operation cannot be completed successfully. Review the Last Error Message before retrying the job to help identify and resolve the issue.
Sync Logs
To view the synchronization logs, navigate to Amazon Connector > Sync Logs from the OpenCart admin panel.
The Sync Logs page provides a complete record of all synchronization activities performed between your OpenCart store and Amazon. You can filter the logs by Channel, Log Type, and Status.
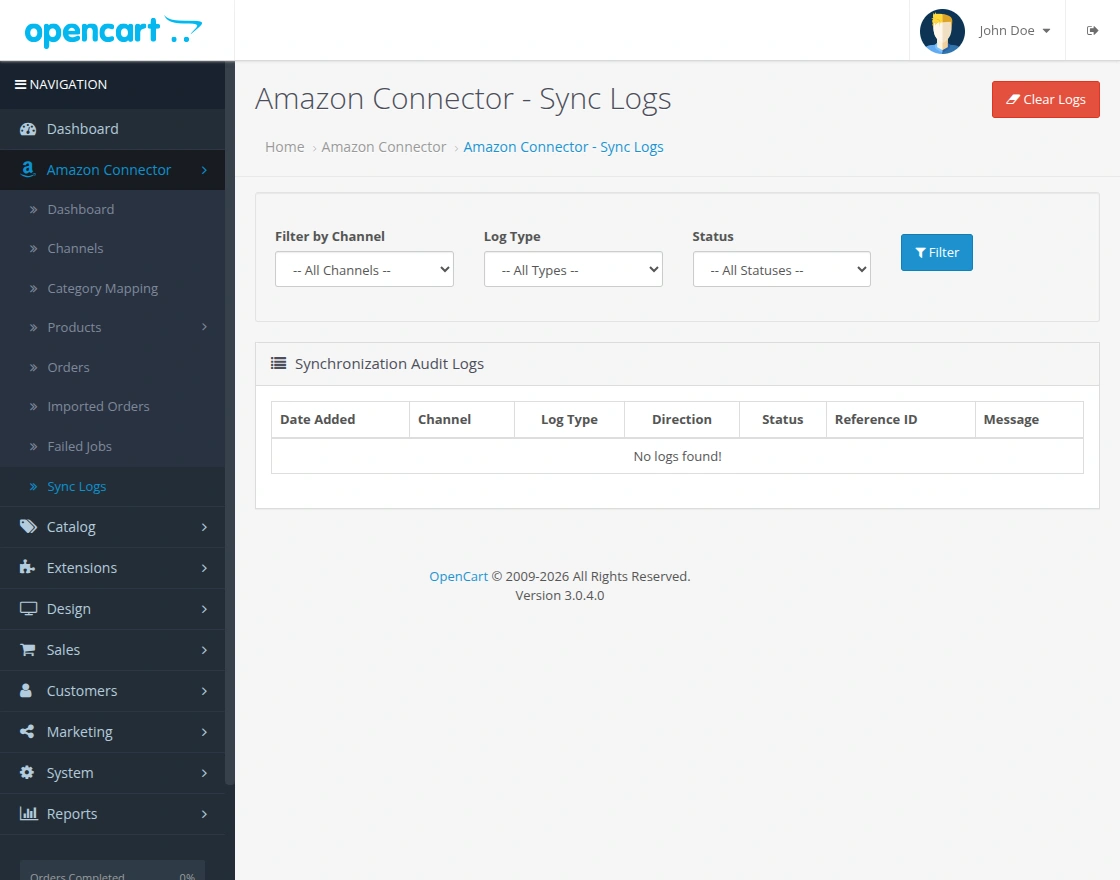
The log list displays details such as the Date Added, Channel, Log Type, Direction, Status, Reference ID, and the corresponding Message for each synchronization activity.
Use the available filters to quickly find specific logs and review the synchronization status of products, orders, or other operations.
Click the Clear Logs button to remove all synchronization logs from the list whenever required.
Note: The sync logs help you monitor synchronization activities and troubleshoot issues by providing detailed status messages for each operation.
Front-End View of Opencart Amazon Connector
Amazon Store View of Opencart Amazon Connector
Moreover, please view the below screenshot, where the store owner is importing the product from Amazon to the Opencart store.
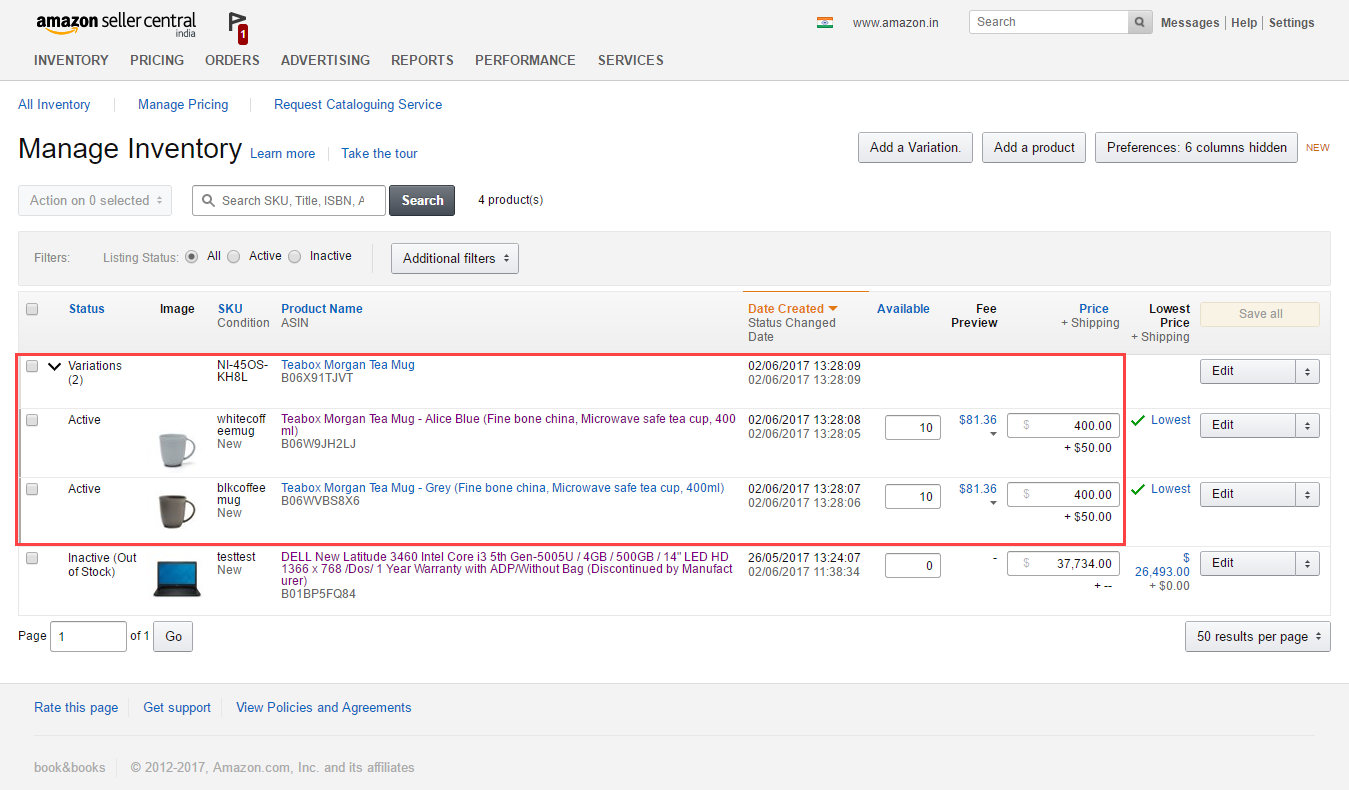
Opencart Front-End View
After that, successfully importing the product from Amazon, it will appear as follows. It will show the product name, image, price, description, specifications, stock, and variations.
When customers select a product variation, OpenCart displays the corresponding image. The example below shows a product with multiple variations.

After that, the customer can select a variation, and the product image changes automatically to match the selected variation.

If you have any questions, suggestions, or customization requests, feel free to contact us at [email protected] or submit a ticket at webkul.uvdesk.com.
You may also check our quality Opencart Extensions.
Current Product Version - 4.0.0.0
Supported Framework Version - 3.x.x.x

Be the first to comment.