Introduction
Multi-Vendor Akeneo Connector for the Magento 2 module allows you to connect and synchronize Magento 2 Multi-Vendor Marketplace with Akeneo.
You can create vendor listing from Akeneo, reference vendor data attribute, and assign products to vendors.
Check a brief overview of the plugin –
Important Note:
- This module requires you to install three modules first –
- For Magento Enterprise/Commerce, select the Magento Enterprise Edition option.
- This module is compatible with Akeneo Community Edition, Enterprise Edition, and Cloud (PaaS/Flexibility) Edition.
- Dedicated Support for Magento 2.4 is provided
Basic Requirements:
- Multi-Vendor Akeneo Connector for Magento 2 works with Akeneo 2.0.x, 2.1.x, 2.2.x, 2.3.x, 3.0.x, 3.1.x, 3.2.x, 4.0.x, 5.0.x, 6.0.x, and 7.0.x. Download Akeneo.
- Node and Yarn packages need to be installed. Click Here
- Also works with Akeneo Cloud Flexibility Mode, which is a PAAS Edition of Akeneo
Features
- Create vendors on Akeneo and export them
- Reference data attribute for vendor
- This module is compatible with the latest Akeneo version 7.0.x
- Assign products to vendors and export them to Magento 2
Magento API Integration for Module Older Version
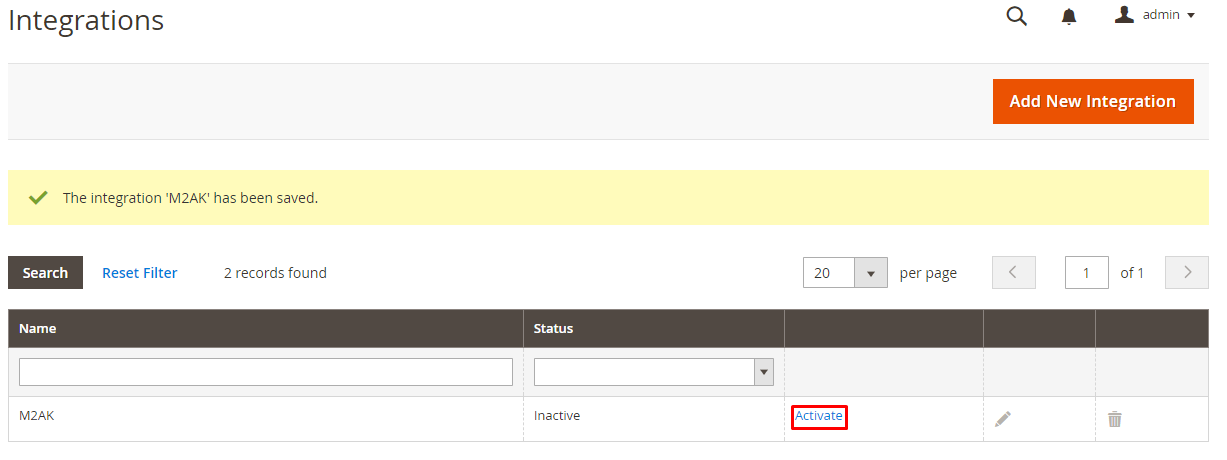
For creating API in Magento, login to your admin panel then go to ‘System>Integrations>Add New Integration’.
In the ‘Name’ field, add any unique name for identification then enter the admin panel password in ‘Your Password’. Please leave the rest of the field blank and continue to the next step.

Select APIs for Integration After providing the Integration Info, go to the API section then select the following resources after that click Save.
- Catalog, Inventory, Products, Categories, Admin Seller Management API, Marketplace Management, Customers
- Stores, Settings, Currency, Attributes, Other Settings

Here are the other options.

Once the API is created, you will see the integration in the list, click Activate.
The following pop-up window will appear, click the Allow button.
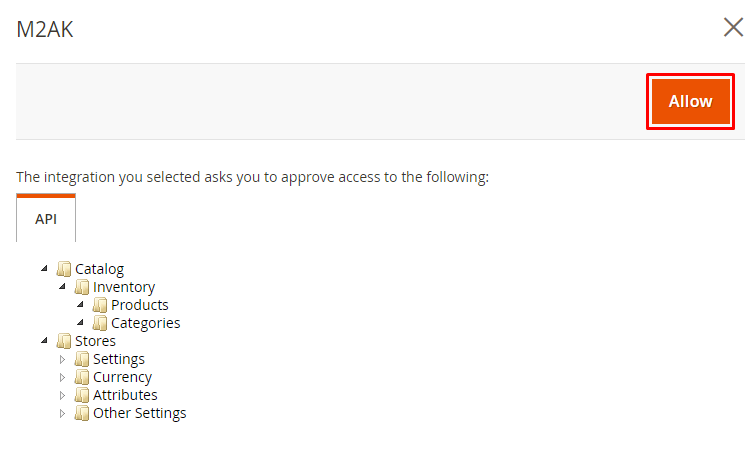
The API credentials will be generated as follows. Then, you need to copy Consumer Key, Consumer Secret, Access Token, and Access Token Secret after that paste them into Akeneo configuration.

For the new version of module:
Admin need to allow permission to the user for that, navigate to Admin -> System -> User Roles -> Edit your User -> Role Resources.
Select the below mentioned roles for the users:
- Catalog, Inventory, Products, Categories, Admin Seller Management API, Marketplace Management, Customers
- Stores, Settings, Currency, Attributes, Other Settings.
Here are the other options.
Composer Installation
Before beginning the composer installation
1: Get the ACCESS KEYS [Create a support ticket]
2: In Akeneo composer.json, add our repository as well as the installation script.
For Akeneo 6.x and 7.x
{
  "scripts": {
        "post-update-cmd": [
           "vendor/webkul/magento2marketplacebundle/src/Webkul/Magento2MarketplaceBundle/install/config.sh COMPOSER=true NO_DOCKER=true"
        ],
        "post-install-cmd": [
           "vendor/webkul/magento2marketplacebundle/src/Webkul/Magento2MarketplaceBundle/install/config.sh COMPOSER=true NO_DOCKER=true"
        ],
        "post-create-project-cmd": [
          "vendor/webkul/magento2marketplacebundle/src/Webkul/Magento2MarketplaceBundle/install/config.sh COMPOSER=true NO_DOCKER=true"
       ]
   },
  "repositories": [{
    "type": "composer",
    "url": "https://akeneorepo.webkul.com/"
  }]
}
For Akeneo <=5.x
{
  "scripts": {
        "post-update-cmd": [

"vendor/webkul/magento2marketplacebundle/composer_install.sh"
        ],
        "post-install-cmd": [

"vendor/webkul/magento2marketplacebundle/composer_install.sh"
        ],
        "post-create-project-cmd": [

"vendor/webkul/magento2marketplacebundle/composer_install.sh"
       ]
   },
  "repositories": [{
    "type": "composer",
    "url": "https://akeneorepo.webkul.com/"
  }]
}
3: Use composer to install the extension.
composer require webkul/magento2marketplacebundle
4: Complete the authentication form.
5: Send a Message of Success
6: Delete your browser’s cache.
Installing Module for Version 6.0.x and 7.0.x
- After unzipping the appropriate extension zip, merge the “src” folder into the akeneo project.
- From the PIM directory, run the following command over the NO-DOCKER Instance.
./src/Webkul/Magento2MarketplaceBundle/install/config.sh COMPOSER=false NO_DOCKER=true
- Run the command below over the PIM directory’s DOCKER instance.
./src/Webkul/Magento2MarketplaceBundle/install/config.sh COMPOSER=false NO_DOCKER=false
Module Installation for Version 4.0.x to 5.0.x
Please follow these steps for installing Multi-Vendor Akeneo Connector for Magento 2 in your Akeneo PIM platform.
- Unzip the respective extension zip then merge the “src” folder into the Akeneo project root directory.

- After that goto config/Bundles.php then add the line:
Webkul\Magento2MarketplaceBundle\Magento2MarketplaceBundle::class => ['all' => true]

in the return array.
- Copy the “config” folder into the akeneo project root directory for routing.

- Run this command after ssh to your akeneo server by the terminal
php bin/console vendor:setup:install
- If you are using php-fpm. Then you need to restart the php-fpm services and apache web server.
For Akeneo 5
sudo service php-fpm7.4 restart
For Akeneo 4
sudo service php-fpm7.3 restart
Docker Installation Command :
For Akeneo 5
alias docker_php='docker-compose run -u www-data --rm php php';
alias docker_yarn='docker-compose run -u node --rm node yarn';
docker_php bin/console cache:clear --env=prod;
docker_php bin/console pim:installer:assets --symlink --clean --env=prod;
docker_php bin/console d:s:u --force;
docker_yarn run webpack;
docker_yarn run update-extensions;
docker_yarn run less;
For Akeneo 4
alias docker_php='docker-compose run -u www-data --rm php php';
alias docker_yarn='docker-compose run -u node --rm node yarn';
docker_php bin/console cache:clear --env=prod;
docker_php bin/console pim:installer:assets --symlink --clean --env=prod;
docker_php bin/console d:s:u --force;
docker_yarn run webpack;
docker_yarn run less;
Module Installation for Version 2.x to 3.x
Please follow these steps for installing Multi-Vendor Akeneo Connector for Magento 2 in your Akeneo PIM platform.
- Unzip the respective extension zip then merge the “src” folder into the Akeneo project root directory.
- Goto app/AppKernel.php then add the following line in function registerProjectBundles()
new Webkul\Magento2MarketplaceBundle\Magento2MarketplaceBundle(),

- After that goto app/config/routing.yml then add these lines at top of the file
mutlivendor:
    resource: "@Magento2MarketplaceBundle/Resources/config/routing.yml"
    prefix:   /
- Navigate app/config/config.yml then add this line according to your akeneo version in the imports section –
For Akeneo 2.x –- { resource: "@Magento2MarketplaceBundle/Resources/config/2.x/config.yml" }For Akeneo 3.x –
- { resource: "@Magento2MarketplaceBundle/Resources/config/3.x/config.yml" }
- After that you have to navigate first to Akeneo installation directory (Ex: cd /opt/bitnami/apps/akeneo/htdocs). After SSH, you have to run the command to your Akeneo server by the terminal.
php bin/console vendor:setup:install
- If you are using php-fpm. Then you need to restart the php-fpm services and apache web server.
sudo service php-fpm7.2 restart
Common Issues After Installation
It might happen that even after proper installation, upon opening your Akeneo admin dashboard, you see a loading screen. In that case, do check for the following solution:
- Webpack Installation: If you get the below error
 It means that the web pack is not installed in your system. Run the following command
npm install --save-prod webpack
npm install
- Module routing.yml is not configured properly. Re-check the routing.yml file as mentioned in the 3rd step of Module Installation
- Clear your browser cache.
Uninstall Module: For Akeneo 6 and 7
- From the PIM directory, run the command below over the NO-DOCKER Instance.
./src/Webkul/Magento2MarketplaceBundle/uninstall/uninstall.sh COMPOSER=false NO_DOCKER=true
- Run the command below over the PIM directory’s DOCKER instance.
./src/Webkul/Magento2MarketplaceBundle/uninstall/uninstall.sh COMPOSER=false NO_DOCKER=false
Create Vendor In Akeneo
After successfully installing the module Multi-Vendor Akeneo Connector for Magento 2 in Akeneo, you need to set up the Magento 2 API credentials in Akeneo.
For creating credentials in Akeneo, you can follow the Akeneo Magento 2 connector user guide.
Then you can see the installed module in Akeneo. After clicking on the Vendors, you can see the Marketplace vendors page.

After clicking on the Add vendor icon, you will go to the Add Vendor page where you can create the vendor.

Here you have to fill in the details like code, Email, first name, last name, and Profile/Shop URL. After entering the details, click on the Save button.
You can see all the created vendors.

Create a Vendor Attribute in Akeneo
Before creating the product in Akeneo, you have to create a Reference data simple select attribute for the vendor in Akeneo.
Goto Akeneo Dashboard -> Setting ->Attributes -> Create Attribute. Then have to select the Reference data simple select attribute.

After it, you have to enter the details like attribute code, and attribute group.

After that, you have to also add the type-specific parameter in this attribute. Click on the Save button.

Then you have to add this attribute to the product family. Then you have to go to Akeneo setting -> Family -> add Attribute.
After adding the attribute to the attribute family, you can see the attribute.

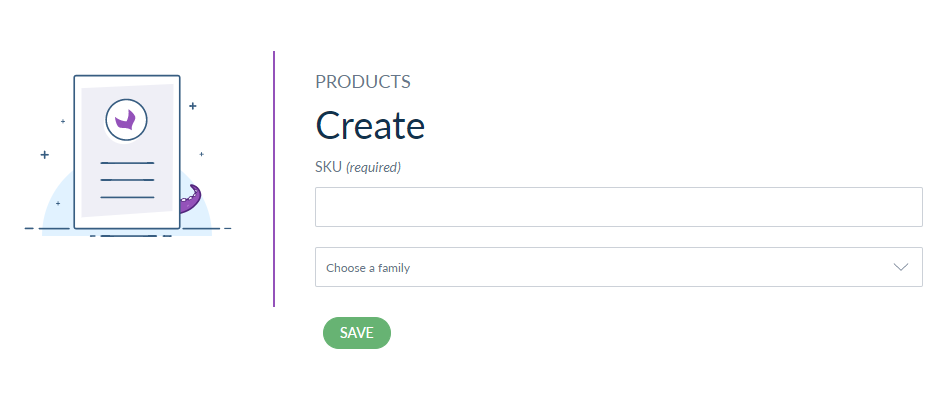
Create Product in Akeneo
After that to create a product in Akeneo, go to navigate to Products then click the Create button. Then you need to choose the product type – as Product or Product Model.
Product – Select this type for creating simple and virtual products.
Product Model – Select this type for creating a configurable product with variations.

Family – A family is a set of attributes that will be the same for all products belonging to a family. The product family represents product type, imposes product information structure, and defines the list of attributes for a product that it belongs.
 Add Product Details
After that, you need to provide information about the product. Then you have to enter the data like Name, Description, Quantity, Price, and SEO information.

Then you can associate the vendor with the product.

Select Category
After entering all the product information, save your changes after that go to Product Navigation then select Categories.

Magento 2 Export Job
Note:
After that to make seller approval by default on the Magento 2 end. For it, you have to navigate Stores->Configuration->Marketplace->General Settings->Seller Approval Required.
Select the Yes option then click on the Save button.

Then to export your product data you need to create a job profile then execute it.
First, go to Exports>Create Export Profile and enter a unique code, the label then select a job profile.

For more information about creating an export profile in Magento 2 Click Here
Export Now
After creating the export profile, click on the Export Now button. The execution of the export process will begin, and the page will refresh continually to update the information.

Execution Process
After that wait for the execution process to complete then check the errors.
After the completion of the export job, the products will appear in the Magento catalog.
Then you can also see the Vendors created and associated with the product in Akeneo.
![]()
Magento Store
As you can see that the following products have been imported from Akeneo.
The admin can view the products and make any changes in the product edit form of Magento.

After that, you can see the vendors associated with the product in Akeneo.
For this, you have to navigate Magento 2 DashBoard -> Marketplace Management -> Manage Seller.

After clicking on the Manage seller, you can see all the vendors associated with the products that are exported from Akeneo.

After that, you can also check the products assigned to the vendors in Magento 2.
For it, you have to navigate Magento 2 DashBoard -> Marketplace Management -> Manage Product.

Import Now
You can create an import job after that in this import job, you can import products withs vendors using an XLSX files.

After that, click on Global Settings to add the import filters:
- Allow file upload: Enable the option to upload the files directly.
- Decimal separator:You need to add the decimal seperator.
- Date format: You need to add the date format.

-
Real time history update: In this product history is automatically updated, and disabling this feature can enhance performance.
-
Convert variant products to simple products: convert variant products into simple products when the “parent” column is empty. If set to “No”, an empty “parent” column will be ignored.
 Then click on the save button and click on import now button to import the product with vendors.
Support
For any issues related to this module, please create a support ticket at our HelpDesk System.
Also, for any pre-sales queries or customization discussion, please drop an email to [email protected].
You may also browse other Magento 2 marketplace addons and our quality Magento 2 extensions.
Please explore our Akeneo Development Services and Quality Akeneo Extensions.
Current Product Version - 3.0.0Akeneo 2 to 5 || 2.0.0, Akeneo 6 || 3.0.0 and Akeneo 7 || 4.0.0
Supported Framework Version - Magento 2.0.x, 2.1.x, 2.2.x,2.3.x, 2.4.x

Be the first to comment.