Magento 2 Web To Print(Adobe Commerce) extension allows you to sell personalized products on your online store.
With the help of the Web To Print extension, the customer can customize the product with text, images, and shapes.
Magento 2 Web To Print extension is a must who are selling personalized products such as printed t-shirts, personalized coffee mugs, and custom phone cases.
Similarly, if you are running a jewellery online store and looking for a feature where your customers can build their own custom rings, check the Magento 2 Custom Ring Building extension.
Also, do you have print-on-demand products within your Printful store and want to sell them on your Magento 2 store, check the Magento 2 Printful Integration extension.
Check how to create a customizable product using the plugin –
Features
- Set web to print status as active or not.
- Show declaration and instruction text before adding a product to the cart.
- Upload font files for the text editor.
- Add various color options for the canvas.
- New product type added in Magento – Web To Print.
- The admin can set the minimum DPI, height, and width of the images.
- The admin can set the canvas width and height in pixels.
- Create multiple templates for the front view, back view, or side view.
- The admin can upload a mask image for the template design.
- Customers can fully customize the template using images, text, and shapes.
- After customizing and designing the product, the customer can download the image.
- The customized image will be visible in the shopping cart and other places as a product image.
- The module supports multiple languages and translations.
- The extension supports Adobe Illustrator.
- Option to generate an Illustrator file and save it as a PDF.
Installation
The installation is just super easy just like our other Magento 2 extensions.
Step 1 – Upload Folder
After downloading the Magento 2 Web To Print module zip file, extract it and go to src>app.

Now, you need to upload the app folder to the root directory of the Magento (Adobe Commerce) installation.
Step 2 – Run Commands
Open the terminal from the Magento root directory and run the following commands:
php bin/magento setup:upgrade
php bin/magento setup:di:compile
php bin/magento setup:static-content:deploy
php bin/magento indexer:reindex
php bin/magento cache:flush
Web-to-Print AI Folder Setup
- Open the Registry Editor on your windows by selecting Run as administrator

- Now you have to select the HKEY_CLASSES_ROOT, click right on it and create a new key (New -> Key)

- Rename the created key as webtoprint.
- Again create a new key inside ‘webtoprint’ -> shell
- Create a new key in the ‘shell’ -> open
- Again create a key in the ‘open’ -> command
Now the Navigation will look like this –
HKEY_CLASSES_ROOT -> webtoprint -> shell -> open -> command

webtoprint –
- Right-click on webtoprint to create a new String (New -> String), and name as – “URL PROTOCOL”
- Click on the first file (DEFAULT) and insert the ‘Value Data’ – “URL:Webtoprint AI Protocol”

shell –
Go to shell and click on the ‘(DEFAULT)’ file. Insert the ‘Value Data’ – “open”

Go to open and click on the ‘(DEFAULT)’ file. Insert the ‘Value Data’ – “&Open”

command –
There is a file located in the Command key that was created at last named – ‘(DEFAULT)’
- Click on the file, a dialog box will appear named – “Edit String” and Input text in the ‘Value Data’ = WScript “path till script” “%1”
Note – “path till script” = Put the path of the folder that is saved in your system and Please ensure that the quotes used for value data are straight quotes.

Changes in Script files –
There are 2 types of files –
- .vbs
- .jsx
-> You have to replace the path mentioned in below codes with the path of the folder which is saved in your system.
JSX file –
var basefilepath = “/C/Users/webkul/Desktop/adobeIllustrator/”
VBS file –
apiURL = Enter your server URL
fileBasePath = “C:\Users\webkul\Desktop\adobe_Illustrator”

Note:- You have to create 2 folder with name “images” and “pdf” then place the generateAIFile.jsx and final_script.vbs file in the folder which is saved in your system.
In apiURL replacewith the path of site (main url)
Language Translation
For translating the module language, please go to app>code>Webkul>WebToPrint>i18n and edit the en_US.csv file.
Now, translate the words on the right and upload the modified file to the same location.
The filename of the translated file should be according to the language and region code, like de_DE.csv.

Initial Configuration – Magento 2 Web to Print Extension
After installing the extension, go to Stores>Configuration>Webkul>WebToPrint Settings.
The following options will be available:
Active – Select Yes to enable the module or select No to disable it.
Declaration Before Add to Cart – You can show any declaration message to the customer before adding the customized product to the cart.
Instruction Before Add To Cart – You can also show some instruction message to the customer.
Canvas Width in Pixels – Enter the minimum width (in pixels) of the upload image.
Canvas Height in Pixels – Enter the minimum height (in pixels) of the uploaded image.
Image Width In Pixel – Enter the width (in pixels) of the final image.
Image Height In Pixel – Enter the height (in pixels) of the final image.
Upload Images Minimum DPI – Set the minimum DPI required for uploading images by a customer. The higher the DPI, the sharper and clearer will be the printed images.

Magento 2 Web to Print Options – Management
Adding Image Category:
For uploading the images for the templates, the admin first needs to create image categories. Go to Web To Print.

Then click on Image Category>Add Images Category.
Then, enter the name, and description, and upload any category image.

Uploading Images
After creating the categories for the images, the admin can now upload images for the templates. Go to Web To Print>Images>Add Image.
Upload the image from your computer, select category and set alt text description.

WTP Fonts
The admin can upload custom font files for the text editor. Go to Web To Print>WTP Fonts>Add Fonts and upload the font file.

WTP Colors
Although the admin and the customer can add the color in the template using color name or color codes.
Besides that, the admin can create some predefined color options for the template. Go to Web To Print>WTP Colors>Add New Color.

Create Personalized Products
For adding a new personalized product to your online store, go to Catalog>Products>Add Product>Web To Print.

Then, go to the WTP Customize tab and click Create WTP Template.

Clicking the Create WTP Template brings up the below section.

Adding Template
To insert a new template, click Add More and the following form will appear where the admin needs to provide the template information:
Title – Set the title for the frontend.
Description – Enter any description of the template.
Base Image – Upload the base image of the product.
Mask Image – Upload the mask image of the product where customization can be done.
Add Template Variation – Use this to add the template variation.

Adding Text
To add text to the template, click the Text icon and edit the text. The text editor has various options to customize the text: font face, bold, italic, size, color, etc.

Adding Images
The admin can add the images to the template. The height and width of the image can be adjusted accordingly.

Adding Shapes
For adding shapes, click Shape and then click any object. You can also customize the shape using fill color, border color, width, etc.

Adding Zoom
For adding zoom, first, click Zoom, and then you can make use of the zoom slider to zoom in or out on the respective image.

Preview
The admin can also preview the customization made from the backend.

Customer Storefront – Workflow
On the product page, customers will see the Customize Product button.

Canvas
After clicking the Customize Product button, the Canvas editor will open.
Here, the customer can customize the product images using the text editor, upload images, add shapes to the image or add zoom functionality to the image.
The customer can choose any of the templates and customize them accordingly.

Final Image
Once, the customer finishes the customization, they need to save the template and then preview it.
Following the preview pop-up window, the customer needs to check the declaration, enter the quantity, and then click the Add to Cart button.

Shopping Cart
Now, when the customer finalizes the image, the product image will be changed automatically.

Once the order is placed, the customer will get a confirmation, as shown in the below image:

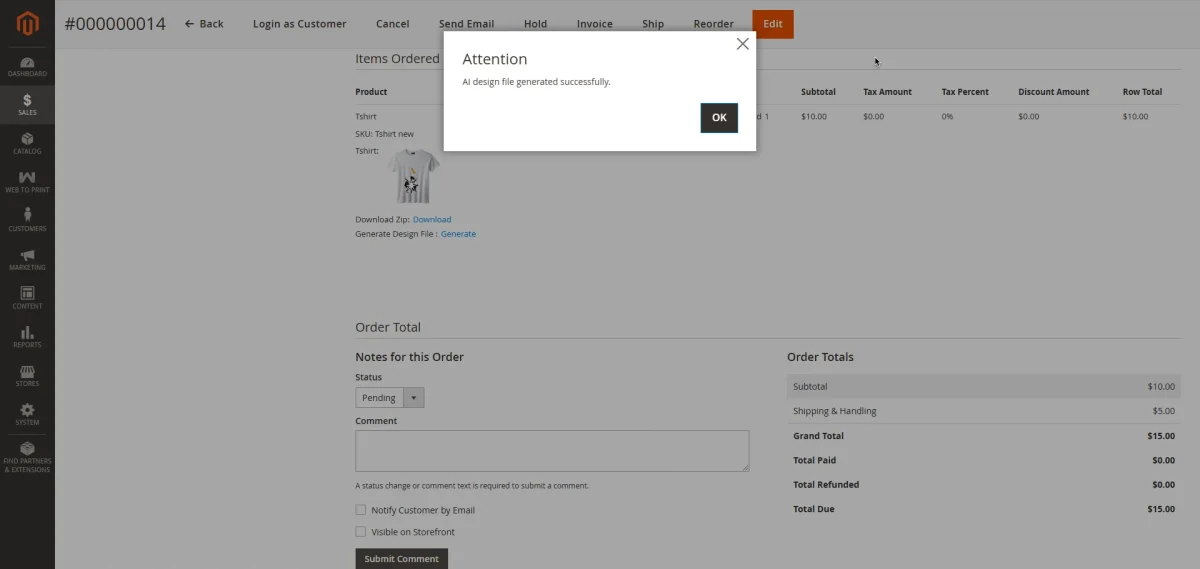
The admin will then select Download zip and Generate file from the order detail page after navigating to the order section at the bottom.

Once the admin clicks on the download zip, he or she can view all of the customised images, as shown in the image below.

When you click the generate button, a PDF file will be generated, as seen in the blog image.
Once the PDF file has been generated, click the Download PDF button to download it.

Once the PDF file has been generated, click the Download PDF button to download it.
Note:
This feature will function only if Adobe Illustrator is installed on your Windows system.
To ensure optimal performance and access to advanced tools, please use the latest version of the software.

Support
That’s all for the Web to Pring extension for Magento 2 (Adobe Commerce), in case you need more information or require any customization, then please send an email to [email protected]
Explore the Adobe Commerce Cloud development service by Webkul.
Current Product Version - 5.0.4
Supported Framework Version - Magento 2.0.x, 2.1.x, 2.2.x,2.3.x, 2.4.x

4 comments
As for now, we do not provide such functionality. We can simply add the desired text and place it in the desired position on the product image. If the customer needs to add a single text on multiple fixed locations of the product image, then they need to go for customization(paid service).
Thanks and Regards.
Magento 2 Web to Print extension will be updated soon for 2.3. For further queries, we request you to share your requirements on [email protected]
Thanks.