Introduction
Hyperlocal Marketplace Mobile App will convert your Magento 2( Adobe Commerce ) Marketplace Hyperlocal web store to a native app.
This app will allow the seller to efficiently manage the store, set the rate of shipping and origin. On the other hand, the customer can easily purchase from the nearest store.
This is a localization of the market to attract maximum customers from the nearby local market. They can compare multiple products for multiple sellers without the trouble of visiting every other nearby store.
The GPS inbuild in the device detects the location of the buyer or the buyer can manually set it. The customer can check products & sellers’ availability. Begin a native app implementation of such features becomes easy.
Thus, the app can be a perfect solution for both customers and sellers which can be accessed anytime and anywhere.
Important Note –
- This App is an add-on to the Magento 2 Marketplace Multi-Vendor Module. So, to use this module you must have Webkul’s Magento 2 Multi Vendor Extension first.
- This App is an add-on of the Marketplace Hyperlocal System For Magento. So, to use this module you must have Webkul’s Magento 2 Marketplace Hyperlocal Extension first.
Check the backend configuration of the hyperlocal mobile app –
Check a brief overview of the Magento 2 Hyperlocal Mobile App –
What Is Hyperlocal?
Before knowing the Hyperlocal Marketplace Mobile App we must understand that what hyperlocal actually mean? The hyperlocal system involves a business structure which is having a local ecosystem. From where the customer can get products and avail services from nearby places.
So, in the Hyperlocal the seller and buyer operate in the vicinity, it includes dealing with a General merchant shop, Restaurant, Market, Mall, and other products and service providers.
GDPR Compliance
All the Mobikul apps are having GDPR compliance which doesn’t force its customer to share their personal data. The app asks the customer to accept the terms and conditions on various pages. Thus, helping them to know the information which app owner is saving.
This GDPR feature is freely available in the app. So, if your store is having EU customer then you need not worry about the issue of GDPR compliance in the app.
Note- The admin can edit the banner image, category icon, and featured category from the admin panel.
Features
The native app has multiple features that keep the user engaged and help in sales incrementation.
Customer-Centric Features-Ease them to buy a product from the app
- The customer can change the current location manually(selection by auto-suggestion), or locate the location on Google maps or select the current location as suggested by GPS.
- The app supports multilingual functionality.
- The user can browse the app in offline mode as well.
- The app user can easily checkout with the product in the cart with a one-page checkout by following steps of checkout.
Seller Centric Features-Effective Store Management from the app-
- CSV upload with the Shipping Rate details.
- The seller can enter the origin to identify the shipping charges.
- Enter the allowed Shipping Area on the basis of Country, State, and City.
- Chat with the admin or send mail to solve the queries.
- Easy and quick management of products and orders using the application by sellers.
- GraphQL APIs implemented in the mobile app.
Admin Configurations
The store owner is capable of editing the mobile app from the admin panel in the Mobikul Tab.
Further, for the basic configuration of the Hyperlocal Marketplace Mobile App, navigate to the following path of the Magento 2 admin panel.
Stores > Settings > Configuration > Webkul > Mobikul
After that, the admin will get three sections of basic configurations which are as follows :
I) Mobikul Basic Configuration
This section comprises the most initial configuration for setting up the Mobikul.

- Username: The admin needs to provide the username for the Mobikul which will be used for connecting to the respective server.
- Password: The admin will provide the password for the Mobikul along with the username.
- Collection Page Size: As the label name of the field is self-explainable, here the admin need to set the number of products that will display on the collection page of the Hyperlocal Marketplace Mobile App at a time.
- Enable random featured product on the home page: If the field is set to “Yes” then, the featured image present on the Hyperlocal Marketplace Mobile App will be taken on a random basis.
Moreover, If the admin sets this field to “No”, then only those products will be featured in the homepage for which the “Is featured for Mobikul ?” is enabled.
Further, for enabling “Is featured for Mobikul ?” for any product the admin will navigate to the following path.
Products > Catalog > Add Product / Edit

- Allowed CMS Pages: The admin can choose the CMS pages of the default Magento, which want to display on the Hyperlocal Marketplace Mobile App.
- Featured Products Banner: This allows admin to set the banner placed at the back of the featured product section.
- New Products Banner: This will allow the admin to set the background banner of new product section on the homepage.
- Deal Products Banner: From here the admin can set the banner for daily deal products present on the homepage.
II) FCM Push Notification Parameter
Moreover, for setting up the push notification feature for the Hyperlocal Marketplace Mobile App then the admin must require this section’s fields to be set up. Please refer to our blog for learning more about:
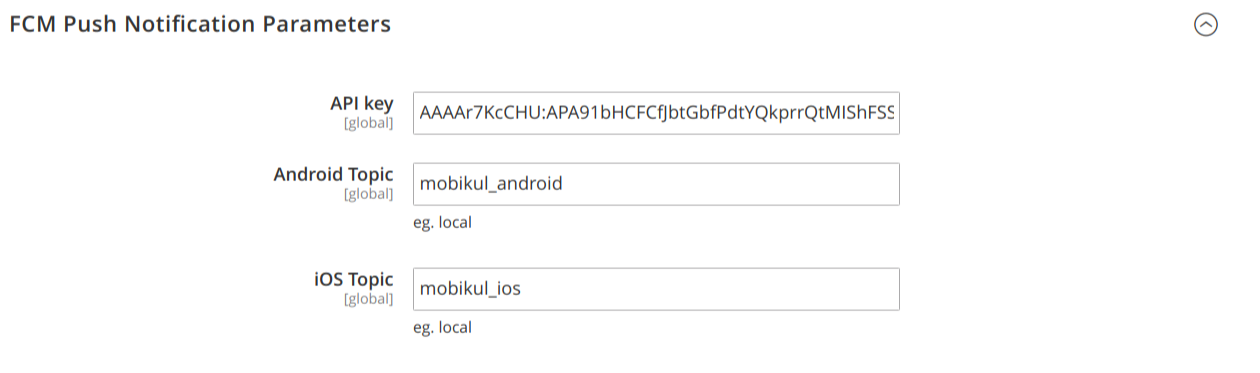
- API key: The admin need to provide the Server API key which user will get after the firebase console registration.
- Android Topic: This is a must for sending the notification on the group basis, on android devices.
The topic name which admin will provide in this field will be the name of the group including all the mobile devices in which the app installation is done.
- iOS Topic: Require in sending the notification on the group basis on iOS devices. The topic name which the admin will provide in this field will be the name of the group including all the devices in which the app installation is done.
III) Mobikul Catalog Search Configuration
Also, the admin can configure the Mobikul’s mobile application SEARCH. The admin can configure the applications’ search on the basis of products and tags.

- Display Tags in Search: This will display the tags in the Hyperlocal Marketplace Mobile App’s search result.
- Number of Tags to display in Search: The admin will set the limit on the number of tags that will be present in the search result.
- Display products in Search: This will display the products in the Hyperlocal Marketplace Mobile App’s search result.
- Number of Products to display in Search: Here the admin will set the limit on the number of products that will be present in the search result.
IV) Application Download From Website
The admin can now display the app URL on their website, by setting the configuration of this section.

- Enable Android Application Download– Here admin can select Yes to make the play store link of the application visible on the website.
- Play store application link- Here, the admin can mention the play store link on the application.
- Enable ios application download- Here admin can select Yes to make the iTunes link of the application visible on the website.
- App Store application link- Here, the admin can mention the iTunes store link on the application.
- Enable Top link- This will make the link visible on the header part of the website.
- Enable Bottom link-This will make the link visible on the bottom part of the website.
- Choose Download link theme– The admin here can select between Light or Dark theme, for better visibility of the application link as per choice.
Thus, after the basic mobile app configuration, the app has multiple tabs in the Mobikul tab.
Push Notifications
The admin can simply add push notifications for displaying it on the Hyperlocal Marketplace Mobile App. Meanwhile, all the mobile app users can get the notification that the admin will push from the backend panel.
For this, the admin will setup push notification configuration by navigating through the following path of the Magento ( Adobe Commerce Cloud )admin panel.
Mobikul Tab > Manage Notifications
After that, the admin will push respective notifications. The notifications will be visible to the user’s device apart from the automatic push notifications of sale.
Note: For using the above menu the FCM Push Notification Parameter has to be set first. To learn more about FCM Push Notification Parameter, please read the Basic Configuration Blog.
Add Notification
Click on the Add Notification button for adding a new notification. The admin can configure the notification as per the requirement by setting up the notification information.

- Notification Image: Upload the notification image from this field.
- Title: Set the title of the notification.
- Content: Provide the content to display with the notification.
- Notification Type: Notification type can be as Product or Category or Custom Collection or Others.
- Product/Category Id: If the notification is a product then provide the Product Id of the product. On click, it will redirect the user to the respective product.
Meanwhile, if the notification type is category then provide the Category Id of the respective category. On click, it will redirect the user to the respective category.
- Store View: Notification can be shown store view wise. “All Store Views” can be selected for pushing the notification in all the store views.
- Notification Status: Select “Enabled” or “Disabled” as per the requirement.
And, if the notification type is custom collection then, in that case, we need to enter ‘Create Product Collection Based on‘ of the Product Attribute Assigned or Product ids or Newly Added Products with Counts.
Furthermore, when the customer selects Product Attribute Assigned then, they need to enter the corresponding Product Type which one wishes to see in the custom collection notification.

However, if the product ids option is selected then the one needs to select the desired product from the collection of products.

Custom Collection Notification type is having one more additional option of Newly Added Products with Count. Here, the admin needs to enter the number of new products to display in the collection.

Featured Category Configuration
The admin can simply add featured categories for displaying it on the Hyperlocal Marketplace Mobile App.
For this, the admin will do a simple featured category configuration by navigating through the following path of the Magento admin panel.
Mobikul Tab > Manage Featured Categories
Add New Featured Category
Click on the Add Featured Category button for adding a new featured category. The admin can configure the featured category as per the requirement by setting up the featured category information.
The Featured Category Information has two sections to configure for setting up the newly added featured category. The first one is the basic configuration of the featured category.

- Image: Upload the featured category image from this field.
- Sort Order: This is the sort order of the featured category among other featured categories.
- Store View: The featured category can be shown store view wise. Select “All Store Views” to display the featured category in all the store views.
- Featured Category Status: The featured category can be enabled or disabled as per the requirement.
Further, the second section is the category configuration of the featured category.
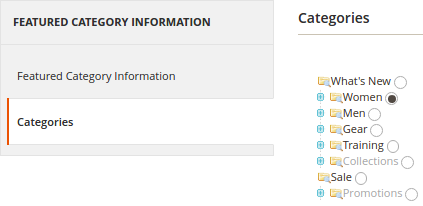
- Choose the category to redirect when the user clicks on the featured category image.
Category’s Banner and Icon Configuration
The admin can configure the banner image for each category and in addition to this, the admin can also configure the category’s icon to display in the hyperlocal Marketplace Mobile App.
Further, for configuring the category’s banner and icon, navigate through the following path of the admin panel.
Mobikul Tab > Manage Category’s Banners and Icons
Add Category’s Banner And Icon
Click on the Add Images button for adding a new banner and icon to a category. The admin can configure the banner and icon as per the requirement by setting up the category image information.
![]()
- Icon Image: Upload the icon image of the category.
- Store View: The Admin can select the banner for a particular store view. This is helpful in case the admin wishes to display banners in multiple languages.
After setting up the banner image and icon image, select the category to utilize the selected banner and icon image.
![]()
- Banner Image: Upload the banner image of the category which will be displayed in the chosen parent category.
![]()
Orders Management
Mobikul Orders can now be separately managed in the admin panel. This facility is given to the app owner to keep a clear record of orders being generated from the app.
The admin can follow the following path to navigate through the settings- Mobikul > Mobikul Order History
List Of Orders-
By clicking on Mobikul Order History the admin can view all the orders that where placed from the app by the customer.
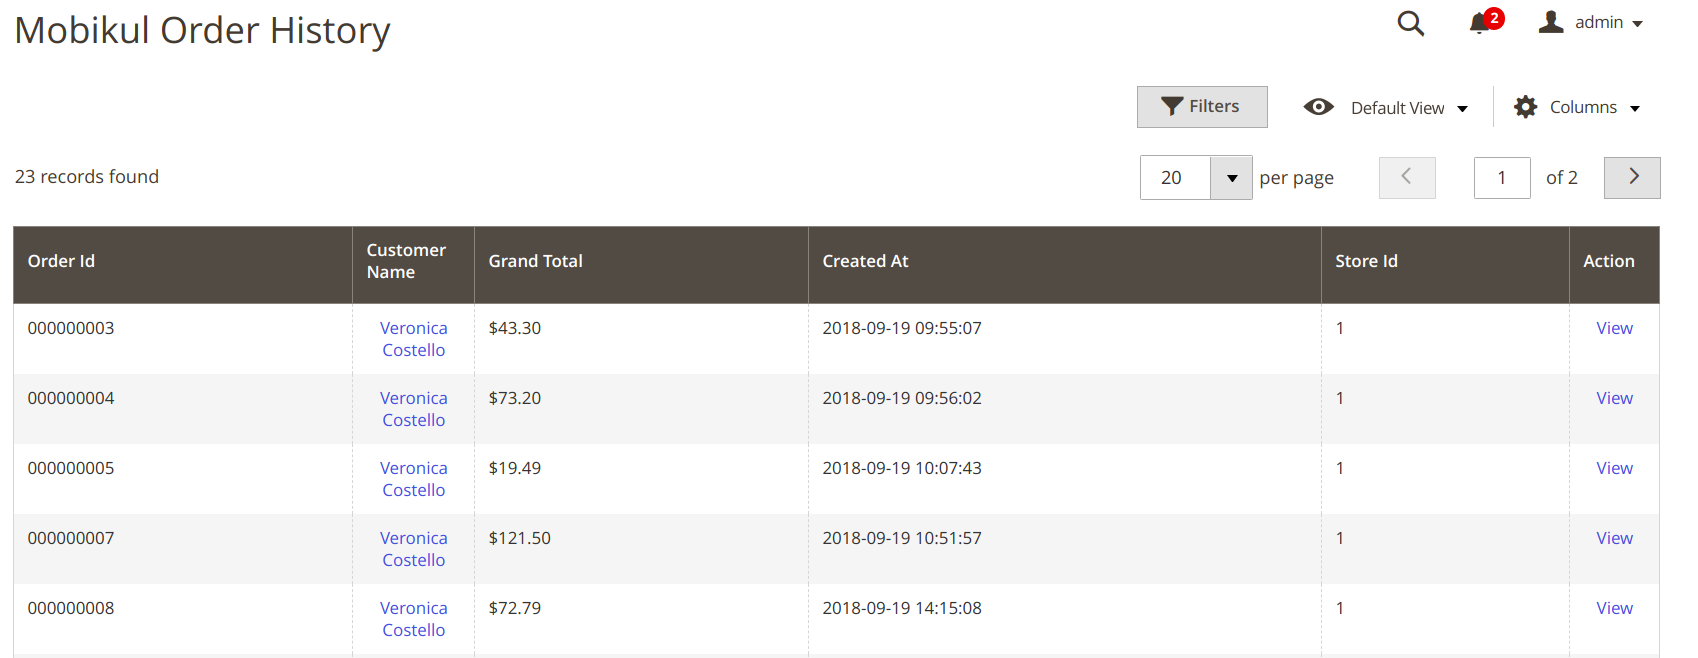
Further, the admin can click on any one of the orders to view the details of the orders.
AR Product Management-
As specified in our earlier article we have implemented the AR Products in two ways-
AR- Product- Virtual-Try On
This product type will allow e-commerce customers to try products in 3D with the help of the mobile application.
The products are the simple product and configurable product type with Mobikul Configuration attached to it for AR-Product type.

Meanwhile, the admin can enter the details of the product as in default Magento.
However, as specified above the admin needs to enter details in Mobikul Configuration-
- AR-Model Type- The admin can select the 3D model option to view the 3D image of the product.
This option will enable two fields-
1-AR Model File For Android- In this field the admin needs to enter the .sfb file which will contain a 3D image of the product.
2-AR Model File For Ios- Here the admin needs to enter the 3D image of the product in the form of the .obj file for the iOS device.
- Texture Image- Here, the admin needs to enter the background of the 3D image.
Now the rest of the options will remain the same as in default Magento 2 Hyperlocal Marketplace Mobile App.
AR- Virtual Measurement
This technique is for now in the iOS app only where the customer can virtually calculate the size of the object. This records the size of the object.
AR product is a simple product with custom options. The admin can specify the attributes of the product.
Besides, with the help of the AR measurement tool, the admin can measure these dimensions and save it in the respective field.
Now let’s see how the admin can enter measurement fields-
Initially, the admin needs to create a simple product by filling the required fields. After that, the admin must enter the Customizable Options.

Thus, the admin will create customizable options like the length, height, size and other desired options. Here, enter the following :
- Option Title- The name of the option as it will appear on the front end.
- Option Type-The type of option that is if its field, Radio Button, some file, etc for taking the input. Here the admin can select the only Field.
- Required- The admin can check the box to make the input filed compulsory.
- Price- The admin can enter the additional price to charge for the option.
- Price Type –The admin selects if the additional price will be on the basis of percentage or the complete price will be added.
App Creator
The admin can manage the sorting of the category carousels present in the mobile app. For this, the admin will navigate to Mobikul > Manage App Creator. Then the admin can change the position by easily dragging the category and drop it to the desired position.

Order Label
The admin can also check that the order placed by the customer from the web end or mobile app. For this, the admin will navigate to Sales > Orders. After that, in the list of orders, an attribute named Order Place Point will be present that will show the order label.
For the reference an image is shown below:

To know more about the backend details, refer here.
Hyperlocal Marketplace Configurations
After installation of the module, admin can configure the module by going to Stores > Configuration > Webkul > Hyperlocal Marketplace. Here Admin needs to enter the following details-
- Enable– Set this field as Yes to enable the module.
- Heading For Location Popup Window– Admin has to enter the heading for the location popup window.
- Radius Unit- The admin can select radius unit as Kilometer or Mile.
- Set Address Change Method- Here, the admin can set change method for address via Popup or via Page redirect.
- Background Banner Image- The admin can set background banner image.
- Button Color- The admin can set color image for button.

Homepage
The Hyperlocal Marketplace Mobile App introductory page that is homepage is infused with multiple features to increase the utility of the app. It is having multiple sections as –
The search option gives the user to find the desired products from the hyperlocal store in a quick way. Hence, it help in increasing the chance of conversion of sales as the customer can concentrate on only desired products.
- Category Carousel- The first section with which our user interacts is the category carousel. It displays a set of categories which are linked with multiple products. That is by clicking a particular category it will redirect you to the category collection page.
- Banner sliders- The second section of our home page is the banner section which can be used by the admin to advertise the exclusive collection, offers, and other details. These banners will either open up to a category or product on click.
- Featured Products- This section of the homepage shows few exclusive collections of products to be shopped from.
- New Products- This is where the customer can view the newly arrived stock of the store.
- Hot Deals- All those products will appear here which have a special price or are running under offer.
- Recently Viewed Products- Those products which have been viewed by the customer in the nearest past.

Search
- Search term- This will search the product as per the keyword typed or spoken by the app user. It is related to the search icon on the top of the screen. Thus, now the customer can quickly look for products from this section also.
- Advanced search- The required product can be searched on the basis of various details like product name, SKU, description, short description, price, and color. So, the user can now get filtered results.
In addition to the above section, the app is powered by an added feature of location detection which can be changed by the user. There are three options for the same :
- Typing the location address-The buyer can type the location name and select the location from the auto-suggestions appearing there.
- Locating the current location on Google Maps- The buyer can even locate the current location from Google maps.
- GPS location detection- The third option for the buyer is to select the location as detected by the GPS.


Dashboard
The dashboard section contains personal information about the customer(app user). So, this section contains-
- My Address-This section will save the default billing and shipping address, along with the other address as an Additional Address. Here, the app user can add additional addresses and can save them for future use for checkout.
- My Order-This will contain details of various orders placed by the customer. Thus, allowing the customer to view the status of the order from the app.
- My Review- These are the feedback on product submitted by customer post-purchase of products.


My WIshlist
Wishlist section contains those products which the customer needs to buy in the near future. Thus, avoiding the need for searching the product in the complete store.

Account Info
This account section contains the detail of the account holder like- first name, last name, email address and a facility to change the e-mail address.
Hence, allowing the app user to easily manage the basic account-related data.

Notification
This section is meant for admin to share the information about the new offers, arrival, and many more with the customer. Thus, the Hyperlocal Marketplace Mobile App user can easily refer to the notifications without the need for scrolling through the notification tab.

Seller Dashboard
This section is for the seller to view sales statics, top-selling products, latest orders, and reviews. Hence, this seller dedicated section will help the seller to know about the sales on the store and will help in improvising the services rendered by the seller.


Seller Profile
The Seller can add details like social media profiles, contact details, Background color (if enabled by the admin), Shop title, Company Banner, Company Logo, Tax/Vat number, Payment details, Policy details, and other information important for recognition of the seller.
Therefore, now all the details can be conveniently manageable by the seller via an app.


Seller Order Management
The seller can manage the order from the app. They can generate an invoice, shipment, cancel and other functions related to orders can be executed. To filter the order, you can use the product name, Product creation date, and product status as well.


The customer can add a filter to fetch the desired order. Thus, the order can be selectively managed by the sellers easily.
Product Management
The seller can view their product in the form of a list. The seller can use the application to manage their products as well. So the sellers now need not struggle with the laptop/desktop to upload the long list of products.
They can simply do this with the help of the Hyperlocal Marketplace Mobile App. They can even edit the previously added product details from the list of products.
Product List
The seller can view the list of products by clicking on ‘My Product List’. The seller can even add a filter to review a particular list of products.


Addition Of Product Via Seller
The seller can now add the products to the store easily via a mobile app. Hence, enabling quick and efficient store management from anywhere and anytime.
The seller needs to complete the following details related to the product-
1. Select the product category from
2. Enter the product name
3. Add the images for the product
4. A full description of the product
5. Short description of the product
6. Enter the price of the product
7. Product quantity (Stock)
8. Weight.
Note – This app favors the addition of only Simple and Virtual products for now.


Seller Transaction
The seller can see the list of transactions in this section which will display the money earned by the seller post deletion of commission. The seller can add a filter and look for the desired transaction. They can even download CSV for the transactions.


The seller can also filter the transactions by Transaction ID and Date.

Customers
The seller can see their customer list under Customer tab from the left menu.


Manage Print PDF Header Info
The seller can manage the header information of the pdf like invoice and packing slips. That is the address details, the name of the organization, and other details which the seller needs to show on invoice and packing slips.

Chat With Admin
The seller can chat with admin to solve queries on the product, client, etc. This is a way through which admin can keep in touch with sellers of the respective marketplace.

Ask Question To Admin
The seller can mail their query to the admin. Allowing the building of a strong marketplace with multiple sellers.
Hence, the admin can now solve the query of the sellers via mail.

Shipping Area
The sellers can add the areas where they can deliver the products. The seller can select the area on the basis of country, state, and the city. This will automatically add the latitude and longitude of the area.


Seller Origin
The seller can enter the origin from the left navigation drawer, which symbolizes the location of the seller. That allows the shipping origin address to calculate the shipping charges. Here the destination will be the customer location.

Here, the sellers can enter the location with the help of the auto-suggestion name of the location.
Hence, the auto-suggestion makes the seller to easily locate their address.
Ship Rate
The seller can upload the rate of shipping the product in the form of a CSV file. The seller needs to enter the Distance From, Distance To, Weight From, Weight To and the respective Cost.


Left Navigation Drawer
The left navigation drawer of the app has-
- All Categories and Products.
- Store change facility
- Marketplace
- Compare Products
- Contact Us
- Other CMS Pages.
All Categories And Products
The app gives a list of categories sub-categories and products in the right navigation panel. The customer can click on the main category which opens a list of sub-categories. On clicking on one of the categories it will direct to the collection page.
In the collection page, the user can filter and sort the products, which will allow easy navigation of the products. The user can add the product to cart and wishlist compare product and quickly view the product. The customer can even click on the product to view the complete description of the product to add it to the cart.
Hence, now ordering of product can be no more trouble for the customer.


Marketplace
This section will be displaying the list of sellers in the Marketplace. Here, only those sellers will appear which will deliver in the respective location.
Thus, the buyer can view the collection of the product of sellers and can order the same as per requirements.


Review The Product
The customer can also write a review for the products they like. They can write the summary and Review for the product and submit that as shown in the image below:


Compare Products
The user can compare multiple products and select the best desire product among the given comparison.
Hence, displaying the comparison can help the customer end up buying the best out of the present collection. It can be for similar or different kinds of products.


Contact Us
The section is meant for the buyer to ask a query with regard to the store and its product. So, they can write any query with regard to store, product, or other questions.

Checkout
The customer can easily purchase the product using the app. So, the app user can simply click on Add To Cart button either from the Product page or collection page or via a quick view from the Homepage.
The products that can be seen in My Bag section, where the buyer can view options like –
- Continue Shopping
- Update Shopping Bag
- Empty Shopping Bag
Thus, allowing ease of managing the cart without any trouble of click back button again and again.
After the complete finalization product, the customer can proceed to the next step of selecting the billing and shipping address. Now, once the address details are set the customer can select the desired shipping method from available shipping methods.
Then the customer can select the payment method for the payment of the order. Henceforth, the customer can click on Place Order to complete the process.


Thus, post-purchase the customer can view the order details in My Order section in the dashboard.
Support
So, that’s all for the Hyperlocal Mobile App for Magento 2, still, have any issue feel free to add a ticket at our HelpDesk System.
Explore the Adobe Commerce Cloud development service by Webkul. You may also browse other Magento 2 marketplace addons. Also our quality Magento 2 extensions.
Current Product Version - 2.0.0
Supported Framework Version - Magento 2.0.x, 2.1.x, 2.2.x,2.3.x, 2.4.x

Be the first to comment.