Magento 2 Multi Vendor Shopify Connector helps the store owner to connect their Magento 2 Marketplace website with multiple Shopify accounts.
This allows them to sync the product, orders from Shopify to Magento 2 Marketplace store.
The admin can also allow the marketplace sellers to connect their Shopify account as well.
Thus, the admin and the seller can even export the products from the Magento 2 Marketplace store to Shopify.
Moreover, this module also helps the admin and the sellers to synchronize the products and orders from their respective Shopify account.
NOTE: This module is an add-on to Webkul’s Magento 2 Multi Vendor Marketplace. To use this module you must have installed Magento 2 Multi Vendor first.
Additionally, you can also list and sell products on Facebook shop using the Magento 2 Multi Vendor Facebook Shop extension.
Check the plugin overview along with the respective account options for the plugin under the vendor and marketplace admin account panel.
Video Tutorial of Magento 2 Multi Vendor Shopify Connector
Magento 2 Multi Vendor Shopify Connector – Features
- The admin and the sellers can map Shopify categories with Magento 2 Marketplace categories.
- Admin and the sellers can import Shopify products to Magento 2 Marketplace store.
- Furthermore, the admin and the seller can set a default category for the imported products in the Magento 2 Marketplace store.
- The admin and the seller can set the default quantity for exported products in the Magento 2 Marketplace store.
- The admin and the seller can import Simple as well as Configurable (product with variants) product types.
- The product information like base image, additional images, name, price, SKU, description, quantity, weight, and super attributes with options get import along with the product.
- Imported Shopify product works the same as the Magento product.
- The admin and the seller can export Magento 2 Marketplace store products to the Shopify store.
- The admin and the seller can export Simple as well as Configurable product types.
- Import Shopify orders to Magento 2 Marketplace store.
- Set the default store view for the imported order in the Magento 2 Marketplace store.
- The orders will fetch automatically via Cron and if order items do not exist in Magento, it will automatically be created.
- Quantity management on Shopify for the orders placed at the Magento store.
- Moreover, the admin can add multiple Shopify Accounts.
- The admin can view and manage the Shopify Accounts.
- Product export to Shopify with the listing template.
- The admin and the seller can set price rule for the imported/exported products.
- Compatible with Shopify Custom App.
- Sync product updates in real-time on Magento 2 Store and Shopify.
Magento 2 Multi Vendor Shopify Connector – Installation
Customers will get a zip folder and they have to extract the contents of this zip folder on their system.
The extracted folder has an src folder, inside the src folder you have the app folder.
You need to transfer this app folder into the Magento 2 root directory on the server as shown below.

After the successful installation, you have to run these commands in the Magento 2 root directory.
php bin/magento setup:upgrade
php bin/magento setup:di:compile
php bin/magento setup:static-content:deploy
php bin/magento indexer:reindex
php bin/magento cache:flush
Magento 2 Multi Vendor Shopify Connector – Multi-Lingual Configuration
For Multilingual support, please navigate to Store>Configuration>General >Locale Options. And select your desired language from the Locale option.

Magento 2 Multi Vendor Shopify Connector – Language Translation
For translating the module language, navigate through src/app/code/Webkul/MpMultiShopifyStoreMageConnect/i18n and edit the en_US.csv file.
Thereafter, rename the CSV as “en_SA.csv” and translate all right side content after the comma in the Arabic language. After editing the CSV, save it.

Now, upload it to the path src/app/code/Webkul/MpMultiShopifyStoreMageConnect/i18n where the installation of Magento 2 is on the server.
The module translates into the Arabic Language. It supports both RTL and LTR languages.
The user can edit the CSV like the image below.

How to Create Custom App in Shopify?
Login to your Shopify store and click the Setting option in the bottom left-hand corner.

The section that comes up tap the Apps and Sales channel side menu option.
After that, tap Develop app option at the top.

The section that comes up, here tap the Create an app button.

Now enter the app name and proceed further.

After that, choose to configure Admin API scopes.

Webhook: Product Updates via Webhook
Create Webhook: Enter the webhook URL to receive automatic real-time product updates.
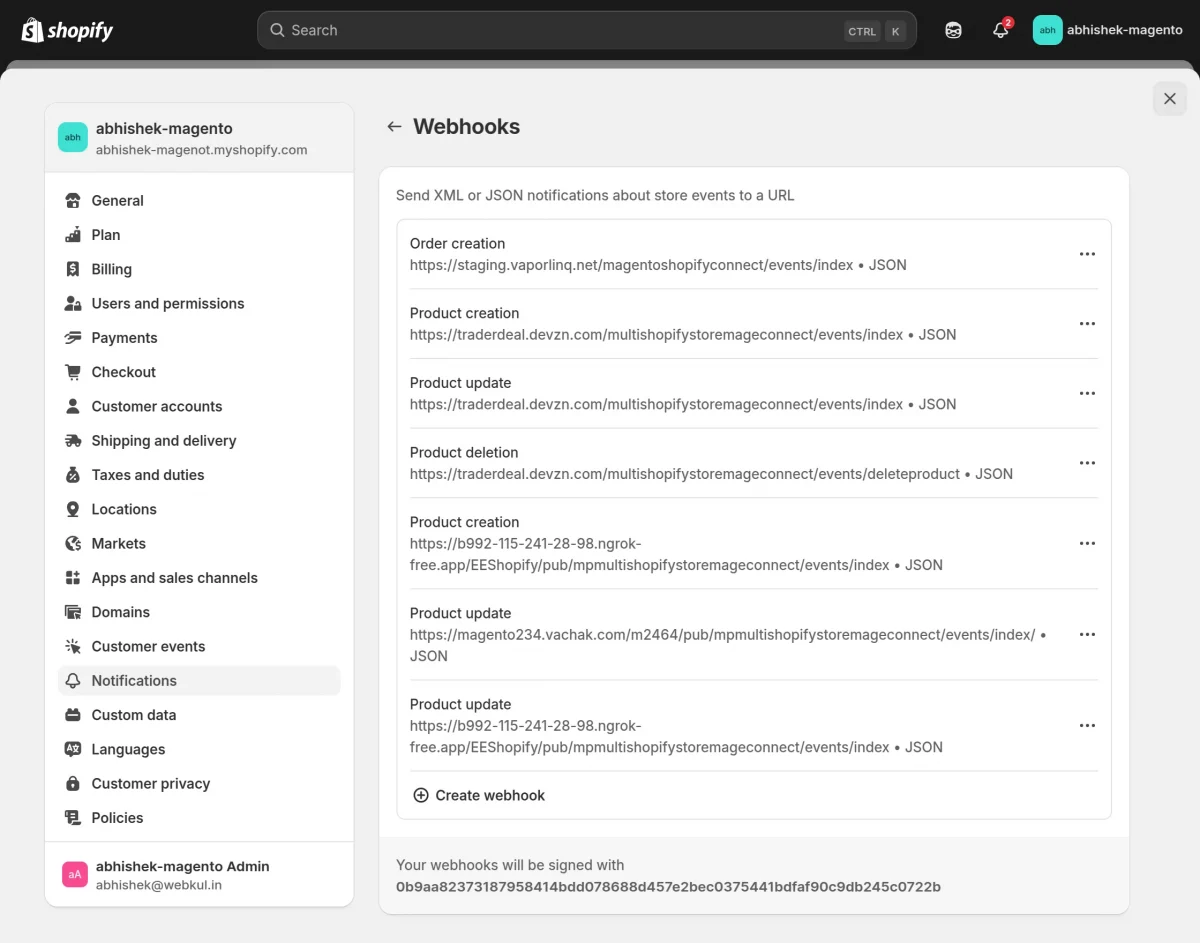
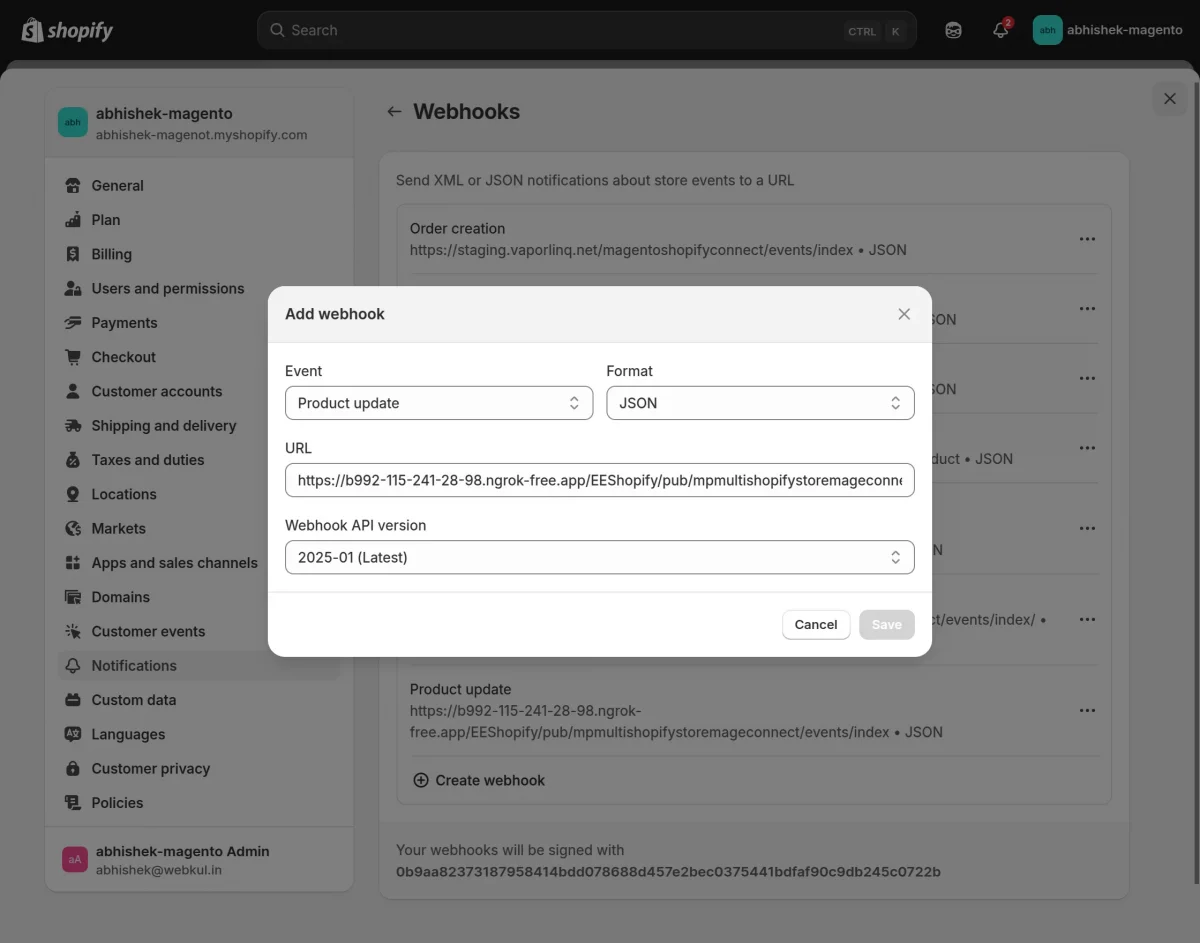
URL for Webhook
Example – {BASE_URL}/mpmultishopifystoremageconnect/events/index
Here, provide the below API access scopes to the app –
- read_content
- read_customers
- read_orders
- read_products
- read_analytics
- write_assigned_fulfillment_orders
- read_assigned_fulfillment_orders and
- write_draft_orders
- read_inventory, and
- write_inventory API

Now, tap the Save button at the top.
After that, install the app by tapping the install button.

After that, on the pop-up tap the install button again.

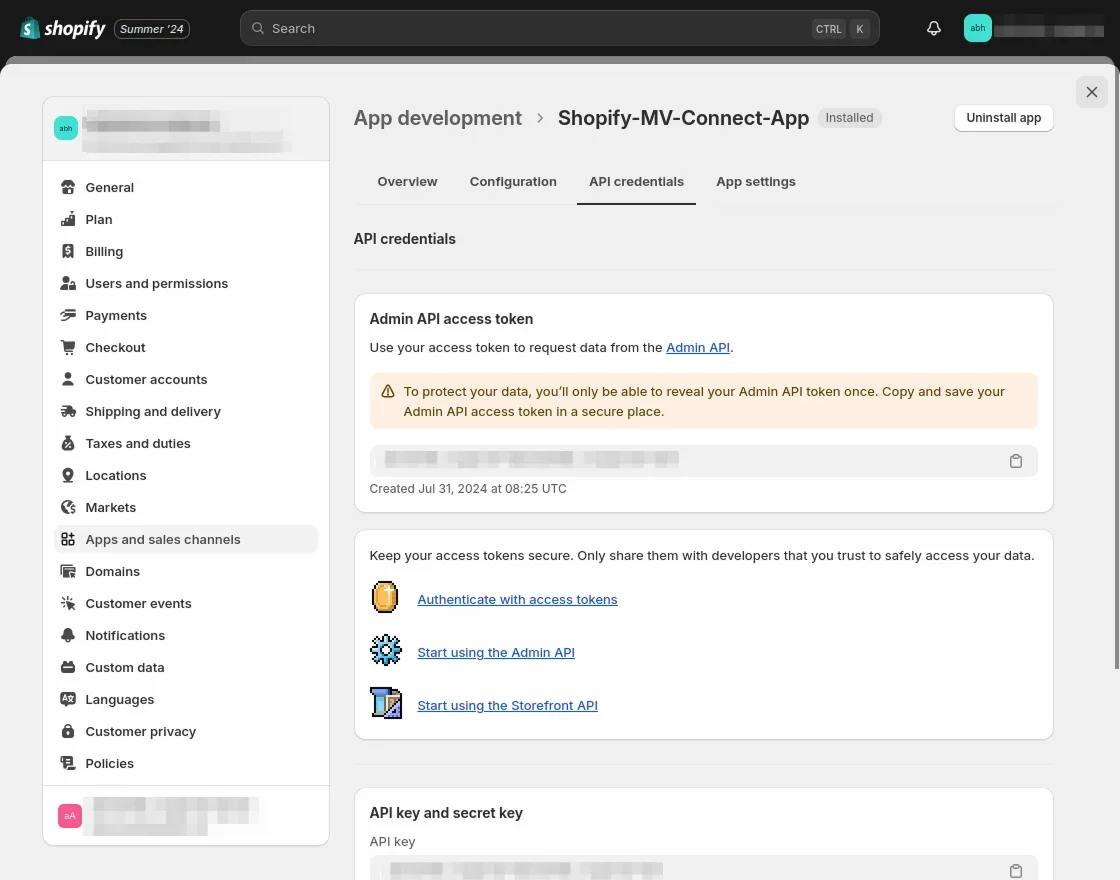
API Access token gets generated.
Magento 2 Multi Vendor Shopify Connector – Admin configuration
The admin can manage the functionality of the Magento 2 Multi Vendor Shopify Connector module by navigating to the –Store>Configuration>Multi-Shopify Magento Connect

Here, the admin can manage the functionality of the module.
Update Product Quantity – The admin can decide whether to update the quantity of a product on Shopify end or not when an order is placed on Magento store.
Update Product – The admin can select if the product should also be get updated on Shopify end when saved at Magento.
Default Source – The admin can select the default Magento source and it will be applicable for all the Shopify products by default.
After that for the module menu options, the admin can navigate through Marketplace management-> Multi Store Shopify Magento Connect.

Now from the admin dashboard, the admin can navigate to Shopify Account Connect to connect multiple shopify account.
To add a new account tap the “Add Shopify Account” button.

Here, the admin can view, manage, and add new Shopify accounts as per requirements.

Here, the admin can fill the required details to add a new Shopify account –
- Store Name: Enter the Shopify store name and this will not be changed once got saved in the Magento 2 Marketplace store.
- Attribute set: The admin can select the attribute set for the imported product.
- Access Token: Enter the Token which the admin has received while creating the app from the Shopify account.
- Domain Name: Enter the base URL of your Shopify store like – johndoe.myshopify.com, where johndoe is prefix in your Shopify base URL
Now click on the Save Shopify Account to add the Shopify account.
Note: After saving the Shopify Connect account details the admin need to save again the general configuration and listing configuration for the further process.
How to Find Shopify Store Name?
You can find your Store name from your Shopify account by navigating to Settings>General>Store Details here, you find the details of your Shopify Store.

Now click on the “edit” button to configure the functionality of the Shopify account.
After clicking on the “edit” button new features will be available to configure the account.
Shopify Account Info Admin – General Configuration
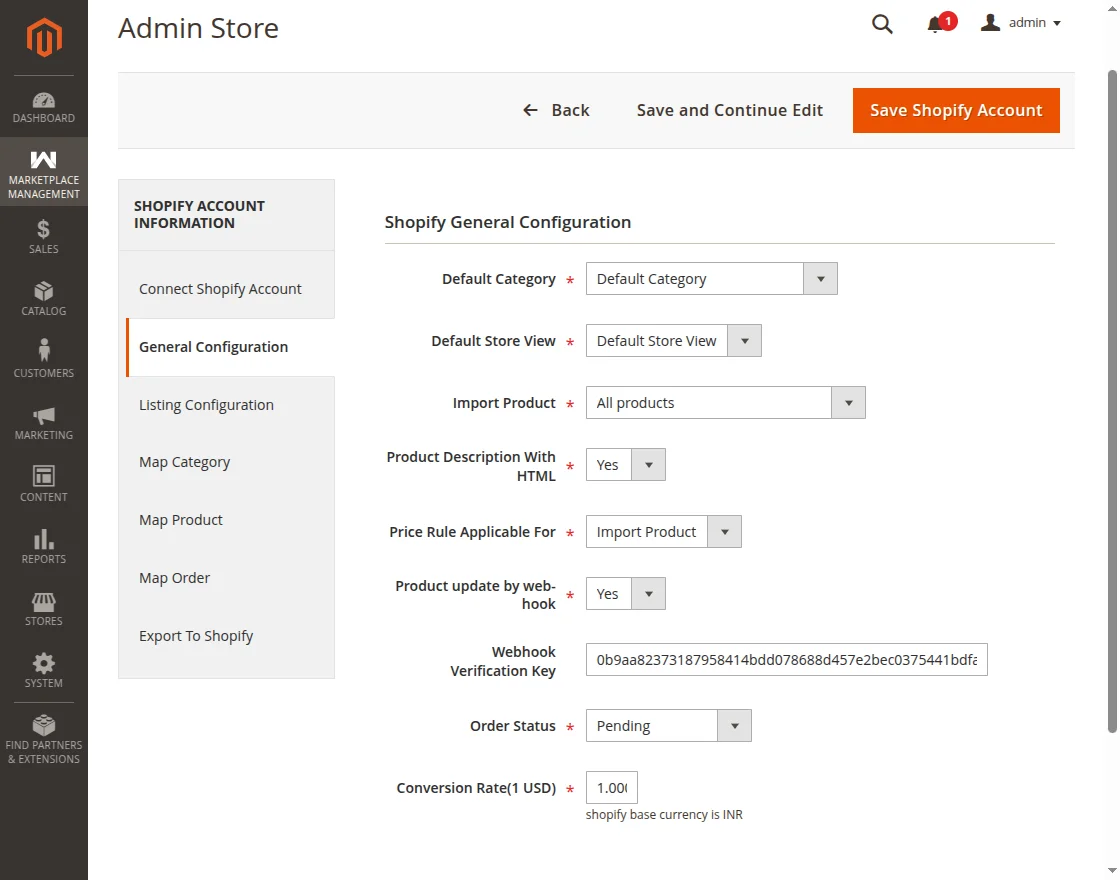
Here, the admin can configure the required details –
Default Category: The admin can select the “default” category here. All the imported products will be imported to the selected category by default.
Default Store View: The admin can select the “Store View” here.
Import Product: The admin can select the “all products” or “Only mapped categories’s product” to import the products.
Product Description With HTML: The admin can select “Yes” or “No” to import the products with product description in HTML.
Price Rule Applicable For: Moreover, the admin can decide the price rule applicable for “None,” “Import Product,” and “Export Product.”
Product Update By Webhook: Sync product changes instantly via webhook in real-time on your Magento 2 Store and Shopify.
Webhook Verification Key: Enter the Webhook Verification Key that appears on the Webhook page
Order Status: The admin can select the Shopify “Order Status” for the products that will be imported to the Magento Store.
On behalf, of the selected Order Status, the products will be imported to the Magento Store.
The admin can select the order status as “Pending,” “Processing,” “Suspected Fraud,” “Complete,” “Closed,” “Canceled,” “On Hold.”
Conversion Rate (1 USD): Enter the conversion rate manually here.
Listing Configuration
The admin can manage the “Listing Configuration” here.

Here, the admin can –
Default Product Quantity – The admin can select the “default product quantity” to export to Shopify store when the product quantity is zero in Magento store.
Select Template – The admin can select the “Template” here that will be used to export the product description of the Magento products while exporting to the Shopify.
Product Type for Export – Furthermore, the admin can select the “Product Type for Export” as it support “Simple,” and “Configurable.”
Other Information – The admin can enter the “Other Information” that will be exported along with the product description.
Map Category
The admin can navigate to the “Map Category” to map the Shopify category with the Magento Store category.

Here, the admin can –
Store Category – The admin can select the Magento category to map with Shopify category.
After selecting the category to map with each other, the admin can click on the “Save Mapping.”
A successful message will be displayed after the mapping of the category.

Furthermore, the admin can also view and manage the already mapped category.

Map Product
Furthermore, the admin can map the Shopify Products with the Magento store.
The admin can navigate to the Map Product under the Shopify Account Information.
Here, tap the import products from Shopify button.

Here, the admin can map the Shopify Products with the Magento store.
The admin can click on the “Import Product From Shopify” in this way, all the products from the Shopify store will get imported.
Thus, a successful message will be displayed to the customers after importing the products.

Now, the admin can click on the “Run Profiler” button to complete the importing process.

Furthermore, the admin can also select, delete, or assign the imported products to the Magento category and then click on the “Save Shopify Account” button to complete the process.

Map Order
Now, the admin can also import the Shopify orders into the Magento store.

For this, the admin can navigate to the “Map Order,” under the “Shopify Account Information” and click on the “Import Order From Shopify.” after that check the number of orders to import.

Now, click on the “Run Profiler” and it will start importing orders from the Shopify store.

After successful importing, a list of the imported orders will displayed on the screen.

Export to Shopify
Now, by navigating to the “Export To Shopify” under the “Shopify Account Information,” the admin can easily export the Magento products to the Shopify Store.

Now, the admin can select the products that the admin wants to export to the Shopify store and select the “Export To Shopify” option from the action option and then click on the “Submit” button.

It will start exporting the Magento products to the Shopify store.

Listing Templates
Using this module, the admin can export the product’s additional information along with products.
For this, the admin needs to create the listing templates by navigating to Multi-Store Shopify Magento Connect-> Listing Templates

Now, the admin can click on the “Create Template” to add a new template.

Here, the admin can enter the “Title” of the listing, and the “Template Content.”
Moreover, the admin can “Map product attributes with template variables” and then use these Template Variables in the Template Content and then “Enable,” or “Disable” the listing templates accordingly.
Note: Each Variable should be unique within the same template.
Now, when the product gets exported, the additional details will also get export to the Shopify store.
Price Rule –
The admin can easily update the price of the synced products automatically. For this, the admin needs to create the Price Rules by navigating to Multi Store Shopify Magento Connect -> Price Rule.

Here, the admin can manage, and create the “Price Rule.” To create the new price rule, the admin can click on the “Add Rule”.

Here, the admin can –
- Product Price From – Select the minimum price for the price rule to be active from.
- Product Price to – Set the maximum price for the price rule to get inactive.
- Operation Type – Select the operation type as fixed or percentage.
- Operation – Select the operation as an increase or decrease.
- Price – enter the amount.
- Shopify Store – select the Shopify store.
- Status – enable/disable the price rule.
HOW WILL IT WORK?
Suppose the price of the synced product is 100 and admin has configured –
- Operation Type: Percentage
- Operation: Increase
- Price: 10
Then 10% of 100 will be added to the original price of the product ie; (10 % 100) + 100 = 10+100 = 110.
Else if the admin has configured –
- Operation Type: Fixed
- Operation: Decrease
- Price: 10
Then 10 will be decreased from the original price of the product i.e; (100-10) = 90.
Seller End
The seller can also connect their Shopify account to the Magento Marketplace Store from the seller dashboard easily.

Now the seller can click on the “Shopify Connect>Account Connect.”
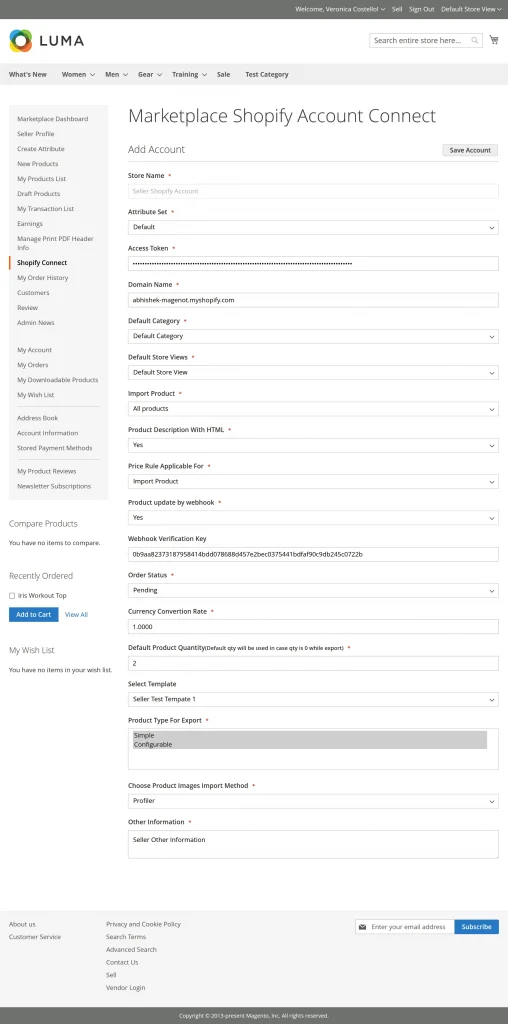
Henceforth, the seller can fill the required details to connect Shopify account.
Store Name – Enter the Shopify store name here to connect to the Magento store.
Attribute Set – Select the attribute set to map with the products.
Access Token- Enter the token of the Shopify custom app.
Domain Name – Enter the Shopify store URL here.
Default Category – Select the default Magento Category to import the products from Shopify.
Default Store View – Select the Default store view.
Import Product – Select the products that will be importing from the Shopify Store. The seller can select “All Products,” or “Only mapped categories products.”
Product Description With HTML – Select “Yes,” or “No” to use product description with HTML.
Price Rule Applicable For – Select the applicable price rule on “Imported Products,” “Exported Products,” or on “None.”
Order Status – Select the “Order Status” on the behalf of the selected order status, the orders will be imported to the Magento store from the Shopify store.
Currency Conversion Rate – Enter the “Currency Conversion Rate.”
Default Product Quantity – Default product quantity is used in case qty is 0 while exporting the products.
Select Template – Select template to apply on the product descriptions.
Product Type for Export – Furthermore, the seller can select the product types to export i.e Simple or Configurable.
Other Information – Enter the other information that will be used with the products.
Map Category Seller End –
The seller can easily select and map the Magento Category with their Shopify store. The admin can Navigate to Shopify Connect>Map Categories to map the categories from the seller dashboard.

Here, the seller can select the Magento Category and Shopify Category and then click on the Save Store to map the categories. It will display the mapped categories after successful mapping.
Map Products Seller End –
Now, the seller can navigate to the Shopify Connect>Map Products that will help the sellers to import the Shopify products to the Magento Store.

Here, the admin can “Import” the products from the Shopify Store to Magento Store. The admin can click on the “Import” button to import the products from Shopify store to Magento store.

After importing the products now click on the “Run Profiler” and it will start the process.

After successfull running and importing the products by profiler all the imported products will be displayed to the seller.

Map Orders Seller End –
The seller can import all the Shopify orders to the Magento store. The seller can navigate to the Shopify Connect>Map Orders from the seller dashboard.

Now, the seller can click on the “Import” button to import the products and then click on the “Run Profiler” to complete the process.

Export to Shopify –
The seller can also export the Magento products to the connected shopify store.

Now, confirm to export the products to Shopify.

Listing Template –
Using this module, the seller can export the product’s additional information along with products by creating a template.

Price Rule –
The seller can also decide the price rule to export and import the products. Seller can click on the “create price rule” to add a new price rule. The seller can create the price rule as “Fixed,” or “Percentage.”

The seller will define when the price rule will get applied to the products. It can be while importing the products to Magento or exporting to Shopify.
The seller decides the option from the “Account Connect” menu.
That’s all for the Magento 2 (Adobe Commerce)Multi Vendor Shopify Connector.
Still, have any queries or suggestions regarding this extension please get back to us at [email protected]
You may also browse other Magento 2 marketplace addons. and our quality Magento 2 extensions.
Current Product Version - 5.0.3-p1
Supported Framework Version - Magento 2.0.x, 2.1.x, 2.2.x,2.3.x, 2.4.x
Be the first to comment.