Now Stripe Payment Gateway is available for your Magento 2 Marketplace by which you can accept payment from all over the world for your eCommerce store.
Stripe is a global technology company that develops business infrastructure for the internet.
It is the rapidly growing payment gateway in modern years, with a presence in 39 countries and 100000+ merchants. For more details about countries click here.
It is the first and leading technology company with a mission to increase the GDP of the internet.
The payment method is a fully responsive design available in all the desktops and mobiles with the 3D secure checkout available in 25 languages and around 135+ currencies.
The checkout happens staying on the merchant site itself, no redirection or popup is there to process the checkout.
This payment gateway is an add-on to the Adobe Commerce Marketplace Module. To use this module you must have install the first Magento 2 Multi Vendor Module.
NOTE:
- This module does not work with Multiple Address Checkout.
- The module does not support Multi-currency.
- The supported regions for separate charges and transfers are Australia, Europe, Japan, New Zealand, and the United States.
- The separate charges and transfers will be applicable only if the platform and connect account are in the same region (for example, both in Europe).
Features- Adobe Commerce Marketplace Stripe Payment
- Enable/disable payment method from the admin panel.
- Provide split payment to sellers for your Marketplace store.
- Accept cards and other Stripe-supported payment methods based on account settings and region.
- Allow the admin to choose the Stripe Integration type.
- Allow sellers to register themselves using stripe connect.
- Sellers can refund the invoiced amount.
- Strong Customer Authentication (SCA) Compliance.
- Multi seller checkout does not work in case of direct charge.
- This module also provides you with the capture later facility for the available funds.
- The admin can enable Vault to allow the customers to save their card details for use by the customer for later purchases.
-
Installation- Adobe Commerce Cloud Marketplace Stripe Payment
Customers will get a zip folder and they have to extract it. After that, the contents of this zip folder are on their system then the extracts folder has an src folder, inside the src folder you have the app folder.
You need to transfer this app folder into the Magento 2 root directory on the server as shown below.

After the successful installation, you have to run the below commands in the Adobe Commerce root directory:
composer require stripe/stripe-php
php bin/magento setup:upgrade
php bin/magento setup:di:compile
php bin/magento setup:static-content:deploy
php bin/magento indexer:reindex
After running the commands, you have to flush the cache from the Adobe Commerce Cloud admin panel by navigating through->System->Cache management as shown below.

Hence, in this way the module installation completes.
Configuration For Multi-lingual Support
For multilingual support, the admin will navigate through Store->Configuration->General ->Locale Options and select the locale as German
(the language into which the admin wants to translate his store content).
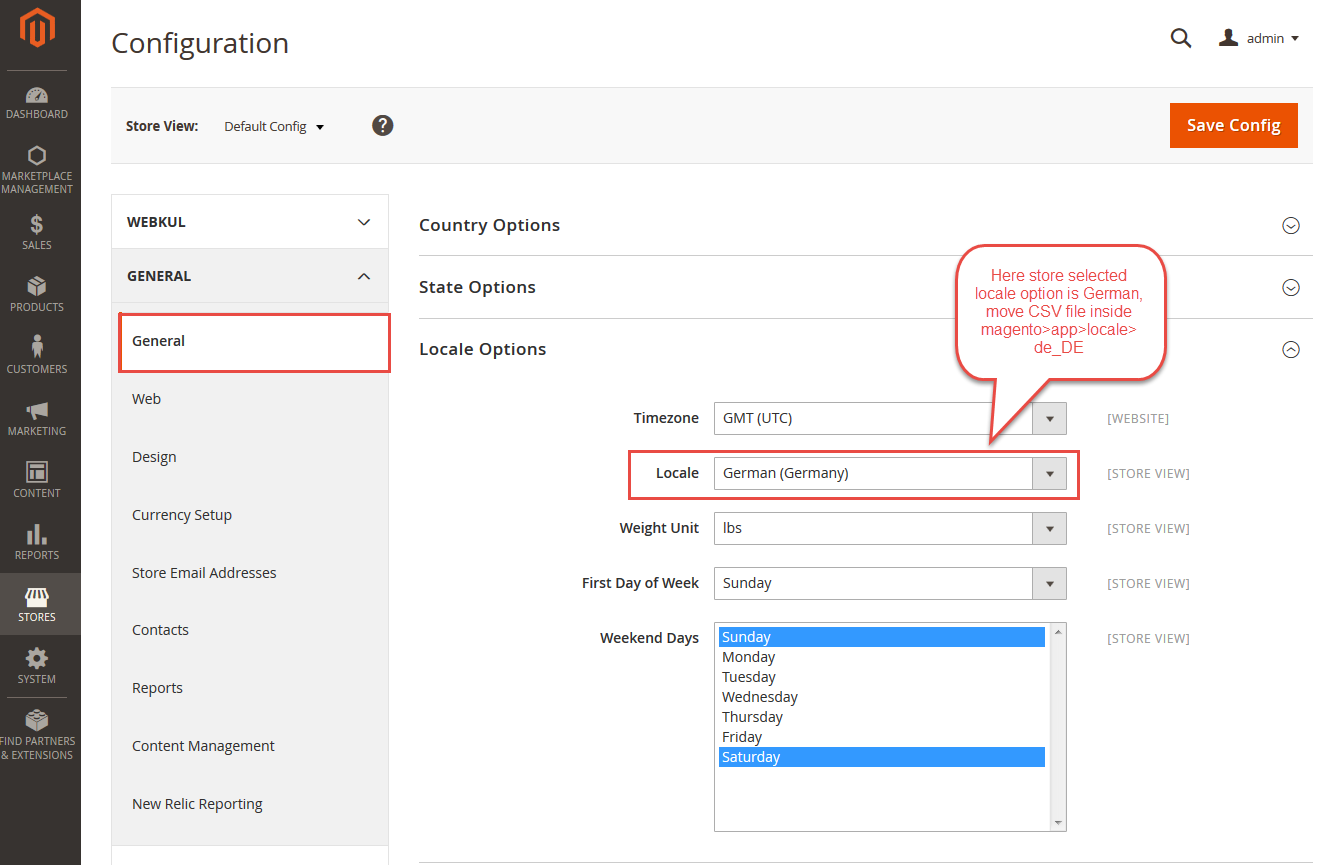
Thus, in this way, the Multi-lingual support configured for the module
Translation- Magento 2 Marketplace Stripe Payment
If a user wants to translate their module from English to the German language then they need to follow the path app/code/Webkul/MpStripe/i18n in their unzipped Adobe Commerce Marketplace stripe payment folder and will get a CSV file with the name “en_US.csv”.
Now they will rename this CSV as “de_DE.csv” and translate all right side content after the comma into the German language.
After editing, save, and then upload the CSV to the path app/code/Webkul/MpStripe/i18n where you have to install Adobe Commerce Cloud on the server.
The module will get translates into the German Language and will support both the LTR and RTL languages.
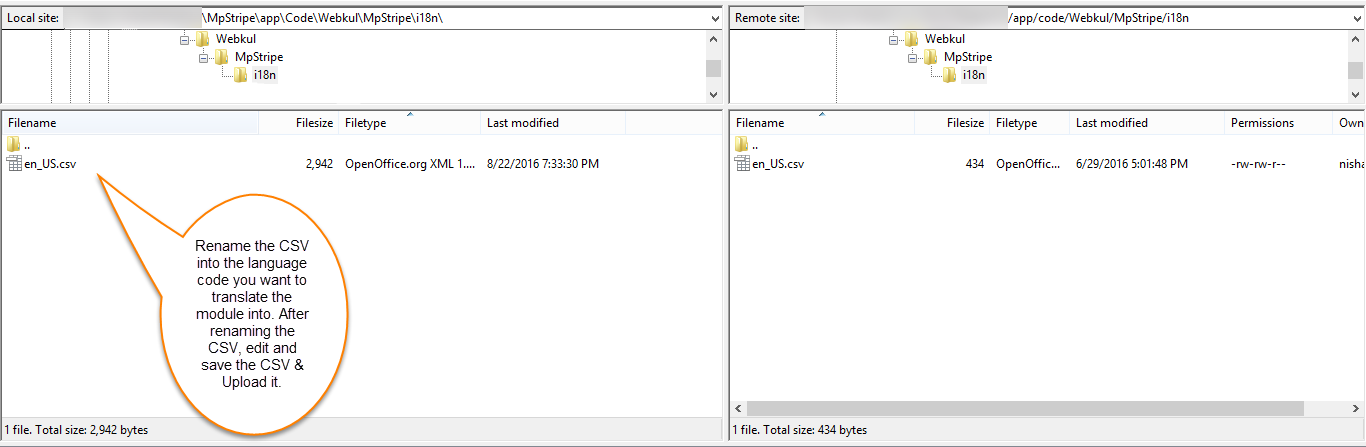

The user can edit the CSV like the image below.

Thus, the module translation completes.
Configuration- Adobe Commerce Marketplace Stripe Payment
After the successful installation of the extension, you can see the configuration panel under Stores > Configuration > Sales > Payment Method > Marketplace Stripe Payment as per the below snapshot:

As per the above screen, you can see many admin config parameters for the Stripe Payment module,
Configuration
Enabled- The admin can enable/disable the Magento Marketplace Stripe Payment Gateway module.
Title- Here the admin can set the title which will display on the front end.
Debug- By this option, the admin can enable or disable the debugging mode.
Vault Enable – If this is enable then the customers will be able to save their card details.
Note: Vault functionality does not work when Charge Type is set as “Direct Charge”
Charge Type- If the Charge type is set as “Direct Charge” so the payment will be transfer to the seller account itself.
Payment directly goes to the seller’s account and commission is transferred from the seller’s account to the admin’s account.
Note:- Multi-seller checkout does not work in case of direct charge.

Charge Type – If the charge type is selected as “Destination Charge” then the charge will be generated on the admin end, after that it will be transferred to the seller and then the commission will collect from the seller. It works for single-seller checkout.
Charge Type-If the charge type is set as “Separate charge and transfer” then all payment firstly goes to the admin’s account.
Then after deducting the commission, the remaining amount will get a transfer from the admin’s to the seller’s account.
The customers can click on the stripe Saved Cards button on my account to view the card details.

API Secret Key- Set API key provided by Stripe Payment Gateway.
API Publishable Key- Set API Publishable key provide by Stripe Payment Gateway.
Client ID- Set Client Id provide by Stripe Payment Gateway, this requires to connect the seller with a stripe account.
Stripe Account ID- Here the admin can enter the Stripe Account ID.
Set Image- You can set the image that displays on the pop-up box while going for payment using the stripe payment.
Payment from Applicable Countries- Here admin can select the specific countries for marketplace stripe payment.
Minimum Order Total- This option allows the admin to set the minimum order total for the Stripe module allows them to check out with Marketplace Stripe Payment Gateway.
Maximum Order Total- Allows admin to set maximum order total.
Sort Order- Here the admin can set the sort order value for the stripe payment gateway.
Generate Webhook – The admin can generate the webhook and see the collected data from the stripe dashboard.
Payment Actions
There are two types of payment actions:
- Authorized – It is used to authorize the fund availability first and then, later on, capture the fund manually.
If this method gets implements and the order is placed by the customer then a capture button will be available to the admin as well as to the seller to capture the payment.
Admin End

Seller End

Note – After clicking on the capture button the invoice will get generates automatically.

Invoice

- Authorized and capture – It is used to authorize/verify the fund availability and then capture the fund automatically.
In this method, the fund will get capture automatically once the order got a place.

Invoice Details


Types of Integration
Here the admin can decide the type of integration as Stripe Connect with Standard Accounts or Stripe Connect with Custom Accounts.
If the admin selects this option as Stripe Connect with Standard Accounts, then the admin cannot enter or edit the details of the Stripe account as it has been done by the seller only.
Or if the admin selects the option as Stripe Connect with Custom Accounts as per the below image:

then, the admin can decide whether to give the seller access to manage the custom account or not.
Note – If the seller is registered with a customer account on Stripe Payment Gateway and later on if the admin changes the integration type to standard accounts then that seller will lose its custom account on this platform.
How to get keys and Account ID
1st Step:
To get the API Keys you can use the Stripe website. First, you’ll need to Sign in to the stripe account or create an account.
Go to https://dashboard.stripe.com/login and enter your login details.

2nd Step:
Now from the stripe dashboard, you can click on the toggle button of the viewing test data if you’re using the module for the test purpose or you can also use the live credentials of your stripe account API’s if you want to set up the module for the live website.
Now, enable the option click the test mode.

3rd Step:
Click the API menu option on the side panel to see the Publishable key (API Publishable Key). Now, click the “Reveal test key token” to get your Secret Key (API Key).

Clicking the “Reveal test key token” will bring up the – Secret Key (API Key).
The admin can use API Publishable Key, and API Secret keys in the admin configuration to set up the module as per the below image:

4th Step:
To get the Client Secret key click the “Settings” menu option on the side panel and then click on the “Connect” option. Enter all the required information for the application.
Set the Website URL as – www.example.com/mpstripe/seller/connect.
Set the Redirect URL as – www.example.com/mpstripe/seller/connect.

The admin can add the URL as per the following image and use the client ID.

Here, you have two keys for the client ID that are used according to the mode –
- Development mode – This client ID is used when your site is in testing mode.
- Product mode – This client ID is used when your site is in live mode.
5th Step:
To get the Account ID to click on the “Profile” option on the right side and then navigate towards the Account section in the profile as per the below image:

Henceforth, the API Key, API Publishable key, Account ID, and the Client Key are used to configure the module.
Generate Webhooks In Stripe Payment Gateway
After that, in the admin dashboard, the admin can click on the Generate Webhook and generate the data.

after successful generating the webhook, the admin can see the successful message from the admin dashboard as shown in the image below –

Whenever that trigger event occurs on the website, the webhook sees the event and collects the data.
Now, the admin can see the collected data from the stripe dashboard as shown in the image below –

The admin can also click on the generated URL for the detailed view of the events as shown in the image below –


Thus, the Webhooks generate in this way.
Seller Configuration
Note: The stripe email should be the same by which the seller creates the account at the Magento end.
Once the installation of the extension is completed, sellers will find the menu “Connect To Stripe” item tab in the seller panel as per the below snapshot:

Note – We use the seller Standard and Custom account to connect with the admin’s account.
For more details about Standard and Custom account please check – https://stripe.com/docs/connect/accounts
Case I:
If the admin has selected the Type Of Integration as Stripe Connect with Standard Accounts, then the seller will see the option as per the below image:

Now clicking on the Connect with Stripe button, the below page will open where the seller has to enter their email ID.

After that, the seller needs to enter their valid mobile number.

Now, enter the mobile number the user will get OTP.

After entering a valid OTP, the seller needs to provide some basic details about their business. Such as business location and types of business.

Here the seller needs to enter their personal details, such as Name, Email Address, Date of Birth, and address.

After providing personal details, now the seller needs to enter their professional details. Such as industry, website and product description.

After providing all details the seller needs to confirm and need to click on “Agree & Submit”.

Once the details are filled in the above screenshot and click “Agree & Submit”, the seller connected with the admin application and then redirected to their account.
The frontend view for the seller is shown in the image below:

Case 2 – To configure Marketplace Stripe Payment for Seller
If the admin has selected the Type Of Integration as Stripe Connect with Custom Accounts and disallowed the seller to manage their customer accounts.
Then when the seller will click on the Connect To Stripe option, then they see the as per the below image:

In this case, the admin will create and manage the stripe account for the seller. For this, they will navigate to Marketplace Management > Manage Seller.
There the admin will select the Manage Stripe Connect Custom Account option under the Manage Stripe Accounts tab.

Further, the admin will create the custom account for the seller by filling up the following form and clicking on “Create Account”.

Here the admin needs to click on “Connect To Stripe“.

Here the admin need to enter the seller’s mobile number.

After entering the seller’s mobile number, the seller will get OTP.

Here the admin needs to enter the seller’s business details.

After entering business details, the admin needs to enter the seller’s personal details as well.

Here the admin needs to enter the seller’s professional details.

Here the admin can review all seller’s details and click on “Agree & Submit”.

Now here the admin can get the seller’s Stripe Custom Account “Connected” status.

Now sellers can check their Stripe account has been created successfully.

And if the admin has allowed the seller to manage their customer accounts, then when the seller will click on the Connect To Stripe option.
Now the seller will click on the Create Stripe Account button and that will redirect him to the below page:

Here the seller has to click on the Connect To Stripe button that will navigate to create an account on Stripe.
Create Stripe Account:
Here the seller needs to enter their valid email id and mobile number.

Business Type: The seller needs to fill in about their business such as type of business.

Personal Details: Here the seller needs to enter their personal details such as Name, Date of Birth, Address and Phone number.

Professional Details: Here the seller needs to enter their professional details such as Industry and Website address.

Review and Finish Up: After filling in all details the seller can check all details and need to click “Agree & Submit”.

Note:
Here the seller needs to connect with the stripe to make the transfer successfully. If the seller does not have a stripe account or has not entered the correct account details then all the payments will go to the admin only.
The admin will pay the transaction fee and then transfer the seller’s share manually.
After a successful connection with Stripe, the seller will redirect back to his payment page with a successful message.

Further, the Pending status will become Active once it is processed from the stripe end.
Note: To update the previously create account the seller needs to contact admin because the seller doesn’t have access to edit the account details from its end.
Stripe Transactions
The seller can also check the stripe transactions once the customer account is create.

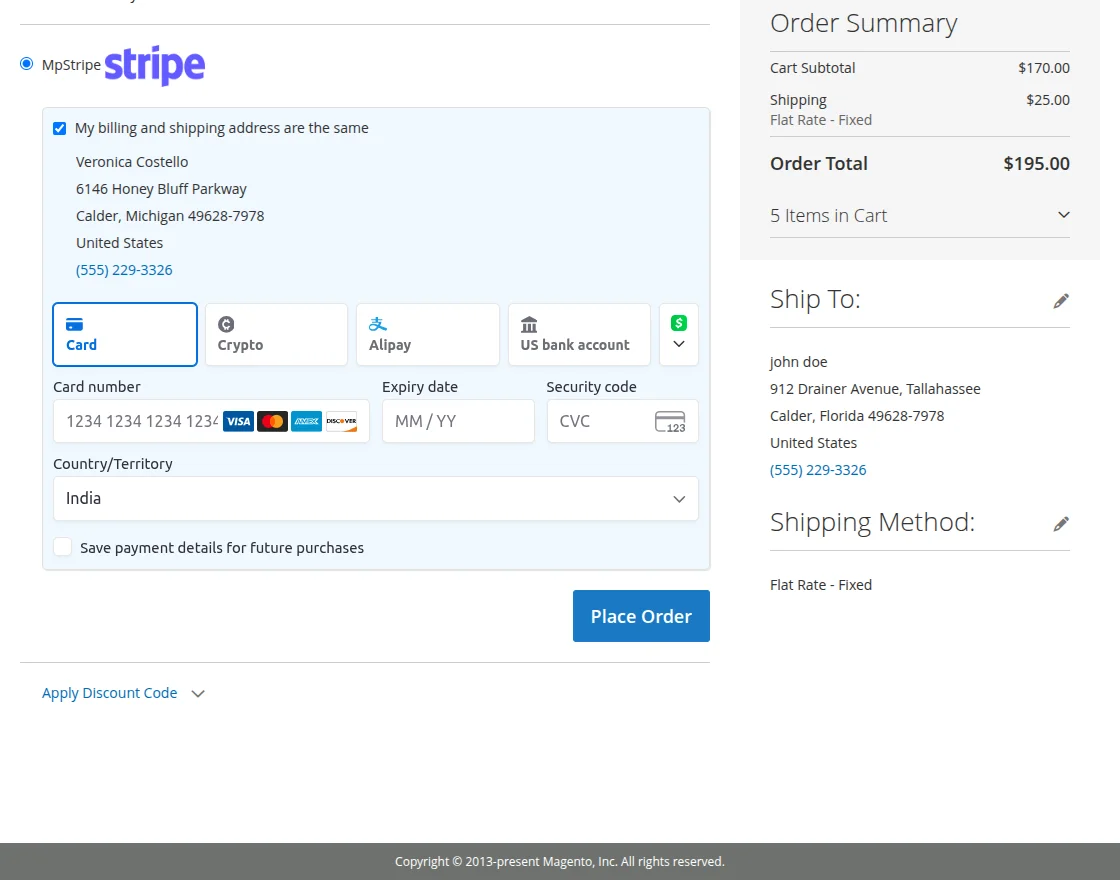
Workflow At Buyer End
If the Magento 2 Marketplace Stripe Payment Gateway Method is enable from the admin panel then the buyer can see this stripe payment method under the “Payment Review” as shown in the given screenshot below.

After Clicking On The Place Order Button the order will be placed successfully.
At Backend Marketplace Stripe Payment
The admin can see the place order details with Marketplace Stripe Payment Gateway by navigating to path admin panel Sales->Orders as per the below image:

After that, the admin can select the order by clicking on the View button and they can see the order information as per the below image:


Order Invoice & Transaction Page:
After the successful transaction has been done using Marketplace Stripe Payment, the admin can see the invoices and transaction details for that particular order in which payment is done using Stripe Payment.

Now, the admin can click on the view button to see the order information as shown in the image below –
Seller’s Invoice Page –


Similarly, the admin can see the transaction details for a particular order in which payment is make using Stripe Payment.
The admin can click on the Transaction tab to see the transaction details as shown in the image below –
All transactions of the sellers for their placed orders –

By clicking on the particular transaction, the admin can view the complete details of the transaction –
Seller’s Transaction Page Details –

Refund – Marketplace Stripe Payment Gateway
The admin can refund the amount online by opening the invoice slip and then clicking the Credit Memo button.
After which they will see a Refund Offline and Refund(Online) button. An online refund will refund the invoice amount back to the customer’s account.
Now, the admin can enter the amount accordingly and click on the refund button as shown in the image below –


Refund At Seller’s End
If the buyer asks for a refund from the seller, the seller can easily make a refund by going to the respective order under their account panel.
Here, the seller will click on the “Credit Memo” button.

Now, the seller just has to select the items to refund and then click on the “Refund” button to make a refund. The details will simultaneously be updates in the seller’s Stripe account.


After creating the credit memo, the seller can see the details of the credit memo and can view the refund details as well.

Refund – Stripe Payment Gateway
The seller can also go directly to his Stripe account and make a refund. The seller just needs to go to the payments section and then select the payment that needs to get a refund.

The refund pop will appear as shown below.
Now, the seller will click on the “Refund” button.
After that, the admin can also check the refund status and refunds amount on Stripe payment gateway from the stripe dashboard as shown in the image below –

Thus, in this way the refund process completes.
Note: If the refund generates from the Stripe dashboard i.e. from the Stripe Payment Gateway, then the seller has to generate the credit memo separately from his Seller Account. As the credit memo will not generate automatically in this case.
Support
Thus, that’s all for Magento 2 Marketplace Stripe Payment. Still, have any issues feel free to add a ticket and let us know your views to make the module better webkul.uvdesk.com.
You may also browse other Adobe Commerce marketplace addons and our quality Adobe Commerce Cloud extensions.
Current Product Version - 5.0.9
Supported Framework Version - Magento 2.0.x, 2.1.x, 2.2.x,2.3.x, 2.4.x

10 comments
Thank you very much for the appreciation. For any further queries, you can email us at [email protected] and we will get back to you accordingly.
Thank you
If the seller will click on Update Account Information then It will open the seller account info form so that he/she can update the detail.
Thanks and Regards
This module provides a split payment functionality. That means once the customer makes the payment, it will automatically split between the seller and the admin as per the commission set by the admin in the marketplace configuration.
The seller will receive the payment in its linked payment account. And the admin will get the commission in their payment account.
If you have any further doubt, feel free to mail us at [email protected]. We will be happy yo assist you.
Thank You.
Thanks for reaching out!
Currently, the module supports payment via card payment method only. Kindly check the User Guide for more information – https://webkul.com/blog/magento2-marketplace-stripe-payment-2/