Introduction
Marketplace Product Labels for Magento 2 extension, the admin can create a different type of label for their products.
And the admin can also give access to the seller to create and display various labels on their products as well.
The admin and the sellers can create the labels and can add those labels to their products.
The labels are like a sale label, new arrival label, exclusive label, the stock label.
It will be beneficial in attracting the customer’s attention to the specific product.
Note: This module is an add-on to Magento 2 Multi Vendor.
So, before using the Marketplace Product Labels for Magento 2(Adobe Commerce), the admin must have installed Webkul Multi-Vendor Marketplace.
Check the plugin workflow in the video below –
Features
- The admin can create labels for their products.
- The admin can also allow the seller to create labels for their products as well.
- Seller’s labels can be approved/disapproved by the admin.
- The admin can also edit the labels of the seller.
- The seller and the admin both can add the labels to their products.
- Supported extensions for the label image can be decoded by the admin.
- The admin can set the transactional e-mail for the label approval or disapproval request.
- The admin can set the dimension of the label.
- Labels on the product will display on category pages and product pages.
- The admin can allow the seller to manage the dimension of their labels.
- This module helps to promote admin and seller products.
- The admin and the seller can create unique product labels with different logo and name.
- This module is compatible with Hyva storefront.
Installation
The admin will get a zip folder, and they have to extract the contents of this zip folder on their system.
The extracted folder has an src folder, inside the src folder you have the app folder.
Admin needs to transfer this app folder into the Magento 2 (Adobe Commerce) root directory on the server, as shown below:

After that, the admin has to run these commands in the Magento 2 root directory.
First Command:
php bin/magento setup:upgrade
Second Command:
php bin/magento setup:di:compile
Third Command:
php bin/magento setup:static-content:deploy
After running the above commands, the admin has to flush the cache from the Magento admin panel by navigating through, System->Cache management as per the below image:

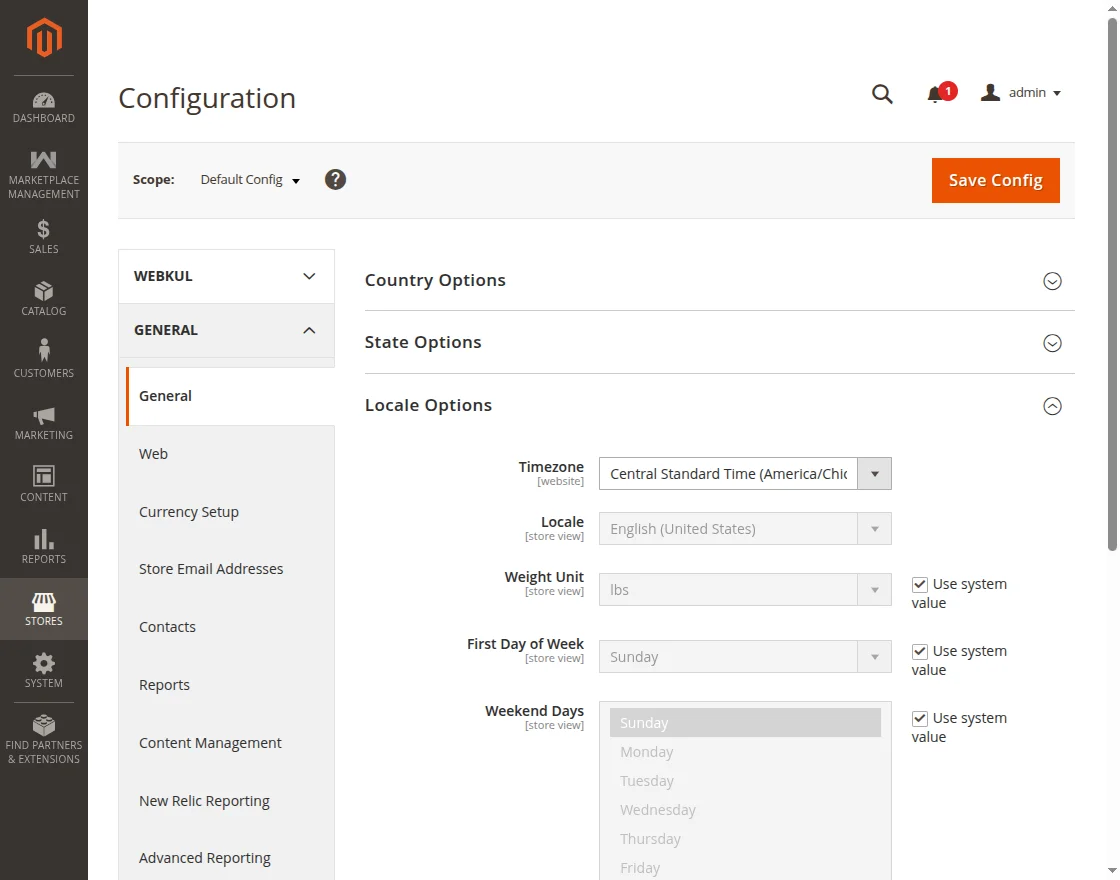
Multi-Lingual Configuration
For Multi-lingual support, the admin needs to navigate to Store > Configuration > General > local Options and select their desired language from the Local option.
Language Translation
If the admin needs to do the module translation, please navigate to the following path in your system-app/code/Webkul/MarketplaceProductLabels/i18n.
Open the file named en_US.CSV for editing as shown in the below screenshot.

Once the admin has opened the file for editing. Replace the words after the comma (,) on the right with your translated words.

After editing and translating the CSV file,
the admin needs to save the translated file name according to your region language and country code such as – de_DE.CSV.
Then, they have to upload the translated file to the same folder from where they have obtained it.

Now, the module translation is complete.
Product Label Configuration
After the successful installation of the module, the admin can also allow the seller to create labels for their products,
by navigating through Stores > Configuration > Webkul > Product Label as per the below:
General Settings
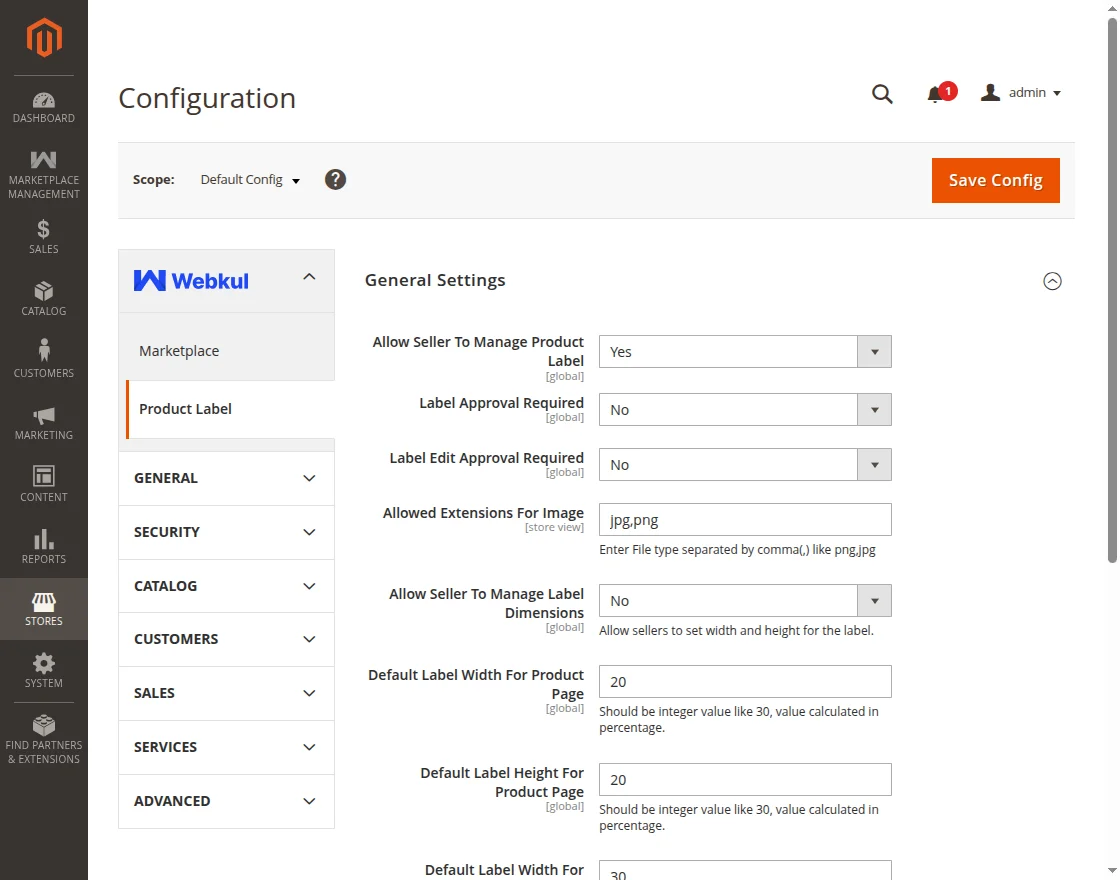
- Allow Seller To Manage Product Label- From here, the admin can decide whether the access to create product label to the seller or not.
- Label Approval Required- If Yes, then the label added by the seller needs to be approved by the admin.
- Label Edit Approval Required- If Yes, then the label edited by the seller needs to be approved by the admin.
- Allowed Extensions For Images- Here the admin can decide the extension of the label images, which the seller can add.
- Allow Seller to Manage Label Dimensions- If yes, then the seller can decide the dimensions of their labels. Or else the admin has to determine the size. After that below are the fields, which the admin needs to fill:
- Width Of Label For Product Page- The admin can decide the width of the label added by the seller on the product page.
- Height Of Label For Product Page- The height of the label added by the seller on the product page can decide from here.
- Width Of Label For Category Page- The admin can decide the width of the label added by the seller on the category page.
- Height Of Label For Category Page- The height of the label added by the seller on the category page can decide from here.
Product Label Transactional Emails
Various types of email notifications are sent to the admin and sellers. The admin can select the mail templates.
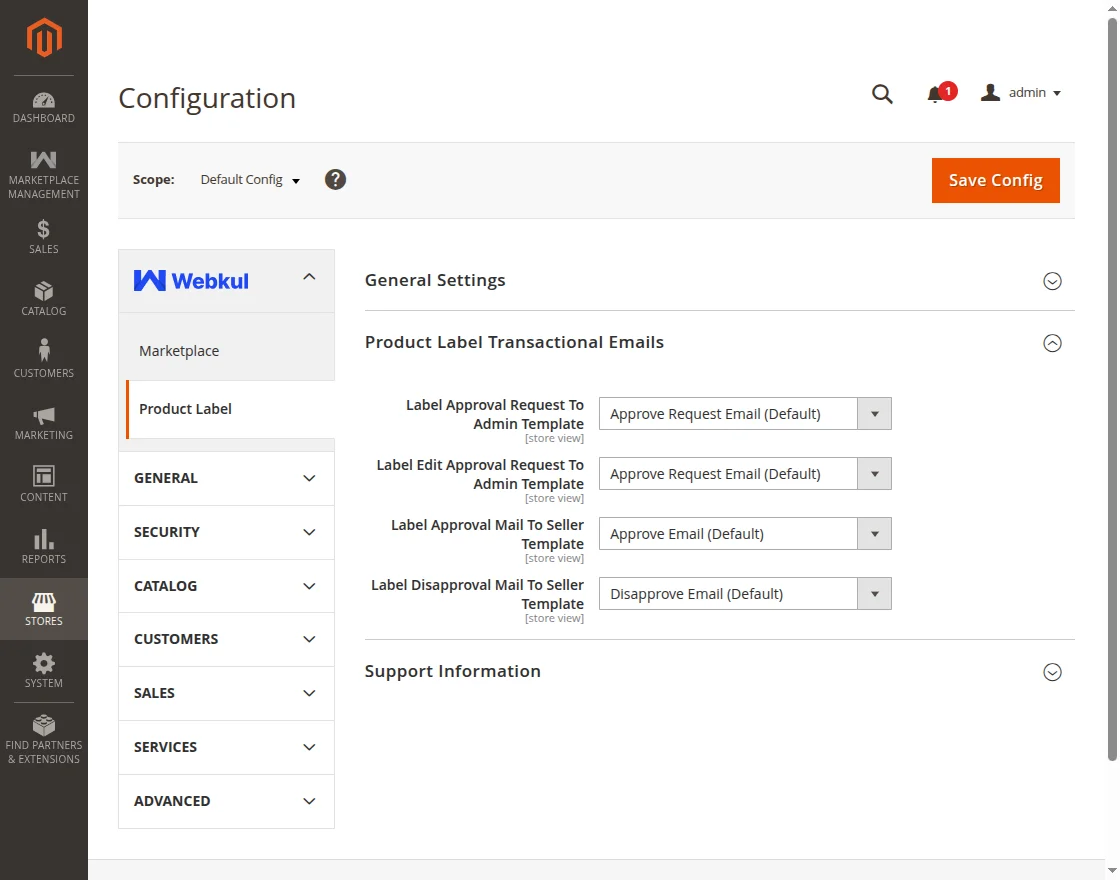
Label Approval Request To Admin Template- The admin will receive the label approval request email, whenever the seller adds a new label.

Edit Label Approval Request To Admin Template- The admin will receive an email, whenever the seller edits their label.

Label Approval Mail To Seller Template- The seller will get a mail whenever the label is approved by the admin.

Label Disapproval Mail To Seller Template- The seller will get a mail when the label is disapproved by the admin.

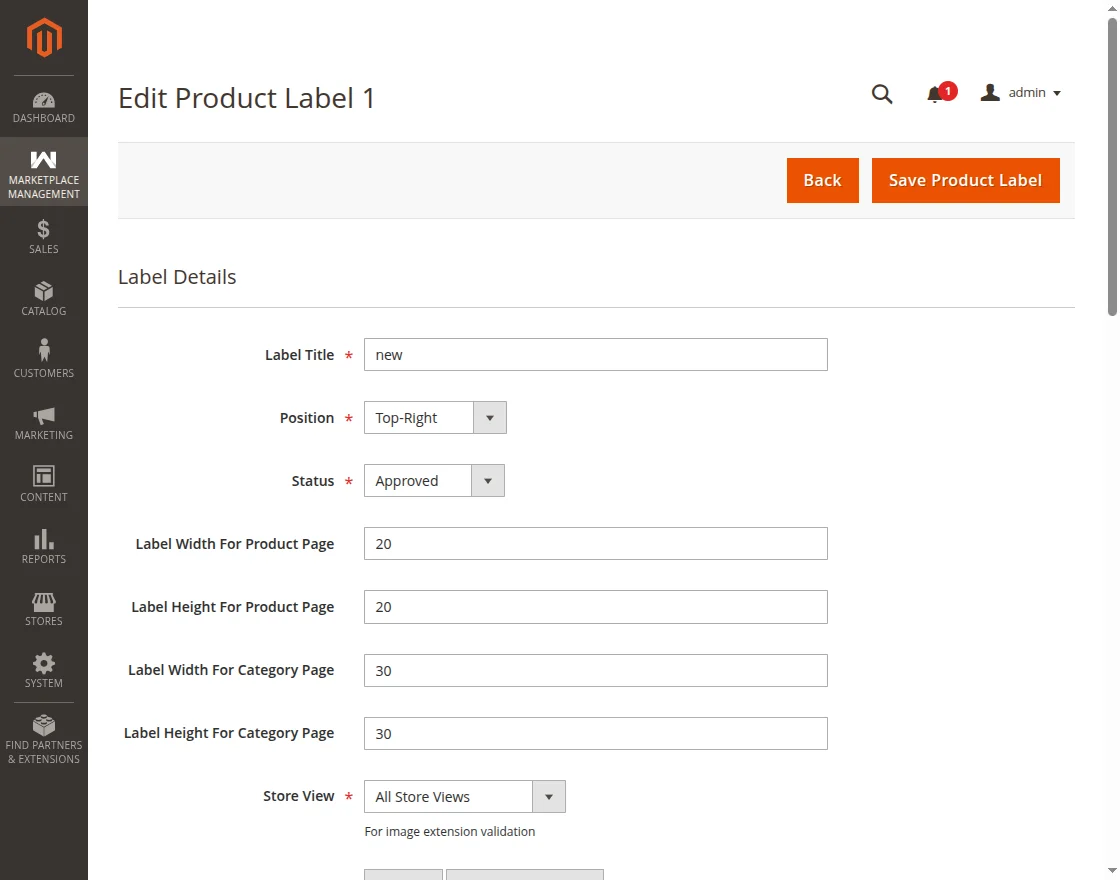
Create label by Store Admin
The admin can navigate towards
Marketplace Management > Custom Product Labels > Manage Product Label to add the labels for their products, as per the below:
Here, the admin can add a new label by hitting the Add Product Label button and can also edit the existing labels by selecting Edit under the Action button.
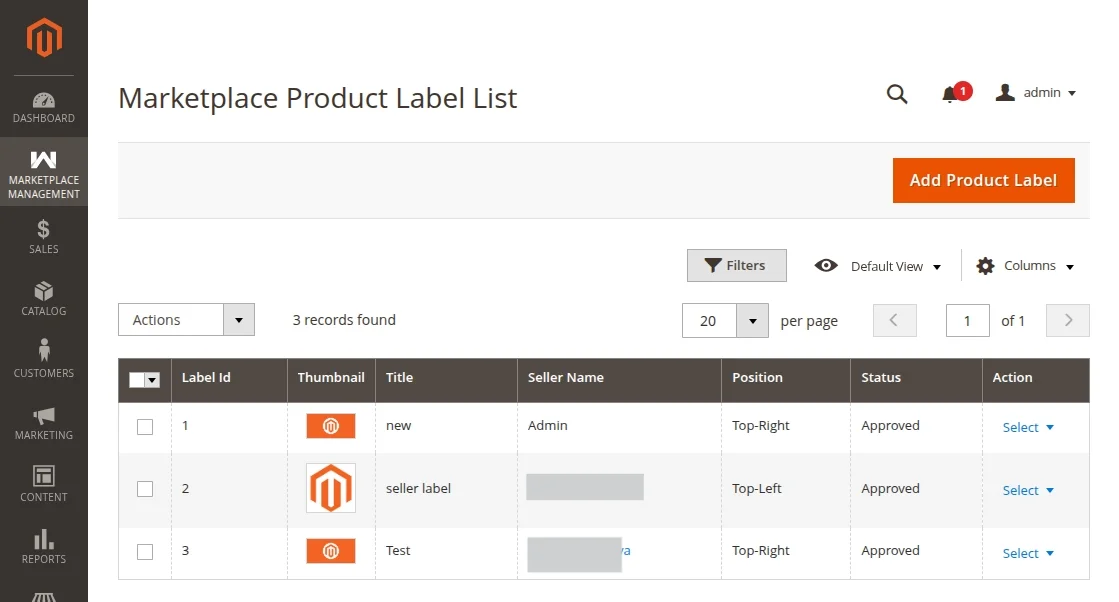
The admin can also edit the sellers’ label. If the admin clicks on the Add Product Label, then various options will appear to create a new label as per the below:
Label Details:
- Label Title- The admin can decide the name of the label.
- Position- The position of the label can be defined here as, Top-Right, Top-Left, Bottom-Right, or Bottom-Left.
- Status- The label can be Disabled/Enabled by the admin.
- Width Of Label For Product Page- The admin can decide the width of the label on the product page.
- Height Of Label for Product Page- The height of the label on the product page can decide from here.
- Width Of Label for Category Page- The admin can decide the width of the label on the category page.
- Height Of Label for Category Page- The height of the label on the category page can decide from here.
- Label Image- The admin can upload the image of the label.
Label Assign by Store Admin
After the creation of the labels, the admin can assign those labels to his products by navigating towards Catalog > Products > Edit > Product Label Image
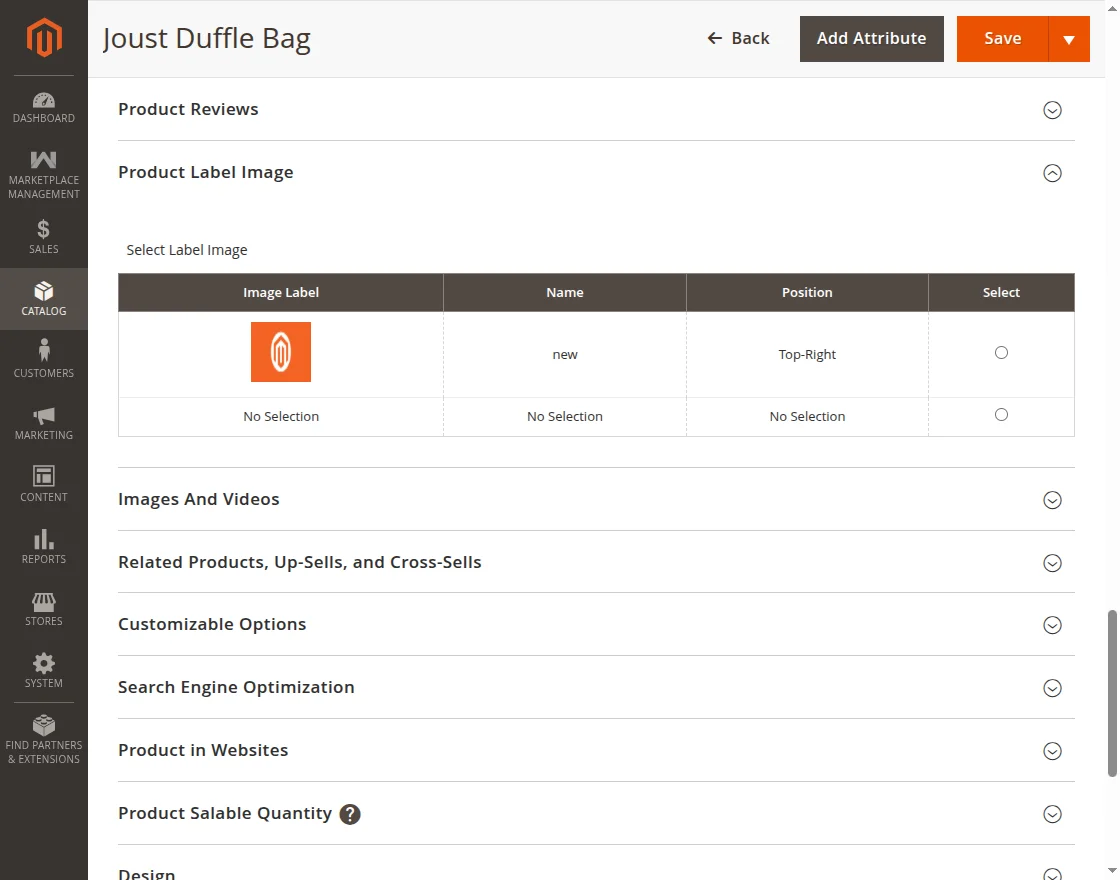
Although, in the product label list, the admin can see all the label created by the sellers.
The admin can also add the label to the product while creating the product.
Note – The admin can only assign his created labels to his products only.
He cannot assign his labels to the seller’s products.
Label Creation by Marketplace Seller
After the approval of the admin, the sellers can also generate the labels for their products.
For that, the seller needs to open their dashboard and navigate towards Custom Product Label > Add New Label as per the below image:

Here, the seller needs to enter:
- The name of the label under Label title.
- The position of the label can be defined by the seller on the product such as Top-Right, Top-Left, Bottom-Right, or Bottom-Left on the product page and category page under “Position”.
- Store View – Here, the seller can select the store view.
- Upload image- Here, the seller needs to enter the image of the label.
If the admin has enabled “Allow Seller To Manage Label Dimensions”,
then some extra fields will appear at the seller-end while creating a label.
Such as, to enter the height and width of the label for the category and the product page.
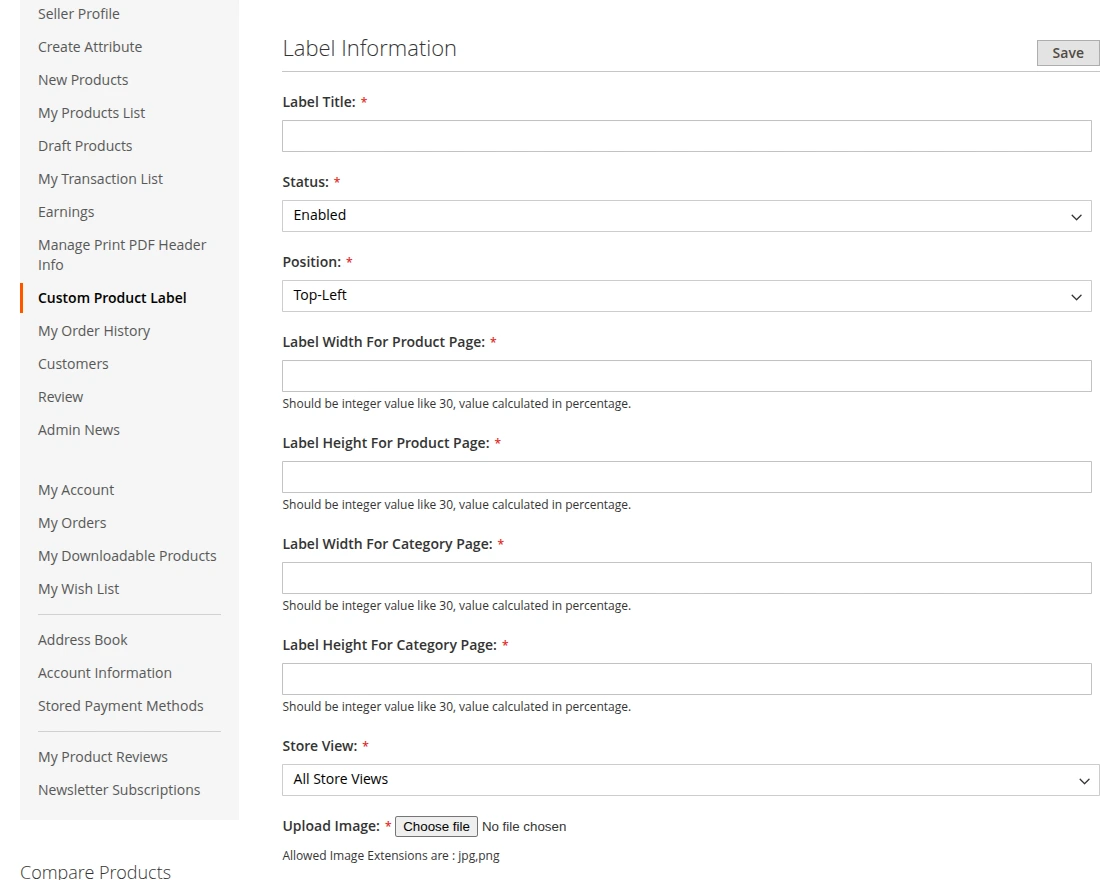
Here the seller can decide the dimension of their label as per their requirement.
Label Assign by Marketplace Seller
For assigning the labels to the product on the category page and the product page,the seller needs to navigate through Products > My Product List > Edit > Product Label Image and
then can select any one label from the labels created by them.
Note – Every seller can only assign his own created labels to his own products only.
The seller cannot assign his labels to other seller’s or admin’s products.

The seller can also add the label to the product while creating the product.
Storefront View – Product Labels
The customer can see the labels added on the product by the admin and the seller on the category page and the product page.
Category page:

Product view page:

That’s all for Marketplace Product Label for Magento 2 (Adobe Commerce),
still have any issues feel free to add a ticket and let us know your views to make the module better https://webkul.uvdesk.com/
Explore the Adobe Commerce Cloud development service by Webkul. You may also browse other Magento 2 marketplace addons. Also our quality Magento 2 extensions.
Current Product Version - 5.0.4
Supported Framework Version - Magento 2.0.x, 2.1.x, 2.2.x,2.3.x, 2.4.x

Be the first to comment.