Magento 2 GTM Extension simplifies Google Tag Manager integration for Adobe Commerce and Magento Open Source stores. It helps merchants track customer interactions, ecommerce events, and conversions without manually adding tracking scripts.
With the Magento 2 GTM Extension, store owners can integrate Google Analytics 4 (GA4), Google Ads, and Meta Pixel to collect accurate data, optimize marketing campaigns, and improve business performance.
Google Tag Manager for Magento 2 acts as a centralized tag management solution, allowing you to deploy, manage, and update tracking tags without modifying your website’s code. Once the GTM container is installed, you can easily add or edit tags directly from the Google Tag Manager interface without requiring technical assistance.

How does the Google Tag Manager work?
You just need to place a small snippet of code on your website. This snippet of code connects your app to the tag manager servers.
You can now make use of the web-based user interface to install the tracking codes on your website, like – the Google Analytics tags.
Now, you can configure triggers to fire when an event occurs. An event can be something like – a page load, a tap on a screen, or a form submission.
It’s all done through Tag Manager’s web interface. When a user interacts with your content, triggers will be evaluated based on the events that you have specified, and the tags will fire accordingly.
Advantages of using the Google Tag Manager:
- Improves your website performance
Google Analytics and Adwords surely slow down your website speed after you have put the codes on the source website.
Google Tag Manager allows third-party to handle all your script-tags and you only need to add its code to your website. - Remarketing Support
This allows you to show your website ads repeatedly to the customers who have visited your site and clicked on certain products. This helps you to get back your visitors again to your store.
Supported Google Tags
Magento 2 Google Tag Manager Extension allows you to deploy and manage a wide range of Google marketing and analytics tags without modifying your store’s source code.
Google Tags
- Google Analytics 4 (GA4)
- Google Ads Conversion Tracking
- Google Ads Remarketing
- Conversion Linker
- Floodlight Counter
- Floodlight Sales
- Google Optimize
- Google Surveys Website Satisfaction
Supported Third-Party Marketing & Analytics Tags
In addition to Google tags, the extension supports a variety of third-party tags for analytics, advertising, customer engagement, personalization, and conversion tracking.
Analytics & User Behavior
- Audience Center 360
- ClickTale Standard Tracking
- comScore Unified Digital Measurement
- Crazy Egg
- Eulerian Analytics
- Hotjar Tracking Code
- Lytics JS Tag
- Mouseflow
- Quantcast Measure
- VisualDNA Conversion Tag
Advertising & Remarketing
- AdRoll Smart Pixel
- Bing Ads Universal Event Tracking
- Criteo OneTag
- DistroScale Tag
- Dstillery Universal Pixel
- Google Trusted Stores
- Intent Media – Search Compare Ads
- K50 Tracking Tag
- Marin Software
- Perfect Audience Pixel
- Placed
- SearchForce Tracking
- Turn Conversion Tracking
- Turn Data Collection
- Twitter Universal Website Tag
Affiliate & Conversion Tracking
- AWIN Conversion
- AWIN Journey
- Tradedoubler Lead Conversion
- Tradedoubler Sale Conversion
- Optimise Conversion Tag
- Mediaplex ROI Tag
- Mediaplex MCT Tag
Customer Feedback & Surveys
- Bizrate Insights Buyer Survey
- Bizrate Site Abandonment Survey
- Google Surveys Website Satisfaction
- Pulse Insights Voice of Customer
- Survicate Widget
Personalization & Customer Engagement
- AB TASTY Generic Tag
- Infinity Call Tracking
- LeadLab
- LinkedIn Insight Tag
- Message Mate
- Nudge Content Analytics
- Oktopost Tracking Code
- Personali Canvas
- SaleCycle JavaScript Tag
- SaleCycle Pixel Tag
- Shareaholic
- Upsellit Confirmation Tag
- Upsellit Global Footer Tag
- Ve Interactive JavaScript
- Ve Interactive Pixel
- Xtremepush – Web Push & Onsite Engagement
Facebook Pixel
The Facebook pixel is one analytics tool that lets you check how effective your advertisements are by letting you understand the actions that people take on your website.
The Facebook pixel has been merged with the Magento 2 Google Tag Manager extension for ease of use of both in a single module.
Using the Facebook pixel, the admin can send the data to Facebook for the various actions that the people take on your e-commerce store.
We have a Magento 2 Facebook Pixel plugin that seamlessly integrates your store with Facebook, allowing precise tracking of customer behavior and ad performance.
Magento 2 Google Tag Manager – Features
- Easily configure Google Tag Manager in your Magento 2 webstore.
- Takes less time to configure scripts within your store.
- Track and check Analytics on Google.
- Integrate Facebook Pixel to your website.
- Can add multiple Facebook Pixel IDs as per multiple store views.
- Track standard events like Product View, Category View, Add to Cart, Add to Wishlist, Initiate Checkout, Purchase, Product Search, and Customer Registration.
- Each event can be enabled or disabled separately.
- Can create the custom audience and reach them via targeted Facebook ads.
- Can also target your audience via dynamic Ads. But for dynamic ads, you need to have your product catalog on Facebook as well.
- Easy access to manage the Magento 2 Google Tag Manager module configurations by the admin panel.
Google Ads Remarketing and Google Ads Conversion Tracking
The Google Ads Remarketing is a feature which allows the admin to create and manage the remarketing campaigns in Google ads through GTM.
Google Ads Conversion Tracking helps the admin to track the conversions and other metrics which are related to the Google Ads campaign through GTM.
Admin can check the number of customers who visited the website through Google ads.
Installation- Google Tag Manager

Customers will get a zip folder and they have to extract the contents of this zip folder on their system. The extracted folder has an src folder, inside the src folder you have the app folder.
You need to transfer this app folder into the Magento 2 root directory on the server as shown below in the snapshot.
After the successful installation, you have to run these commands in the Magento2 root directory.
php bin/magento setup:upgrade
php bin/magento setup:di:compile
php bin/magento setup:static-content:deploy
php bin/magento indexer:reindex
php bin/magento cache:flush
Translation- Google Tag Manager
For translating the Magento 2 Google Tag Manager module language, please go to app>code>Webkul>GoogleTagManager>i18n and edit the en_US.csv file.
Now, translate the words on the right and upload the modified file to the same location.
The filename of the translated file should be according to the language and region code in which you want to translate like de_DE.csv.

Google Tag Manager – Module Configuration
After the successful installation of the extension, the admin will navigate to Stores > Configuration > Webkul > Google Tag Manager Configuration
There, you will find the General settings to configure the Google Tag Manager.
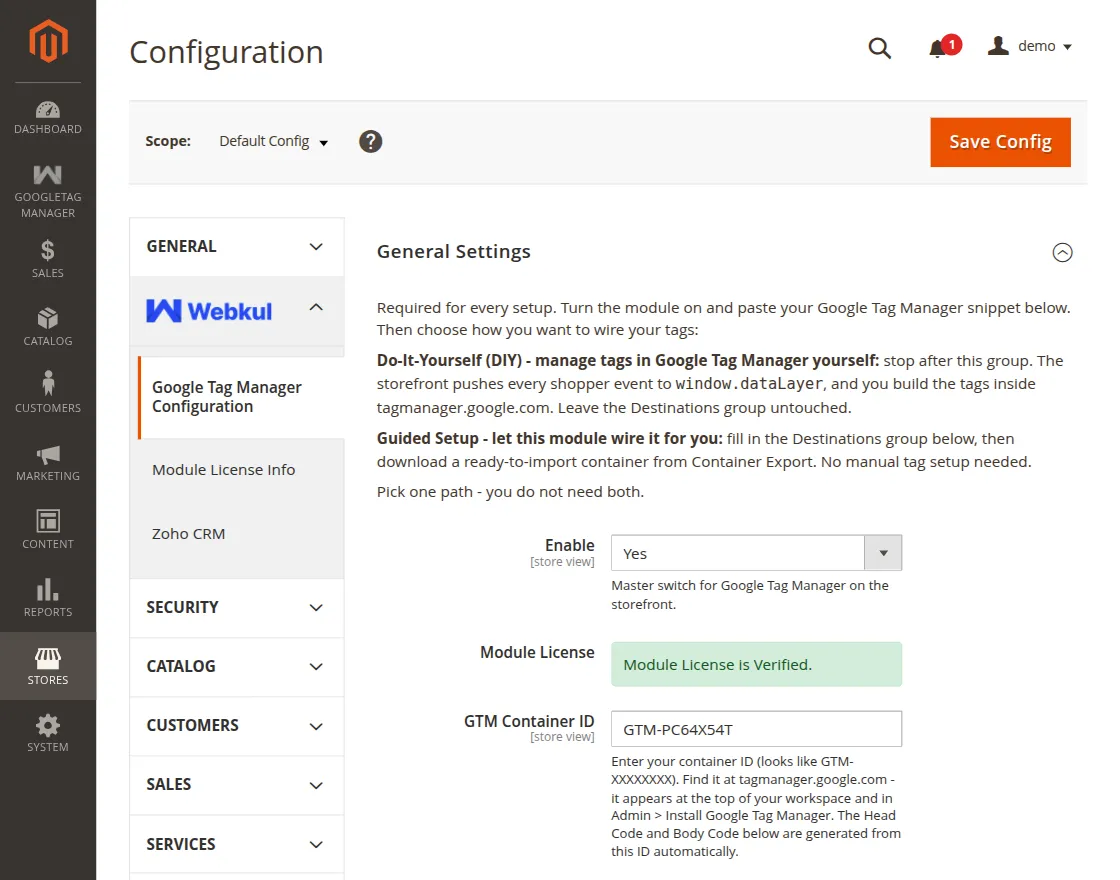
General Settings of Google Tag Manager
The General Settings section allows you to configure the Google Tag Manager integration for your Magento 2 store.
Here, you can enable the extension, connect your Google Tag Manager container, choose your preferred setup, and configure the tracking events that will be pushed to the data layer.
Choose Your Setup
Before configuring the extension, choose how you want to manage your tracking tags.
Do-It-Yourself (DIY)
Manage your tracking directly in Google Tag Manager.
The extension pushes ecommerce events to the dataLayer for custom tags, triggers, and variables.
Guided Setup
Choose this option if you want the extension to prepare your tracking setup automatically.
Simply configure your tracking destinations and import the generated GTM container into your Google Tag Manager account.
Note: Use either the DIY or Guided Setup method. Both options should not be used together.
- Enable: Enable or disable the Google Tag Manager integration for your Magento 2 store.
- Module License: Displays the current license status of the extension.
- GTM Container ID: Enter your Google Tag Manager Container ID (for example, GTM-XXXXXXX). The extension automatically generates the required GTM installation code using this Container ID.
- Test Google Tag Manager Setup: Click Run Test to verify that your Google Tag Manager container is configured correctly and accessible from your storefront.
- Head Code: Displays the Google Tag Manager Head script generated from your Container ID. This code is generated automatically and cannot be edited.
- Body Code: Displays the Google Tag Manager
<noscript>code generated from your Container ID. This field is for reference only and is not editable.
Shopper Actions to Track
Choose the customer actions you want to send to the data layer.
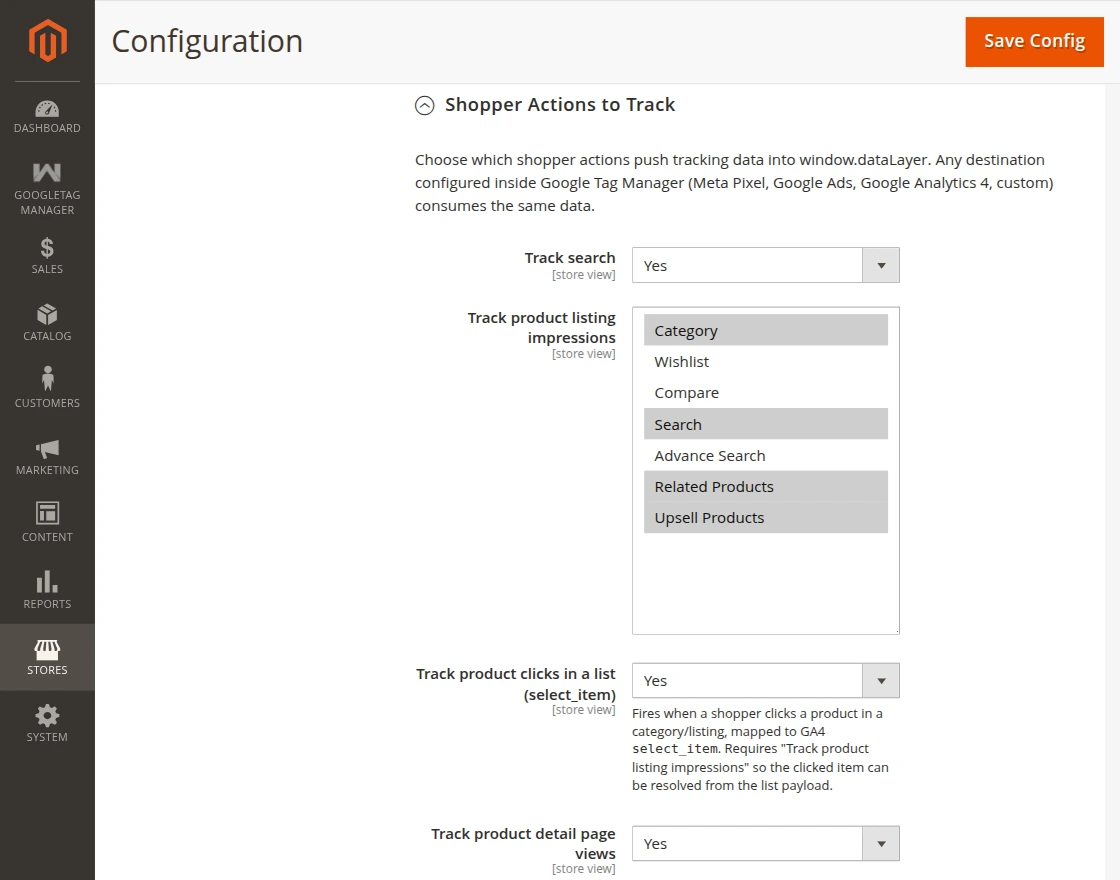
These events can be used with Google Analytics 4, Google Ads, Meta Pixel, and other platforms configured through Google Tag Manager.
- Track Search: Enable this option to track customer search queries performed on your Magento 2 store.
- Track Product Listing Impressions: Tracks products displayed on category pages, search results, wishlist, compare pages, related products, upsell products, and other supported product listings.
- Track Product Clicks in a List (select_item): Tracks when a customer clicks a product from a product listing. The event follows the Google Analytics 4
select_itemformat. - Note: Enable Track Product Listing Impressions for accurate product click tracking.
- Track Product Detail Page Views: Tracks every product detail page viewed by the customer.
- Track Add to Compare: Tracks products added to the comparison list.
- Track Add to Wishlist: Tracks products added to the customer’s wishlist.
- Track Add to Cart: Tracks every successful Add to Cart action performed by customers.
- Track Remove from Cart: Tracks products removed from the shopping cart.
- Track Cart Page Views: Tracks every visit to the shopping cart page.
- Track Coupon Applied: Tracks successfully applied coupon codes during shopping or checkout.
- Track Coupon Removed: Tracks when a customer removes an applied coupon code.
- Track Checkout Start: Tracks when a customer starts the checkout process.
- Track Shipping Method Selection: Tracks the shipping method selected during checkout.
- Track Payment Method Selection: Tracks the payment method selected during checkout.
- Track Purchases: Tracks successful purchases and sends complete order details, including products, revenue, tax, shipping, and discounts.
- Track Customer Registration: Tracks successful customer account registrations.
- Track Customer Login: Tracks successful customer logins.
- Track Newsletter Signup: Tracks successful newsletter subscriptions from your Magento 2 store.
Tracking Data Tuning
Customize the information included in your tracking events to meet your reporting requirements.
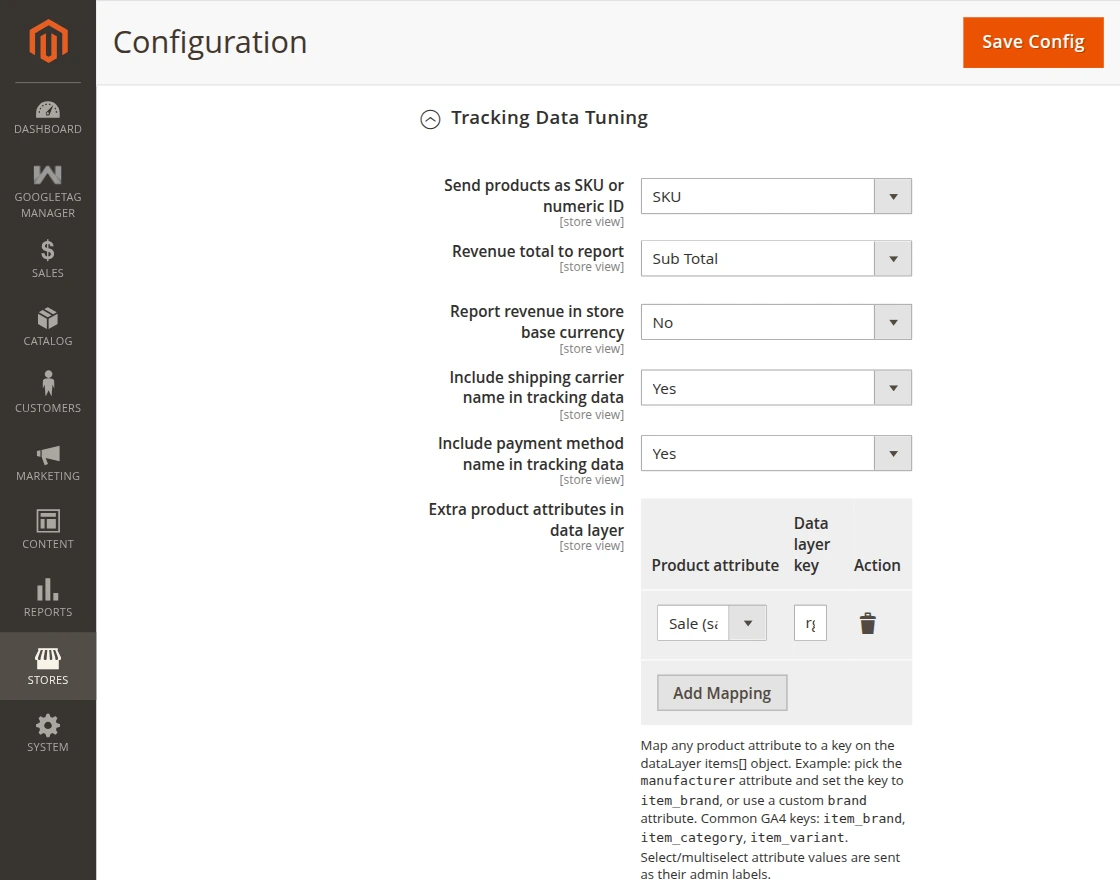
- Send Products as SKU or Numeric ID: Choose whether products are identified using their SKU or the Magento Product ID in tracking events.
- Revenue Total to Report: Choose whether the extension reports the order Subtotal or Grand Total as revenue.
- Report Revenue in Store Base Currency: Enable this option to report revenue using your store’s base currency instead of the order currency.
- Include Shipping Carrier Name in Tracking Data: Includes the selected shipping carrier in checkout and purchase events for better reporting.
- Include Payment Method Name in Tracking Data: Includes the selected payment method in checkout and purchase events.
- Extra Product Attributes in Data Layer: Map Magento product attributes to custom data layer keys such as
item_brand,item_category, anditem_variantto enrich your analytics and advertising reports.
Customer Identifiers and Consent (PII – GDPR / CCPA)- Google Tag Manager
Configure how hashed customer information is collected while complying with privacy regulations such as GDPR and CCPA.
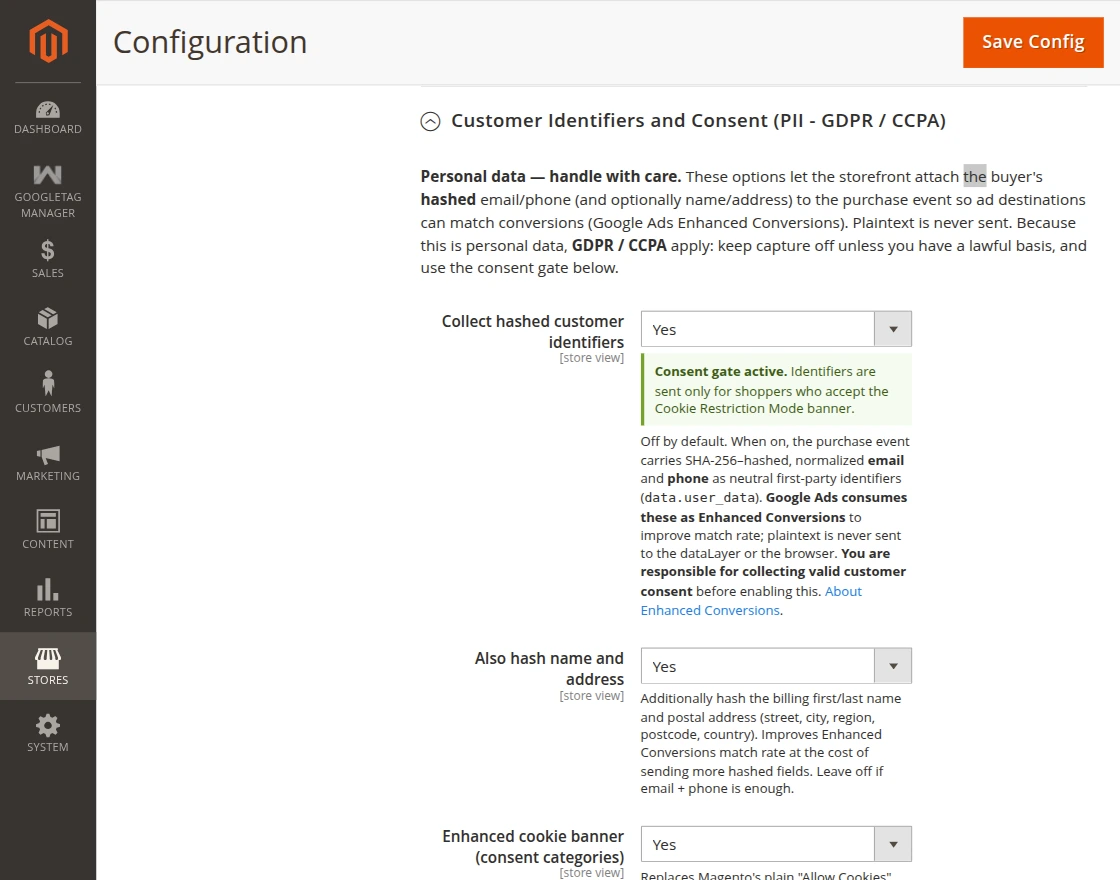
- Collect Hashed Customer Identifiers: Sends SHA-256 hashed customer email and phone number with purchase events to support Google Ads Enhanced Conversions. Plain text customer information is never sent.
- Also Hash Name and Address: Additionally hashes the customer’s billing name and address to improve Enhanced Conversion match rates.
- Enhanced Cookie Banner (Consent Categories): Displays an advanced cookie consent banner that allows customers to manage Analytics and Marketing permissions before tracking begins.
- Require Shopper Consent Before Sending Identifiers: Sends hashed customer identifiers only after the customer has provided the required cookie consent.
GTM – Destinations (Guided Setup)
The Destinations section is available for the Guided Setup workflow. Enable the platforms you want to track, enter their required IDs, and export a ready-to-import Google Tag Manager container.
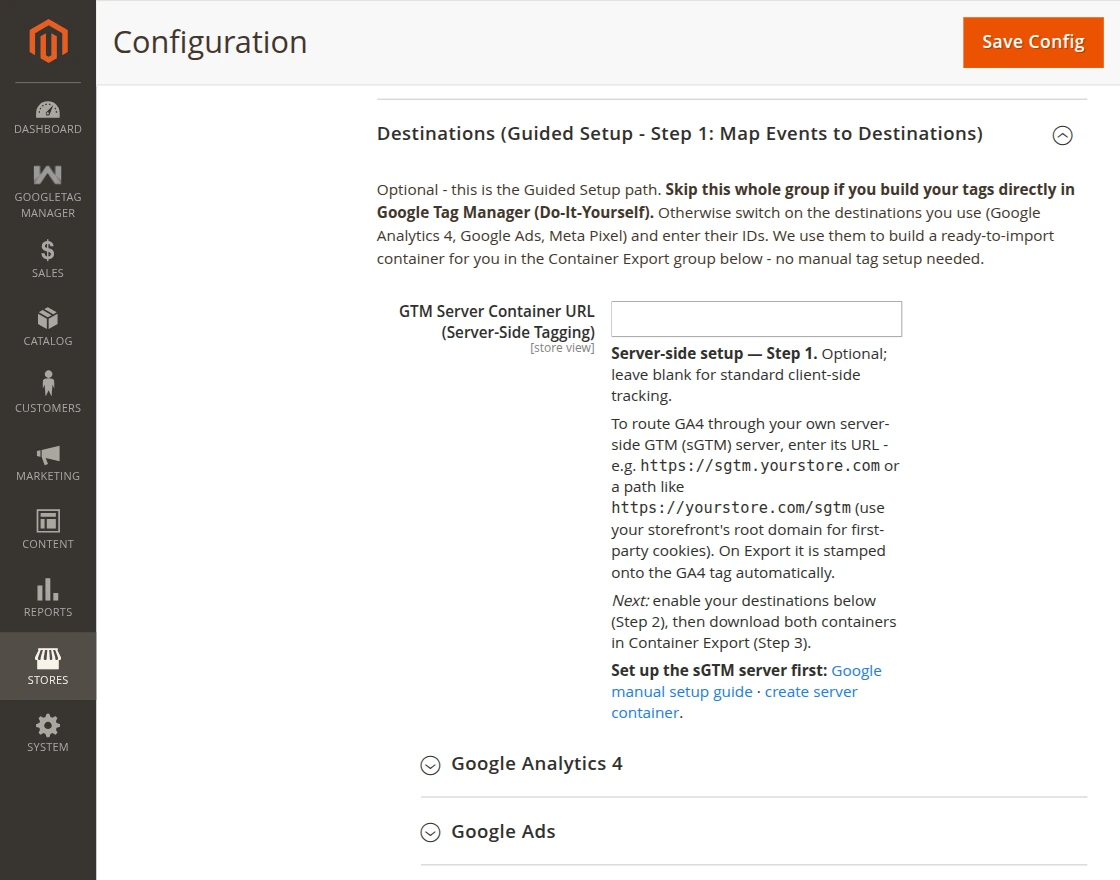
If you manage your tags manually in Google Tag Manager, you can skip this section.
- GTM Server Container URL (Server-Side Tagging): Enter your Server-side Google Tag Manager (sGTM) URL if you use server-side tagging. Leave this field empty to continue using the standard client-side Google Tag Manager setup.
Google Tag Manager – Google Analytics 4
Configure Google Analytics 4 to collect customer events from your Magento 2 store through Google Tag Manager.
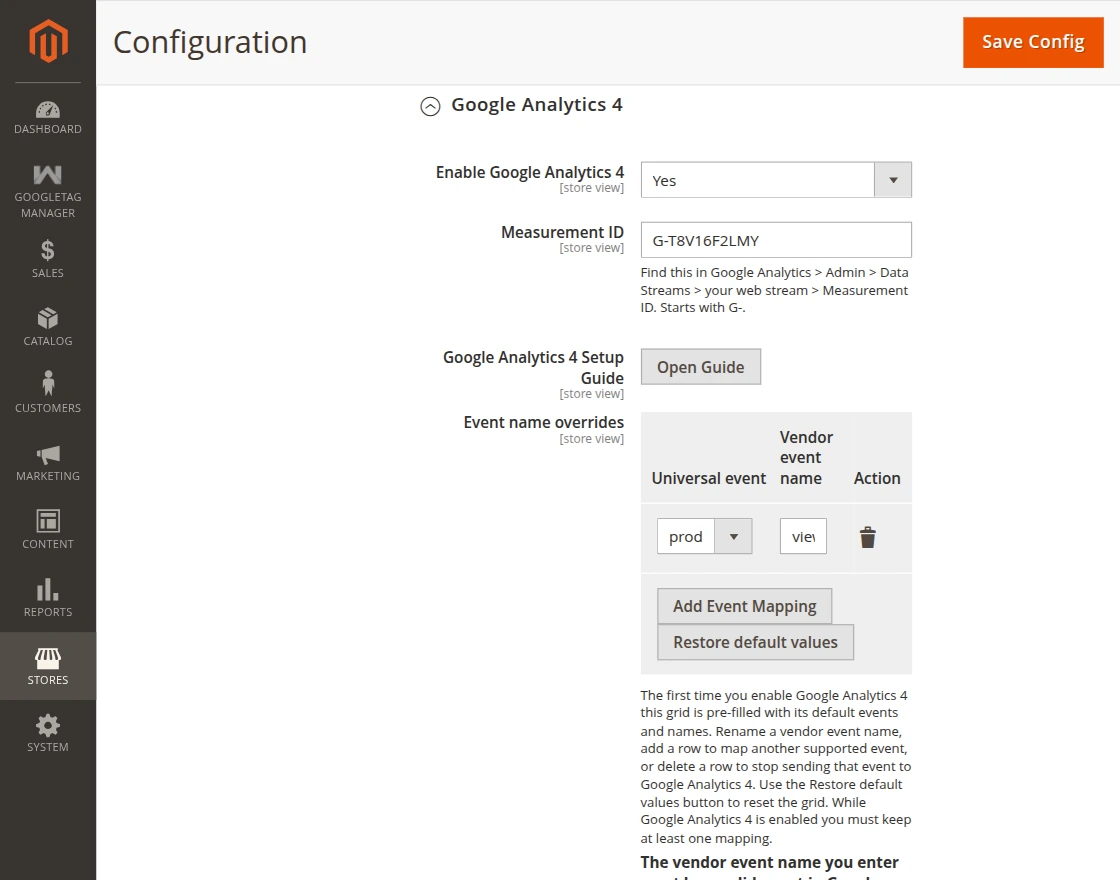
- Enable Google Analytics 4: Enable this option to send supported tracking events to your Google Analytics 4 property.
- Measurement ID: Enter your Google Analytics 4 Measurement ID (for example, G-XXXXXXXXXX). You can find it under your GA4 Web Data Stream settings.
- Google Analytics 4 Setup Guide: Click Open Guide to view the setup instructions for connecting Google Analytics 4 with Google Tag Manager.
- Event Name Overrides: Customize the default event names sent to Google Analytics 4. You can rename events, add new mappings, or restore the default configuration whenever required.
Google Tag Manager – Google Ads
Configure Google Ads conversion tracking and remarketing using Google Tag Manager.
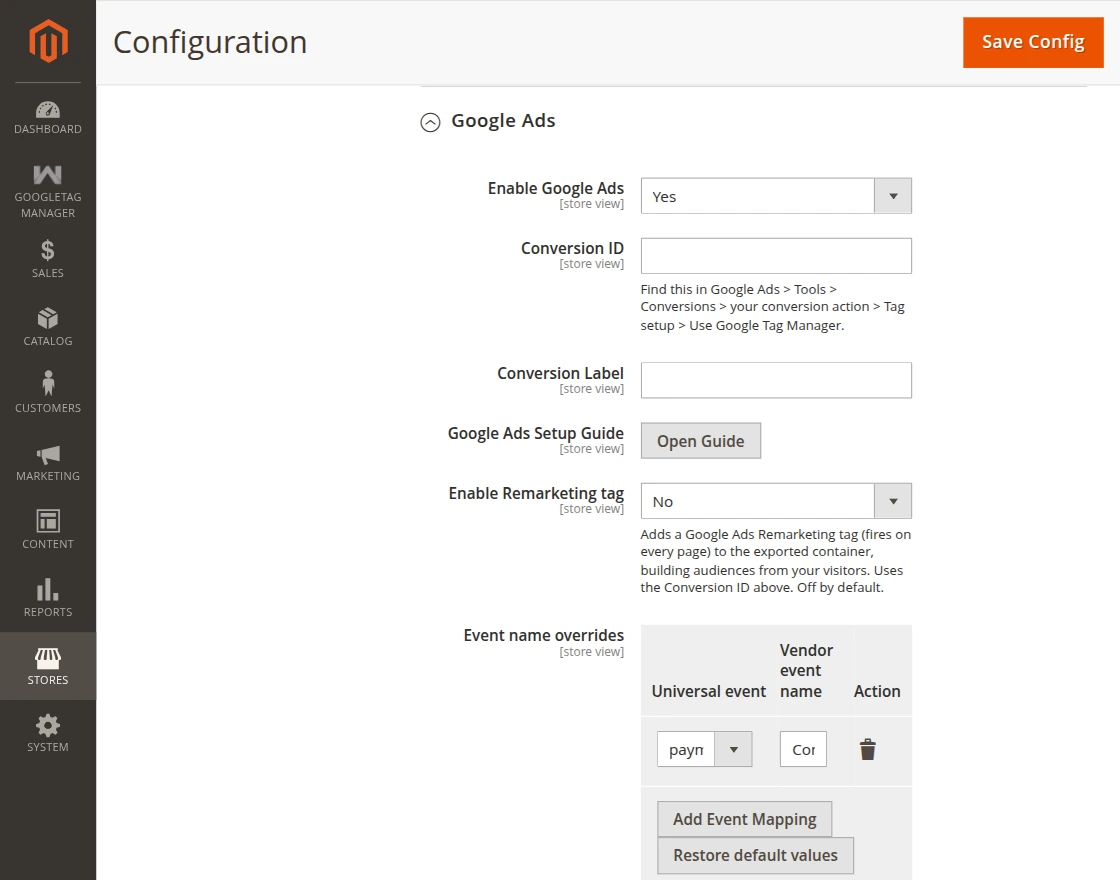
- Enable Google Ads: Enable this option to send conversion events to your Google Ads account.
- Conversion ID: Enter your Google Ads Conversion ID. This ID connects your Magento 2 store with your Google Ads conversion actions.
- Conversion Label: Enter the Conversion Label associated with your selected Google Ads conversion action.
- Google Ads Setup Guide: Click Open Guide to view the complete Google Ads setup instructions.
- Enable Remarketing Tag: Enable this option to add the Google Ads Remarketing tag to your exported GTM container. It helps build remarketing audiences from your store visitors.
- Event Name Overrides: Modify the default event names sent to Google Ads. You can create custom mappings or restore the default event configuration at any time.
Meta Pixel for Google Tag Manager
Configure Meta Pixel to track customer activities from your Magento 2 store for Facebook and Instagram advertising.
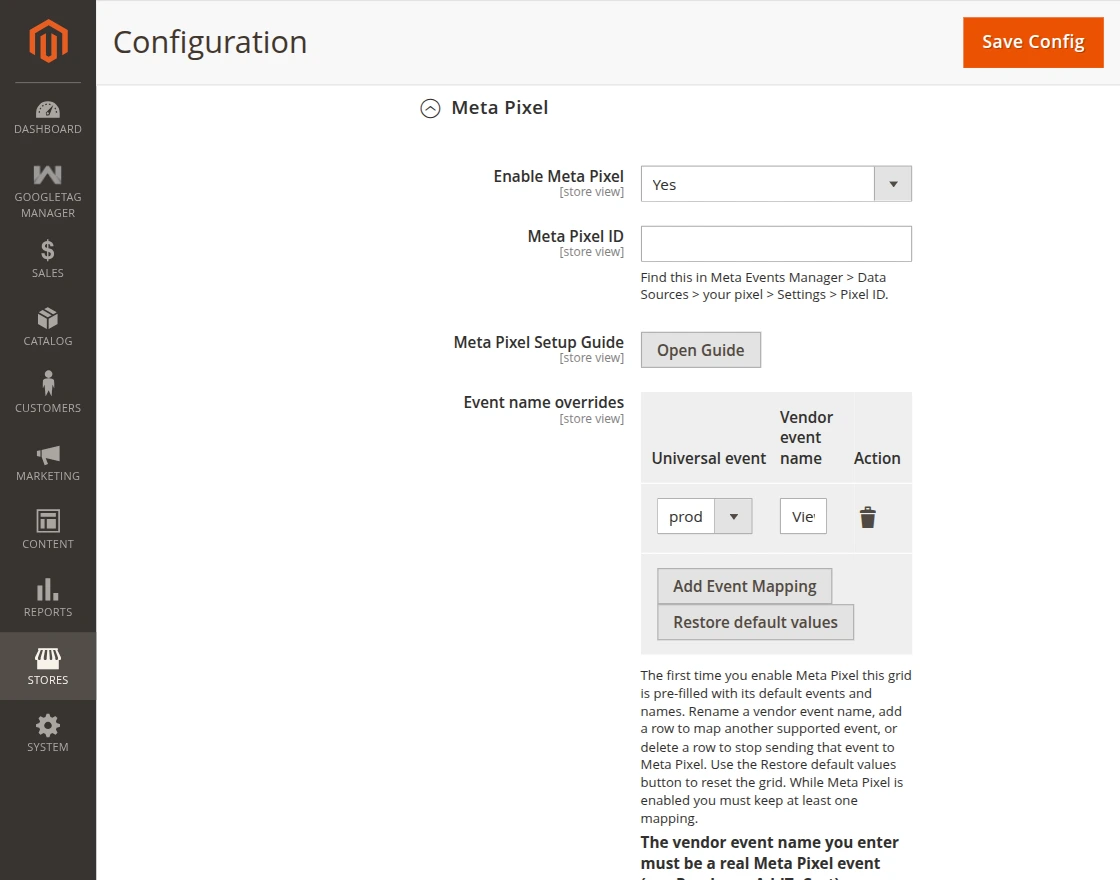
- Enable Meta Pixel: Enable this option to send supported customer events to your Meta Pixel.
- Meta Pixel ID: Enter your Meta Pixel ID. You can find it in the Meta Events Manager under your Pixel settings.
- Meta Pixel Setup Guide: Click Open Guide to view the setup instructions for Meta Pixel integration.
- Event Name Overrides: Customize the event names sent to Meta Pixel. You can rename events, create additional mappings, or restore the default configuration whenever needed.
Container Export
After configuring your tracking destinations, download a ready-to-import Google Tag Manager container.
Import it into your GTM workspace to start tracking events without creating tags manually.
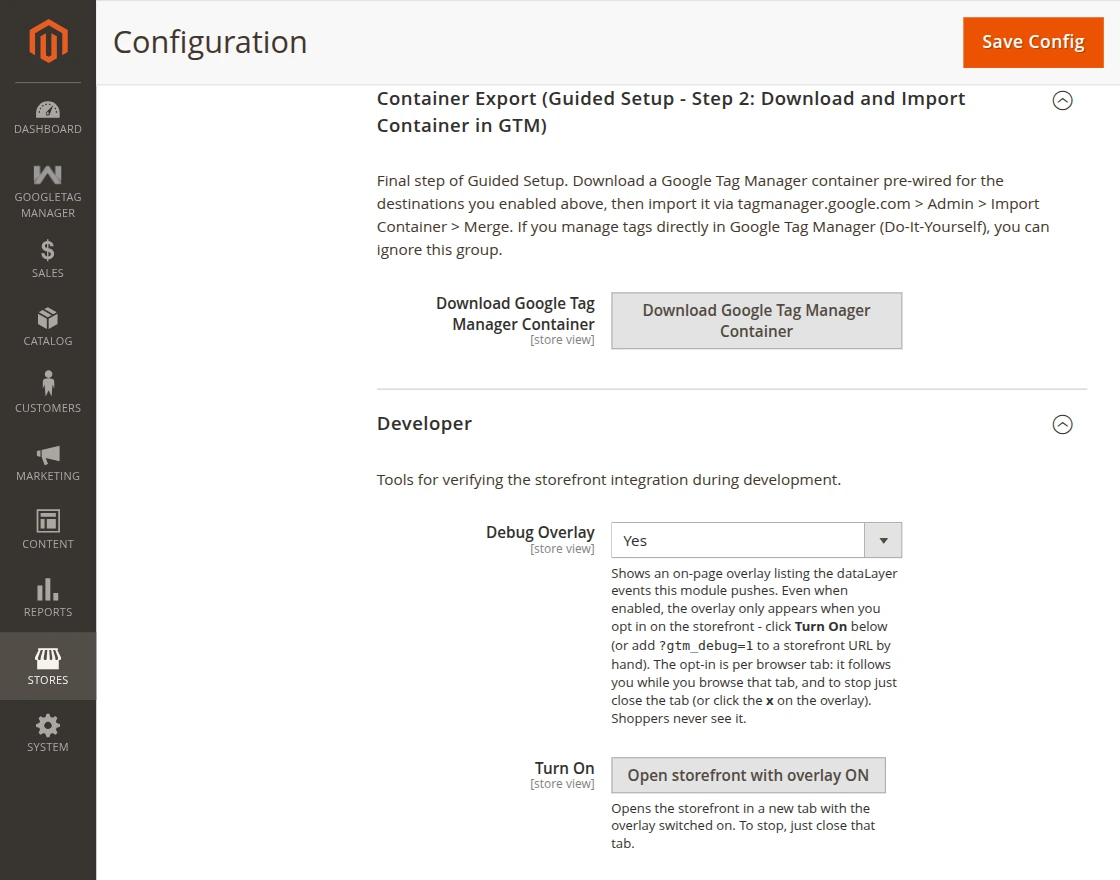
- Download Google Tag Manager Container: Click this button to download the configured Google Tag Manager container. Import the downloaded file into your GTM account to complete the Guided Setup.
Developer
The Developer section provides tools to help verify and troubleshoot your Google Tag Manager integration during development.
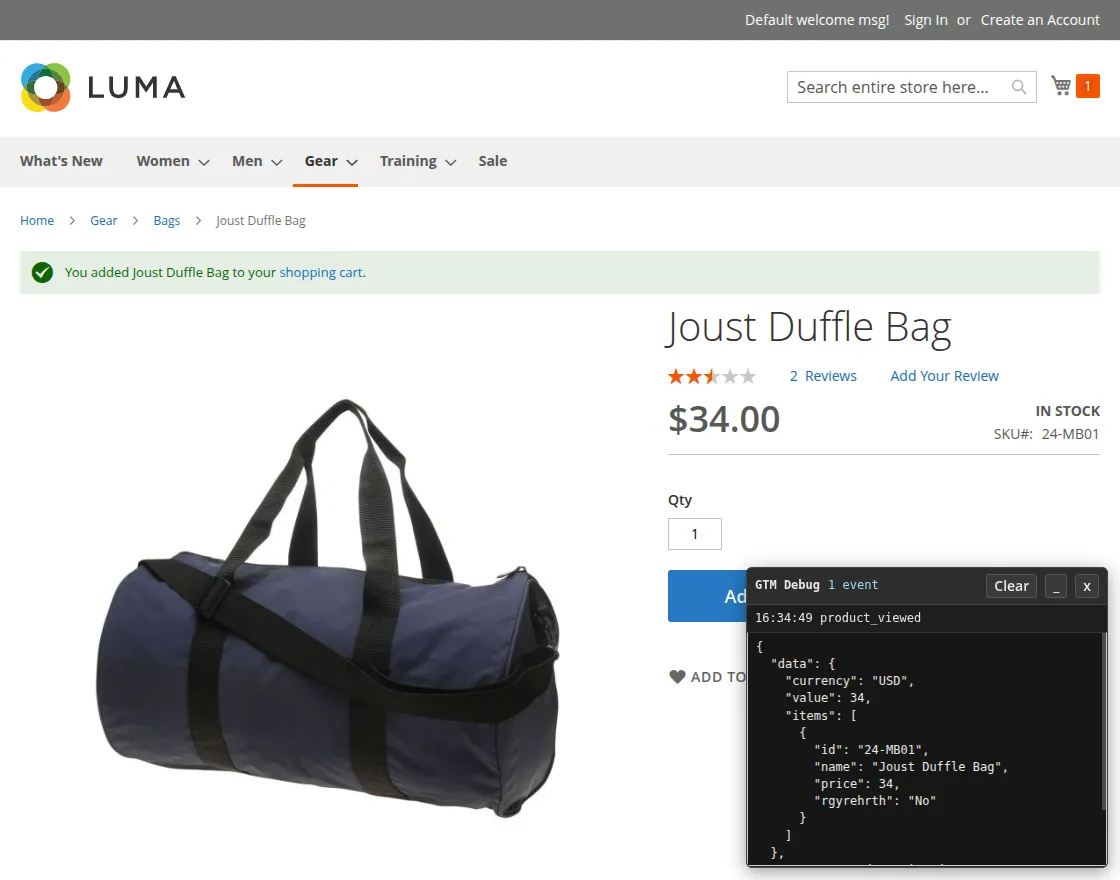
- Debug Overlay: Enable this option to display a debug overlay on the storefront. The overlay shows every data layer event generated by the extension, making it easier to verify your tracking implementation. It is visible only when manually enabled and is never shown to store customers.
- Turn On: Click Open Storefront with Overlay ON to launch your storefront in a new tab with the debug overlay enabled. Close the tab or disable the overlay when you finish testing.
How to Get the GTM Container ID for Google Tag Manager?
To configure the extension, you first need a Google Tag Manager (GTM) Container ID. If you don’t already have a GTM account, you can create one for free by visiting the Google Tag Manager website.
Follow the steps below to create a GTM account and obtain your Container ID.
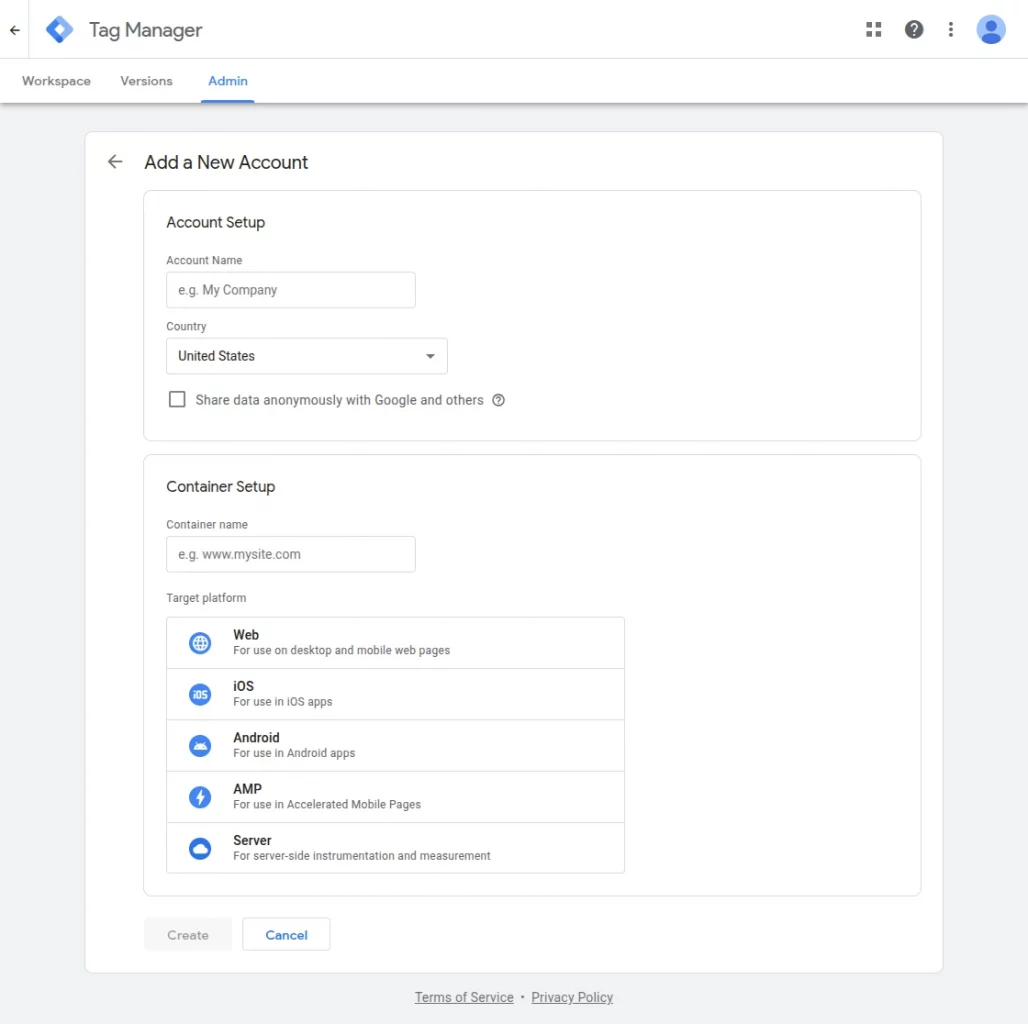
Step 1: Create a Google Tag Manager Account
Visit the Google Tag Manager website and sign in with your Google account. If this is your first time using GTM, click Create Account.
Enter the following details:
- Account Name
- Country
- Container Name (usually your website name or domain)
- Target Platform as Web
Once you’ve entered the required information, click Create.
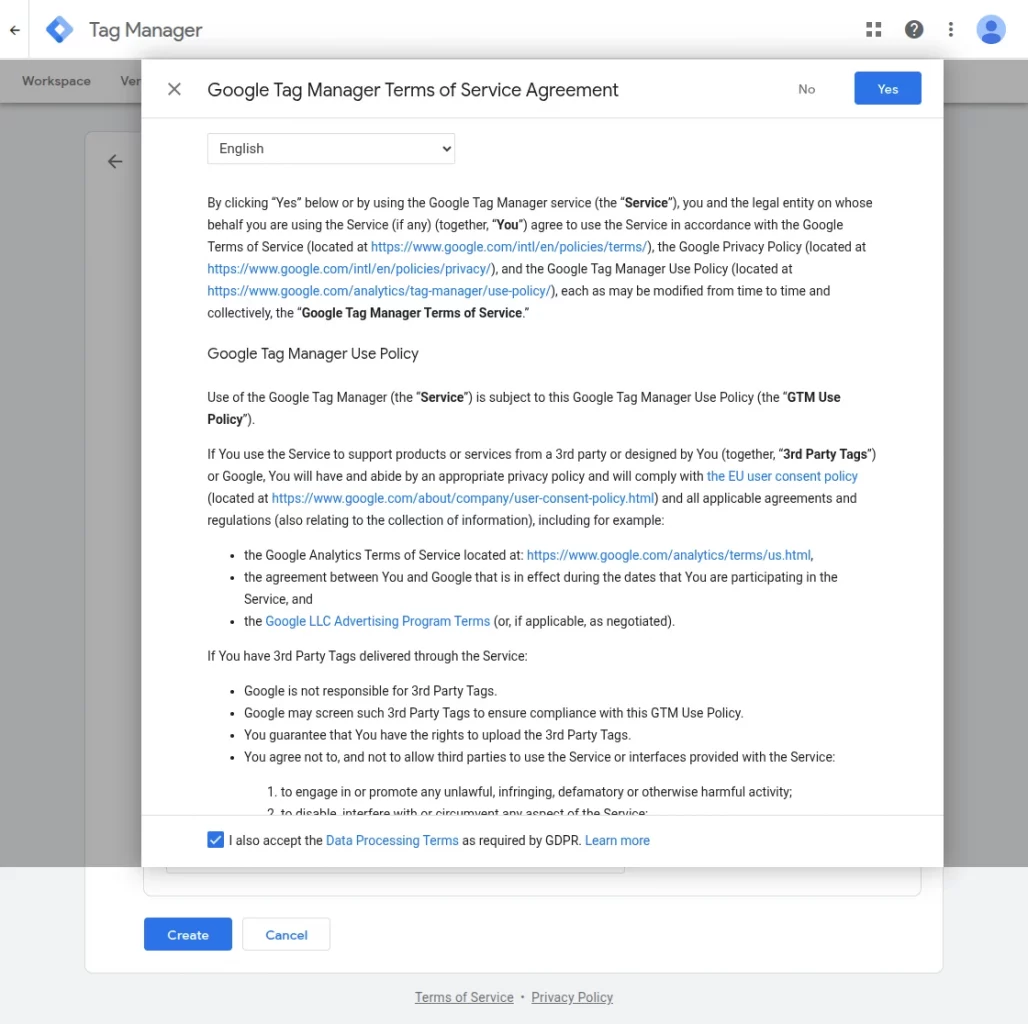
Step 2: Accept the Terms of Service
Review the Google Tag Manager Terms of Service and click Yes to accept the agreement and continue.
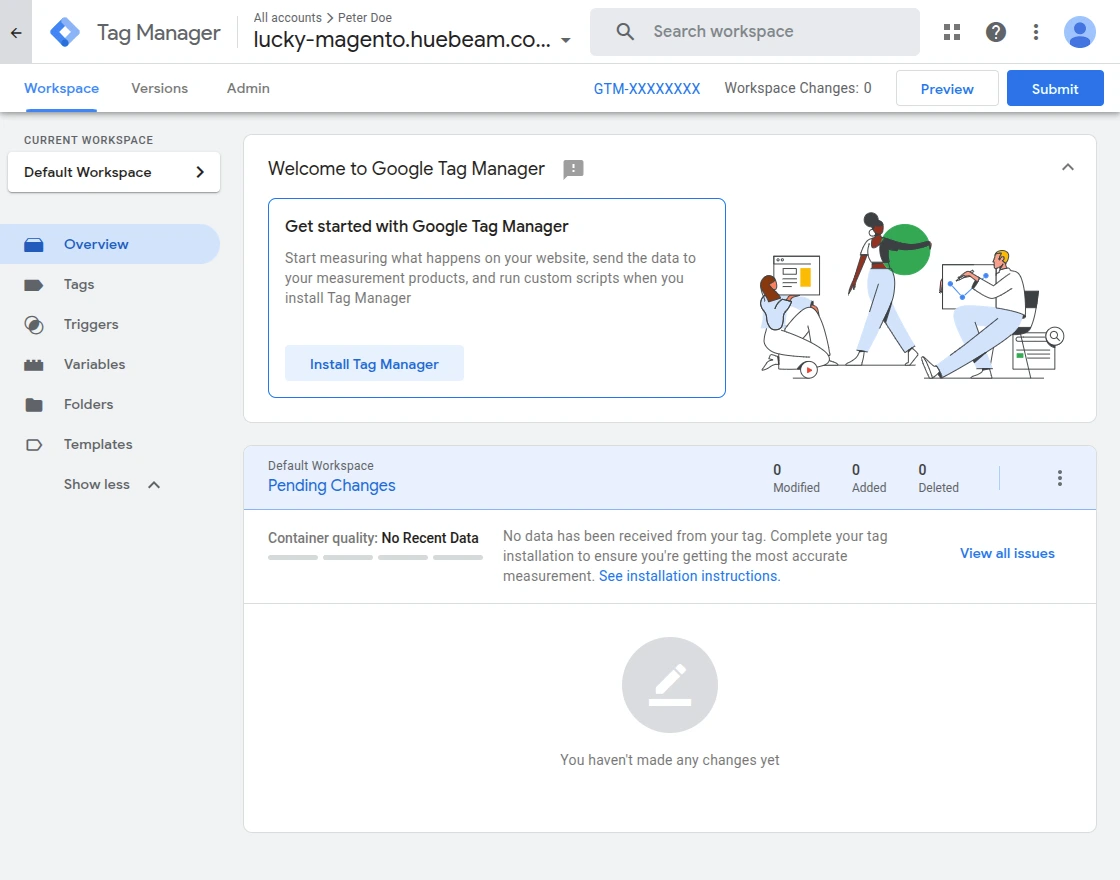
Step 3: Copy the GTM Container ID
After your account and container are created, you’ll be redirected to the GTM workspace.
Your Container ID appears at the top of the page and looks similar to GTM-XXXXXXX.
Copy this ID and use it in the GTM Container ID field under the extension configuration in your Magento 2 admin panel.
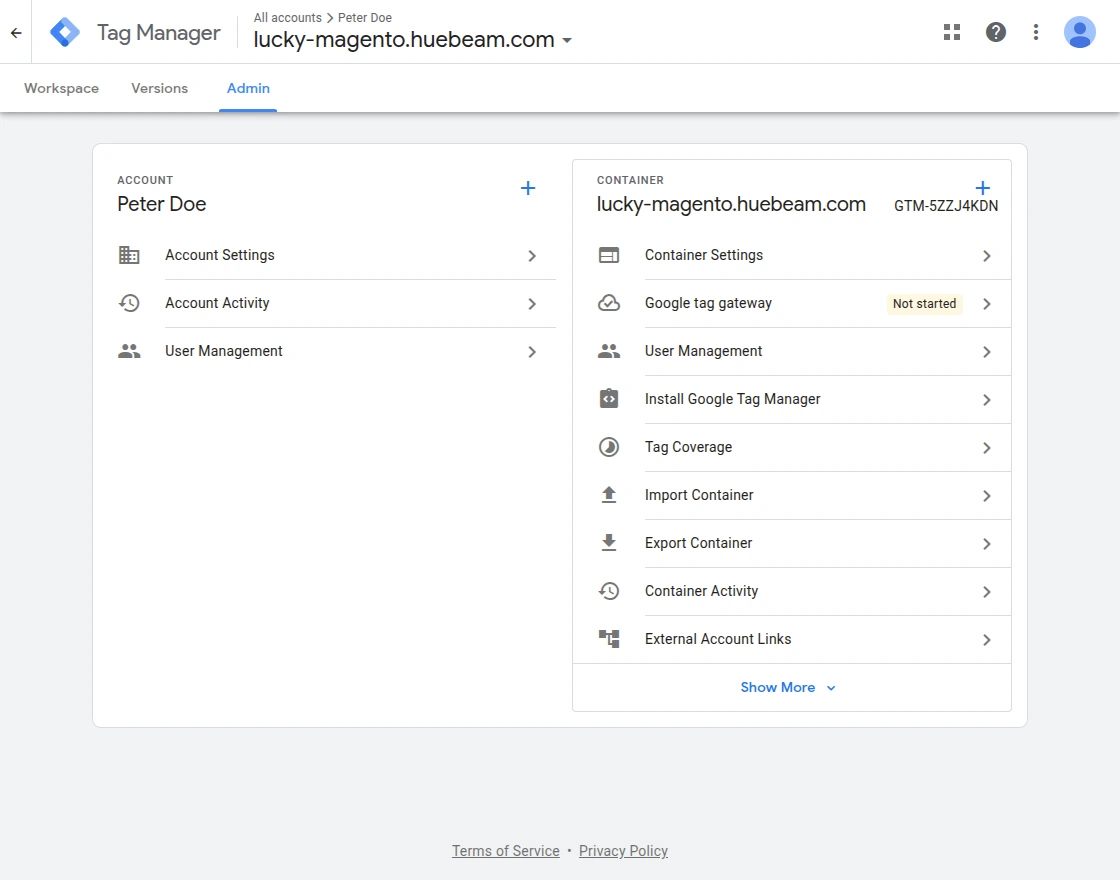
Step 4: Open the Admin Section
After creating your container, click the Admin tab from the top navigation menu.
This section allows you to manage your container settings and import an existing GTM container if required.
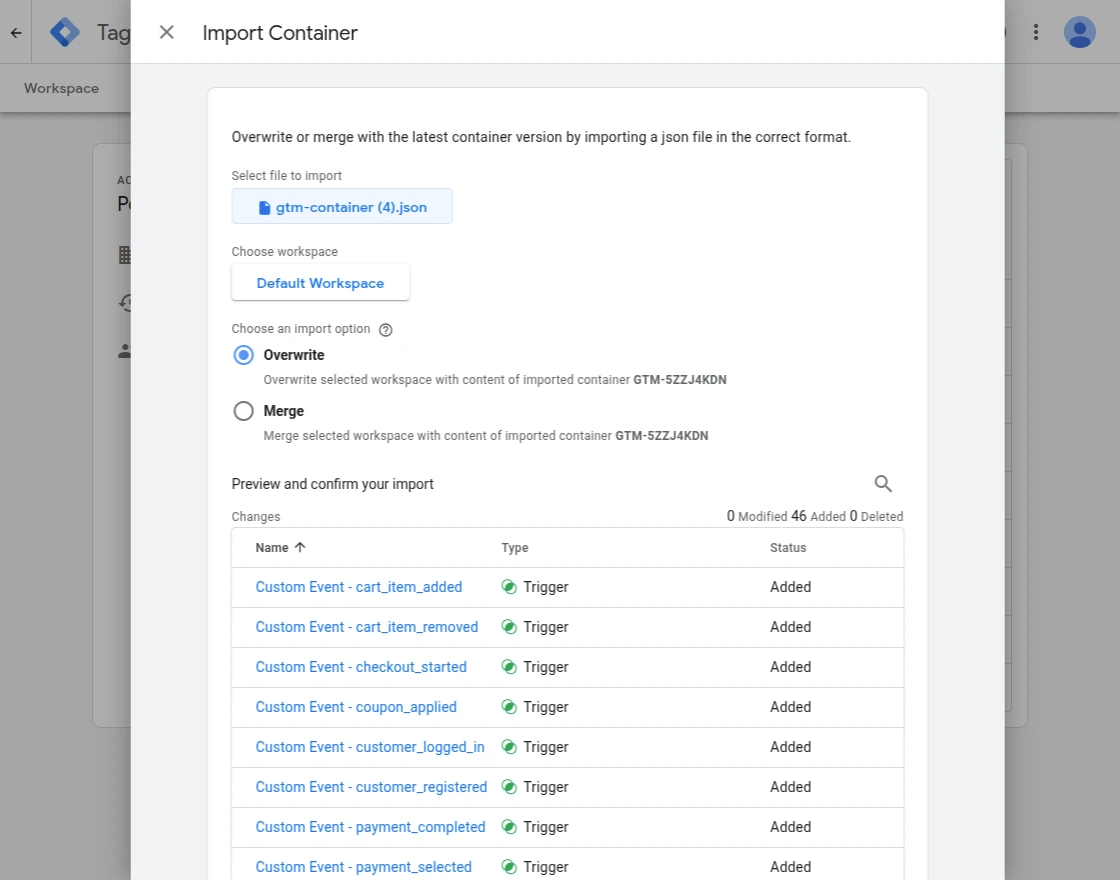
Step 5: Import the GTM Container
Click Import Container and select the container file downloaded from the Magento 2 Google Tag Manager extension.
Choose:
- Workspace: New
- Import Option: Overwrite
Click Confirm to import the container successfully.
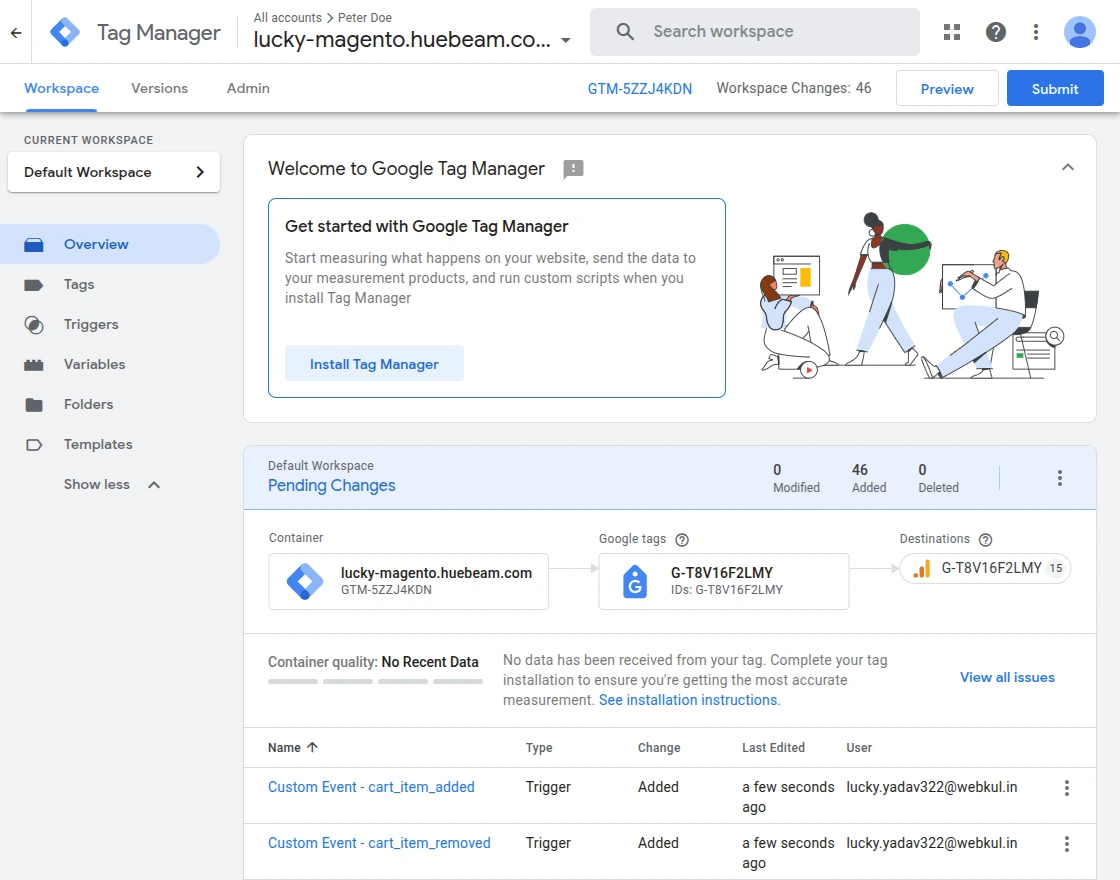
Step 6: Publish the Container
After importing the container, click the Submit button available in the top-right corner of the page.
This prepares your container for publishing.
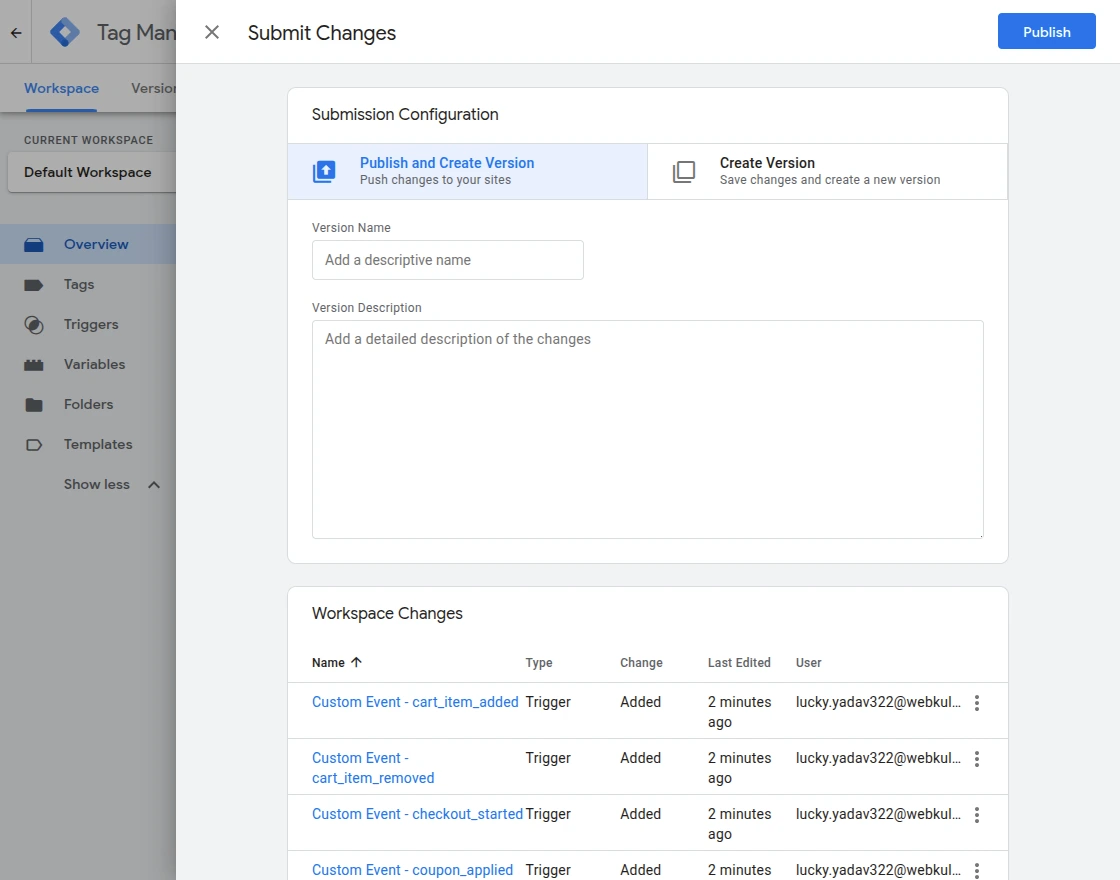
Step 7: Create a Version and Publish
Select Publish and Create Version, enter a Version Name and an optional Description, then click Publish.
Your tracking configuration is now live.
Step 8: Verify the Published Container
After publishing, you’ll see a confirmation message indicating that the container has been published successfully.
This confirms that your GTM configuration is active.
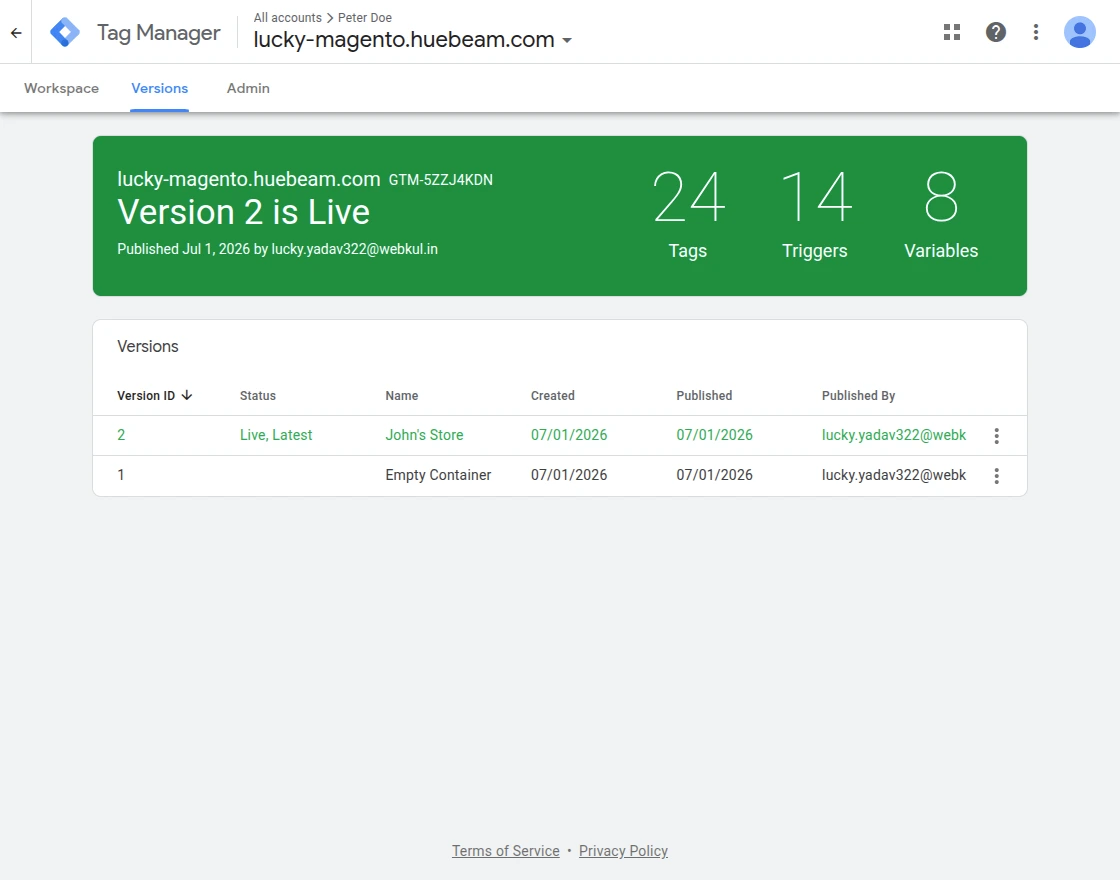
Step 9: Verify the GTM Container ID
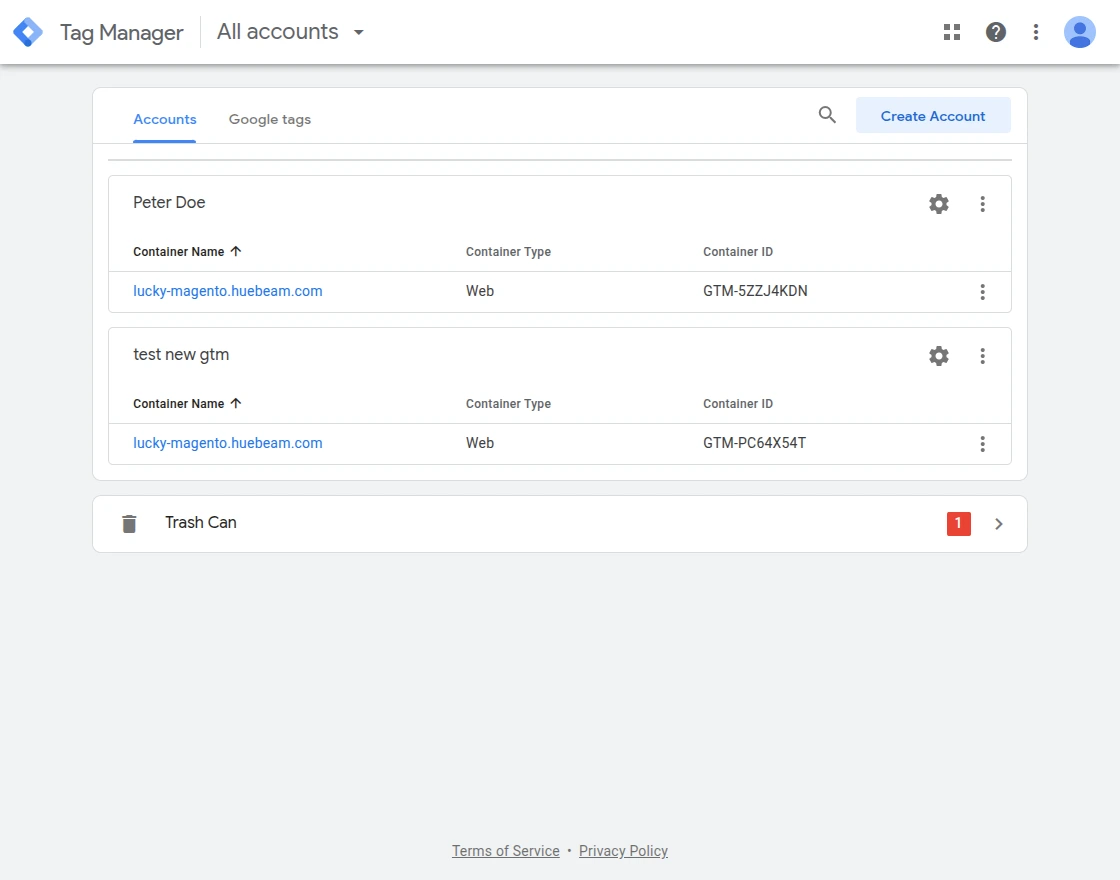
Click the Tag Manager logo in the top-left corner or open All Accounts.
Locate your website container and verify its Container ID (GTM-XXXXXXX). You can now use this ID in the extension configuration.
How to Get the GTM Account ID?
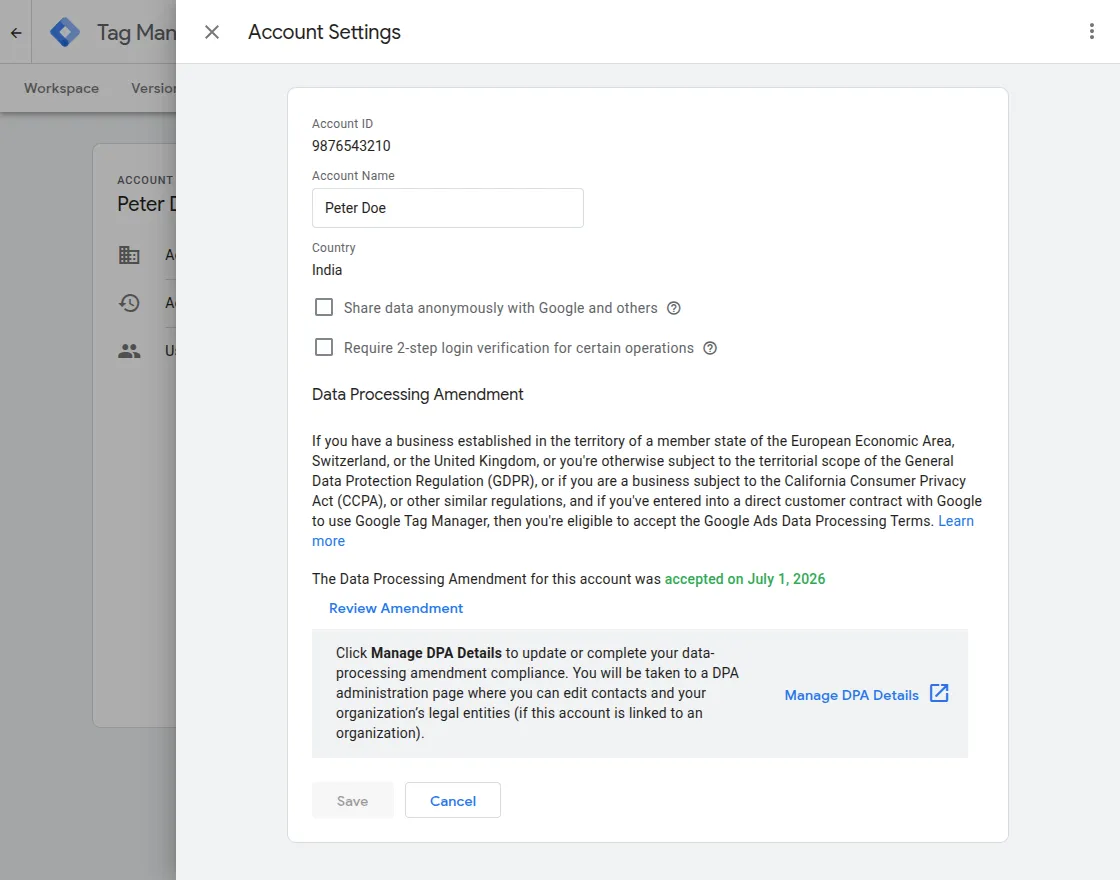
If the extension requires your Google Tag Manager Account ID, you can find it from the GTM Admin settings.
Step 1: Open Account Settings
In your GTM workspace, click the Admin tab and then select Account Settings.
Step 2: Copy the Account ID
The Account ID is displayed in the Account Settings page.
Copy this ID and use it wherever required in the extension configuration.
How to get Conversion Code & Conversion Label?
For getting this you need to click here and then click on Sign in you will redirect towards the page as mentioned in the snap:

Then go to tools and settings, and click on conversions :

Next, Click on add conversion:

On the next page, click on the website:

Once clicking on the website, next enter the domain name:

Next, Click on Add a conversion action manually:

Enter all the relevant details, once entering all the details click on done:

Once clicking on done, Next, click on save continue>>Done.

Now go to the conversion which you have just created:

Now on the next page, click on Tag setup as mentioned in the snapshot will appear then go to Use Google Tag Manager

Here you will get the Google Conversion code and label:

How to Get the Google Analytics 4 Measurement ID?
To connect your Magento 2 store with Google Analytics 4 (GA4), you need a Measurement ID. This unique ID enables GA4 to track website traffic, customer behavior, and ecommerce events.
If you don’t already have a Google Analytics account, you can create one for free. Follow the steps below to create a GA4 property and obtain your Measurement ID.
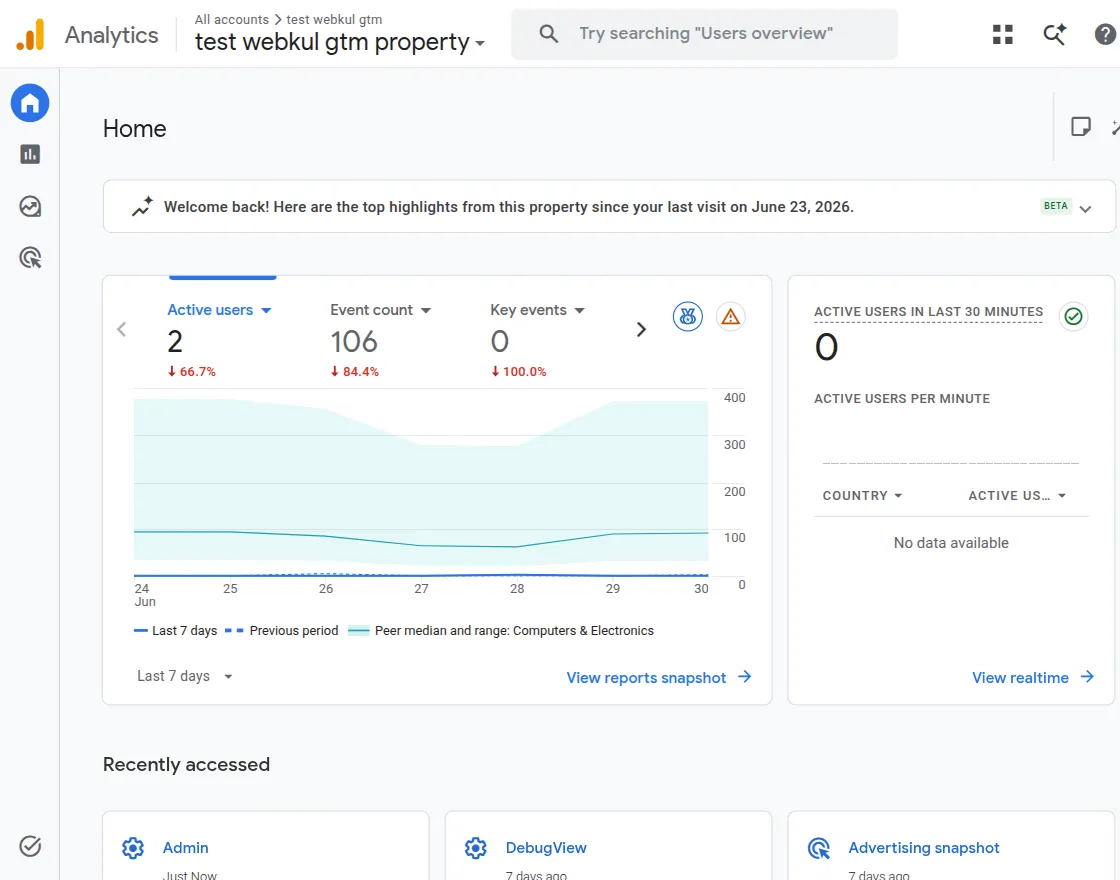
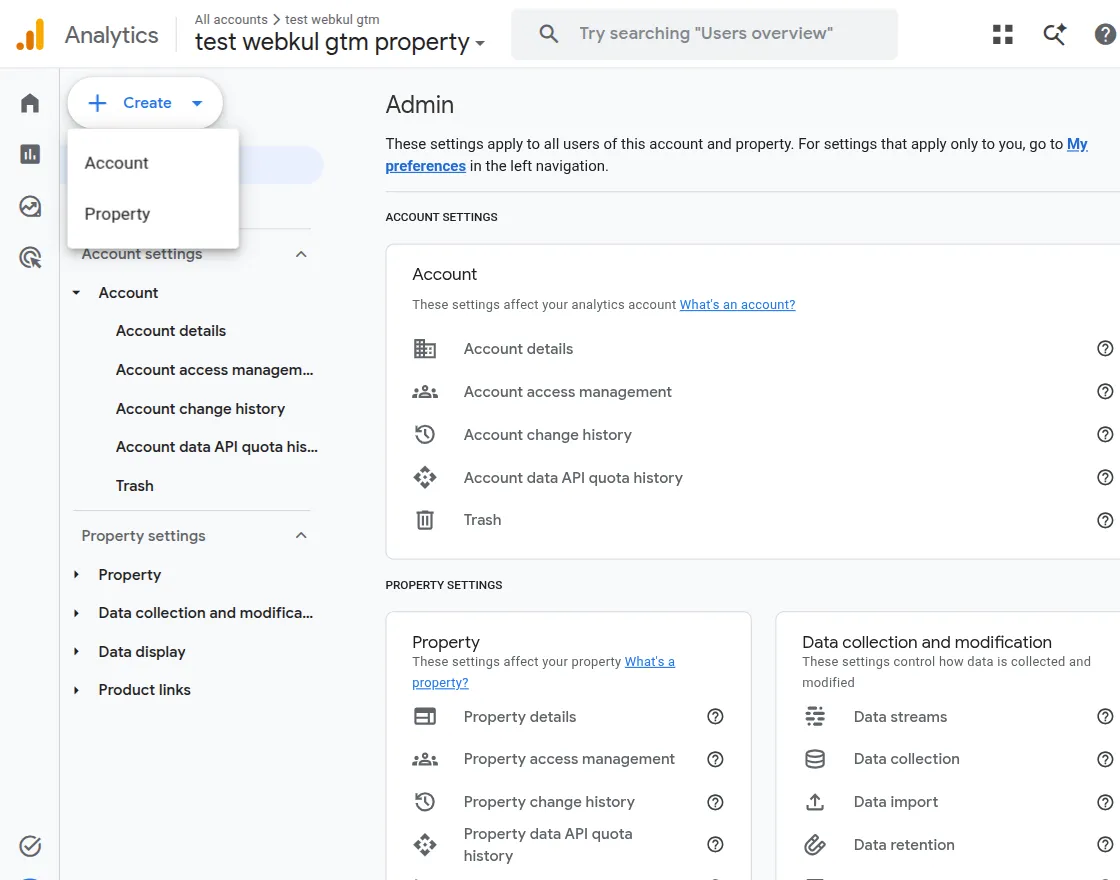
Step 1: Open the Admin Section
Sign in to your Google Analytics account and click Admin from the left-side navigation menu.
This section allows you to manage your Analytics accounts, properties, and data streams.
Step 2: Create a Google Analytics Account
If you don’t have an Analytics account, click Create Account to create a new one.
If you already have an account, you can skip this step and continue with creating a new property.
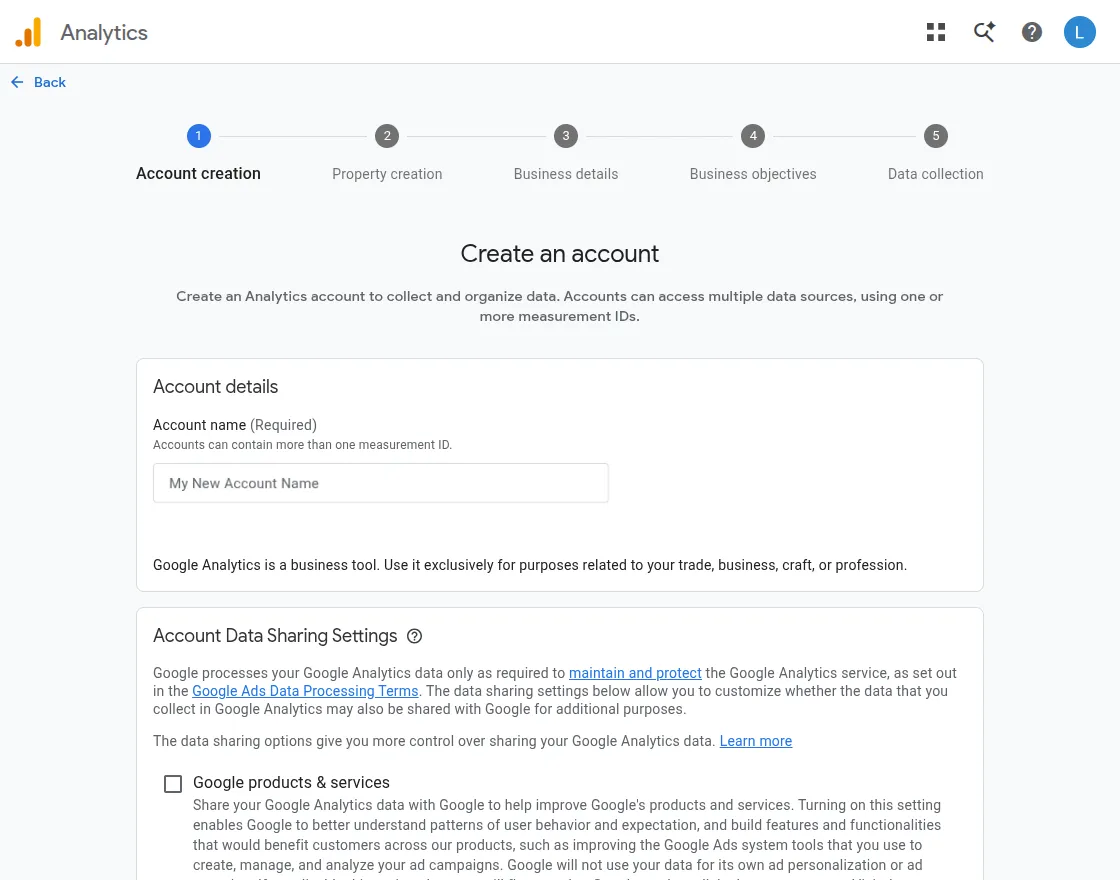
Step 3: Enter the Account Details
Provide an Account Name for your Google Analytics account and click Next to continue.
Choose a meaningful name that helps you identify your business or website.
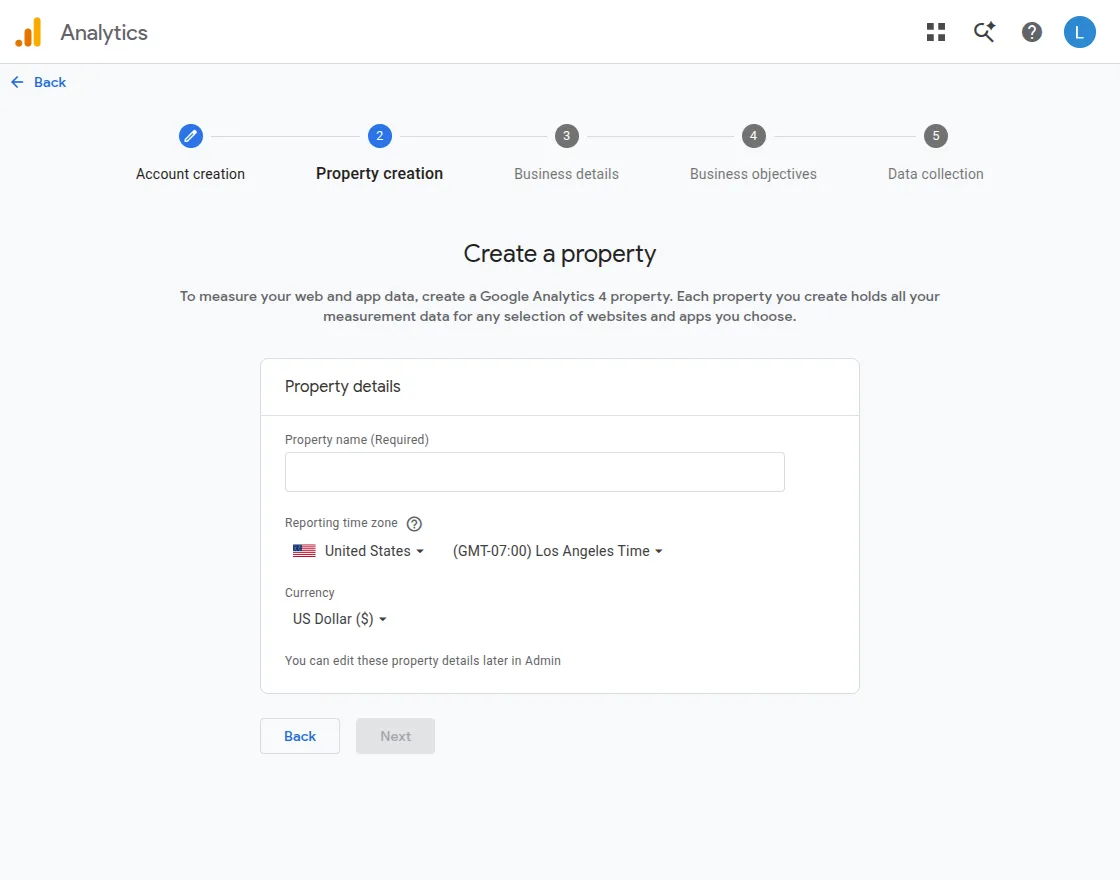
Step 4: Create a Google Analytics Property
Enter the required property details, including the Property Name, Reporting Time Zone, and Currency.
These settings determine how your website data is processed and displayed in Google Analytics reports.
Step 5: Add Your Business Information
Select your Industry Category and Business Size, then click Next.
This information helps Google Analytics provide reports and recommendations that better match your business.

Step 6: Choose Your Business Objectives
Select the business objectives that best describe how you plan to use Google Analytics.
Google Analytics uses these preferences to customize dashboards, reports, and insights for your store

Step 7: Accept the Terms and Create a Data Stream
Review the Google Analytics Terms of Service and click I Agree.
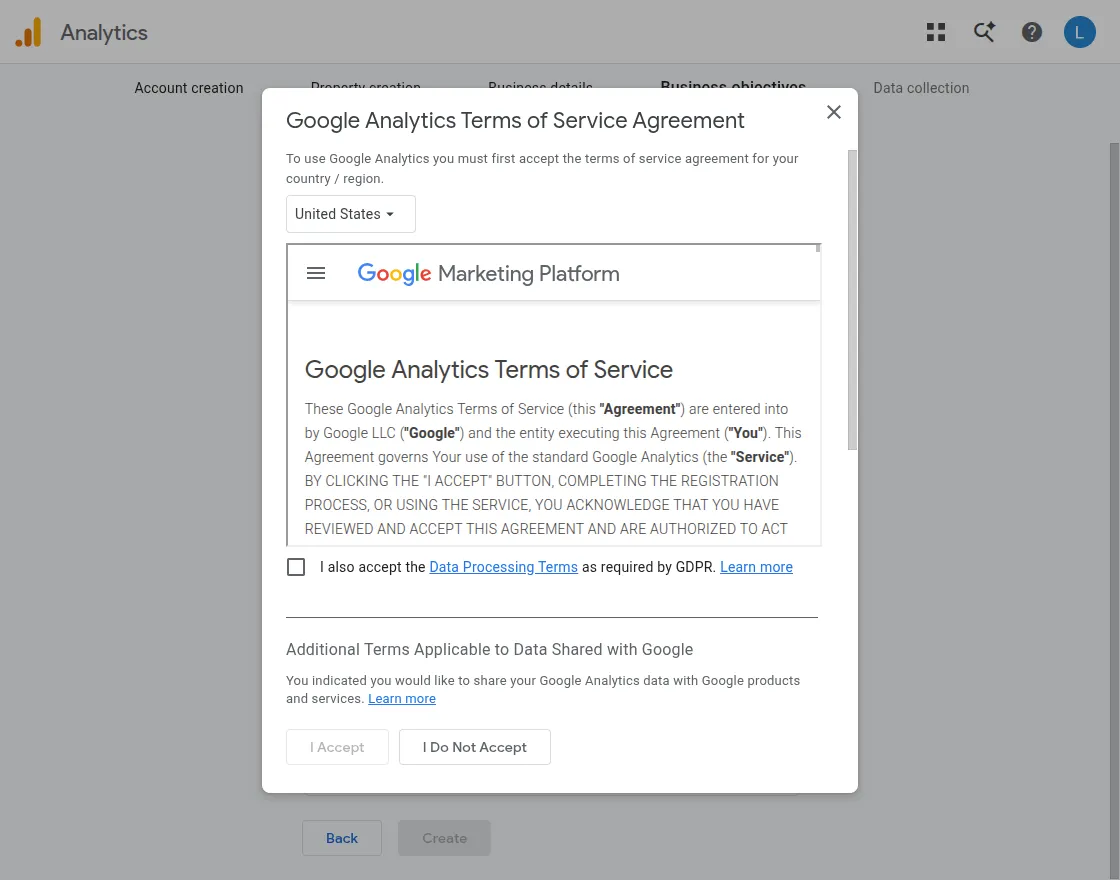
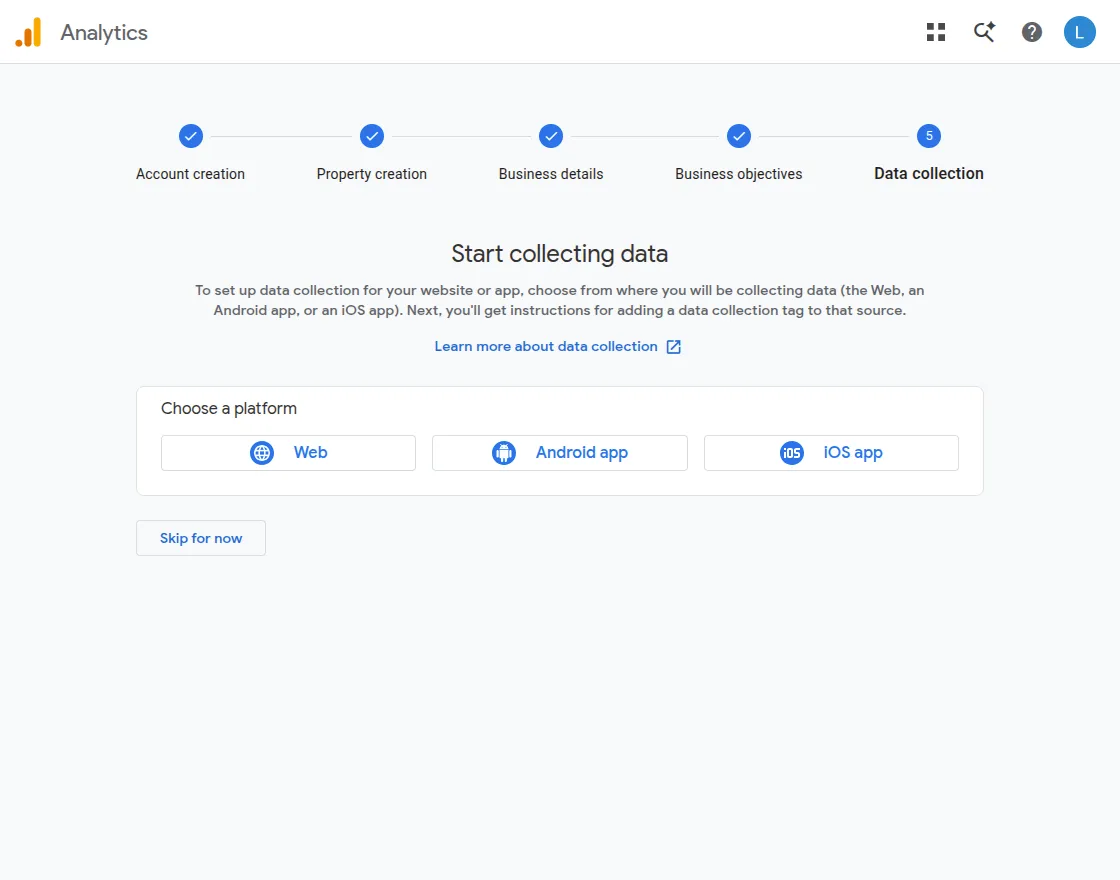
Next, select Web as the platform to create a data stream for your Magento 2 website.
Once clicking on next there will be a pop-up of terms & conditions, click on I agree, Next choose the data collection option as mentioned in the snapshot:
Step 8: Configure the Web Data Stream
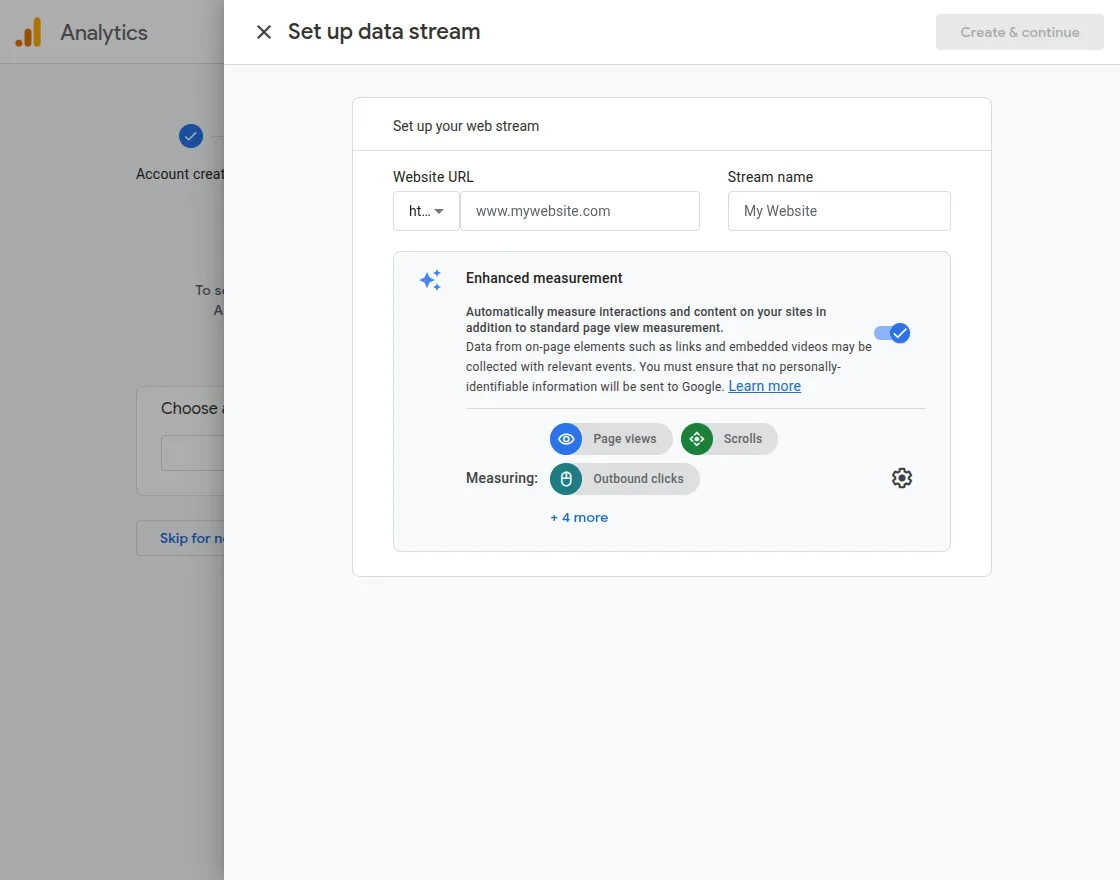
Enter your Website URL and a Stream Name, then click Create and Continue.
Google Analytics will now create a data stream for your website.
Step 9: Copy the Google Analytics 4 Measurement ID
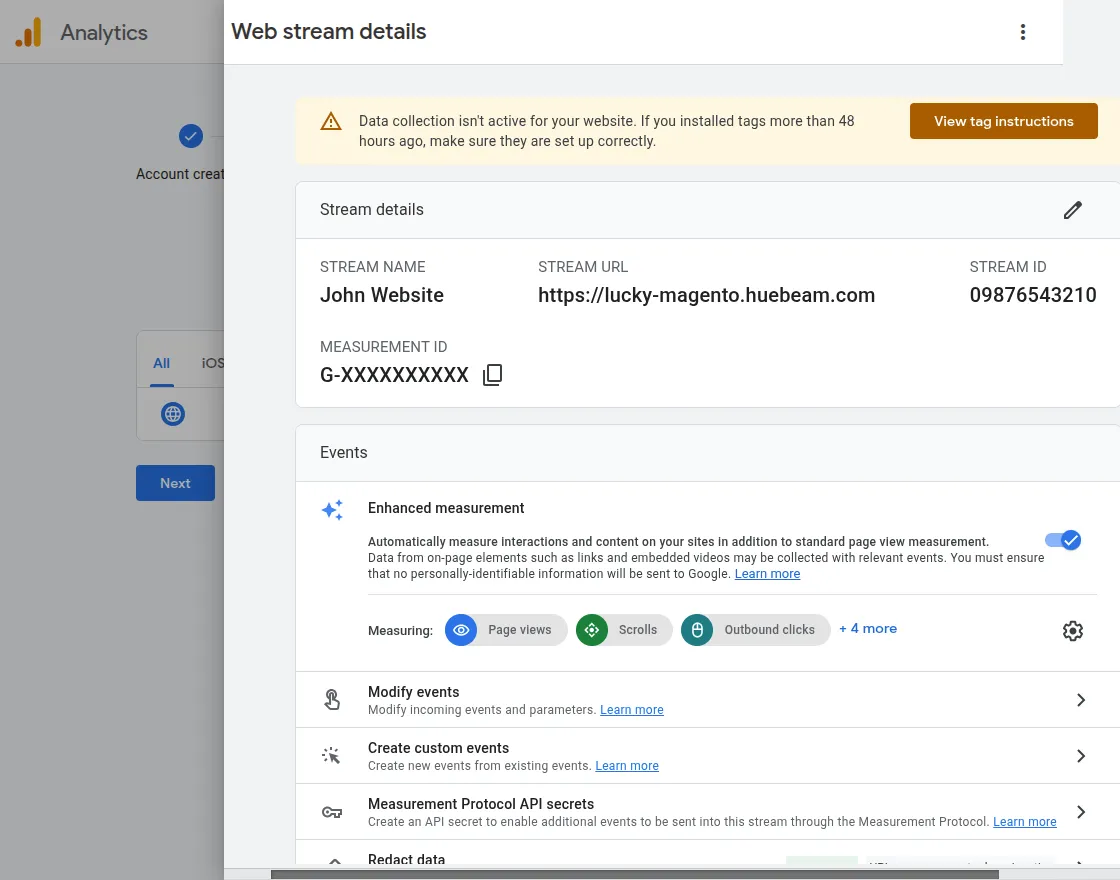
After the data stream is created, you’ll be redirected to the Web Stream Details page.
Here, you’ll find the Measurement ID, which starts with G- (for example, G-XXXXXXXXXX).
Copy this ID and paste it into the Measurement ID field under the Google Analytics 4 configuration in your Magento 2 extension.
How to Get the Meta Pixel ID?
To integrate Meta Pixel with your Magento 2 store, you need a Meta Pixel ID. In the latest Meta Events Manager interface, the Pixel ID is represented as the Dataset ID.
Follow the steps below to create a Meta Pixel and obtain your Dataset ID (Meta Pixel ID).
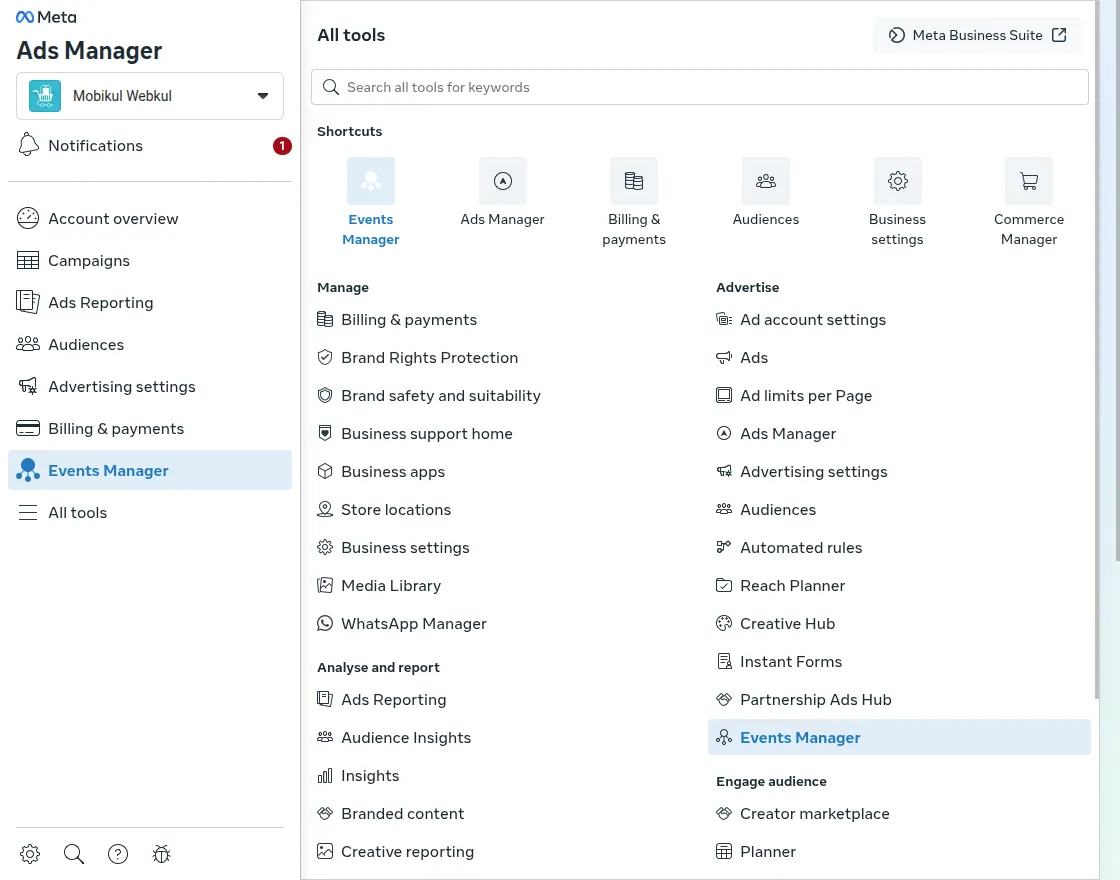
Step 1: Open Meta Events Manager
Sign in to your Meta Business account and open Meta Events Manager.
Click Connect Data, then select Web as the data source to start creating a new Meta Pixel.
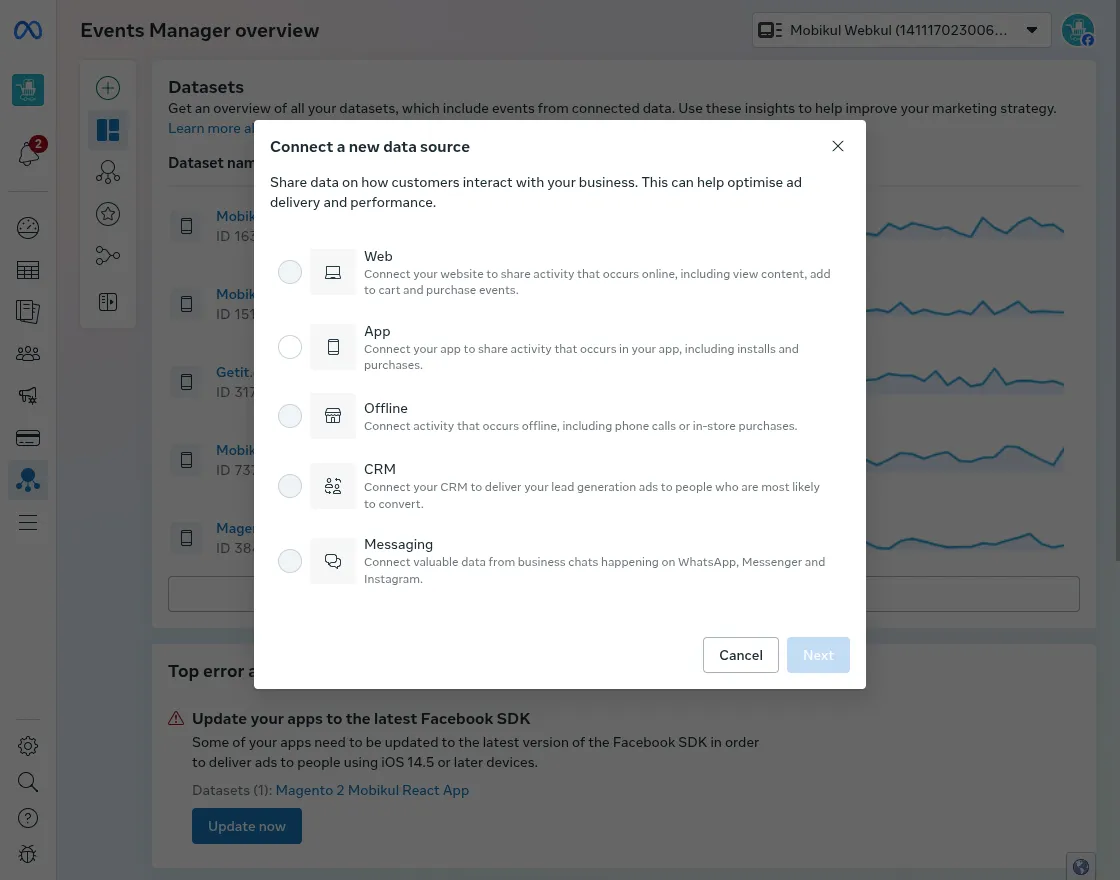
Step 2: Create a New Dataset
In the Connect your data window, click Create new dataset.
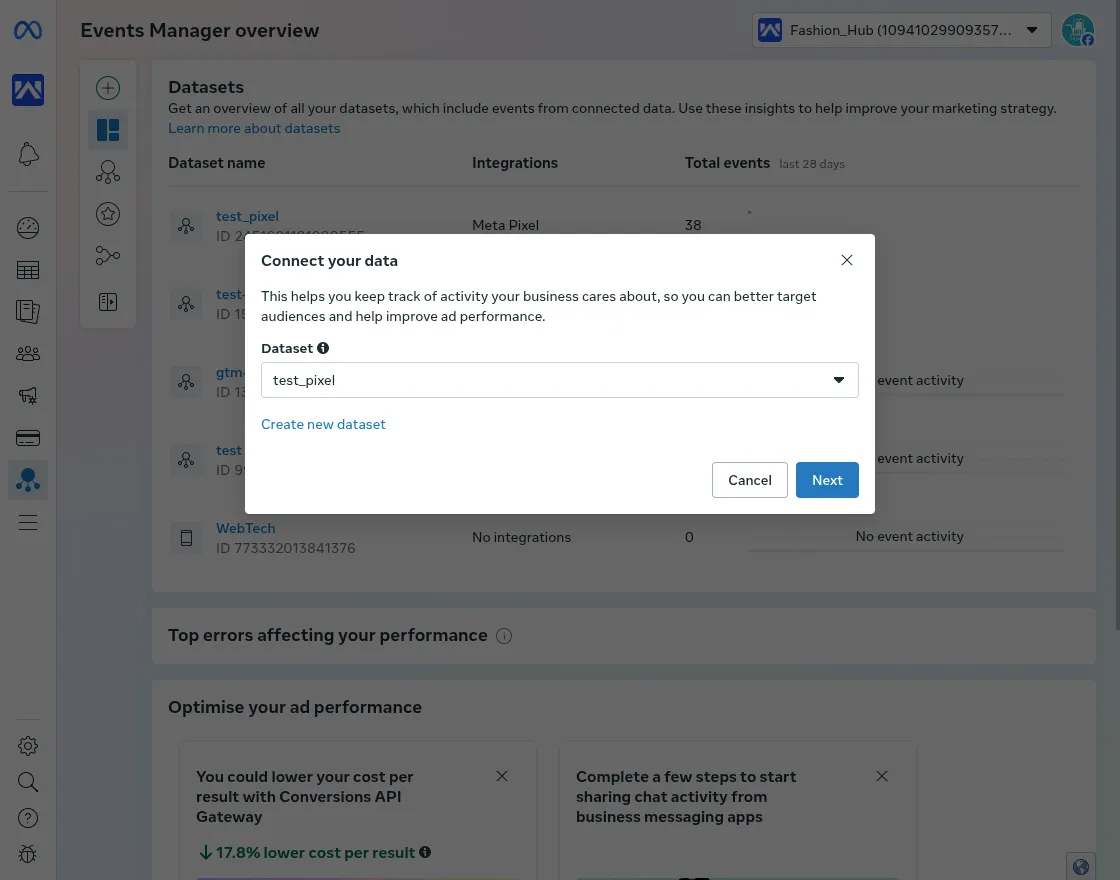
Step 3: Choose the Setup Method
After selecting your dataset, the Recommended setup window appears.
Select Set up manually and click Next.
This option lets you manually configure the Meta Pixel without using a partner integration.
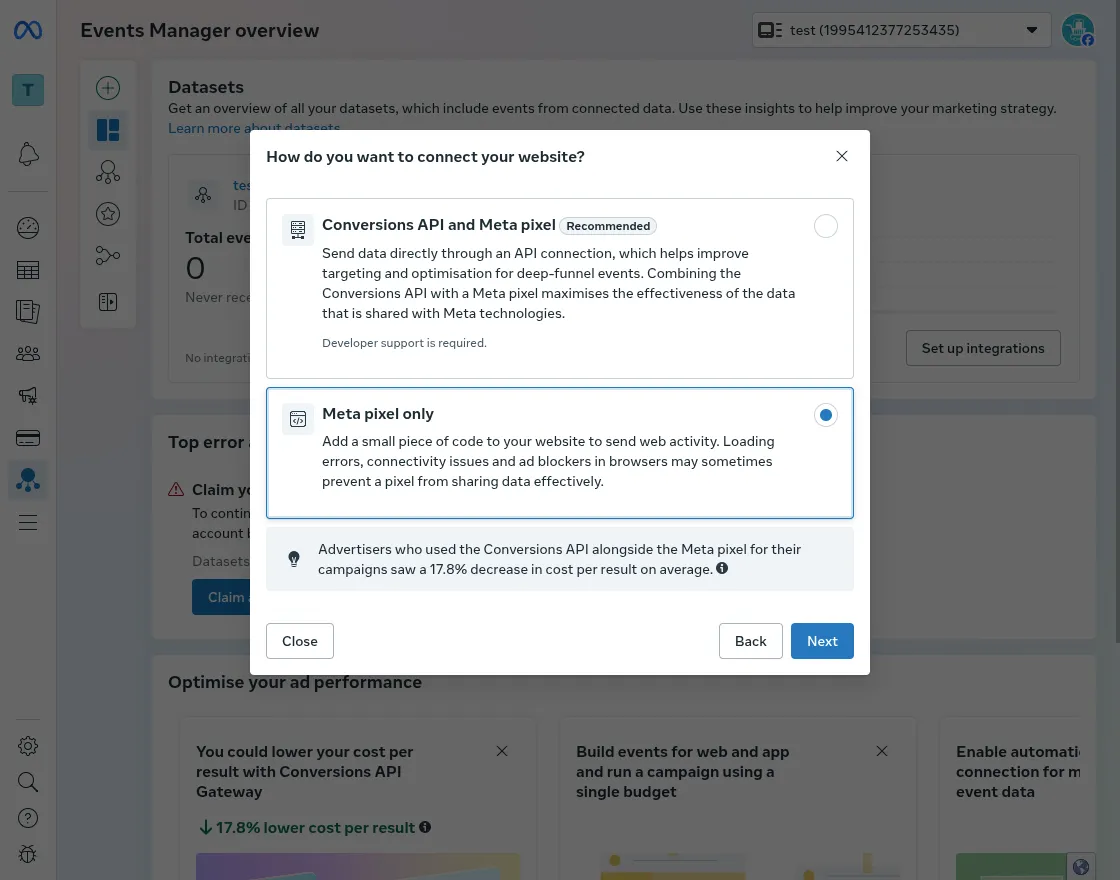
Step 4: Select the Connection Method
On the How do you want to connect your website? screen, choose Meta Pixel only and click Next.
This creates a browser-based Meta Pixel that tracks visitor activity on your website.
Note: If you plan to use server-side tracking with the Conversions API, you can select Conversions API and Meta Pixel. However, for this extension, Meta Pixel only is sufficient.
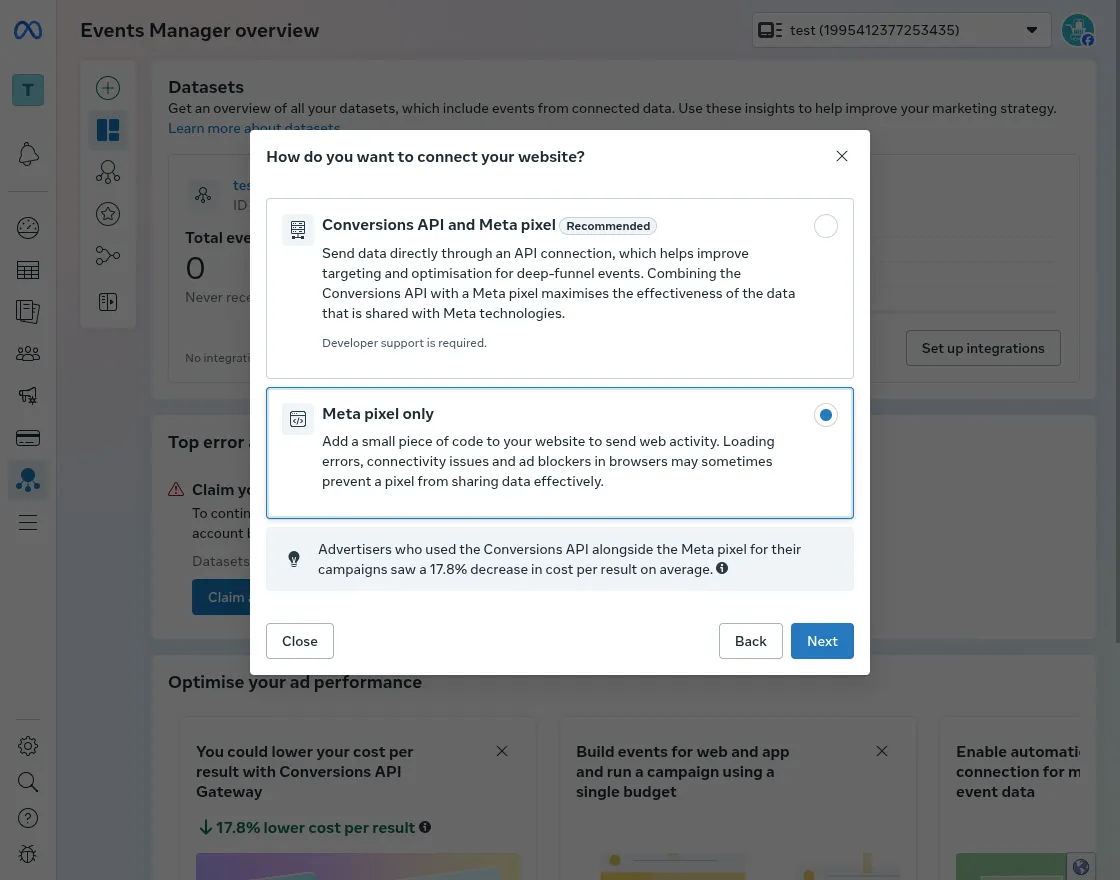
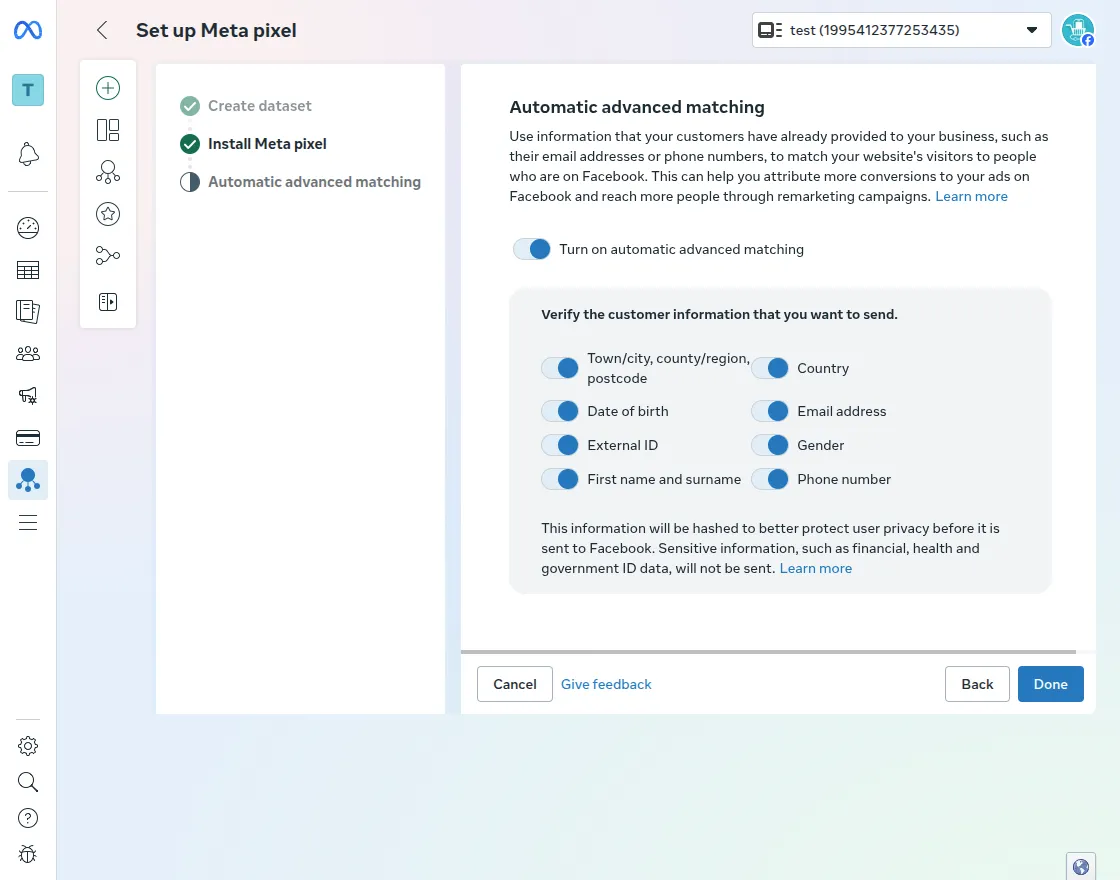
Step 5: Configure Automatic Advanced Matching
On the Automatic Advanced Matching page, you can choose whether to enable advanced matching for your Meta Pixel.
This feature securely hashes customer information, such as email addresses and phone numbers, to improve event matching and conversion tracking.
Once you’ve reviewed the settings, click Done to complete the Meta Pixel setup.
Note: This step is optional. You can leave the default settings unchanged if you don’t want to enable Automatic Advanced Matching.
Step 6: Copy the Meta Pixel ID
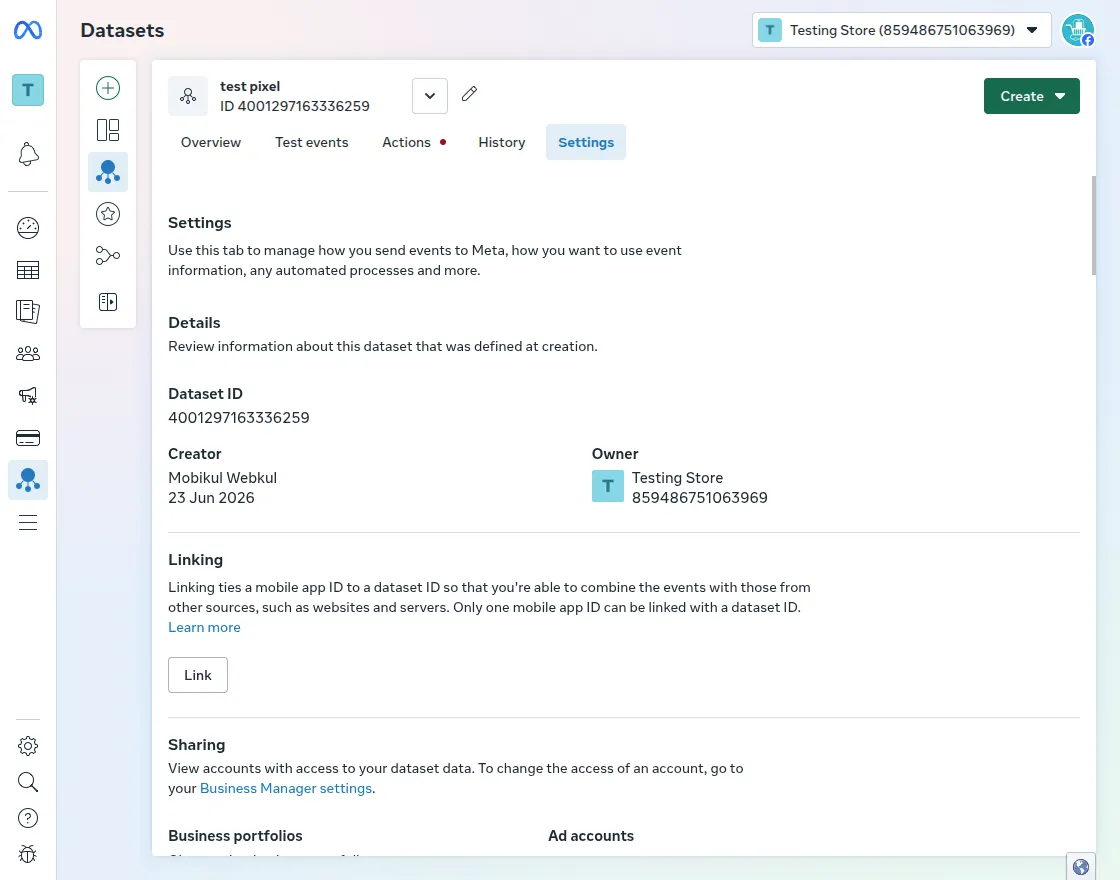
After the setup is complete, open the Settings tab of your newly created dataset.
Under the Details section, you’ll find the Dataset ID.
In the latest Meta Events Manager, the Dataset ID serves as the Meta Pixel ID. Copy this value and paste it into the Meta Pixel ID field under the Meta Pixel configuration in the Magento 2 extension.
Note: Meta has updated its interface and now manages website tracking through Datasets. If you don’t see a separate Pixel ID, use the Dataset ID instead.
How to Validate That the Google Tag Manager Extension Is Installed Correctly?
After configuring the Google Tag Manager (GTM) extension, it’s recommended to verify that your tracking is working correctly.
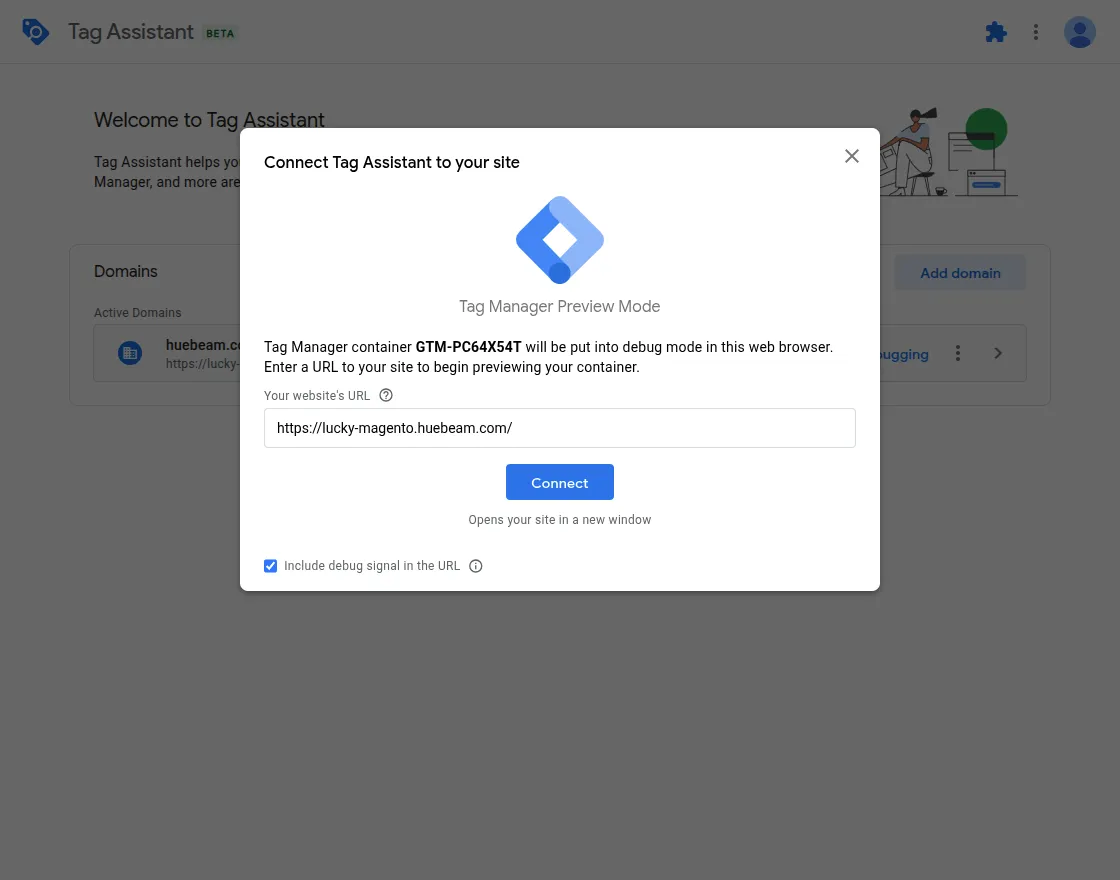
You can use Google Tag Assistant to ensure that your GTM container is loaded successfully and the required ecommerce events are being pushed to the dataLayer.
To get started, open Google Tag Assistant, click Add Domain, enter your store URL, and start a new debugging session as shown below.
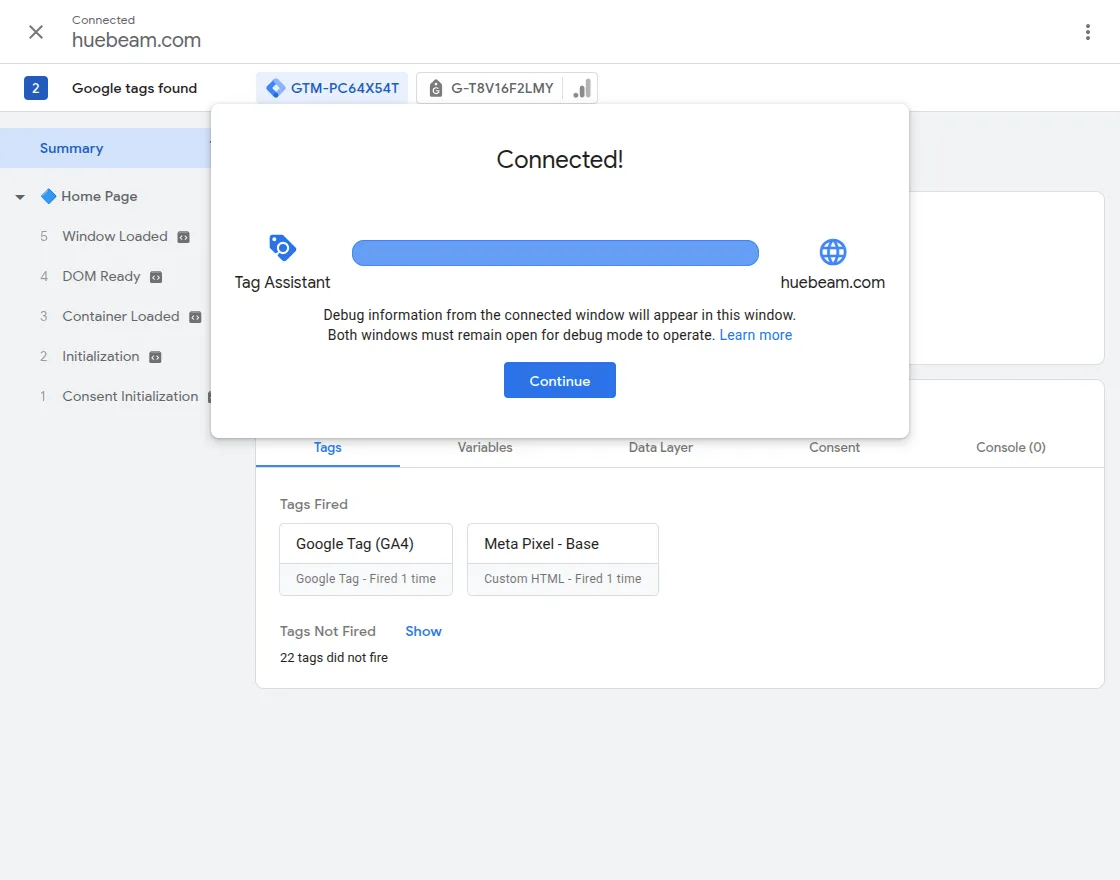
Once connected, Tag Assistant enters Debug Mode and displays all Google Tag Manager events triggered on your website, allowing you to verify that your ecommerce tracking is working correctly.
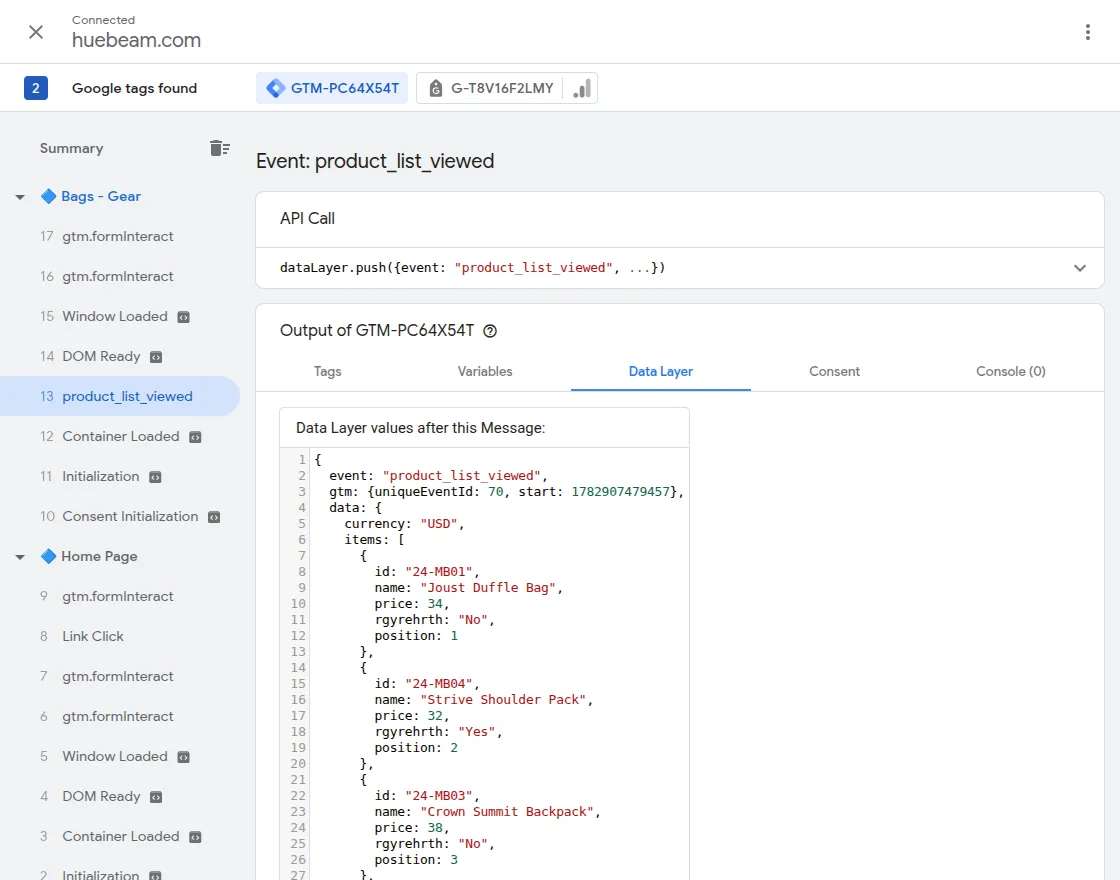
Category Page Tracking
On the Category page, verify that the view_item_list event is triggered with the correct product listing details, including the product ID, name, category, price, and position.
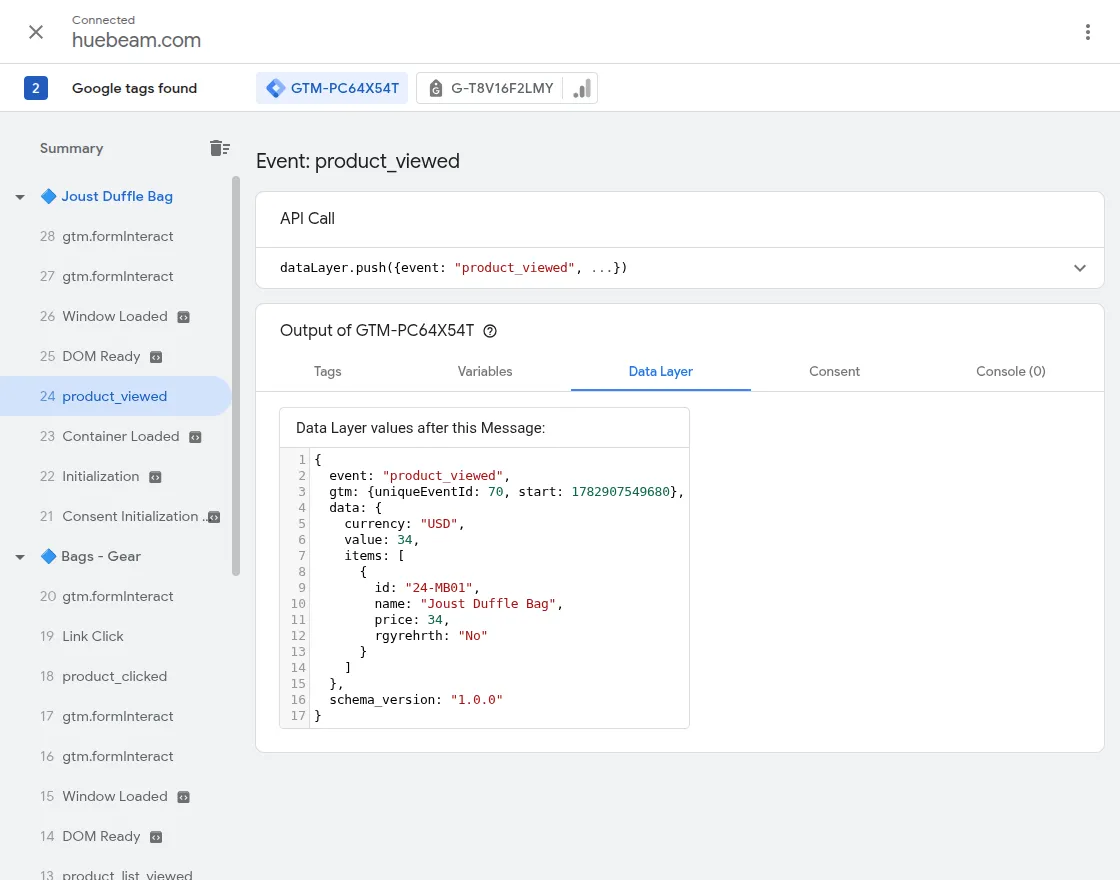
Product Page Tracking
Open any product page and verify that the view_item event is triggered with the correct product details, including the product ID, name, category, price, and other configured attributes.
Cart Page and Add to Cart Tracking
Add a product to the cart and verify that the add_to_cart and view_cart events are triggered with the correct product and cart details.
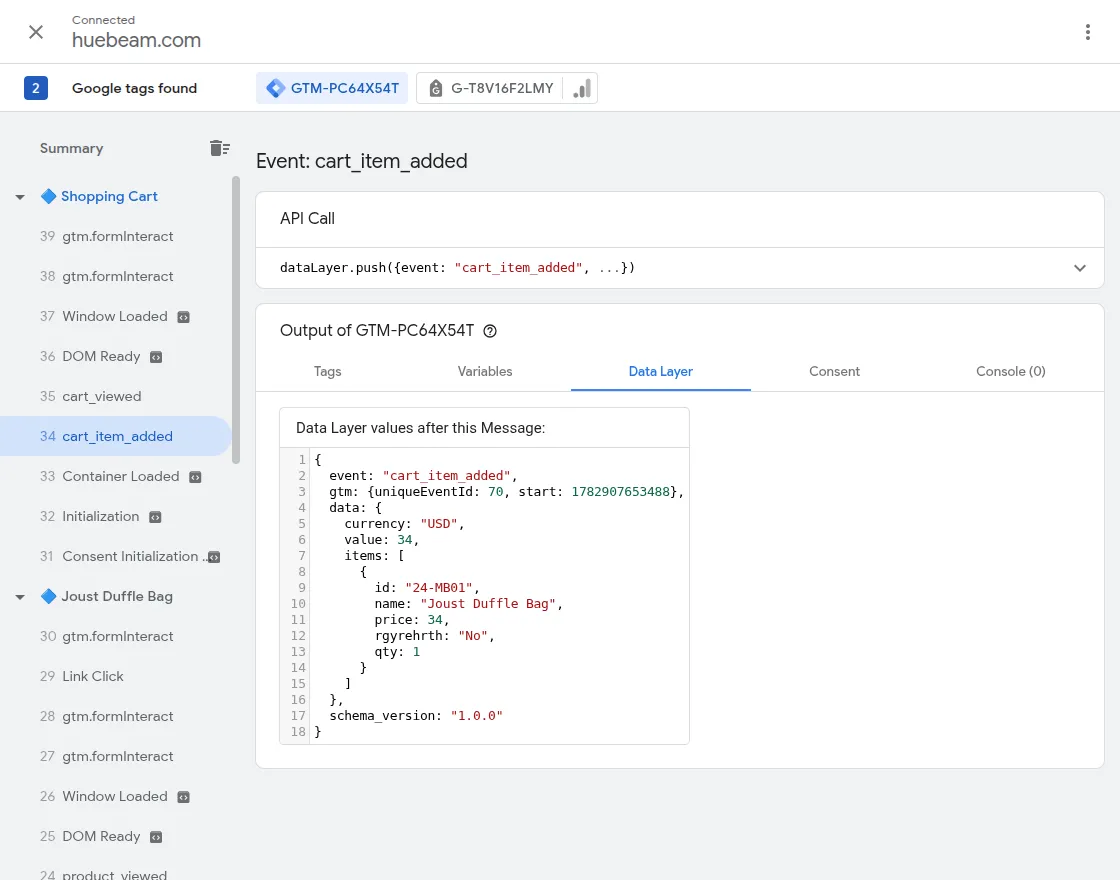
All tracked events are pushed to the Google Tag Manager dataLayer, allowing Google Analytics 4, Google Ads, and Meta Pixel to capture accurate ecommerce data.
Website Analytics Reports
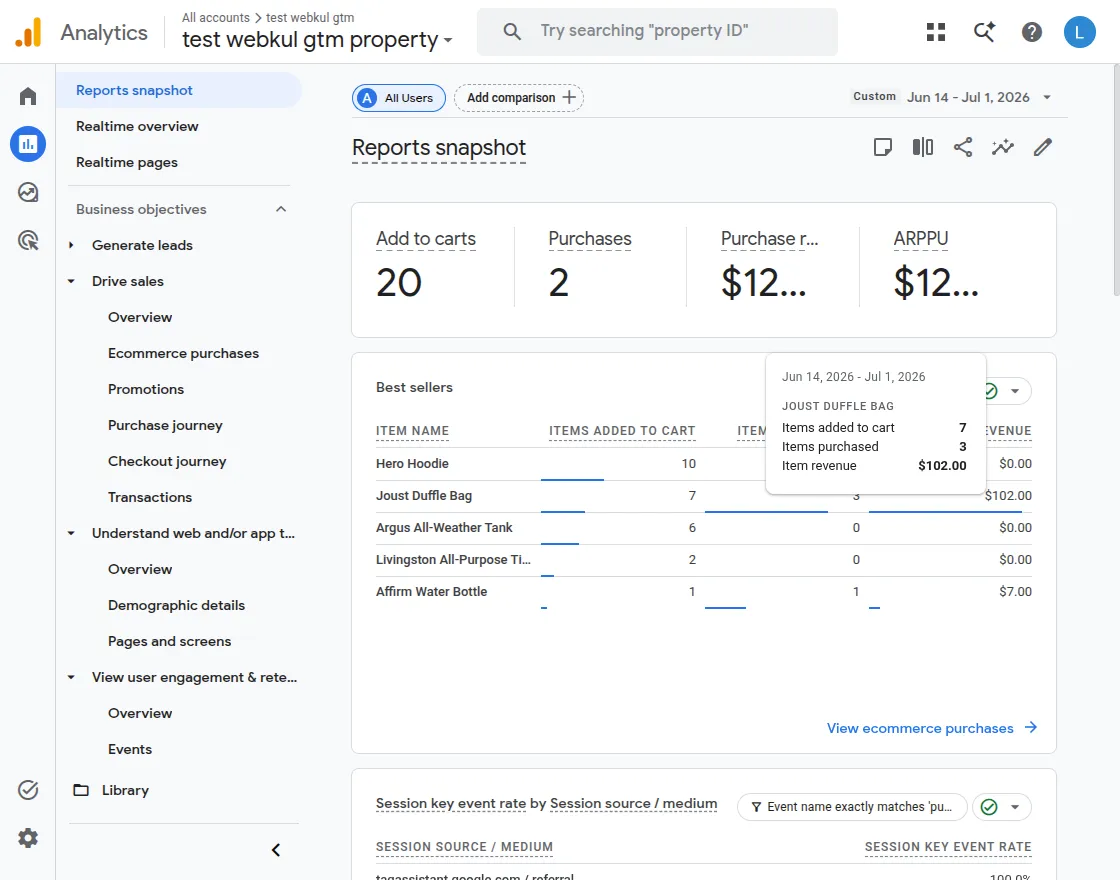
After configuring the extension and completing the integration, you can monitor your store’s performance using Google Analytics 4 reports.
E-commerce Overview
The E-commerce Overview report provides key metrics such as Revenue, Transactions, Conversion Rate, and Average Order Value to help you monitor your store’s overall performance.
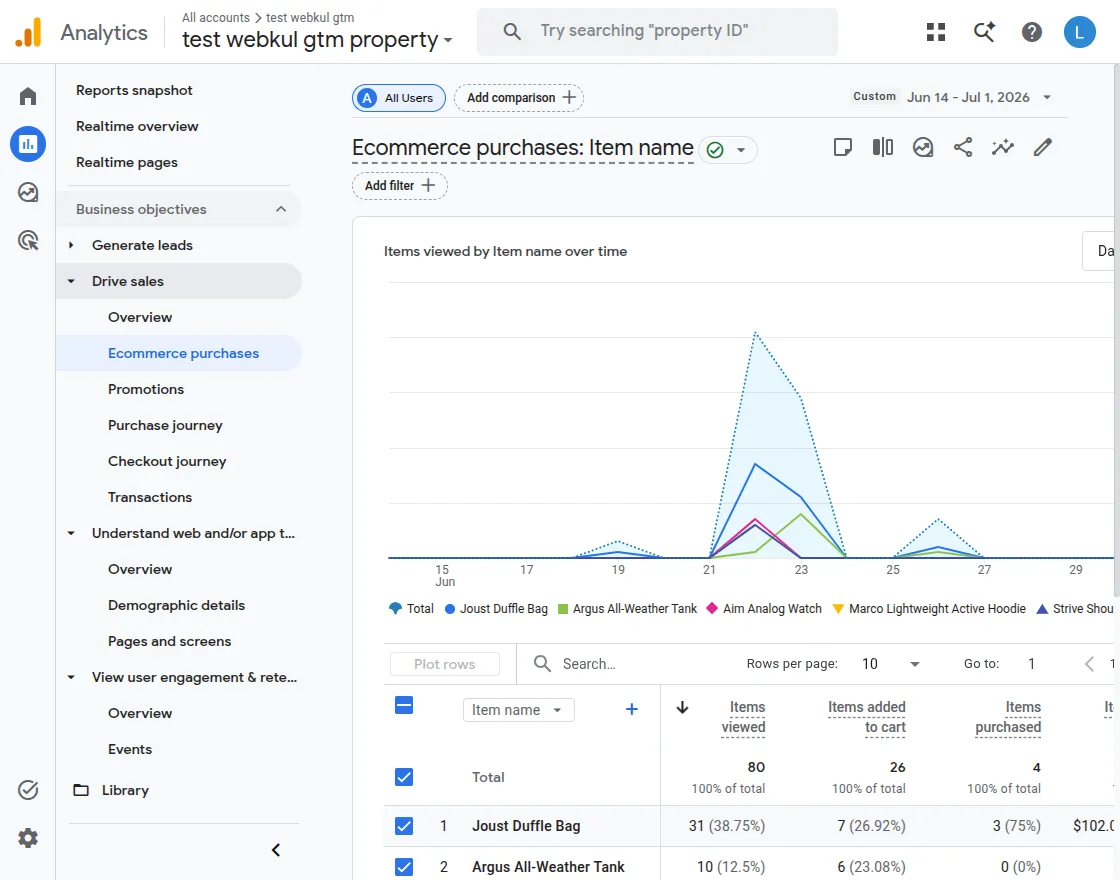
Ecommerce Purchases
The Ecommerce Purchases report shows key product metrics, including Items Viewed, Items Added to Cart, and Purchases, helping you measure product performance.
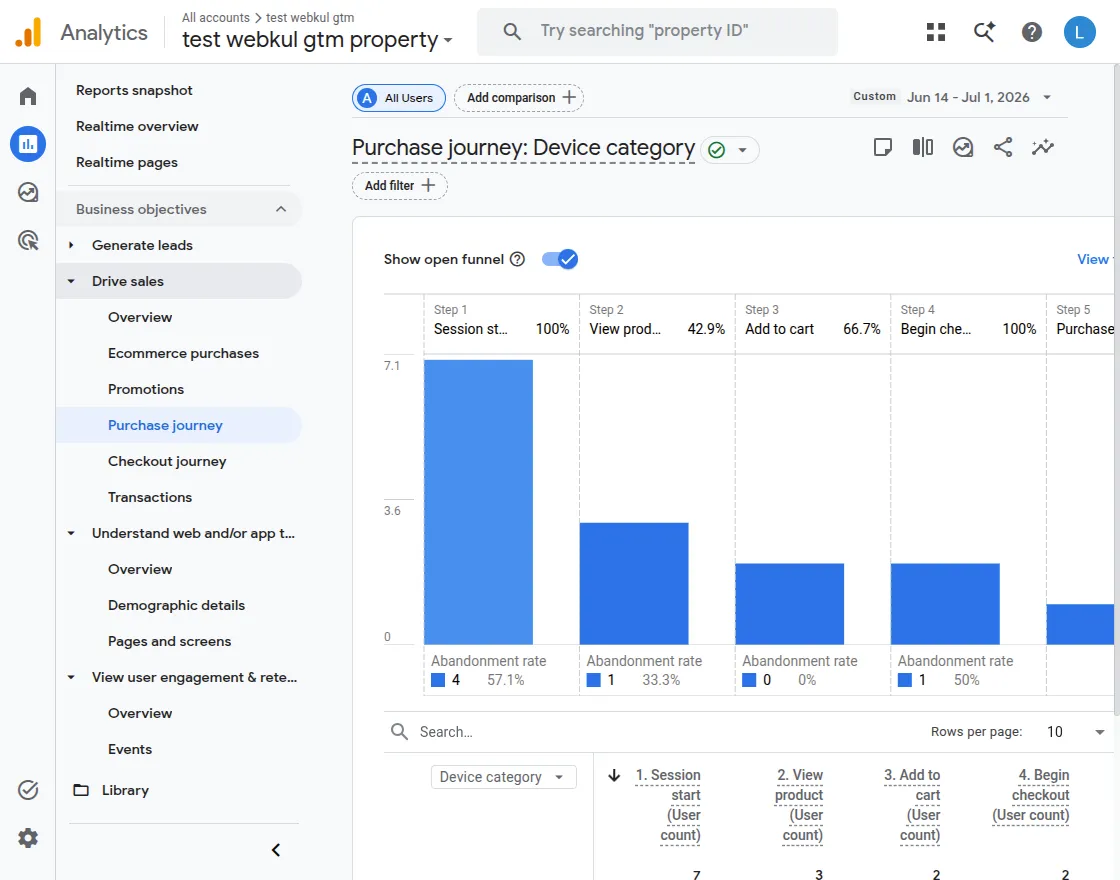
Purchase Journey
The Purchase Journey report shows the customer’s path from Product View to Add to Cart, Checkout, and Purchase, helping you identify drop-off points and optimize conversions.
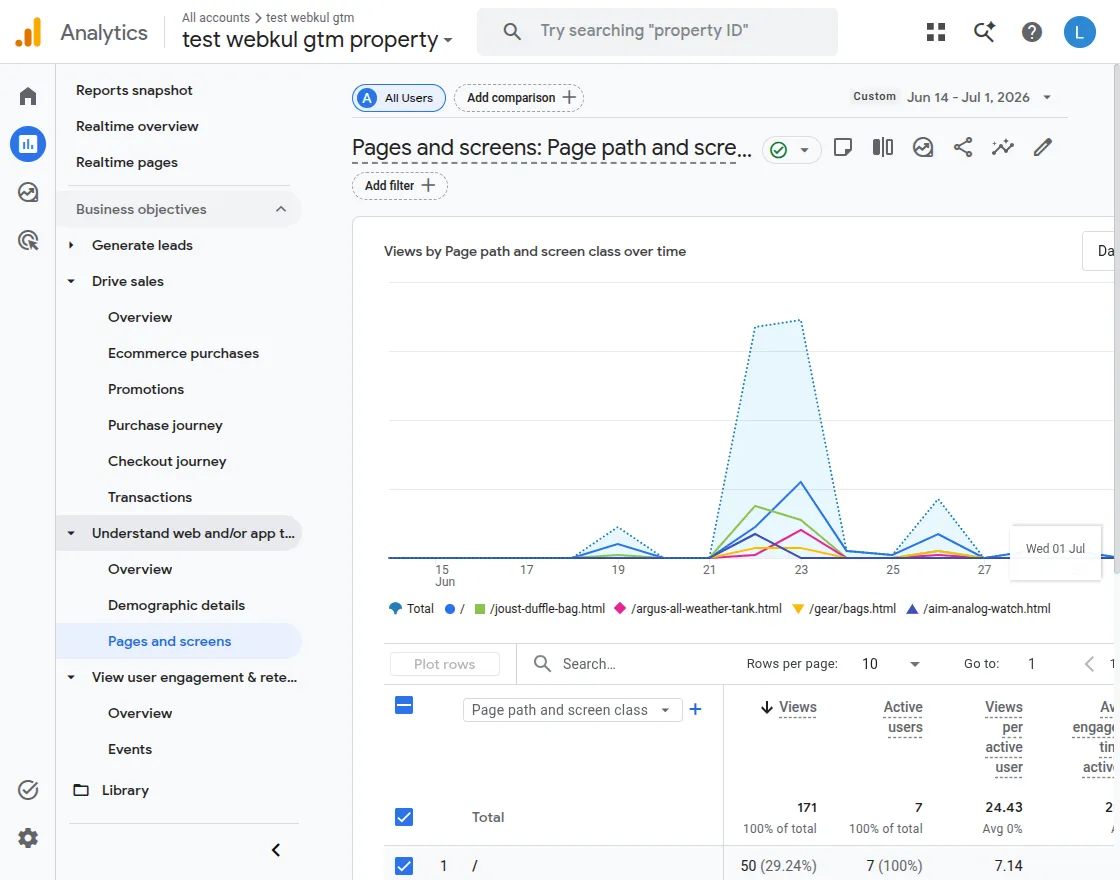
Pages and Screens
The Pages and Screens report shows your store’s most-visited pages, including page views and user engagement, helping you understand customer behavior and optimize your Magento 2 store.
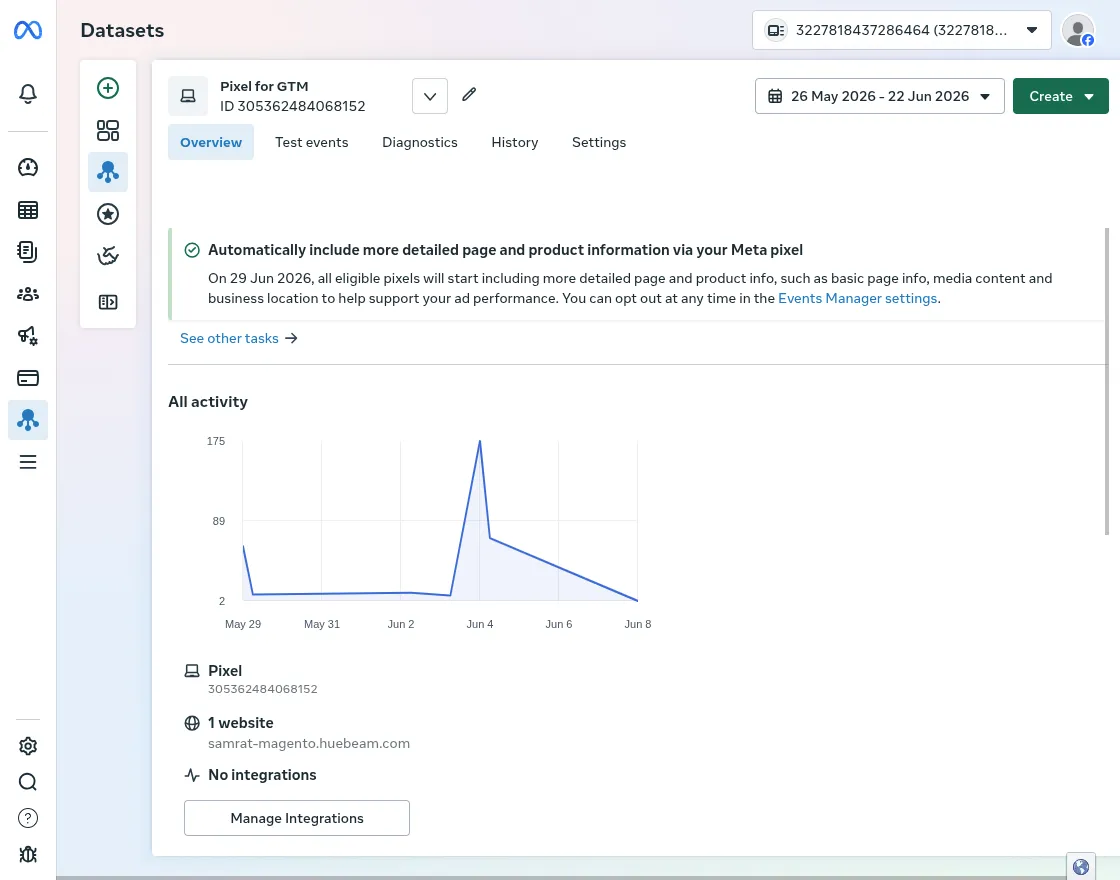
Meta Pixel – Frontend Event Tracking
After configuring the extension and connecting your Meta Pixel, you can verify that customer events are being tracked correctly in Meta Events Manager.
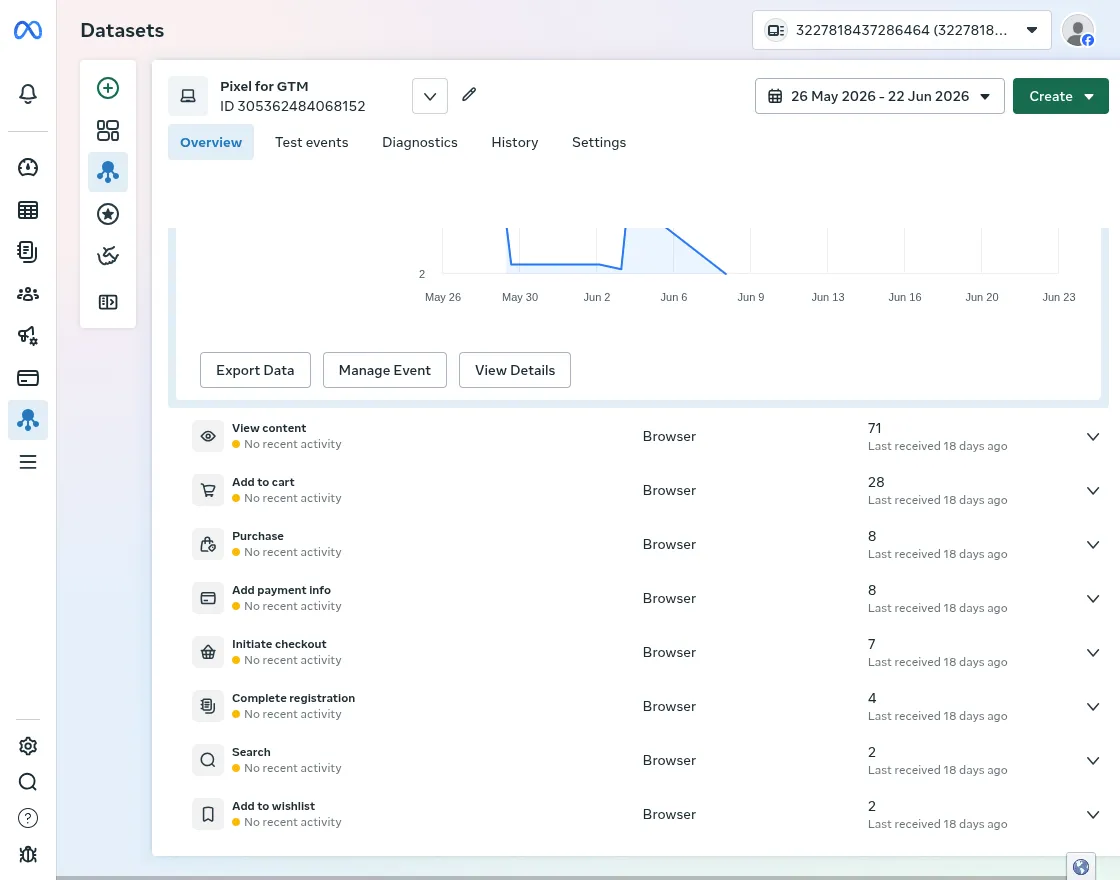
Sign in to your Meta Business account and open Events Manager. From the left panel, select your Dataset (Meta Pixel) and open the Overview tab.
Here, you can monitor all the events received from your Magento 2 store, such as Page View, View Content, Add to Cart, Initiate Checkout, and Purchase.
To view detailed information about a specific event, click the event name from the Recent Activity section.
The event details page displays valuable information, including the event time, parameters, customer information (if enabled), browser details, and other tracking data received by the Meta Pixel.
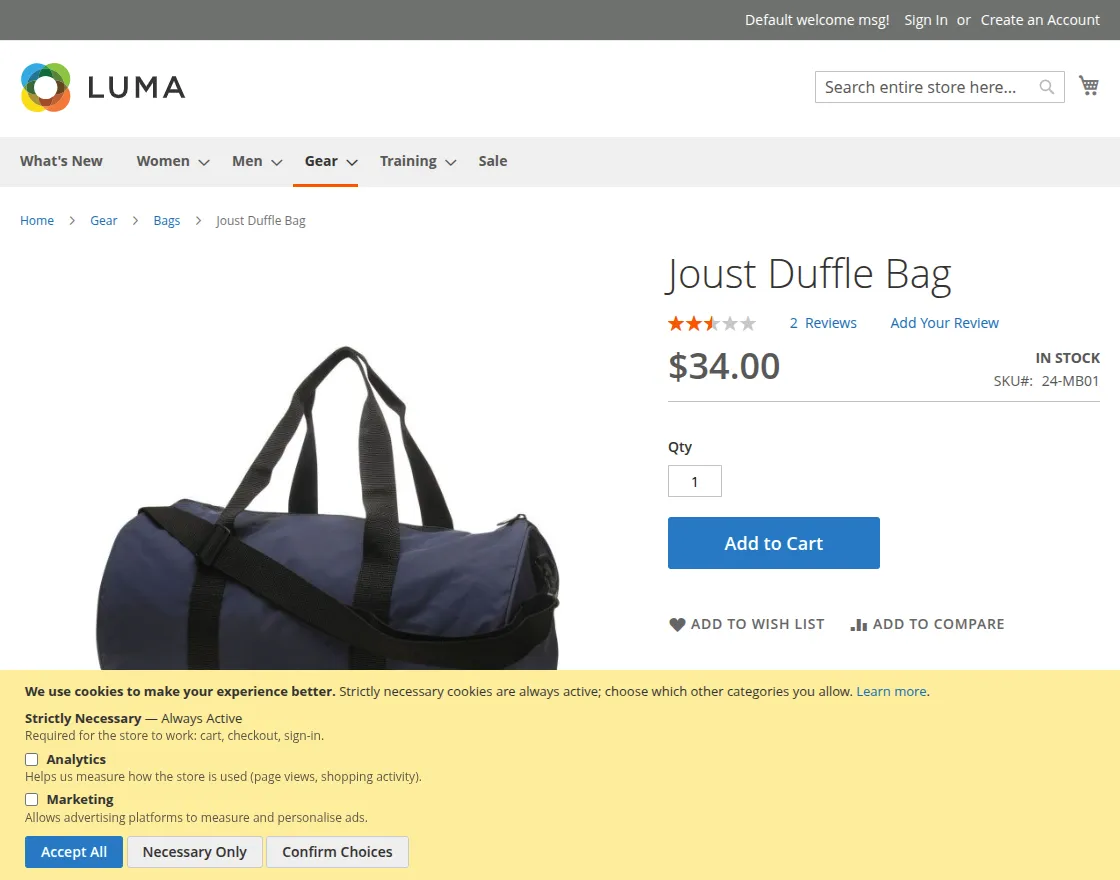
Cookie Consent
If the Cookie Consent feature is enabled, customer tracking is managed according to the selected consent preferences.
The extension sends events to Google Tag Manager, Google Analytics 4 (GA4), Google Ads, and Meta Pixel only for the categories that the customer has approved.
Verify Event in GTM Debug Mode
After opening your store, the GTM Debug panel displays all events triggered by customer interactions in real time.
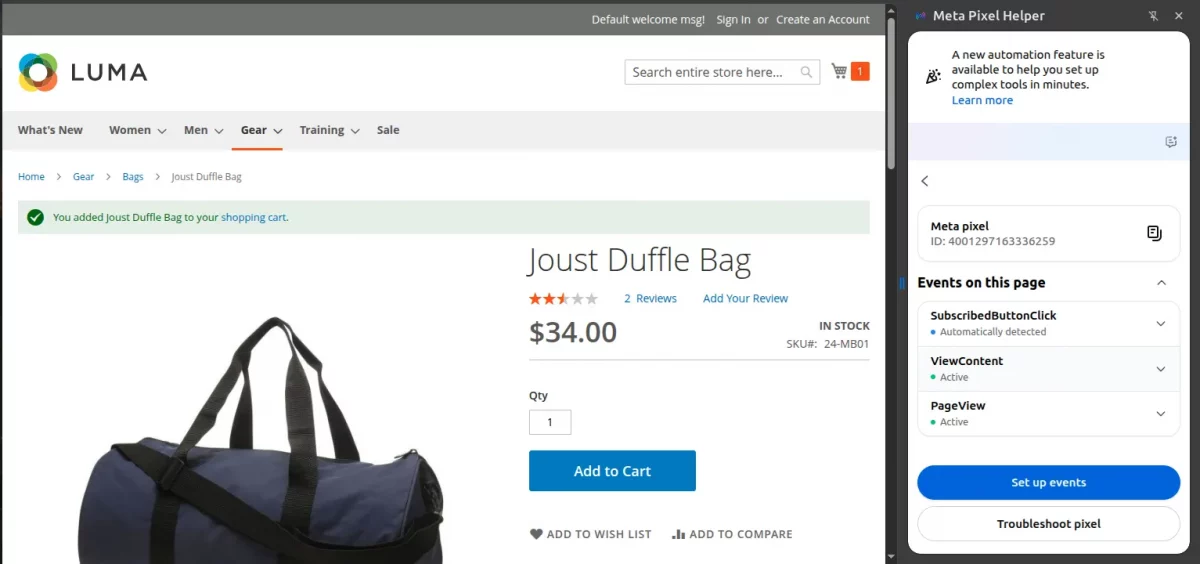
Verify Events for Meta Pixel
You can also verify that your Meta Pixel or Google Tag Manager events are firing correctly on individual pages of your Magento 2 store.
For quick event validation, use Google Tag Assistant or the Test Events section in Meta Events Manager to verify that your tracking events are firing correctly.
Note: Disable any ad blocker or browser privacy extension while testing, as they may prevent Google Tag Manager and Meta Pixel events from being detected correctly.
That’s all about the Magento 2 Google Tag Manager Extension.
We hope this guide helps you set up Google Tag Manager, Google Analytics 4 (GA4), Google Ads, and Meta Pixel.
Start tracking ecommerce events and customer behavior with confidence.
If you still have any issue feel free to add a ticket and let us know your views to make the module better https://webkul.uvdesk.com.
Explore our complete collection of Magento 2 extensions to enhance your store’s functionality, improve customer experience, and drive business growth.
Current Product Version - 4.0.4
Supported Framework Version - Magento 2.0.x, 2.1.x, 2.2.x,2.3.x, 2.4.x


greetings
I have a multivendor marketplace store, and the marketplace extension id of some other vendor.
1. Can I install this and will it be compatible.
2. I have a facility where customer can search a vendor. Can I get data from those pages also.