Magento 2 Gift Card extension will allow the admin to create gift cards/certificates using the gift card product type.
The admin can directly create multiple numbers of gift cards as products. The Admin can enable or disable the status of the gift card.
Admin can set the maximum number of days to redeem a Gift Card. Magento 2 Gift Card extension is useful for those who want to gift something to their friend, relative, or person electronically.
Note I: Only a single gift card/code can be used up within a single purchase.
II: Gift cards can not be applied during Multi-address checkout.
If you want to add the same functionality to your marketplace store, you can check the Magento 2 Multi Vendor Gift Card extension.
Check the plugin configuration and workflow –
Features
- Gift card product type included ensuring a smooth creation of gift cards via the admin panel.
- The admin can create multiple numbers of gift cards.
- The Admin can set the number of days to redeem a gift card.
- The Admin can enable or disable the Gift Card.
- Customers can use a complete or a certain amount of the gift card to make purchases.
- Gift card users can use one gift card on multiple purchases.
- Gift card users will get email notifications after each gift card usage.
- Customers can add personal messages while purchasing the gift card.
- This extension is compatible with the Hyva Theme.
- GraphQL has been implemented for the extension.
Install Extension from Webkul Store
#1 Download Module
Firstly, you need to log in to Webkul Store, go to My Account>My Purchased Products section, verify and then download and extract the contents of this zip folder on the system.
#2 Upload Folder
Once the module zip is extracted, follow path src>app and then copy the app folder into the Magento 2 (Adobe Commerce) root directory on the server as shown below:

#3 Run Commands
After uploading the module folder, you need to run the following commands in the Magento 2 (Adobe Commerce) root directory:
php bin/magento setup:upgrade
php bin/magento setup:di:compile
php bin/magento setup:static-content:deploy
php bin/magento setup:static-content:deploy
php bin/magento cache:flush
Install Extension from Magento Marketplace
If you have purchased this extension from the Magento Marketplace then please follow the below process or visit this link.
#1 Get Access Keys
You need to get access keys, navigate to My Profile in Magento Marketplace, then choose Access Keys in the My Products section.

Go to Magento 2 and then you need to copy both the Access Keys – Public Key and Private Key. These access keys will be needed in the next steps for authentication.

If access keys are not created earlier, click Create A New Access Key, enter any name and click OK.

#2 Update composer.json File
To know the component name and version number, go to your Magento Marketplace account section, My Profile>My Purchases, then find this extension to view the details.
Please note – Below is an example image, every extension will have its unique component name and version.

After that, navigate to your Magento project directory and update your composer.json file in the following format.
composer require <component-name>:<version>
For example, to install version 4.0.0 of this extension you need to run the following command:
composer require webkul/gift-card:4.0.0
#3 Enter Access Keys
Now you will need to enter the Access Keys that you obtained as explained in the first step #1 Get Access Keys.
Wait for Composer to finish updating your project dependencies and make sure there aren’t any errors.
#4 Run Command
You need to run the following commands:
php bin/magento setup:upgrade
php bin/magento setup:di:compile
php bin/magento setup:static-content:deploy
php bin/magento setup:static-content:deploy
php bin/magento cache:flush
Multi-Lingual Configuration
For Multilingual support, please navigate to Store>Configuration>General >Locale Options. And select your desired language from the Locale option.
Language Translation
If you need to do the Magento 2 Gift Card module translation, please navigate to the following path in your system app/code/Webkul/GiftCard/i18n.
Open the file named en_US.CSV for editing as shown in the below screenshot.

Once you have opened the file for editing. Replace the words after the comma(,) on the right with your translated words.

After editing and translating the CSV file, you need to save the translated file name according to your region language and country code such as – de_DE.CSV.
Then upload the translated file to the same folder from where you have obtained it. Now your Magento 2 Gift Card module translation is complete.

Module Configuration
After the successful installation of the module, the admin will navigate to Stores -> Configuration-> Gift Card.

General Setting
- Active – In this field, the admin will choose the active status ‘YES’ to enable the functionality for the store or either choose ‘NO’ to disable it.
Email Setting for Gift Card
- Notification Template– The admin has to set a template that the customer can view upon receiving the Gift card.
Left Amount Email Setting for Gift Card
- Name of Admin in Mail– The admin will set a name that is visible in the email received by the customer.
- Admin Email– The admin has to enter the email id from which the customer will receive the emails.
- Admin Left Amount Notification Template – The admin has to select the template for the left amount of the Gift Card which the customer will receive in an email from the admin.
Gift Card Text Messaging Setting
- Twilio Account SID – The admin has to enter the Twilio Account SID.
- Twilio Auth Token – The admin has to enter the Twilio Auth Token.
- Sender Mobile – The admin has to enter the sender’s mobile number.
Note: To generate the credentials and log in tap Twilio login.
Gift Card Active Duration
- No. of days – In this field, the admin has to set the number of days allowed to redeem a Gift Card.
Add Gift Card
Now the Admin will navigate to Products-> Catalog and then click on Add Product. On Add Product Admin has to select Gift Card product type.

Clicking the “Gift card” will bring up the page to add a Gift card. Now, enter all the required information as is required for a regular product as shown below in the snapshot below.

Frontend Workflow
Product Page
At the front end, on the Gift card product page, the customer enters the E-mail id of the person to whom he/she wants to send the Gift Card.
The Customer can also send a message to the one to whom he/she is sending the Gift Card. Then click on “Add to Cart” to go to the checkout as per the below snapshot.
Note – The email id that is entered under the “Email To” can be used to redeem the gift card.
Also, the user that is going to redeem the gift card should use the same email id for registering at the store else he/she won’t be able to redeem the gift card.

Selected Gift Card design images are shown on the Minicart, Cart, and Checkout page.

The customer can see the details of the gift card on the Order Review page as per the below snapshot.

Email Notification
After the order has been placed and the invoice of this order gets generated.
The person(whose e-mail address was entered) will receive the gift card on the same email ID as shown below in the snapshot.

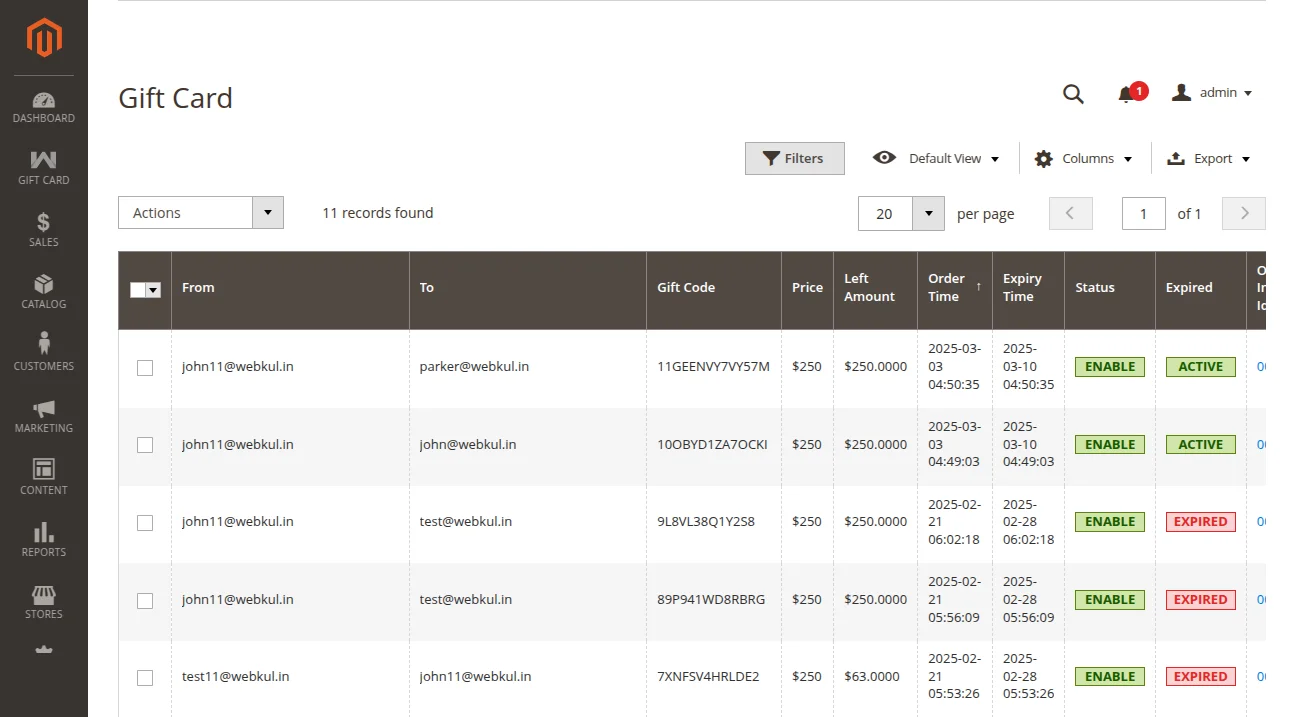
Gift Card Details – Admin Panel
Once the invoice has been generated the Admin can view gift card purchased details by navigating to Gift Card -> Gift Card Details.
From here the Admin can enable or disable the Gift Card status. If the Admin has disabled the status, then the Customer cannot apply the Gift Code received.
Using Gift Card Discount
Now, when this customer(receiving the Gift card code) makes a purchase using the registered email address(to which the Gift card is sent).
Then he/she can redeem the gift card amount at the cart page as shown below in the snapshot.
The Customer can use the entire discount amount or some of the amounts at the time of purchase.
For example: If the customer has a gift card of $1500 worth, then he can make use of all of it or use some of the amounts like $100 and keep the rest to use at a later time.

**Note: Only a single gift card/code can be used up within a single purchase.
After applying for the discount, the cart page looks as shown in the snapshot below.

The Customer can also clear the discount amount.
Order View
After completing the above-shown order, the customer will be able to see the Order details under “My Order” section as shown below.

The admin can also see the gift card details and other additional information related to the order under the Sales -> Order -> Order view as seen in the screenshot given below.
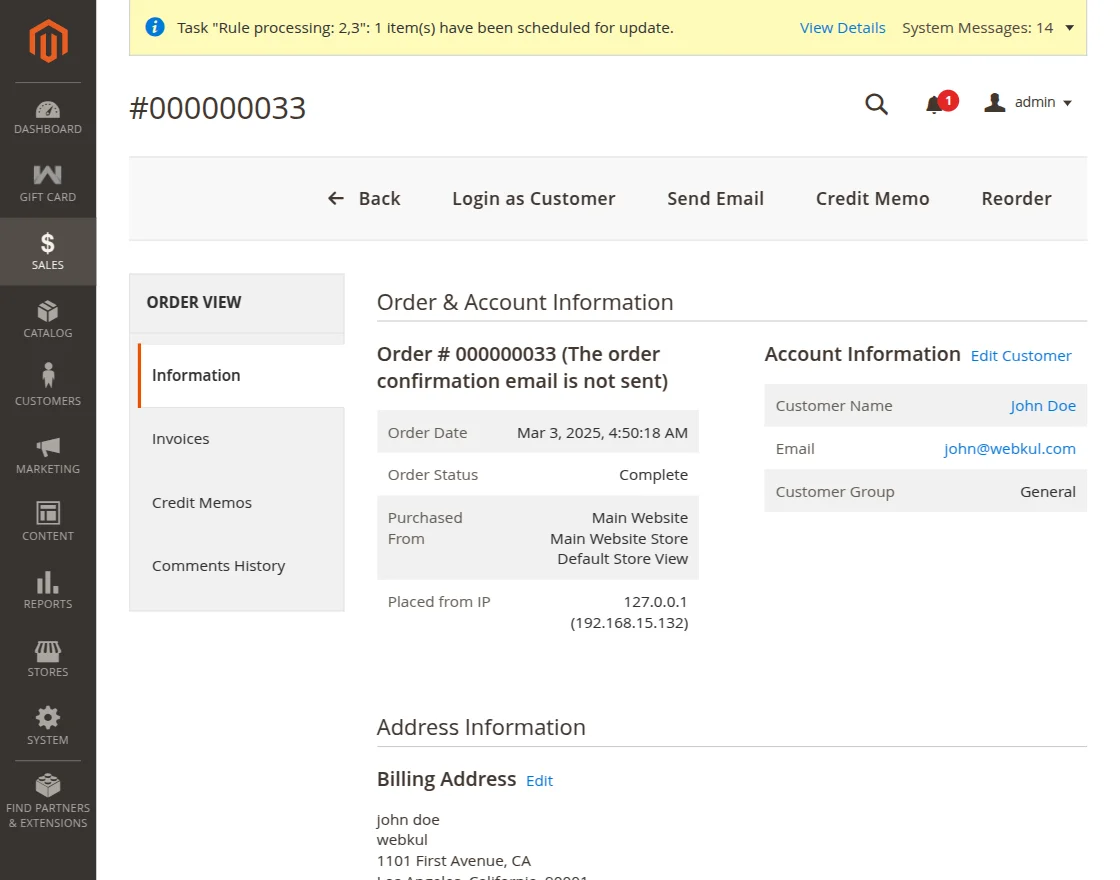
Admin can see all the information about the refunded orders, excluding gift cards (as the gift cards are non-refundable) under Sales -> Credit Memos -> Credit Memos View.

Gift Card Detail Page
Under the Gift Card Detail Page, the customer can see their all gift cards with their details.

Here, the customer can search for gift cards through email, gift code, by price, or through left amount.
- From: The email id will appear here from which the gift card is created.
- Gift code: The code of the gift card appears here.
- Price: The total value amount of the gift card will appear here.
- Left Amount: The amount which is left from the total value of the gift card will appear here.
Support
That’s all for the Gift Card for Magento 2 (Adobe Commerce) still have any issues feel free to add a ticket and let us know your views to make the module better https://webkul.uvdesk.com/en/
Explore the Adobe Commerce Cloud development service by Webkul. You may also browse other Magento 2 marketplace addons. Also our quality Magento 2 extensions.
Current Product Version - 4.0.6
Supported Framework Version - Magento 2.0.x, 2.1.x, 2.2.x,2.3.x, 2.4.x

2 comments
Thanks for your message!
The actual image size should be the default one for the Magento 2 itself that is used for the gift card. For any other query or requirements, suggestions kindly reach out to us directly at [email protected]
Warm Regards.