Introduction:Magento 2 functional Testing
Magento 2 functional Testing Framework is the best practice for QA and developers to test their module functionalities.
Here, I’ll explain how you can register in your Magento store if there are some extra fields on it.
I have tried it with Webkul’s best Magento add-on Multi-Vendor Marketplace. Which creates some custom attributes in the Magento default customer registration form.
Magento already provides Magento 2 functional Testing test cases for some basic functionalities like new customer creation, customer login, product creation, etc.
Here, I have written MFTF test cases for the Magento registration page which have 2 new fields one is text type and the other one is radio.
Create New Customer Account Page

For testing please set up all the required things as explained here. Magento has already provided a very well-explained User Guide for MFTF.
So, to learn MFTF please read Magento Functional Testing Framework Guide.
Note Please check the blog Prerequisite for Custom Modules with Magento Functional Testing Framework to learn the basic configurations you need to do before writing your custom module tests.
Here, I have written tests in multiple parts. It will be easy to write a test in this sequence.
Page The Magento 2 functional Testing uses a modified concept of [PageObjects], which models the testing areas of your page as objects within the code.
Section: Section is a standard file for defining UI elements on a page used in a test.
Data– Data entities are required for the user inputs for your HTML fields.
Action Group:It is used when you need to perform the same sequence of actions multiple times
Test: It is a Codeception test container that contains multiple individual tests.
I have created my test MFTF folder at the given path MagentoRoot/dev/tests/acceptance/tests/functional/Magento/FunctionalTest/Marketplace
Inside Magento 2 functional Testing folder there are 4 folders ActionGroup, Data, Section, and Test.
I am using an existing Magento page so, I have not created a Page folder and files related to that.
if you have any new pages to test then you must create a page folder as well.
Let’s start with the code
Page
First I need to create a page. I am using the Magento default registration page.
I do not need to create it again as Magento already provides it StorefrontCustomerCreatePage.xml in MagentoRoot/dev/tests/acceptance/tests/functional/Magento/FunctionalTest/Customer/Page.
Let’s see the code
<?xml version="1.0" encoding="UTF-8"?>
<!--
 /**
  * Copyright © Magento, Inc. All rights reserved.
  * See COPYING.txt for license details.
  */
-->

<pages xmlns:xsi="http://www.w3.org/2001/XMLSchema-instance"
        xsi:noNamespaceSchemaLocation="../../../../../../vendor/magento/magento2-functional-testing-framework/src/Magento/FunctionalTestingFramework/Page/etc/PageObject.xsd">
    <page name="StorefrontCustomerCreatePage" url="/customer/account/create/" area="storefront" module="Magento_Customer">
    <section name="StorefrontCustomerCreateFormSection"/>
    </page>
</pages>
The corresponding web page is generated by the Magento Customer module and is called by the baseUrl + backendName + customer/account/create/ URL.
The Storefront Customer Create Page declares only one [section]:
StorefrontCustomerCreateFormSection located in the
Customer/Section/StorefrontCustomerCreateFormSection.xml file
<section> contains the sequence of UI elements. Will explain the <section> in the next step.
Section
A section is a reusable part of a page. So, I have used the same section name and the same file name for my module section.
You’ll get the Magento default customer <section> file inside the MagentoRoot/dev/tests/acceptance/tests/functional/Magento/FunctionalTest/Customer/Section/StorefrontCustomerCreateFormSection.xml
Let’s see the code
<?xml version="1.0" encoding="UTF-8"?>
<!--
 /**
  * Copyright © Magento, Inc. All rights reserved.
  * See COPYING.txt for license details.
  */
-->

<sections xmlns:xsi="http://www.w3.org/2001/XMLSchema-instance"
        xsi:noNamespaceSchemaLocation="../../../../../../vendor/magento/magento2-functional-testing-framework/src/Magento/FunctionalTestingFramework/Page/etc/SectionObject.xsd">
    <section name="StorefrontCustomerCreateFormSection">
        <element name="firstnameField" type="input" selector="#firstname"/>
        <element name="lastnameField" type="input" selector="#lastname"/>
        <element name="emailField" type="input" selector="#email_address"/>
        <element name="passwordField" type="input" selector="#password"/>
        <element name="confirmPasswordField" type="input" selector="#password-confirmation"/>
        <element name="createAccountButton" type="button" selector="button.action.submit.primary" timeout="30"/>
    </section>
</sections>
A <section> name is a Unique section name identifier.
This <section> contains the sequence of UI elements in a section of the page MagentoRoot/dev/tests/acceptance/tests/functional/Magento/FunctionalTest/Customer/Page/StorefrontCustomerCreatePage.xml.
<element> is a UI element used in an action. Each element consists of a name, type, and selector.
<element> type is your HTML field type.
<element> selector is a CSS selector of your HTML field.
All the Signup fields selectors are here but my custom module’s fields are missing. So, I have created a file with the same name StorefrontCustomerCreateFormSection.xml inside.
MagentoRoot/dev/tests/acceptance/tests/functional/Magento/FunctionalTest/Marketplace/Section/StorefrontCustomerCreateFormSection.xml
Let’s see the code
<?xml version="1.0" encoding="UTF-8"?>
<!--
 /**
 * Webkul Software.
 * @category  Webkul
 * @package   Webkul_MarketplaceMFTF
 * @author    Webkul
 * @copyright Copyright (c) Webkul Software Private Limited (https://webkul.com)
 * @license   https://store.webkul.com/license.html
 */
-->

<sections xmlns:xsi="http://www.w3.org/2001/XMLSchema-instance"
        xsi:noNamespaceSchemaLocation="../../../../../../vendor/magento/magento2-functional-testing-framework/src/Magento/FunctionalTestingFramework/Page/etc/SectionObject.xsd">
    <section name="StorefrontCustomerCreateFormSection">
        <element name="becomeSellerRadioButton" type="radio" selector="#wantpartner" timeout="30"/>
        <element name="shopUrlField" type="input" selector="#profileurl"/>
    </section>
</sections>
Here you can see that I have created 2 new elements required for my custom fields with the name “becomeSellerRadioButton” and “shopUrlField“.>
I have used Magento default customer user data to create a customer. You can create your own customer data or can do changes in the existing Magento customer data in (MagentoRoot/dev/tests/acceptance/tests/functional/Magento/FunctionalTest/Customer/Data/CustomerData.xml).
if you are using Magento provided Magento 2 functional Testing code then you don’t need to write the same code again. You can write only additional data in your code.
Here are the Magento MFTF code files available:
MagentoRoot/dev/tests/acceptance/tests/functional/Magento/FunctionalTest/Customer
I have used some of the customer information from:
/dev/tests/acceptance/tests/functional/Magento/FunctionalTest/Customer/Data/CustomerData.xml
Let’s see the code
<?xml version="1.0" encoding="UTF-8"?>
<!--
 /**
  * Copyright © Magento, Inc. All rights reserved.
  * See COPYING.txt for license details.
  */
-->

<entities xmlns:xsi="http://www.w3.org/2001/XMLSchema-instance"
        xsi:noNamespaceSchemaLocation="../../../../../../vendor/magento/magento2-functional-testing-framework/src/Magento/FunctionalTestingFramework/DataGenerator/etc/dataProfileSchema.xsd">
    <entity name="CustomerEntityOne" type="customer">
        <data key="group_id">0</data>
        <data key="default_billing">defaultBillingValue</data>
        <data key="default_shipping">defaultShippingValue</data>
        <data key="confirmation">confirmationData</data>
        <data key="created_at">12:00</data>
        <data key="updated_at">12:00</data>
        <data key="created_in">createdInData</data>
        <data key="dob">01-01-1970</data>
        <data key="email" unique="prefix">[email protected]</data>
        <data key="firstname">John</data>
        <data key="lastname">Doe</data>
        <data key="middlename">S</data>
        <data key="password">Admin123</data>
        <data key="prefix">Mr</data>
        <data key="suffix">Sr</data>
        <data key="gender">0</data>
        <data key="store_id">0</data>
        <data key="taxvat">taxValue</data>
        <data key="website_id">0</data>
        <requiredEntity type="address">CustomerAddressSimple</requiredEntity>
        <data key="disable_auto_group_change">0</data>
        <!--requiredEntity type="extension_attribute">ExtensionAttributeSimple</requiredEntity-->
    </entity>
    <entity name="Simple_US_Customer" type="customer">
        <data key="group_id">0</data>
        <data key="default_billing">true</data>
        <data key="default_shipping">true</data>
        <data key="email" unique="prefix">[email protected]</data>
        <data key="firstname">John</data>
        <data key="lastname">Doe</data>
        <data key="password">pwdTest123!</data>
        <data key="store_id">0</data>
        <data key="website_id">0</data>
        <requiredEntity type="address">US_Address_TX</requiredEntity>
    </entity>
    <entity name="Simple_US_Customer_For_Update" type="customer">
        <var key="id" entityKey="id" entityType="customer"/>
        <data key="firstname">Jane</data>
    </entity>
</entities>
Magento has provided all the default customer information in the “CustomerData.xml” file.
Now here I have used only some of them like first name, last name, email, and password.
You can change these data according to your need.
<data key=”email” unique=”prefix”>[email protected]</data>
email defines the customer email address [email protected] with a unique prefix. Example: [email protected].
I have created a separate data file with the name “SellerData.xml” in
MagentoRoot/dev/tests/acceptance/tests/functional/Magento/FunctionalTest/Marketplace/Data to put the remaining data for my custom fields
Let’s see the code-
<?xml version="1.0" encoding="UTF-8"?>
<!--
 /**
 * Webkul Software.
 * @category  Webkul
 * @package   Webkul_MarketplaceMFTF
 * @author    Webkul
 * @copyright Copyright (c) Webkul Software Private Limited (https://webkul.com)
 * @license   https://store.webkul.com/license.html
 */
-->

<entities xmlns:xsi="http://www.w3.org/2001/XMLSchema-instance"
        xsi:noNamespaceSchemaLocation="../../../../../../vendor/magento/magento2-functional-testing-framework/src/Magento/FunctionalTestingFramework/DataGenerator/etc/dataProfileSchema.xsd">
    <entity name="SellerEntityOne" type="seller">
        <data key="shopurl" unique="prefix">garment</data>
    </entity>
</entities>
In the customized signup form, I have 2 new input types radio and text. In input type “radio”
I need to fill the new text field “profileurl” in the signup form. So, I need to create separate data for it and I have created <data> key “shopurl”.
“SellerEntityOne” is the name of the element <entity>. <entity> “type” is used later to find specific persistence.
<data> key “shopurl” defines the seller’s shopurl code garment with a unique prefix. Example: 598123365garment.
Action Group
I have created an <actionGroup> file “StorefrontCreateSellerActionGroup.xml” inside MagentoRoot/dev/tests/acceptance/tests/functional/Magento/FunctionalTest/Marketplace/ActionGroup
As I need to create sellers frequently for testing. I can reuse this group of action.
Let’s see the code
<?xml version="1.0" encoding="UTF-8"?>
<!--
 /**
 * Webkul Software.
 * @category  Webkul
 * @package   Webkul_MarketplaceMFTF
 * @author    Webkul
 * @copyright Copyright (c) Webkul Software Private Limited (https://webkul.com)
 * @license   https://store.webkul.com/license.html
 */
-->

<actionGroups xmlns:xsi="http://www.w3.org/2001/XMLSchema-instance"
        xsi:noNamespaceSchemaLocation="../../../../../../vendor/magento/magento2-functional-testing-framework/src/Magento/FunctionalTestingFramework/Test/etc/actionGroupSchema.xsd">
    <actionGroup name="StorefrontCreateSeller">
        <arguments>
            <argument name="customer" defaultValue="customer"/>
            <argument name="seller" defaultValue="seller"/>
        </arguments>
        <amOnPage stepKey="signupPage" url="customer/account/create/"/>
        <waitForPageLoad stepKey="pageLoadBeforeLogin"/>
        <fillField stepKey="fillFirstName" userInput="{{customer.firstname}}" selector="{{StorefrontCustomerCreateFormSection.firstnameField}}"/>
        <fillField stepKey="fillLastName" userInput="{{customer.lastname}}" selector="{{StorefrontCustomerCreateFormSection.lastnameField}}"/>
        <fillField stepKey="fillEmail" userInput="{{customer.email}}" selector="{{StorefrontCustomerCreateFormSection.emailField}}"/>
        <click stepKey="clickBecomSellerRadioButton" selector="{{StorefrontCustomerCreateFormSection.becomeSellerRadioButton}}"/>
        <waitForAjaxLoad time="3" stepKey="waitForAjaxResponse" after="clickBecomSellerRadioButton"/>
        <fillField stepKey="shopUrl" userInput="{{seller.shopurl}}" selector="{{StorefrontCustomerCreateFormSection.shopUrlField}}"/>
        <fillField stepKey="fillPassword" userInput="{{customer.password}}" selector="{{StorefrontCustomerCreateFormSection.passwordField}}"/>
        <fillField stepKey="fillConfirmPassword" userInput="{{customer.password}}" selector="{{StorefrontCustomerCreateFormSection.confirmPasswordField}}"/>
        <click stepKey="clickCreateAccountButton" selector="{{StorefrontCustomerCreateFormSection.createAccountButton}}"/>
        <wait time="3" stepKey="waitForPageLoad" after="clickCreateAccountButton"/>
        <waitForPageLoad stepKey="pageLoadAfterLogin"/>
        <see stepKey="seeWelcomeMessage" userInput="Thank you for registering with Main Website Store."/>
    </actionGroup>
</actionGroups>
name “StorefrontCreateSeller” is the identifier of the action group.
The <arguments> element is a wrapper for an array of <argument> elements.
<argument> name is identifier of an argument in the scope of the corresponding action group.
<argument> defaultValue provides a default data value. Here, I have used 2 defaultValue-
“customer” from MagentoRoot/dev/tests/acceptance/tests/functional/Magento/FunctionalTest/Customer/DataCustomerData.xml. Its defined as type=“customer”
<entity name=”CustomerEntityOne” type=”customer”>
“seller” from MagentoRoot/dev/tests/acceptance/tests/functional/Magento/FunctionalTest/Marketplace/SellerData.xml. Its defined as type=”seller”
<entity name=”SellerEntityOne” type=”seller”>
The rest of the elements are action elements that are predefined.
Test
I have created test file “StorefrontSellerCreateTest.xml” inside MagentoRoot/dev/tests/acceptance/tests/functional/Magento/FunctionalTest/Marketplace/Test
Let’s see the code
<?xml version="1.0" encoding="UTF-8"?>
<!--
 /**
 * Webkul Software.
 * @category  Webkul
 * @package   Webkul_MarketplaceMFTF
 * @author    Webkul
 * @copyright Copyright (c) Webkul Software Private Limited (https://webkul.com)
 * @license   https://store.webkul.com/license.html
 */
-->

<tests xmlns:xsi="http://www.w3.org/2001/XMLSchema-instance"
        xsi:noNamespaceSchemaLocation="../../../../../../vendor/magento/magento2-functional-testing-framework/src/Magento/FunctionalTestingFramework/Test/etc/testSchema.xsd">
    <test name="StorefrontSellerCreateTest">
        <annotations>
            <features value="Seller Creation"/>
            <stories value="Create a Seller via the Storefront"/>
            <title value="You should be able to create a seller via the storefront"/>
            <description value="You should be able to create a seller via the storefront."/>
            <severity value="CRITICAL"/>
            <testCaseId value="WEBKULMP-00001"/>
            <group value="sellercreate"/>
        </annotations>
        <actionGroup stepKey="FrontCreateSeller" ref="StorefrontCreateSeller">
        <argument name="customer" value="CustomerEntityOne"/>
        <argument name="seller" value="SellerEntityOne"/>
        </actionGroup>
    </test>
</tests>
The <test> name is a unique identifier of your test.
<annotations> are essentially comments in the code. For more details please click here.
Here, I have used my <actionGroup> and reference to “StorefrontCreateSeller” name from
MagentoRoot/dev/tests/acceptance/tests/functional/Magento/FunctionalTest/Marketplace/ActionGroup/StorefrontCreateSellerActionGroup.xml
<group value=”sellercreate”/> is used to run the particular test for this action group only.
Configuration
Now, you need to configure .env file under MagentoRoot/dev/tests/acceptance. For the configuration, and for getting started please refer MFTF getting started guideline.
Commands Required to Run
After completing all the codes. You need to run the Selenium server in the terminal
java -jar <path_to_selenium_directory>/selenium-server-standalone-<version>.jar
Now go inside your MagentoRoot/dev/tests/acceptance and generate your tests using the command
vendor/bin/robo generate:tests
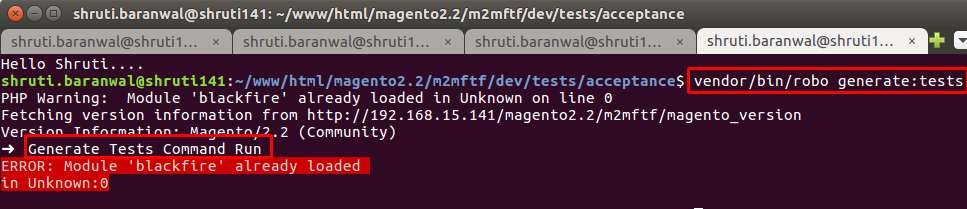
Now, you can see a folder created with the name _generated inside MagentoRoot/dev/tests/acceptance/tests/functional/Magento/FunctionalTest
and run the command on the terminal to run your generated test
vendor/bin/robo group GroupValue
in my case, I ran the command vendor/bin/robo group sellecreate

To check your test case report with allure please run the command vendor/bin/robo allure2:open


That’s all about the MFTF for the custom signup form.
Get in touch
If you need any other information, then please drop an email at [email protected]. Also, visit our useful Magento 2 extensions
Current Product Version - 1.0.0

Be the first to comment.