Magento 2 B2B Sales Representative can manage products on behalf of the store owner. It is the sales representative who will be responsible for meeting sales and marketing targets.
It becomes easy for the customers as they will not have to make efforts to get in touch with the admin of a store. They can simply contact the sales rep for a product or quote-related queries.
Through Magento 2 Sales Rep extension, the admin can create Sales Representatives and assign them to products or categories.
Afterwards, the customers may request a quote for a product(s). The sales rep assigned for that product shall take care or manage the quote request.
It is the right customers that the sales rep must look for so as to generate sales. In conclusion, it will turn real revenue for the store.
In other words, in this way, the sales rep builds the customers’ trust and create happy customers.
Note:
- This module is dependent on our Magento 2 Pricelist module. One must need to install the pricelist module so as to avail its functionalities.
- This module is not supported for Bundle and grouped product.
Features
- Admin can create multiple sales representatives.
- The default sales rep for a category and product can be set by the admin.
- If no sales rep is created, then the admin himself is the sales rep.
- The admin can assign roles such as Manager, sales rep, administrator, etc, to the sales reps.
- A team can be allocated to a sales rep by the admin.
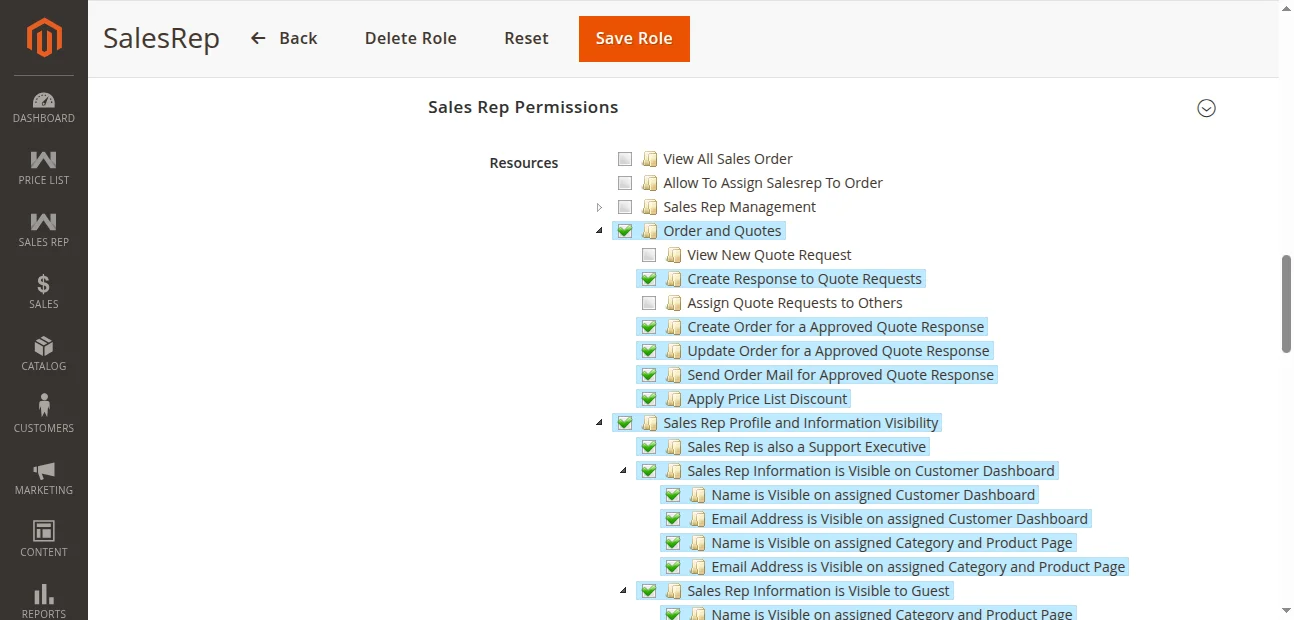
- The admin may assign permissions to the sales rep.
- The sales rep’s activities can be viewed by the admin.
- Admins and sales reps also have their own sales rep dashboard.
- The admin assigns sales reps to the quote requests.
- A dedicated sales rep can be assigned manually or automatically.
- The Sales Reps are visible on category & product pages.
- Sales Representative have the leverage to manage their quotes and messages.
- Also, the Sales Rep can create quote responses for customer quotes.
- The report for each Sales Rep is generated.
- Customers can create quotes requests for products.
- The customers can have a dedicated sales rep.
- The customer can message a sales rep regarding quote requests.
- Sales Representatives can assign order quotations to another representative.
- This extension is compatible with the Hyva Theme.
- The extension is compatible with GraphQL.
Installation
Customers will get a zip folder and they have to extract the contents of this zip folder on their system. The extracted folder has an src folder, inside the src folder you have the app folder.
You need to transfer this app folder into the Magento2 root directory on the server as shown below.

After the successful installation, you have to run these commands in the Magento2 root directory.
php bin/magento setup:upgrade
php bin/magento setup:di:compile
php bin/magento setup:static-content:deploy
php bin/magento indexer:reindex
php bin/magento cache:flush
After running the commands, you have to flush the cache from the Magento admin panel by navigating through->System->Cache management as shown below.
Language Translation
For translating the module language, navigate through src/app/code/Webkul/Salesrep/i18n and edit the en_US.csv file.
Thereafter, rename the CSV as “en_SA.csv” and translate all right side content after the comma in the Arabic language. After editing the CSV, save it.
Then upload it to the path src/app/code/Webkul/Salesrep/i18n where the Magento2 is installed on the server. The module gets translated into the Arabic Language. It supports both RTL and LTR languages.
Configuration: Magento 2 Sales Representative
After that, On successfully installing the Magento 2 Sales Rep extension, the admin can set the configurations by navigating through the Sales Rep > Settings > Sales Rep tab.
Moreover, Under the Sales Rep tab, the admin can configure the settings for “Sales rep Settings, Dedicated Sales rep, Default Sales rep, Managers and Team, Mail and Sales Rep Emails tabs.”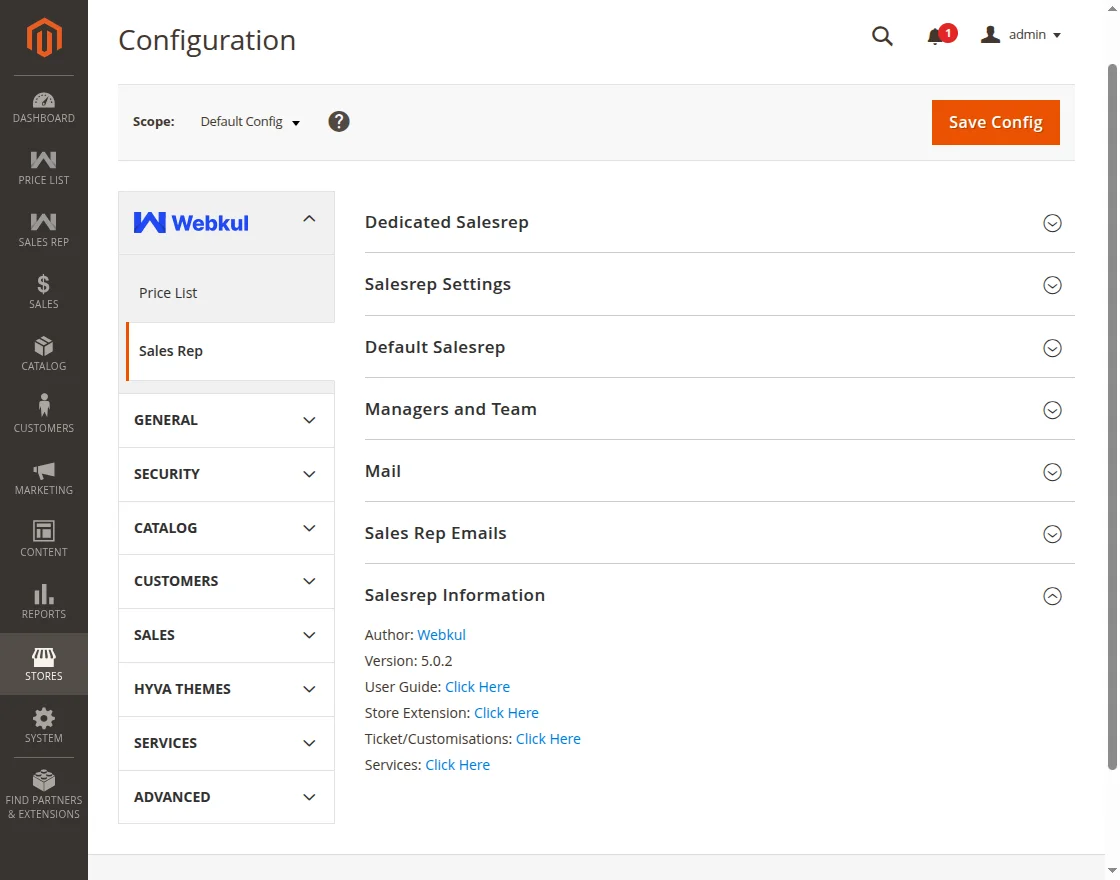
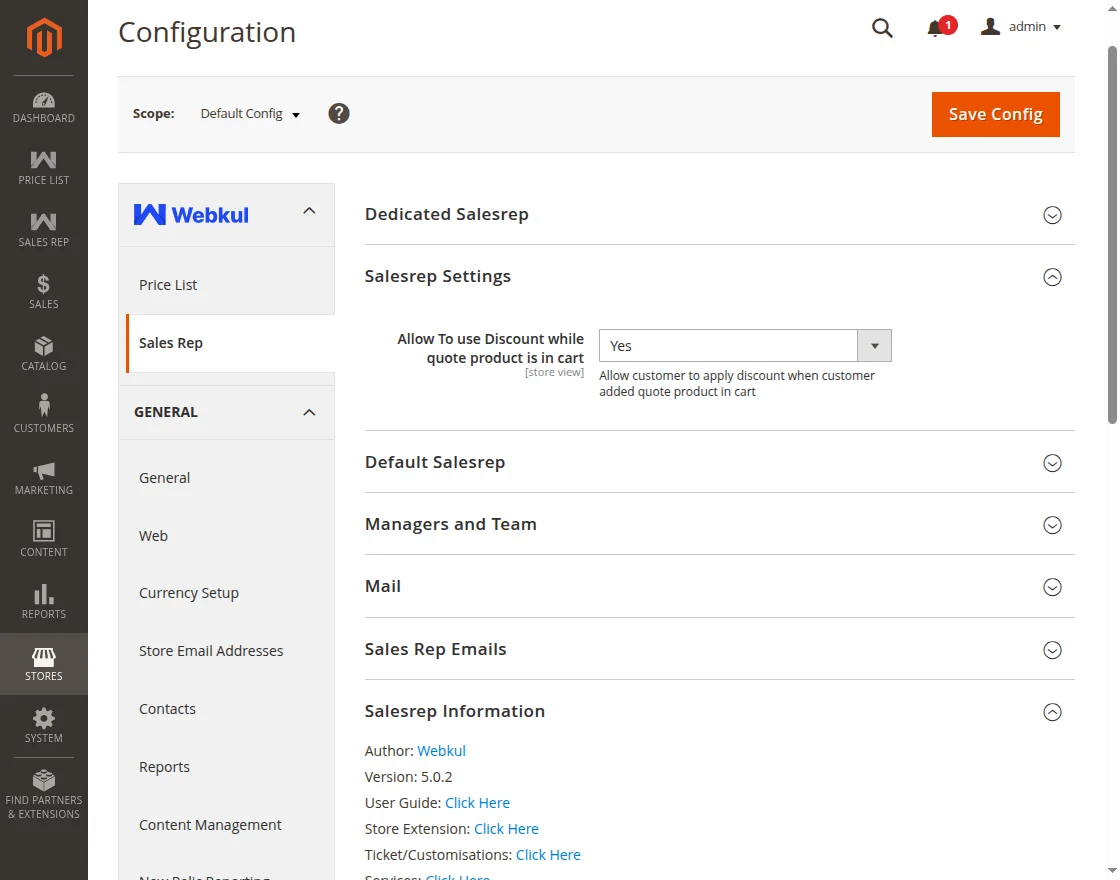
Sales rep Settings:
The Salesrep Settings tab includes the “Allow To use Discount while the quote product is in the cart” tab as shown in the image below.
The admin may choose the options Yes and No against the “Allow To use Discount while the quote product is in the cart” tab.
If set Yes then some discount will be applicable on the cart for the selected product. Thereafter, if chosen No then no discount will be applicable.
Dedicated Salesrep:
The Dedicated Salesrep tab includes the “Assign Manually” tab and the “Assign As” tab as shown in the image below.
The admin may choose the options as Yes and No against the “Assign Manually” tab.
If chosen as Yes against the Assign Manually tab, the “Assign As” tab is not visible and the admin will have to manually assign the Sales Representatives manually for each quote request.
Thereafter, If chosen as No against the Assign Manually tab, the “Assign As” tab shall be visible, against which the admin can select any of the three given options-
“Default Product Sales Rep, Default Category Sales Rep, or First contacted sales Rep.”
- Product Sales Rep: Sales Representative assigned to the Products.
- Category Sales Rep: Sales Representative Assigned to the Category.
- First Contacted Sales Rep: The Sales Representative which was initially contacted.
Default Salesrep:
Under the Default Salesrep tab, the “Category Sales Rep” and the “Product Sales Rep” tabs are present as shown in the image below.
Category Sales Rep tab includes a list of representatives which are assigned for the categories present in the frontend.
Hence, If the admin selects No against the Assign Manually tab under Dedicated Sales Rep and chooses Default Category Sales Rep against the “Assign As”.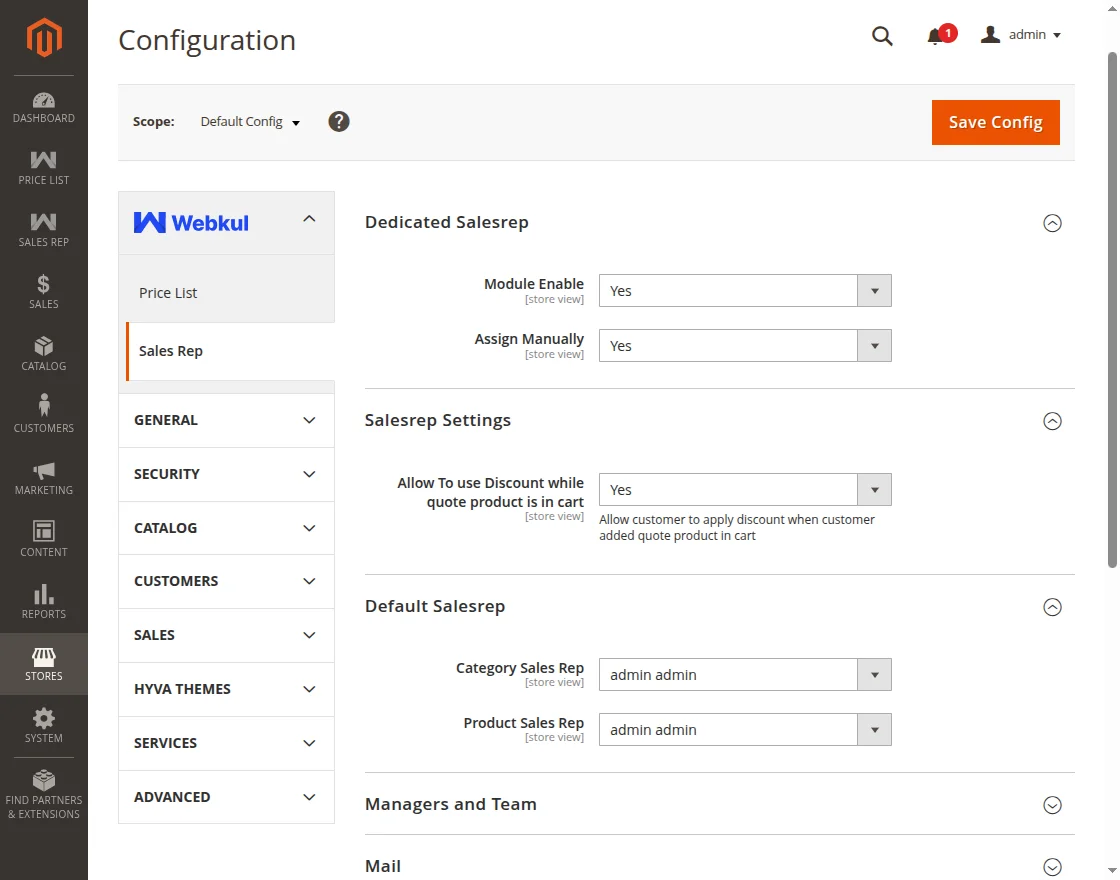
Managers and Team:
Under Managers and Team, “Max. Number of Managers of Sales Rep” and “Max. Team Size” tabs are present.
The admin defines the maximum number of Sales Rep Managers against Max. Number of Managers of Sales Rep tab.
The admin defines the maximum size of the team against Max. Team Size tab.
Mail:
Under the Mail tab, the “Default From Field” and the “Default From Name” tabs are present as shown in the image below.
Against the Default From Field tab, the admin defines the default email address.
The admin adds the default name against the Default From Name tab.
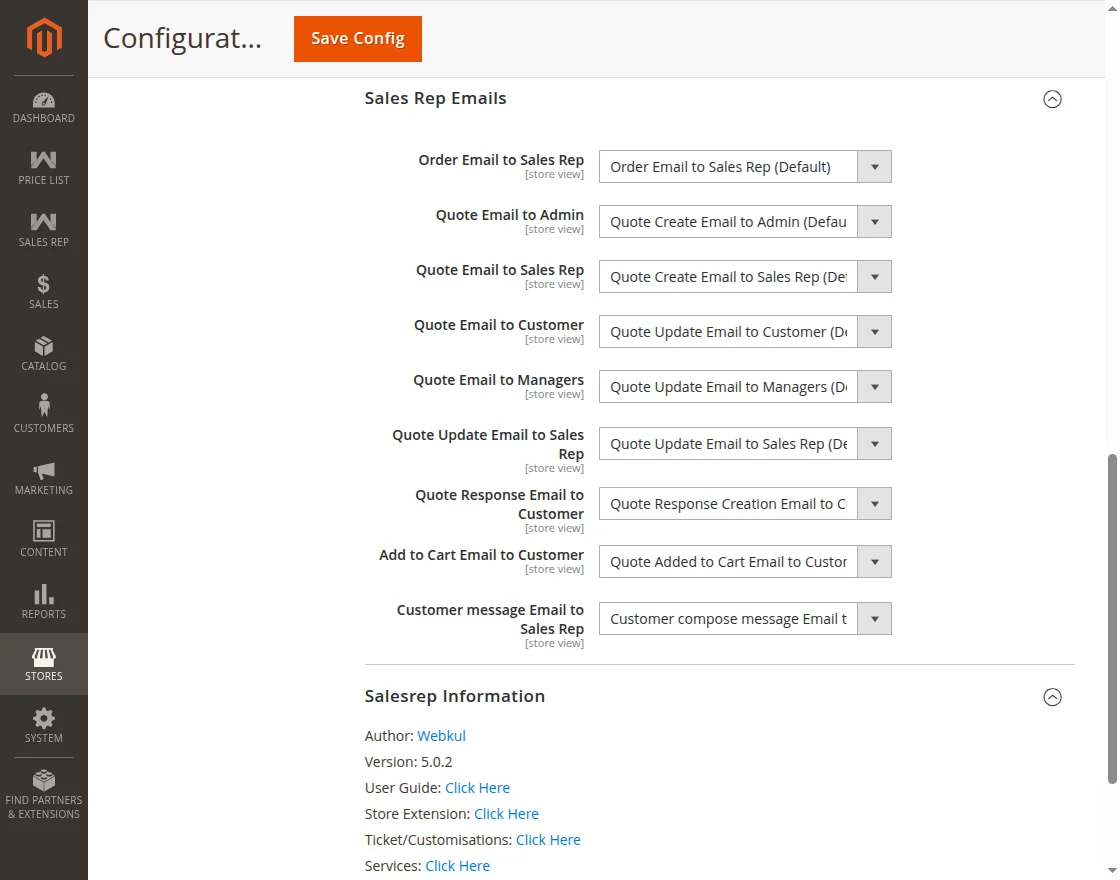
Sales Rep Emails:
The Sales Rep Emails tab includes the following-
- Order Emails to Sales Rep,
- Quote: Email to Admin, Email to Sales Rep, Email to Customer, Email to Managers, Update Email to Sales Rep, Quote Response Email to Customer,
- Add to Cart Email to Customer,
- Customer Message email to Sales Rep.
Sales_Rep Dashboard Options
Similarly, Once the admin configures the Magento 2 Sales Rep extension successfully, the admin can set the configurations for the options for the SALES REP tab.
The SALES REP tab includes the following options- “Dashboard, Reports, Orders, Quote Requests, Messages, Customers, Sales Reps, and Settings” as shown in the image below.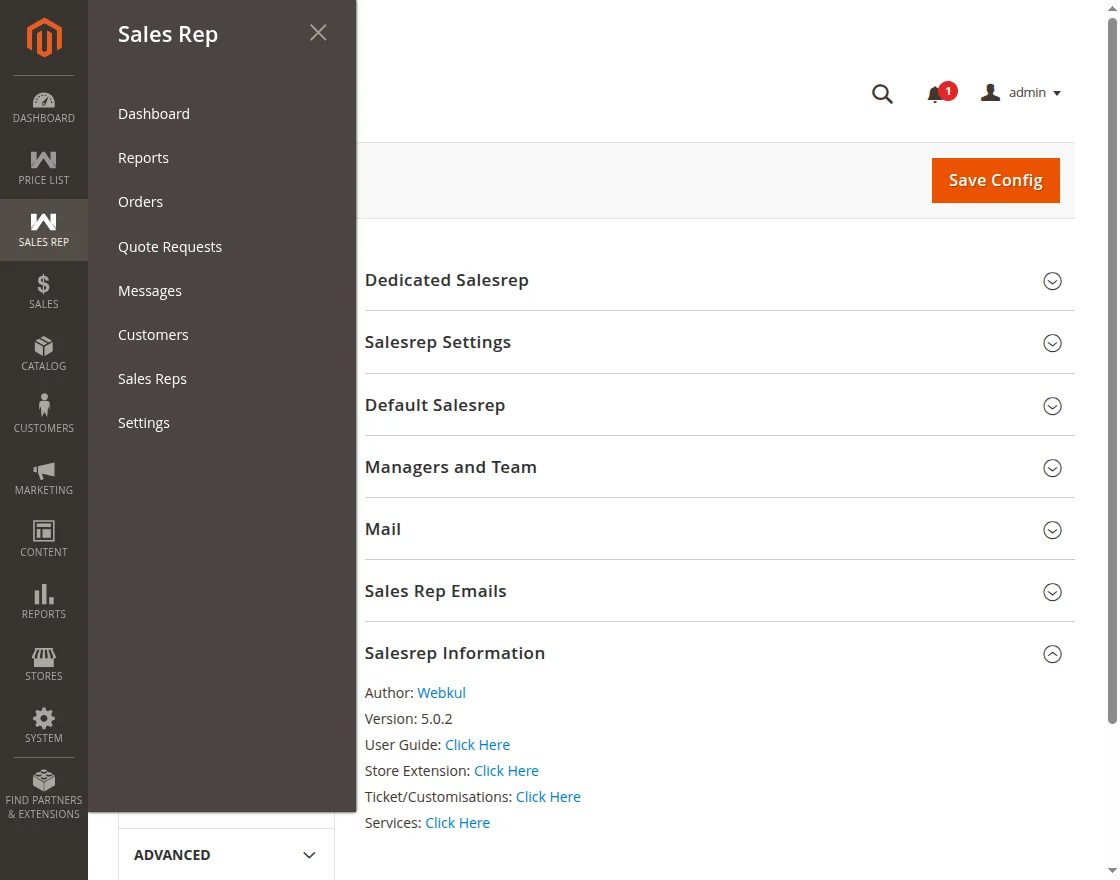
Let’s discuss the options under the SALES REP tab:
Sales Rep- Dashboard
On clicking the SALES REP tab, the first option visible is the Dashboard.
The admin can click on the Dashboard option, the Sales Rep Dashboard page opens up.
Therefore, The admin can view statistics representations for details such as Totals, Averages, New Quotes, and New Messages as shown in the image below.
The Dashboard also displays a graphical representation of the sales statistics for each month. This helps in keeping a track of the sales occurring each month. 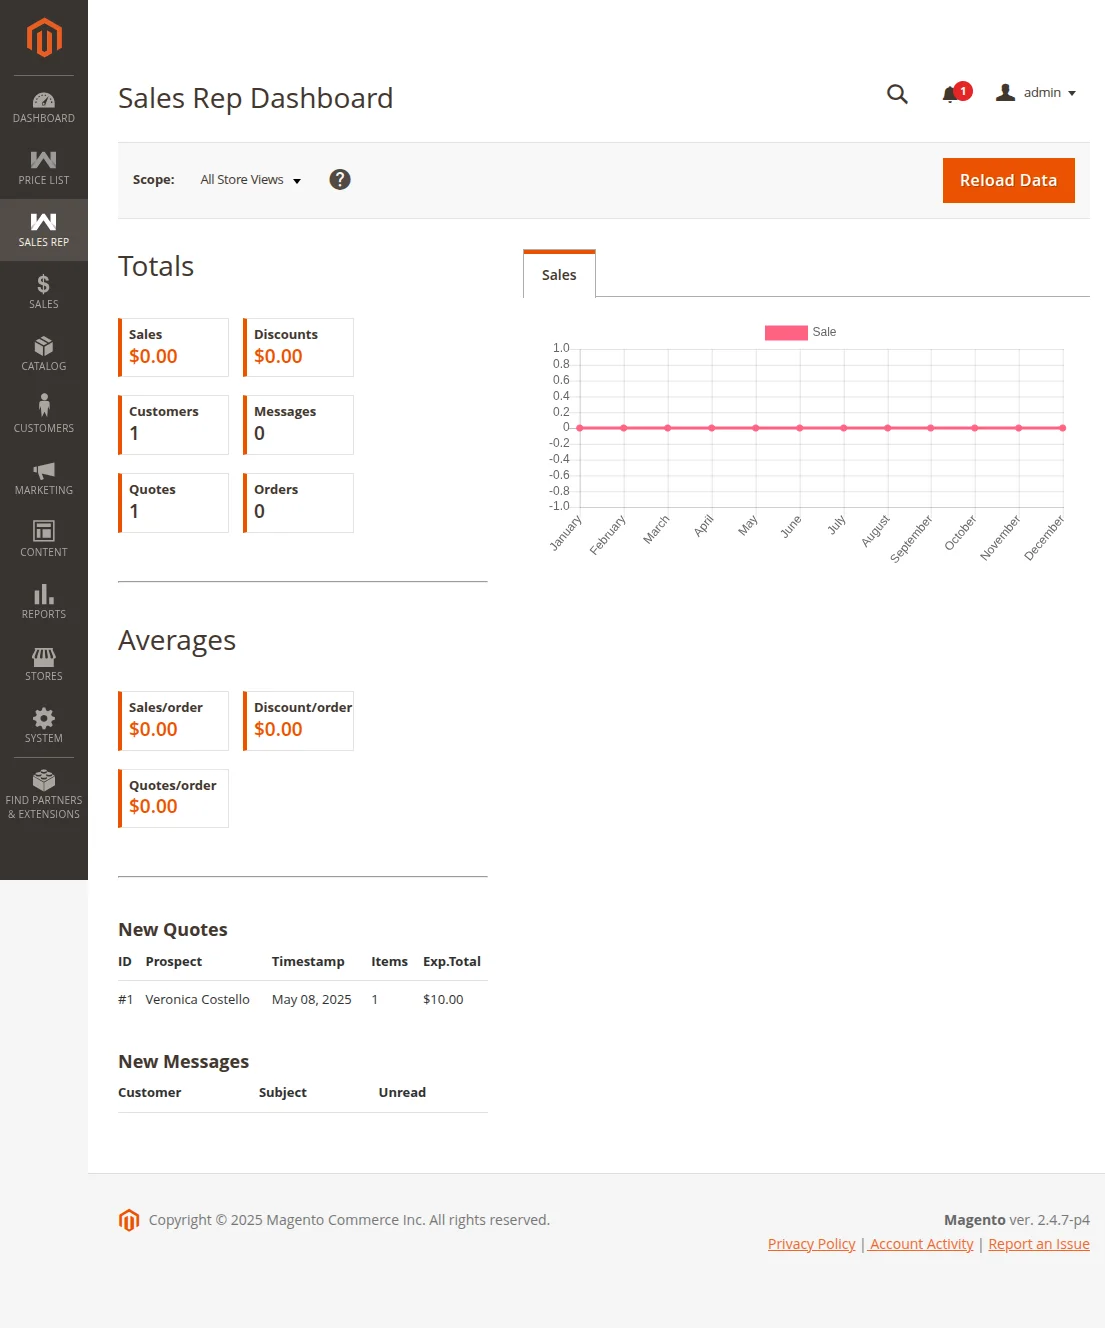
Sales Rep- Reports
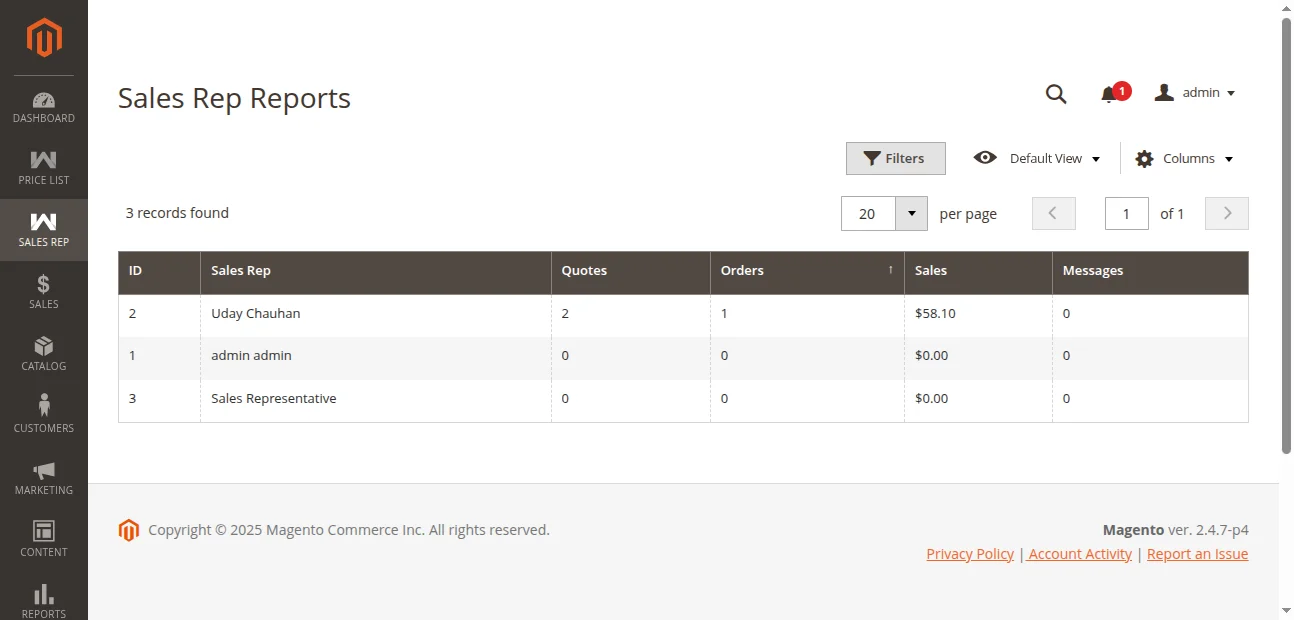
The second option under the SALES REP tab is Reports.
Thus, The Sales Rep Reports page displays all the sales representatives and their respective IDs.
It also displays the number of Orders, Sales, Messages, etc for a particular sales representative as shown.
Sales Rep- Orders
Hence, The third option under the SALES REP tab is Orders.
After that, On clicking the Orders option, the Orders page opens up where which displays a list of orders for the sales representative.
Moreover, The table on the Orders page displays the details such as order ID, Grand Total (Base), Grand Total (Purchased), Purchase Date, Purchase Point, and Status of the orders. 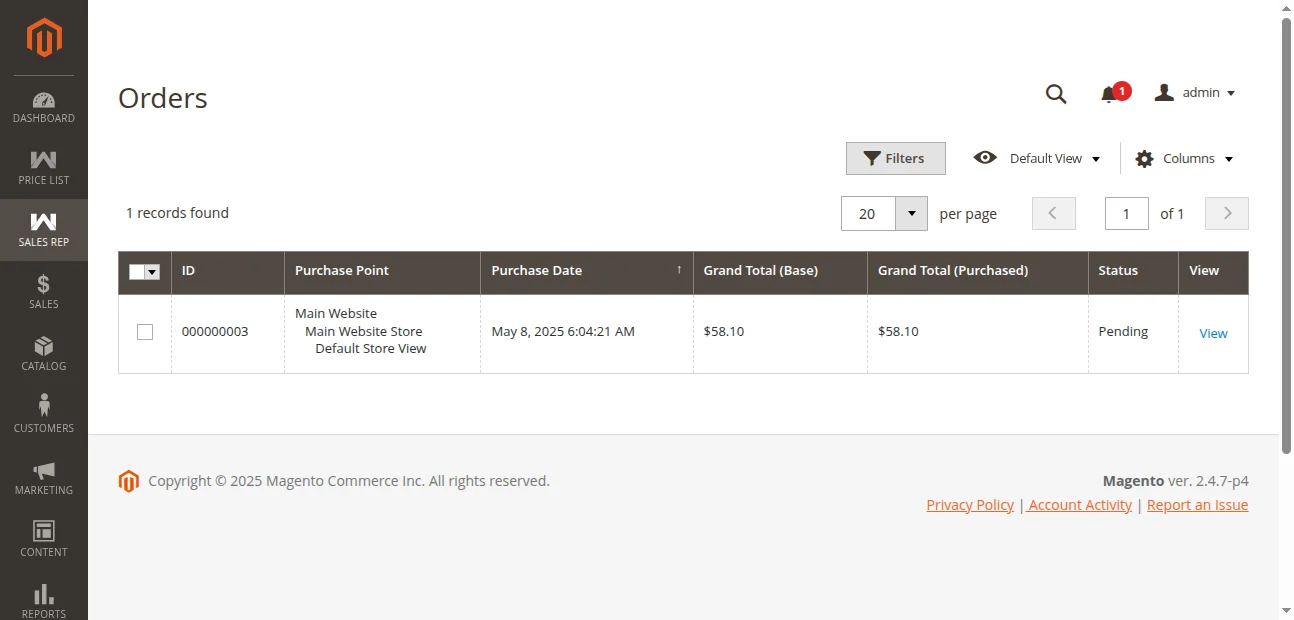
Sales Rep- Request for Quotes
The fourth option, which is visible under the SALES REP table, is Request for Quotes.
Similarly, the customers can log in to the frontend and place a quote request for a product under the Quote Requests tab.
The customer will have to choose a product and its quantity.
Furthermore, enter a quoted price for the product and send the quote for the respective product by clicking on the SEND QUOTE REQUEST button.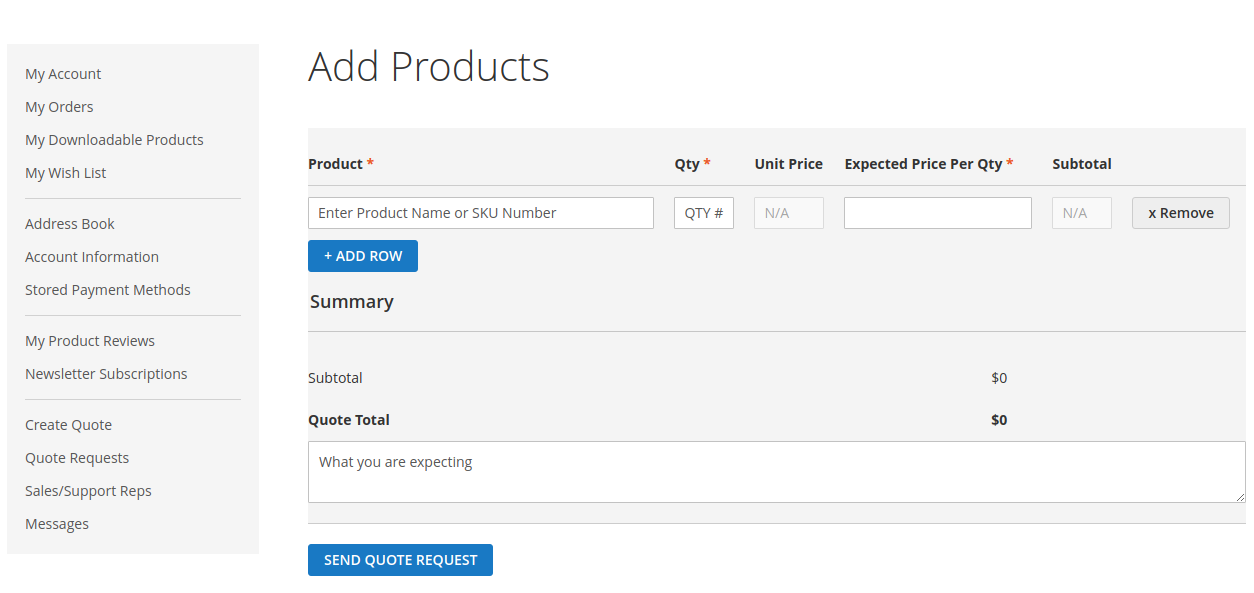
As the quote is sent, a success message “Quote Created Successfully” display on top of the page as shown in the image below.
A table displaying the details of the quote which the customer requests shall appear as the quote is sent as shown.
After that, On clicking “View Quote” for the respective Quote Id, the quote details shall appear. 
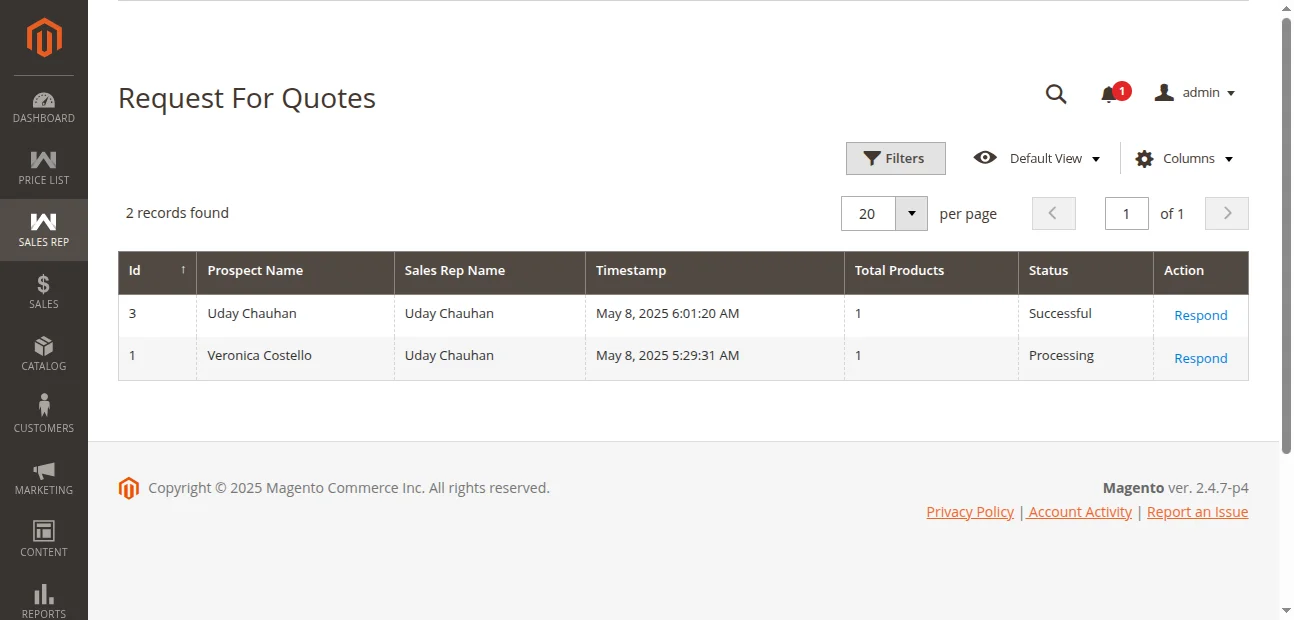
In the backend, the admin can view the new quote requests by navigating through Sales Rep > Quote Requests.
Hence, the Request For Quotes page shall open up displaying a list of quote requests as shown in the image below.
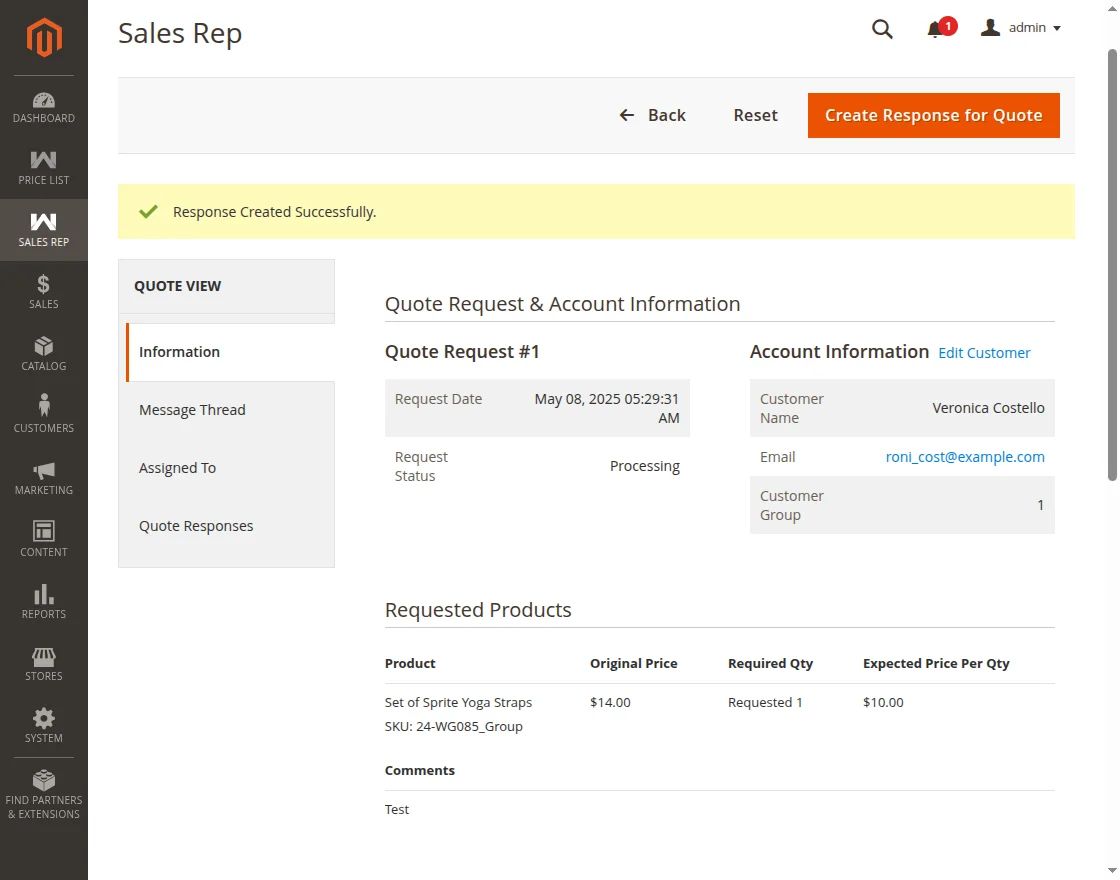
Hence, The admin needs to click on the “Respond” action so as to create a response for the quote request sent by the customer.
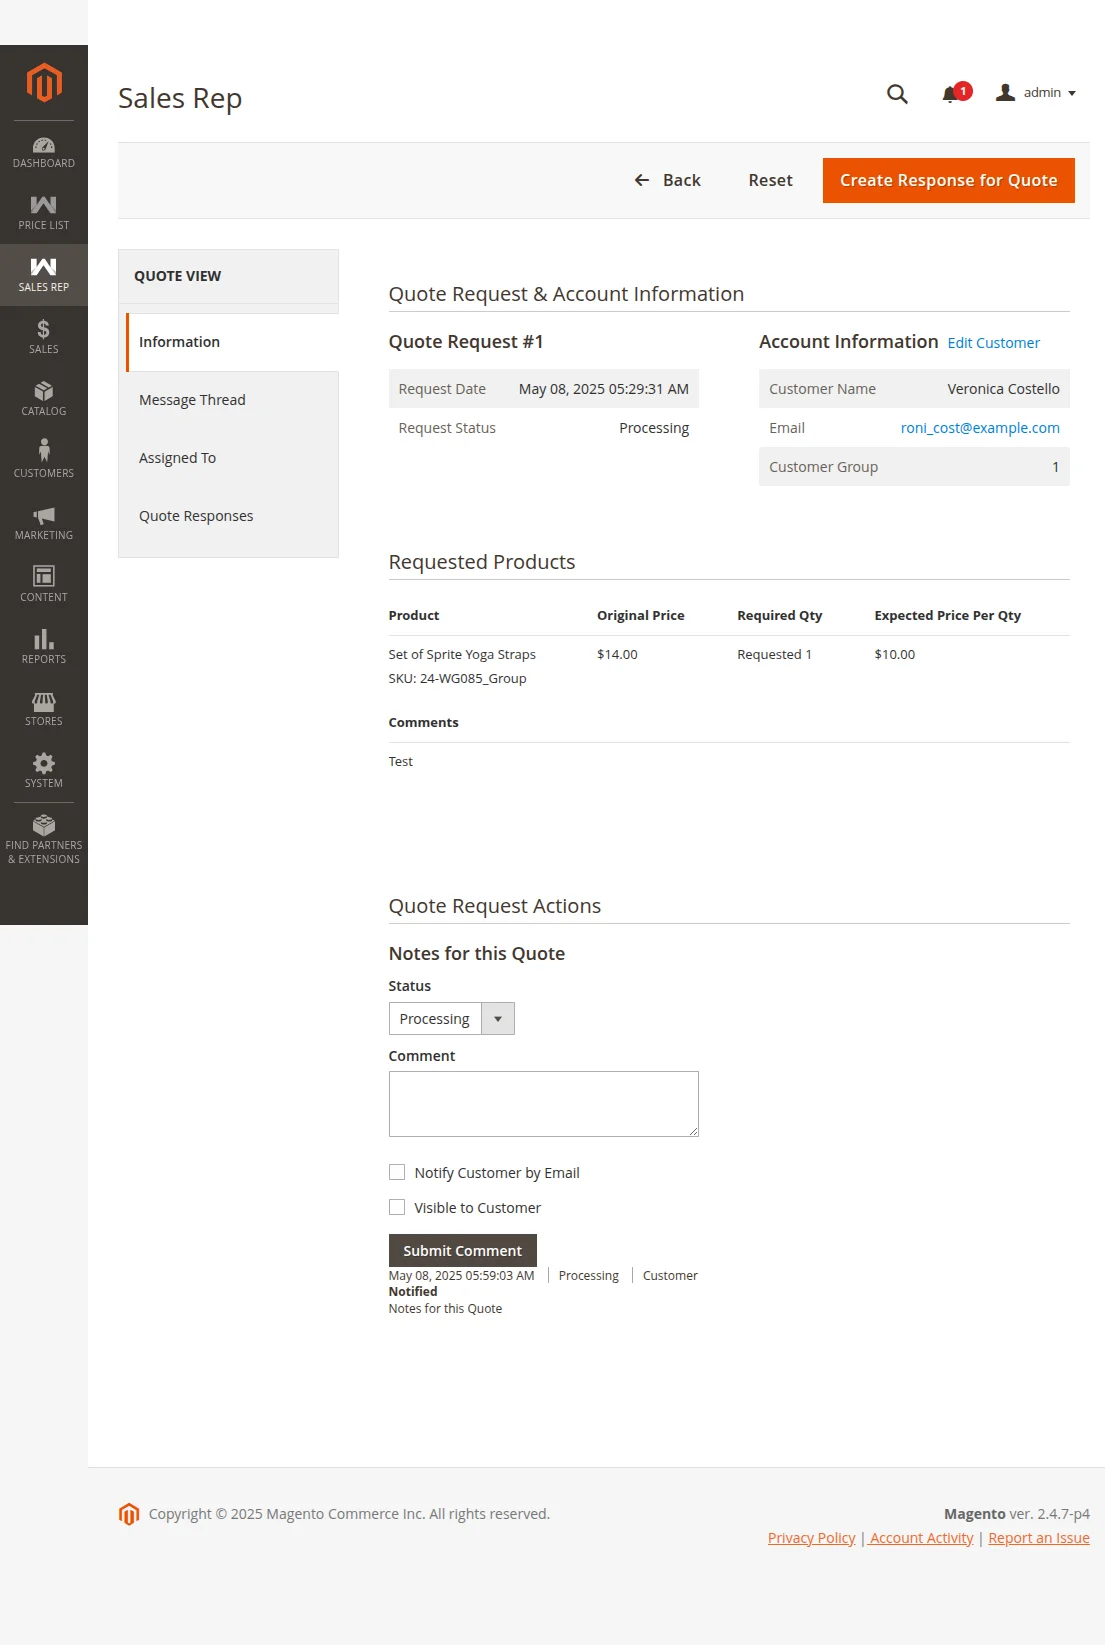
The Information tab includes the following:
Quote Request and Account Information: It includes the Quote Request’s date and Status and Account Information which includes the Customer’s Name, Email, and the Customer Group.
Requested Products: Product/ Products for which the customer places a quote request. It displays the Original Price, Required Price, and the Expected Price per quantity.
Quote Request Actions: It includes the Notes and the Status for the respective quote. The admin can even choose to Notify the Customer by Email and whether or not it shall be Visible to the Customer.
Hence, The admin can create a response for the quote requests sent by the customers by simply clicking the Create Response for Quote button as shown.
Under the Message Thread tab, the messages which are exchanged between the sales rep regarding the quote request displayed.
The sales representative can add a reply and send it to the customer as shown in the image below.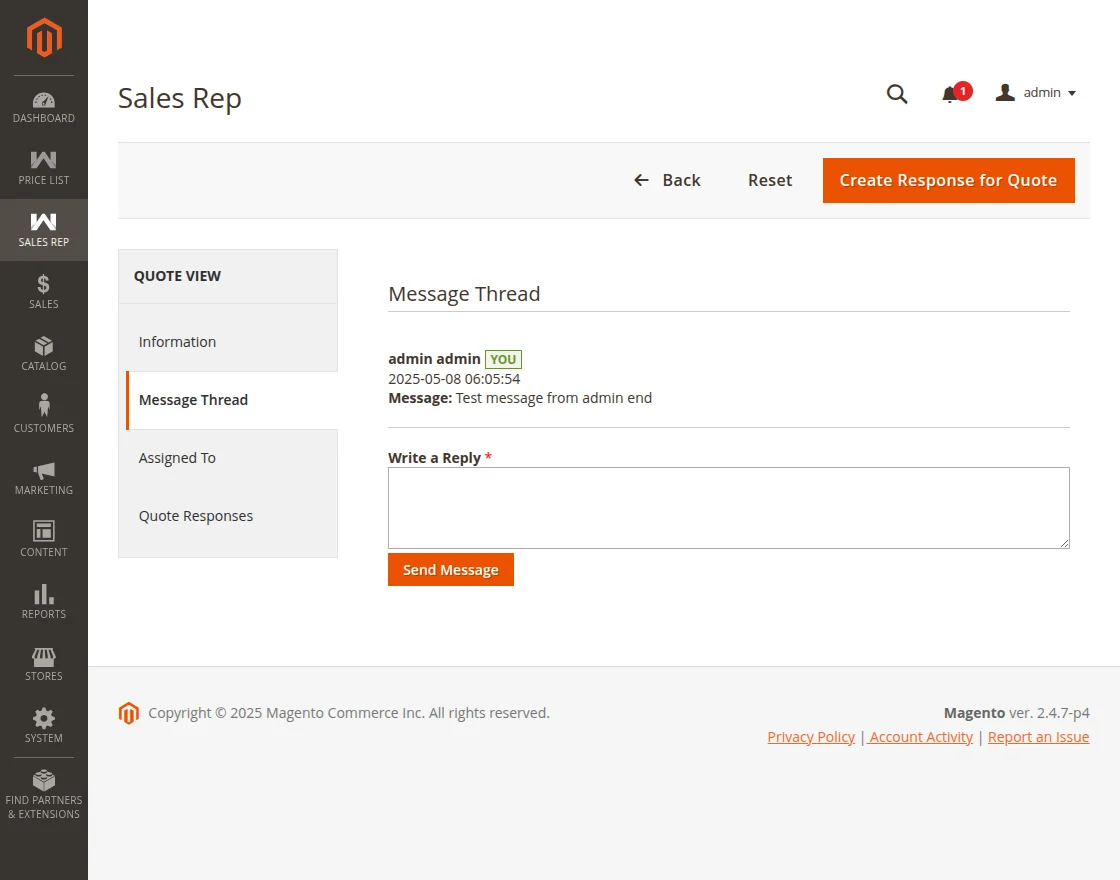
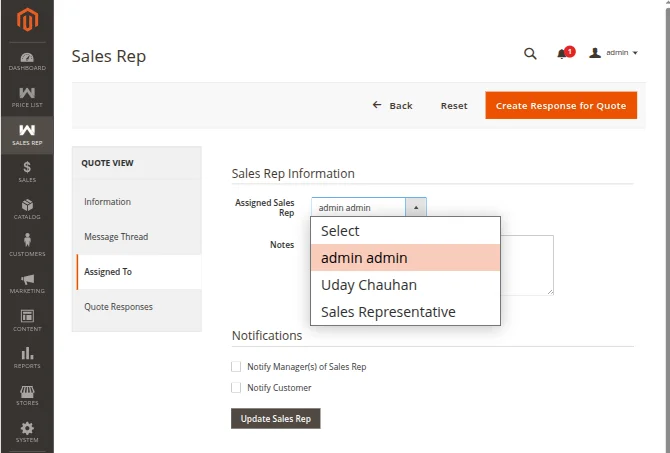
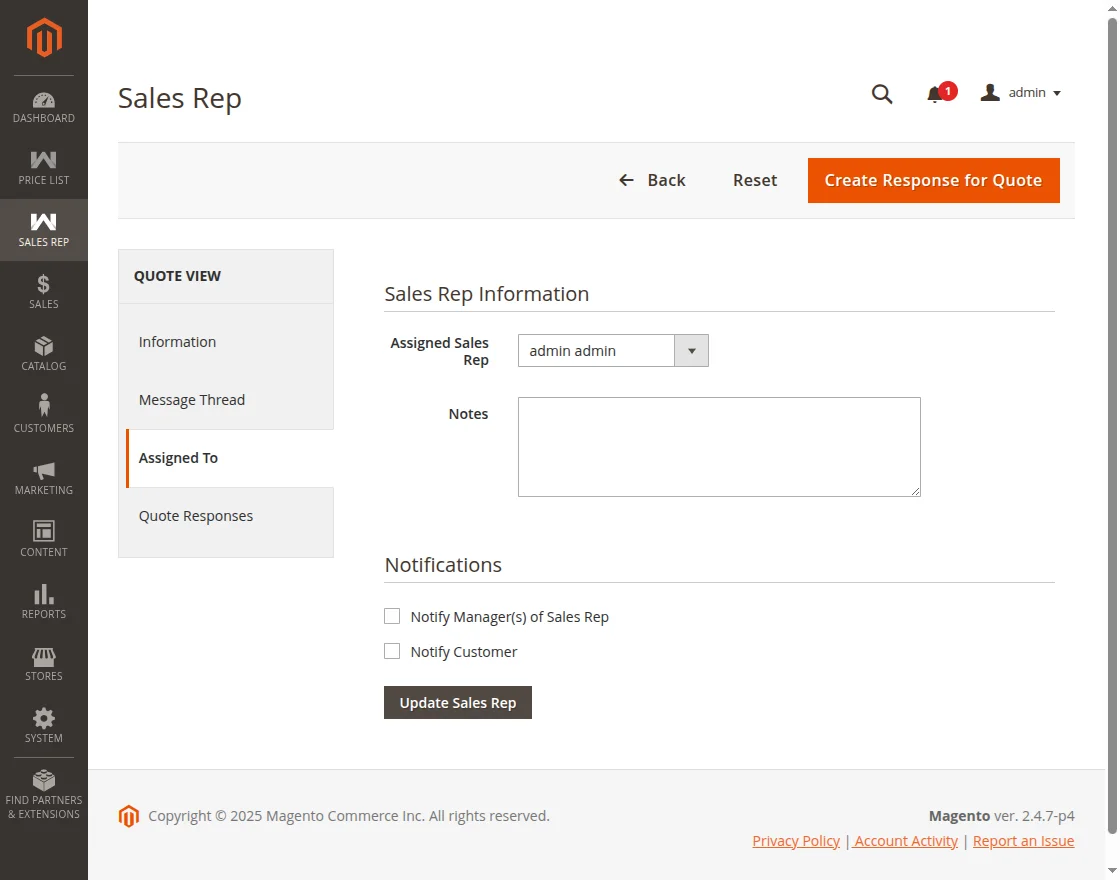
The Assigned To tab includes:
Sales Rep Information: It includes Assigned Sales Rep and the Notes fields.
Against the Assigned Sales Rep, the admin can assign a sales rep from the given list and add a note against the Notes field.
Notifications: The admin can choose to notify the Manager(s) of the Sales Rep and also notify the Customer.
Sales Representative Assign Order Quotation to Another Representative
Now the admin can allow to sales representative to assign order quotations to another representative.
By clicking “System” need to check the permission option, then need to click on “User Roles” and select “Assign Quote Order to Others”.
After enabling this feature by the admin now the sales representative can easily assign their order quotation to another representative.
The first sales representative will log in to their dashboard, then they need to click on “Sales Rep”>Quote Request>Respond>Assign to>Assign to Sales Rep”.
Quote Response tab:
Under the Quote Response tab, the sales rep can create a Response for Quotes that the customer requests.
After that, click on the Create Response for Quote button, and the admin can create responses for the quotes that the customers request.
Similarly, in the View action, the sales rep can add the price rules for the customer’s quote. 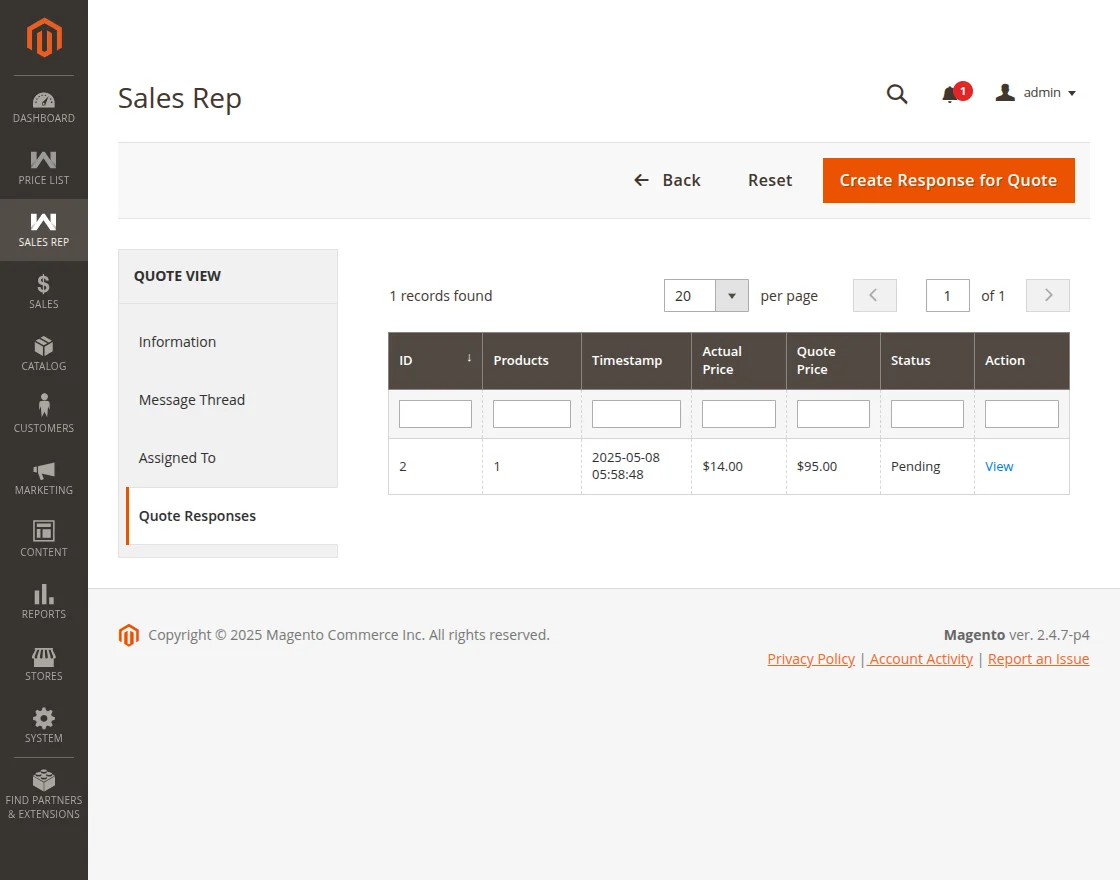
As the sales rep clicks the Create Response for Quote button, under the Requested Items, the sales rep can add and view the Expected Price (the quoted price that the customer requests).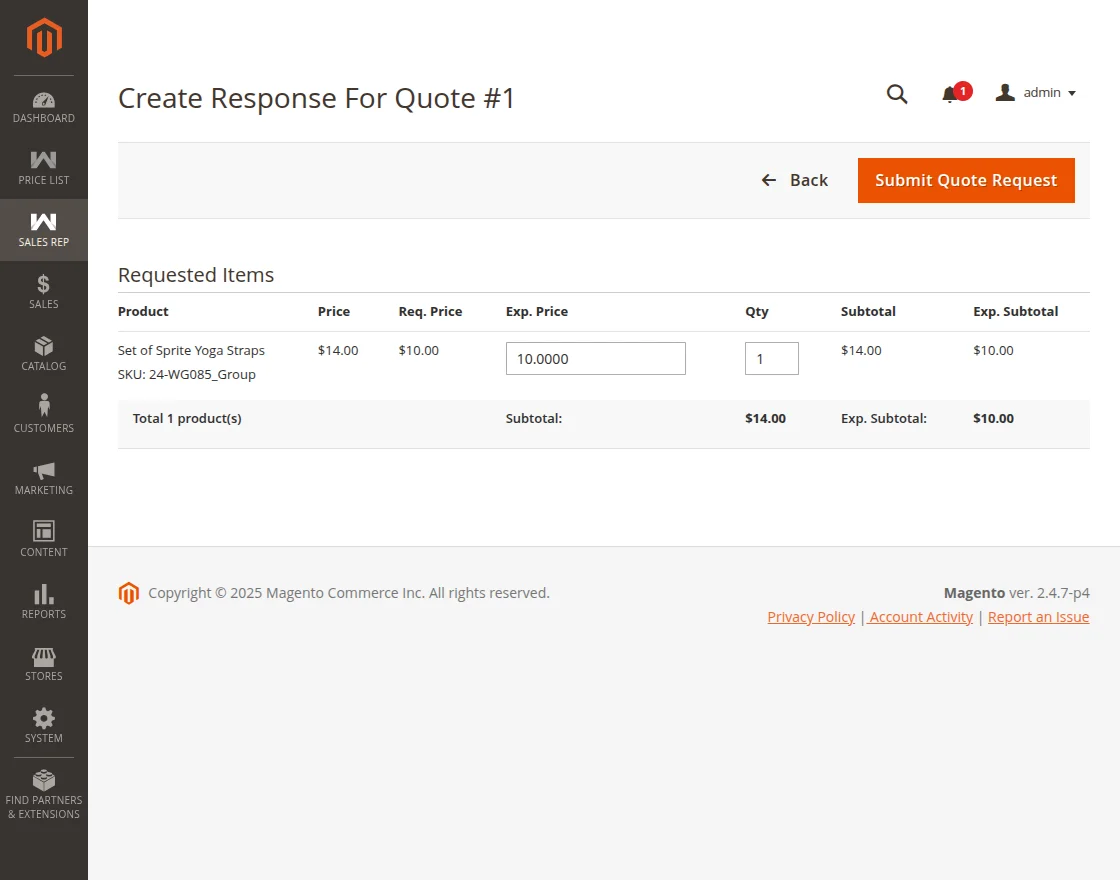
If the sales reps do not find the quoted price feasible, then the sales rep adds a reasonable quote price under Expected Price and clicks on Submit Quote Request.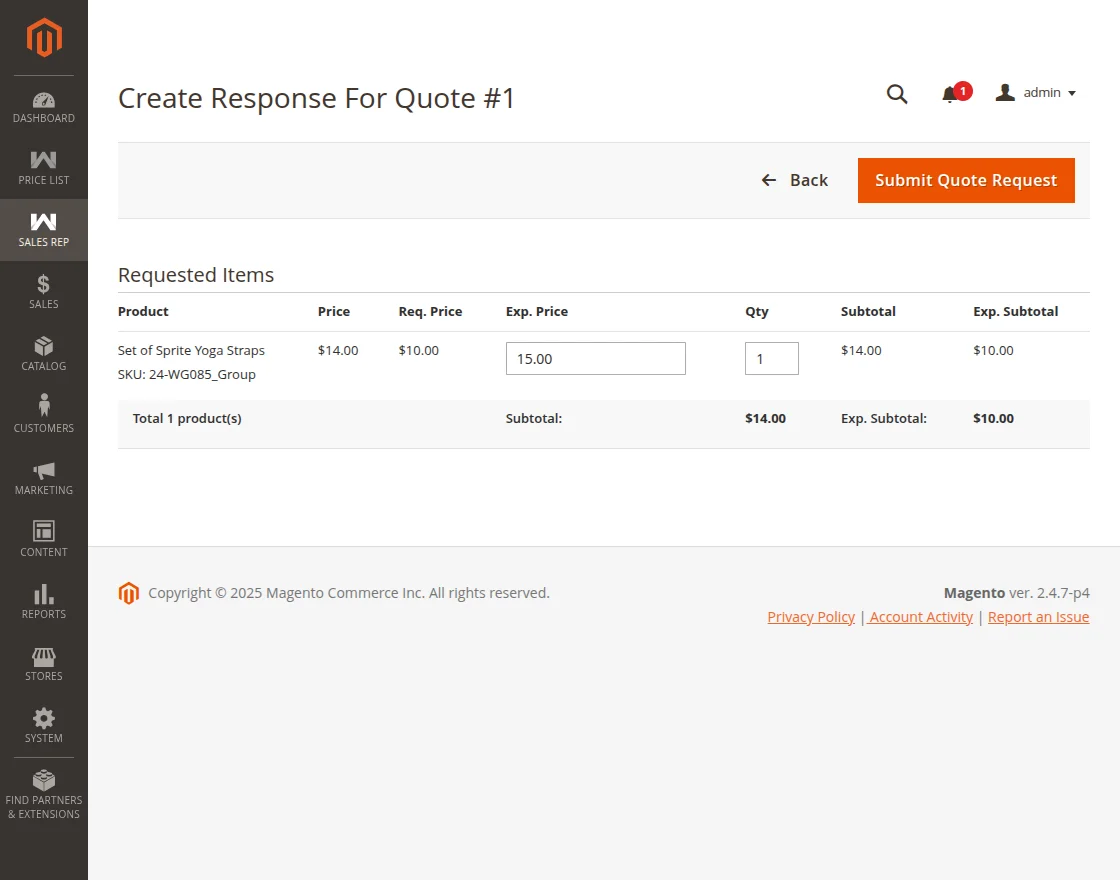
As the sales rep submits the quoted price, as shown in the snapshot below.
The customer can view it under the Quote Requests tab for the respective Quote Request ID in the frontend, as shown in the image below.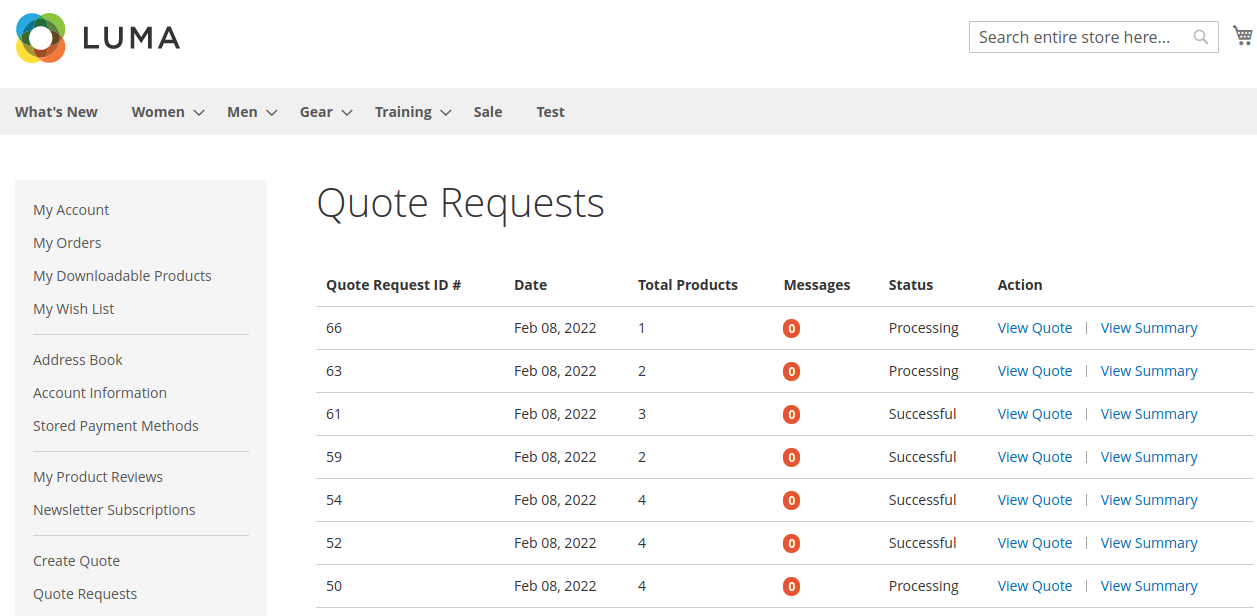
The customer needs to click on the View Quote action for the respective Quote Request ID.
Quote Responses
Under the Quote Responses tab, the sales rep’s quote price is visible to the customers in the Quote Price column as shown in the image below.
As the customer clicks on the View action for the Quote ID under Quote Responses, the Quote Response page opens up as shown in the image below.
If the customer finds the sales rep’s price reasonable, then under “Action” the customer may Accept or Reject the quote as shown in the image below. 
Once the customer Accepts the sales rep quote price, the respective sales rep can add a price rule under Price List(s) available for this customer, by clicking Add Price List.
Under the Price List Information tab, the sales rep can add the details of the fields such as Price list Name, Priority, Start Date, End Date, and Status.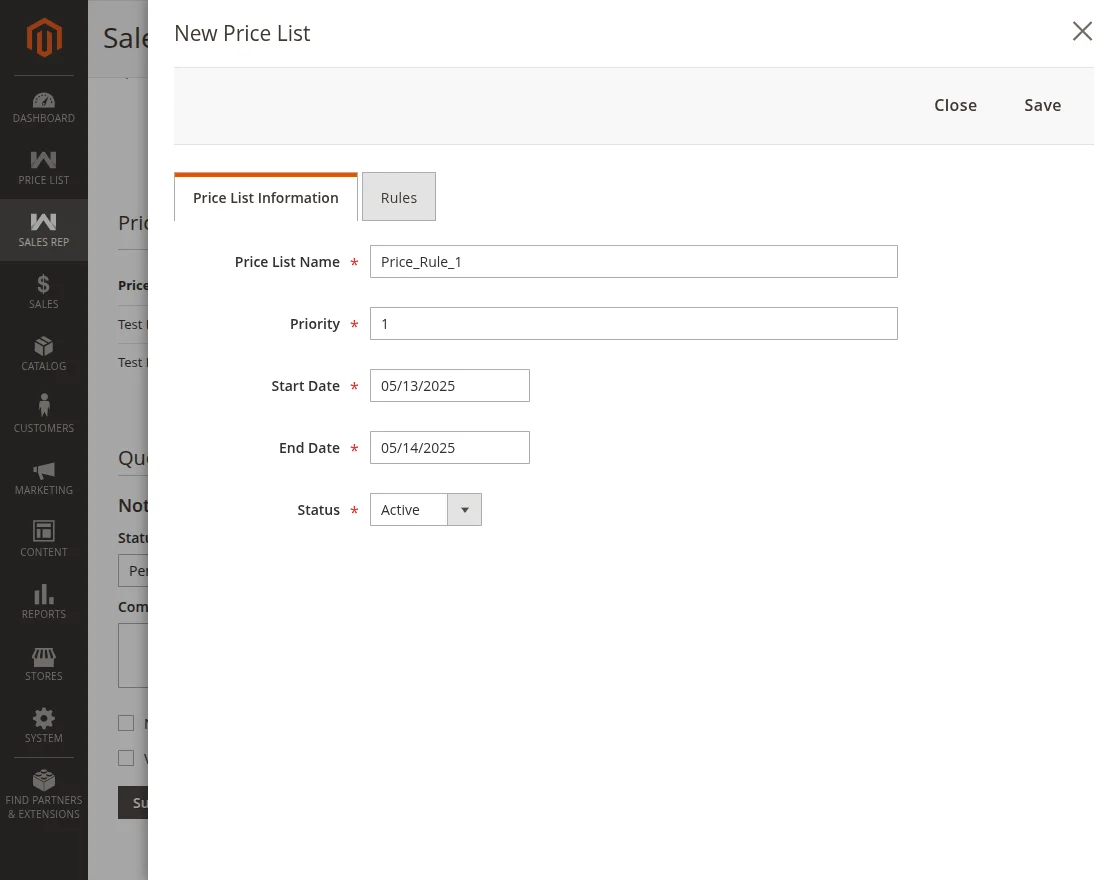
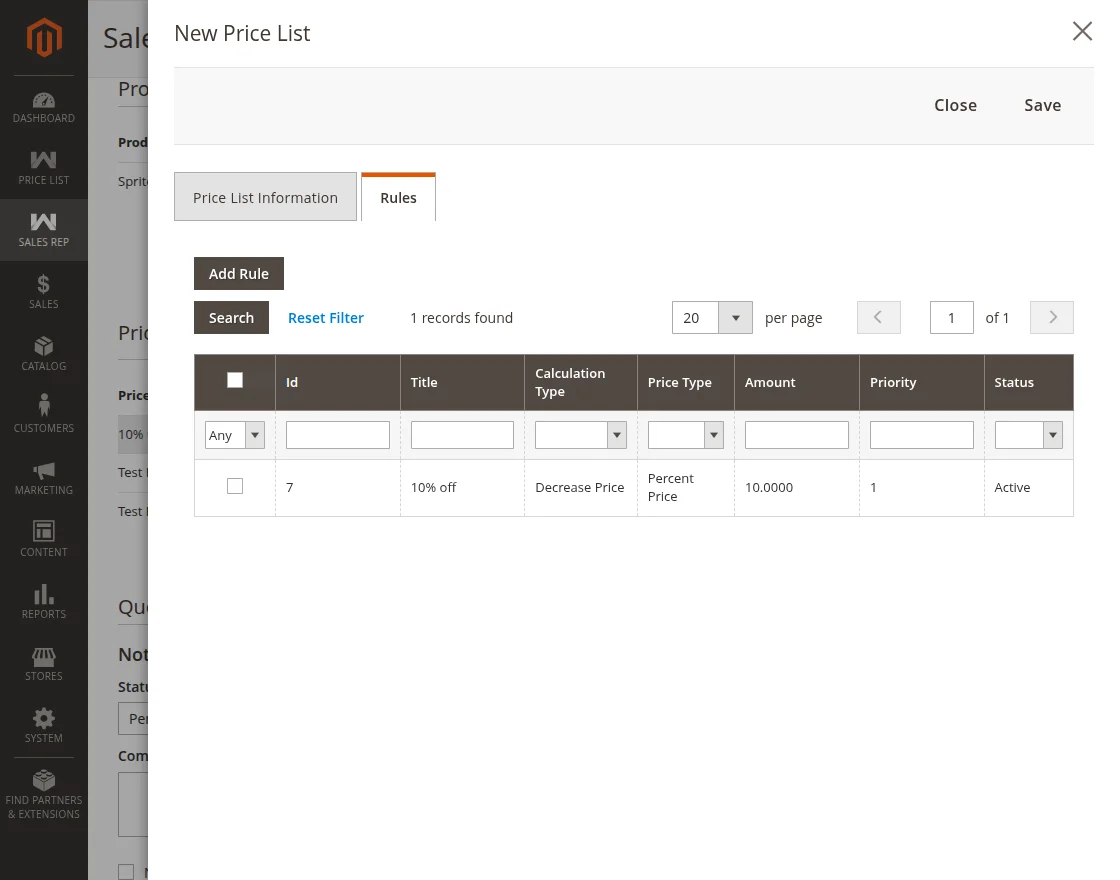
On clicking the Add Rule button under Rules tab, as shown in the image below, the sales rep may add a new rule.
The sales rep can view the product under the Products tab, for which the sales rep creates the rules.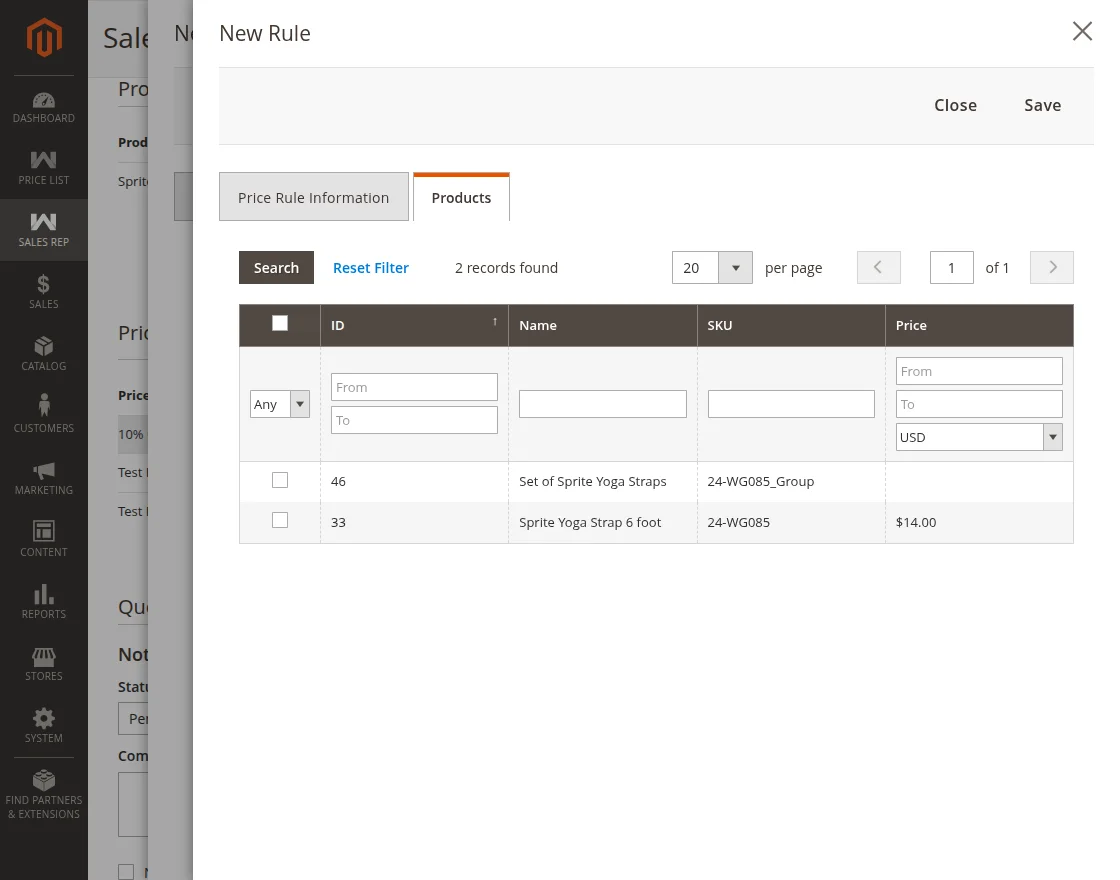
As the rule is created and saved, the Price Rule is added under Price List(s) Available for this customer.
Thereafter, the sales rep can add the quote to the customer’s cart by clicking the Allow customer to add to Cart button for easy processing of the order as shown in the image.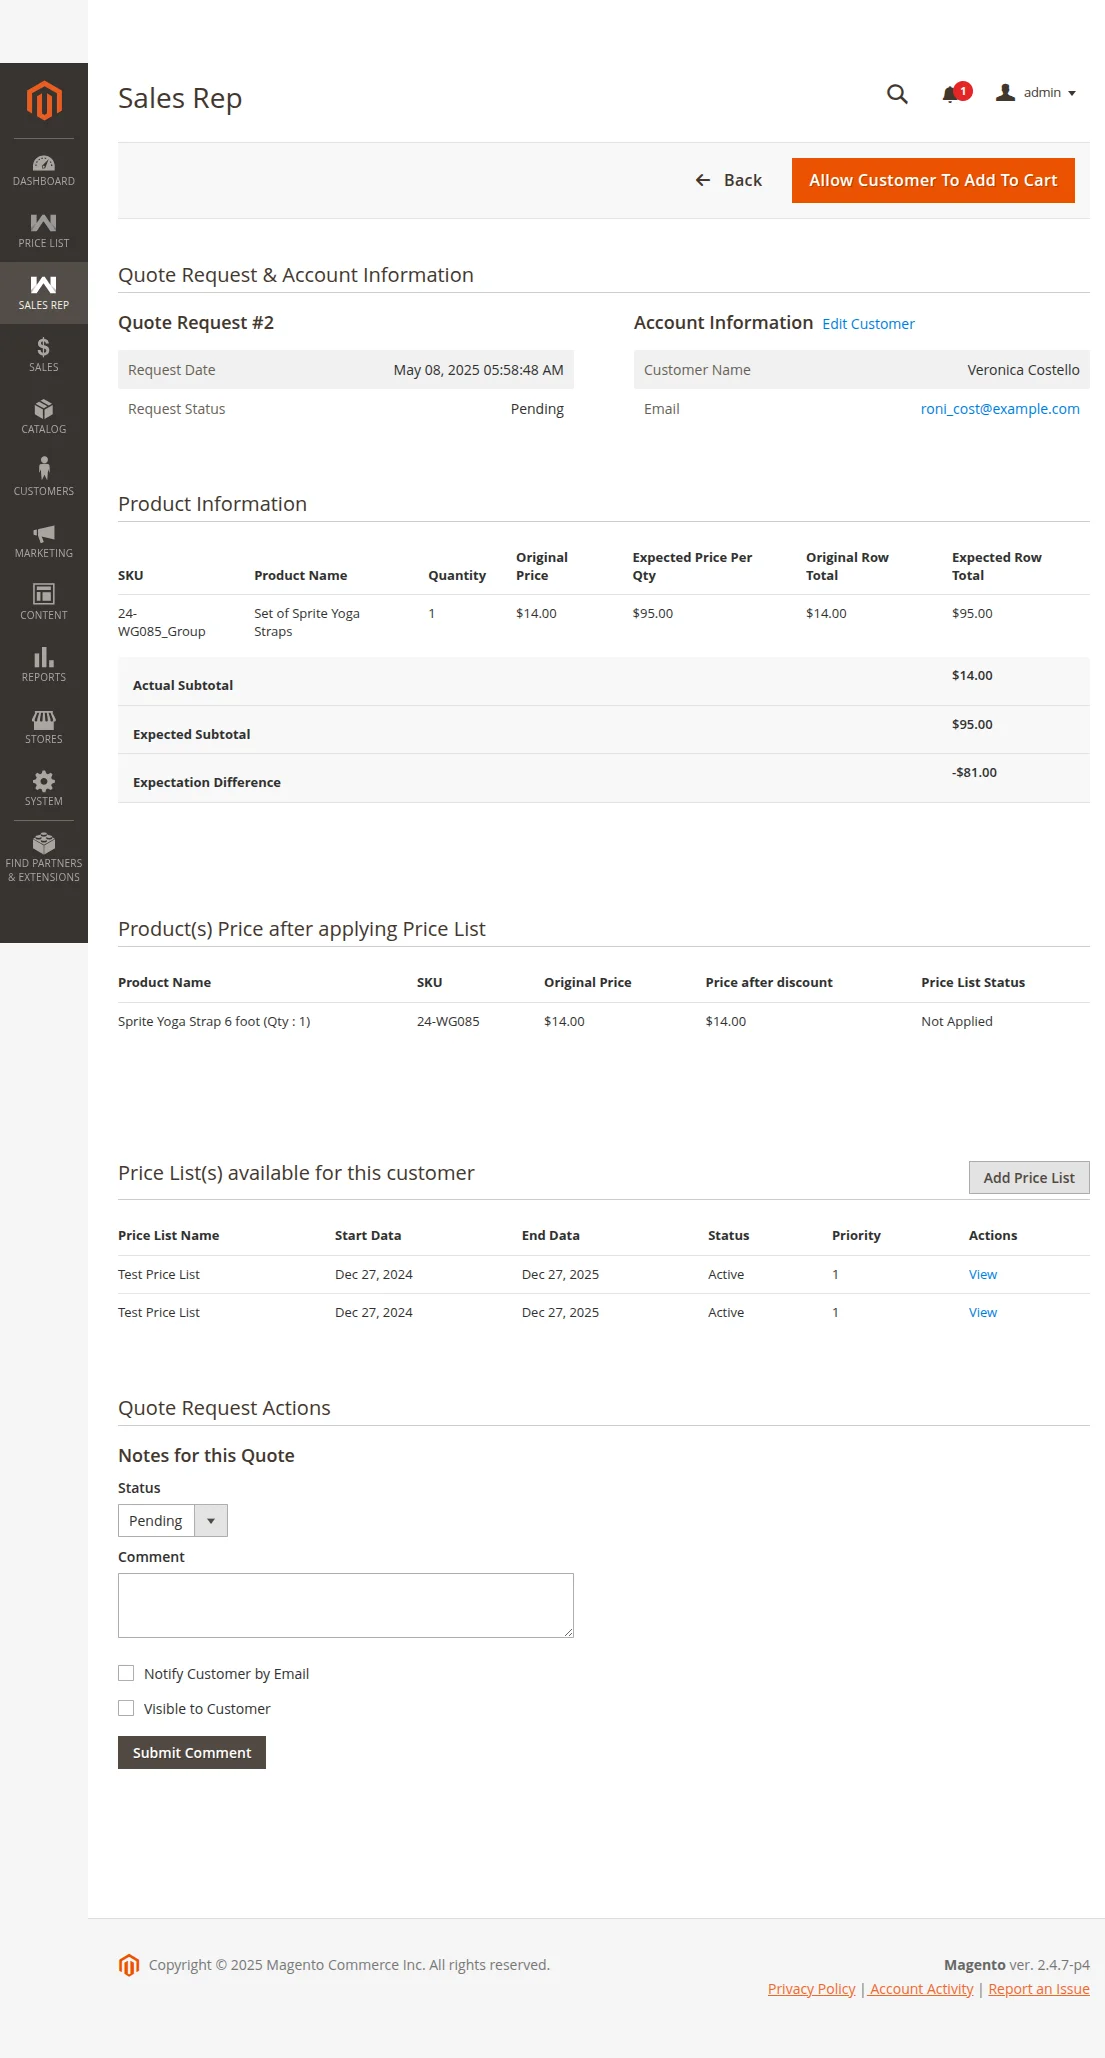
Sales Rep- Messages
The fifth option which is visible under the SALES REP table is Messages.
After that, the sales rep is visible under the in category and product pages..

The customers will have to log in, first, so as to message the sales rep.
The name of the sales rep is visible on the left corner of the category or product page as shown in the image below. 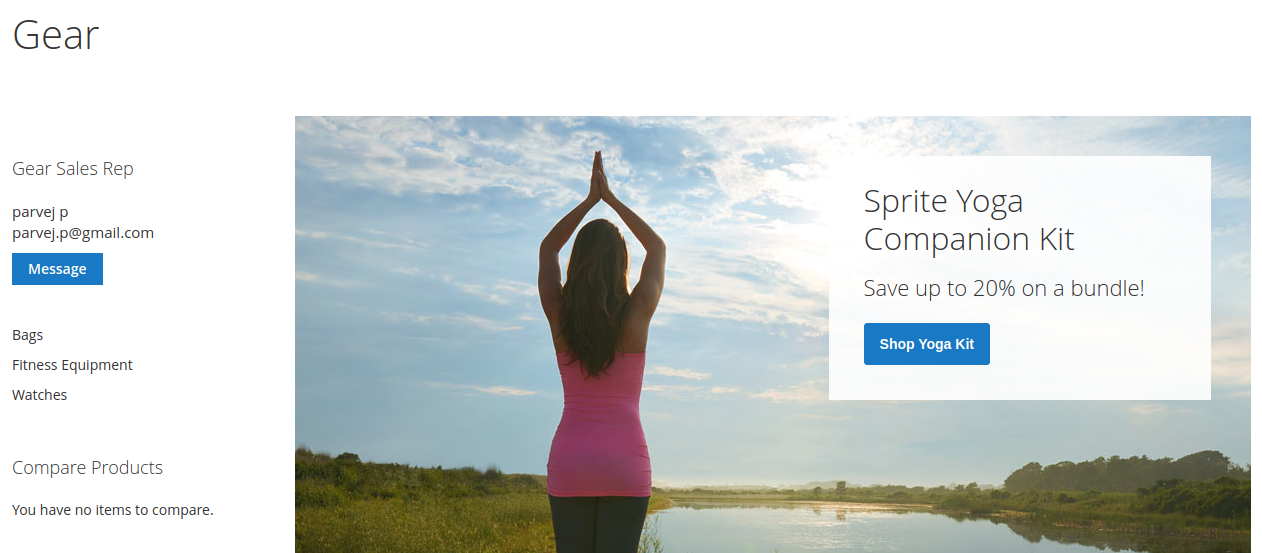
The customer will have to click on the Message button so as to message the sales rep.
A pop-up, as shown in the image below, appears where the customer adds the message and sends it to the respective sales rep. 
These details of the message shall be visible under the Message > Message History on the My Account page on the frontend as shown in the image below. 
Thereafter in the admin panel, the admin will have to navigate through Sales Rep > Messages in order to view the conversation or messages regarding the quote which the customer generates.
A Sales Rep Message page opens up where the list which includes the Customer Name, Sales Rep Name, Time Stamp, Title and Message. 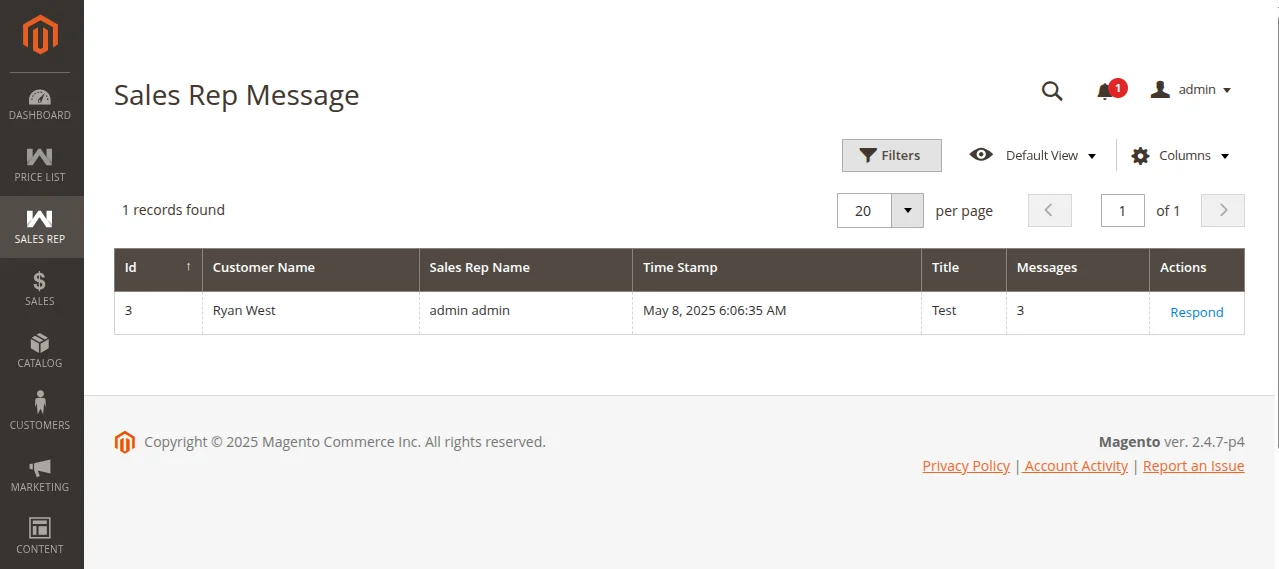
On clicking the “Respond” button for the respective customer, the Message Thread page shall open up.
After that, it will display the messages exchanged between the customers.
In addition, sales Rep can add a message under the “Write a Reply” tab as shown in the image below. 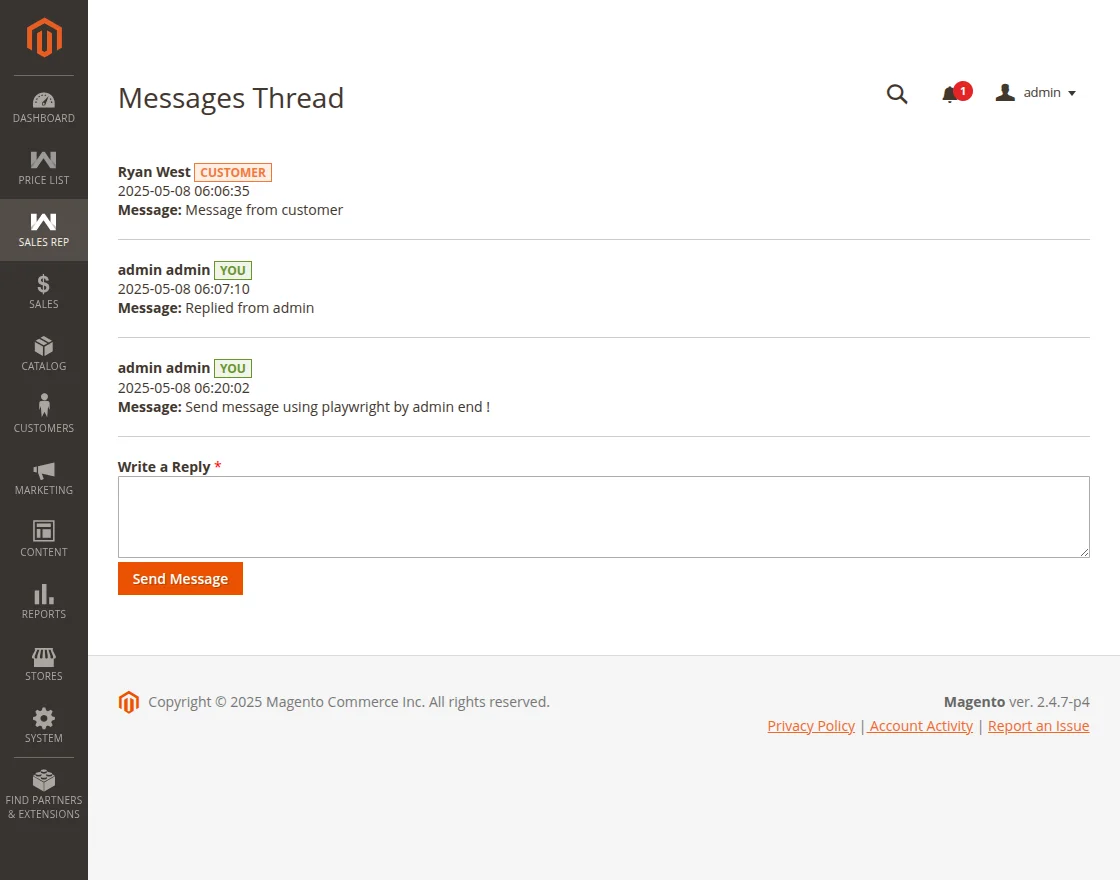
-
Sales Rep- Customers
The sixth option, which is visible under the SALES REP table, is Customers.
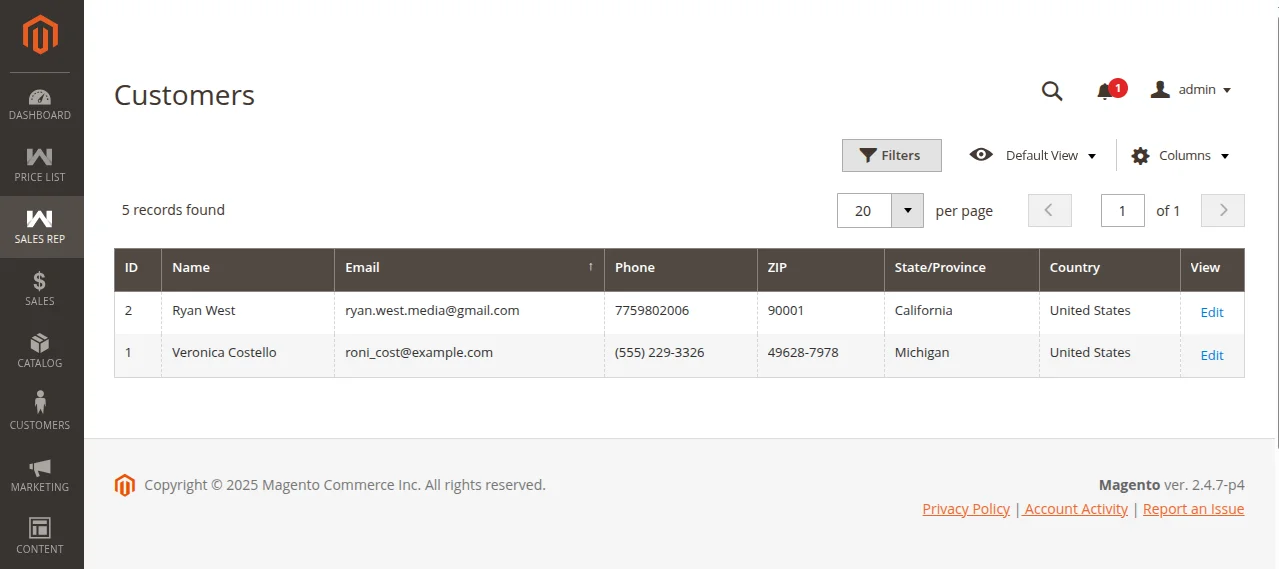
After that, the admin can view the list of customers by navigating through Sales Rep > Customers.
Above all, complete information regarding the customer shall be displayed on clicking the Edit button for a respective customer.
- Sales Rep- Sales Reps
The seventh option, which is visible under the SALES REP table, is Sales Reps.
The admin needs to navigate through Sales Rep > Sales Reps so as to view the sales representative and their respective details.
The Sales Reps page opens up, where a list of all the sales representatives is displayed. Also, the admin can create a new Sales Rep by clicking on the Add New Sales Rep button.
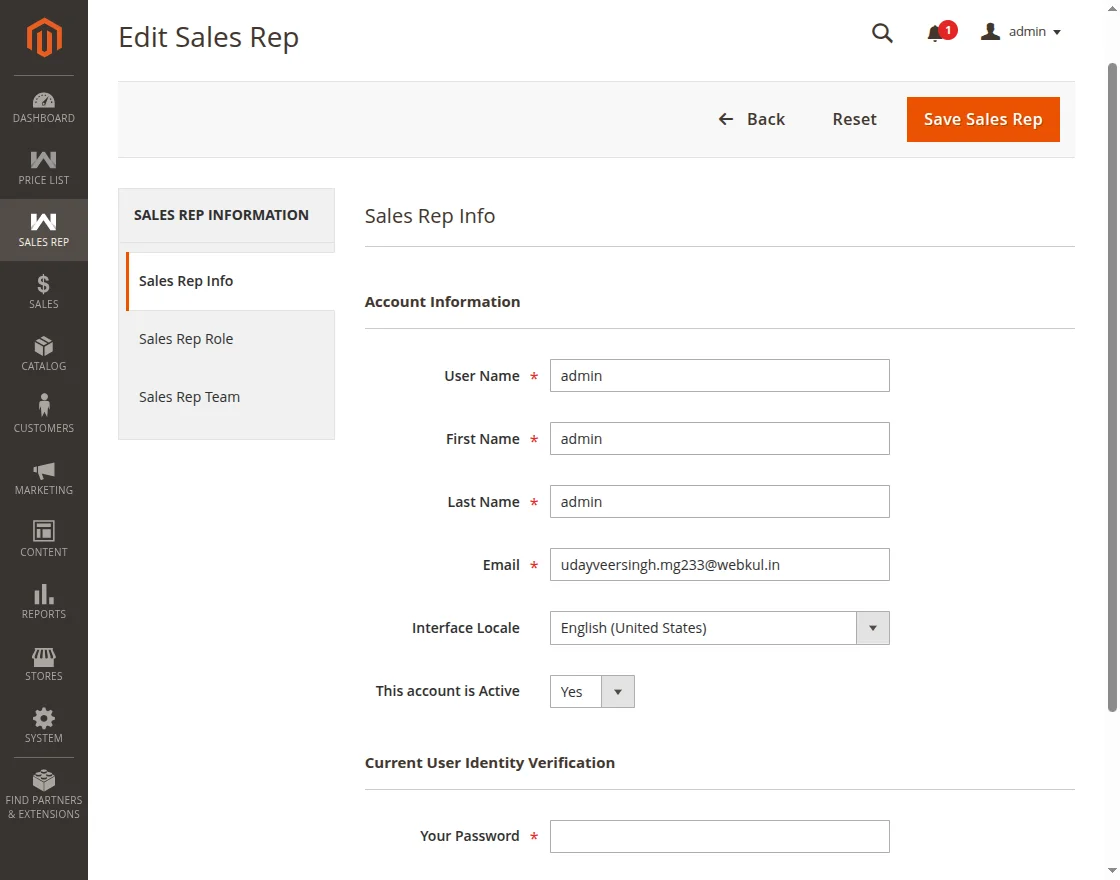
After that, the admin can click on ‘Edit’ to view details of the Sales Rep.
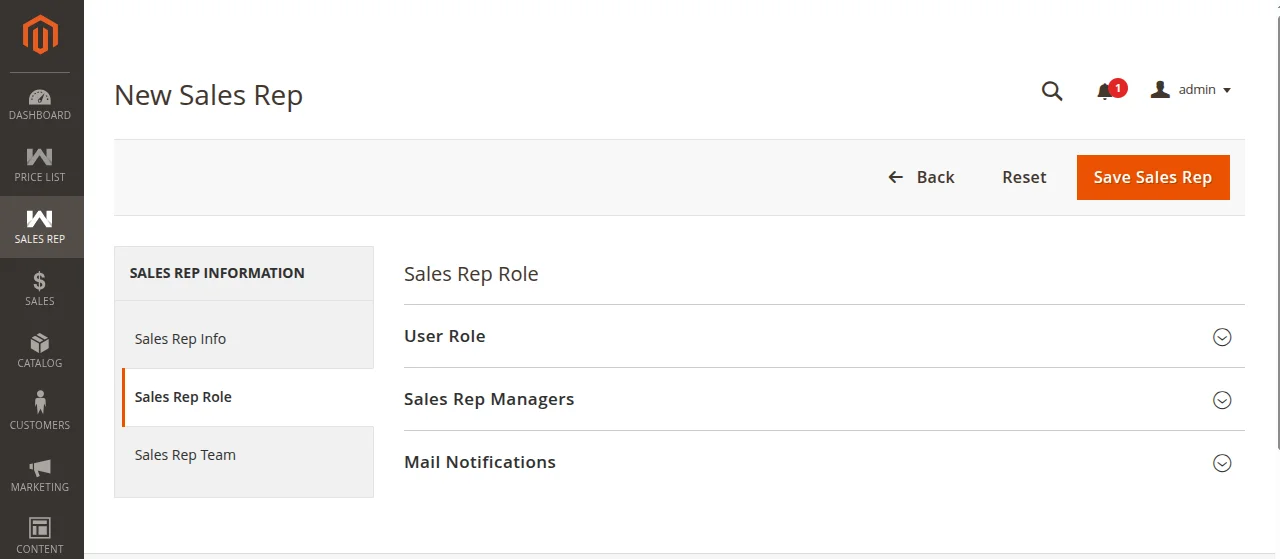
In addition, the Edit Sales Rep page opens up, which includes the following tabs- Sales Rep Info, Sales Rep Role, Sales Rep Team.
The sales Rep Info tab comprises:
- Account Information, which includes details such as User Name, First Name, Last Name, Email, Interface Locale, etc.
- Current User Identity Verification, which includes the Your Password field.
Sales Rep Role tab comprises the following sections:
- User Role
- Sales Rep Managers
- Mail Notifications
User Role section:
Similarly, in the User Role Section, the admin may assign any of the roles given in the list to any Sales Representative.
For instance, the admin assigns the role of “Manager” to a Sales Representative.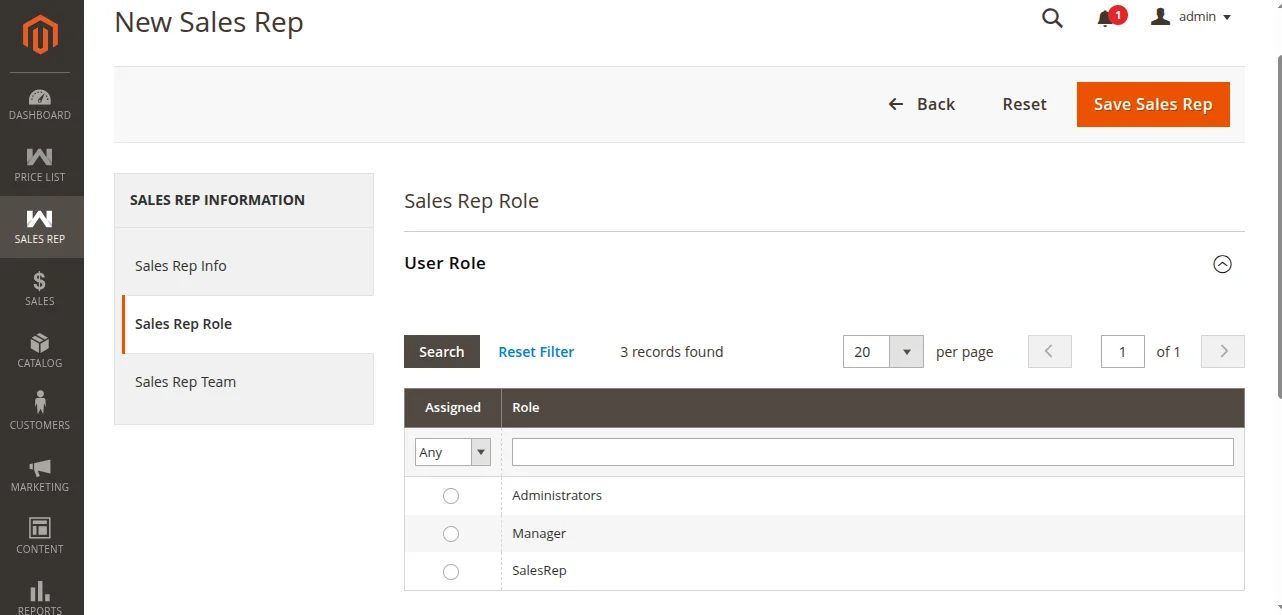
Sales Rep Managers section:
Sales Rep Managers section displays a table that includes the details of the Sales Representative. In addition, the Role which the admin assigns to the Sales Rep.
Therefore, table demonstrates details such as- ID, Username, First Name, Last Name, Email, Role. 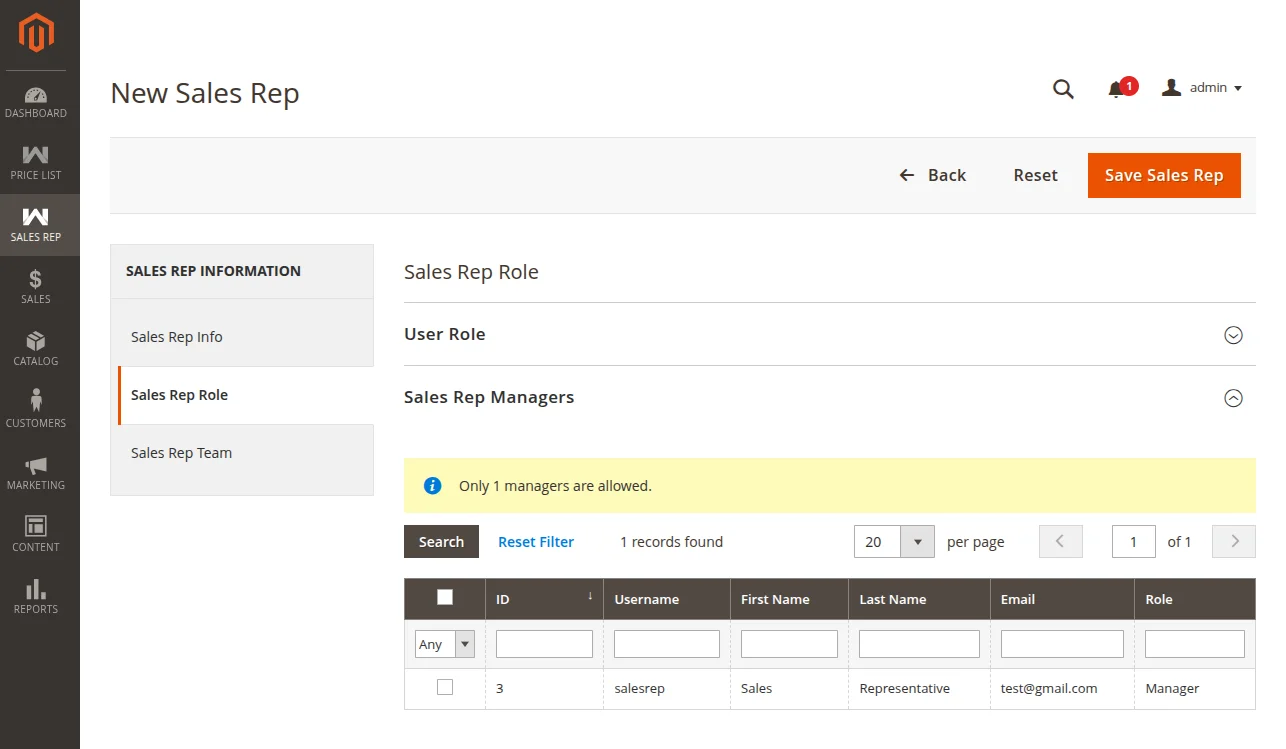
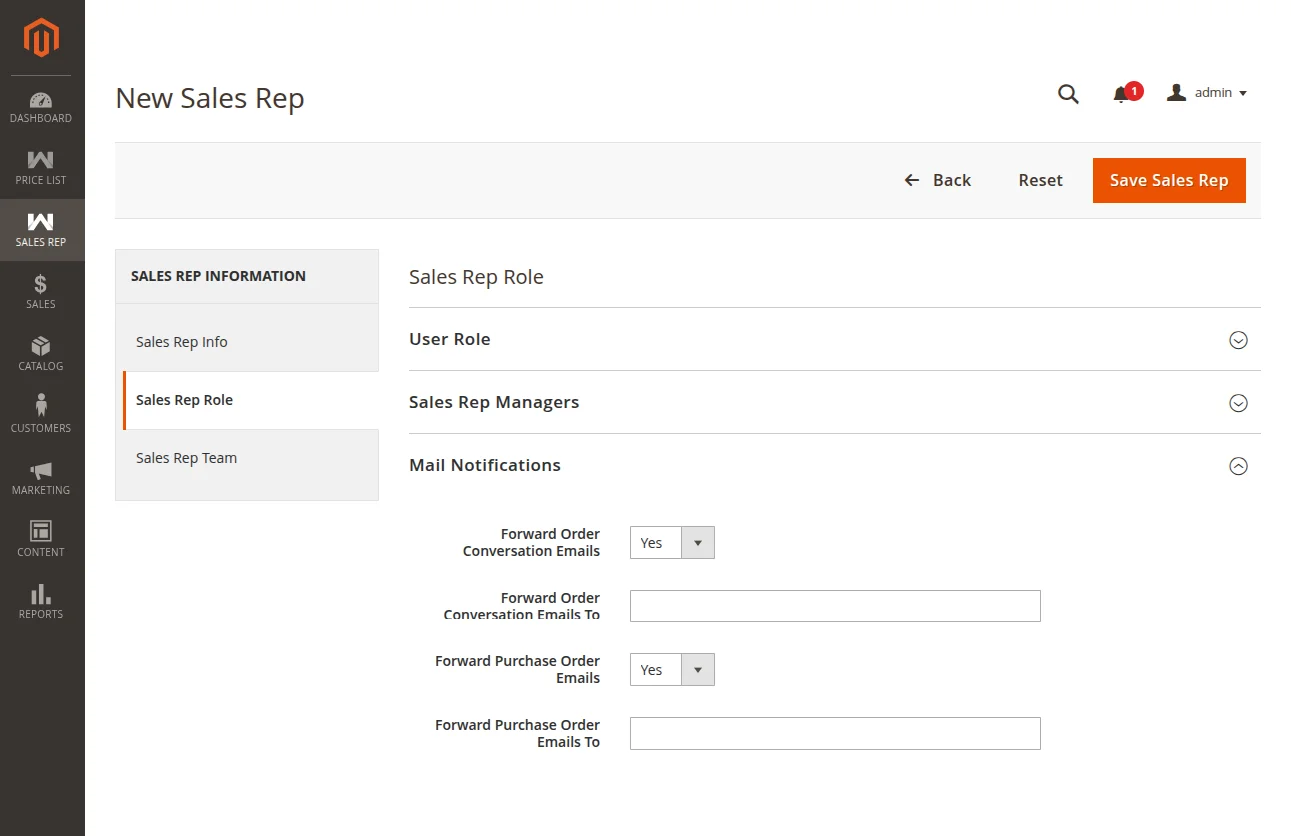
Mail Notifications:
Under Mail Notifications, the admin can Forward:
- Order Conversation Emails: The admin either select “Yes or No” so as to forward and not forward the order conversation emails.
- Order Conversation Emails To: If “forward order conversation emails” field is set as yes, then against this tab, the admin needs to add to whom the emails must be forwarded.
- Purchase Order Emails: The admin either select “Yes or No” so as to forward and not forward the purchase order emails.
- Purchase Order Emails To: If “forward purchase order emails” field is set as yes, then against this tab, the admin needs to add to whom the purchase order emails must be forwarded.
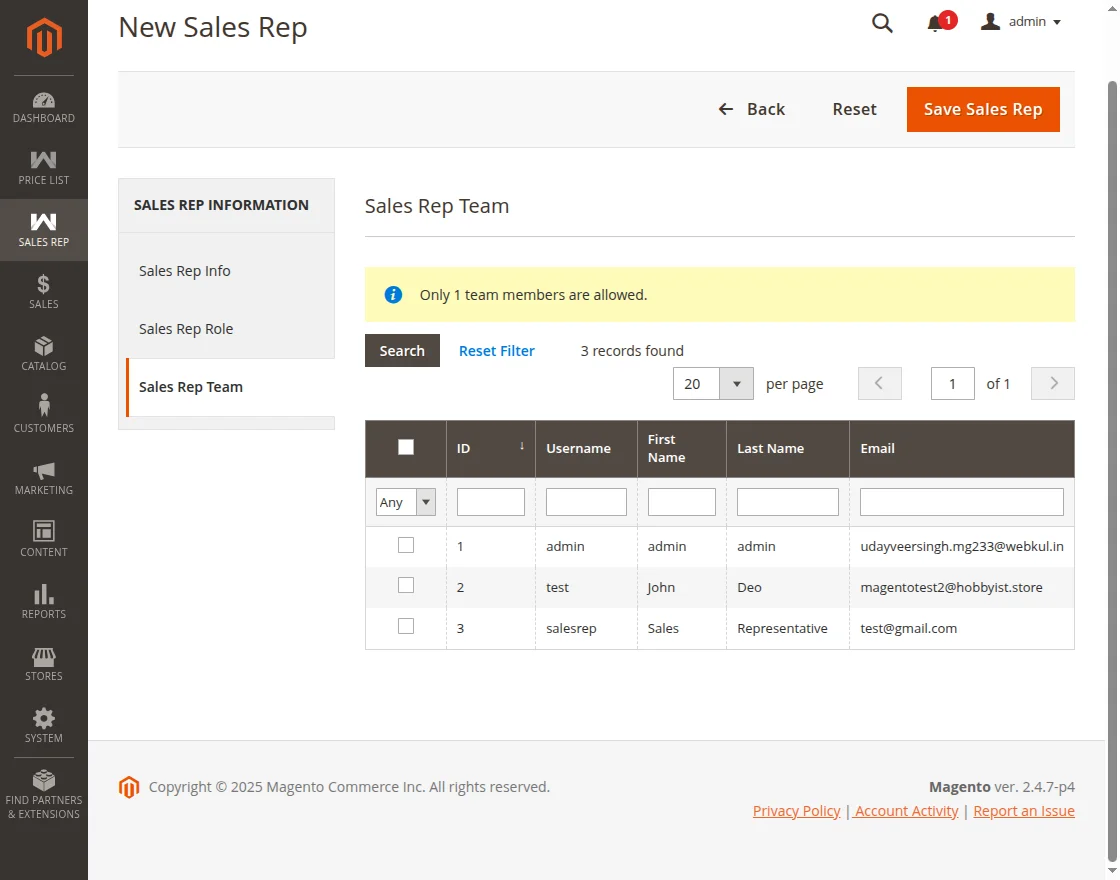
Sales Rep Team tab:
Sales Rep Team tab displays a tabular demonstration that includes the details of the sales representative team.
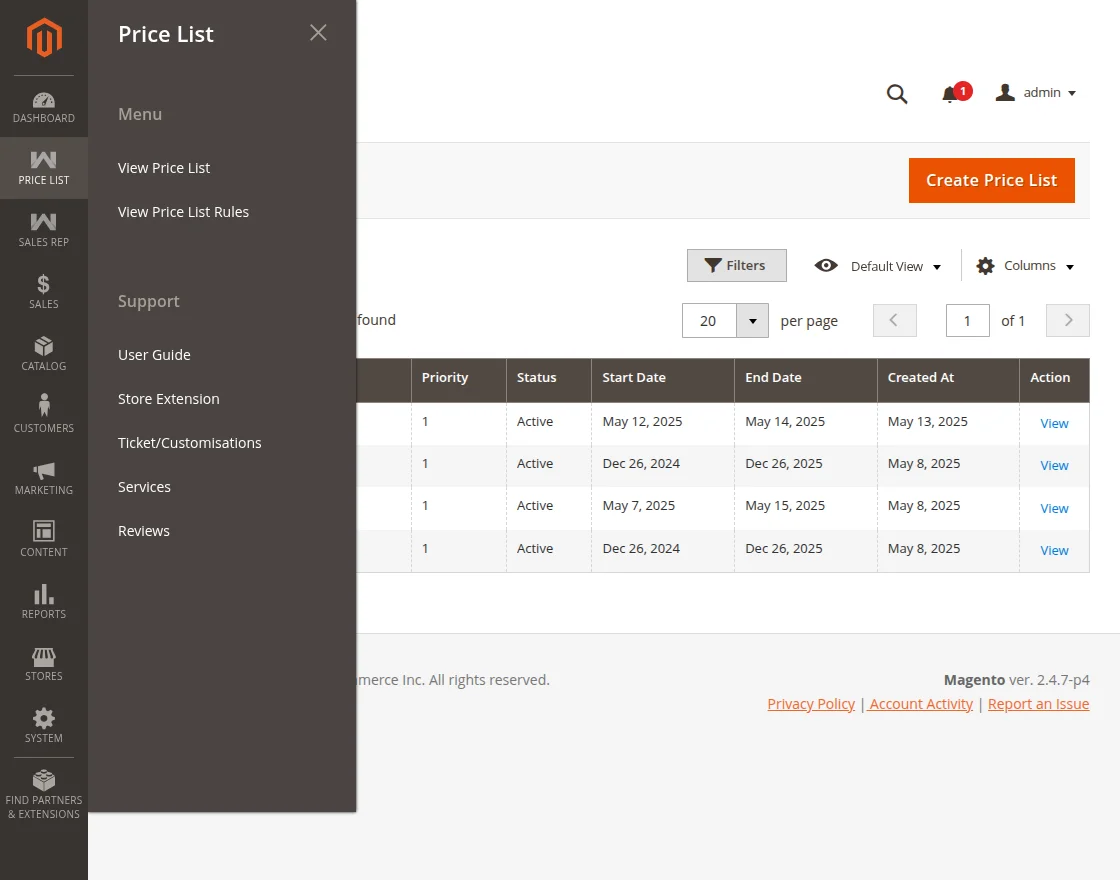
Price List Tab:
The Price List tab includes the following two options:
- View Price List
- View Price List Rules
Above all, now discuss each option available for the Price List tab.
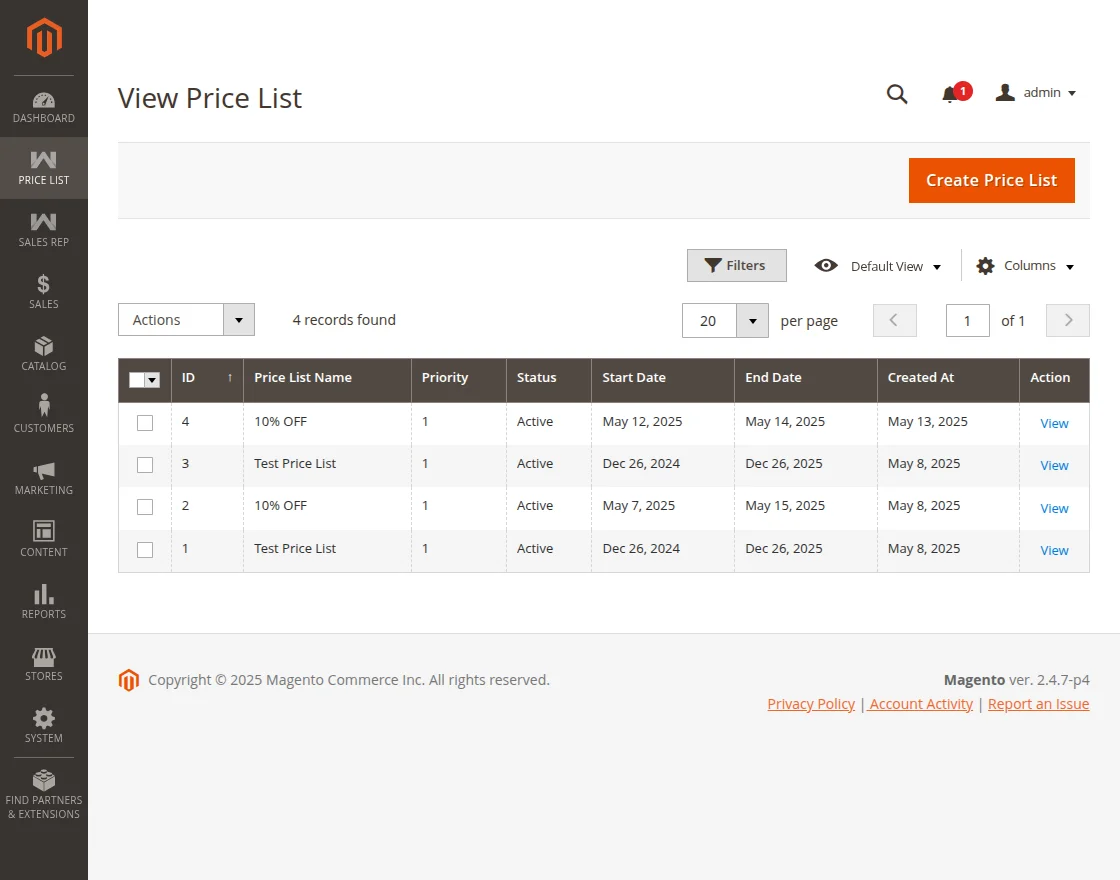
Price List- View Price List
Under the View Price List option, the sales rep can view the Price List created.
The sales rep can also create a price list by clicking on the Create Price List tab as shown in the image below.
Above all, it includes the following tabs:
- Price List Information
- Rules
- Customers
- Customer Group
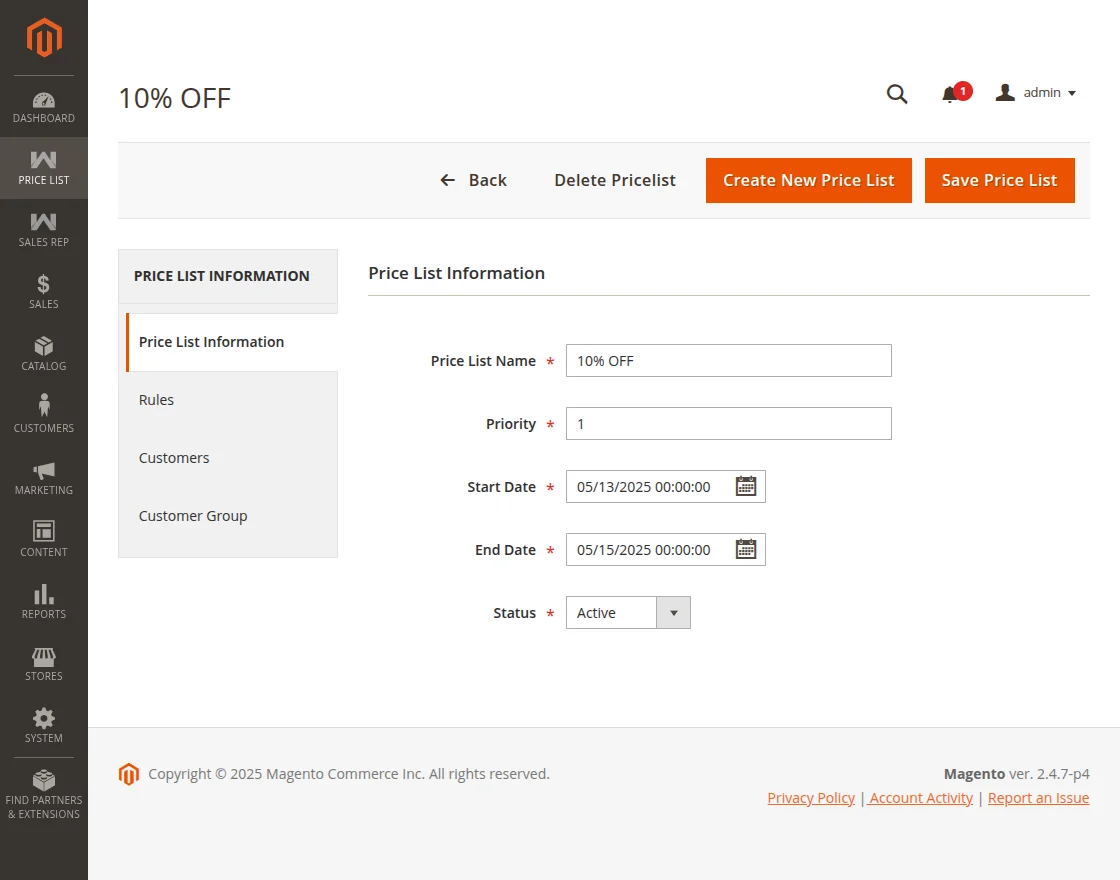
Price List Information:
The PriceRule_1 page opens up where the sales rep adds the details of the Price List Information. For instance, Price List Name, Start Date, End Date, and Status also.
Rules:
The Rules tab displays the list of rules created for the Price List in a tabular form. In addition, details such as ID, Title, Calculation type, Price Type, Amount, Priority and Status.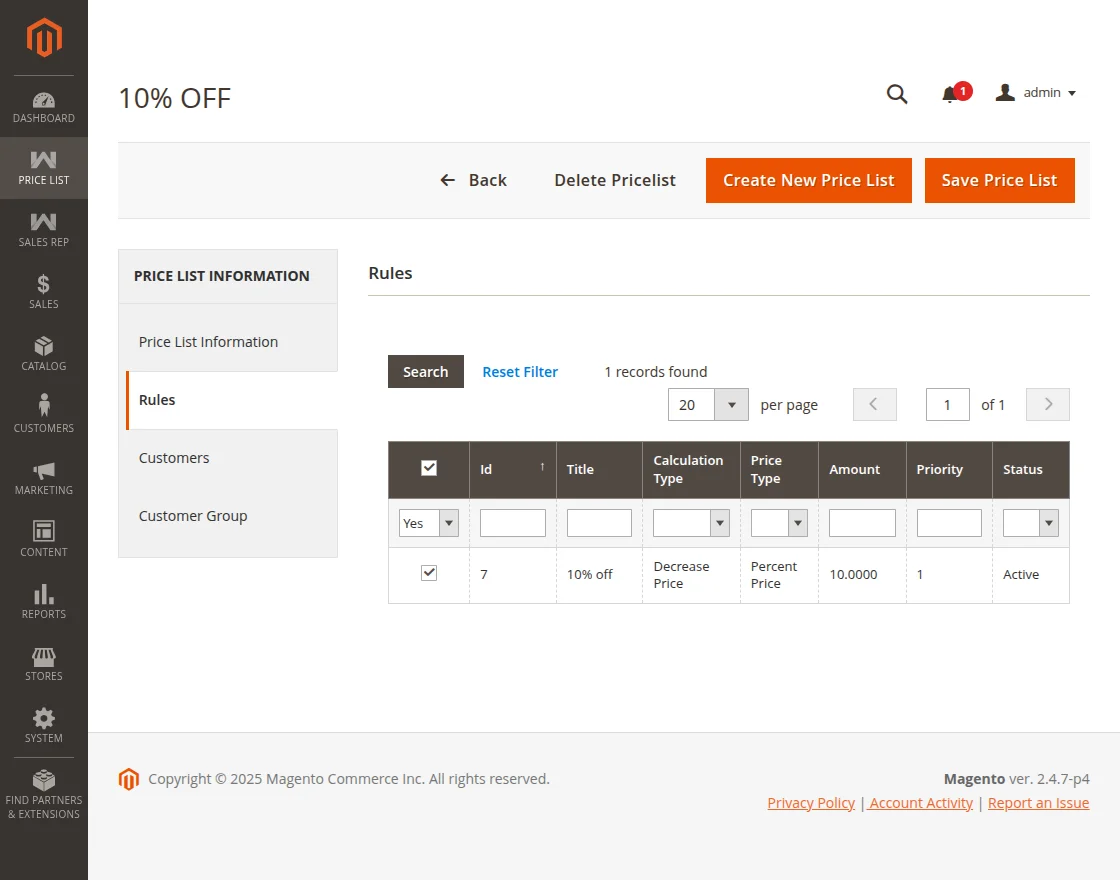
Customers:
After that, under the Customers tab, the sales rep can select the customer from the given list for which the price list is to be created.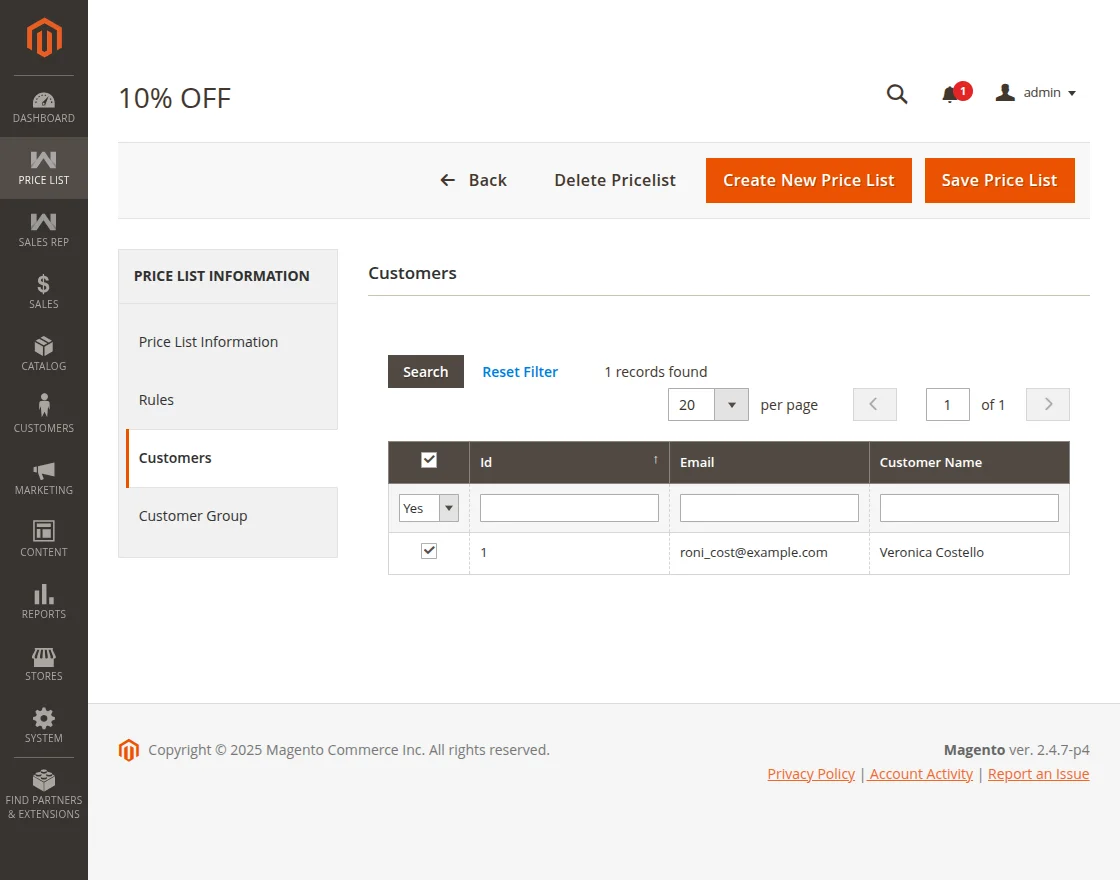
Customer Group:
Under the Customer Group tab, the sales rep can choose any of the given customer groups so as to create the Price List.
After that, the Sales Rep can choose either General, Wholesale or Retailer or all the given customer groups for which the price list shall be created. 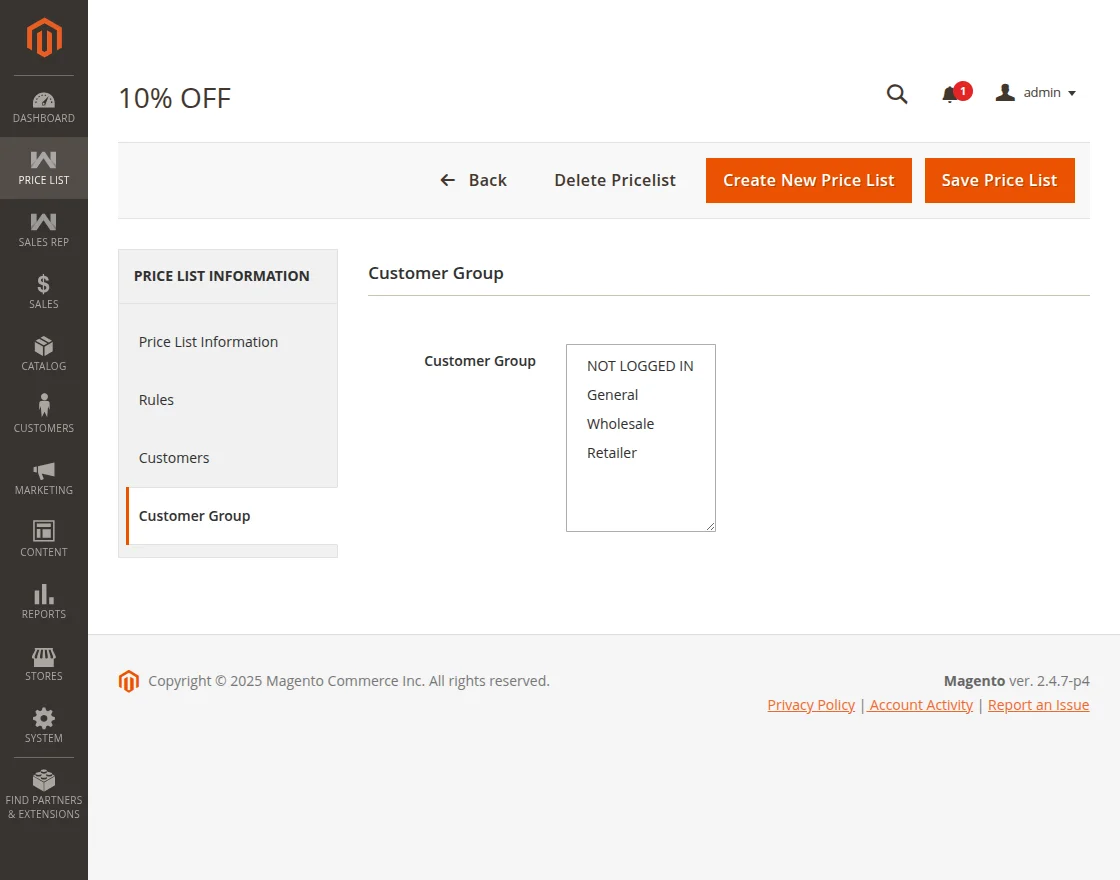
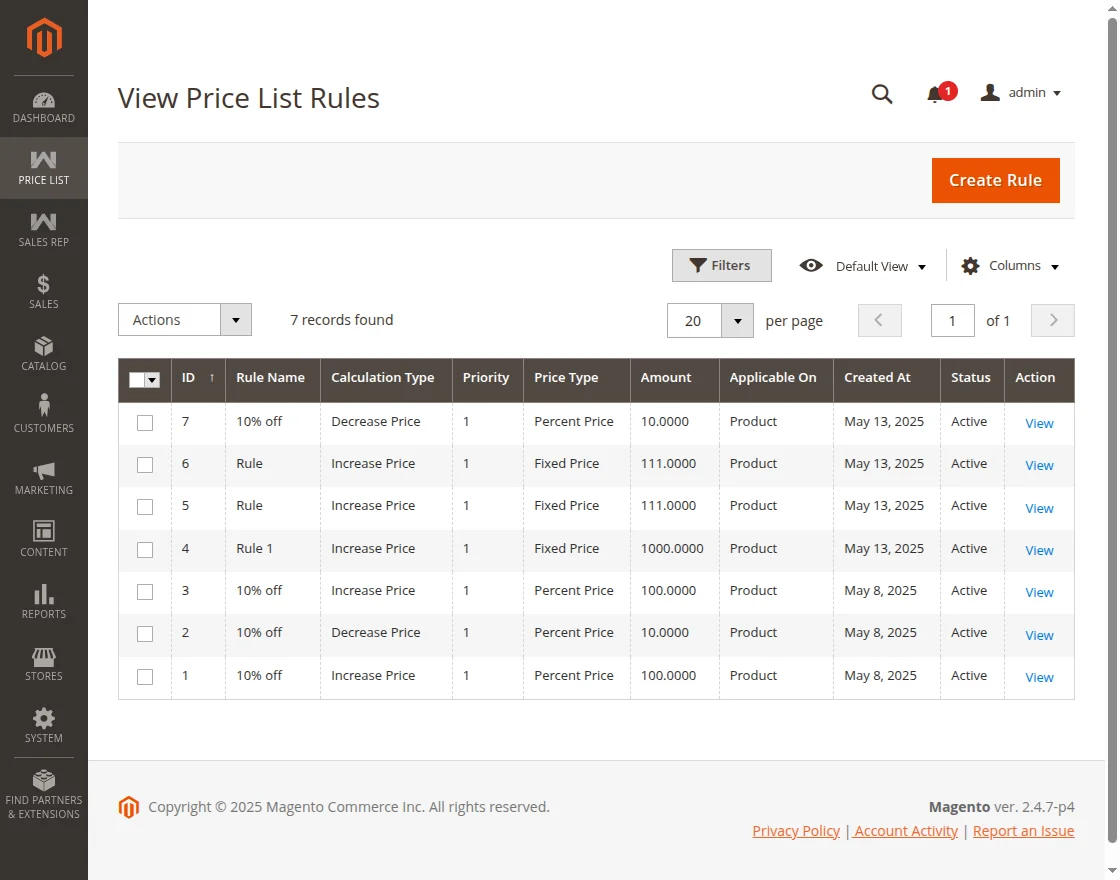
Price List: View Price List Rules
Under View Price List the sales rep can view the list of rules which are created.
The sales rep can create a new price list rule by clicking the Create Rule button.
Therefore, they can choose to view the Price List Rule by clicking the View action against the Price Rule.
It includes the following tabs:
- Price List Information
- Products
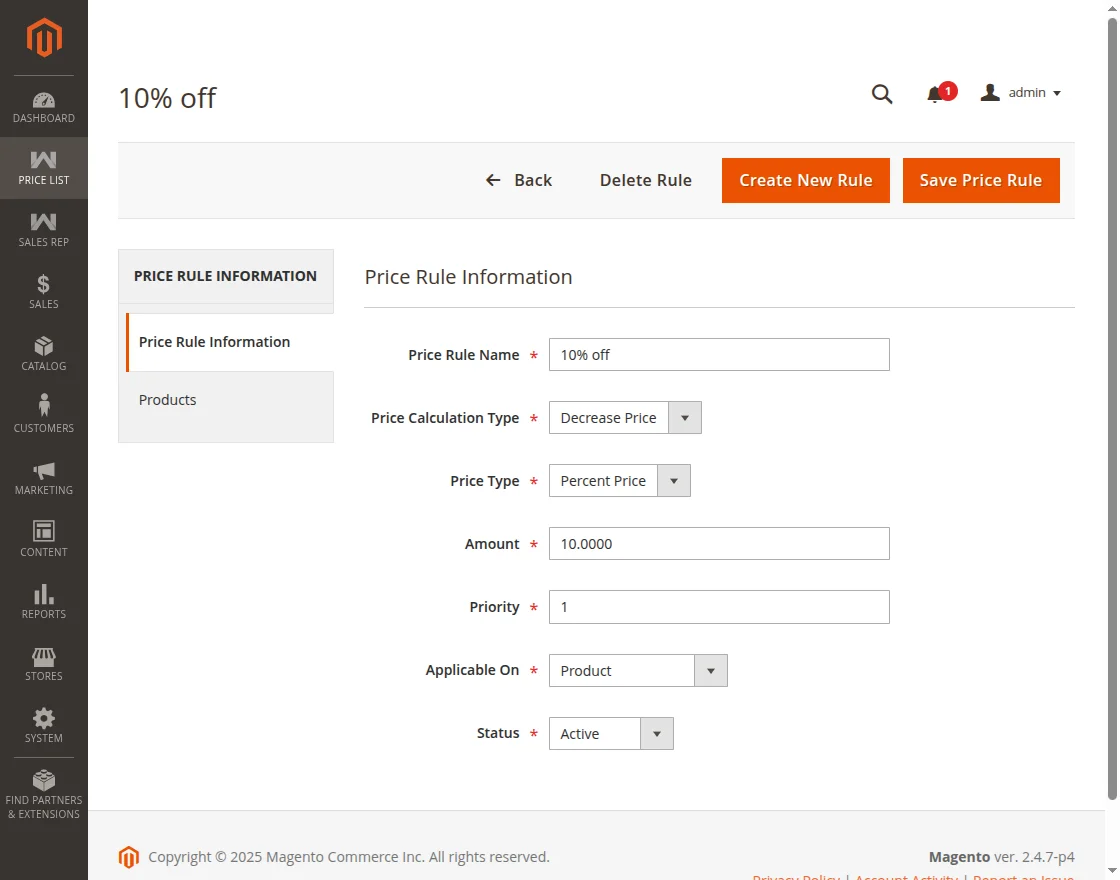
Price Rule Information:
The Price Rule Information tab includes information about the Price Rule.
Above all, it displays details such as Price Rule Name, Price Calculation Type, Price Type, Amount, Priority, Applicable on, and Status.
Similarly, the sales rep can choose either the Rule is to be applied on the Products or Categories, as need be against the Applicable On field.
Products:
If chosen Products against the Applicable On the field, then, under the Products tab, the sales rep can choose the product for that price rule. 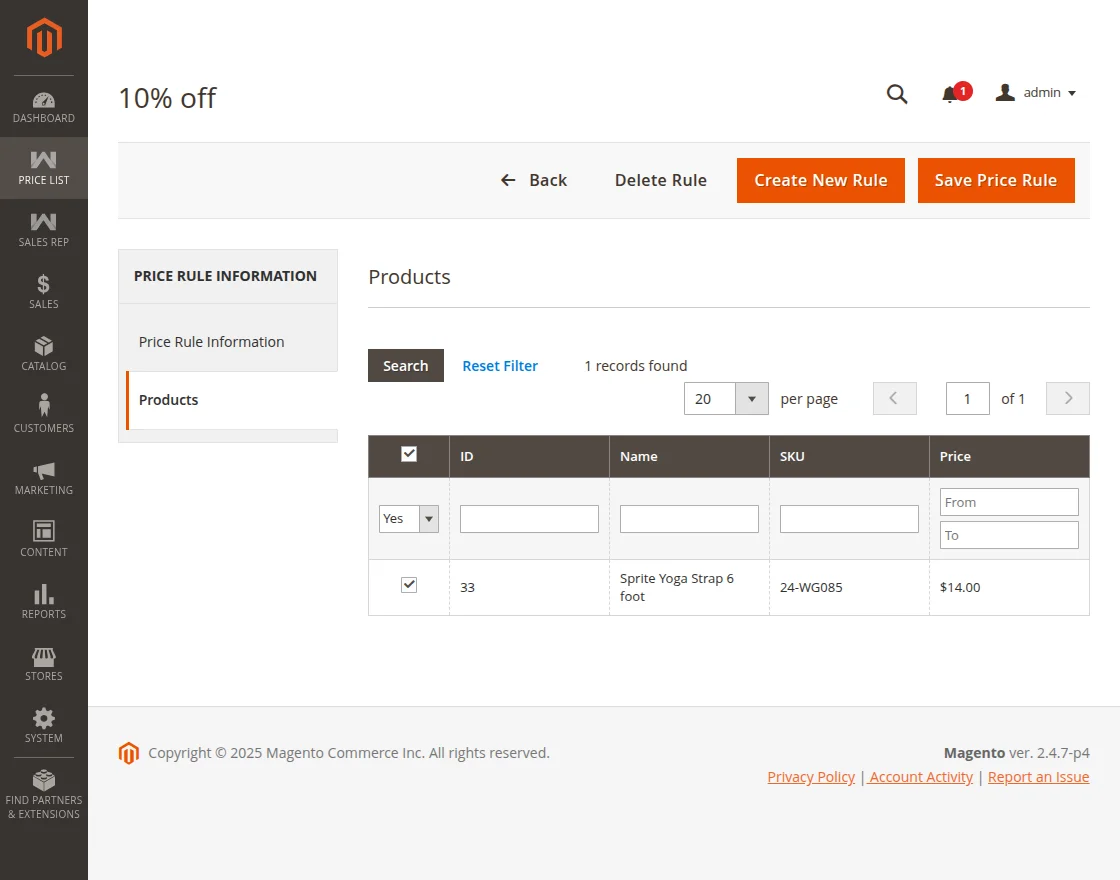
Discount
Furthermore, the admin can set ‘Allow To Use Discount while quote product is in the cart‘ as Yes, to enable a discount on the quoted product.
this will be reflected on the customer front at the time of checkout as in the below screenshot. The discount can be seen here on the cart:

That’s all for the Sales Representative Extension for Magento 2. If you still have any issues, feel free to add a ticket and let us know your views on our Webkul Support System.
Current Product Version - 5.0.2
Supported Framework Version - Magento 2.0.x, 2.1.x, 2.2.x,2.3.x, 2.4.x

1 comments