In this dev doc article, we will talk about Adobe Commerce (Magento 2) Extension Creator. Further, we will also learn how to use Adobe Commerce (Magento 2) Code Generator which has been developed by Webkul’s Magento Team.
Firstly, you need to install the module. You can install it with the composer by running following command
composer require webkul/code-generator
You can download it from GitHub https://github.com/webkul/magento2-code-generator also. Then run the php bin/magento setup:upgrade and php bin/magento setup:di:compile to successfully install it.
AutoMageDev – Snippets and AutoComplete
Advanced Magento 2 AutoSuggestion extension for Visual Studio Code.
Now let’s check out how we can use this module to generate codes.
Note: Now this module also works for interactive cli, you need to pass only the type in the command. Ex: php bin/magento generate:code --type=new-module

Create New Module
php bin/magento generate:code Webkul_ModuleName --type=new-module
Available Params:--type=new-module

It will create the directory Webkul/ModuleName under app/code folder and also create the required files which are registration.php and module.xml.
Create Models
php bin/magento generate:code Webkul_ModuleName
--type=model
--table="wk_modulename_testdata"
--name=TestData
Available Params:--type=model
--table="table_name"
--name=ModelName
I have manually created InstallSchema.php to create a table named wk_modulename_testdata.

When we run the command it will create the model, resource model, collection classes and api data interface for that table. And if you are using db_schema.xml file to create the table then it will also generate a getter and setter.
Create Repository
php bin/magento generate:code Webkul_ModuleName
--type=repository
--name=TestDataRepository
--model-class="\Webkul\ModuleName\Model\TestData"
--collection-class="\Webkul\ModuleName\Model\ResourceModel\TestData\Collection"
Available Params:--type=repository
--name=RepositoryClassName
--model-class=ModelClassFullName
--collection-class=CollectionClassFullName

It will create the repository class and the interface.
Create Controller
php bin/magento generate:code Webkul_ModuleName
--type=controller
--name=Index
--area=frontend
--path=Test
--router=test
Available Params:--type=controller
--name=ControllerName
--area=frontend|adminhtml
--path=RelativeToModuleControllerFolder
--router=RouteName
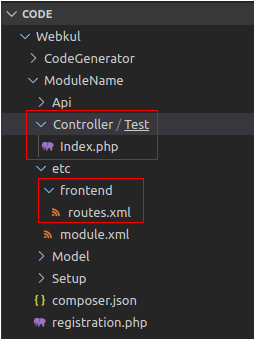
It will create the controller class and also create the routes.xml if it is not available. If you want to create a controller for the admin end then you must adminhtml in the area parameter. In that case, the path parameter will be relative to Controller/Adminhtml folder as shown below,
php bin/magento generate:code Webkul_ModuleName
--type=controller
--name=Index
--area=adminhtml
--path=Test
--router=test

Create Helper
php bin/magento generate:code Webkul_ModuleName --type=helper --name=Data
Available Params:--type=helper
--name=HelperName
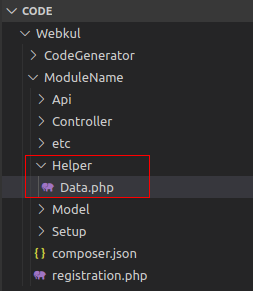
This command creates the Helper class in the Helper folder.
Create Plugin
php bin/magento generate:code Webkul_ModuleName
--type=plugin
--name=ProductAttributesUpdater
--plugin="\Magento\Catalog\Model\Product"
Available Params:--type=plugin (Optional, default area is all)
--name=PluginName
--plugin=FullClassName
--area=frontend|adminhtml
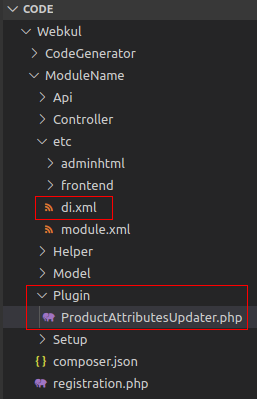
This will create the Plugin class in the Plugin folder and add the plugin entry in the di.xml file. If di.xml is not already available then it will create a new di.xml file.
The area parameter is optional, if it is not provided then it will create di.xml directly under the etc folder and if provided then it will create the di.xml under the given area folder which will be under the etc folder.
Create Observer
php bin/magento generate:code Webkul_ModuleName
--type=observer
--name=SalesOrderPlaceAfterObserver
--event=checkout_submit_all_after
Available Params:--type=observer (Optional, default area is all)
--name=ObserverName
--event=event_name
--area=frontend|adminhtml

The observer command will create the Observer class in the Observer folder and create events.xml if events.xml is not already created. Otherwise it will add the entry in the existing events.xml file.
The area parameter is optional, if it is not provided then it will create events.xml directly under the etc folder and if provided then it will create the events.xml under the given area folder which will be under the etc folder.
Create Cron
php bin/magento generate:code Webkul_ModuleName
--type=cron
--name=SendStatement
--schedule="0 1 * * *"
Available Params:--type=cron (Optional, default schedule is “0 1 * * *”)
--name=CronName
--schedule="0 1 * * *"

It will create the Cron class in the Cron folder and will create the crontab.xml file if does not exist else it will just add the entry.
Create Custom Logger
php bin/magento generate:code Webkul_ModuleName
--type=logger
--name="customlogfile"
Available Params:--type=logger (Optional, default name is vendorname_modulename.log)
--name=loggerfilename

When we run the command it will create the required files for a custom logger. Then you can use the logger class which is \Webkul\ModuleName\Logger\Logger in our case to log data in your custom logger file. Note- No need to add .log extension in the –name param.
Create Command
php bin/magento generate:code Webkul_ModuleName
--type=command
--name=PrintHello
--command='test:hello'
Available Params:--type=command
--name=CommandClass
--command='test:hello'
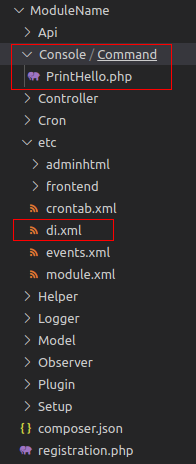
It will create the command class in Console/Command folder. So when we run php bin/magento test:hello (in our case) it will run the execute method of the command class.
Create Override of classes like Block, Model, Controller, etc
php bin/magento generate:code Webkul_ModuleName
--type=rewrite
--name=ProductView
--rewrite="Magento\Catalog\Controller\Product\View"
--path="Rewrite/Controller"
Available Params:--type=rewrite (Optional, if not provided it will create the class in Rewrite folder)
--name=ClassName
--rewrite='OverriddenClass'
--path=RelativeToModuleFolder
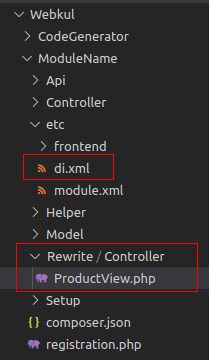
It will create a class with the name as in –name param and it will be created in a folder that has been provided in –path param.
If no –path param is provided then it will be created in the Rewrite folder by default. The class which has to be overridden must be provided in –rewrite param. The preference entry will be added in the di.xml file.
Create View
php bin/magento generate:code Webkul_ModuleName
--type=create-view
--name=test_test_index
--area=frontend
--block-class=MainData
--template=test.phtml
--layout-type=2columns-left

<strong>Available Params:</strong>
<code>--type=create-view
--name=route_controller_action
--area=frontend|adminhtml
--block-class=Main</code> <strong><em>(Optional, default value is Main)</em></strong><code>
--template=content.phtml</code><strong><em>(Optional, default value is content.phtml)</em></strong><code>
--layout-type=empty|1column|2columns-left|2columns-right|3columns|admin-empty|admin-1column|admin-2columns-left</code> <strong><em>(Optional) </em></strong>

This command will create the block class, layout file and the template file under respective directories. You can generate view for both frontend and backend with this command.
Create Email Template
php bin/magento generate:code Webkul_ModuleName
--type=email
--name="Email Label"
--id="modulename_email_test"
--template="test"
Available Params:--type=email (Optional, default value is modulename_email_label)
--name="Label"
--id="modulename_email_label"
--template="label"

This will create the template file in view/frontend/email folder and add the entry for the email in email_templates.xml file which will be created automatically if not exist. You can check more about emails on blog.
Create Payment Method
php bin/magento generate:code Webkul_CustomPay
--type=payment
--payment-code=CustomPayPOD
--name="Custom Pay POD"
Available Params:--type=payment
--payment-code=PaymentCode--name="Payment Name" (Optional, default value is “Custom Payment”)
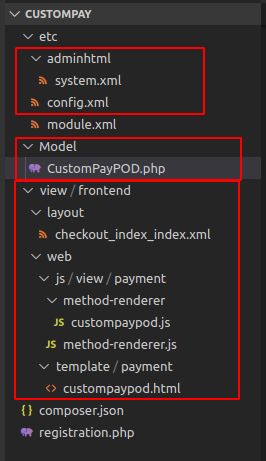
The payment creates command will create the necessary files for creating a payment method. It will add an entry in system.xml to show it in the Payment Methods section.
Also, the files required to show and modify the payment method on the checkout page will be created. You just need to edit the model class.
Create Shipping Method
php bin/magento generate:code Webkul_CustomShip
--type=shipping
--shipping-code=custom_shipping
--name="Custom Shipping"
Available Params:--type=shipping
--shipping-code=shipping_code--name="Custom Shipping" (Optional, default value is “Custom Shipping”)
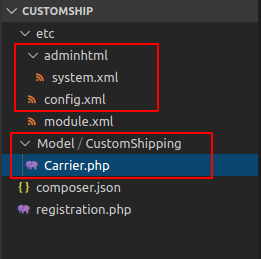
It will add an entry in system.xml to show it in the Shipping Methods section. Also, the Carrier Class will be created where you can modify the collectRates method.
Create Unit Test
php bin/magento generate:code Module_Name --type=unit-test
Available Params:
–type=unit-test
This will generate the Unit Test Classes under the Test/Unit folder. To check out more about the Unit Test please follow our blog Unit Test Implementation in Magento 2 custom module.
Create Ui Component Listing
php bin/magento generate:code Webkul_TestModule
--type=ui_component_listing
--name=test_test
--columns_name=test_column
--model_class_name=TestData
--table=test_table
Available Params:
--type=ui_component_listing
--name=Ui Grid Listing File Name
--columns_name=Listing Columns Name
--model_class_name=Model Class Name for getCollection
--table=Table Name for Get Column
It will add an entry in the di.xml file and create the listing file in the view/adminhtml/ui_component folder.
Create Ui Component Form
php bin/magento generate:code Module_Name
--type=ui_component_form
-name="test_test_form"
--provider_name="Data Provider Name"
--model_class_name="Model Class Name"
--fieldset_name="Field Set Name"
--fieldset_label="Field Set Label"
--submit_url="Form Submit Url"
--form_field="Form Fields in Json Format"
Available Params:
--type=ui_component_form
--name=Ui Form File Name
--provider_name=Data Provider Class Name
--model_class_name=Model Class Name for getCollection
--fieldset_name=Field Set Name for Field
--fieldset_label=Field Set Label
--submit_url=Form submit url (test/test/save)
--form_field=[{"field_name": "test_input_field", "field_type": "input", "field_label": "Test Input Field", "is_required": "true"}]
Note: The form will accept the (input, select, multiselect, imageUploader) field types.
It will create the save and back button for the form and also add a DataProvider for the form data in Ui/DataProvider folder after that it will create a UI component form in the view/adminhtml/ui_component folder
For technical assistance, please contact us via email at [email protected]. Additionally, explore a variety of solutions to improve your online store by visiting the Adobe Commerce extensions page.
For professional advice or to develop customized features, consider hiring Adobe Commerce Developers for your project.
Thanks for reading the blog.

Be the first to comment.