Inline grid edit in admin panel makes life easier and edits faster as there is no need to redirect the page to edit a row in a grid. We can edit on the row itself.
Step 1-
We use the following code inside _prepareColumns() for the column we want to edit in our grid file.
$this->addColumn('name', array(
  'renderer' => 'Company_Module_Block_Adminhtml_Grid_Renderer_Inline',
  'header' => Mage::helper('module')->__('Name'),
  'index' => 'name',
));
Step 2-
In our renderer file we use the following code
Click here to use grid renderer in magento 2
class Company_Module_Block_Adminhtml_Grid_Renderer_Inline extends Mage_Adminhtml_Block_Widget_Grid_Column_Renderer_Input
{
public function render(Varien_Object $row)
{
$html = parent::render($row);
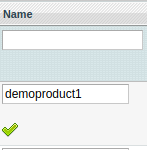
$html .= '<img src="'.Mage::getBaseUrl('media').'module/tick.png" id="addName'. $row->getId() .'">';
return $html;
}
}
After this, textbox will appear with the values in it and the image to save the data on click.
Step 3-
On ‘click’ event of the image our data should be saved. So in our module.xml file in design/adminhtml/default/default, we add the following code inside the handler
<reference name="js">
    <block type="core/template" name="edit" template="mpeticketsystem/edit.phtml" />
</reference>
Step 4-
Next in edit.phtml file we can write our jquery where we call our controller through ajax on click of the image.
$(document).ready(function(){
    $(document).on('click','[id^=addName]',function(){
        var id = this.id;
        var pro_id = id.substring(7);
        var prev = $(this).prevAll("input[type=text]").val()

        $.ajax({
            url: "<?php echo Mage::helper('adminhtml')->getUrl('module/adminhtml_index/functionName') ?>",
            type: 'get',
            dataType: 'json',
            data: { id: this.id, pro_id: pro_id, text: prev },
            beforeSend:function() {
    	        Element.show('loading-mask');
    			    },
            complete:function() {
    	        Element.hide('loading-mask');
    			    },
            success: function(transport){
                var data = transport;
                if(data['error'] == true) {
                    alert(data['items']);
                } else {
                    alert("Updated");
                }
            }
        });
    });
});
Step 5-
At last in our controller file we write code to save the data
public function updateproductnameAction() {
    $params = $this->getRequest()->getParams();
    $data = Mage::getModel('module/model')->load($params['pro_id']);
    try{
        $data->setName($params['text']);
        $data->save();
        $response=array('error'=>false);
    } catch (Exception $e) {
        $response=array('items'=>$e->getMessage(),'error'=>true);
    }
    $this->getResponse()->setBody(Mage::helper('core')->jsonEncode($response));
}
This will save the text written inside the textbox.
This example is for a single column and we can implement it for several columns as required.
Hope this example helps. Good luck.

Be the first to comment.