Online shoppers expect ecommerce websites to be fast, responsive, and easy to use across different devices. At the same time, businesses need the flexibility to change their storefront without rebuilding the entire commerce system.
Headless eCommerce separates the frontend from the backend and connects them through APIs. This lets businesses create flexible shopping experiences while managing products, orders, and customers through their existing platform.
If you’re interested in building a modern ecommerce storefront, you can also explore our guide on how to build an ecommerce website with Next.js
In this guide, we will explain what headless ecommerce is, how it works, its benefits and challenges, and how to set up a headless ecommerce website step by step.
What Is Headless eCommerce?
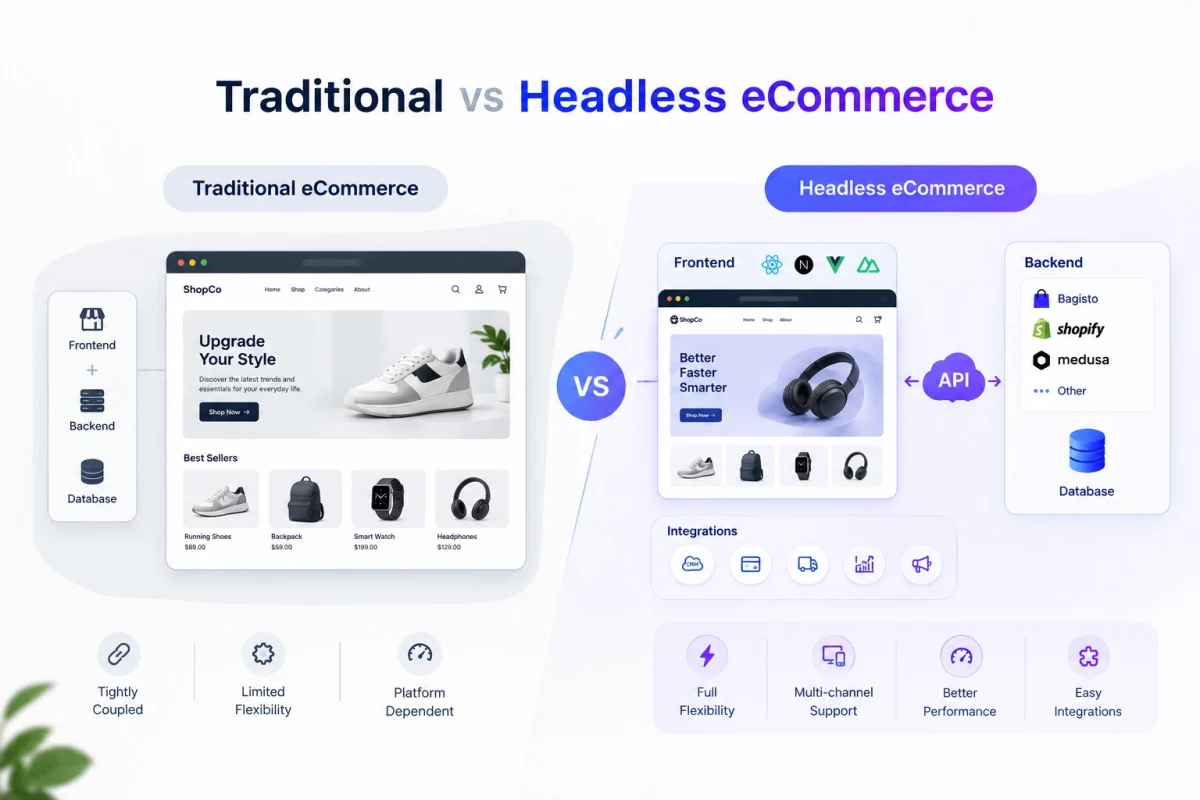
Headless ecommerce is an architecture where the frontend and backend of an ecommerce store are separated.
The backend manages business operations such as products, inventory, customers, orders, payments, and shipping. The frontend is responsible for what customers see and interact with.
Instead of the backend directly generating the storefront pages, the frontend communicates with the backend through APIs.
For example:
- Frontend: Next.js, React, Vue, or Nuxt
- Backend: Bagisto, Shopify, Medusa, or another ecommerce platform
- API: REST or GraphQL
- Database: Managed by the ecommerce backend
- Hosting: Separate hosting can be used for the frontend and backend
This approach gives developers more control over the storefront while keeping ecommerce operations in the backend.
Traditional vs Headless eCommerce
In a traditional ecommerce setup, the frontend and backend are usually part of the same application.
In a headless setup, they are separate applications connected through APIs.
| Factor | Traditional eCommerce | Headless eCommerce |
|---|---|---|
| Frontend | Limited to platform’s theming system | Fully customizable with any frontend framework |
| Backend | Tightly connected | Independent |
| Design flexibility | DepTheme-based | Code-level control |
| APIs | May be limited | API-first approach |
| Performance | Depends on platform/theme | Can be optimized with modern frameworks |
| Multiple channels | More limited | Easier to support |
| Development | Simpler | More technical |
| Maintenance | Usually easier | Requires multiple systems |
Benefits of Headless eCommerce
Businesses generally choose headless architecture when they need more control over their storefront and customer experience.
1. Complete Frontend Flexibility
Developers can build the storefront using frameworks such as Next.js, React, Vue, or Nuxt instead of being restricted to the ecommerce platform’s theme system.
This makes it easier to create custom layouts, interactions, animations, and shopping experiences.
2. Better Performance
Modern frontend frameworks support techniques such as server-side rendering, static generation, image optimization, and caching.
When combined with a CDN and an optimized API layer, these techniques can help improve page loading and the overall shopping experience.
3. Omnichannel Experiences
A single ecommerce backend can provide data to multiple customer-facing applications.
For example, the same backend can power:
- Web storefront
- Mobile application
- Progressive web application
- In-store kiosk
- Other digital channels
This allows businesses to maintain their commerce operations in one place while creating different experiences for each channel.
4. Easier Frontend Redesigns
Since the frontend is independent from the backend, developers can redesign the storefront without rebuilding the entire ecommerce system.
The backend can continue managing products, customers, orders, and inventory while the frontend is updated independently.
5. Flexible Integrations
APIs make it easier to connect ecommerce systems with external services such as:
- CRM platforms
- ERP systems
- Payment gateways
- Shipping services
- Search platforms
- Marketing tools
- Analytics platforms
How to Set Up a Headless eCommerce Website
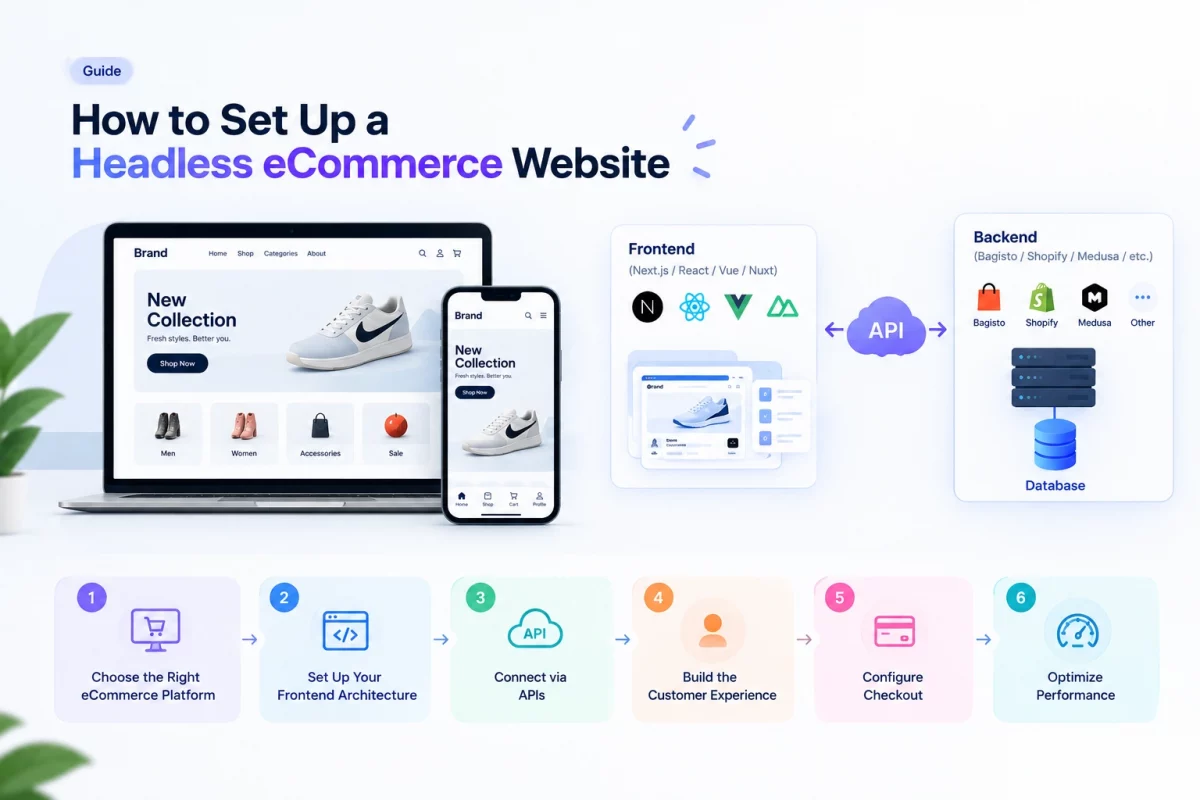
Setting up a headless ecommerce website involves more than connecting a frontend to an ecommerce API. You need to plan the platform, frontend, APIs, checkout, and performance.
The following steps cover the most important parts of building a headless ecommerce website without going too deep into framework-specific implementation.
1. Choose the Right eCommerce Platform
The first step is to choose the ecommerce backend that will manage your store’s core operations.
The backend should handle products, categories, inventory, customers, carts, orders, promotions, and checkout. It should also provide APIs that allow the separate frontend application to access this functionality.
Popular options include:
- Bagisto Headless Commerce – Open-source and self-hosted with REST and GraphQL API support.
- Shopify – A hosted platform with APIs for building custom storefronts.
- Medusa – An open-source, API-driven platform designed for customizable commerce experiences.
When selecting a platform, consider API capabilities, customization, hosting requirements, scalability, integrations, and overall cost.
2. Select the Frontend Technology
Once you have selected the commerce backend, choose the technology for your customer-facing storefront.
Frameworks such as Next.js, React, Vue, and Nuxt can be used to create custom ecommerce experiences. If you are using Next.js, you can also explore our guide on how to build eCommerce with Next.js for a practical implementation approach.
Choose a frontend that can handle the store’s rendering and performance needs. Product and category pages can use server-side rendering or static generation, while carts and customer accounts can use dynamic server-side or client-side interactions.
The frontend should communicate with the commerce backend through APIs instead of accessing the backend database directly. This keeps the frontend and backend separated and makes the architecture easier to maintain.
3. Design the API Integration
The API is the connection between the frontend and the commerce backend.
Before development begins, identify the APIs required for the complete shopping experience, including:
- Product and category data
- Search and filtering
- Customer accounts
- Cart management
- Checkout
- Payment
- Shipping
- Orders
Create a dedicated API layer in the frontend application to handle these requests. This keeps commerce logic separate from UI components and makes the application easier to maintain.
For security, private API credentials and sensitive tokens should be handled on the server side and should not be exposed unnecessarily in browser code.
4. Build the Storefront and Catalog
With the API integration in place, build the customer-facing storefront.
Start with the core ecommerce pages:
- Homepage
- Category pages
- Product pages
- Search results
- Cart
- Customer account
- Checkout
Connect product and category pages to the commerce APIs and display information such as product images, prices, variants, availability, and descriptions.
At this stage, also plan URL structures, internal linking, responsive layouts, and product image optimization.
5. Set Up Customer, Cart, and Checkout Flows
A headless store needs more than product pages. The complete customer journey must work across the frontend and backend.
Customer authentication should allow shoppers to register, log in, manage their accounts, view orders, and save addresses.
The cart should support:
- Adding products
- Updating quantities
- Removing products
- Applying discounts
- Calculating totals
- Maintaining cart state
The checkout then connects these steps with customer information, addresses, shipping, payment, and order creation.
Because these flows involve multiple API requests and customer sessions, they should be planned early rather than treated as a final implementation step.
6. Integrate Payment and Shipping
Payment and shipping are important parts of the checkout flow. In a headless setup, both need to be connected between the storefront and commerce backend.
Payment Integration
Payment integration connects the checkout with a payment provider such as Stripe, PayPal, or a regional payment gateway.
The storefront collects the required checkout details, while payment processing is handled by the payment provider or commerce backend based on the integration flow.
Shipping Integration
Shipping integration is used to fetch available shipping methods and calculate delivery charges during checkout.
Once the customer selects a shipping method, the selection should be sent to the commerce backend before placing the order.
Test both integrations with different checkout scenarios. This should include successful payments, failed or cancelled payments, unavailable shipping methods, and other checkout errors.
7. Implement SEO and Performance
SEO and performance should be considered while building the storefront, not after development is complete.
For SEO, implement:
- Dynamic page titles and meta descriptions
- Canonical URLs
- Product and breadcrumb structured data
- XML sitemap
- Robots.txt
- SEO-friendly URLs
- Internal linking
For performance, use appropriate rendering and caching strategies.
Stable product and category content can be cached or statically generated where appropriate, while dynamic information such as cart and customer data should be handled separately.
Image optimization, CDN delivery, API caching, and Core Web Vitals monitoring can further improve the storefront experience.
8. Test and Deploy the Store
Before launching, test the complete shopping journey from product discovery to order placement.
Check the store across different devices and browsers, and test scenarios such as:
- Product out of stock
- Invalid coupons
- Expired customer sessions
- Failed payments
- Cancelled payments
- Shipping method changes
- Cart updates
- API failures
Once testing is complete, deploy the frontend and backend using infrastructure appropriate for the selected technologies.
The production setup should include SSL, environment variables, API security, monitoring, backups, and error tracking.
A successful headless ecommerce launch is not just about making the storefront work. The frontend, commerce backend, APIs, payment systems, shipping services, and performance strategy all need to work together reliably.
Bagisto vs Shopify vs Medusa for Headless eCommerce
Bagisto, Shopify, and Medusa all support headless architectures, but they differ in how they are built, hosted, and extended.
| Factor | Bagisto | Shopify | Medusa |
|---|---|---|---|
| Headless support | Yes, via dedicated Shop and Admin API packages | Yes, via Shopify’s Storefront API and Hydrogen | Yes, headless by design |
| API availability | REST and GraphQL | GraphQL (Storefront and Admin APIs) | Primarily REST, with a modular API layer |
| Hosting | Self-hosted | Fully hosted | Self-hosted/managed |
| Source Code | Full access | Platform-controlled | Full access |
| Customization | High | Moderate | High |
| Infrastructure Control | High | Low | High |
| Best For | Custom ecommerce | Custom ecommerce Fast hosted commerce | Developer-focused commerce |
Where Each Platform Tends to Stand Out
Bagisto
Bagisto Headless is suited to teams that want more control over their source code and infrastructure. As an open-source, self-hosted platform, it can be customized to match specific business requirements.
It supports features such as catalog management, customers, cart and checkout, promotions, localization, and multi-store setups. It also provides REST and GraphQL APIs for building custom storefronts.
The trade-off is that teams are responsible for hosting, deployment, and infrastructure management. For businesses that value source-code control and want to avoid depending entirely on a hosted commerce platform, this approach can provide greater flexibility.
Shopify
Shopify works well for businesses that want a fully hosted commerce platform. Teams can launch a headless storefront using the Storefront API or Hydrogen without managing the underlying infrastructure.
Its large app ecosystem and hosted checkout can also reduce development and maintenance work for smaller teams.
Medusa
Medusa is a good option for teams looking for a modern, developer-focused, open-source commerce backend. It is built with TypeScript and provides a modular approach to commerce development.
This makes it useful for teams that need custom commerce logic and want more control over the backend architecture.
Common Mistakes to Avoid
When building a headless ecommerce website, avoid these common mistakes:
Choosing the Frontend Before the Backend
Understand the backend API and its limitations before designing the complete frontend architecture.
Ignoring API Performance
A fast frontend cannot compensate for slow APIs. Optimize API requests and avoid unnecessary calls.
Leaving SEO Until the End
SEO requirements should be included while building product, category, and content pages.
Poor Cart and Session Management
Incorrect session or cart handling can result in lost carts, incorrect prices, or failed checkout flows.
Exposing Sensitive Credentials
Never expose private API keys, secrets, or sensitive customer tokens in browser-side code.
Conclusion
Headless ecommerce separates the frontend from the backend and connects them through APIs. This gives businesses greater control over the storefront, performance, integrations, and customer experience.
However, headless architecture also introduces additional development and maintenance requirements. It is not automatically the best choice for every ecommerce business.
Before choosing a headless approach, evaluate your development resources, API requirements, performance goals, customization needs, and long-term business plans.
With the right ecommerce backend, frontend framework, API architecture, caching strategy, and SEO implementation, a headless ecommerce website can provide a flexible foundation for building modern shopping experiences across multiple channels.

Be the first to comment.