


















Introduction
ERPNext Website Loyalty adds a points program to your ERPNext Webshop. Customers earn loyalty points when they buy from your website. They can then spend those points as a discount in the cart.
The store admin uses an earning rule to decide how many points an order gives. A redemption rule sets how much each point is worth. ERPNext saves every point a customer earns or spends in their loyalty transactions.
This guide shows you how to set up the program, how a customer redeems points in the cart, and how to track each customer’s balance.
Prerequisites for using ERPNext Website Loyalty
ERPNext Website Loyalty works in conjunction with the following module:
Webshop
You must install the above-mentioned module to use the ERPNext Website Loyalty.
Features
- Turn the loyalty program on or off from one settings page.
- Award loyalty points based on the amount a customer spends.
- Set a minimum order amount, a priority and date limits for each earning rule.
- Limit an earning rule to one Item Group or Customer Group.
- Convert points into a cash discount with a redemption rule.
- Cap the discount at a share of the cart total.
- Show the point balance and estimated earnings in the website cart.
- Apply the loyalty discount to quotations and sales orders.
- Keep a running balance for each customer in loyalty transactions.
Installation
- After purchasing the app from Webkul Store, you will receive a link to download the module ZIP file.
- Extract the ZIP file. You will see a folder named ‘website_loyalty’.
- Set up the module in your git repository, then fetch it using:
bench get-app --branch main https://git.webkul.com/erpnext-apps/erpnext-website-loyalty-management.git
(Replace “main” with your branch name and replace the “HTTPS URL” with your HTTPS clone URL.)
- Install the app on your site:
bench --site <your-site-name> install-app website_loyalty
- Run bench migrate to complete the setup.
Workflow
Setting Up the Loyalty Program
- After you install the app, a Website Loyalty section appears in the Website sidebar. It links to Loyalty Settings, Loyalty Rules, Redemption Rules and Loyalty Transactions.
- Click Loyalty Settings. Tick Enabled to switch the program on.
- Enter the number of days in Points Expiry Days. Leave it at 0 if points should never expire.
- Set Maximum Cart Redemption Percent. A customer can never take more than this share of the cart off with points.
- Click Save.
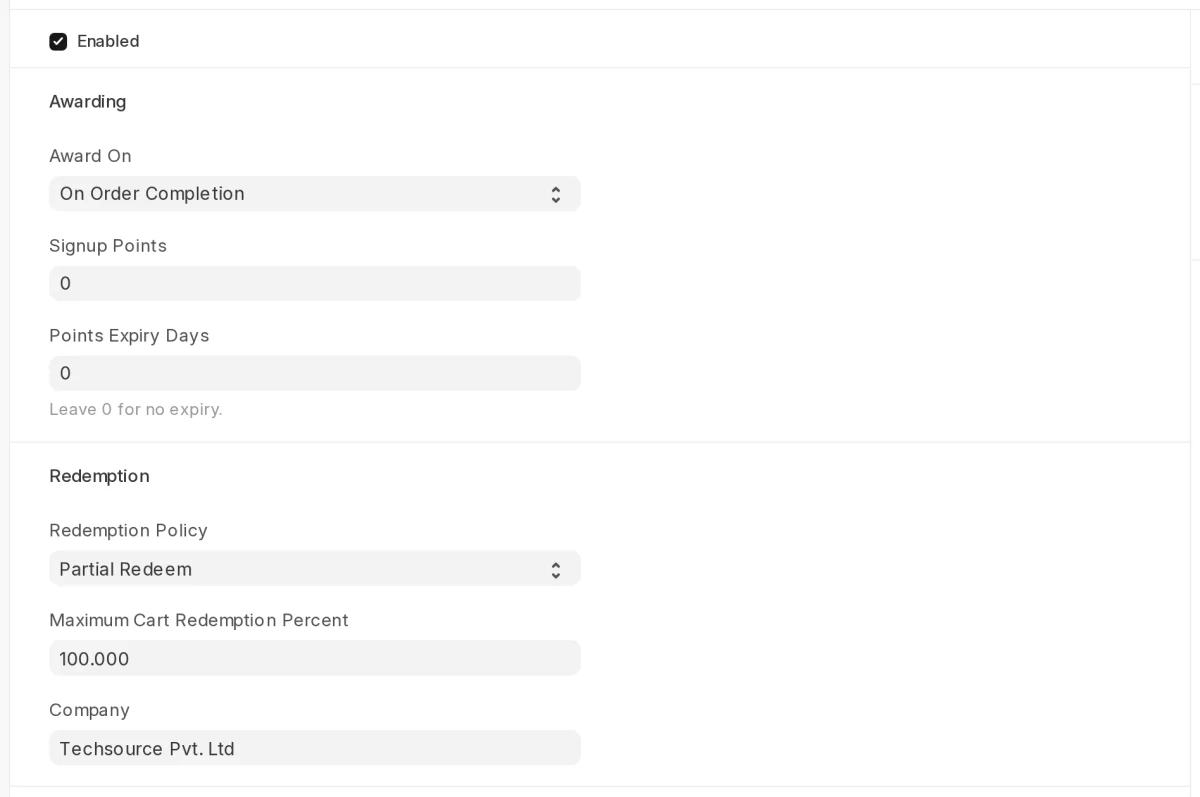
Note: In this version, ERPNext adds and removes points when you submit a sales order, whichever Award On option you pick.
Creating an Earning Rule
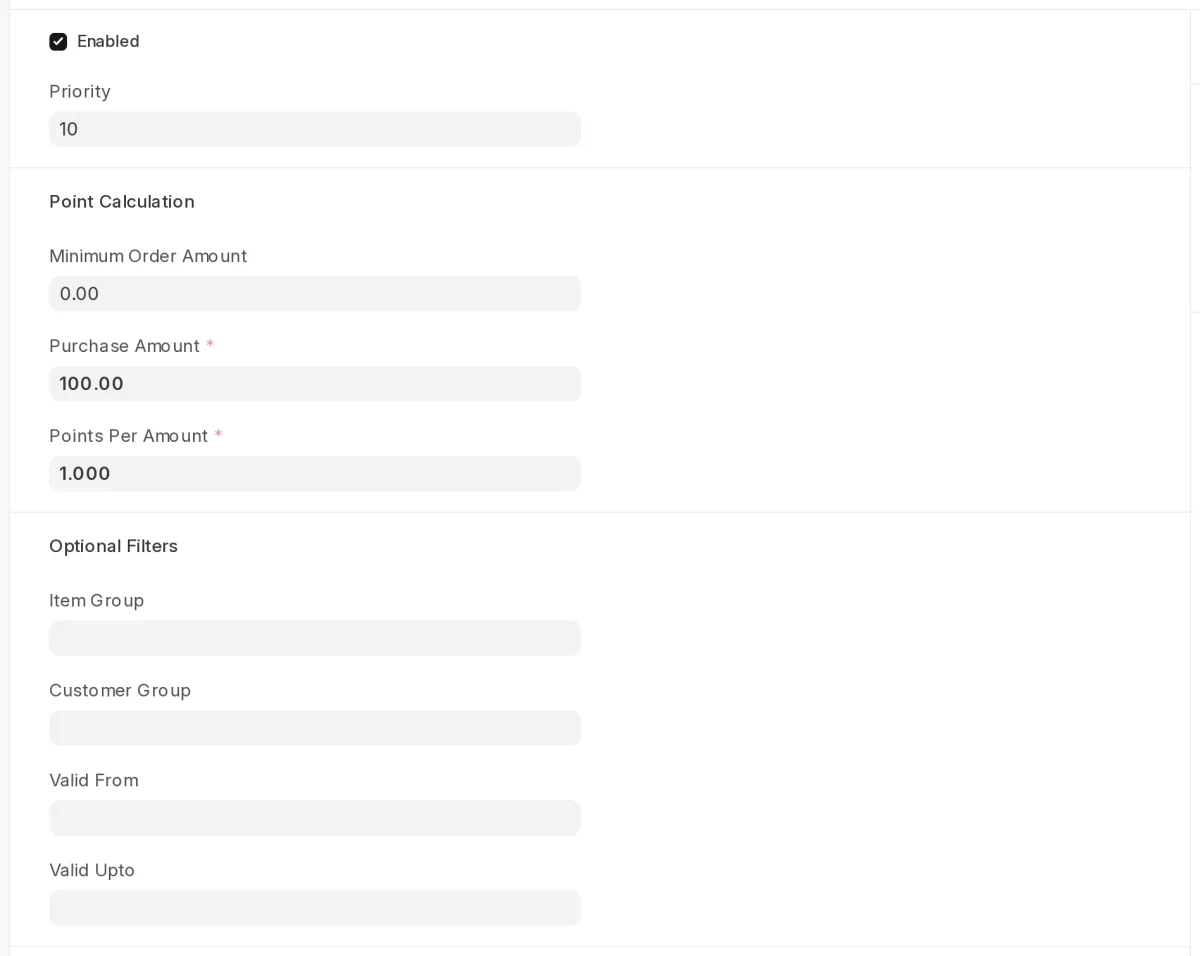
- Click Loyalty Rules in the sidebar. The app creates one earning rule for you, 1 Point Per 100.

- Open a rule, or add a new one from the list.
- Under Point Calculation, enter the Purchase Amount and the Points Per Amount. For example, 100 and 1 gives one point for every 100 spent.
- Enter a Minimum Order Amount if small orders should earn nothing.
- Pick an Item Group or Customer Group to limit the rule. Add Valid From and Valid Upto dates for a time-limited offer.
- Set the Priority. When several rules match, ERPNext uses the one with the lowest number.
Creating a Redemption Rule
- Click Redemption Rules in the sidebar and open a rule.
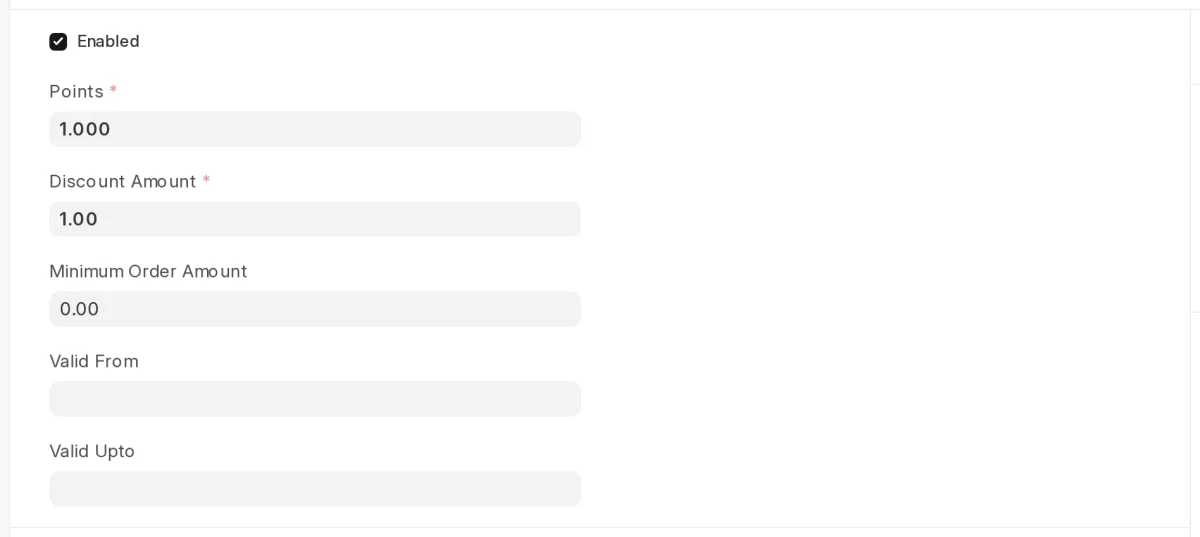
- Enter the Points and the Discount Amount they are worth. The default redemption rule, 1 Point = 1 Discount, makes each point worth 1 in your currency.
- Enter a Minimum Order Amount if the cart must reach a set value before points can be used.
- Click Save.
Redeeming Points in the Cart
- A logged-in customer opens the cart. The Website Loyalty panel shows their loyalty points balance and the points this order will earn.
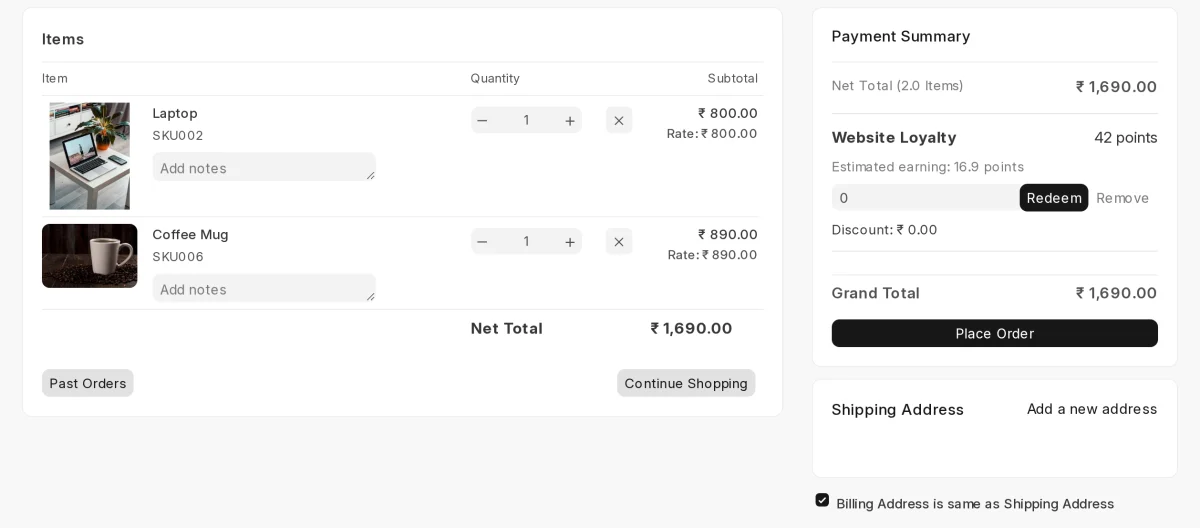
- The customer types the number of points to use and clicks Redeem.
- The Payment Summary now shows the Loyalty Discount and a lower Grand Total. Click Remove to undo it.
Note: Guests do not see the panel. A customer must log in to earn or redeem points.
Tracking Points from the Backend
- Open the customer’s sales order and expand the Website Loyalty section. It shows the points redeemed, the discount they gave, the points earned and the Loyalty Stage.
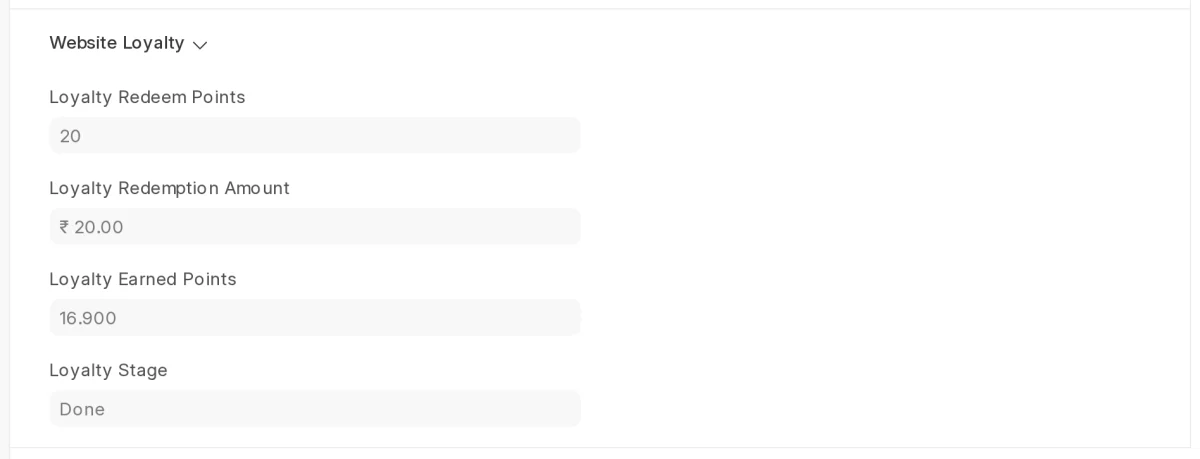
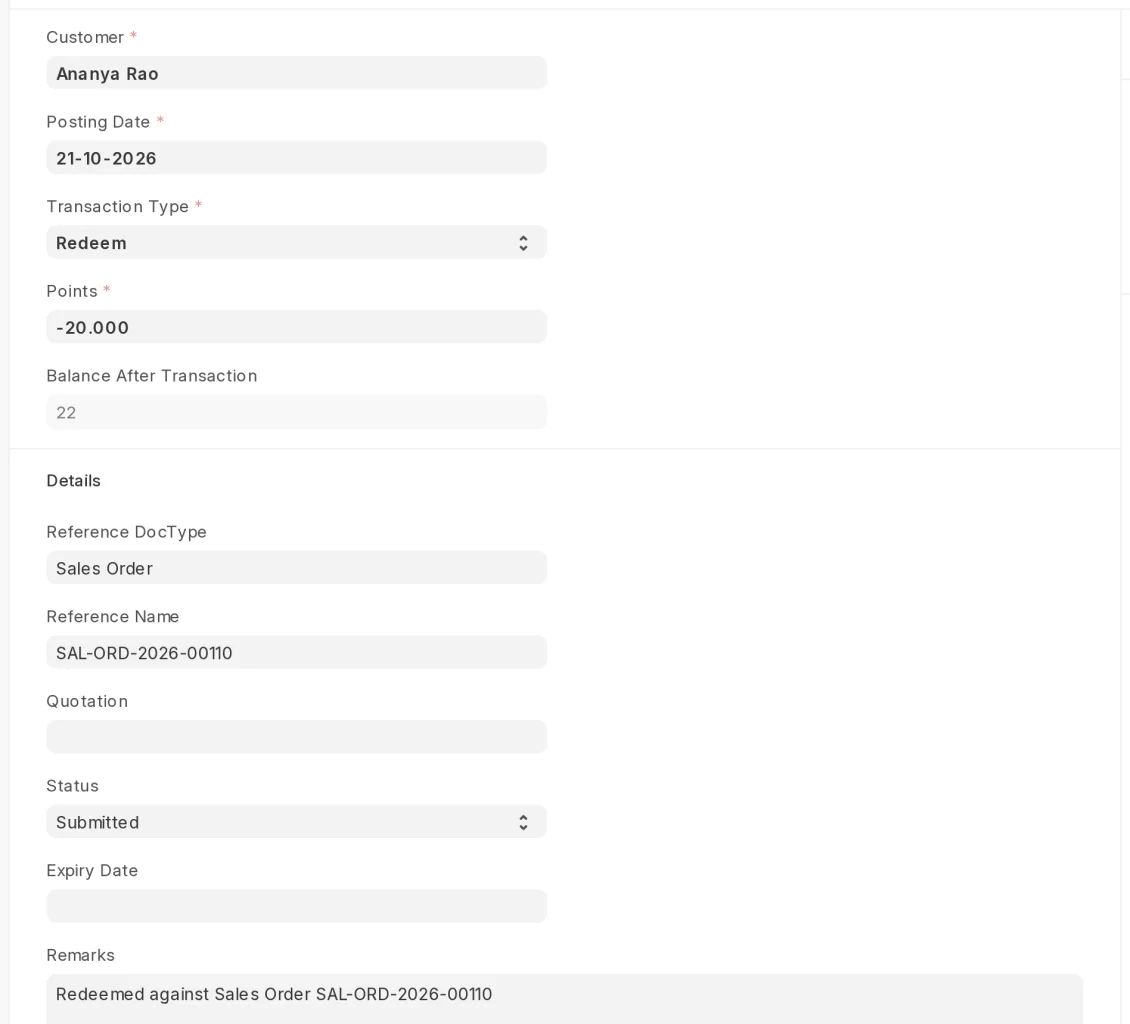
- Click Loyalty Transactions in the sidebar. Each row shows the Transaction Type, the Points and the Balance After Transaction.

- Open a row to see the full record, including the linked sales order. If you cancel a sales order, ERPNext adds a Reversal entry to the loyalty transactions.
Need Help?
Hope you find this guide helpful! Please feel free to share your feedback in the comments below.
If you still have any issues/queries, please create a ticket at the UV Desk.
I hope this helps. In case of any further queries, contact us at our support mail.
Thanks for paying attention!!
Current Version – 0.0.1
Supported Framework Version – ERPNext v16

Be the first to comment.