Magento 2 Multi Vendor Mobile App ( Adobe Commerce) converts your marketplace store into a mobile app. The customers can easily purchase the products in one go.
Your customers no more need to have a laptop or desktop. As they can easily explore the store through their smartphones.
It will not only benefit the store owner and customer it will benefit the sellers too.
Sellers can view their dashboard, and order history and can contact the admin through the mobile app.
So why wait for more, have a Magento 2(Adobe Commerce) e-commerce marketplace Mobile App, and step ahead.
Note:
- The adobe commerce Multi-Vendor Mobile App is fully compatible with Webkul Multi-Vendor Marketplace Module.
- To use this Mobile App, the user must have installed Magento 2 Multi Vendor Module first.
- Further, the Magento 2 Mobile App Builder must first be installed in order to use this marketplace Mobile App.
Check the brief overview of the marketplace mobile app configuration settings –
Check the brief overview of the marketplace mobile app –
Features Of The Mobile App
Seller End Features
- The sellers can view and edit their profile.
- Seller Dashboard is available.
- Seller Order History.
- The seller can ask a question to the admin.
- Seller-Admin chat is available.
- Supported product types are Simple, Virtual, and Downloadable products.
- Multiple sellers can register and upload their products.
- The Customer can view the sellers profile and the review before placing an order.
- From the add new product section, the seller can add the products within the app.
- The seller can view a record of his transactions and sales chart on his dashboard.
- Separate Seller profits, Shop logo and seller collection page with banner image.
- Sellers products can be edited or deleted by the seller as well as the admin.
- Seller can add their shipping, privacy and return policies for his/her own store.
Customer End Features
- Availability of Seller list.
- View Seller Collection.
- The user can review the seller.
- Seller Location is mentioned on the map.
- Marketplace Landing Page Where Popular sellers and Description about the marketplace is mentioned.
- Seller details and contact option from the product page.
- Fully Flutter Native Android and iOS
- Unlimited Push Notifications
- Real-Time Synchronization
- Multi Payment Gateways supported
- Interactive Theme
- Multiple Shipping Support
- Enhanced Layered Navigation
- Multilingual Support
- Offline Mode
- App has support towards AI-based features like- AR Product Visualisation.
- The app also gives support to the AI feature-Augmented Reality- Size Calculation(only iOS).
- Finger Print Login
- Related Products
- Next/Previous Product View On Product Page
- Voice product Search
- Mobile & Tablet support
- Easy Checkout Process
- Customers can purchase all types of products.
- The app supports GDPR to protect and control the data of the app user.
- Multi-Currency Support
- Product Sharing over Social media
- Order Tracking by Notification
- Deep Linking
- Social Login (*)
- Mobile Number Login (*)
- One Time Password (*).
- Product Search Via Barcode Scanning (*)
Admin End Features
- Admin can manage configuration settings such as collection page size, random featured products on the homepage, allowed CMS pages, app image background color, and Mobikul Watch App settings(*).
- Admin can manage FCM push notification parameters, including the Firebase Project ID, FCM auth JSON file upload, and Android and iOS topics.
- Admin can manage Payment Methods settings like choosing from the list of Allowed Payment Methods.
- Admin can manage Mobikul Catalog Search settings, including displaying tags and products in search, as well as setting the number of tags and products to display.
- Admin can manage application download options from the website, including enabling Android and iOS downloads, top and bottom links, and choosing the download link theme.
- The admin can manage configurations like App Theme color, App icon, Select launcher icon type, Splash Screen image, Home page Layout (Featured Category and Banner view), and Categories View.
- The admin can also add a walk-through to make the application look more fascinating.
- Admin can manage Category’s Banners and Icons, Mobikul Order History, Manage Carousel, and Home Page Configurator.
- Catalog API caching with Magento default cache.
- GraphQL APIs implemented in the mobile app.
The features with Asterix mark (*) are the paid features.
Note: Here for iOS, the AR products are supported in the application as well as the Safari web browser.
Technical Stack:
- The mobile app is purely Flutter native which uses Dart for both Android and iOS.
Installation Procedure
The installation is quite simple just like the standard Magento 2 extensions.
#Upload Folder
Once the module zip extracts, follow path src>app and then copy the app folder into the Magento 2 root directory on the server as shown below:

# Run Commands
You need to run the following commands:
composer require google/auth
php bin/magento setup:upgrade
php bin/magento setup:di:compile
php bin/magento setup:static-content:deploy
php bin/magento indexer:reindex
php bin/magento cache:flush
Language Translation
For translating the module language, navigate through src/app/code/Webkul/MobikulMpGraphql/i18n and edit the en_US.csv file.
Thereafter, rename the CSV as “en_SA.csv” and translate all right side content after the comma in the Arabic language. After editing the CSV, save it.

Now, upload it to the path src/app/code/Webkul/MobikulMpGraphql/i18n where the installation of Magento 2 is on the server.
The module translates into the Arabic Language. It supports both RTL and LTR languages.
The user can edit the CSV like the image below.

Admin Configuration
The store owner is capable of editing the mobile app from the admin panel in the Mobikul Tab.
Further, for the basic configuration of the Mobikul mobile app, navigate to the following path of the Magento 2 admin panel Stores > Settings > Configuration > Webkul > Mobikul
After that, the admin will get the below(I-IV) sections of the basic configurations.
Mobikul Basic Configuration
This section comprises the most initial configuration for setting up the Mobikul.

Collection Page Size: Admin needs to set the number of products to display on the collection page of the Mobikul mobile app at a time.
Enable random featured product in home page? If the field is set to “Yes” then, the featured image present on the Mobikul mobile app will be taken on a random basis.
Moreover, If the admin sets this field to “No”, then only those products will feature on the homepage for which the “Is featured for Mobikul ?” is enabled.
To, enable Is featured for Mobikul ? for this go to the Products > Catalog > Add Product / Edit.

Allowed CMS Pages: The admin can choose the CMS pages of the default Magento, which want to display on the Mobikul application.
Featured Products Banner: This allows the admin to set the banner placed at the back of the featured product section.
New Products Banner: This will allow the admin to set the background banner of the new product section on the homepage.
Deal Products Banner: From here the admin can set the banner for daily deal products present on the homepage.
FCM Push Notification Parameter
Moreover, for setting up the push notification feature for the Mobikul mobile application. the admin requires to set up The Below fields.
Further, please do refer to our blog for learning more about Sending notification through the app (via Firebase console).

Firebase Project ID: Admin needs to enter his Firebase project ID in this field.
Upload FCM Auth JSON File: Here the store admin will be required to Upload the FCM Auth JSON File
Android Topic: This is a must for sending the notification on a group basis, on Android devices.
iOS Topic: Require sending the notification on a group basis on iOS devices.
Note: The topic name that the admin will provide in the above two fields will be the name of the group including all the devices in which the app installation is done.
Seller Admin Chat Configuration
The admin needs to enter here the email address that will be used to communicate with sellers.
Admin must create a customer account with the entered email ID so that he can chat with the sellers using the marketplace mobile app.

Payment Methods
In the payment methods section, only offline default payment methods will be visible which Magento2 provides.
If enabled and at the mobile application end selected will be visible between these payment methods.

Mobikul Catalog Search Configuration
Also, the admin can configure Mobikul’s mobile application SEARCH. The admin can configure the applications’ search on the basis of products and tags.

Display Tags in Search: This will display the tags in the Mobikul application’s search result.
Number of Tags to display in Search: The admin will set the limit on the number of tags that will present in the search result.
Display products in Search: This will display the products in the Mobikul mobile application’s search result.
Number of Products to display in Search: Here the admin will set the limit on the number of products that will present in the search result.
Application Download From Website
The admin can now display the app URL on their website, by setting the configuration of this section.

Enable Android Application Download: Here admin can select Yes to make the play store link of the application visible on the website.
Play store application link: Here, the admin can mention the play store link on the application.
Enable ios application download: Here admin can select Yes to make the iTunes link of the application visible on the website.
App Store application link: Here, the admin can mention the iTunes store link on the application.
Enable Top link: This will make the link visible on the header part of the website.
Enable Bottom link: This will make the link visible on the bottom part of the website.
Choose Download link theme: The admin here can select between Light or Dark theme, for better visibility of the application link as per choice.
The below image shows the mobile app download option in the Magento 2 storefront, offering users with direct access through single click.

Enable Seller App
The seller app option must be enabled to activate the seller login functionality in the mobikul marketplace mobile app.
Navigate to Marketplace > Seller App Settings and select the seller app enabled to YES.

Thus, after the basic mobile app configuration, the app has multiple tabs in the Mobikul tab.
Mobikul Api Cache Settings

Here, the admin will –
- Enable the cache.
- Set the cache refresh rate.
- Clear the cache by tapping the respective button.
Home Layout Configuration
The admin can set the Home Layout as Layout One and Layout Two as shown in the image below:

Layout One

Layout Two

The admin can also manage the category view.

Two category views are provided in the demo that is Default Category View and Tab Category View:
Default Category View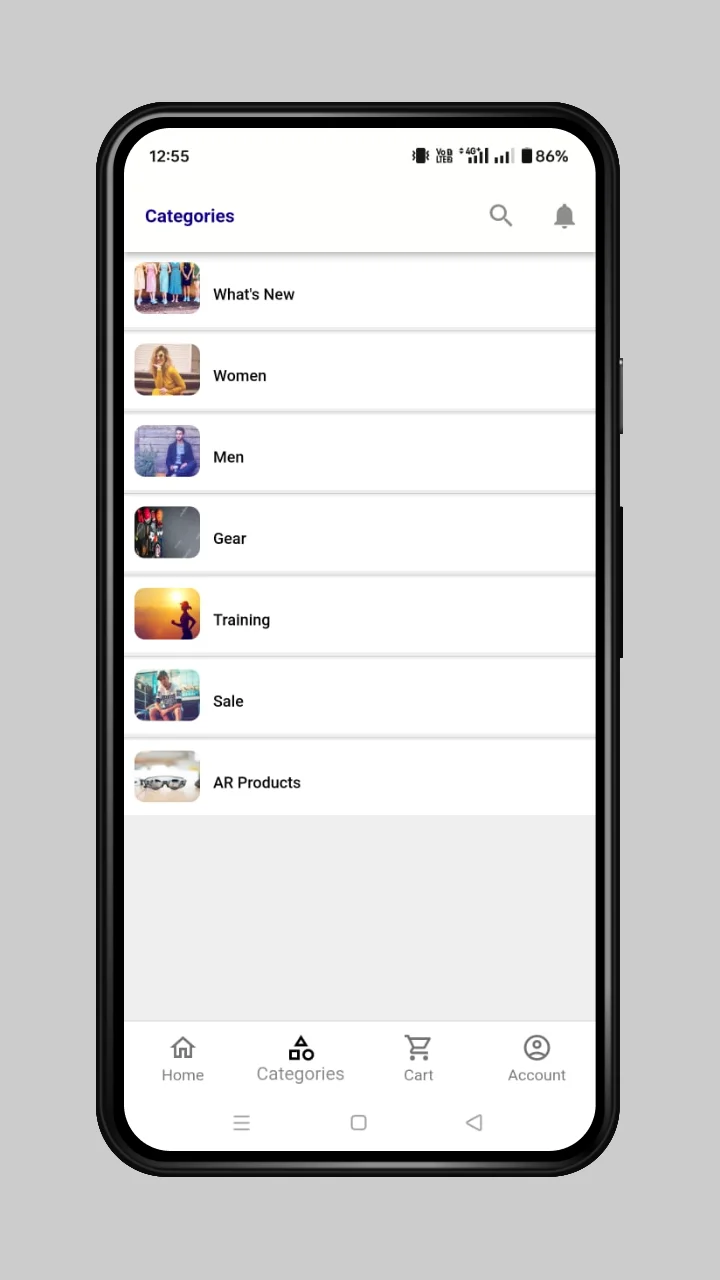
Tab Category View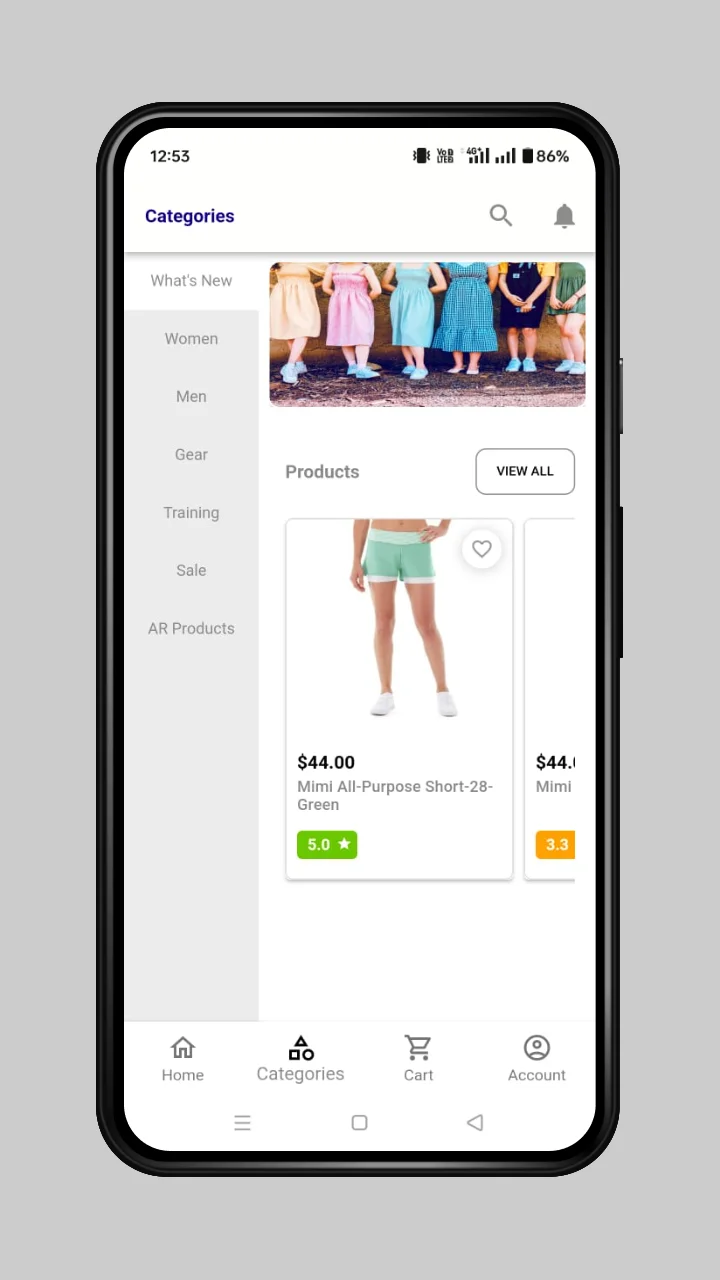
Launcher Icon Configuration
The admin can also select the launcher icon. Further, the admin can manage the same from the admin panel:

There are five types of launcher icons available as in the image below:

Dynamic Theme Management
The admin can also manage and configure the frontend appearance of multiple sections of the mobile app from the backend. The configurations that come under this sections are mentioned below:
Light Mode Theme Configuration
The admin can also manage the theme configuration when the mobile phone theme mode is set to light.
For this, the admin needs to enter the details like App Button Color, App Theme Color, App Theme Text Color, App Button Text Color, Upload App Logo, and Upload Splash Image.

Frontend View on Light Mode


Dark Mode Theme Configuration
The admin can also manage the theme configuration when the mobile phone theme mode is set to dark.
For this, the admin needs to enter the details like App Button Color, App Theme Color, App Theme Text Color, App Button Text Color, Upload App Logo, and Upload Splash Image.

Frontend View on Dark Mode


Manage Walk Through
Firstly, the admin needs to add the walkthrough version from the configuration by navigating to Stores > Configuration > Walk Through Settings.

The admin can manage the walkthrough configuration by navigating to Mobikul > Manage Walk Through.
There the list of walk through will be visible as shown in the image below:

The admin can create the new walk through by clicking on the Add Walk Through button available in the top right corner.
Further, the admin needs to provide basic details like Walk Through Image, Title, Description, Color code (hexadecimal), Sort Order, and

Moreover, the admin can also edit the previously created walk throughs by clicking its respective edit button present in the list. Further, the page will view as shown in the image below:

Walk Through Mobile App View
The walkthrough will look somewhat like the images shown below.


Manage Banner
By navigating to the left side menu Mobikul > Manage Banner section.

Store admin can add multiple banner images in the mobile app by clicking on the ‘Add Banner‘ button.

Banner Image: Needs to upload the image for banner in this option.
Sort Order: The banner image can be arranged as per the sort number order for that image.
Product/Category ID: Admin needs to set here the product or the category ID.
Store View: Admin will select the store view for defining the banner image visibility.
Banner Type: The admin can select the banner type to define whether the updation is done for product or category.
Banner Status: Admin can enable or disable the banner images.
Manage Notifications
The admin can simply add push notifications for displaying it on the mobile app.
All the mobile app users can get the notification that the admin will push from the backend panel.
Therefore the admin will set up the push notification configuration For this, go to the Mobikul > Manage Notifications.

After that, the admin will push respective notifications. The notifications will be visible to the user’s device apart from the automatic push notifications of sale.
Note: For using the above menu the FCM Push Notification Parameter has to be set first. To learn more about FCM Push Notification Parameter, please read the Basic Configuration Blog.
Add Notification
Click on the Add Notification button to add a new notification in the mobile app.
The admin can configure the notification as per the requirement by setting up the notification information.

- Notification Image: Upload a new image or select an existing one from the gallery for the notification.
- Notification Title: Set the title for the notification message.
- Notification Content: Provide the content that will displayed with the notification.
- Notification Type: Notification type can be as Product or Category or Custom Collection or Others.
Product/Category ID: If the notification is a product then provide the Product ID of the product which the user will redirect when the notification is clicked.
Meanwhile, if the notification type is category then provide the Category ID of the product which will redirect when the notification is clicked.
Store View: Notification can be shown store view-wise. “All Store Views” can be selected for pushing the notification in all the store views.
Notification Status: The notification can be enabled or disabled as per the requirement.
If the notification type is custom collection, we need to enter ‘Create Product Collection Based on‘ the assigned Product Attribute.
Alternatively, you can use Product IDs or Newly Added Products with Counts.
Furthermore, when the customer selects Product Attribute Assigned then, they need to enter the corresponding Product Type which one wishes to see in the custom collection notification.

However, if the product ids option is selected then the one needs to select the desired product from the collection of products.

Custom Collection Notification type is having one more additional option of Newly Added Products with Count. Here, the admin needs to enter the number of new products will display in the collection.

Manage Featured Categories
The admin can simply add featured categories for displaying it on the Mobikul application. For this, go to the Mobikul > Manage Featured Categories.

Add New Featured Category
Click on the Add Featured Category button for adding a new featured category. The admin can configure the featured category as per the requirement by setting up the featured category information.
The Featured Category Information has two sections to be configured for setting up the newly added featured category. The first one is the basic configuration of the featured category.

Image: Upload a new image or select an existing one from the gallery for the featured category.
Sort Order: This is the sort order of the featured category among other featured categories.
Store View: The featured category can be shown store view wise. “All Store Views” can be selected for displaying the featured category in all the store views.
Featured Category Status: The featured category can be enabled or disabled as per the requirement.
Further, the second section is the category configuration of the featured category.

Choose the category that will be redirected when the featured category image is clicked.
Manage Categories Banners & Icons
Admin can configure the banner image for each category and in addition to this, the admin can also configure the category’s icon which will be displayed in the Mobikul Mobile app.
To configure the category’s banner and icon, navigate through the following path of the admin panel Mobikul Tab > Manage Category’s Banners and Icons.
![]()
Add Category’s Banner And Icon
Need to click on the Add Images button to add a new banner and icon to a category.
The admin can configure the banner and icon as per the requirement by setting up the category image information.

Icon Image: Upload a new image or select an existing one from the gallery for the category icon.
Store View: The Admin can select the banner for a particular store view. This is helpful in case the admin wishes to display banners in multiple languages.
After setting up the banner image and icon image, select the category for which both the banner and icon image will be used.

Default and Tab View Banner Image: Upload the banner image of the category which will be displayed in the chosen parent category.


Mobikul Order History
Mobikul Orders can now be separately managed in the admin panel.
This facility is given to the app owner to keep a clear record of orders being generated from the app. For this go to the Mobikul > Mobikul Order History.
List Of Orders
By clicking on Mobikul Order History the admin can view all the orders that where placed from the app by the customer.

Further, the admin can click on any one of the orders to view the details of the orders.
Mobikul Carousel Images
Store admin needs to navigate through Mobikul->Mobikul Carouse Images.

To add a new carousel image, tap the Add button and fill in the details.

Mobikul Carousels
Store admin needs to navigate through Mobikul->Mobikul Carousels

Tap Add to add a new product or image carousel.

Here, the admin will –
- Choose the title
- Select the carousel type as – Product or Image
- Select the background image
- Choose background color
- Select the sort order
- Choose store view

After that select the carousel images to assign.
 Then, select the carousel products to assign, and lastly, save the carousel.
Home Page Configurator
Admin can manage the sorting of the category carousels present in the mobile app.
For this, the admin will navigate to the left side icon for Mobikul > Home Page Configurator
Then the admin can change the position by easily dragging the category then drop it to the desired position.

Order Label
The admin can also check that the order placed by the customer from the web end or mobile app.
For this, the admin will navigate to Sales > Orders. After that, in the list of orders, an attribute named Order Place Point will be present that will show the order label.
For reference an image is shown below:

To know more about the backend details, refer to our article on Magento 2 Mobile App Admin Configuration.
AR Product Configuration
As specified in our earlier article we have implemented the AR Products in two ways-
AR- Product- Virtual-Try On
This product type will allow e-commerce customers to try products in 3D visualization with the help of the mobile application.
The products are the simple product and configurable product type with Mobikul Configuration attached to it for AR-Product type.

Here the admin can enter the details of the product as in default Magento.
However, as specified above the admin needs to enter details in Mobikul Configuration-
AR-Model Type- The admin can select the 3D model option to view the 3D image of the product.
This option will enable two fields-
1-AR Model File For Android- In this field the admin needs to enter the .sfb file which will contain a 3D image of the product.
2-AR Model File For Ios- Here the admin needs to enter the 3D image of the product in the form of the .usdz file for the iOS device.
Texture Image- Here, the admin needs to enter the background of the 3D image.
If the admin select 2-D for AR Model Type then the following options will appear:
AR 2-D Model File- Here the admin needs to select the .png file type image for the 2-D model.

To get more information about AR product backend management you can click here.
AR- Virtual Measurement
This technique is for now in the iOS app only where the customer can virtually calculate the size of the object. This records the size of the object.
AR product is a simple product with custom options. The admin can specify the attributes of the product.
Besides, with the help of the AR measurement tool, the admin can measure these dimensions then save it in the respective field.
Now let’s see how the admin can enter measurement fields-
Initially, the admin needs to create a simple product by filling the required fields. After that, the admin must enter the Customizable Options.

Thus, the admin will create customizable options like the length, height, size and other desired options. This can be done by entering-
- Option Title- The name of the option as it will appear in the front end.
- Option Type-The type of option that is if its field, Radio Button, some file, etc for taking the input. Here the admin can select the only Field.
- Required- The admin can check the box to make the input filed compulsory.
- Price- The admin can enter the additional price that will be charged for the option.
- Price Type –The admin selects if the additional price will be on the basis of percentage or the complete price will be added.
Mobikul Watch
Here, the admin can manage the watches added by the users for the Magento 2 mobile app on their smart watches.
Note- You can use Mobikul app features on Android smartwatches with the help of the Magento 2 Watch App extension(This is a paid service)
Frontend | Mobikul Marketplace Mobile App
Splash Screen
The launching screen of the app can be amended from the code end and will appear to the users as they open up the app.
Also, the admin can upload a splash image from the backend panel in JPG, JPEG, GIF, or PNG format with an 18:9 ratio.
Thus, helping the app owner introduce the app or organization in a better way.


Homepage
Obviously. the homepage is the major point of attraction for the customer. For this, the mobile app supports a highly interactive homepage divided among systemized sections.
- Category Carousel- The user interacts with the first section which is a category carousal. These category carousals are set of categories linked with the respective products.
Further by clicking on the desired category the user will navigate to the corresponding category page.
- Featured Products- This section of the homepage shows few exclusive collections of products to be shopped from.
- New Products- Under this section, the app users will be able to purchase the latest products in the store.
- Hot Deals- Moreover, products with special prices or offers will appear under this section.


Other Carousel Sections- Apart from the above sections multiple carousels can be added by the app owner for the user. Thus, the app owner can configure the backend for the same.
They can be of either Product type or Image Type. So, for better understanding, we have the following sections-
- Trending Now- This section includes the top-selling products of that particular store.
- Banner Carousel- Subsequently, this section presents a carousel of banners which includes various categories then navigates the user to the respective category.
Besides, “Best Offers” and “Fashion Accessories” are the banner carousels shown below.
- Daily Deals- This section displays a product carousel which includes products for the deal-of-the-day.
- Offers For You- This presents the list of banners that directs the user to the respective product or category page.


- Recently Viewed Products- In the end, the app provides a product carousel which displays the products accessed by the users in most recent time.

Product Page View To The Customers
The customer can view the desired product for navigating to the product page, that will view the product in the clear appearance and seller details as mentioned in the image below:


The seller can click on the contact seller button for sharing any query or details regarding the product.
Notification
The most trendy way to circulate information regarding new arrivals and offers is push notifications.
This not only fascinates the customer in a great sense but also increases the sales rate of the store to a high extent.
Meanwhile. the customer can easily access the notification by clicking on the notification icon on the navigation bar.
Thus, they can easily scroll the notifications in the notification tab. Also, they can directly navigate to the respective product page by clicking on the notification.


Search
The app user can search the desired product to save time they spent in scrolling through the complete app.
This section is useful for customers who wish to check out quickly. The two types of search are-
- Search term- This will search the product as per the keyword typed by the app user. It is related to the search icon on the top of the screen on the homepage.
Apart from that, the users can also search using their voice.


- Search Using Text and Image – The customers will be able to make use of the search by scanning the text and image as well.


- Advanced search- The required product can be searched on the basis of various details like product name, sku, description, short description, and price.


Navigation Panel
The application views the navigation menu when the user clicks on the menu icon present on the navigation bar.
Moreover, from this navigation menu, the user will be able to access the major features of the application.
The navigation panel is divided into the following sections:
- Home Page – Displays the top categories, offers, featured products, trending now, hot deals, daily deals, and recently viewed products.
- Categories: In this section, the list is present which includes various categories linked to their respective set of products.
- Cart – All the products added to the cart are visible in this section.
- Account: Indeed, this section is visible to the users having an account in the application. From this section, the user can access the following features:
- Dashboard
- My Wishlist
- All Orders
- My Downloadable Products
- Product Reviews
- Address Book
- Account Info
Note- The customer-centric options will be visible to the sellers also, as the sellers can also be the customers.


Sign In/Sign Up
For using the mobile application, user needs to either register or sign in first.
The existing customers who already have an account can directly log in to the mobile app using their credentials. Further, new customers can create a new account.


Meanwhile, when the user clicks on Create An Account button, the app will redirect them to the registration form which includes the details as shown in the image below:


Whereas, if the user clicks on Sign In With Email button the app will redirect the user to the login page which asks the user for the registered email id and password.


- Seller account: The app users allows the user to log in as a seller. Thus, for the sellers both the accounts will be visible i.e. “Customer Account” and “Seller Account”. From this section the user can access the following features:
- Seller Dashboard
- Seller Profile
- Seller Orders
- Add New Products
- Seller Products
- Transactions
- Customers
- Invoice Print Template
- Chat with Admin
- Ask Questions
- Settings: Admin can manage the settings for the marketplace mobile app.
- Preferences: This section includes the most well-known features which should be available in the application. Supports the following features:
- Language
- Currency
- Others: Here users can view all the other related CMS Pages created by the store admin.
- Home Page
- Privacy Policy
- About Us
- Customer Service
- Contact Us
- Compare Products: Here the users can view products alongside to compare with each other.
- Marketplace: If the user is looking for the sellers and their details then they must land to this section. This allows the customer to view the marketplace.


CUSTOMER ACCOUNT
Dashboard
Under this section, the user can edit the profile details and also view the details like:
- Recent Orders: Generally, customers place many offers in a meantime. Thus, with the app they can easily access their previous orders.
- Address: Further, this section comprises of the Billing and Shipping addresses. Further, the customer can easily select among them at the time of checkout. The user can also add the new address as additional addresses and edit the existing one.


- Reviews: Most times customer drop their reviews about the product or the seller. They can view all those reviews under this section of the customer dashboard.


My Downloadable Products
This section includes the list of all the downloadable product ordered by the customer. Moreover, the customer can download the product as per the downloads available.
Meanwhile, the admin can either set the download limit or set the customer free for unlimited downloads for the downloadable products.

My Wishlist
Most times, the customer wishes to purchase the product later. Surely, in this app the customer can add the products to the wishlist and purchase them later.
Also, the customer can move the product to the cart directly from the wishlist.


Account Info
This section comprises the information of the user like First Name and Last Name. The user can also change the email and password from here only.


SELLER ACCOUNT – Seller Dashboard
This section will be visible only to the sellers. Under this section the seller can check the sales statistics and top selling categories and the following information:
Sales Map: This displays the location of customers from different countries marked in the map.
Sales Graph: The growth of sales id visible here on the basis of hours, week, month and years.
Top-Selling Categories: A pie chart is visible showing the percent growth in the product categories.
Top 5 Products: Shows the list of top 5 products as per the sales statistics.
Latest Orders: Under this, the seller can check the latest orders with the order status placed by the customer.
Recent Reviews: The customer can also review the seller, those reviews are visible under this section only.


This seller-dedicated section will help the seller to know about the sales in the store and will help in improvising the services rendered by the seller.


Seller Profile
With the help of this section, the seller can enter information related to:
Basic Details

Image and Theme

Social Profiles

SEO

Payment Info

Policies


Seller Order
This section contains the details of the orders received by the seller along with their current status.


From here the seller can generate invoice, shipping slips, mail order details and cancel the orders individually.
However, the seller can even download the invoice and shipping slips collectively for multiple orders.


The seller will be able to generate credit memo for the orders with status as “Complete”.


The seller can add a filter to fetch the desired order as well.


New Products
The seller can add new products from the app by entering details like-
- BASIC


- PRODUCT CATEGORY & PRODUCT PURCHASE LIMIT

- STOCK

- IMAGES

- SEO

- RELATED, UPSELL, CROSS-SELL PRODUCTS

My Product List
The logged-in sellers can view the list of their products in this section which can be edited or deleted from this section. The seller can navigate the desired product with the help of filters.


Seller Transaction List In The Mobile App
This will display the list of the transaction which will show the money earned by the seller post deletion of commission.
The seller can add a filter and look for the desired transaction. They can even download CSV for the transactions.


Also, the seller can Request the admin for Withdrawal and once the admin completes the process then only the amount will get transfer to the seller account.
Apart from that, the seller can filter the transactions as well.

Manage Print PDF Header Info
The seller can manage the header information of the pdf like invoice and packing slips.
That is the address details, the name of the organization and other details which seller needs to show on invoice and packing slips.

Chat With Admin
The seller can chat with admin to ask multiple queries related to the sale of products, the issue with the commission, etc.
This is a way through which admin can keep in touch with sellers of the respective marketplace.

Ask Questions to Admin
The seller can even mail the questions to the admin with regard to different queries.

Marketplace
This section shows information about the best sellers & their products that have been added to the Marketplace.
Here a customer can check the seller collection, add any of the seller’s products to his wish list or add them to cart for purchasing.
By clicking on the View all sellers, the user will be able to see a list of all available sellers in the marketplace.
The user can search the sellers by shop name as well. To know more about a seller, the user can check their profile page by clicking their store name.
After clicking on the shop name, the user will be able to see the Profile Page, Policies(Shipping & Return.), Ratings and the Feedback for the Shop name.


Profile Page
The user of the app can check the seller profile page from here & see the recently added or can click the view all option for checking all the products of the seller.


Policies
The user can check the shipping, privacy and return policies of the seller in this section.

Reviews
The app user is free to rate the app and write a review to the seller’s store. The reviews will be visible on the seller profile page.


Contact Us
The app will give the app user the facility to the app user to send mail to the respective seller.

Location of the seller
The app user can locate the seller store location on google map from here.

Report Products
Buyers can flag a product by selecting an admin-provided reason or entering a custom reason under the ‘Other’ option to flag the product.


Customer Details
Sellers can view the customer details and order count within the marketplace mobile app by navigating to Seller Account>Customer


Settings
The app user can take control of the app’s few basic functionalities likewise-
Notification
The app user can manage the notifications from the app. This is for various steps in the app-
Thus, the app user can disable or enable –
- All the notifications of the app.
- Orders based notifications.
- Offer based notifications.
- The app User can even monitor the notifications for an abandoned cart.
Offline data
The app user can even manage the data appearing in Offline mode. Thus, the app user can enable or disable the following field to do so-
- Track and Show Recently Viewed Products.
- Track and Show Search History.
Thus, the above details can be even clear from history.

However, there is an additional button to Manage In Device Setting which we direct the user to the app setting on the device.
Other CMS Pages
Here you can see all the CMS Pages that were created by the store admin.
They can be anything like- Privacy Policy, About Us page, Contact Us page, and other such pages.


Compare Products
The app users can see the comparison of various products from here on the basis of attributes like sku, description, short description and other attributes.
Comparison can help the customer end up buying the best out of the present collection. It can be for similar or different kind of products.

Contact Us
This is the section meant for customers to contact the admin. They can write any query regarding the store, product, or other questions.

CMS Pages
These pages are meant to inform the app user about the store like the description of the store, policies, customer service details, about the store, and other information.


Checkout
The app provides customers to checkout with products in an easy way. First, the customer adds the product to the cart.
This Cart section will have the following functionalities-
1- Update Shopping bag- This will save the updates done, like product quantity increase in the cart.
2- Continue Shopping Button- By clicking this button the customer can add more products to the cart.
3- Empty Shopping Bag- This will delete all the products from the cart.
4- Discount- The customer can even enter any discount coupon code.

After adding the product to bag the customer can now click on Proceed.
The customers can now select the shipping address and the shipping method and click on proceed.

After this, the customer will select Billing Address and Payment Information, and finally, review the order, click on Place Order.


Finally, the order is completed with the visible success message popup.

That’s all for the Magento 2 Ecommerce Marketplace Mobile App. Furthermore still, have any issues free to add a ticket and let us know your views to make the app better.
Current Product Version - 5.0.0
Supported Framework Version - Magento 2.0.x, 2.1.x, 2.2.x,2.3.x, 2.4.x

8 comments
Greetings of the day!!
Thanks for the appreciation. Please let us know if there is something else we could help you with. That will be a pleasure for us.
You can contact us at – https://webkul.uvdesk.com/en/customer/create-ticket/
Thanks & Regards,
Webkul Team
I saw the app is supported Simple, Virtual, and Downloadable products.
May I know what file types are available when the seller adding “Downloadable Information” for the Downloadable product?
And, what file types are supported for buyer download after purchased some kinds of Downloadable products.
Thanks,
It supports all the file types that are supported by the default Magento. And for the buyers, it depends on the uploaded file type by the sellers/admin for the downloadable product.
For any further queries, please email us at [email protected] and we will get back to you accordingly.
Thank You
this app provide at the en the apk and the ipa that must be submitted to both store?
Thks
Thanks for your query, please connect with us at [email protected] for further details.
Can this app be converted to flutter app? Can you do this as a custom development work?
The existing app can not be converted to a flutter app but we can develop this through the customization.
For more details, you can mail us at [email protected].