Magento 2 Dropship Extension is a shipping method where the store owner does not require the storing of products in its location.
Rather all the products are in different warehouses across regions.
So when a customer places an order, the shipping is from the nearest warehouse instead of the store using the Magento 2 dropship module.
Dropshipping also complements Magento 2 backorder, where the store owner can accept orders that are not yet available.
Using the Magento 2 (Adobe Commerce) Dropship module, the admin can add multiple warehouses for a product with the quantity.
Basically, the Magento 2 (Adobe Commerce Cloud) Dropship module provides the Multi-Source Inventory concept.
Thus, lets the multi-source sellers manage their multi-warehouse inventory conveniently.
Using the Magento 2 dropship module, the admin can even import products from AliExpress into his store.
Thus, one can start selling those products within his own store very easily.
To place the orders at AliExpress the admin just needs to click a single button.
Hereafter, allowing you to make the payment as we have automated the order process for the AliExpress Orders.
Note:
- To use the Aliexpress product import feature, you must have Aliexpress API access, and it needs to be obtained from your end.
A small overview of the Magento 2 dropship plugin can be seen in the video mentioned below –
Video Tutorial – Importing Products from AliExpress To Magento 2 Store
Features
- Import AliExpress products(simple & configurable) from AliExpress into your selected store.
- Create configurable products if the product has options otherwise, create a simple product.
- Edit the product information(with images) on the AliExpress website before importing it to the store.
- Update AliExpress order status from AliExpress Chrome extension.
- Import products from the AliExpress Product, Search, and Category pages.
- Shop URL verification while registering your Magento store URL.
- Add Product Price Synchronization from AliExpress using cron.
- The description of the product also gets imported the same as AliExpress.
- Admin can import AliExpress products website-wise.
- The product information like-
- basename,
- price,
- product reviews,
- meta-
- title,
- keywords,
- description,
- SKU, description(simple tags, HTML tags, and multiple images), and
- configurable attributes get imported along with the product.
- The Admin can add Warehouses.
- View all AliExpress Orders in a separate section.
- Automated Order Process for the AliExpress Orders.
- Mention warehouse stock quantity in the products.
- The admin can assign multiple warehouses to a product.
- The shipping cost is calculated according to the warehouse location.
- The admin can add warehouse(supplier) product price rules.
- The mapping of Magento categories is done with the Warehouse Categories from the admin end.
Few More On Features-
- Provide multi-warehouse inventory features in your Magento 2.0.x, 2.1.x, and 2.2.x version.
- The Warehouse manager can manage his order after admin approval.
- Allowed Warehouses(suppliers) to view their dashboard to analyze sales.
- The Magento 2 dropship module properly works with default Magento shipping methods.
- The admin can add the Data-Flow Profile to map Magento product attributes with warehouse product attributes.
- Admin can import products from Aliexpress with Multiple images, product description, Reviews & Metadata.
- The admin can import multiple warehouse(supplier) products using a single CSV, XML, and XLS file.
- Update AliExpress Edit Popup Model.
- Manage thumbnail, attribute & Variations price.
- Also, Import swatch images from AliExpress
- Allowed admin to import individual warehouse(supplier) products using CSV, XML, and XLS file.
- Automatically created supplier account if not exist during warehouse products import using CSV, XML, and XLS file.
- Applying price rules on warehouse(supplier) products during import using CSV, XML, and XLS file.
- The admin can view the warehouse(supplier) dashboard to analyze sales.
- The admin can also view warehouse(supplier) orders and warehouse(supplier) products.
- Mass Assign/Un-Assign imported products to various warehouses.
- Set the Default quantity and cost of the imported products when they are assigned to the warehouse.
- Assign the warehouse automatically or manually.
- Google Maps API-based address auto-complete.
- Select the email template for order approval and a new warehouse account.
- Select shipping methods for every warehouse.
- Separate warehouse manager login for managing the orders and shipments.
- The admin can do complete management (add/edit/delete) of the warehouses.
- The admin can assign warehouses to unassigned orders.
- Add shipping rate information using a CSV file.
Additional Features As For Magento 2.3
However, the below features are part of Magento 2.3
- Dropship usage MSI feature.
- Each Warehouse is mapped with a Source.
- When creating a warehouse, a source for that will be created and assigned to stocks.
- Quantities are managed through sources on the product edit page.
Installation
The installation is quite simple just like the standard Magento 2 extensions.
Customers will get a zip folder and they have to extract the contents of this zip folder on their system.
Henceforth the extracted folder has a src folder, inside the src folder you have the app folder.
Now, you need to transfer this app folder into the Magento2 root directory on the server as shown below.

If you have downloaded the module from Magento Connect then unzip the respective extension zip.
Hence, create Webkul (vendor) and then Dropship (module) name folder inside your Magento root directory as app/code/Webkul/Dropship.
Thereafter, move all module files inside /app/code/Webkul/Dropship/ folder in the Magento root directory.

After the upload, you can see the folders in your Magento 2 Root Directory.
Then you have to run these commands in the Magento 2 root directory.
composer require webkul/aliexpress
composer require phpoffice/phpspreadsheet
php bin/magento setup:upgrade
php bin/magento setup:di:compile
php bin/magento setup:static-content:deploy
php bin/magento indexer:reindex
php bin/magento cache:flush
Magento 2 (Adobe Commerce) AliExpress Importer Chrome Extension
You need to install this extension on your Google Chrome browser for importing the products to your Magento 2 store.
So, please follow check and install the AliExpress Chrome extension from the Chrome Web Store.
Multi-lingual Support
For multilingual support, the admin will navigate through Store->Configuration->General ->Locale Options.
Hence, select the locale as German (the language into which the admin wants to translate his store content).

Translation
If a user wants to translate their module from English to German then they need to follow the path app/code/Webkul/Dropship/i18n.
Thus, unzip the Magento2 Dropship folder and get a CSV file with the name en_US.csv.
Now they will rename that CSV as de_DE.csv and translate all right-side content after the comma in the German language.
Hereafter, edit the CSV, save it, and then upload it to the path app/code/Webkul/Dropship/i18n where they have installed Magento2 on the server.
The module will be translated into the German Language. Thus, it supports both RTL and LTR languages.
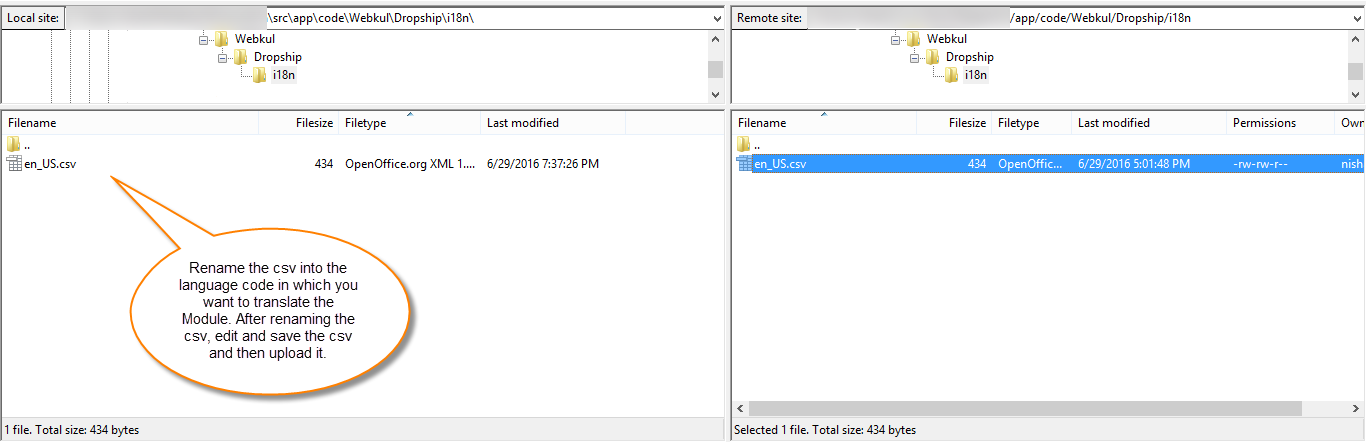

The user can edit the CSV like the image below.

How to Get Google API Key?
The admin needs to get the Google Maps API key to address auto-complete to work. Please check this link to get the API Keys.
How to get the App ID & App Secret?
Go to Open Service AliExpress site and register as a new user.

After registration, you can login to your account through the same section again.
After login go to App Console section.

At the app console, tap the Create button to create an app.

After that choose the developer type as – Dropshipping Developer and proceed further.

Now, enter the base information as per need and tap Submit after that.

In that registration form, you need to fill in all the required information accordingly.
For Collaboration Type – you have to select Dropshipping (individual)
For, How do you build your website through third-party field you have to select the Third-party (Shopify/ WooCommerce/ Wix, etc)) as required.

All Other fields you can choose accordingly.
After Completing all the fields and submitting the form, this will go into the review section.
After being successfully reviewed, you can proceed further.
After the profile review is complete, you can create the app and get the App Key And App Secret key.
Now, go to create app section and tap the create button.
After that, select app category as Drop Shipping and tap the Create App button.

The section that comes after that, add the respective information and tap Submit.

Now, when the app is created, manage it by taping the respective link on the righ-hand side for the same.
Now, navigate to the section App Overview and check your App key and Secret key.

Admin Configuration
Thus, after the accomplishment of the installation steps, the admin can configure the Magento 2 dropship extension by navigating to Store>Configuration>Dropship Manager.
General Settings
- The admin can enter the Name and e-mail ID of the admin account.
- Select the auto or manual assignment of the warehouse.
- Google API key to connect the Google Map with the website.

Note – Dropshipping is only visible to the customer when the mode of Warehouse Assignment is set to Auto. However, in Manual mode, Dropshipping is not applicable.
Dropship Transactional Emails
Show Price Details in Order Approval Mail – The admin can configure the mail by selecting this option as yes or no. This allows the visibility of price details in Order Approval Mail.
Order Approved Template – The admin can select the template for the mail generated on order approval.
New Warehouse Account Template – The admin can select the mail template shared when creating a new warehouse account.
AliExpress Settings
First, Install the AliExpress Chrome Extension.

Username and Token – The admin will set the username and token, this will be used in the Store authentication at the Aliexpress end.
App ID – Enter the App id for the App created at Open service AliExpress.
App Secret – Enter the App secret for the App created at Open service AliExpress.
Quantity – This is the default product quantity at the time of the warehouse assignment.
The Default Cost – This is the cost of the product when the warehouse is assigned to a product.

Default Attribute Set Id – The selected attribute set will be assigned to Ali-express products by default.
Default Tax Class – The selected tax class set will be assigned to Ali-express products by default.
Weight – The default weight for the Ali-express product.
Currency Rates – The admin enters currency rates according to import currency.
Import AliExpress products Images with Message Queue – Select this option as Yes to import images with message queue(live alert) else select it as no to not display the same.
Product Active – The admin manages the product status that imports.
Default Warehouse -The admin selects here the default warehouse for the Ali express products.
Default Website – The admin selects the default website that assigns to the Ali-express products.
 lt=”additional settings” width=”1120″ height=”880″ />
Default Category – Select the default category for the imported AliExpress products.
Manage Dropship Shipping
Now, the admin can navigate to Stores> Configuration> Sales> Shipping Methods> Dropship and manage the setting using the Magento 2 dropship extension.

- Enable or disable the dropship shipping for the checkout.
- Enter the title for the drop ship shipping method.
- Select Yes if want to show the dropship shipping method even if the dropshipping is not available else select No.
- Enter the display error message that will be displayed to the customers when the dropship shipping method is not available.
Admin Management
Now, the admin can see “Dropship Manager” in the admin panel as per the image below.
Warehouse Dashboard Section – Admin’s End

Clicking the menu option will redirect to the default admin dashboard page.
Warehouse Manager
If you have a growing business and selling products over locations like Dubai, Japan, the US, etc.

Hence, the module lets you create (MSI) multiple warehouses for each inventory location easily.
Here, the admin can see all the Warehouses, user names, titles, statuses, and links to edit the warehouse.

The admin can add a new Warehouse by clicking on the “Add New Warehouse” button. Thus, a new page appears where the admin has to enter all the warehouse information.
Herein, the admin has to select the shipping methods for each warehouse.
Manage Stock
In Magento 2.3.x before creating the warehouse the admin need to create stock first and assign that stock to the website.
Hence, to manage Stock the admin will navigate through Stores>Inventory>Stock.

Here, the admin enters details relative to the stock- the name, Sales channel- Websites, and Source- List of Warehouses where the stock is available.

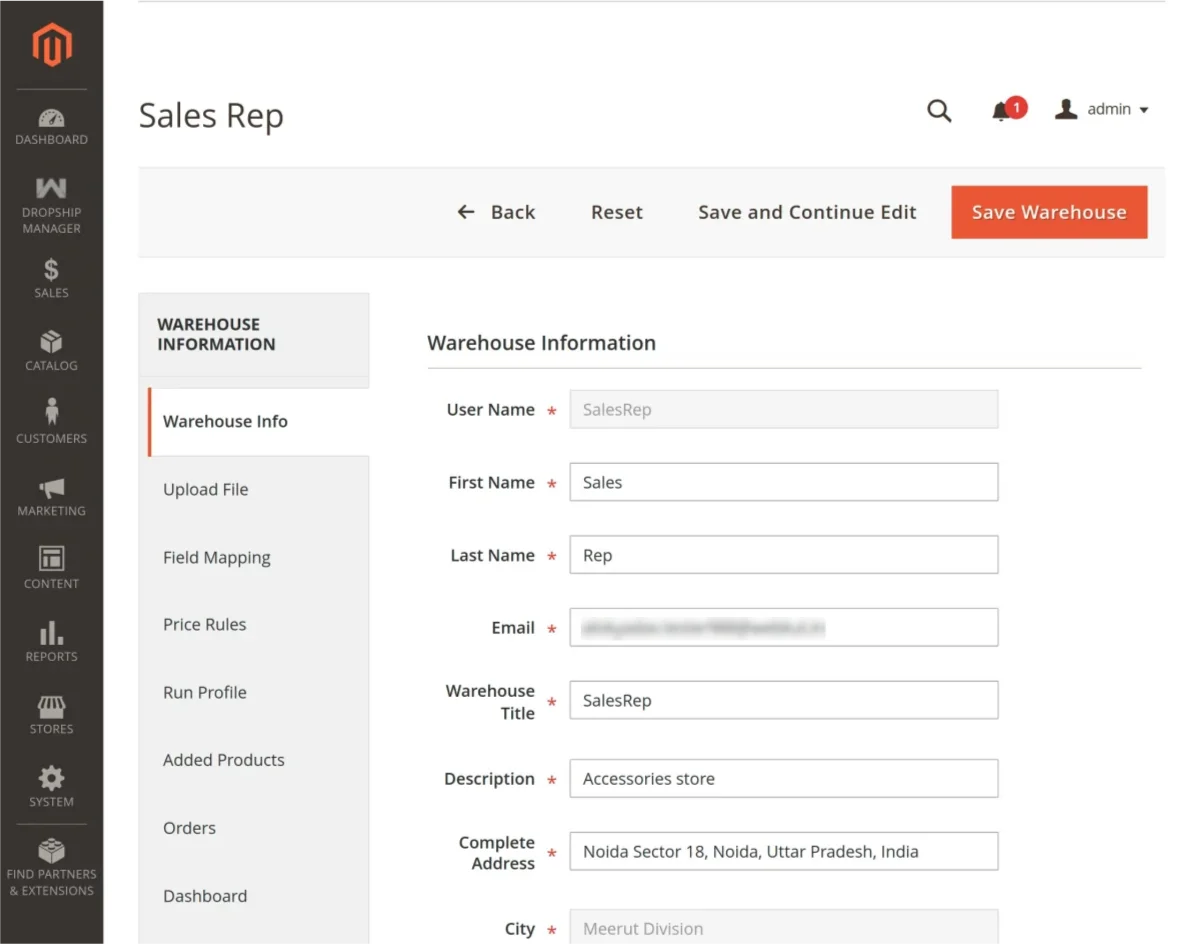
The admin then needs to edit the warehouse with the following information- Upload File, Field Mapping, Price Rules, Run Profile, Added Products, Orders, and the dashboard.
Warehouse Info
The admin can edit a warehouse by clicking on the edit button that brings up the page with the warehouse information.

Upload File Section
Under this section, the admin can Upload Products with their Images for this selected warehouse.

Two sample types to download from, that can be used for easily uploading the products
- Download Samples If the SKU doesn’t exist.
If you download these samples then you can add new products by filling in the product information in the CSV, XML, or XLS file and then upload it under the “Upload Product File” section.
Please check the below example using the CSV file.
- Download Samples If SKU exists.
If you download these samples then you can update the warehouse products. Here, the admin will enter the SKU, Price, Stock, to update the products.
Now, after downloading the sample file (CSV, XML, XLS) if you want to use it for uploading the products in bulk.
Then you need to enter the product details first and then under “Upload Product File” upload the file.
After that add the images zip file under “Upload Product Images.zip”. Now, click the “Save Warehouse” button to upload the products.
Field Mapping
For the selected warehouse, the admin can either select an already created Dataflow Profile. Else can Add Field Mapping for the In Database values versus the In file values.
In case, a user has changed the CSV header name to match the database values with the in file values, the admin can create the field mapping.

Price Rules
If the admin wants to change the product price set by the warehouse, the admin needs to select any of the price rules as per need.
Thus, the admin can see the selected price rules for this warehouse and can multi-select other price rules as well that are available.
The warehouse cost for the product is $10 and you want to set the price for the product at your website as $ 20, then select the price rules that will allow this hike.
So, the admin can easily create the price rules under the “Manage Price Rule” section.

Run Profile Section
If the admin has uploaded the product file and the product images zip file. Then the admin can select that profile to run so as to import the products to the warehouse.
Here, the admin can enable/disable the option -“Want to skip if product warehouse price is greater than product price” by checking and unchecking it.
If enabled, this will allow the admin to skip the products of the warehouse that are having a greater price than the product price.
If you already have a product at your web store that is already set to price $100. Whereas, the warehouse from which you are importing the products has set the price for that product as $120.
Then you may check the option “Want to skip if product warehouse price is greater than product price”.
In order to skip those products of the warehouse that are having a greater price than your store’s product price.

Added Products
The admin can see all the warehouse added products and also can see the orders placed for each of the products.
Also, the admin can click on the View Orders to see all the orders placed for this warehouse product.

Orders
The admin can find all the orders placed for this particular warehouse.
The admin can see the Order numbers, their status, the total Order Total, the Warehouse Total, and the Warehouse Shipping.

Dashboard
Under this section, the admin will be able to see the statistics like the – Statistics for the Orders placed and the amount of revenue generated for the selected warehouse.
So, the admin can see the warehouse information like – Lifetime Sales, Average Order, last Orders, Most Viewed Products, etc.

Manage Shipping Rule
From here, the admin can add and manage the shipping rates of different warehouses. The admin can delete any existing shipping rate.
So, to add shipping rates admin just needs to upload a CSV file having shipping rates.

To add a new shipping rate click the “Add New Shipping Rules” button that brings up a page to import the shipping rules.
The admin will download the sample CSV file for adding the shipping rules.
After creating the shipping rules, the admin will upload this shipping rule CSV file. Henceforth, select the warehouse(supplier) for whom the admin wants to add the shipping rules.
Lastly, click the “Save” button to save the shipping rules as shown below in the snapshot.

Shipping Rule CSV file Example
Here, the admin can create the shipping rule for the Warehouses(suppliers) if they have not added the shipping cost from their end.
The admin will enter the Country Code, Zip From, Zip To, Price, Weight from, and Weight To values in the CSV file.

How To Assign A Product To A Single Or Multiple Warehouse
Admin can easily assign an individual product to the available warehouses by navigating through Products >Catalog.
Henceforth click the edit button next to the product as shown below.

After clicking Edit, go to the Warehouse Stock option. Thus, Tick the warehouse where the product is available and enter the quantity of the product.
Below is the screenshot for Magento 2.2.x for the same.

And below is the screenshot for Magento 2.3.x for assigning the product and the quantity to the warehouse.

Dropship Product Profile
The admin can easily upload the products for single or multiple warehouses(suppliers) at the same time.
Here the admin can select the different file types (CSV, XML, and XLS) for uploading the products.
The admin needs to enter the file column values and then upload this file along with the product images zip file.

Types of Download Files
Here we have two sample types to download from, that can be used for easily uploading the products
- Download Samples If the SKU doesn’t exist.
If you download these samples then you can add new products by filling in the product information in the CSV, XML, or XLS file and then upload it under the “Upload Product File” section on the store.
Please check the below example using the CSV file.
- Download Samples If SKU exists.
If you download these samples then you can update the warehouse products.
Here, the admin will enter the SKU, Price, Stock, and the Supplier(e-mail Id) to update the products.
Please check the below example using the CSV file.
Now, after downloading the sample file (CSV, XML, XLS) if you want to use it for uploading the products in bulk, you need to enter the product details first.
However, under “Upload Product File” upload the file and add the images zip file under “Upload Product Images.zip”.
Upload Profile
Now, click the “Upload Profile” button to upload the products.
Hereafter clicking the “Upload Profile” button, you will be directed to the “Run Profile” page.
Here, the admin under the “Select Profile” option will select the profile to run as shown below in the snapshot.

To skip products of the warehouse whose price is greater than the product price select the option as “Yes”.
If you already have a product at your web store that is already set to price $100.
However, the warehouse from which you are importing the products has set the price for that product as $120.
Then you may check the option “Want to skip if product warehouse price is greater than product price” to skip those products of the warehouse that have a greater price than your store’s product price.
Run Profile
Now, click the Run Profile button after which the products will start importing as per the snapshot below.

After completing the product upload, you can see the total number of products imported.

Field Mapping Section
The admin can select an already created Dataflow Profile or can Add Field Mapping for the In Database values versus the In file values.

So, in case, a user has changed the CSV header name to match the database values with the in file values, the admin can create the field mapping.
Price Rules Section
Under this section, the admin can select the Price rules that will be applicable to the product. So, all the created price rule by the admin will be shown under the Price rules.
Now, the admin can select the price rules for getting the correct price hike for the warehouse products on his web store.
For example, if cost for the product is $10(for the warehouse) and you want to set the price for the product at your website as $ 20, then select the price rules that will allow this hike.

Run Dropship Product Profile
If you have already uploaded the product file and the product images zip file, you can run that profile at a later time as well under this section.
Just select the already created profile and then click on the run profile to import the products.
Enable/Disable Option
Here, the admin can enable/disable the option “Want to skip if product warehouse price is greater than product price” by checking and unchecking it.
The option allows the admin to skip the products of the warehouse that are having a greater price than the product price.

Dropship Dataflow Profile
Under this section, the admin can find all the data flow profiles that he has created for use.
To add a new Dataflow profile the admin will click on the “Add New Dataflow Profile” button as shown below.

Clicking the “Add New Dataflow Profile” button will bring up the section. Wherein the admin can do the field mapping.
This mapping is between the actual database entries and the column names of the file that will be uploaded for the product import.
Hence, this allows the admin to use his own specific and understandable column names for the file.

Now, the admin can use these “In File” names for the file as shown below in the snapshot while uploading their products.

Category Mapping
Under this section, the admin will be able to manage category mapping. Here, the admin can map the warehouse category with his store category.
Thus, for category mapping, click the “Map New Category” button at the top right-hand side of the page.

Now, the New Category Mapping page comes up and here the admin will
- Enter the Name for the mapped Category
- Select the Attribute Set for this Category
- Lastly, select the Store Categories with which you want to map and click the save button.

How To Create Price Rules?
Here, the admin can create new price rules as per need and can see the created ones. However, to do this the admin needs to follow the navigation as Dropship Manager> Price Rule.
These price rules will be available for selection under the field mapping section.
Thus, to create a price rule, the admin will click on the “Add New Price Rule” button at the top right-hand side.

Now, enter the minimum price, maximum price, the price that will be added to the product in this price range.
Select the added price to be fixed or percentage, and click the Save button to save the price rule.
To edit the price rule, click on the “Edit” button which brings up the page to edit the price rules.
Here, you can alter the Min, Max, Price and the Price Type – Fixed or Percentage as per your need.

Installing – AliExpress Importer Chrome Extension
Follow the below steps to install the AliExpress Importer Chrome extension from the admin backend –
Steps
- Navigate to Stores->Configuration->Webkul->Dropship Manager->AliExpress Settings.
- Now, tap on the Install link.

3. You will be redirected to the Google Chrome store. Here, tap on the “Add to Chrome” button to install the AliExpress importer extension.
4. Now, a pop-up will appear just click on the “Add Extension” button and we are done installing the Magento 2 AliExpress Importer extension in the Chrome browser.
How to Import AliExpress Products
Before importing the products from AliExpress into your store you should first install the AliExpress product importer extension in your Google Chrome browser.
After that, you can continue as explained below.
Go to the AliExpress website AliExpress Website and navigate to the products or just search the products in the search bar.
Hence, now, while hovering your mouse you can see the blue icon for the “AliExpress product Importer“.
Just click that icon to import the products into your store.
After clicking the blue icon above, you need to authenticate your store first before you can import the products. Just copy the URL of your store like the snapshot below.
Please make sure that your store address uses https:// else the extension will not work.
If your store setup contains any folder then add that folder name like https://example.com/folder_name/

Register Your Store
Now, click on the AliExpress product Importer icon. This brings up a pop-up just enter your store URL and click the next button to proceed further.
Clicking next will bring the pop-up to enter the Username and the Token.
To get the Username and the Token:
You will navigate to Stores->Configuration->Webkul->Dropship Manager.
Now, go to the AliExpress Settings tab.
Herein you will find the username and the token that needs to be copied.
After copying the token just save the configuration.
You can regenerate the token any number of times by clicking the “Update Token” button.
Also, you can manually enter the Username and the Token and then Save the configuration.
Credential Access – To Authenticate the Store
Thus, use the manually entered Username and the Token to authenticate your store.

Lastly, click the “Submit” button in the above snapshot your store will be authenticated and you will see a success message “Authenticated Successfully”.
Now, you can click the importer icon after the authentication to import the product. You can import the products from the product, category, and the search pages.
After tapping the importer icon you can see message for Authentication Successful and
respective product is in queue to be created.

AliExpress Products
Now, the Magento 2 store admin will navigate through Dropship Manger->AliExpress Products.

Here, if you have no products to import then the Import Products button will be disabled else enabled.
Tap the Import Products button to create the products within the Magento 2 store.

After this is done, you can now see that the Import Images button is enabled.

Tap the same to import the images for the imported products and the process will start.

After the process is completed, the page will auto refresh and you can see the imported products.

The admin can edit the product and view it’s associated products as per his requirement.
Edit Product –
Tap the edit link for the respective product.

The admin can also see the product variations section after editing the product.

View Associated Products –
Tap the View link for the same.

The admin can also edit the details of the associated products as required.

The imported product is visible under the respective category at the Magento 2 store front.

Product page –

Additional information section –

Assigning imported AliExpress Products to Warehouses –
The admin an choose the AliExpress Products one by one to assign/unassign to warehouse or in bulk to assign/unassign to the warehouse.
When you are mass assigning the products to various warehouses, the quantity and the default cost set under the AliExpress Settings.
This done in the back-end module configuration and will be applicable to all the products.
Apart from that, the admin can also delete the imported AliExpress product.

After choosing the Assign ware house the respective list will be visible for assignment.

Now a popup for confirmation appears.

After warehouse assignment you can see the warehouse status changed.
Edit Store URL/Add a New Store URL – Authentication
To edit the store URL or add a new store URL for authentication click the “Update Authentication Details” button within the AliExpress Importer pop-up.

This button can be used to edit a previously entered URL or can be used to authenticate a new store URL. After that just click the next button to proceed further.
AliExpress Orders
When the products that are imported from AliExpress to your Magento 2 store get purchased at your store, all of those orders will be visible under this section.
Clicking the “Place Order” button will redirect the admin to AliExpress.
If you are already logged in at AliExpress then you will see the product in the order being added to the cart.

After that, tap continue and change the address by checking the customer address popup on the right-hand side.

Magento 2 store customer order address will appear in the right. Tap, add new address button.

After that, enter the address and proceed as required.

The admin of the Magento 2 store can also mark the orders as Placed, by clicking the respective Place button to accomplish the placement.
Hence, to do this the admin needs to navigate within the AliExpress Importer pop-up window.
After clicking the Place button, the admin can see the status as Placed in the AliExpress pop-up window.

Now, navigate to Dropship Manager>AliExpress Orders. Thus, here, under the Action tab for the respective order, the admin can see the status as Already Placed.
Customer’s End
Dropship Shipping will apply on the cart when the assigned warehouse of the product provides shipment to the buyer address.
The customer can see the Dropship Shipping Method in the shipping method section as shown below in the snapshot.
The shipping methods will be available to the customer according to the allowed shipping methods for the warehouses using the Magento 2 dropship extension.

Admin – Warehouse Order Management
In this section, the admin can approve the warehouse orders or cancel them.
Additionally, the admin can assign a warehouse to those drop ship orders that have not assign to any warehouse.


After clicking the Unassigned button, a popup window will appear where the admin can easily assign the warehouses to the products using the Magento 2 dropship extension.
Thus, the admin will be able to see the available warehouses and the quantity of the item available.
Clicking the Assign To Warehouse button the order products will ship from the warehouses.

Warehouse Manager Section
When the Warehouse Manager logins into Warehouse Manager, then he/she can see three tabs
- Warehouse Dashboard menu option(To check their Order and Amount statistics)
- Warehouse Order Manager(To manage the warehouse Orders)
- Manage Shipping Rule(To Manage Shipping Rules).

Warehouse Dashboard Section
Under this section of the Magento 2 dropship extension, the warehouse manager can see the order and amount statistics for his warehouse and other details regarding the warehouse.
The warehouse manager can also filter all the warehouse orders and amounts by – the last 24 hours, Last Seven Days, Current Month, Year To Days, and 2 Years to Days as per the snapshot below.

Warehouse Order Manager
Here, the warehouse manager can view all drop ship orders received for this warehouse using the Magento 2 dropship extension.
The warehouse manager can click on the Create button under the Action to create a new shipment.
Here the warehouse manager will be able to see those orders which the admin approves.

The warehouse Manager can see the order details and generate shipment. Please check the image below for a better understanding.

Manage Shipping Rule Section
The Warehouse Manager can upload the CSV file for uploading the shipping rules using the Magento 2 dropship extension.

After uploading the CSV files, the shipping rates will be visible in the grid showing the warehouse ID, country ID, postal code range, weight bracket, and shipping cost.

That’s all for the base Magento 2 Dropship Extension(Adobe Commerce Cloud).
Still, have any issues feel free to add a ticket and let us know your views to make the module better http://webkul.uvdesk.com/ Also, please visit our useful Magento 2 Extensions.
Current Product Version - 5.0.4
Supported Framework Version - Magento 2.0.x, 2.1.x, 2.2.x,2.3.x, 2.4.x

13 comments
Dear Mamta,
We request you to kindly email us at [email protected] with all the issues you’re facing so we can assist you faster and better.
Thanks
In case of an issue with our module, Kindly email us at [email protected] so we can assist you better & at our earliest.
Thanks
If the supplier out of stock, or stop selling. Would my item set as out of stock? Or it will keep showing up.
Thank you.
And If that product is out of stock on the aliexpress then you will have to set “out of stock” on the Magento 2 store as well manually.
or
If the product is out of stock from one of the warehouses (suppliers) but overall quantity still remaining then product will be displayed on the Magento 2 store and customer can place the order for remaining quantities.
Still, have any query kindly mail us at [email protected].
Regarding this or any other further detailed inquiry regarding the module. You can just revert us at [email protected].
Thanks
In this case, the product will keep showing up at the Magento end. You need to remove that product listing from the Magento 2 store manually.
This way you can make that product unavailable at Magento 2 store also. Otherwise, it will keep showing up on the Magento 2 store.
Still, have any query kindly mail us at [email protected]
Thanks